1
Pro
ProPresenter 6 for Mac
User Manual
Last edited on March 17, 2015.
All content is current as of version 6.0.
ProPresenter 6 User Manual
Copyright ©2005-2015 Renewed Vision, Inc. All rights reserved.
ProPresenter is owned by Renewed Vision, Inc.
6720 Jamestown Drive
Alpharetta, GA 30005
Licensing Information
There are two types of licenses available for ProPresenter. Both forms of the license refer to a
single geographical location. If your church or organization wants to use ProPresenter in
multiple geographical locations, each location is required to own its own license.
A SINGLE USER LICENSE grants permission for one (1) computer to be used as the
presentation computer at a given time. The license may be installed on an unlimited number of
computers for editing purposes or for CONCURRENT (non-simultaneous) presentation use. A
SINGLE USER LICENSE removes the watermark from one presentation computer at a time. A
SINGLE USER LICENSE is platform specific to Mac or Windows.
A SITE LICENSE grants permission for an unlimited number of computers to be used as the
presentation computer simultaneously. Any computer with an active SITE LICENSE may be
used as an editing or presentation computer at any time. The watermark is removed from all
computers with a SITE LICENSE. A SITE LICENSE may be activated on both Mac and
Windows computers simultaneously. A SITE LICENSE is only available to churches. Other
organizations will need to purchase multiple single user licenses. A SITE LICENSE is only
available for Houses of Worship.
Planning Center Online (“PCO”) is wholly owned by Ministry Centered Technologies, LLC
(“Ministry Centered Technologies”). License fees may apply and are the sole responsibility of
the user.
SongSelect is wholly owned by Christian Copyright Licensing, Inc. (“CCLI”). License fees may
apply and are the sole responsibility of the user
© 2005-2015 Renewed Vision, Inc.
ProPresenter 6 User Manual
Installing ProPresenter in Mac OS X
Info Center
Free Media Content
Configuring your computer for first use
System Display Preferences
DVD settings
Desktop background
Screen saver
1
5
6
8
8
9
9
9
ProPresenter Preferences
11
General
Display Preferences
12
15
Corner Pinning
17
Label
Live Video
Network
Enable Network
Master Control
ProPresenter Remote
Telestrator
Remote Stage Display Server Settings
Text Stream
Sync
Local Sync
Cloud Sync
Services
Advanced
Modules
Toolbar
Copyright Settings
CCLI Reporting
Presentation Layers
Working with Templates
Working with Media
Video/Image Bin
Media Browser
Media Properties
Working with Presentations
Presentation File Formats
Using the Library
Adding new presentations
Using multiple libraries
Playlists
Planning Center Online Playlist
Slide and Table View
Working with Slides
Slide Grouping and Arrangements
© 2005-2015 Renewed Vision, Inc.
18
19
20
20
20
20
21
21
21
22
22
24
30
31
32
33
37
40
41
43
45
45
48
49
53
53
54
55
56
57
58
60
61
62
ProPresenter 6 User Manual
Document Properties
Transitions
Resizing Presentations
Editing Slides
Slide Element Cropping/Zooming
Go to Next Timer
Hot Keys
Saving Files
Slide Reflow
Chord Charts
Importing and Exporting Files
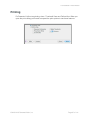
Printing
Song Select
PowerPoint and Keynote Triggering
Bibles
Downloading and Installing
Using the Bible Module
Bible Presentations
Props
Clocks
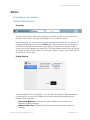
Messages
Mask Layer
Audio Bin
Timeline
Using DVDs
Displaying Web Pages
Stage Display
Social Media
Telestrator
Record Output
Cues/Cue Palette
Localization
Modules
Demo Modules and Registering Modules
Alpha Key Module
Edge Blending Module
Master Control Module
Multi-Screen Module
SDI Output Module
Communication Module
Playback Deck/Media Server Control Protocols
Switcher Control Protocols
DMX and MIDI Protocols
Using RS-422 Serial with Communications Module
MIDI Module
© 2005-2015 Renewed Vision, Inc.
65
66
67
68
70
76
78
79
80
82
83
87
88
89
90
90
90
92
93
94
96
98
99
101
102
104
105
109
111
112
113
114
115
116
117
118
120
121
123
124
124
124
126
128
130
ProPresenter 6 User Manual
Matrox Configuration
Display Patterns
Keyboard Shortcuts
Troubleshooting
Additional Resources
© 2005-2015 Renewed Vision, Inc.
134
136
137
140
141
ProPresenter 6 User Manual
About this user guide.
This document is not meant to teach you everything there is to know about
ProPresenter. We hope that it will help answer many of your basic questions, or point
you in the right direction to figure things out, but it’s not going to teach you everything.
We have a lot of video tutorials on our website if you learn better by seeing and hearing
rather than just reading, or if you want a combination of the two. Go to
www.renewedvision.com/tutorials to view the videos.
Most of the screenshots in this user guide were taken from the Mac version of
ProPresenter 6 during development. There may some slight variation in design, but the
look should be close enough to understand what is being covered.
© 2005-2015 Renewed Vision, Inc.
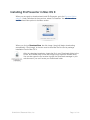
Installing ProPresenter in Mac OS X
When you are ready to download and install ProPresenter, go to the Renewed Vision
website. Under Download in the menu bar, select ProPresenter. You will then click on
the Download Now option for the Mac version.
When you click on Download Now, the disk image (.dmg) will begin downloading
automatically. “Disk Image” is the term used to describe the file used to package
installation files for Mac OS X.
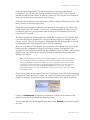
After the download completes, locate the file in your Downloads folder in the
Finder, and double-click on the disk image icon to open the installer utility.
You can also open the file location through the Downloads manager in your
web browser if you can’t locate your Downloads folder.
© 2005-2015 Renewed Vision, Inc.
Page 1 of 141
ProPresenter 6 User Manual
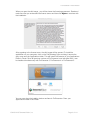
When you open the disk image, you will be shown the licensing agreement. Read and
make sure that you understand the license terms and then click Agree to continue with
the installation.
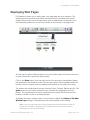
After agreeing to the license terms, the disk image will be opened. To install the
application on your computer, click on the ProPresenter6 icon and drag it across the
gray arrow onto the Applications folder. This will install ProPresenter in your Applications
folder in Finder. Since all previous versions of ProPresenter have individual files, it can
be installed simultaneously with ProPresenter 3, ProPresenter 4 or ProPresenter 5.
You can now close the installer window and launch ProPresenter 6 from your
Applications folder in the Finder.
© 2005-2015 Renewed Vision, Inc.
Page 2 of 141
ProPresenter 6 User Manual
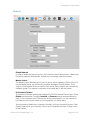
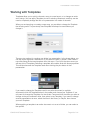
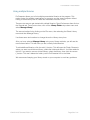
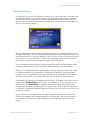
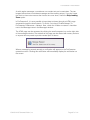
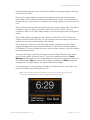
You will see the message shown below the first time you launch the program, click
Open to continue.
When ProPresenter launches, you will be prompted to enter your License Registration
information. This information is provided to you electronically after purchasing a license
or when you request a trial code.
Note: A Single User License is for a specific platform--Mac or Windows. It can be
installed on multiple computers, but only used on one computer at a time for
presenting. A Site License covers the Mac and Windows version and allows you to
use multiple computers for presenting at the same time. Both licenses are for
individual locations. A Site License is only available to churches and other Houses of
Worship.
If you have not purchased a code, or don’t have a trial code, you can choose to either
purchase a code by clicking on “Buy Now” or open ProPresenter by clicking on
“Demo”. The demo version is fully functional, but it does have a watermark on the main
output and the stage display output.
If you receive a message saying your code is invalid, check the following things:
• Is your code a ProPresenter 6 code?
• Are you entering the 30-digit code? Is it six sets of five alphanumeric characters?
• Did you include the dashes in the code if you manually entered it?
• Is there an extra space on the end of the Unlock Code if you copied/pasted it?
• Did you transcribe any letters/numbers incorrectly?
Before contacting us directly, please go to support.renewedvision.com and
attempt to retrieve your registration information. If you purchased from a reseller
and need to redeem your activation code, please go to www.renewedvision.com/
registration.php.
© 2005-2015 Renewed Vision, Inc.
Page 3 of 141
ProPresenter 6 User Manual
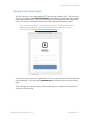
Once you have successfully entered your license information you will be asked to enter
your user account password for your computer. We can’t help you if you don’t know this
password.
© 2005-2015 Renewed Vision, Inc.
Page 4 of 141
ProPresenter 6 User Manual
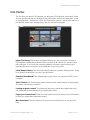
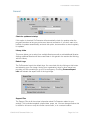
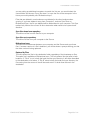
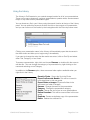
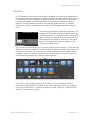
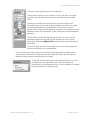
Info Center
The first time you launch ProPresenter you will see the ProPresenter Information Center.
You can access this later by clicking on the ProPresenter logo in the upper-right corner
of the application. Uncheck the “Open Info Center after Launch” option at the bottom to
prevent this screen from opening every time you launch the program.
Import Pro Library ProPresenter will detect whether you have a previous version of
ProPresenter installed automatically. When you click on this button, the correct import
utility will open. If you have both versions installed, the newer version will be used.
Importing libraries is covered in more detail later in this user guide.
Install Sample Library This will install a small collection of public domain hymns. There
is no need to install these if you don’t use old hymns.
Download User Manual This will download a copy of the user guide as a PDF to your
computer.
Video Tutorials The ProPresenter tutorial videos can be viewed directly in the program.
An internet connection is required
Looking for great content? This button will launch our media store page where you
can download the free samples or buy additional content.
Forgot your Unlock Code? Enter the email address that was used to buy ProPresenter
to have your registration information resent.
More Questions? This link will take you to our user forums where you can get more
help.
© 2005-2015 Renewed Vision, Inc.
Page 5 of 141
ProPresenter 6 User Manual
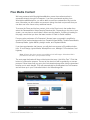
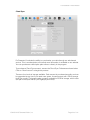
Free Media Content
We have partnered with WorshipHouseMedia to power the media store that is
accessible directly through ProPresenter. If you have purchased anything from
WorshipHouseMedia before, you will be able to use those credentials to log into the
store, otherwise you will create a new account during the check out process that you
can then use in the future to buy additional media.
To access the Store and the free content, click on the Store icon in the toolbar then
select the RenewedVision Video Sample Download link. Depending on the size of your
screen, you may have to scroll down a little to see this banner. If nothing is loading on
this page, ensure that you have the latest version of Flash for Safari installed.
Everyone who purchases a ProPresenter 6 license (new or upgrade) is qualified to
receive 60 free motion backgrounds from Centerline New Media, CreationPower Media,
Graceway Media, Igniter Media, pixelgirl media, and Playback Media.
If you have purchased a site license, you will also have access to 50 additional clips
from 12 Inch Design, Igniter Media, WorshipFilms.com, Midnight Oil Productions, and
Highway.
Note: All users also have access to an additional 120 still images. A download link is
provided to these files in your purchase receipt.
The next page that loads will have a blue button that says “Add All to Cart”. Click that
button to continue the process. The rest of the check out will be guided by on-screen
prompts. Follow those until you get to the final download page then click the download
buttons next to each bundle. They will automatically be downloaded into ProPresenter
and will show up in your Purchased folder in the Video/Image Bin.
© 2005-2015 Renewed Vision, Inc.
Page 6 of 141
ProPresenter 6 User Manual
Some users will not be shown this page right away. If instead of seeing the page above
you see a blue button that says “Purchase ProPresenter”, use the following
troubleshooting steps to resolve this.
• This is due to the license information not passing correctly from ProPresenter to
WorshipHouseMedia on the first try. Click on the Info button in the upper left corner
of this window then Store to fix this.
• You haven’t actually entered a valid license yet. Verify you have purchased and
entered a ProPresenter 6 license.
© 2005-2015 Renewed Vision, Inc.
Page 7 of 141
ProPresenter 6 User Manual
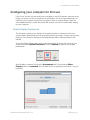
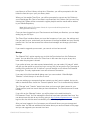
Configuring your computer for first use
If this is the first time you are setting up a computer to use ProPresenter, there are a few
things you need to do first to optimize your experience. The most important thing is to
make sure your screens are properly configured, which is covered below. There are
some additional links to online resources that we think you will find useful while setting
up your computer.
System Display Preferences
The first step to getting your displays configured correctly is making sure that your
system display preferences are set up properly. Before you begin, connect your primary
output to your computer. Setting up the Stage Display will be discussed later in this
manual.
To access Display Preferences, click on the Apple menu in the top-left corner of your
screen and select System Preferences. Click on Displays to open up the display
preferences.
After Displays is opened, click on the Arrangement tab. Ensure that the Mirror
Displays option is unchecked. You can also do this by pressing Command-F1 on your
keyboard.
© 2005-2015 Renewed Vision, Inc.
Page 8 of 141
ProPresenter 6 User Manual
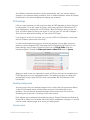
Your Display resolutions should be correct automatically, but if you need to make a
change to your external display resolution, click on Gather Windows, select the Display
Preferences for the external display and change the resolution.
DVD settings
If this is a new computer you will need to localize the DVD playback so that it will work
in proPresenter. To do this, open the Finder, select your hard drive (“Macintosh HD”),
open Applications, double-click on DVD Player. When DVD Player opens for the first
time, you will be asked to select your region. If you live in the US, this will be Region 1.
After you have selected this setting, you can close DVD Player.
If you forget to do this, the first time you try to use a DVD in ProPresenter, it won’t work
and you’ll need to come back to this step.
It is also recommended that you turn off auto play settings on your Mac to prevent
resource conflicts between DVD Player.app and ProPresenter’s DVD player. To find
these settings, open System Preferences then click on CDs & DVDs under the
Hardware options. Change the When you insert a video DVD option to Ignore.
When you need to use your computer to watch a DVD you will need to manually open
DVD Player.app from your Applications folder. This settings prevents your Mac from
automatically trying to play the DVD, which can interfere with ProPresenter’s DVD
functionality.
Desktop background
You may want to set your desktop background to a solid color (we recommend black)
so that if ProPresenter stops working during service it’s less noticeable to your
audience. You may like the desktop background that you have set, but it can be
distracting during service if it ends up on the main screens.
Each display can be adjusted individually by going to System Preferences>Desktop &
Screen Saver. Black is not a default solid color that is available as a desktop, so you will
need to create a black image file to set as your background.
Screen saver
© 2005-2015 Renewed Vision, Inc.
Page 9 of 141
ProPresenter 6 User Manual
If you have a screensaver enabled, it’s probably going to show up on screen at the
wrong time during your service, so you’ll want to set it to not come on for a couple of
hours, or disable it completely.
Go to System Preferences > Desktop & Screen Saver. Click on the Screen Saver tab at
the top of the window. It doesn’t matter what screen saver is selected, just drag the
Start screen saver slider to the time you want or Never.
© 2005-2015 Renewed Vision, Inc.
Page 10 of 141
ProPresenter 6 User Manual
ProPresenter Preferences
This section will cover the Preference menu in ProPresenter 6. It’s likely that you will
need to make very few changes to your Preferences beyond the initial setup.
Preferences are accessed by clicking on the ProPresenter menu and then selecting
Preferences, or by pressing Command-, (Command and the comma key).
© 2005-2015 Renewed Vision, Inc.
Page 11 of 141
ProPresenter 6 User Manual
General
Check for updates at startup
If this option is checked, ProPresenter will automatically check for updates when the
program launches as long as you have an internet connection. If you don’t want to be
notified of updates automatically, uncheck this option, but remember to check regularly
for updates.
Library folder
This menu allows you to select from multiple libraries as well as add additional libraries.
Adding additional libraries will be covered later in this guide in the section title Working
with the Library.
Default Logo
The ProPresenter logo is the default logo. You can check this by clicking on this button
and selecting your own image. Having your organization’s logo or other image here
provides you with something to go to in an emergency. Checking Preserve aspect
ratio will maintain the aspect ratio of the logo image.
Support Files
The Support Files is all the unique information about ProPresenter related to your
settings. This includes templates, playlist data, props, etc. You can change whether this
is stored for all users or only the current user account, or in a custom location.
© 2005-2015 Renewed Vision, Inc.
Page 12 of 141
ProPresenter 6 User Manual
The default setting is “Only this User”. In general, this information is kept unique
between user accounts, however, if you have an administrator account and a standard
user account, and want ProPresenter to be identical in each account, you can change
this to “For All Users”. You will generally want to do this before you start adding content
to ProPresenter to avoid any issues with your data.
The Custom Path option allows you to store this information in a custom location. This
may be on a server or in a third-party cloud storage service, or even in a custom
directory on your computer for other user accounts to be able to access the files easier.
Media Repository
This is the directory where any media purchased through the store is downloaded to
and where media that is imported with bundles is stored. Click the magnifying glass to
go directly to the selected directory.
If you choose Only this User, your media will be managed per user account. If you
choose All Users, this folder will be created in a shared directory accessible by all
users. You can change this location at anytime.
If you check the Manage Media Automatically option, any media that you add to
ProPresenter will be copied to this location. By default this option is not checked, so any
media added to ProPresenter doesn’t move the original files. If you enable this option,
all media files will be added to ProPresenter and automatically moved into your media
repository, preventing accidental broken links. If you already have a well organized
media storage method, you may not want to enable this option.
If you use the local Sync option you will need to enable Manage Media Automatically if
you want to sync your media files. If you use the Cloud Sync option, this is enabled
automatically when you first connect your account to ProPresenter.
© 2005-2015 Renewed Vision, Inc.
Page 13 of 141
ProPresenter 6 User Manual
Search Paths
If you need to move all of your media from on directory to another (e.g., ~/Desktop/ to
~/Documents/), you can add a new search path. When you restart ProPresenter, the
links to your media will all be updated.
Copyright
Copyright settings are covered later in this guide in the section called Copyright
Settings. The settings here are the global settings for Copyright display.
Reset All Preferences
This resets all the custom settings made in Preferences.
© 2005-2015 Renewed Vision, Inc.
Page 14 of 141
ProPresenter 6 User Manual
Display Preferences
Display at Top Most Window Layer
Select this box to keep the ProPresenter output above any other windows on your
output screen. Disable this box if you need to show a full-screen video using the Web
browser, or you need to show a PowerPoint or Keynote presentation.
Scale to Fit Output Display
This will scale your presentation to the output resolution if they don’t match.
Enable Stage Display
This will enable the stage display on the indicated screen. You can also enable the
Stage Display screen by pressing Command-2.
Configure Stage Display
This will bring up the stage display layout editor. This is covered in more detail later in
this guide in the section called Stage Display.
The Output (Out) and Stage Display (SD) outputs can be set within the Display
preferences by clicking and dragging the displays to the right positions. Note that you
© 2005-2015 Renewed Vision, Inc.
Page 15 of 141
ProPresenter 6 User Manual
are only moving the screen indicators in ProPresenter. The physical arrangement of the
screens can only be changed in System Preferences. If you open ProPresenter and
your screens load incorrectly, come to this Preference screen and re-arrange the words
“Out” and “SD” until they are assigned correctly.
System Display Settings
This will open the Display settings available in System Preferences that were covered
earlier in this guide.
Output Screen
Clicking Full Screen will automatically use the resolution you set in Display
preferences. If you need to use a custom size, enter the resolution and press Enter.
Corner Pinning
This allows you to make adjustments to the display output and will be covered later in
this user guide.
Screen Color
This specifies the default slide background color. This is the color you will see on your
thumbnails and if no other background is selected. You can use any color.
Screen Position
This allows you to designate which part of the screen your presentation will be
anchored to if the presentation dimensions are smaller than the actual output resolution. © 2005-2015 Renewed Vision, Inc.
Page 16 of 141
ProPresenter 6 User Manual
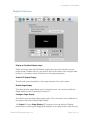
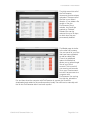
Corner Pinning
In ProPresenter 6 we have included the ability to use corner pinning on the output from
the program. This will allow you to make modifications to the output shape when
keystoning isn’t quite enough, or you’re projecting onto a surface with angled sides.
From the Display preference tab, enable Corner Pinning by checking the box next to it.
Click on the Corners button to open the settings. The settings default to a perfect
square using your Output Screen resolution.
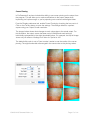
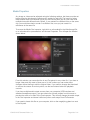
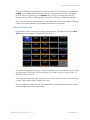
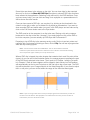
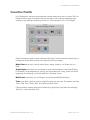
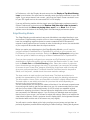
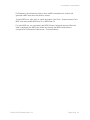
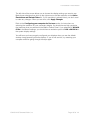
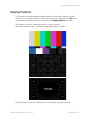
The images below shows what changes to each value does to the actual output. For
this illustration, the output screen has been set to 640x480 and each setting is
individually represented by the eight thumbnails below. For example, the top left image
shows only the effects of setting the X Value for TopLeft to 100.
The default slide color is set to Cyan to make it easier to see the results of the corner
pinning. The eight thumbnails are arranged in the same order as the pinning values.
© 2005-2015 Renewed Vision, Inc.
Page 17 of 141
ProPresenter 6 User Manual
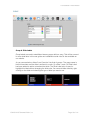
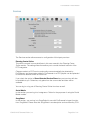
Label
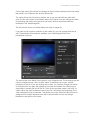
Group & Slide Labels
Group labels are used to established stanza groups within a song. This will be covered
in more detail later in this user guide and a detailed tutorial video is also available on
our website.
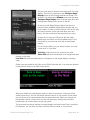
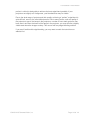
As you can see below, slides 2 and 3 are the first slide of groups. The group name is
listed in brackets and the slide is outlined in a color. On slides 1 and 4, a Slide Label
has been added to add a note about that slide. The Slide Label color is used to
highlight this label without changing the slide color. You can add either label by rightclicking on the slide and selecting the type of label you want to use.
© 2005-2015 Renewed Vision, Inc.
Page 18 of 141
ProPresenter 6 User Manual
Live Video
ProPresenter supports a live video feed over FireWire, SDI, or USB input. While this
feature is convenient, it does have some drawbacks like latency (delay) when using
FireWire. It's best suited for overflow rooms or small services where you may have a
single camera and cost is more important than latency. It's not recommended for larger,
multi-camera venues that are served best by a multi-port switcher.
Video Device
Select the input device for your video source. This can be the iSight camera, an
external camera source, or a software “camera” like CamTwist or ManyCams.
Audio Device
Select the audio source (if needed) to be used with your camera.
Preserve Aspect Ratio
This prevents your camera input from being stretched full-screen if your output
resolution and the camera resolution don’t match.
© 2005-2015 Renewed Vision, Inc.
Page 19 of 141
ProPresenter 6 User Manual
Network
Enable Network
In order to enable all network services, this checkbox should be checked. A Name and
Port will be selected automatically, though you can change these if necessary
Master Control
The Master Control Module has two uses. It can be set as a Master or Slave control. To
use the Master mode, you will need to purchase the Master Control Module. Every
version of ProPresenter 6 can be used in Slave mode. Slave systems are controlled by
a Master system. This feature is covered in more detail later in the user guide.
ProPresenter Remote
This section of Network preferences enables the iOS ProPresenter Remote app. Check
Enable and then either (or both) Controller or Observer and set new passwords for
each. If your computer and iOS device are on the same network, you can connect to
ProPresenter and use the remote to control playlists or to follow along.
You may need to disable your computer’s firewall if you have connection issues. Open
System Preferences, go to Security. Click on the Firewall tab and click on Stop to turn
off the firewall.
© 2005-2015 Renewed Vision, Inc.
Page 20 of 141
ProPresenter 6 User Manual
Telestrator
Enabling this setting will allow you to use the iOS Telestrator app to add annotations to
the output. This feature is covered in more detail later in the user guide.
Remote Stage Display Server Settings
Enabling this setting will allow you to use the iOS ProPresenter Stage Display app. This
allows you to use any iOS device as a wireless stage display. Set a new password for
this. If you are on a very restricted network, as your network administrator for a port that
you can use if you can’t connect.
Text Stream
If you are using ProVideoPlayer 2, you can enable this setting for ProPresenter 6 to send
it’s text output as a layer in ProVideoPlayer 2. More information about this can be found
in the ProVideoPlayer 2 documentation.
© 2005-2015 Renewed Vision, Inc.
Page 21 of 141
ProPresenter 6 User Manual
Sync
Local Sync
ProPresenter 6 makes it easy to sync files between computers, including files other than
just your Library. This makes it much easier to setup a new computer with ProPresenter
as well as being able to keep computers in sync with each other.
Note: In order to sync your media files, you must have selected Manage Media
Automatically from the Media Repository settings on the General tab. Media that is
added to ProPresenter with bundles is automatically placed in this repository, but
media that you add to ProPresenter is not automatically located here. Sync is only
able to move media files in this location. Hot Folders are also excluded from the sync.
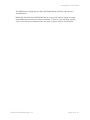
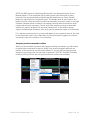
The diagram below shows you the basic idea of how Sync works now. Before you can
even begin syncing, you will need to have a central folder for everything to be stored.
This needs be a dedicated folder in a shared directory or on an external drive that is
used just for syncing.
Once you have your central folder in place, use the “Sync files up” option on Mac 1 to
create the necessary sync folders and to copy the data. You will have up to five folders
in your sync folder. After the sync is complete, you can use any of the sync options. If
© 2005-2015 Renewed Vision, Inc.
Page 22 of 141
ProPresenter 6 User Manual
you are setting up additional computers to match the first one, you would select the
central folder and choose “Sync files down” to move the files to that computer. In the
future you would probably use “Bidirectional sync”.
Files that are deleted in one location are not deleted in the other locations when
syncing. If you have deleted a song from Computer 2, and use Sync Down or
Bidirectional Sync, the file you deleted will be added back to your computer. This Sync
method only looks at the current file list to determine what needs to be synced each
direction.
Sync files down from repository
This will move files from the Source to your computer.
Sync files up to repository
This will move files from your computer to the Source.
Bidirectional sync
This will look for differences between your computer and the Source and sync those
files. If a newer version of a file is detected, you will be shown a prompt alerting you that
the older version is being replaced.
Replace My Files
This will replace the files in the destination folder regardless of the timestamp on files.
This option isn’t available on Bidirectional sync. This only affects files that exist in both
locations. If “File A” is not in both the local and the sync directory, it will either be added
to the destination or left alone. If “File B” exists in both the local and sync directory, the
file coming from the source of the will be used even if it’s older than the one in the
destination.
© 2005-2015 Renewed Vision, Inc.
Page 23 of 141
ProPresenter 6 User Manual
Cloud Sync
ProPresenter 6 includes the ability to synchronize your data through a a web-based
service. This is a subscription service and more information is available on our website.
You can purchase a subscription plan online or directly in the program.
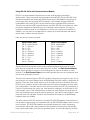
To purchase a Cloud Sync account, access the Cloud Sync Preferences shown below.
Click on “New Account” to begin the process.
There are four levels of storage available. Each amount is purchased annually, and can
be upgraded at any time if you need more space. Accounts starts with 1GB of storage
for $1 per month. The largest option currently available is 25GB of storage, which costs
$20 per month (less than $1 per Gigabyte per month).
© 2005-2015 Renewed Vision, Inc.
Page 24 of 141
ProPresenter 6 User Manual
At the end of your order, there will be an activation link. Clicking this link will take you to
another page where you can create your username and password. You will also receive
an email with the activation link in case you close this window too early.
If you prefer to purchase through our website, you will receive an email with the
activation link. Use this link to create your account.Once you have created your user
account, you can click the “Login” button on the Preference panel to begin the sync
process. When you click “Login” you will see the window below. Enter the credentials
that you created after purchasing.
When you first log into your account, you will be prompted to link your presentation
libraries to your cloud account. If a library exists in your cloud account that doesn’t exist
locally, you will be prompted to create a local version of the folder. The libraries are
linked based on name.
If you prefer to create a new version of a library with the same name as another library,
you can choose to create a new cloud library for that as well. You will end up with two
libraries that have the same name, but different file paths. When you add a new Library
to ProPresenter through the Library Manager, you will also have an option to link that
© 2005-2015 Renewed Vision, Inc.
Page 25 of 141
ProPresenter 6 User Manual
new library to a Cloud Library at that time. Otherwise, you will be prompted to link the
folder the next time your sync your library data.
When you first enable Cloud Sync, you will be prompted to convert any Hot Folders in
your Video/Image Bin. Due to how data is synchronized, Hot Folders can’t be used. Any
existing Hot Folders will be converted to regular playlists and the media will be added
to your Media Repository.
Note: While using ProPresenter Cloud, all of your media will be placed in the
Managed Media directory.
Once you have logged into your Cloud account and linked your libraries, you can begin
setting up your first sync.
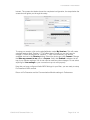
The Cloud Sync interface allows you to set the frequency of your sync, the settings and
files you want to sync, and shows you the amount of storage available and your monthly
transfer limit. You can also access the online cloud manager and change your linked
libraries.
If you need to upgrade your account, you can do so from here as well.
Manage
The “Manual Only” option requires you to click the Sync button from this Preference
panel. You can also click on the Pro Cloud icon in the menu bar to sync at any time,
even when the program is closed.
If you prefer to have your data synced automatically, you can select “At Interval” which
will give you the option to sync every hour or every day. As long as the Pro Cloud app is
running in the menu bar, the “At Interval” sync will be able to run without ProPresenter
being open. The only requirement is an active Internet Connection.
If you want to limit the bandwidth being used, you can uncheck “Allow Multiple
Transfers” to limit the sync to one file at a time.
If you are setting up a computer that has content you don’t want to upload, but you do
want to download files, check the “Prevent Uploads” box. This is unchecked by default.
The “Storage” and “Transfer” status bars show you how much data is stored in your
Cloud account, and how much data you have transferred. The Transfer amount is reset
monthly.
If you click on the “Manage” button, you will be taken to the web interface for
ProPresenter Cloud. You can manage the files that have been uploaded from here. You
can also access this site at any time by going to http://cloud.propresenter.com. You will
log into this site with the same credentials you used in the program.
After you have logged in, the first screen you will see will show you your storage and
transfer data. You will see additional information about your account listed on this page
and you can upgrade your account from here.
© 2005-2015 Renewed Vision, Inc.
Page 26 of 141
ProPresenter 6 User Manual
The Application Data screen lists all of the information found in your Application Data
file path. This included references your linked Libraries; template; and data for Props,
Messages, Masks and Stage Display.
The Application Data list is the only one that includes the ability to immediately and
permanently delete a file. Clicking on “Purge” will completely remove the selected file
from your Cloud Sync account and will not be recoverable. A local copy will still exist.
You should only have to purge a file if you upload a damaged copy and don’t want it to
sync down to other computers.
© 2005-2015 Renewed Vision, Inc.
Page 27 of 141
ProPresenter 6 User Manual
The third screen lists all of
the ProPresenter
documents that have been
uploaded. These are all of
the files in your linked
libraries. If you delete a file
locally or from the
ProPresenter Cloud
website, the file will be
marked as “Deleted”.
Deleted files can be
restored for up to 30 days,
at which time they are
permanently deleted.
The Media page is similar
to the other two screens.
You can see all of your files
that have been uploaded,
as well as delete files.
There is an additional
feature for Media that
allows you to upload single
files to your Cloud
account. This is useful if
you need to add a media
file to your Cloud account
but don’t have access to a
computer with
ProPresenter. You can log
into this site, upload the
file, and then when the computer with ProPresenter is synced, the file will be
downloaded and added to the media repository locally. You will have to manually add
the file into ProPresenter after it has been synced.
© 2005-2015 Renewed Vision, Inc.
Page 28 of 141
ProPresenter 6 User Manual
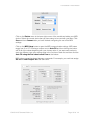
Sync Options
Before you actually sync any files, you will need to let ProPresenter know which pieces
of your data you want to have synced. The simplest option is selecting “Everything”,
which syncs all of your user data, library files, and media files.
If you prefer to limit the data that is being synced--you will likely want to do this is you
chose a small Cloud storage option--then you can select the parts that you want to have
synced.
Library Documents and Playlists will sync your presentation files as well as all of your
playlists.
Video/Image Files will sync the actual media files. In order for this work properly,
ProPresenter automatically enabled “Manage Media Automatically” for the media
repository and all of your content. Hot Folders are also converted to regular playlists
and the media is then managed as well. Remember, media takes a long time to upload
and takes up the most space. If you have a small storage plan, be careful with your
media uploads.
Video/Image Bin is the media.pro6pl file. This file contains the listing of all the playlists
and media files, as well as the media properties, in your Video/Image Bin. This setting
does not transfer any media. As mentioned above, Hot Folders are not supported with
Cloud Sync, so they will be converted into standard media playlists when you enable
Cloud Sync.
Audio Files and Audio Bin work the same as the Video/Image Files and Video/Image
Bin. The first syncs the actual audio files, the second syncs the playlist data.
Templates sync all of your templates.
User data syncs information for Props, Masks, Stage Display Data, linked library
names, CCLI data, etc.
© 2005-2015 Renewed Vision, Inc.
Page 29 of 141
ProPresenter 6 User Manual
Services
The Services section allows access to configuration of third-party services.
Planning Center Online
This will be covered in more detail later in this user manual in the Planning Center
Online section. The settings listed here allow you to control the basic behavior of the
PCO integration.
Changes made to a PCO service order online can automatically be detected by
ProPresenter, and documents added in ProPresenter to a PCO playlist can be uploaded
to the service element online for future use.
If you check the option to Show Historical Service Plans then past services will also
be available to you. Otherwise, only plans from the current date and later will be
available.
You can log in or log out of Planning Center Online from here as well.
Social Media
In this section you can log in to Instagram or Twitter for the purposes of using the Social
Media module.
SongSelect
In this section, you can log in to SongSelect for use with ProPresenter’s import function
from SongSelect. Please note that SongSelect is a subscription service offered by CCLI.
© 2005-2015 Renewed Vision, Inc.
Page 30 of 141
ProPresenter 6 User Manual
Advanced
Import Video/Image Scale Behavior
These settings affect how backgrounds and foregrounds are formatted when you import
them into ProPresenter. Generally you will want to set Background to Stretch to Fill so
that backgrounds fill your entire screen. Foreground will usually be Scale to Fit so that
the aspect ratio of the video remains the same when displayed on your screens.
Video Playback
Use Option-Click to Suppress Auto Start Video allows you to trigger a video without it
starting. This is intended for broadcast-type environments where a video producer/
director needs to see a video cue loaded before it plays.
Render Output Behavior
These settings are used for troubleshooting rather than general performance. Render
Output as Anamorphic allows you to use 16x9 content in a 4x3 environment without
distorting the original video.
© 2005-2015 Renewed Vision, Inc.
Page 31 of 141
ProPresenter 6 User Manual
Modules
The Modules tab lists all of the available modules for ProPresenter 6. Any module you
have purchased will have a green check mark instead of the blue “Buy” button. We’ve
also made it possible to demo any of the modules before you buy them.
Note: Demo modules add a watermark to the output screen while in use and are also
reset when you restart ProPresenter. The Master Control module has a 10 minute
time limit.
New Module Code
If you have purchased a module, enter the 25-digit code here and then click the + to
activate the module. After you have activated a module, the blue “Buy” button will
change to a green check mark. When ProPresenter is registered, the ID Code will be
shown. This is needed to purchase a module and link it to a specific computer.
Demo Modules
If you click this button, all the modules will be enabled in demo mode for the current
session of ProPresenter. You will have the full functionality of the modules, but the
ProPresenter watermark will be placed on the output screen. When you close
ProPresenter, the modules will be turned off again.
Purchased modules will have a green check next to them instead of the blue “Buy”
button.
Each module will be covered in more detail later in this user manual.
© 2005-2015 Renewed Vision, Inc.
Page 32 of 141
ProPresenter 6 User Manual
Toolbar
This section covers all the default toolbar icons first, and then explains the remaining
icons that can be added to the toolbar through the Customize Toolbar option.
Clear All
This removes everything that is active in ProPresenter: slides, videos, pictures, audio,
websites, etc. When you click this button it will clear the screen and show your default
slide color that is set in Preferences. This also stops timed presentations or the
Timeline.
Slides
This will remove anything that is part of the slide layer. Normally this is just text, but may
also have pictures on a slide, or other slide objects. Clearing slides will keep the
background showing and allow audio files to continue playing. If you are using a timed
presentation or a Timeline, these will continue and the next slide that is triggered will be
displayed.
Backgrounds
This will clear the background, still image or video, from the screen but everything else
will continue. When you clear the background from a presentation, the default slide
color will be used instead until a new background is selected.
Tip: If you want to select a slide that has a background linked to it, but don’t want to
use that background at the time, press the Option key to temporarily remove the
backgrounds from the presentation while you select the slide. Release the Option key
and the backgrounds will be shown again.
Clear Props
Props include any image or video you have playing above everything else on screen as
well as items shown using the Messages module. Using Messages will be covered later
in this user guide. Additional ways to clear Props will also be covered later in this guide.
Clear Audio
This will clear any audio file that is selected from the Audio Bin or audio file that is
added directly to a presentation or the Timeline. This does not clear audio that is
embedded in a video file.
Logo
This button will show the default logo that you have set in Preferences. This functions
the same as a Clear command and removes all other content from the screen.
New
This creates a new Library document. You will be able to select the Template and
Category of the presentation before adding it to your Library.
Editor
When a Library presentation is selected, you can use this button to open the
presentation in the Editor to make changes.
© 2005-2015 Renewed Vision, Inc.
Page 33 of 141
ProPresenter 6 User Manual
Video/Image
This opens the Video/Image Bin below the Slide Viewer. The Video/Image Bin is used to
organize your media files in ProPresenter.
Audio
This opens the Audio bin to the right of the Slide Viewer. The Audio Bin can be used to
play audio files for walk in music, sound effects for plays, or whenever you want to play
music from ProPresenter.
Messages
This opens the Messages module. Messages include any on-screen announcement
you need to make, like a child number, or countdown clocks shown to the audience.
Props
Props are any element that you want to keep on screen above other elements. This is
commonly used for things like logo bugs in the corner of the screen. A “logo bug” is
similar to what TV stations display in the lower right corner during shows.
Clocks
This opens the clocks window, where you can control any number of clocks that appear
on the Stage Display or are linked to on-screen messages.
Bibles
This will open the Bibles module in ProPresenter. You can access any installed
translation or add new translations at any time. Bible searches can be turned into new
presentations, added to the currently selected presentation, or shown directly from
here.
Store
This opens to our media store, which is powered by Worship House Media. You can
download the free media samples through the store, or you can purchase new media
for your organization.
Social Media
This opens the Social Media module, allowing you to show a stream of searches from
Twitter and Instagram directly within ProPresenter. This is covered in more detail later in
this user guide.
Template
You can change the template for the active presentation from this button. You’re also
able to change the template for an individual slide or multiple presentation at once
depending on the selections that are made.
Format
This opens the in-line formatting toolbar that allows you to make fast formatting
changes to the font style of your slides from within the Slide Viewer instead of having to
open the Editor.
Output
This button toggles the primary output on and off.
© 2005-2015 Renewed Vision, Inc.
Page 34 of 141
ProPresenter 6 User Manual
Volume
This controls the output volume of ProPresenter. If your computer volume is turned up
and you still don’t hear anything from ProPresenter, make sure this hasn’t been muted.
DVD
This opens the DVD module. You can create clips from a DVD and add them to a
presentation or playlist, shown a DVD segment directly from here, or rip a DVD clip into
a file on your computer.
Note: Newer Mac minis and all MacBook Airs don’t have a built-in DVD
player. You will need an external optical drive to use this feature. Multiple
optical drives are not supported.
Timeline
This opens the Timeline interface for a song. Creating a timeline is covered in more
detail later in the user guide.
Song Select
This will open to CCLI’s SongSelect service. This is a subscription service and is not
part of Renewed Vision. We only provide access to this service.
Customize
This button is a shortcut to the Customize Toolbar window where you can add and
remove, or re-arrange, the toolbar icons.
ProPresenter logo
The ProPresenter logo button opens the Info Center where you can find links to helpful
resources.
The following options are available through the Customize Toolbar option. To add or
remove icons, open the Customize Toolbar window and drag icons on and off the
toolbar. To re-arrange icons, just drag them to the new location on the toolbar.
Separator
You can added this vertical dashed line to help divide your toolbar into sections that
make more sense for you.
Space
This is an invisible element in the toolbar, but functions the same as a Separator.
Flexible Space
This is similar to “Space”, but it grows and shrinks depending on the size of the
ProPresenter window.
Information Center
This gives you quick access to the Information Center page.
© 2005-2015 Renewed Vision, Inc.
Page 35 of 141
ProPresenter 6 User Manual
Live Video
This will enable your selected camera input that you set in Preferences.
Web Browser
This opens the built-in web browser, allowing you to show entire websites seamlessly
from within ProPresenter.
Media Browser
This opens the Media Browser. The Media Browser will be covered in more detail later
in this user guide.
Stage Display Message
This will open a message window that sends a message to just the Stage Display if it is
enabled in the Stage Display layout.
iPhone
This item gives you a quick on and off switch for the iOS remote app. If you have the
Network settings properly configured for the remote, this will enable and disable the
settings.
Mask
The Mask layer is another layer available in presentations. Since most users probably
don’t need this feature, we don’t include it in the default toolbar. The Mask layer will be
covered in more detail later in this user guide.
Telestrator
This will open the Telestrator tools which allows you to draw on top of your live output in
real time.
© 2005-2015 Renewed Vision, Inc.
Page 36 of 141
ProPresenter 6 User Manual
Copyright Settings
ProPresenter makes it easy to display copyright information for songs. When you import
a song from SongSelect, the data is automatically filled in. If you create your own song
files, you can manually enter the copyright information if you want to.
There are two places that you need to configure copyright display. The first place is in
Preferences at the bottom of the General tab. These are the global settings that apply to
every presentation in the library. As you can see, you can choose to show the copyright
information on the first, last, first and last, or every slide of your presentation.
The License # box on the right is for you to enter your church’s unique license number.
You will need to contact CCLI for this number if you aren’t sure what it is.
To change the copyright elements that are shown (Title, Artist, publishing information,
etc.) click on the CCLI Layout... button. This will open the options shown below.
Each of the copyright elements are controlled by “Tokens”, a feature in ProPresenter
that allows text from one part of the program to be automatically shown by a different
feature. The tokens on the left are the active tokens, meaning these are the ones that
will be shown. The column on the right shows all of the options available. You can add
© 2005-2015 Renewed Vision, Inc.
Page 37 of 141
ProPresenter 6 User Manual
and remove tokens from the left column by clicking and dragging them in and out of the
right column.
Note:
The copyright symbol is not included as a token, so if you
accidentally delete it you can use Option-G on your keyboard to type it
again.
Clicking on Edit Template will open the Template Editor and allow you to format the
position and text settings for your copyright information. Since tokens aren’t actually
text, the only thing you’ll see in the text box is the copyright symbol. If you want to see
how text will look formatted, add any text you want since this will be replaced
automatically.
Once you have configured how you want your copyright information to be displayed,
you will need to make sure a presentation has information to display and that it’s
enabled. If you have imported a song from SongSelect, this information is filled in
automatically and Display Copyright is checked by default.
To access the copyright information, click on the blue info button next to the
presentation title at the top of the slide viewer. If this data isn’t already filled in, you can
fill in as much as you know. If you need to change whether or not the copyright
information is shown for a specific presentation, check or uncheck the Display
Copyright box
This information is used by the tokens that you enabled in the previous section. If you
include a token but there is no information in that text field, nothing will be shown on the
slide(s) that the copyright information is displayed on.
Note: The Title entered here can be different than the name of the presenta6on in the Library. If you want to have mul6ple copies of a presenta6on, but show the correct copyright © 2005-2015 Renewed Vision, Inc.
Page 38 of 141
ProPresenter 6 User Manual
informa6on for each presenta6on, just change the name of the presenta6on in the library and leave this as is. The rest of this panel is covered later in this user guide.
© 2005-2015 Renewed Vision, Inc.
Page 39 of 141
ProPresenter 6 User Manual
CCLI Reporting
One feature we have been asked for over and over again is the ability to generate a
CCLI report. In ProPresenter 6 we make it easy to generate a report of all the new songs
you’ve added to your library. CCLI only requires that you report when you add a song to
your library, not how many times you use the song.
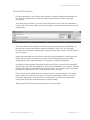
To access this, open Preferences, go to the General tab, and click on the Reporting...
button at the bottom.
You can reset this list to make it easy for you to track your songs during each reporting
period. You can also export the list as a text file if you want to keep a backup copy of
this list for your records.
© 2005-2015 Renewed Vision, Inc.
Page 40 of 141
ProPresenter 6 User Manual
Presentation Layers
ProPresenter 6 presentations are composed of up to six layers.
Mask Layer
Have you ever wanted to project onto something that wasn’t a projector screen? Did
you use tape and cardboard to block out your project’s light to fit that shape? Instead of
placing a physical object in front of your projectors, you can draw a Mask in
ProPresenter, or using Photoshop to create custom projection areas. Once enabled, a
Mask will automatically activate when ProPresenter opens. Masks can only be enabled
and disabled from the Mask module. You will need to customize your toolbar to add the
Mask module button.
Props Layer
Props are items that sit on the topmost-layer of your visible output (not visible over a
Mask). The most common Prop type is a logo “bug.” This is a small graphic that is
usually shown in the lower right corner of the screen at all times. This is the same thing
as a cable channel logo that is shown on TV. Messages and Countdowns are also
shown in the Props layer, in addition to actual Prop.
Slide Layer
Slides are the most fundamental element of ProPresenter and exist within Library
presentations. They contain the bulk of the information most users will be displaying.
© 2005-2015 Renewed Vision, Inc.
Page 41 of 141
ProPresenter 6 User Manual
The slide layer may contain ext slides, announcement loops, slideshows or any other
pre-formatted text and/or graphic slides. There are several additional features that will
be covered later in this user guide.
Video Playback
This layer is used for any full-screen video or image playback. There are two variations
on this layer: Backgrounds and Foregrounds.
• Backgrounds are videos or graphics played underneath the Slide Layer. They
persist across multiple slides and continue to display until cleared or another
background is triggered. Background videos are automatically set to loop, but this
can be changed in the settings for each file in Media Properties. Backgrounds can
be assigned directly to slides or selected from the Video/Image Bin.
• Foregrounds are generally any video or image that you would notate on a cue
sheet, such as sermon illustration videos, announcement videos, or any other video
or image that is intended to be shown by itself. They will clear the output when
triggered and be cleared when another slide is triggered. Foreground videos are set
to play just once, but this can be changed in the Media Properties for each file.
They can be added directly to presentations, Playlists, or played directly from the
Video/Image Bin.
Live Video
The Live Video function in ProPresenter takes a live camera feed from any QuickTimecompatible video interface and shows it full screen underneath the other layers
mentioned above. If a background is active, you will need to clear the background in
order to see the Live Video source.
Background Color
This is the default color you want to show when absolutely nothing else is shown on the
screen (by default this is set to black). In addition to the default global screen color
defined in Preferences, a default background color can be defined for each
presentation as well as individual slides within a presentation.
© 2005-2015 Renewed Vision, Inc.
Page 42 of 141
ProPresenter 6 User Manual
Working with Templates
Templates allow you to quickly reformat a song to a new layout, or to change an entire
set of songs. You can apply Templates to new or existing documents, and they can be
used to completely change the look of a presentation in a matter of seconds.
When you are importing or creating a new song, you are able to change the Template
that is being used. The previously used Template will always be used unless you
change it.
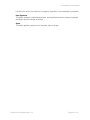
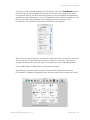
There are two options for creating new slides in a presentation. In the image below, you
can see a plus sign and a down arrow. If you select the plus (+) button, it will create a
new slide using the last used template from this menu. If you click the down arrow you
will see a list of Templates. Selecting a template will create a slide with those properties.
This will also become the Template used when clicking the plus button in that
presentation.
If you need to change the Template used for an entire document (or multiple
documents) click the Template button in the toolbar and choose your Template. If you
only want to change the Template of a few slides, Command-click the slides you want to
change so they are outlined in blue, then select a new Template. If you need to change
several presentations at once, select the titles in the Library or Playlist, then choose
your new Template.
When applying a template to an entire document or to a set of slides, you can select a
few options.
© 2005-2015 Renewed Vision, Inc.
Page 43 of 141
ProPresenter 6 User Manual
Preserve Text Attributes will update the slide using the formatting that the Template
specifies, but it will preserve specific attributes like italics, bold and underline. If you
have text that is already formatted and you don’t want to lose this formatting, check this
box.
Size Text to Fit will update the font size of the text in a text box on a slide to fit the
slide. If the font would have been too big to fit in the text box, it will be scaled down so
that it all fits.
You can create new Templates from any of these Template menus. You can also rightclick on slides to change the Template or create a new Template.
© 2005-2015 Renewed Vision, Inc.
Page 44 of 141
ProPresenter 6 User Manual
Working with Media
Video/Image Bin
The Video/Image Bin is the best location for managing your media within ProPresenter.
To access the Video/Image Bin, click on the Video/Image icon in the toolbar. You can
also press Control-V or open it from the View menu. Once the bin is open, you will find it
below the slide viewer. The first time you open this, it will be empty, but once you have
started adding content it will begin to look like the image below.
The left section of the Video/Image Bin is used to maintain your playlists and help you
organize your content. The top two bins—Backgrounds and Foregrounds—are the
default bins and can’t be renamed, moved or deleted. These bins are your initial
organizational tools for your media. To add playlists or folders, click the action menu in
the lower-left corner of the Video/Image Bin playlist column. You can resize or hide the
playlist column using the vertical handle bars in the lower-right corner of the playlist
column.
By right clicking on a media cue, you can select a number of playback options. Loop
will cause the clip to play until it is stopped by the user. Stop will play the clip once and
stop on the last frame. Next will play the clip once and then advance to the next clip in
the Video/Image Bin. Soft Loop will play the video once, and when it reaches the end
of the file, it will loop to the beginning of the video while performing a crossfade. Go to
Cue allows you to specify a clip that should be played after the selected clip is finished.
Backgrounds are automatically set to loop while they play, Foregrounds are
automatically set to play just once.
In ProPresenter 6, we’ve also added Media Bin Keyword Tagging. You can create
keyword tags, each with it's own color, and assign these tags to Videos or Images.
Right click on any video or image to assign a tag. You can also add new, custom tags
when you right click on any video or image.
© 2005-2015 Renewed Vision, Inc.
Page 45 of 141
ProPresenter 6 User Manual
All videos or images that are tagged with any tag are shown by selecting the tag from
the left bar of the Video/Image Bin. Each Video or Image can have multiple tags. For
example, you could create a tag called "Blue Videos" and a tag called "Slow Videos",
and apply it to a video that fits both of those descriptions. Then, when you select either
of those Tags in the Video/Image bin, you'll see that video, along with any others in that
tag.
You can also further organize your content into playlists. Playlists in the Video/Image Bin
work similar to those in the Library in that you can add content from your main bins into
the playlist without removing them from the main bins. You can also add media directly
from the Finder into a playlist. When you do this, the file will also appear in your
Backgrounds bin.
If you need to organize your playlists further you can create a new Group Folder (black
folder icon). Folders are used to organize playlists, so if you created a folder called
“Holidays” like the one shown above, you can then add playlists to that folder for each
holiday. Folders are really useful to organize playlists of special purpose media like this.
Media cannot be added directly to a folder.
Hot Folders are used to link directly to a folder on your computer. Any time you add or
remove media from that folder, those changes will be reflected in the Hot Folder. Media
cannot be added to a Hot Folder from within ProPresenter. Hot Folders are useful if you
have a temporary work folder that you’re constantly updating. Since the Hot Folder will
watch for changes, you can move files in and out of that folder as much as you need to.
Media in a Hot Folder is not included in the Backgrounds or Foregrounds bins.
To add media to your Video/Image Bin you can use any of three different options. The
fastest way to add media is to open the folder containing the media in the Finder and
drag the files into the Video/Image Bin where you want them located. The other options
are to click on the plus button on the bottom of the bin or by going to
File>Import>Import Video/Image and locating the media in the Finder window that
opens. Using the latter option will import the media to the selected bin or playlist in the
Video/Image Bin.
If you want to change the sort order of your media, click on the Sort By drop-down
menu at the top of the Video/Image Bin. There are a number of options that you can use
to sort your media. If you are looking for files with specific words in the file name, type
that in the Search box to search the current bin or playlist.
As with presentations, media files also have their own set of transition options.
© 2005-2015 Renewed Vision, Inc.
Page 46 of 141
ProPresenter 6 User Manual
To access these transition options, click on the transitions button in the lower-left corner
of the Video/Image Bin. Select the transition you want your media to use and set the
duration, then click Done.
The icons in the lower-right corner and the slider allow you to toggle between a
thumbnail and a list view of your media and to change the size of the thumbnails.
If you see thumbnails with a question mark on top of them it means the file path to that
media file has changed. Either relink the file, or remove it from the Video/Image Bin.
When you delete media from the Video/Image Bin, you will be prompted to delete just
the cue, or to also delete the actual file.
If you choose “Move to Trash”, then both the media file and the cue will be deleted. This
is useful if you have imported temporary content such as announcement graphics or
single-use media that you also want to delete from your computer. If you have a
ProPresenter Cloud account, the media file will also be marked for deletion from the
Cloud. Keep in mind that any files marked as “Deleted” in your Cloud account can be
restored for up to 30 days. If you have multiple copies of the same cue in your Video/
Image Bin, each of the cues will also be removed with this option.
If you choose “Delete Cues”, then just that specific cue will be removed from the Video/
Image Bin and the original file will be left alone.
© 2005-2015 Renewed Vision, Inc.
Page 47 of 141
ProPresenter 6 User Manual
Media Browser
To access the Media Browser, click on View and then select Media Browser. You can
also customize your toolbar and add a button or press Control-K on your keyboard to
open it.
The Media Browser gives you another option for accessing your media files. If you have
use iMovie you may be familiar with this interface since it is similar to the media browser
in that program. Media is automatically categorized in Images, Audio, Movies, and
Links, making it easy for you to quickly find what you’re looking for.
To use content from the Media Browser, click and drag it to the slide that you want it
applied to. Images, Audio, and Movies can only be added to presentation; you cannot
use the Media Browser to add content to your Video/Image Bin. Links pull the
bookmarks from Safari and can then be added to a playlist and will open the Web
Browser when selected.
© 2005-2015 Renewed Vision, Inc.
Page 48 of 141
ProPresenter 6 User Manual
Media Properties
Any image or video can be adjusted using the following settings, but these must be set
before using the clip since the effects aren’t applied in real-time. The benefit of using
these effects within ProPresenter is that you can use the same clip on your hard drive
multiple times with different looks. Before, if you wanted five different looks on the same
clip, you would have had to render five different files; now you just create five
references to the same file.
To access the Media Cue Inspector, right-click on a thumbnail in the Video/Image Bin,
or on a thumbnail in a presentation, and choose Properties. This will open the window
shown below.
From this window, you can adjust the In and Out points for any video file. If you have a
longer video and only want to show part of it, this is where you can make those
changes without having to edit the original video. If you need to change the thumbnail
or remove the custom in and out points, use the two buttons below the playback
controls.
If you have multiple audio output sources from your computer (USB interface and
standard headphone output), you can select one of those outputs from this menu to
preview the audio of a video in the Cue Inspector. This will only change the audio output
in the Cue Inspector and doesn’t affect any other audio output from ProPresenter.
If you need to locate this file on your computer, click on the magnifying glass icon next
to the file path.
© 2005-2015 Renewed Vision, Inc.
Page 49 of 141
ProPresenter 6 User Manual
On the right side of this window, the buttons at the top switch between basic information
tab (shown), the Properties tab, and the Effects tab.
The Label will use the file name by default, but as you can see with the video that’s
open, the file name doesn’t necessarily make a lot of sense. You can change the Label
to something that makes more sense for you and it will then be shown below the
thumbnail in the Video/Image Bin.
The Info section shows you details about the video or image file.
If you want to set a custom transition for the media file, you can change that here as
well. These effects will actually be available in the Video/Image Bin and in a
presentation once set.
The second tab in the Media Cue Inspector is the Properties tab. These settings can be
used to change the way a file is scaled, where it’s positioned on screen, and the
orientation of the file. If you are working with a video, you can also change the volume
of the audio track, the play rate (speed) of the video and whether the video loops or
stops when it reaches the end of the file. There is also an option called “soft loop” for
videos. When the video reaches the end of the file, it will loop to the beginning of the
video while performing a crossfade. This allows you to loop video files which were not
designed to be looped, because there will be smooth fade to cover the change
between the last and the first frame. © 2005-2015 Renewed Vision, Inc.
Page 50 of 141
ProPresenter 6 User Manual
In the image above, there are two arrows shown in the lower-right corner of the window.
These arrows are shown when you select multiple media cues and open all of them in
the Inspector. Clicking the arrows will switch to the next or previous file.
The third tab in the Media Cue Inspector allows you to make a number of changes to
media cues without ever having to edit the original media file.
When you first select the Effects tab, you can several changes to the clip.
Adjust Color
This allows you to adjust the Hue, Saturation, Contrast, and Brightness to change the
basic look of the video or image.
Blur
This applies a blurring mask to the entire video or image. Moving the slider left and right
will change how much blurring is used.
Color Filter
This allows you to apply a filter over your video or image with a color that you select.
Color Invert
This option inverts all of the colors, to achieve a “negative” type effect.
Edge Blur
Edge Blur applies a circular blurring mask from the outer edges. The sliders change the
amount of blurring that is applied.
Gray Invert
© 2005-2015 Renewed Vision, Inc.
Page 51 of 141
ProPresenter 6 User Manual
Like the color invert, this achieves a “negative” type effect, but completely in grayscale.
Heat Signature
This effect emulates a heat signature map, showing Reds where the image is brightest
and Blues where the image is darkest.
Sepia
This effect applies a sepia tone to the entire video or image.
© 2005-2015 Renewed Vision, Inc.
Page 52 of 141
ProPresenter 6 User Manual
Working with Presentations
Presentation File Formats
ProPresenter has three basic file types. These formats are cross compatible between
the Mac and Windows versions.
.pro6 -- This file extension is used on documents found in the Library. If you open up
the folder where your Library is stored, you will see files such as “Amazing Grace.pro6”.
.pro6x -- This file extension is used when you create a bundle. A bundle is a
compressed folder similar to a .zip folder. Bundles include presentation documents
(.pro6) as well as any media elements associated to the presentations or playlist
selected. This can be a single presentation or a playlist with bundled media.
.pro6plx -- This file extension is used when exporting a playlist without media files
bundled with the document files.
To import any of these three formats, simply double-click on the file on the computer
you want to open the file with and follow the prompts to add the content to the correct
locations. You can also go to File > Import >Import File to locate your file and import it.
© 2005-2015 Renewed Vision, Inc.
Page 53 of 141
ProPresenter 6 User Manual
Using the Library
The Library in ProPresenter is your central storage location for all of your presentations.
These can be song documents, scripture presentations, speaker notes, announcement
loops, or any other custom presentation types.
You can locate any file in your Library using the search function at the top of the Library
panel. You can search by keywords in either the title or the contents of a presentation,
and you can further sort the results by their categories with the Filter drop-down menu.
Clicking on a presentation name in the Library will immediately open that document in
the slide viewer and allow you to begin using it immediately.
If you want to change the order that the results are sorted, click on Sort By and select
either Title, Category, or Last Used.
To rename a presentation, right-click and choose Rename, or double-click the name to
edit the title. You can change the category of a presentation by right-clicking on the
name and selecting a new Category.
In addition to the Rename option, there are several other options available when you
right-click in the Library.
Reveal in Finder: Opens the file in the Finder.
Export ProPresenter Bundle: This will be covered in
more detail later in this user guide.
Export Slides as Images: Exports all slides in the
document to a folder of images.
Rename: Change the name of the presentation.
Category: Change the presentation category.
Resize: Change the size of one or more presentations.
Reflow Document: This will be covered later in this user
guide.
Duplicate: Creates a duplicate copy of the presentation.
Delete: Deletes the selected file.
© 2005-2015 Renewed Vision, Inc.
Page 54 of 141
ProPresenter 6 User Manual
Adding new presentations
When you create a new presentation (File>New, Command-N, or clicking “New” in the
toolbar), you will be given the chance to name your file as well as change some of the
basic properties. Before a file is added to your library, you can give it a title, select the
template that will be used for the slides, and change the category and size of the
presentation if needed.
© 2005-2015 Renewed Vision, Inc.
Page 55 of 141
ProPresenter 6 User Manual
Using multiple libraries
ProPresenter allows you to link multiple presentation libraries to the program. This
makes it easy for multiple organizations or groups to use the same computer without
having to share library files or create lots of alternate versions of files.
There are two ways to get started with multiple libraries. Open Preferences then click on
the General tab. Once you are here, click on the Library Folder drop-down menu and
select Manage Library.
The second method is by clicking on the File menu, then selecting the Select Library
menu and then Manage Library.
Use these same two locations to change the active Library at any time.
After you have selected Manage Library using one of these methods, you will see the
menu shown below. This will show you the currently linked libraries.
To add additional libraries, click the add (+) button. This will open the Finder. Browse to
where you want to add the new library, create the folder and select it. It will be added to
this list. If you want to remove a linked library, select that library, then click the remove
(-) button. This won’t delete the folder, just the ProPresenter link to the folder.
We recommend keeping your library stored on your computer to avoid any problems.
© 2005-2015 Renewed Vision, Inc.
Page 56 of 141
ProPresenter 6 User Manual
Playlists
Immediately below the Library is the Playlist manager. Playlists are a way to create an
outline of your service or event with all the elements contained in a single list.
There are five different options available in this section: New Document, New Playlist,
New Group Folder, New Planning Center Online Playlist, and New Header. Planning
Center Online Playlists allow you to connect to your Planning Center Online account
and pull in the order of service directly into ProPresenter. This will be covered in more
detail later in this use guide. For now, we’ll focus on regular Playlists and Folders.
To create a playlist, click on the action menu in the lower left corner and select the type
of playlist you want to create, or select to create a folder. The New Document option
creates a new file in the Library.
Note: Playlists are used to organize presenta6ons and media. Group Folders are used to organize your Playlists. To add presentations from your Library or media from the Video/Image Bin, click on the
item and drag it into the playlist. You can also drag media files, PowerPoint, or Keynote
files from the Finder directly into a Playlist. PowerPoint and Keynote files in a Playlist will
create a trigger to launch the appropriate program for native-playback of the
presentation.
If you double-click on a playlist or folder, you can rename it. If you want to move a
playlist into a Folder, drag the playlist name to the Folder and it will be moved into the
Folder.
Normally when you click on an item in a playlist, it only shows that presentation or file.
However, if you click on the Contiguous button, everything in the playlist will be loaded
into the Slide Viewer for one continuous view of the playlist contents.
It is in the context of using the Contiguous Slide View that the New Header option can
be very useful. When you add a header to your playlist, it helps to define a particular
section of the playlist. For example, you may have a section of the playlist for “Songs”
and a section of the playlist for “Announcements”. When this is viewed in the
Contiguous Slide View, the header will help to delineate the difference sections.
The button in the lower-right corner with the four arrows will resize the Playlist window
and hide the list of playlists on the left and the Library above, allowing you to see the
Playlist easier.
To export a playlist, right-click on the playlist name and select Export Playlist. Choose
the file path and check the Include Media option if you want to export all of the
associated media. You can also drag the playlist name directly to another folder on your
computer to automatically export the playlist with all the media.
© 2005-2015 Renewed Vision, Inc.
Page 57 of 141
ProPresenter 6 User Manual
Planning Center Online Playlist
You can connect to your organization’s PCO account two different ways. The first way to
do this is to simply choose New PCO Playlist in the Playlist manager and login through
the interface shown below. The second is through ProPresenter’s Services Preferences
menu. This will be covered later as there are other settings available from there.
Note: Planning Center Online is not a Renewed Vision product. You are required to have an ac6ve Planning Center Online account to use this feature. You can find out more about Planning Center online at hLp://get.planningcenteronline.com/. Anyone who can log into your organization’s PCO account can use this feature with their
own credentials, or you can select remember me and allow everyone to use the same
login.
After you login, you will see a second window asking you to authorize ProPresenter to
connect to your account.
© 2005-2015 Renewed Vision, Inc.
Page 58 of 141
ProPresenter 6 User Manual
Once you have connected to PCO and authorized your account to be used by
ProPresenter, you will see a list of all the available services in PCO. This is also the
window you will be taken directly to when you add future PCO Playlists in ProPresenter
since you will already be connected to your account.
Once you have found the service that you would like to add to ProPresenter, click on the
plus (+) button in the lower-right corner.
During the import process, ProPresenter will attempt to find songs in your Library that
match songs in the PCO playlist. If it finds files, it will automatically link them for you. If
no matches are found, you will need to add the songs to ProPresenter and then link
them to the PCO playlist.
The import process will also download any media that is a part of a PCO Service. Also,
if you have specified a sequence for a song in Planning Center (for example: Verse 1,
Chorus, Verse 2, Chorus), this sequence will be applied to the arrangement for a song
in ProPresenter with the arrangement name “PCO Arrangement”.
After you have added a PCO playlist, you’ll notice there are several icons shown in the
Playlist that aren’t available in a regular ProPresenter playlist. ProPresenter 6 can
recognize the extra playlist elements that are available in Planning Center, making these
playlists even more useful to you and your volunteers because you can add notes
directly in the playlist.
Note: A PCO playlist cannot have new elements added to it from within ProPresenter.
There is currently no way to modify the order of a PCO playlist. If you need to add or
change an element, change it from within your PCO account and refresh the playlist.
If you prefer to make changes to the playlist within ProPresenter, you can right-click
on the playlist name and select Convert to non-PCO to turn it into a standard
ProPresenter playlist. You will not be able to undo this and changes will not be made
in Planning Center.
One of the key parts of this feature is that your ProPresenter song files can be uploaded
and stored in Planning Center for future use. Once ProPresenter has scanned your PCO
playlist for changes, you will see an alert about attachments at the top of the playlist.
Clicking on Attachments will allow you to upload or change files as needed in the
playlist to reconcile ProPresenter and Planning Center.
You can also right-click on the playlist name and choose Refresh if you need to update
any files.
© 2005-2015 Renewed Vision, Inc.
Page 59 of 141
ProPresenter 6 User Manual
Once a ProPresenter presentation has been included in a PCO playlist, it’s considered
Linked. If you realize that the wrong version of a song was linked to the PCO playlist,
you can unlink it by clicking on the Unlink button. If a file is missing from the PCO
playlist, you can add it by dragging the file from your Library into the area indicated.
Also, as a new feature in ProPresenter 6, any media that is linked to an item in Planning
Center will be downloaded to ProPresenter and linked in the playlist.
Slide and Table View
ProPresenter 6 offers two ways of viewing presentations. The default view is the Grid
View, which shows larger thumbnails of each slide.
Grid View is designed to show you a large thumbnail of your slide so that you can easily
see the design of the slide. This is referred to as a “what you see is what you get”, or
WYSIWYG, type of layout.
Table View shows you a smaller thumbnail, but shows makes it easier to read the slide
content. Slide notes are also visible in this view.
You can toggle the slide view and the thumbnail size using the buttons and the slider in
the lower-right corner of the slide viewer.
© 2005-2015 Renewed Vision, Inc.
Page 60 of 141
ProPresenter 6 User Manual
Working with Slides It’s important to note that ProPresenter is always “live”. When you click on a slide, it will
immediately be sent to your output screen. Any media will also be shown if included
with the slide. When a slide is live, it has an orange outline around it so that you can
quickly see which slide is being shown. In Table View, the entire row will be orange, as
shown in the previous image.
When a background video or image is added to a slide, it is indicated with the icon in
the upper-left corner. This icon will match the Backgrounds and Foregrounds icons from
the Video/Image Bin. If you have added a video to a slide, a box in the lower-left corner
will show you how long the video is. Other icons will appear in the upper-right corner;
those will be covered in other sections throughout this user guide.
To move slides, click and drag the slide thumbnail. You will see drop indicators while
moving the slide around to show you were it will be inserted in the presentation.
Slides can be duplicated within a presentation, making it easy for you to create slides
for repeated sections of a presentations. Duplicating is similar to copying and then
pasting a slide. To duplicate a slide, select the slide while pressing the command key
and then press Shift-D. You can also right-click on a slide and choose Duplicate.
ProPresenter also allows you to disable specific slides. To disable a slide, right-click on
it and choose Disable Slide from the menu. To re-enable the slide, right-click on the
slide and choose Enable Slide. A disabled slide will be skipped when advancing
through a presentation using the space bar or arrow keys, and will also be grayed out
to indicate it is disabled. Disabled slides can still be used if you click on the slide or use
a hot key to select it.
As you can see in the image above, this slide is marked with “Chorus” and is blue.
Slides can be labeled and grouped together in ProPresenter. This will be covered in
more detail in the section on “Slide Grouping and Arrangements” later in this user
guide.
© 2005-2015 Renewed Vision, Inc.
Page 61 of 141
ProPresenter 6 User Manual
Slide Grouping and Arrangements
Groups & Arrangement makes it easy for you to create multiple versions of a single
song without having to save several files in your library. Groups & Arrangements allows
you to define slides as part of a stanza (Group) and then arrange them in whatever
order you need.
Note: Once you start using Slide Groups, every slide in that presentation must be
part of a group. By default, all of the slides start in a generic group called “Group”.
To get started, right-click on a slide and select a Group Name. If you have 8 slides and
start on the first slide, all 8 slides will be grouped into the selected group. If you start on
slide five, the first four slides will remain in the generic “Group” and the last four slides
will be in your selected group, for example “Verse 1”. This second scenario is shown in
the image below.
You can right click on any slide to start a new group for the slides between that slide
and the next group. If slide three is selected above and named “Chorus”, only slides 3
and 4 will be affected. Slides 1 and 2 are still part of “Group”.
© 2005-2015 Renewed Vision, Inc.
Page 62 of 141
ProPresenter 6 User Manual
Groups can be renamed by repeating the naming process and selecting a new name.
Groups can also be split into additional groups by right-clicking on one of the slides
and selecting a new group. In the image below, the last four slides have been split up
into three groups, with slide five being the only one that is still part of Verse 1.
You will also notice that each group is now represented in the bar between the title and
the slide thumbnails. This is where you access Arrangements and can create new
arrangements, and delete or rename existing arrangements. To access these, click on
the flow chart button. The button is outlined in red in the image below.
Once you have grouped your slides into the correct groups, you can make adjustments
if necessary. When you drag slides around in the presentation you will see left and right
arrows that are the same color as the group that you hovering over, or a vertical teal
colored bar that indicates you are adding the slides between groups. The image below
shows moving a slide into a group, as indicated by the green arrow. Hold the Option
key while dragging will duplicate, rather than move, the selected slide.
If you duplicate a group in the presentation, you will see a new group added to the
Arrangements toolbar. This new group will function independent of the other one even
though the name is the same. You may want to change the name on this new group to
make it clear which one you are using in the Arrangement.
© 2005-2015 Renewed Vision, Inc.
Page 63 of 141
ProPresenter 6 User Manual
To create a new Arrangement for your presentation, open the Arrangements toolbar and
click on the options menu on the left and select Add New Arrangement. You will be
prompted to name this new arrangement.
Once you have created your new arrangement you will need to drag the groups into
that you want to be shown in that new arrangement. Click on the tokens in the top row
and drag them to the second row to organize your arrangement.
If you repeat a group in your arrangement, any edits made to one of those instances will
apply to the others. If you have Chorus in your arrangement five times and add a
background to the first slide of the chorus, it will be added to the other instances of
Chorus. This also applies to any changes made to the text on a slide. These changes
are also reflected in other arrangements that use the same group. The properties of an
arrangement are not unique to that specific arrangement.
Due to how arrangements are stored within the song file, you can actually have the
same presentation in your playlist multiple times with a different active arrangement
selected for each instance of the presentation. To change the arrangement, right-click
on the presentation in the playlist and select the arrangement from the Select an
Arrangement list. You’ll se the arrangement name at the top of the presentation when
you open as you can see in the image above. The selected arrangement is stored as
part of the playlist data, so exporting the playlist will maintain the proper arrangement
when you open it on another computer.
© 2005-2015 Renewed Vision, Inc.
Page 64 of 141
ProPresenter 6 User Manual
Document Properties
Every presentation in your Library has the ability to support additional data about the
file. This will typically only be used for songs since the primary data is copyright
information.
To access this information, click on the blue info button to the left of the presentation
name in the slide viewer. When you click this button, it will open the panel shown in the
image below.
This information is automatically included on any song imported from SongSelect, or
that has the copyright information properly formatted in a text file. The copyright
information is used when displaying the copyright information, which is covered later in
this user guide.
Notes that are added here are shown at the top of the presentation in a dark gray bar
above the title. Notes are useful if you need to include a general reminder about
something related to the presentation for the person running ProPresenter.
In addition to the copyright information and the chord chart, you can also change the
default slide color, size and category of the current presentation if you need to. Clicking
the blue info button a second time will close this panel. You can also access this same
information in the Editor, which is covered later in this user guide.
Chord charts can be attached at the document level of any presentation. You would
want to attach a chord chart this way if you have a single page to show. If you have
more than one page of chord charts for a presentation, you will want to add those
through the Slide Editor and attach them to specific slides.
Working with Chord Charts are covered later in this user guide.
© 2005-2015 Renewed Vision, Inc.
Page 65 of 141
ProPresenter 6 User Manual
Transitions
In ProPresenter 6 there are several transitions available to use with your presentations
and media. Transitions are able to be applied to individual slides, individual documents,
or set globally for every presentation. Media transitions can be applied to individual
cues and set globally. Any slide/cue transition overrides the document or global
transition, and the document transition overrides the global transition. If a specific
transition is not set for a slide/cue or document, then the global transition is always
used.
There are three locations for selecting transitions. The
image to the left shows the global transition menu with
no selected transition, as indicated by the scissor icon.
When a transition is selected, you will see a blue icon
that represents the transition, as shown in the image
below. The image below shows the position of the
document transition menu.
The first row of transitions allow you to set the duration of the transition. The second row
allows you to select a “direction” for the transition to take (for example, Push to the Left).
The last two transitions, Fly In and Zoom In, have an additional option called “Motion
Extended”. When this setting is enabled, your slide will follow the direction, and then
continue moving through your slide in the same direction.
If you want to set a global transition that is used by every presentation (unless a
document or slide transition is enabled), click on the transition menu in the lower-left
corner of the slide viewer. To apply a transition to a slide, right-click on the slide and
select the Transitions menu item.
© 2005-2015 Renewed Vision, Inc.
Page 66 of 141
ProPresenter 6 User Manual
Resizing Presentations
There may be times when you are given a presentation to use in ProPresenter that was
created on a different computer that had a different output resolution set. When this
happens, you will see a yellow triangle in the upper-right corner of the slide viewer.
When you click on this alert, you’ll see a message like the one below telling you what
size the document will be resized to. All slide elements will be scaled correctly to
maintain the same look on your slides.
If you need to resize a lot of presentations at the same time, you can select multiple files
in the Library, then right-click and choose the correct size from the Resize menu. If one
of the four standard options doesn’t work for you, click on Custom Size and enter the
correct dimensions.
© 2005-2015 Renewed Vision, Inc.
Page 67 of 141
ProPresenter 6 User Manual
Editing Slides
ProPresenter offers a few ways to edit presentations. Individual slides can be changed
using Quick Edit, the overall look of a presentation can be changed using the Format
menu, or you can make extensive edits using the Editor. Templates can also be used to
change the look of a presentation, but that will be covered later in this user guide.
The quickest way to edit a slide is with Quick Edit.
The Quick Edit function allows you to make simple changes to individual slides. This is
useful if you find small grammar or spelling mistakes or realize you need to change a
line break or other simple change. The Quick Edit window is a small, floating edit
window that opens when you right-click on a slide and select Quick Edit. You can
continue selecting on other slides while this is open.
If you locate a spelling error or need to make a change quickly, you can open Quick
Edit, and it only takes a few seconds to correct the spelling. Clicking the ‘X’ in the topleft corner of the Quick Edit window applies the change to that slide immediately. As
mentioned earlier in this user guide, if you have your slides grouped together, every
repeated instance of that slide will also be updated. In the image below, the slide being
changed is the first slide of the Chorus. Since the chorus of a song tends to be
repeated several times in a song, being able to change this once saves even more
time.
The second way to edit a presentation is with the Format toolbar. This button is located
on the right side of the toolbar by default.
As you change the different formatting options, the presentation you’re working with will
be updated immediately so you can see the changes. If you need to make changes to
multiple presentations, just click the Apply All button as you select the rest of the
presentations to apply the same settings again.
The Editor is the most robust way to edit a presentation. Here you have full access to
the slides and can modify the contents of the slides and edit all of the various
properties of the presentation. Since the Editor is a WYSIWYG (what you see is what
you get) editor, what you are seeing in the editor is exactly what will be shown on your
output screen.
To open the Editor, click on the Editor button in the toolbar, or right-click on a slide and
select Edit Slide.
To begin editing a slide, select the slide you want to work with from the thumbnails on
the left side of the Editor. This will change the slide that is open in the Editor. If you are
done editing a presentation and need to edit another one, you can select the other
presentation without having to close the Editor. You can also edit presentations even if
you have another one running as a slideshow loop or have any slide or video showing.
Use the buttons in the lower-left corner to add new slides as needed. These two buttons
are the same ones from the Slide Viewer.
© 2005-2015 Renewed Vision, Inc.
Page 68 of 141
ProPresenter 6 User Manual
The first seven buttons across the top of the Editor are used to add slide objects. These
objects are: Text Box, Shape, Image, Video, Live Video, HTML Web Page, and Text
Ticker. Slides in ProPresenter can support any combination of these objects on an
individual slide. Click on the object that you want to add to the slide, then resize and
position it where you would like it to be on the slide.
There are more options available for the
Text Ticker. The Text Ticker can display
plain text that is manually entered, it can be
linked to an RSS feed URL, or it can show
plain text that is stored in a local file.
You can specify the speed at which the
ticker moves as well as the behavior of
what happens when the ticker reaches the
end. Loop Immediately will cause the
ticker to begin right away after finishing,
such that the first letter will appear
immediately after the last letter. Loop with Delay will cause the ticker to finish playing
completely, and then begin again. Do not Loop will play the ticker once and not loop it
again until the slide is clicked again.
The rulers button in the toolbar displays rulers on the left side and top of the Editor to
make it easier for you to size and position objects on the slide. When you have the ruler
mode open, you can click on either ruler and drag away from it to create an Editor
Guide. This is a blue line that will persist on all other editor screens. Objects on slides
will “snap” to these guides, making it easy to manually position objects in the same
place on multiple slides
The last two buttons are used to change the arrangement of layers on the slide. The first
is Bring Forward and the second is Send Backward.
© 2005-2015 Renewed Vision, Inc.
Page 69 of 141
ProPresenter 6 User Manual
If you are trying to center an object on the slide, yellow crosshairs will show up when
you have reached the vertical and horizontal center points.
If you want to change the zoom level of the slide, click on the zoom menu in the lowerright corner and select a new zoom level. By default this is set to Scale to Fit so that you
can see the entire slide regardless of your screen size or layout.
Slide Element Cropping/Zooming
In ProPresenter 6, it is now possible to crop/zoom individual media elements on slides.
To do this, after importing media to a slide as a slide object, double click on the media
object so that the “handles” on all of the sides and corners of the object turn black.
Now, just drag any one of the handles, and you will see the image move within it's
preset frame and you can adjust the portion of the image that you want to see.
© 2005-2015 Renewed Vision, Inc.
Page 70 of 141
ProPresenter 6 User Manual
The column on the right side of the Editor is where most of the functionality
exists. There are five different sets of properties that you can change.
On this panel you can override the default background color set in
Preferences for this one presentation. You can also change the size of the
document and the category of the presentation.
If you set a transition it will apply for the entire presentation and override the
global transition.
© 2005-2015 Renewed Vision, Inc.
Page 71 of 141
ProPresenter 6 User Manual
The second set of properties are Slide Properties.These settings apply to
the current slide only.
If you need to disable a slide, uncheck the Enabled box. If you need to
change the background color of an individual slide, you can do that by
enabling the Background option and selecting a color. Hot keys are used
to trigger slides using your keyboard; these can be any letter from A to Z.
The slide label shows up as the name of the slide. These are used to
identify slide groups and to create groups and arrangements.
If you set a transition here it will apply to just this slide.
If you have multiple objects on a slide, it can become difficult to keep track
of the order of the object. Clicking on the layer will select the object that it
goes with on the slide so you can identify which object is where.
If you need to use multiple chord charts throughout the presentation, add
them to the appropriate slide that they need to be shown with.
The third set of properties are Slide Build Properties. Each object on a
slide can have a separate transition when it is brought “In” to the slide and
when it is sent “Out” from the slide. To add a transition, select the object in
the editor and pick a transition in this panel.
Each object with a selected transition will appear in this list.
An individual object can be set to transition “With Slide”, “On Click”, “With
Previous”, or “After Delay”.
With Slide means that the object will use the selected build transition, but
will appear as soon as the slide is first launched.
On Click will allow subsequent clicks after the first time the slide is clicked
to bring in the objects.
With Previous will link objects together so that one click will bring in
multiple objects.
After Delay will bring an object in after a specified amount of time (i.e. 3
seconds).
© 2005-2015 Renewed Vision, Inc.
Page 72 of 141
ProPresenter 6 User Manual
The fourth tab is the Object Properties tab. This is where you adjust the
general properties of slide objects.
The top section of allows you to change the coordinates of an object’s
position, as well as its size, rotation and opacity.
The Name label doesn’t apply to regular slides, but is used with the Twitter
module and Bible templates, so it will be covered in those sections.
The Fill Color is used to change the color of a shape or the color of a text
box. Fill Color also supports opacity. The Line Color changes the outline of
the object or text box and Line Width is the thickness of the line. Corner
Radius controls the roundness of the corners of an object or text box. If
you need to make a circle, enter 360 in this box.
The Shadow settings can be used on slide objects or on text. The Angle of
the shadow is similar to what direction you want the shadow to come off
the object or text. The dial next to Angle allows you to quickly adjust the
position of the shadow. Length controls how far away from the object or
text the shadow is and Radius controls the blurriness of the shadow.
Tip: If you have very intricate fonts, a high radius value may cause some performance issues. If you have a shadow applied to text, and then add a fill color to the box, the shadow
will move from the letters to the text box automatically. So if you need to have the
shadow on the text and a colored box behind it, you will need to add a shape object
behind the text box.
© 2005-2015 Renewed Vision, Inc.
Page 73 of 141
ProPresenter 6 User Manual
The fifth set of properties are the Text Properties.
The top section allows you to choose your font, font color, font styles,
and color. You can also add an outline to text and select an outline
color.
Tracking and Leading may be two terms you aren’t familiar with.
Tracking refers to the amount of space between the letters in a single
line (horizontal spacing). Leading refers to the amount of space
between lines of text (vertical spacing). Leading is not supported by the
Windows version of ProPresenter, so this setting won’t transfer between
platforms.
The next area controls the alignment of the text. The first row is the
horizontal alignment of the text and the second row is the vertical
alignments. Checking Adjust to Fit will dynamically resize the text box
as needed.
If you click Apply All, all of the settings on this panel will be applied to
the other text boxes in your presentation.
One of the primary reasons many of our users still use PowerPoint for their Pastor’s
sermon notes is the need for bullet lists and fill-in-the-blank slides. Text Reveal was
added to make it easier to build those kind of slides.
To use the Text Reveal function, select either Bullet List or Fill in
the Blank from the drop-down menu. This will change the
functionality of the selected text box. It is not possible to combine
the two functions in a single text box.
© 2005-2015 Renewed Vision, Inc.
Page 74 of 141
ProPresenter 6 User Manual
The sixth properties tab is the Image/Video Properties tab. This tab
can only be accessed if you have an image or video, or live video,
object on a slide.
If you have added an image or live video to the slide, only the top
section will be shown.
You can change the source of the file while maintaining any other
value you’ve set for the object. If you need to find out where an
image or video is located, click on the magnifying glass to open it in
the Finder.
The drop-down menu allows you to select different scaling options
for the image or video. These options change the way the image or video is displayed
within the boundary of the object’s box.
If you have added a video file or live video object to the slide, you will have the second
set of options available. Since you don’t have full playback control of a video on a slide
like you do with a video played as part of a presentation or from the Video/Image Bin,
you have to adjust some of the settings here.
The Volume slider will change the volume of the video if there is an audio track. The
Rate slider will change how slow or fast the video plays.
If you need to adjust the Start and End points of the video, you can enter the values
here. These values are calculated as percentages, so you may need to test these
settings to get them right.
If you need to change the way the video plays, click on the Behavior menu and select
Stop, or Loop.
© 2005-2015 Renewed Vision, Inc.
Page 75 of 141
ProPresenter 6 User Manual
Go to Next Timer
A common need in ProPresenter is the ability to create an announcement loop from a
series of slides, graphics, or short videos. There are two easy ways to do this. The first
is to use a Go to Next Timer, the second is to use the Timeline. The timeline method
will be covered later in this user guide.
A Go to Next Timer can be applied to slides, images or videos in a presentation. A timer
can’t be applied to media in the Video/Image Bin.
While using a Go to Next Time is simple, it does take a little bit of prep work to make
sure it works the way you want it to and the way you expect it to work.
Before creating your timer it’s important to know the difference in how a Go to Next
Timer works with Foreground video versus Background videos. There is no difference
with slides or graphics.
Backgrounds: If your video is a Background, a Go to Next Timer begins
counting from the start of the video. This means that if your video is 30 seconds
long, but your timer is set to 10 seconds, then the video will only play for 10
seconds before advancing. If your video is 30 seconds long and your time is 45
seconds, then the video will play one complete time and then advance halfway through
the second time.
Foregrounds: If your video is a Foreground, a Go to Next Timer begins counting
at the end of the video. This means that when your video ends, then the timer is
triggered. If you have a 30 second video and a 10 second timer, your video will
play completely one time, then wait 10 seconds before advancing to the next item. If
you want the videos to play one right after the next, set the timer to 0 seconds.
You can set a timer from two different locations. The easiest option is from the toolbar.
Click on Format then on the clock icon. There are only a few standard options available
here. Selecting one of these will apply the time to all the slides in a presentation. The
last slide in the presentation will also automatically have a loop to first slide cue
added.
© 2005-2015 Renewed Vision, Inc.
Page 76 of 141
ProPresenter 6 User Manual
The second, and more flexible, option is to select all the slides that you want to add a
timer to, then right-click on any one slide, and choose Go to Next Timer from the menu.
You can enter any value, in seconds, that you want to use for the transition time.
Remember that if you are using Foreground videos and want them to advanced
automatically, use zero seconds.
If you need to enter different values for individual slides, you can edit the timer settings
for each slide. If you want your presentation to loop continuously, check the box next to
Loop to first slide on the last slide in your presentation. You can also assign a loop cue
by right-clicking on the slide and selecting Loop to first slide without entering the
Timer Settings.
If you have added a timer or loop cue to a slide, it will be shown in the upper right
corner of the slide so that you can quickly see what the settings are for that slide.
When you are showing slides with a slide timer, you will see a stop sign icon with a
clock on it under the playback controls. Clicking this button will stop the timer from
running until you click on a slide again.
© 2005-2015 Renewed Vision, Inc.
Page 77 of 141
ProPresenter 6 User Manual
Hot Keys
Hot Keys allow you to assign specific letters (A through Z) to slides. Some users prefer
to assign letters to certain parts of songs to make it easier to quickly jump between
sections. To add alphabetical hot keys to slides, right-click on a slide and choose Hot
Key from the menu. This will open a window that allows you to assign any lowercase
letter to that slide. You can also edit the hot key assigned to a slide in the Editor from
the Slide Properties tab.
You can also select slides using a numeric keypad or the number row on your
keyboard. To jump to any slide, type the number and press Enter on your keyboard. The
slide will be selected immediately. The slide number is found in the lower left corner of
the slide thumbnail.
You have two seconds between key strokes to enter another value. After two seconds, if
the enter/return key has not been pressed, the hot key trigger window will automatically
close. Pressing the escape key will also close this slide selection overlay. © 2005-2015 Renewed Vision, Inc.
Page 78 of 141
ProPresenter 6 User Manual
Saving Files
ProPresenter will auto save all changes. The auto save feature works in the background
and is triggered any time a change is made. The change will be saved within a few
seconds. If you make a change and close ProPresenter before the auto save function
has a chance to save your changes, you will be prompted to save your changes upon
closing.
© 2005-2015 Renewed Vision, Inc.
Page 79 of 141
ProPresenter 6 User Manual
Slide Reflow
Whether you're changing the flow of a song's text during import or creating a new
version of an existing song in your Library, ProPresenter 6's Text Reflow functionality
gives you a complete view of a song's text on the left hand side and a slide view on the
right. You can easily change line breaks, slide breaks, add labels in this text edit view.
You can see how the changes make your slides look as the slide view updates with your
changes. This is a substantial time saver versus having to edit on a slide by slide basis.
Reflow can be accessed three different ways. When you first import a song to
ProPresenter (from a file or SongSelect) you can click on the Edit button in the lower left
corner to open Reflow if you want to edit the song before importing it. If a song is
already in your library or playlist, right-click on the file name and select Reflow
Presentation... from the list of options. You can also select Reflow Presentations...
from the File menu. Any of these three methods will open the same window shown
above.
The left side of the window provides a text layout of the presentation making it easy for
you to quickly see the text and manipulate the slide breaks. New slide breaks can be
entered by clicking the Insert Slide Break button or by pressing Option-Enter. Slides
breaks are entered where the cursor is located. To remove a slide break, click in front of
the text following the break and press the delete key. This will remove the break and
merge the two slides back together. You can also click and drag the slide dividers to
adjust the slide break positions.
© 2005-2015 Renewed Vision, Inc.
Page 80 of 141
ProPresenter 6 User Manual
You can edit the slide groups in Reflow as well. Click on the down arrow on the right
side of the slide dividers and select your group label or group color. There are two
versions of this menu depending on which slide you are editing.
If you are adjusting the first slide of a group (the one that shows the group name) you
will see the menu shown below. You can change the name and color of the group, as
well as add a slide label to the slide.
If you select this menu on a slide within a group, you can start a new group as well as
add slide labels.
Note: Reflow is designed to work with basic presentations with a single text box on
each slide. Presentations with slides that have more than one text box will not work
properly with Reflow.
© 2005-2015 Renewed Vision, Inc.
Page 81 of 141
ProPresenter 6 User Manual
Chord Charts
ProPresenter 6 includes the ability to attach chord charts to presentations. This can be
done at the document level or per slide. To attach the presentation at the document
level, access the Document Properties from the Slide Viewer or from in the Editor. To
attach a chord chart at the slide level, access the Information Panel at the top of the
document by clicking the blue “i” button.
Click on the box next to Chord Chart and then
click on Add Chord Chart. This will open a file
browser window; browse to the location of your
PDF and select it.
If your PDF is a single page it will be added
right away. If it’s a multi-page PDF, you will see the window shown below. Select the
page that you want to link to a specific slide from the column on the right, then click
Save to use that page. You can use the same document on multiple slides just by
selecting different pages within the PDF. As with media, when a PDF is linked to a slide,
it will be shown until a different PDF page is selected. If you have multiple slides for a
stanza, you only need to add the PDF to the first slide of the stanza.
© 2005-2015 Renewed Vision, Inc.
Page 82 of 141
ProPresenter 6 User Manual
Importing and Exporting Files
This section will cover the various import and export options available from the File
menu in ProPresenter 6.
To access the Import options, click on File>Import and choose the option you want to
use. You can also drag files from the Finder directly to the Library or Video/Image Bin to
start the import process.
The different Export options are at the bottom of the File menu. You can also export files
by right-clicking on the name and choose Export or dragging the presentation or
playlist to a folder on your computer.
Import File
This option is used to import text files (.txt or .rtf) Word files (.doc or .docx), or other
ProPresenter document files (.pro5 or .pro6).
After selecting a file to import, you will be shown options for importing.
© 2005-2015 Renewed Vision, Inc.
Page 83 of 141
ProPresenter 6 User Manual
“Slides delimited by” allow you to specific a number of lines or paragraphs per slide, or
to use a custom slide break marker in the source file.
Regardless of which delimiter you use, the number placed in the “delimiter(s) per slide”
determine when new slides are generated. If you have selected “Line Break” and enter
“2”, you will end up with two lines on each slide, with respect for stanza breaks. Same
with paragraphs. If you have used a customer delimiter such as “//” or “*” in your file,
just type that into the “Slides delimited by” field.
The middle section allows you to update the size, category and template that will be
used for the file you’re importing.
You can also decide if you want the file to go to the Library, to just the selected Playlist,
or to a new Playlist. If you choose New Playlist you’ll be prompted to enter a name.
The button in the lower-left corner opens Slide Reflow.
Import Text from Clipboard
This option uses the same import options as Import File, but allows you to copy text
from a website or a file such as a PDF or other file type not supported by ProPresenter
and import it into the Library.
Import PowerPoint
If you have PowerPoint installed on your computer, you can convert PowerPoint files into
formats ProPresenter can use.
Note: PowerPoint 2011 is required. Once you have located the PowerPoint file that you want to convert, choose the option
that you want to use before clicking Open.
You can drag PowerPoint or Keynote files (Keynote must be installed as well) directly
into a playlist. This does not convert the presentation, but creates a cue for the
presentation that will launch the proper program so that you can quickly run your
PowerPoint or Keynote file with full animations and transitions.
© 2005-2015 Renewed Vision, Inc.
Page 84 of 141
ProPresenter 6 User Manual
Import Video/Image
This option opens a new file browser window. Navigate to the video or image that you
want to import and select it. The file will automatically be added to whichever bin or
playlist is currently selected in the Video/Image Bin.
Import Library from Previous Version
This option will open a window showing the document library from ProPresenter 4 or
ProPresenter 5 if there is an older version currently installed on your computer. This will
allow you to select a library to import and convert to ProPresenter 6.
Importing these files does not affect your previous files, so you can import the files while
you are getting ProPresenter 6 configured without affecting the previous versions.
Export Document
There are several ways to export an individual document or multiple documents that
have been selected.
As Bundle
Bundles are used to gather Library files and media files together into a single
package that can be opened in ProPresenter on another computer running
ProPresenter 6. If you select multiple songs in your Library, they will all be
included in the same bundle along with the media. Importing bundle file will
add the files to your Library.
As ProPresenter 5
This option exports the file for use in ProPresenter 5.
As ProPresenter 6
This option exports the file natively for use on another computer running
ProPresenter 6.
As Plain Text
This option will export the select presentation(s) as a plain text file with a .txt
extension. This export method strips all formatting except line and paragraph
breaks.
As Slide Images
This option will export each slide in the document as a JPEG image (with slide
background) or PNG image (without slide background).
© 2005-2015 Renewed Vision, Inc.
Page 85 of 141
ProPresenter 6 User Manual
Export Templates
ProPresenter 6 makes it easy to export templates to be used on another computer.
Instead of having to search through the Finder to find these files and manually add
them on another computer, you can export specific templates to a single bundle file.
When you double-click this file on another computer, the templates will be imported and
be available for immediate use.
Export Playlist
This option will export the selected playlist. When you export a playlist you can choose
to include the media with the playlist if you want. Importing a playlist on another
computer will rebuild the playlist exactly the way it is on the original computer. Playlists
can also be exported by right-clicking on the playlist name, or dragging the playlist
name to a folder on your computer.
© 2005-2015 Renewed Vision, Inc.
Page 86 of 141
ProPresenter 6 User Manual
Printing
ProPresenter 6 offers two printing views: Thumbnail View and Outline View. When you
open the print dialog you’ll need to expand the print options to see these features.
© 2005-2015 Renewed Vision, Inc.
Page 87 of 141
ProPresenter 6 User Manual
Song Select
SongSelect is owned by Christian Copyright Licensing International (CCLI). If you are
an active license holder of a CCLI license for your church or organization then you have
the option of purchasing a subscription to SongSelect.
For more information about CCLI and SongSelect, visit www.ccli.com.
If you have access to SongSelect, ProPresenter can store the registration information for
you and provide direct access to SongSelect through the program. This makes it easy
to get songs from SongSelect without having to leave ProPresenter.
You can search using SongSelect by selecting SongSelect from the View menu.
In ProPresenter 6, you can also search for songs in SongSelect directly from the Library
search box. To do this, be sure that you have checked “Include SongSelect Results in
Search” in the Library preferences (accessed by clicking the button to the right of the
search box).
In either of these search interfaces, you can search by title, author, keywords, or CCLI
number. © 2005-2015 Renewed Vision, Inc.
Page 88 of 141
ProPresenter 6 User Manual
PowerPoint and Keynote Triggering
Importing PowerPoint and converting it into JPEGs or ProPresenter slides has been
covered earlier in this manual. This section will cover importing PowerPoint and Keynote
files as full-feature presentations.
Due to limitations with PowerPoint and Keynote, ProPresenter is triggering the
presentation and relying on the appropriate program to play the presentation. This
means that while a PowerPoint or Keynote file is being shown, that program controls the
output and any content within ProPresenter (Mask, Props, Messages, etc) can’t be
shown over the output content.
The process of adding a PowerPoint or Keynote presentation to ProPresenter for Mac is
very simple. Open a new Finder window and drag the file into a playlist. You will see the
presentation name listed the same way any item added to a playlist is shown.
PowerPoint and Keynote files are distinguished by using the application icon
associated with the file.
After you select the presentation that you want to use, a slide for the presentation will
appear in the slide viewer. When you click on this slide, the appropriate presentation
program will open up over ProPresenter and switch the output to either PowerPoint or
Keynote.
PowerPoint and Keynote files can only be added to a playlist and not into the Library or
another presentation file.
© 2005-2015 Renewed Vision, Inc.
Page 89 of 141
ProPresenter 6 User Manual
Bibles
Downloading and Installing
Using the Bible Module
Searching
There are three ways to search for passages in the Bible module. You can select from
the Book menu, search by a specific passage, or use a keyword search.
Before searching, you need to select a specific translation from the menu on the left. To
use the passage selector, click on the Book menu, then choose a book and chapter of
the Bible; this will load all the verses in that chapter. To search for a specific range of
verses, type in the passage and press Enter. The Bible passage search also recognizes
shortened versions of book names. To do a keyword search, type in your search term in
the search box on the right.
Display Options
As with songs and other presentations, you can apply a template to Bible passages to
format them the way you need. Bibles also include several extra settings that are
unique to Bible passages.
• Show Verse Numbers: Checking this option enables verse numbers to be
displayed in Bible passages.
• Break on New Verse: Checking this will create new slides for each verse of a
passage.
© 2005-2015 Renewed Vision, Inc.
Page 90 of 141
ProPresenter 6 User Manual
• Display Translation: Checking this option will show the translation that is being
used.
• Preserve Font Color: Checking this option will retain “red letter” words and other
formatting in the Bible text.
• Verse Refs: This option is only available if Break on New Verse is selected.
Selecting this option will display the verse reference on each slide.
• Passage Each: Selecting this option will show the reference for the entire passage
being shown on each slide.
• Passage Last: This option will only display the passage reference on the last slide.
• No Reference: This option doesn’t display the passage reference on any slide.
© 2005-2015 Renewed Vision, Inc.
Page 91 of 141
ProPresenter 6 User Manual
Bible Presentations
The Bible Module is designed to make it easy for you to find verses on the fly in the
least amount of time possible. You can quickly search for verses through several
different look-up methods, and begin displaying those slides moments later.
Once you have found the passage that you want to use, click on the action menu in the
lower-left corner and choose either Save as Document or Copy to Current Document.
The Save as Document option will create a new presentation in your Library with the title
of the passage. The Copy to Current Document option will add the passage to the
document that is currently selected in the library or a playlist. This option makes it much
easier for you to prepare a single presentation for a sermon.
You can easily add the previous or next verse to a passage by clicking on the Previous
Verse or Next Verse buttons. These two buttons are available in the Bible module as
well as on Bible presentations in the Library.
After you have created a presentation for the Bible verses, you can format the slides the
same way you format song presentations.
ProPresenter 6 allows you to use a single format for your verse and reference, or create
two unique styles for the verse and references. All of this is done through the use of
Templates.
To create a new Bible template that supports individual styles for the reference and
verse text, click on the Template button then choose Create New Template. This will
open the Template Editor, which is similar to the standard Editor.
Once the editor is open, add two text boxes to the slide and format the text how you
want each part to look. For the example below, each text box has had a line added
around the box to make it easier to see the two boxes.
After you have created your two text boxes, the next step is to name the two boxes so
that ProPresenter knows how to use this template in the Bible module. To name each
box, select the Object Properties tab on the right, select one of the text boxes, then
choose either Bible Text or Bible Reference from the Name menu. You can see in the
image above that the Bible Text option is shown while the text box that says “Verse Text”
is selected. The image below shows Bible Reference selected.
© 2005-2015 Renewed Vision, Inc.
Page 92 of 141
ProPresenter 6 User Manual
Props
Props make it easy to leave items on screen for an extended time, but are also easy to
clear at any time. Some common uses for props may be a lower-third graphic, a logo
bug (a “bug” is a broadcast term for a small graphic in the corner), or other persistent
graphic that you want to leave on screen.
A prop can remain on screen for just one slide, multiple slides, or for the entire
presentation. This layer is independent of other layers allowing props to be triggered at
any moment. Props adhere to transparency settings for those graphic formats that
support them (.PNG stills or animation videos with an alpha channel).
To activate a prop, click on the prop thumbnail. You can clear individual props by
clicking on the prop’s name in the toolbar. If you want to clear all of the props at once,
add the Clear Props button to the toolbar and use that. The Clear Props button is not
included in the default toolbar.
If you want to change the Props module to a floating window, click on the icon in the
top-right corner. To return it to a docked position, click on the same corner again.
The first button in the lower-left corner is the Edit button. Clicking on this will open the
Props Editor where you can create as many props as you need. The second button
allows you to set transitions for the Props. The slider in the lower-right corner changes
the size of the thumbnails.
© 2005-2015 Renewed Vision, Inc.
Page 93 of 141
ProPresenter 6 User Manual
Clocks
To access the clocks module, customize the toolbar to add the Clocks icon, select it
from the View menu, or use Control-C on your keyboard.
The clocks module serves two purposes. The primary purpose is controlling clocks that
are seen only on the stage display. The second is controlling countdown clocks that
can be shown on the stage display, in a Message, or both.
This section will cover the basics of how this module works, and using clocks and
countdowns on the stage display and in messages will be covered later in this user
guide.
Current Time Format allows you to choose the way you want to display the system
clock in ProPresenter.
You can then add an unlimited number of countdown clocks by pressing the plus
button at the bottom right of the Clocks window. Each of these clocks can be set to
Count Down Timer, Count Down to Time or Elapsed Timer.
A count down timer is a standard countdown clock that runs for a given amount of
time.
The count down to time timer allows you to indicate a specific time of day of
countdown to.
The elapsed timer allows you to count up from a specific time, keeping track of the
total time.
If you change the time, click the reset button to the left of the clock to update the time.
Clicking Stop will end the clock. Over Run allows a clock to continue running past zero.
The buttons at the bottom will start, reset, or stop all of the clocks simultaneously.
© 2005-2015 Renewed Vision, Inc.
Page 94 of 141
ProPresenter 6 User Manual
If you want to change the Clock module to a floating window, click on the icon in the top
right corner. To return it to a docked position, click on the same corner again.
© 2005-2015 Renewed Vision, Inc.
Page 95 of 141
ProPresenter 6 User Manual
Messages
ProPresenter allows multiple messages to be formatted and ready to go on-demand
and even display multiple messages on the same screen simultaneously with different
formatting for each message. To open the Messages module, click on the Messages
icon in the toolbar.
There are two views available for the Messages module. The initial, collapsed, view
allows you to easily change the content of a message or a countdown clock. You can
choose various messages from the drop-down menu.
If you want to change the Messages module to a floating window, click on the icon in
the top right corner. To return it to a docked position, click on the same corner again.
When you open the Messages module, you can click on the drop-down menu to select
from any message that has already been created. If you need to add a new message,
click on the plus button. To edit a message, click the edit button to the right of the new
message button.
Messages work using a combination of predefined text and token text. Tokens create
content dynamically depending on your needs. There are some included tokens or you
can add any custom token that you need. As you can see in the image to the above,
the selected message just has one text field called “Message”.
The image to the left shows a message
that can be used to ask parents to come
to the nursery. Along with the predefined
text, there is also a token in use. Using
tokens makes it easy to create messages
that need to be updated regularly.
Instead of having to type this entire
message every time it’s need, the person
running ProPresenter would only need to
enter the child number and the room
number. These two numbers will be
formatted properly and inserted into the
rest of the message.
The bottom row of buttons control
showing and hiding a message ,as well
as the transition that is used when displaying a message.
The second function that the Messages module serves is to create on-screen
countdowns for your audience. If you don’t want to buy a countdown video for an event,
ProPresenter makes it easy to format a countdown clock that can be used over any of
your own content.
© 2005-2015 Renewed Vision, Inc.
Page 96 of 141
ProPresenter 6 User Manual
As with regular messages, countdowns can contain text and a countdown. The two
images below show a countdown message and the resulting output. If you don’t want
the clock to show extra zeros at the front as time runs down, check the Strip Leading
Zeros option.
In ProPresenter 6, it is now possible to input data to tokens through an HTML page
accessed through the local network. To do this, first check “Enable Network” in
ProPresenter Preferences > Network. Next, check the “Visible on network” checkbox
next to the Message name in the Messages window.
The HTML page can be accessed by clicking the small computer icon on the right side
of the messages window. The address of this page can be shared with nursery workers
or anyone who may need to provide remote input of tokens.
When a message is entered remotely, a notification will appear on the ProPresenter
operator’s screen. Clicking this notification will immediately display the notification on
the screen.
© 2005-2015 Renewed Vision, Inc.
Page 97 of 141
ProPresenter 6 User Manual
Mask Layer
The purpose of a Mask is to allow you to physically change the output of ProPresenter
that is shown on your displays or screens. With a Mask you can quickly change the
output to be virtually any shape you want. Masks are also perpetual items in
ProPresenter; when you enable a Mask, until you clear it, the mask will be visible. Masks
are displayed when ProPresenter opens if a mask was enabled when the program was
closed.
Before using the Mask module you will need to customize your toolbar and add the
Mask icon. You can also open the Mask module from the View menu or by pressing
Control-Shift-M.
Only one mask can be active at any time. Masks also have their own transition time, but
do not have transition effects. To enable a mask, click on the thumbnail. To clear it, you
must return to this module and click the Clear Mask button or select the Clear Mask
option from the Actions menu. There is no shortcut button or key combination to clear
a mask.
If you need to create more advanced masks, you can use Photoshop or other editors
and import images with transparencies. The Oval screen mask was made in Photoshop
and the other two were made in ProPresenter using rectangles.
Creating a mask may take a lot of work depending on your environment and needs, so
be prepared to spend more than just a few minutes creating it.
© 2005-2015 Renewed Vision, Inc.
Page 98 of 141
ProPresenter 6 User Manual
Audio Bin
The audio bin allows you to control audio playlists directly from inside the program
without having to rely on an outside application to play music or sound effects.
To open the Audio Bin, click on the Audio icon in the toolbar, select Audio Bin from the
View menu, or press Control-A.
There are four components of the Audio Bin. At the top are playback controls. Any
audio file played from the Audio Bin or added directly to a slide are controlled from
here.
The top part of the Audio Bin lists the folders and playlists used to organize audio files.
All audio files added to the bin are listed under Library, but can then be sorted into
individual playlists. To add a folder or playlist, click on the action menu button.
The lower section lists all the songs or sound effects in the selected playlist. Clicking on
the name of a file will trigger the audio to start playing. You can change the columns
shown by right-clicking on one of the headers (Title, Artist, Duration) and unchecking
the options you don’t want.
A search box allows you to quickly locate any item in the Audio Bin.
Clicking the plus button at the bottom of the Audio Bin will open a Finder window for
you to select the tracks you want to import. You can also drag files directly from the
Finder into the Audio Bin.
You can also specify that audio from the bin or a selected playlist can be shuffled by
clicking the Shuffle button at the bottom right corner.
There are two audio types that can be imported into the Audio Bin.
Audio Tracks are full-length songs. Only one audio track can be played at a time. If
you have a song in the Audio Bin, you can drag it directly to a slide or to the timeline to
link it with a specific presentation.
Sound Effects: These are short audio files that do not require full audio control. Multiple
sound effects can be played simultaneously. These files can only be stopped with the
Clear Audio or Clear All command.
The type of audio file is selected by default based on audio length. Longer files are
Audio Tracks and shorter files are Sound Effects. Right-click on the file to bring up a
contextual menu to change the audio files type.
If you want to change the playback behavior, you have three options: Loop, Go to Next,
and Stop. To change the behavior, right-click on the file and select the Behavior menu.
Either audio type can be dragged onto a slide to create an Audio Cue in the same
manner as media cues. When a slide with an audio-cue clip is clicked, it will
© 2005-2015 Renewed Vision, Inc.
Page 99 of 141
ProPresenter 6 User Manual
automatically play the audio clip. These clips are controlled by the playback controls in
the Audio Bin.
© 2005-2015 Renewed Vision, Inc.
Page 100 of 141
ProPresenter 6 User Manual
Timeline
ProPresenter 6 makes it easy to sequence slides in a timeline with or without an audio
track. This makes it easy for you to create presentations with custom timings between
slides or to record the slides to match a song. The ability to sequence slides with music
is especially useful for worship leaders who don’t have a band or someone to run lyrics
for them since the song and lyrics can be started with a single click.
To begin this process, open the Timeline by clicking Timeline in the View menu.
There are three ways to add slides to a timeline. The first is to drag the thumbnails from
the presentation to the timeline. The second is by clicking on the Slide Show button in
the lower-right corner of the timeline and selecting a preset value. This will space all of
the slides out at the same interval. The third way is to record the timeline.
Audio files can be added to the timeline by clicking the Audio Track button, dragging a
file from the Audio Bin, or dragging a file from the Finder to the timeline. After you have
added an audio track, you’ll see a solid green bar with the song name added and the
duration value in the upper right corner will show the total length in seconds. To remove
an audio file, click on Audio Track and select Remove Current Track.
Click on the Record button to ready the timeline for recording, then press the play
button when you are ready. If you have added an audio file, the audio will begin
playing. To record slides to a timeline, click on the slides like you normally would when
going through a presentation.
The timeline has a hidden feature that isn’t available anywhere else in the program. If
you trigger the same slide multiple times, each word will highlight in yellow during
playback, creating a karaoke or sing-along effect with the words. If you have a slide
with five words, click once for each word when that word is sung before moving to the
next slide.
If you find that the audio track is playing too fast for you to accurately record the slides,
you can manually move the slide cues when you’re done, or you’re can slow down the
song with the Rate slider. This will cause the song to play slower so that you can have
more time to anticipate slides.
When you have finished recording a presentation, click the record and playback to stop
the recording. If you need a timeline to loop, click on the loop button to the left of the
Duration time box. Entering a value in Offset will move all of the slide cues by a given
amount. Duration can only be changed if there is no audio file attached to a timeline.
Clicking the info button in the upper right corner of a cue will let you change the cue
label and see any sub-cues that were recorded as part of the cue. The Seconds slider
changes the time scale of the timeline so you can see more or fewer slides at once.
© 2005-2015 Renewed Vision, Inc.
Page 101 of 141
ProPresenter 6 User Manual
Using DVDs
DVD images used with permission from New Tribes Mission. www.NTM.org/reach.
ProPresenter makes it easy to use a DVD during your presentation by allowing you to
select specific clips for playback from a DVD. It is also possible to rip a DVD so that the
clip needed is stored on the computer instead having to rely on a DVD working properly
or having to use third-party programs to rip DVD clips.
There are two ways to use DVD content in ProPresenter. The first way is to create clips
from the DVD. When you create a clip, you aren’t saving the DVD content to your
computer, you’re simply creating reference points to the DVD. The DVD must be in the
computer in order for a clip to be played.
To create a DVD clip, click on the DVD icon in the toolbar to open up the DVD player.
You can also open the DVD player by selecting it from the View menu. This will open the
window shown below.
Play the DVD as normal using the standard DVD controls at the bottom of this interface.
To create a DVD clip, click the Set buttons on the bottom right of the interface to set the
start and end points of the DVD clip. If you need to reset either the start or end point,
click Clear and reset the points. Next, choose a name for your clip and press the Save
button.
© 2005-2015 Renewed Vision, Inc.
Page 102 of 141
ProPresenter 6 User Manual
Saved clips are shown in the column on the right. You can view clips for the mounted
disc only or click on the Show All DVD Clips checkbox to show all DVD clips that have
been created in the application. Selecting a clip will load it in the DVD interface. Once
you have saved a clip, you can click and drag it into a playlist or a presentation and it
will be shown like other media.
Once you have saved a DVD clip, you can play it by clicking on the thumbnail in the
column on the right or after you’ve added it to a playlist or presentation. If you want to
show an entire DVD and would rather just cue it in the DVD player and not make a clip,
click on the Full Screen button next to the Eject button.
The DVD must be in the computer for a clip to be used. Saving a clip only creates a
bookmark for the clip on the disc. However, if you would rather not rely on the DVD to
be in the computer, you can actually rip DVD clips with ProPresenter 6.
Preparing to rip a DVD clip is the same as saving a clip. Set the in and out points and
name the clip, but instead of clicking on Save, click on Rip. You will see a progress bar
while the clip is being ripped.
Note: You will need to install the HandBrakeCLI. This can be installed on the DVD Preferences panel within ProPresenter’s Preference menu. We also recommend installing VLC to expand the types of DVDs you can rip content from. When a DVD clip is ripped, the entire chapter that contains the In and Out point will be
ripped. As you can see in the illustration below, the orange segment represents the part
of the DVD that is selected to be shown. The In point is in Chapter 1 and the Out point
is in Chapter 2. Both of these chapters will be ripped in their entirety, but ProPresenter
will automatically set the In and Out points on the final clip to the correct spot. The DVD
clip will be placed in your Foregrounds bin in the Video/Image Bin. If you need to adjust
the in or out point, you can do that within the range of the video that was ripped.
Note: If you are using an SDI card to send your output signal from ProPresenter you will not be able to use this feature. DVD playback isn’t rendered the same way as other content in ProPresenter, and can’t be shown via SDI.
© 2005-2015 Renewed Vision, Inc.
Page 103 of 141
ProPresenter 6 User Manual
Displaying Web Pages
ProPresenter 6 allows you to easily share a live web page with your audience. The
software provides a web browser within the interface that is mirrored to the output
display without all the extra interface pieces such as address bars, bookmarks, and
other distracting elements, so the focus remains on the content of the page itself.
You will need to add the Web browser icon to your toolbar, select it from the view menu,
or press Control-W to access the web browser.
Click on the Show button in the top right corner of the browser to immediately display
the webpage for the audience to see. You can then interact with the website within the
browser on your computer and your audience will be able to see what you’re doing.
The toolbar also contains basic browser functions: Back, Forward, Refresh and Go. The
globe allows you to create a bookmark cue in a playlist by dragging the icon to a
playlist. The square button on the far right allows you to switch the browser window
between a docked screen or a floating window.
To display full-screen Youtube videos, you will need to disable the Display at Top Most
Window Layer setting in Preferences as was covered earlier in this manual.
Note: If you are using an SDI card to send your output signal from ProPresenter you will not be able to use this feature. Web pages aren’t rendered the same way as other content in ProPresenter, and can’t be shown via SDI.
© 2005-2015 Renewed Vision, Inc.
Page 104 of 141
ProPresenter 6 User Manual
Stage Display
This feature requires an additional video output from your computer. Most users will
need a USB display adapter like the one available for sale in our store. If you have a
newer Mac, you may have two Thunderbolt ports which can be used for your primary
output and your stage display out.
To enable the Stage Display output, open Preferences and select the Display tab. If all
three of your displays are active, you will see three boxes on the Display preferences
screen. Check the box next to Enable Stage Display. This will activate the Stage
Display output.
At this point, a purple box labeled SD will show on display preferences. This box may
become active on the wrong screen when you enable the stage display. If this happens,
click on the stage display box and drag it to the correct box representing your stage
display.
Pressing Command-3 will switch ProPresenter’s preview window to show a preview of
the Stage Display instead of the normal ProPresenter output.
Pressing Command-4 will quickly open the Stage Display Configuration Window.
© 2005-2015 Renewed Vision, Inc.
Page 105 of 141
ProPresenter 6 User Manual
There are two ways to access the configuration for stage
display. The first is by clicking on the Configure Stage
Display button on the Display preferences screen. The
second is by selecting the Window menu and choosing
Configure Stage Display. Both methods open the same
configuration display that is shown to the left.
At the top of the Stage Display Options window is a
listing of all the available stage display layouts that you
have created. To add or remove layouts, click on the plus
and minus buttons on the right and name your new
layout. You can create as many layouts as you need.
Anyone who is using an iOS device with the stage
display app can select from any available layout. Only
one layout at a time can be used with a wired stage
display.
For the Current Slide, you can select to show “text only”,
“static slide” or “live slide”.
Text Only will show just a text version of the slide.
Static Slide will show a thumbnail of all images and other
objects on the slide.
Live Slide will show the slide exactly as it appears on the output display, including
video.
Slides notes are added in the Editor on the Slide Properties tab. If no notes are entered,
nothing will be shown in the Slide Notes boxes.
When you enable the stage display option to show chord charts, a new box will be
added to the layout. You can move and resize the box to fit your needs. Chord charts
are only shown for the presentation they are associated with. When you change to a
presentation without a chord chart, the box will be empty. Adding chord charts to
presentations is covered earlier in this user guide.
The clock and countdown settings for stage display are linked to the Clocks module in
ProPresenter. You can start any clock from the Clocks module, or if you have a
© 2005-2015 Renewed Vision, Inc.
Page 106 of 141
ProPresenter 6 User Manual
Countdown Message that uses a clock that is enabled on the stage display, it will start
with that clock as well.
Clocks on the stage display are useful for showing how much time is left before an
event starts and for showing a speaker how much time he has left. If you would like to
change the color of each clock or countdown on the stage display, you can do that from
here.
Video Countdown shows the time remaining on the currently playing video. This feature
is helpful for those on stage to know how much time is left in a video, such as a
countdown video or intro video. When enabled, it runs for Background and Foreground
videos.
Strip Leading Zeroes changes the clock display from 00:05:30 to 5:30. Clocks also
support a function called Over Run, you can now have the clock change colors when it
passes zero if you have Use Negative Color enabled.
The next section of options control how stage display messages are shown. Stage
Display Messages are unique because these are only shown on the stage display. In
ProPresenter 6, you can change the color of the box when it flashes, or you can disable
the flashing effect entirely.
To access this feature, open the View menu and select Stage Display Control, add a
button to your toolbar, or press Control-S. Type your message and click the Send
Message; the Message box on the stage display will show the message and flash if you
have that enabled. Clear will remove the message completely and Hide removes the
message from the stage display, but doesn’t delete the message.
In ProPresenter 6, it is now possible to display the countdown time, current item, and
next item as linked from Planning Center Live.
Note: To use the Planning Center Live feature, you must have a Planning Center Online account and have configured your plan using the Planning Center website.
© 2005-2015 Renewed Vision, Inc.
Page 107 of 141
ProPresenter 6 User Manual
To begin using this feature, be sure that you have linked your PCO account in
ProPresenter Preferences > Services. Next, select a PCO service to link from the Stage
Display Control window. From here, you can advance through elements of your PCO
Live Plan. The items on the ProPresenter Stage Display will also advance if the Planning
Center Live plan is updated from another device.
© 2005-2015 Renewed Vision, Inc.
Page 108 of 141
ProPresenter 6 User Manual
Social Media
ProPresenter 6 includes the ability to search for and display results from Twitter and
Instagram directly through the program. You can search by keywords or hashtags, and
moderate which results are shown on screen.
To open the Social Media module, click on the Social Media button in the toolbar, select
it from the View menu, or press Control-Shift-W.
To begin, login to your Twitter or Instagram accounts.
Then you can begin searching for tweets to show on screen. You can search for a
keyword or by using a hashtag.
There are a few general options for the Social Media module.
Auto Approve Results will approve all results immediately for display. It does not
require manual moderation of what appears on screen.
© 2005-2015 Renewed Vision, Inc.
Page 109 of 141
ProPresenter 6 User Manual
Auto Remove on Show will show an item once and then remove it from the list to be
shown. If this box is not checked, an item will continue to be shown, in rotation with the
others, until it is manually removed.
Save Approved Items allows approved items to persist even if ProPresenter is
restarted.
Highlight Hashtags/Users allows hashtags or usernames to be highlighted in a
different font color from the rest of the text.
There are also a few options for each of the Social Media Services. For Twitter:
Include Historical Search allows older results to be searched and used. If you have
authorized ProPresenter to access your Twitter account, the results will be updated in
real-time.
Checking Ignore Retweets will ignore tweets using the new retweet styling as well as
messages that start with “RT”.
Checking Ignore Links will ignore tweets that contain a URL.
For Instagram:
Checking Refresh Search Automatically will update the search results at a specified
time so you continue to see the most recent results.
Once you have search results available you can remove results, ignore them, or
approve them. Clicking the X will remove a results if it isn’t relevant or you don’t want to
see it, and clicking the check will approve the content. Approved content is moved to
the column on the right and go into the display rotation.
As with slides and media, you can also set a transition for your approved content. Click
the transition menu in the top-right corner and pick from any of the available transitions;
these work just like slide transitions.
Once you have approved content, you can set the Slide Duration to be up to 60
seconds long before the next item is shown. If you need to clear the list of approved
tweets, click the Clear Approved button.
The formatting of individual content is handled by templates. Several templates are
included with ProPresenter 6. Individual templates can be set for Twitter and Instagram
content, and the correct template will be used when displaying the relevant content.
© 2005-2015 Renewed Vision, Inc.
Page 110 of 141
ProPresenter 6 User Manual
Telestrator
ProPresenter 6 introduces an exciting new feature, the Telestrator.
This handy new feature allows you to draw on top of your live output in real time using
any of 4 "tools". Using the pen tool, you can sketch any freehand drawing or you can
use the circle tool to make quick, perfect circles. The spot tool draws focus to a
particular part of the screen inside of a circle, and the laser tool functions like a laser
pointer, allowing you to virtually "point" to anything on the screen.
The tools, their size, and their color, can be quickly selected from the menu bar at the
top of the Telestrator.
With the Telestrator app for iPad, you can allow anyone to draw on the screen remotely,
too. Connecting wirelessly, you can see the live output from ProPresenter and draw in
real time.
© 2005-2015 Renewed Vision, Inc.
Page 111 of 141
ProPresenter 6 User Manual
Record Output
ProPresenter 6 now allows you to record everything shown on ProPresenter’s Output
Window directly to a file. The filename should be specified in the target box.
You can select between four codec options: ProRes 422 LT, ProRes 422, ProRes HQ,
and ProRes Proxy.
There is also an option to select the size of the recording. There are a few common
video sizes listed, but you can also specify that the recording should match the size of
your ProPresenter output.
Lastly, you can select whether to record 30 or 60 frames per second.
Pressing the record button in the bottom right will begin recording. When you are ready
to stop recording, press stop and a file will be created at the specified target.
© 2005-2015 Renewed Vision, Inc.
Page 112 of 141
ProPresenter 6 User Manual
Cues/Cue Palette
In ProPresenter 6, almost everything action can be added as a cue on a slide. The Cue
Palette makes it easy to see these cues in one place, and it can be opened by right
clicking on any slide and selecting Add Cue > Communication Cue > Cue Palette.
Clear Cues allow a slide to clear a different slide layer. These function the same way as
clicking one of the Clear buttons at the top left side of the toolbar.
Media Cues allow you to quickly add a Video, Image, Audio or Live Video cue to a
slide.
Stage Display cues allow you to change to a pre-defined layout on the Stage Display.
For example, at the beginning of a song, you could select the “Song” layout, but at the
beginning of a teaching, you could select the “Teaching” layout.
MultiScreen cues allow you to change to a pre-defined MultiScreen layout.
Timer cues allow a slide to perform a specific action for any timer. The options are Start
Timer, Stop Timer, Reset Timer, and Reset and Start Timer
Communication module cues can be added by right clicking on a slide and selecting
Add Cue > Communication Cue.
© 2005-2015 Renewed Vision, Inc.
Page 113 of 141
ProPresenter 6 User Manual
Localization
ProPresenter 6 has the ability to be localized into other languages. As of the release,
only Spanish and Korean will be included, but other languages will be added over time.
Instead of localizing the application directly, we have included language packs in the
program that are changed based on your system language settings. If you choose a
language other than Spanish or Korean, ProPresenter will use English as the default
language.
© 2005-2015 Renewed Vision, Inc.
Page 114 of 141
ProPresenter 6 User Manual
Modules
Each of the features covered in this section of the user guide require an additional
purchase of an unlock code, and in some case, additional hardware is required. For
information about pricing, please visit our website.
Unlike a ProPresenter license, modules are licensed per computer and do not have a
site license option. If you require the same module on multiple computers, you will need
to purchase multiple copies of the module.
Modules are linked directly to a computer by a system ID Code and cannot be
transferred as needed. Modules can be transferred by our customer service
department in the event of hardware upgrades or hardware failure.
© 2005-2015 Renewed Vision, Inc.
Page 115 of 141
ProPresenter 6 User Manual
Demo Modules and Registering Modules
ProPresenter makes it easy to demo module. To access these options, open
ProPresenter Preferences and click on the Modules tab. You will see the interface
shown below.
If you have purchased modules in a previous version of ProPresenter on this same
computer, they will have been automatically upgraded to ProPresenter 6 and will show
has already being purchased.
To demo the modules, click the Demo Module button at the bottom of the menu. This
will activate all of the modules in Preferences. When you activate a demo module, a
watermark will be applied to your output screen. Modules are also only active for the
current session of ProPresenter. When you close and re-launch the program, you will
need to active the demo modules again. Demo modules are intended for determining if
they will fit your needs and are not intended to be used in a live event. No temporary
trial codes for modules will be available.
If you want to purchase a module, click on the blue Buy button. This will open the inapp store where you can purchase the module. Modules purchased this way will
automatically be registered and activated on the same computer.
If you have purchased a module, enter the 25-digit code and then click the plus button
to activate it. When you purchase a module, you will be sent an activation code. You will
need to follow the instructions in the receipt to activate that number for the unlock code.
You will also need the ID Code shown on the Modules tab in order to link the code to
the right computer.
© 2005-2015 Renewed Vision, Inc.
Page 116 of 141
ProPresenter 6 User Manual
Alpha Key Module
The Alpha Key Module has two functions: (1) Blend ProPresenter’s content over
incoming video and then send that combined content back to a switcher or projector;
(2) Generate a key and fill signal that is then sent to a broadcast-quality switcher that is
able to accept this type of signal.
When using method one, the actual compositing of the incoming video signal and the
content in ProPresenter (text or lower-third graphics normally) is done on the video card
itself and then sent back out to a switcher or projector. Choose this method by selecting
Internal from the drop-down menu.
The second method sends what are referred to as a “key and fill signals” to your
switcher allowing you to have a broadcast-quality signal. Choose this method by
selecting External from the drop-down menu.
These are the settings that you should set on the HD-SDI tab in Preferences.
• Check the box for Enable Output Device and choose the "Blackmagic Video Output".
• For the Mode setting, choose the appropriate setting whether it be standard definition
(NTSC) or High Definition (720p, 1080p).
• The Compression setting should be left blank.
Finally, you will need to specify what kind of keying you wish to do under the "Alpha Key
Settings" section:
• Disabled: This will output a full video out signal to your program and preview ports
on the Decklink card
• Internal Key: If you are using the Alpha Keyer as a downstream key, with a video
input coming into the Decklink card and one going out of it, then this is an Internal
Key (be aware that audio is passed through the Decklink card when using this mode
-- you cannot use the Decklink audio outputs for sound out of ProPresenter when this
mode is active).
• External Key: If you are sending separate key and fill outputs to your broadcast
video switcher, this is the option you will choose. It sends the key signal through the
preview out of the Decklink card and the fill out of the program output.
Set the Blend to specify the maximum opacity of the video overlays.
NOTE: In order to get full HD output you must have a video display device aLached to the computer that is at least the resolu6on of the HD output. The reason is that everything is rendered in the graphics card before output and we are unable to render out video textures at resolu6ons higher than the display devices the computer is connected to.
For example, if you're trying to render out at 1920x1080 content to your output display, your primary display must also have at least this resolu6on, if not higher. In addition to configuring the Alpha Key settings on the Advanced tab, you will also
need to ensure a few settings are correct on the Display tab.
© 2005-2015 Renewed Vision, Inc.
Page 117 of 141
ProPresenter 6 User Manual
In Preferences, click the Display tab and ensure that the Display at Top Most Window
Layer is not checked. You also need to manually enter the output resolution for your SDI
signal. If your output doesn’t look correct, verify that the Output Screen resolution is set
for your SDI signal and not the connected DVI or VGA display.
If you are still having trouble with the signal, open the Blackmagic preference panel in
System Preferences and make sure that Remove field jitter when video is paused is
not checked and that When not playing video, send is set to Black. Both of these
options are on the bottom of the Setting tab in the Blackmagic preferences panel.
Edge Blending Module
The Edge Blending module makes it easy and affordable to use edge blending in your
environment. Edge blending consists of two or three overlapping projected images that
have the overlapping regions adjusted to create a seamless blend. Because the
outputs of each projector have to overlap in order for blending to occur, the actual width
of your output will be smaller than the output resolution.
Before you make your adjustments to the Edge Blending Module, you will need to
configure a Matrox DualHead2Go or TripleHead2Go, as well as your computer and
ProPresenter, for the proper resolution. Refer to the Matrox Configuration section later
in this user guide for details on setting up a Matrox DualHead2Go or TripleHead2Go.
Once you have properly configured your computer and ProPresenter to work with
double-wide or triple-wide media, you can configure the Blend module. To start, check
both the Enable Data and Enable Blending boxes. Select the number of projectors
(two or three) that you are going to be using. To get started, you can enter the number
of screens as your Screen Size, however, entering the final screen width in inches will
give you a more precise blend. The Blend Area and Total Blend need to be positive
values, so if they aren’t, double-check the screen resolution settings.
The lower section is used to adjust your blend areas. The black-and-white box is
actually the representation of the curve being used to apply the blending adjustments.
The three options--Linear, Cubic, and Quadratic--will result in slightly different blends.
Test each option to see which works best for you since this varies depending on
projectors and environmental factors.
The four sliders allow you to adjust the values of the blend. You will need to spend some
time working with these to get the best blend you can. It’s recommended that you start
with the first two sliders, Blend and Intensity, at 100% to help you establish a good
baseline for adjusting your blend. Gamma adjusts the brightness of the non-blended
are compared to the blended regions. If you find that your blended areas are brighter
than the rest of your screen, you will want to adjust this settings. Black Level adjusts the
video black brightness. Since a projector doesn’t display black, the brightness between
the blended area and the rest of the screen may vary slightly.
You will want to use the blend grid to help you align your projectors and get them as
perfectly aligned as possible before adjusting the blend settings. Getting the alignment
© 2005-2015 Renewed Vision, Inc.
Page 118 of 141
ProPresenter 6 User Manual
perfect is critical to being able to achieve the best edge blend possible. If your
projectors are slightly out of alignment, your blended area may be visible.
Due to the wide range of projects and their quality, achieving a “perfect” edge blend is
quite difficult, even for the most skilled person. Due to many factors, such as quality of
the projectors, age of the lamps in the projectors, number of hours each projector has
been used, and even the brand of the lamps in the projector, you may still see a slightly
visible area where the images overlap. This occurs with any edge blending solution.
If you aren’t familiar with edge blending, you may want to watch the tutorial on our
website first.
© 2005-2015 Renewed Vision, Inc.
Page 119 of 141
ProPresenter 6 User Manual
Master Control Module
The Master Control Module allows one Master ProPresenter station to remotely trigger
slides and Video/Image Bin contents of one or more networked ProPresenter Slave
stations. Each Slave station can have its own content suitable for its output, so it can be
the same or different material than the Master station.
The ProPresenter stations must first be networked together. To ensure that all signals
are properly sent to the Slave stations we recommend using a wired network, though a
wireless network will work.
First, on each of your Slave stations, select Slave from the pulldown menu in the Master
Control section. The Name will be filled in with your computer’s name and the Port will
be filled in with a randomly generated port.
On your Master station, select Master from the pulldown menu in the Master Control
section. You will now see a list of any Slave stations that are found on the network.
Click the Connect button for each of the Slave stations. Optionally, you can also check
the Reconnect checkbox which means that this station will always automatically
connect when it becomes available.
From this point, when you click on a slide on the Master station, the corresponding slide
will be displayed on the Slave station. For example, if you click on the first slide in the
first playlist document on the Master station, the first slide in the first playlist will be
displayed on the Slave station.
Similarly, when you click on an item in the Video/Image Bin on the Master station, the
corresponding item will be displayed on the Slave station.
For more advanced configuration, you can change the Name or Port of the Slave
station by switching the Master Control pulldown menu to Off, making the necessary
changes, and then switching back to Slave.
ProPresenter 6 will include the Slave functionality for free, but the Master Control
Module will be an additional add-on purchase. Pricing is available on our website.
© 2005-2015 Renewed Vision, Inc.
Page 120 of 141
ProPresenter 6 User Manual
Multi-Screen Module
The Multi-Screen module allows you to extend your projection from one screen, to two
or three screens.
Note: Refer to the Matrox Configuration section later in this user guide for details on
setting up a Matrox DualHead2Go or TripleHead2Go. This section will assume that
your computer and hardware have been properly configured.
Once you have enabled the Multi-Screen module, you can select either DualHead2Go
or TripleHead2Go from the drop-down menu. The configuration is identical within in
ProPresenter, but for this purpose, the settings are shown for TripleHead2Go.
The Multi-Screen Module allows you to use one default configuration, or to create
multiple layout cues that can change the layout on demand. To create a new layout,
click on the plus button and name the new layout. Use the minus button to remove a
layout. These layouts can be used by right-clicking on slide thumbnails and selecting
the cue from the “Add Multi-Screen Setting Cue”.
The options in the lower half of this preference menu allow you to designate which
elements are shown on which screen. There are two additional new features here. The
first is that you can use different templates for individual screens. If you want to have
large text on one screen, but want to use lower-third text on the other two screens,
simply create templates and then select them on the correct screen. Live Video also
has its own settings now. So instead of your live video input following the Video/Image
settings, it can now be shown on specific screens.
Note: If you have certain elements in a template and they don’t exist in the Alt.
Template (e.g., Text Reveal settings), those won’t be used. So if the certain screen is
doing a text reveal, but the Alt Template on the side screens doesn’t have a text box
with the same Text Reveal setting enabled, the full text will be shown immediately.
Once you have create the layouts that you want to use, you’re ready to go. If you create
multiple layouts, the one that is selected will be the one that is used by default. If you
want to change to a different layout on cue, right-click on a slide and select the
appropriate layout from the multiscreen cue menu.
Selecting Tile next to video with extend the same video or graphic all the way across
your attached displays. Leaving this box unchecked will cause your video or graphic to
be shown on each of the three screens.
DVD clips can only be shown on one screen. Due to how DVDs are played we aren’t
able to provide any additional control over the positioning of DVD playback.
Web pages will be shown stretched across all three screens.
A TH2G can also function as a DH2G, you just have to change the settings in the GXM
Control Panel and the MultiScreen panel.
© 2005-2015 Renewed Vision, Inc.
Page 121 of 141
ProPresenter 6 User Manual
The MultiScreen module doesn’t affect the Stage Display and both can be used
simultaneously.
Masks can be used with a MultiScreen set up, but you will need to create a custom
sized Mask layer sized to your output resolution. To do this, open the Mask module,
click on the Document Properties tab, and enter a custom size for the resolution.
© 2005-2015 Renewed Vision, Inc.
Page 122 of 141
ProPresenter 6 User Manual
SDI Output Module
The SDI Output module allows you to send true high-definition video to your video
system. When you enable this module, additional settings will be enabled on the
Advanced tab in Preferences.
Check the box for Enable Output Device and then choose the appropriate device and
mode that is required for your video system. This module is designed to work with
Blackmagic video cards. Other SDI cards may work, but they are not supported.
In Preferences, click the Display tab and ensure that the Display at Top Most Window
Layer is not checked. You also need to manually enter the output resolution for your SDI
signal. If your output doesn’t look correct, verify that the Output Screen resolution is set
for your SDI signal and not the connected DVI or VGA display.
If you are still having trouble with the signal, open the Blackmagic preference panel in
System Preferences and make sure that Remove field jitter when video is paused is
not checked and that When not playing video, send is set to Black. Both of these
options are on the bottom of the Setting tab in the Blackmagic preferences panel.
© 2005-2015 Renewed Vision, Inc.
Page 123 of 141
ProPresenter 6 User Manual
Communication Module
The Communication Module provides connectivity to external devices via network or
serial communications according to what the protocol supports. The Communication
Module consists of a number of different protocols which can be organized into three
groups. This module supports the following: AMP, VDCP, Sony BVW, GVG100, Sony
BVS, GlobalCache, RossTalk, DMX, and MIDI.
Purchasing the Communication Module gives you access to any of these protocols. You
can also choose to purchase MIDI as its own module. After you have purchased the
Communication Module you will see the new Communication tab in Preferences.
Note: A working knowledge of the protocol you need to use is strongly recommended
as each protocol has various options available and they are not covered in great
detail in this guide. Due to the variety of configurations for these protocols, we can’t
offer much support. Protocol specifics should be available in product manuals or from
hardware manufacturers.
Playback Deck/Media Server Control Protocols
These protocols include AMP, VDCP, and Sony BVW. AMP and VDCP are media
server protocols that have more capabilities than Sony BVW such as triggering clips by
name. BVW can only control the playback of an already triggered clip.
Switcher Control Protocols
These protocols include GVG100, Sony BVS, and RossTalk. These protocols can
control a switcher, allowing you to remotely enable and disable keys or fade to black.
Sony BVS is preferred over GVG100 when available since it has greater capabilities.
RossTalk is a proprietary protocol supported by some Ross switchers. RossTalk is the
preferred choice for a compatible Ross switcher because it uses network
communication rather than serial. RossTalk is supported as 2 modes, Device and
Controller. In Controller mode, ProPresenter can send commands to a connected Ross
switcher. In Device mode, RossTalk provides some control of ProPresenter from a
compatible Ross switcher. For Device mode, the Ross switcher is setup to connect to
ProPresenter as if it were an Expression CG machine. Once connected, Up/Down on
the switcher will advance through the items of the selected playlist, and next will trigger
slides or videos just like pressing the spacebar/right arrow key on the ProPresenter
machine. Note that if you want to use both Controller and Device modes for RossTalk,
you must configure 2 RossTalk devices, one for each mode as these modes require two
different network connections.
You can also clear the output using the Clear Layer command where the layers
correspond to the different ProPresenter clear commands as follows:
Layer 0
Clear All
Layer 1
Clear Live Video
Layer 2
Clear Background
Layer 3
Clear Slide
Layer 4
Clear Props
© 2005-2015 Renewed Vision, Inc.
Page 124 of 141
ProPresenter 6 User Manual
To add any of the available protocols to ProPresenter, click on the Add Device button in
the lower right corner and select the protocol from the list. Each protocol has unique
configuration settings. We have set each protocol to use the standard configuration as
specified by each manufacturer. If your configuration requires different settings you will
need to refer to the documentation for the device you are connecting to with
ProPresenter. The screenshot below shows GVG100 as an example.
After you have added a protocol, you will see a box that shows you the active protocols.
You can connect or disconnect any protocol, or remove it, from here. If you need to
change the settings for a protocol, click on the gear icon to open the settings menu.
Click on MIDI Setup or DMX Setup to modify these protocols.
The following screenshot shows several of the protocols listed at the same time.
ProPresenter is capable of supporting more than one protocol at the same time, within
© 2005-2015 Renewed Vision, Inc.
Page 125 of 141
ProPresenter 6 User Manual
reason. Some protocol combinations don't make sense to run at the same time, like
AMP and VDCP, but some do like AMP and RossTalk.
DMX and MIDI Protocols
Both of these protocols allow the user to define the DMX channels or MIDI notes that
are mapped to the various controls for ProPresenter. DMX is fixed to a sequence of
contiguous channels just like a lighting fixture, whereas MIDI allows you to map any
note to a given MIDI controllable ProPresenter command. These settings are defined in
the Communication preference pane in ProPresenter under the DMX and MIDI buttons.
The DMX configuration allows you to define the starting channel and displays how the
other channels are mapped. DMX supports ArtNet over a network only. USB-DMX
interfaces are not supported. The screenshots below show a standard DMX setup.
These values are entered by clicking on the DMX Setup button in the Communication
Module. The image below is a scrolling window, not two separate windows.
MIDI is covered extensively in the next section.
In the Communication preference pane you can setup devices which persist in
ProPresenter until you remove them. They may optionally automatically reconnect when
ProPresenter is relaunched. From this preference pane you can also configure the DMX
and MIDI options. In addition, there's a checkbox for whether to allow filenames longer
than eight characters for VDCP and AMP.
© 2005-2015 Renewed Vision, Inc.
Page 126 of 141
ProPresenter 6 User Manual
VDCP and AMP require a Video/Image Bin playlist to be designated as the Comm
Module playlist. This is the playlist that is used to select clips with either of these
protocols. You can designate any Video/Image Bin playlist as your Comm Module
playlist by right-clicking on the playlist name. The display name of each video in this
playlist must be unique and will be modified as necessary to make it unique. If the eight
character filename option is checked, the display name will also be trimmed to eight
unique characters as necessary. Consult your video switcher's manual to determine
whether you need to enable the 8 character filename limit. If the switcher doesn't
support variable length filenames, then you'll need to enable that option in ProPresenter.
For a switcher control protocol, an option will appear in the contextual menu of any slide
to add a switcher control cue to that slide. Any time that slide is triggered, the chosen
command is sent to the switcher if it's connected.
Assigning module commands to slides
When you have enabled a protocol that supports sending commands, you will be able
to assign those commands to specific slides. Each protocol supports different cue
options, so the menu that you see will be different. If you only have a single protocol
assigned, you will not have the sub-menu of protocols. GVG100, RossTalk (Controller
mode), and Sony BVS are the only protocols that have slide cues available.
© 2005-2015 Renewed Vision, Inc.
Page 127 of 141
ProPresenter 6 User Manual
Using RS-422 Serial with Communications Module
RS-422 is a serial standard that defines how the serial signal is transmitted
electronically. There are several serial standards including RS-232 and RS-485. Note
that these standards are electrically different and are not compatible even though in
many cases they use the same DB-9 connector. Unfortunately, there are different,
incompatible ways that RS-422 may be wired through a standard DB-9 connector.
There are two common DB-9 pinouts that are used with RS-422 in the context of video
production equipment. Depending on your computer serial interface, you may be
required to create a cable or use adapters to convert from one pinout to another. In
addition, you may have to compensate for a pinout on a serial interface that doesn't
match either of these common pinouts.
Here are the two common pinouts:
Deck Control Slave
DB-9, usually Female
Pin 1 -> Ground
Pin 2 -> Tx Pin 3 -> Rx +
Pin 4 -> Ground
Pin 5 -> Nothing
Pin 6 -> Ground
Pin 7 -> Tx +
Pin 8 -> Rx Pin 9 -> Ground
Deck Control Master
DB-9, usually Male
Pin 1 -> Ground
Pin 2 -> Rx Pin 3 -> Tx +
Pin 4 -> Ground
Pin 5 -> Nothing
Pin 6 -> Ground
Pin 7 -> Rx +
Pin 8 -> Tx Pin 9 -> Ground
These pinouts were originally used on tape based playback decks and have since
been used on media servers and video switchers as well. The Deck Control Master
pinout would typically be found on a controlling device such as an editor or video
switcher. The Deck Control Slave pinout would typically be found on a playback deck
that is to be controlled via serial.
There are two common types of RS-422 computer interfaces you might run into. One is
the serial port on video hardware such as BlackMagic Decklink cards or UltraStudio 4K
devices. There are other similar devices such as those made by AJA which also have
RS-422 ports, however we have discovered that AJA does not properly set their serial
port configuration. In at least some of their devices (namely the ioXT), the serial port is
fixed to a certain baud rate, parity, etc. and cannot be changed, as confirmed by AJA.
Unfortunately, none of the manufacturers we talked to really support the serial port on
their video hardware as a general purpose serial port, they tend to only support it when
used with their own software. However, we found that the serial port on BlackMagic
hardware was very reliable.
The other common RS-422 interface is a simple RS-422/USB adapter. Note that this is
not the same thing as (and not compatible with) an RS-232/USB adapter which is much
more common. RS-422/USB adapters are typically designed for use in computing
environments rather than video production environments, therefore they will typically
have a pinout that differs from the two specified above. In our limited testing, we have
© 2005-2015 Renewed Vision, Inc.
Page 128 of 141
ProPresenter 6 User Manual
had mixed results with RS-422/USB adapters. There are also RS-422/RS-232 converters
which may work in conjunction with a common RS-232/USB adapter. We have not
tested this setup.
Serial ports that are found on video hardware interfaces such as those made by
BlackMagic typically have a Deck Control Master pinout configuration. When using the
VDCP, AMP or Sony BVW protocols to control video playback in ProPresenter, the
computer's serial port needs to be a Deck Control Slave configuration instead. This
requires a custom cable or the use of adapters to switch the transmit and receive pins.
When using GVG100 or Sony BVS editor protocols to control a video switcher, the editor
port on a video switcher typically matches the Deck Control Slave pinout so this works
with a BlackMagic serial port with just a straight through serial cable.
One of the easiest ways to create the necessary DB-9 cable for whatever pinout you
need, is to use two DB9/ethernet adapters connected with a straight thru ethernet
cable. These inexpensive adapters are available from monoprice
http://www.monoprice.com/products/product.asp?p_id=1151
http://www.monoprice.com/products/product.asp?p_id=1152
The adapters come ready to assemble. You insert the colored leads from the ethernet
jack into the appropriate pins of the DB9 connector. Here is a common configuration
used to swap the transmit and receive lines for using a BlackMagic serial port as a
Deck Control Slave with the VDCP, AMP or Sony BVW protocols in ProPresenter:
Adapter 1:
DB9 Pin 1 <-> White
DB9 Pin 2 <-> Blue
DB9 Pin 3 <-> Yellow
DB9 Pin 4 <-> Red
DB9 Pin 5 <-> Nothing
DB9 Pin 6 <-> Green
DB9 Pin 7 <-> Orange
DB9 Pin 8 <-> Black
DB9 Pin 9 <-> Brown
(Colors are the Ethernet
leads.)
Adapter 2:
DB9 Pin 1 <-> White
DB9 Pin 2 <-> Black
DB9 Pin 3 <-> Orange
DB9 Pin 4 <-> Green
DB9 Pin 5 <-> Nothing
DB9 Pin 6 <-> Red
DB9 Pin 7 <-> Yellow
DB9 Pin 8 <-> Blue
DB9 Pin 9 <-> Brown
(Colors are the Ethernet
leads.)
The goal in creating the proper cable is to connect the Receive lines Rx-/Rx+ with the
Transmit lines on the other end Tx-/Tx+, as well as connecting the ground pins. The
polarity of the Rx/Tx connection should match, so Rx- should be connected to Tx- and
Rx+ should be connected to Tx+. This process is the same regardless of what serial
interface you are connecting to. For RS-422/USB adapters or other RS-422 serial ports,
you may need to consult the documentation for your device to get the pinout.
© 2005-2015 Renewed Vision, Inc.
Page 129 of 141
ProPresenter 6 User Manual
MIDI Module
The MIDI Module can be purchased separately or as part of the broader
Communication Module.
The MIDI configuration allows you to auto-fill all the commands from a starting note, or
you can assign any MIDI note to a given command. You must ensure that you don't
assign the same MIDI note to multiple commands since this will result in undefined
behavior. MIDI connections are supported for any CoreMIDI device. Network devices
may be configured via OS X's Audio MIDI Setup utility.
Audio MIDI Setup is found in /Applications/Utilities in the Finder.
After you have opened Audio MIDI Setup, click on the Window menu and select Show
MIDI Window.
Double-click on the Network icon on the MIDI Studio screen.
After you double-click on Network, you will see the MIDI Network Setup panel. This is
where you create your session that will allow your MIDI controller and your Mac to
© 2005-2015 Renewed Vision, Inc.
Page 130 of 141
ProPresenter 6 User Manual
interact. The screen shot below shows the completed configuration; the steps below the
screenshot will guide you through the setup.
To setup your session, click on the plus (+) button under My Sessions. This will create
a default session titled “Session 1”. This name doesn’t matter so you don’t need to
change it. Check the box next to “Session 1”. After a few moments, you will see
available devices in the Directory listing. Select the device and click Connect. Change
the Who may connect to me option to Anyone. Verify that Enabled is selected at the
top of your Session settings. You do not need to make any other changes. Do not select
anything for Live routings or your connection may not work properly.
Now that you have configured Audio MIDI Settings for your Mac, you are ready to setup
ProPresenter’s MIDI controls.
Return to ProPresenter and the Communication Module settings in Preferences. © 2005-2015 Renewed Vision, Inc.
Page 131 of 141
ProPresenter 6 User Manual
Click on the Device menu in the lower-right corner of the module and add a new MIDI
device. Select the correct device that you have setup to be used with your Mac. Click
Save and then Connect after you have finished configuring the rest of the MIDI
settings.
Click on the MIDI Setup button to open the MIDI communication settings. MIDI notes
range from 0 to 127. Entering a number next to Auto Fill and then clicking the button
will fill all of the values beginning with your chosen value. If you want each section to
start at a different, type your starting value in the first box of each list and then click the
Auto Fill using the first value in each Form at the bottom.
MIDI values cannot be shared between commands. For example, you could not assign
All: 48 and Next Playlist: 48 at the same time.
© 2005-2015 Renewed Vision, Inc.
Page 132 of 141
ProPresenter 6 User Manual
ProPresenter 6 also allows any slide to have a MIDI cue attached to it which will
generate a MIDI note when that slide is clicked.
To add a MIDI cue, right click on a slide and select “Add Cue > Communication Cue >
MIDI” and select either MIDI Note On or MIDI Note Off.
For each MIDI cue, you can specify the MIDI Channel, Note and Intensity. When the
slide is displayed, the MIDI note will be sent through the MIDI interface that is
configured in ProPresenter Preferences > Communications.
© 2005-2015 Renewed Vision, Inc.
Page 133 of 141
ProPresenter 6 User Manual
Matrox Configuration
The Edge Blending module and the Multi-Screen module both require a Matrox
DualHead2Go (DH2G) or TripleHead2Go (TH2G). We do not support any other
hardware for these two modules.
We recommend downloading the latest software driver directly from Matrox’s website
rather than installing the one on the CD. You can choose the version you need here.
The following instructions are only for the Digital Edition or DisplayPort Edition DH2G
and TH2G. If your computer has a MiniDisplayPort or ThunderBolt connection, you
must use the DisplayPort Edition.
Select EDID Management from the drop down list.
If you have not connected your Mac to your DH2G or TH2G, you will be guided through
this process first. Once you have connected the hardware, you will see a screen like the
one below.
© 2005-2015 Renewed Vision, Inc.
Page 134 of 141
ProPresenter 6 User Manual
The left side of the screen allows you to choose the display settings you need to use.
Make those selections then click on the right arrow to add the resolution to the Active
Resolutions and Refresh Rates list. If your resolution is already listed, you don’t need
to make any changes. When you are done, click Apply Changes.
Refer to the Configuring your computer for first use section for instructions on
selecting the resolution for your secondary display. You should have a high resolution
that matches what you selected in the Matrox Control Panel. If you selected 3 * 800x600
60 Hz in the Matrox settings, you should have a resolution option of 2400 x 600 60 Hz in
the system display settings.
You will know you have properly configured your displays when you see the default
desktop image spanning all three displays. If you do not see this, try restarting your
computer and then going through the steps again.
© 2005-2015 Renewed Vision, Inc.
Page 135 of 141
ProPresenter 6 User Manual
Display Patterns
ProPresenter 6 has three different display patterns built into the program to make it
easier for you to adjust projectors. These can be found by clicking on the View menu
and selecting the pattern you want to use from the Display patterns sub-menu.
Color Bars is useful for calibrating the color of your projectors.
Blend Grid makes it easy to configure overlapping projector images.
Focus provides five points of reference for focusing and adjusting key stone.
© 2005-2015 Renewed Vision, Inc.
Page 136 of 141
ProPresenter 6 User Manual
Keyboard Shortcuts
Command
Shortcut
ProPresenter Menu
Preferences
Command-‐, (Command-‐Comma)
Empty Cache
Control-‐Command-‐E
Hide ProPresenter
Command-‐H
Hide Others
Command-‐Op6on-‐H
Quit ProPresenter
Command-‐Q
File Menu
New Presenta6on
Command-‐N
Save All
Command-‐S
Save As
Shib-‐Command-‐S
Print
Command-‐P
Edit Menu
Undo
Command-‐Z
Redo
Shib-‐Command-‐Z
Cut
Command-‐Z
Copy
Command-‐C
Paste
Command-‐V
Paste and Match Style
Op6on-‐Shib-‐Command-‐V
Duplicate Slide
Shib-‐Command-‐D
Delete
Delete
Select All
Command-‐A
Deselect
Command-‐D
Show Spelling and Grammar
Command-‐: (Command-‐Colon)
Check Spelling
Command-‐; (Command-‐Semicolon)
Special Characters
Command-‐Op6on-‐T
Ac=ons Menu
Next Slide
→
Previous Slide
←
Next Background
Command-‐→
Previous Background
Command-‐←
Clear All
F1
Clear Slide
F2
Clear Background
F3
Clear Props
F4
Clear Audio
F5
Clear Mask
N/A
© 2005-2015 Renewed Vision, Inc.
Page 137 of 141
ProPresenter 6 User Manual
Logo
F6
Live Video
F7
Search Library
Command-‐F
Show Library Selec6on
Command-‐L
Show Slide on Stage Display Only
Command-‐0 (Command-‐Zero)
View Menu
Audio Bin
Control-‐A
Bibles
Control-‐B
Clocks
Control-‐C
DVD
Control-‐D
Editor
Control-‐E
Format Bar
Control-‐F
Mask
Control-‐Shib-‐M
Media Browser
Control-‐K
Messages
Control-‐M
Props
Control-‐P
Resources
Control-‐R
SongSelect
Control-‐Shib-‐S
Stage Display Message
Control-‐S
Timeline
Control-‐T
TwiLer
Control-‐Shib-‐W
Video/Image Bin
Control-‐V
Web
Control-‐W
Format Menu
Bring to Front
Shib-‐Command-‐F
Send to Back
Shib-‐Command-‐B
Show Fonts
Command-‐T
Bold
Command-‐B
Italic
Command-‐I
Underline
Command-‐U
Bigger
Command-‐+ (Command-‐Plus)
Smaller
Command-‐ -‐ (Command-‐Minus)
Show Colors
Shib-‐Command-‐C
Copy Style
Op6on-‐Command-‐C
Paste Style
Op6on-‐Command-‐V
Align Leb
Command-‐{
Center
Command-‐|
Align Right
Command-‐}
Copy Ruler
Control-‐Command-‐C
Paste Ruler
Control-‐Command-‐V
© 2005-2015 Renewed Vision, Inc.
Page 138 of 141
ProPresenter 6 User Manual
Window Menu
Output Window (On/Off)
Command-‐1
Stage Display Window (On/Off)
Command-‐2
Editor
Send remaining text to new slide
Op6on-‐Return
Send remaining text to next slide
Op6on-‐Shib-‐Return
© 2005-2015 Renewed Vision, Inc.
Page 139 of 141
ProPresenter 6 User Manual
Troubleshooting
If you are having problems with ProPresenter operating properly, please verify that you
have the latest updates installed for ProPresenter 6. If you cannot open the program,
you can download the latest version from our website.
For further troubleshooting instructions, please visit http://forums.renewedvision.com.
Access the correct support forum for your version of ProPresenter and refer to the
Troubleshooting topic listed in each forum.
© 2005-2015 Renewed Vision, Inc.
Page 140 of 141
ProPresenter 6 User Manual
Additional Resources
Tutorial Videos
There are a number of quick tutorial videos that will introduce you to the basics of many
of the new features in ProPresenter 6. These are not intended to be training resources,
but are simply to help you understand how features work and where things are located.
Click here to watch the tutorials.
Support Resources
You can access a wealth of information about ProPresenter and search for help in our
knowledgebase. This is available at: http://support.renewedvision.com
User Forums
Our user forums are a great place to get help from other users and from our support
staff. You must create an account in the forums in order to post messages or replies,
but this is a free resource.
Phone and E-mail
You can find our direct contact information on our website.
Twitter
You can find us on Twitter using these names: @renewedvision, @propresenter,
@rvsupport.
© 2005-2015 Renewed Vision, Inc.
Page 141 of 141