1
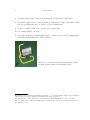
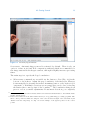
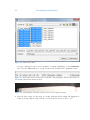
User Manual
Booksorber User Manual
v1.0 /3
Typesetting: The Author
Day of Print: April 22, 2013
Booksorber in a nutshell
Booksorber is an innovative new software which allows you to quickly and easily
digitize your books for mobile use, employing a digital camera. No further investment in expensive hardware is needed and it only takes a few minutes to process an
entire book in excellent quality.
iii
Contents
1
1.1
1.2
1.3
Introduction
Disclaimer . . . . . . . . . . . . . . . . . . . . . . . . . . . . . . . . . . . . . . . . . . . . . . . . . . 1
Thanks for using Booksorber . . . . . . . . . . . . . . . . . . . . . . . . . . . . . . . . . . . 1
Hardware Requirements . . . . . . . . . . . . . . . . . . . . . . . . . . . . . . . . . . . . . . . 1
2
2.1
2.2
2.3
Software Installation
Windows . . . . . . . . . . . . . . . . . . . . . . . . . . . . . . . . . . . . . . . . . . . . . . . . . . . 3
Mac OSX . . . . . . . . . . . . . . . . . . . . . . . . . . . . . . . . . . . . . . . . . . . . . . . . . . . 3
Linux . . . . . . . . . . . . . . . . . . . . . . . . . . . . . . . . . . . . . . . . . . . . . . . . . . . . . . 4
3
3.1
3.2
3.3
Capturing the raw image material
Scanning Rig Setup . . . . . . . . . . . . . . . . . . . . . . . . . . . . . . . . . . . . . . . . . . 5
Camera Settings . . . . . . . . . . . . . . . . . . . . . . . . . . . . . . . . . . . . . . . . . . . . . 6
Efficient ’Scanning’ . . . . . . . . . . . . . . . . . . . . . . . . . . . . . . . . . . . . . . . . . . . 8
4
4.1
4.1.1
4.1.2
4.1.3
4.1.4
4.1.5
4.1.6
4.2
4.2.1
4.2.2
4.2.3
4.2.4
4.2.5
Processing with Booksorber
The Concepts . . . . . . . . . . . . . . . . . . . . . . . . . . . . . . . . . . . . . . . . . . . . . .
Dewarping . . . . . . . . . . . . . . . . . . . . . . . . . . . . . . . . . . . . . . . . . . . . . . .
Lighting correction . . . . . . . . . . . . . . . . . . . . . . . . . . . . . . . . . . . . . . . .
Text and Image Quality Enhancement . . . . . . . . . . . . . . . . . . . . . . . .
Finger Removal . . . . . . . . . . . . . . . . . . . . . . . . . . . . . . . . . . . . . . . . . .
PDF Binding . . . . . . . . . . . . . . . . . . . . . . . . . . . . . . . . . . . . . . . . . . . . .
PDF Post-Processing . . . . . . . . . . . . . . . . . . . . . . . . . . . . . . . . . . . . . .
Getting Started . . . . . . . . . . . . . . . . . . . . . . . . . . . . . . . . . . . . . . . . . . . . .
Creating a new Project . . . . . . . . . . . . . . . . . . . . . . . . . . . . . . . . . . . .
Project Setup . . . . . . . . . . . . . . . . . . . . . . . . . . . . . . . . . . . . . . . . . . . .
Making Corrections . . . . . . . . . . . . . . . . . . . . . . . . . . . . . . . . . . . . . . .
Generating the final output . . . . . . . . . . . . . . . . . . . . . . . . . . . . . . . . .
Help . . . . . . . . . . . . . . . . . . . . . . . . . . . . . . . . . . . . . . . . . . . . . . . . . . . .
5
5.1
5.2
Troubleshooting
Out of Memory Error . . . . . . . . . . . . . . . . . . . . . . . . . . . . . . . . . . . . . . . . 19
Slow Processing Speed . . . . . . . . . . . . . . . . . . . . . . . . . . . . . . . . . . . . . . . 19
6
6.1
6.2
6.3
Tips for PDF Post-Processing and OCR
The benefits of OCR . . . . . . . . . . . . . . . . . . . . . . . . . . . . . . . . . . . . . . . . 21
Tools for OCR (commercial and free) . . . . . . . . . . . . . . . . . . . . . . . . . . . 21
End formats other than PDF . . . . . . . . . . . . . . . . . . . . . . . . . . . . . . . . . . 22
v
11
11
11
12
12
12
12
12
12
12
15
15
16
vi
Acknowledgements . . . . . . . . . . . . . . . . . . . . . . . . . . . . . . . . . . . . . . . . . . 23
Contact and further Info
. . . . . . . . . . . . . . . . . . . . . . . . . . . . . . . . . . . . . 25
1 Introduction
1.1 Disclaimer
The software shipped with this manual is the first official release version. This
means:
• Not all envisioned features are integrated yet. (E.g. finger recognition is still
missing and will be delivered with one of the following updates.) 1
• Processing speed will still be significantly increased in the future by introducing
OS-specific optimizations.
• Despite thourough testing and use of solid design principles, software bugs can
slip into the product. In any case we try hard fix any issues upon feedback as
soon as possible with a new update!
1.2 Thanks for using Booksorber
Thank you for choosing Booksorber! We honestly hope to deliver a useful product to
make high-quality bookscanning affordable for everybody. We are looking forward
to your feedback! Many thanks also to all the early-on supporters and beta-testers
of Booksorber!
1.3 Hardware Requirements
For efficient capturing of the raw book images:
• A digital camera with 10-12 Megapixels and the possibility to manually set ISO,
exposure, white balance and focus (standard features). 2
• A remote trigger (cable, IR, wireless, PC interface, or your best friend). 3
1
Currently there are many improvements in the pipeline which will very soon be included.
A fixed focal length lens equivalent to a 50mm full format lens is often a good choice for reproduction
work like this, offering good value for money.
3 A timer function/device can be useful as well to allow hands-free operation. (Program it to take a
picture approx. every two seconds.) Functions like this can be added for some camera types using
alternative firmware like the CHDK Project (http://chdk.wikia.com/wiki/CHDK) for the Canon
Powershot series.
2
1
2
1 Introduction
• A stable camera tripod with a head that can be tilted 90◦ downwards. 4
• An intense light source. (Strong desktop lamp may be fine, but small robust
halogen spotlight like the one in Fig. 1.1 is recommended.) 5
• A piece of matte black cloth or paper as a background.
For processing with Booksorber:
• A recent PC/Laptop (ideally with a dual- or quadcore processor 6) running Windows/MacOSX/Linux and >2GB of RAM.
Figure 1.1 A typical small halogen spotlight used in construction work, cheaply available at most hardware stores.
4
If available a tripod with black finish is preferable to one with metallic surfaces since unwanted
reflections on book pages (an issue with high-gloss print) is avoided.
5 The larger surface of the light source also makes shadowless illumination of the book easier.
6 The processing can be efficiently parallelized so N instead of 1 processor cores almost yield a speed
increase factor of N.
2 Software Installation
For maximum ease of use and installation/uninstallation without side-effects, the
current versions of Booksorber are delivered as a portable application. This means
that installation merely consists of extracting the archive contents to some folder
on your harddisk and running the main executable. Nothing else on your computer
(program folders, registry, startup links...) will be changed. The software is therefore
uninstalled as easily just by deleting the extracted folder.
When the program is run for the first time, you will be asked for your licence number
- please enter the one you received separately via email or choose “Free Trial Mode”.
Some special notes for different operating systems apply:
2.1 Windows
Please don’t “install” Booksorber to one of the c:\programs or c:\programs (x68)
folders. These folders have restricted access and program execution will fail because
configuration files can’t be written!
Please use the 64bit version when installing it on a 64bit operating system. If only a
32bit OS is available, OutOfMemory Errors may occur which can be circumvented
by reducing the number of processing threads at the expense of processing speed
(see the Troubleshooting Section 5.1 for details).
Launch by executing Booksorber.exe.
2.2 Mac OSX
Starting with OSX 10.7 the Java Runtime is no longer preinstalled, and has to be
manually installed before using Booksorber. See this link (http://helpx.adobe
.com/x-productkb/global/install-java-jre-mac-os.html) for details.
Please make sure you use a 64bit kernel and Java runtime if possible. If you encounter OutOfMemory Errors in that case, please edit the launch script and increase
the amount of memory Booksorber is allowed to use (see the Troubleshooting Section 5.1 for details). On a 32bit system you can at least circumvent the error by
reducing the number of processing threads (Edit->Global Options) at the expense
of processing speed.
Launch by executing launch-macosx.command.
3
4
2 Software Installation
2.3 Linux
Please make sure a current Java Runtime (JRE 6 or higher) is installed.
Please make sure you use a 64bit kernel and Java runtime if possible. If you encounter OutOfMemory Errors in that case, please edit the launch script and increase
the amount of memory Booksorber is allowed to use (see the Troubleshooting Section 5.1 for details). On a 32bit system you can at least circumvent the error by
reducing the number of processing threads (Edit->Global Options) at the expense
of processing speed.
Launch by executing launch-linux.sh.
3 Capturing the raw image material
3.1 Scanning Rig Setup
Please refer to section 1.3 for the required hardware components.
Figure 3.1 Hardware setup for scanning.
• Set up the tripod with the camera facing down as shown in Fig. 3.1. Adjust the
height of the tripod and focal length of the objective, so that the book fills the
frame 7 when opened in the middle, with some margin to account for movement
which will occur when turning the pages during the capture process. (See Fig.
3.2 for an example image.) A focal length around 50mm (full format equivalent)
amounts to a typical distance of one meter between book and camera, and is
usually a good choice. 8
7
8
Important to take best advantage of the available camera resolution.
A closer distance with a more wide-angle lens leads to undesirable perspective distortion.
5
6
3 Capturing the raw image material
Tip
If you have troubles getting the tripod legs out of view, try extending the rear
leg more (but watch that the camera does not tip over). Zoom objectives may
have the problem of the tube “creeping out” (focal length not staying fixed).
This can be prevented by fixing the focal ring by wrapping a strip of Duck Tape
around it.
• Place the black background.
• Align the lightsource exactly parallel and in line with the book spine, so that no
shadows are produced at the spine due to sideways illumination! A larger light
source can be placed closely behind the rear tripod leg. (The leg won’t throw a
visible shadow if the light is large and close enough.)
Tip
When using a tripod painted in black, a piece of aluminum foil wrapped around
it near the light source can prevent heat damage.
Place the light source in a slightly elevated position (e.g. staple it on some books)
so that the angle of incidence of the light is not completely flat 9.
• Reduce ambient light from other light sources (close curtains, move away from
strong room lights...) so that they are negligible compared to the main light
source 10. (After correctly adjusting exposure for the main light, a picture taken
with the main light switched off should essentially be black - or at least very
dark).
3.2 Camera Settings
To ensure consistent results in the post-processing step, all book pages have to be
shot under the same conditions. Therefore all relevant camera settings have to be
done manually. In the following all necessary steps are described conceptually refer to your camera’s user manual if you’re not sure on how they translate to your
specific model.
Image Fileformat Select the highest quality and highest resolution JPG output
option.
9
A too shallow angle of incidence means that unevenness in the paper structure is strongly accented
(due to shadows) which is undesirable.
10 Again, this is necessary to prevent shadows at the book spine due to sideway illumination. Also,
very strong light gradients should be avoided (e.g. sunlight spots).
3.2 Camera Settings
7
Figure 3.2 A typical image
ISO Choose the lowest available ISO value (sensor sensitivity - typically 100 or
200) for lowest possible noise in the final image. 11
Whitebalance Choose “incandescent lamp” or do a manual white balance.
Exposure Set the camera to manual exposure. Choose an aperture of 5,6 to 8 for
sufficient depth of field 12 then adjust the exposure time for proper exposure
(will typically end up around 1/30s). Judge proper exposure by taking test
shots and displaying the histogram of grey values: It should look comparable
to Fig. 3.3.
Focus Flip the book open somewhere in the middle and center/align it with respect to the viewfinder. (Note for DSLRs: This can be done more conveniently
using a Live-View mode if available.) Use the autofocus to focus on some text
section, then switch to manual focus so that it won’t change during the capturing process.
11
If using a sufficiently strong light source this should still allow reasonable exposure times. (The
tripod also helps in this respect.)
12 Focus depth is of concern since the pages will always be slightly curved and the page height will
vary as pages are flipped.
8
3 Capturing the raw image material
Figure 3.3 Typical histogram of a correctly exposed page. The available dynamic
range is well used, while taking care that no
highlights are clipped.
3.3 Efficient ’Scanning’
• The basic idea is simple: Take an image, turn the page, take an image, turn the
page,... A speed of 80 pages per minute can be achieved. It’s most convenient to
look at the book from the correct side (like you would read it). This means that
- with the described setup - images are taken upside down, which is no problem,
because they can later be rotated by 180◦ in the Booksorber software.
• Pull the pages slightly apart with two fingers in the middle of the left and right
border as shown in Figure 3.2. (Although corrected later, less curvature near
the spine means higher-quality results!)
Warning
Never put fingers on the top border, bottom border or near the corners! 13
• Hold the trigger in one hand permanently and turn the pages with the other one
as illustraded in Fig. 3.4. (Also see the video on the homepage (http://www
.booksorber.com/index.php?page=media#video).)
Tip
If using an IR trigger without direct line of sight to the camera sensor, triggering
is more reliable by directing it towards the book which then reflects the IR light.
13
This interferes with automatic boundary detection.
3.3 Efficient ’Scanning’
9
• Take care to turn the pages consistently without abrupt moves between taking
pictures.
Figure 3.4 Example of typical handling.
4 Processing with Booksorber
4.1 The Concepts
4.1.1 Dewarping
Pages are flattened by detecting their curved boundaries and using this information
to build a 3-dimensional model of the surface to correct for warping in the image 14.
The boundaries are modeled by Bezier curves with four control points known from
(vector) graphic design programs. One main feature is the automatic detection of
those boundaries, but they can be manually adjusted as well.
In the currently implemented way of operation, definition of all page boundaries is
done semi-automatically: Every few pages (10-20) the boundaries are automatically
detected (and manually corrected if necessary). These explicitly set boundaries are
indicated by red lines. Boundaries of in-between pages are interpolated (indicated
by green lines) 15.
To do this in the most effective way, the user is supported by a feature which progressively divides the intervals between those “keyframes”. By pressing the hotkey
D (for “divide”) the program successively jumps to the page in the middle, the page
in the middle of the first half, the page in the middle of the second half, and so
on. Manual corrections can always be done starting from the currently interpolated
position of the boundaries. Because of this interpolation scheme and the fact that
simple Bezier curves are very well suited to describe the curvature of typical book
pages, it is possible to very efficiently do these steps completely manually for an
entire book (typically 5 minutes of work), which may be necessary for very tricky
print materials (like magazines with dark pictures cropped at the page boundaries).
4.1.2 Lighting correction
Because Booksorber intends to make book scanning possible with a minimalistic
hardware setup, it has to correct for uneven lighting caused by the use of a single
light source. To work reliably, lighting conditions should nevertheless be the same
for all pictures, and at least 3-5 pictures of a book should be processed.
14
15
This works independently of book contents (text, graphics, ...)!
Interpolation works quite well because changes from one page to the next are gradual (if a bit of
care is taken, not to suddenly shift the book while taking the pictures).
11
12
4 Processing with Booksorber
4.1.3 Text and Image Quality Enhancement
Text and Image sections are automatically identified and receive different treatment
for optimal output quality.
4.1.4 Finger Removal
If it’s not possible to remove fingers from the image by simple cropping (in the final
PDF binding stage), they can be automatically detected and removed.
4.1.5 PDF Binding
After processing, an overlay of all pages is displayed which can be conveniently
used to determine crop borders before all output images are assembled to a single
convenient PDF file.
4.1.6 PDF Post-Processing
Third-party tools can be easily used for text recognition or further format conversions of the output. (See section 6.)
4.2 Getting Started
Projects are saved in a project folder with the following structure:
/ Main project folder containing the batch.xml configuration file and the out.pdf
PDF output file (after processing).
/scans The raw images.
/out Images of the processed pages.
4.2.1 Creating a new Project
Select Project > New Project and specify the .JPG raw images from your camera
storage card in the following dialog (Fig. 4.2). Finally enter name and location for
the project folder. The images will be automatically copied there.
4.2.2 Project Setup
If your book is basically grayscale, select the corresponding output option in the
Project > Project Settings dialog (Fig. 4.5). Check/Uncheck 180◦ rotation
4.2 Getting Started
13
Figure 4.1 The main program Window
if necessary. Automatic finger removal is activated by default. There is also an
option to reduce noise (and JPG compression artifacts) which is recommended for
raw image material from cheaper cameras, although it slightly increases processing
times.
The main step is to specify the Page boundaries 16:
• All necessary commands are accessible via the button toolbar (Fig. 4.3) in the
bottom or via hotkeys. Adjust the page boundaries of the first scan. First try
it automatically by pressing the Detect Boundary button or the hotkey A (for
“automatic”). If manual corrections are necessary they can be done by moving
the Bezier-curve control points of the boundary 17. The boundaries change from
green to red as you make adjustments. If automatic detection goes completely
16
A fully automatic scheme will be included in the next releases as an alternative to the semiautomatic
scheme described here.
17 Bezier curves function in the same manner as they do in popular image processing programs. The
inner control points determine the tangent of the curve and the strength of the deformation (via
distance from the endpoints). See Fig. 4.4 for an example of the typical position of the control
points.
14
4 Processing with Booksorber
Figure 4.2 New Project Menu
wrong, boundaries can be reset via Edit > Reset Boundary or the BACKSPACE
key. Use the ZOOM button to toggle between the default and a magnified view.
Figure 4.3 Button Bar with most important commands. The progress bar indicates the position of
the currently selected scan within the book.
Figure 4.4 Typical Bezier curve with control Points for a book page boundary.s
• Repeat these steps for the next 2-3 scans (navigate there using the navigation
buttons in the button bar) and also for the last few scans of the book 18.
4.2 Getting Started
15
• Press the Subdivide button or press the D hotkey (for “divide”) to jump to
the middle of the book and again set the boundary. Repeat this procedure
until all boundaries are sufficiently accurate. (Successive Subdivide commands
will automatically jump to positions refining the intervals between scans with
explicitly set boundaries, giving the best result with minimal work.)
Tip
You can use the demo project included with the distribution (automatically opens
up when the program is opened for the first time) for the first experiments without
the need to provide your own scans.
4.2.3 Making Corrections
Unwanted scans (blurred image, hand in image) can be removed through Edit >
Delete Scan 19.
4.2.4 Generating the final output
In the Edit > Global Settings dialog the number of program threads used for
parallel processing of the images can be modified. It has to equal at least 1 and
should be no more than the number of available processor cores. The choice determines a compromise between processing speed and system responsivity during
processing. The number of cores minus one is used as a default which is usually
fine.
Warning
On some laptop computers extended times of 100% processor load may
lead to crashes of the system because of overheating. - In this case the
number of threads should be reduced.
Start the actual unattended processing by pressing Start processing. Depending
on your system this takes something between 10-20 seconds per page on average.
Tip
During processing, the finished output images are sequentially written to the /out
directory within the project directory. By opening these, one can monitor the output
results early on, and maybe terminate processing if settings need to be changed.
18
Boundaries for the first and last few pages should be set without skipping scans, because at the
beginning and the end of a book, page positions typically change quite rapidly.
19 More possibilities (e.g. adding scans after creation of the project and re-processing only of selected
scans) will be included in the next releases.
16
4 Processing with Booksorber
Figure 4.5 Project Settings Menu
After processing is finished, the PDF export dialog is displayed (Fig. 4.6). Here the
cropping borders for the PDF can be specified. Press ENTER to export the PDF file
which is then automatically opened in the default viewing application.
The PDF export step can be repeated afterwards (e.g. to choose different cropping
borders) without the need to reprocess all pages by selecting Process > Re-Export
PDF.
4.2.5 Help
This manual can be displayed from within the program: Help > Help Contents.
4.2 Getting Started
17
Figure 4.6 Pdf Export Dialog. A transparent overlay of all processed pages is shown to make selections
of cropping Borders easy.
5 Troubleshooting
5.1 Out of Memory Error
(Parallel) Processing of high-resolution images is a memory-intensive task. Booksorber memory requirements depend linearly on the number of pixels of the raw
images and the chosen number of processing threads (determining the number of
images processed in parallel).
If using the 32bit release of Booksorber (Windows) or an external 32bit Java Runtime Environment (OSX, Linux) only 1.2 - 1.5 GB of RAM can be used due to
constraints of 32bit Java programs, so it is likely to get an "OutOfMemory" Error
when processing larger images with the default settings.
It is always possible to get rid of this error by reducing the number of processing
threads (under Edit->Global Settings) at the expense of lower processing speed.
If on a 64bit operating system, the best solution to the problem would be to also
use the 64bit release of Booksorber (Windows) or an external 64bit Java Runtime
Environment (OSX, Linux) which can make use of all available memory.
• When using the Windows Booksorber.exe executable a proper amount of memory
is automatically allocated in this case.
• OSX and Linux users have to edit the respective launch files (with a standard text
editor) and manually change the usable amount of memory to a suitable value
(e.g. set "-Xmx3000m" to use 3000 MB). A good choice would be to use your
available memory minus 1000MB to leave some room for other system processes.
(Never allocate more than physically available memory!)
5.2 Slow Processing Speed
Depending on the size of the raw images and the number of available processor cores
processing currently takes something around 10 seconds per page on average. Please
don’t be afraid if processing of a few pages seems to take much longer - some lengthy
one-time pre-calculations are performed at startup (can last up to 2 minutes) - no
output is generated during that phase.
Processed pages are written to the "out" folder of the project directory on the fly.
Processing at least 8 pages and comparing the timestamps of the first and last
processed page gives a more precise estimate for the average processing time on
your system!
19
20
5 Troubleshooting
The performance will be further improved in future releases. Nevertheless Booksorber should already be quite useful since it works unattended once it’s set up.
Capturing your book using a digital camera is really fast, and already now you can
finish post-processing of a 300-page book in an hour while having lunch...
In some cases Booksorber might not automatically recognize the number of (virtual)
cores available on your computer. If you experience slow performance on a modern
multi-core processor please check the number of processing threads under Edit>Global Settings. It makes sense to increase this value to a maximum of the number
of available (virtual) cores (which you can determine by checking the task manager /
activity monitor of your system). (The preset value defaults to the maximum value
minus one, to keep your system responsive during processing.)
6 Tips for PDF Post-Processing and OCR
6.1 The benefits of OCR
Just as for any other (book) scanner, quality enhanced images of the book pages
are the primary output of Booksorber. Even if they are assembled into PDF file
format for convenient viewing they stay just that - bitmap images. Such PDF files
also take up quite a bit of storage space (estimated at about 1MB per page).
If one wishes to search within the text or easily highlight text sections, it is necessary
to perform OCR (optical character recognition) on the output using readily available
third-party tools. Depending on the chosen tool this higher-level interpretation can
also visibly enhance text quality and most importantly, significantly reduce the file
size of the final PDF (typical shrinkage by a factor of 10).
6.2 Tools for OCR (commercial and free)
Probably the best (but also expensive) tool for OCR and PDF post-processing is
Acrobat Professional by Adobe (the original developers and maintainers of the PDF
standard). Using their newest ClearScan technology, text is not only recognized, but
replaced by a vectorized font (generated on the fly from the averaged image input)
which yields smooth print quality at any zoom level and much smaller files.
Tip
PDF-XChange Viewer from Tracker Software (http://www.tracker-software.com
/product/pdf-xchange-viewer) also performs OCR reliably and is free (for private and commercial use).
Other well-known commercial products are
• Abby FineReader (http://finereader.abbyy.com/)
• Nuance OmniPage (http://www.nuance.com/for-individuals/by-product/omnipage
/index.htm)
For more, see
• This exhaustive list of OCR software on the english Wikipedia (http://en
.wikipedia.org/wiki/List_of_optical_character_recognition_software)
or..
21
22
6 Tips for PDF Post-Processing and OCR
• A more concise comparison on the german Wikipedia (http://de.wikipedia
.org/wiki/Texterkennung#OCR-Software)
Unfortunately open-source solutions are not quite mature yet. (OCR also is quite a
complex topic)
6.3 End formats other than PDF
PDF is a format very well suited for digitization of complex print material (like
college and university textbooks) with mixed text, photos, tables, formulas and
vector illustrations. In particular viewers are available for almost every platform
(including smartphones, tablets and ebook readers) which are mostly free and offer
features like text highlighting, annotation, full-text search, bookmarks and much
more.
Another noteworthy format which strives for something similar is the DJVU file
format (http://en.wikipedia.org/wiki/DjVu). However, viewer availability and
list of supported features are far inferior. 20
Besides that, an entire ecosystem of ebookreader formats like EPUB exist (both
proprietary and open). They are targeted more towards a precise high-level representation of (mostly text-only) documents like novels, which are then dynamically
formatted depending on the size of the reading device.
Warning: (Creating ebookreader-friendly output)
Because these formats store text as pure characters and not as some
meta-information overlay to an underlying scanned bitmap, much work
has to go into manual correction of OCR errors if one wants to generate
such a file based on scanned input.
Tip
Many tools expect one image per page as input. With Booksorber these raw output
files are accessible in the /out folder within the project folder!
20
Especially watch out for the “highlighting feature” of the common WinDJView software: Highlighting information is stored in the program, not the document file - this means all highlighting
information is lost upon reinstall of the software or when reading the document on another device!
Acknowledgements
Many thanks to the early-on supporters of this product:
Mag. Thomas Geiß-Granadia, Paul Martschini, Martin Kubat, Andre Schopper,
Unger Ernst, Evan Robinson, Daniel Blauensteiner, Adrien Welter, Anthony Moscar,
Mike Buebe, Florian Träxler, Andreas Job, Akos Kaszoni, Gerd Dickmeiss, Hinrich
Peters, Gal Buki, Mark Klingman, Alex Lane, ...
The program distributed with this documentation includes open-source third-party
libraries governed by licences included within the “licences” directory of the distribution.
23
25
Contact and further Info
• Booksorber Homepage (http://www.booksorber.com)
• email: [email protected]