1
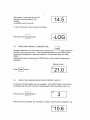
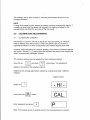
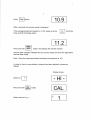
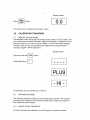
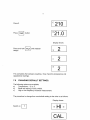
TECHNOLOGY
slNARrtun
MOISTURE
PROBE
U S E RM A N U A L .
Read all instructionspriorto operatingyour SinarrM
MoistureProbe.Whenever
usingthis unit,rememberto followthe appropriateoperatingprocedures.
For your reference/record
:
SerialNumber:
Purchase
Date:
Date Registration
Card Mailed:
MoistureProbe.Rev.2. 11105
For Version 1.2 software.
Sinarru Technology
Unit 1 & 2, Old Station Business Park, Compton, Newbury, Berkshire, RG20
6NE, ENGLAND
Tel: +44 (0)1635579940 Fax: +44 (0)1635579941
Email: office @sinar.co.uk Website: www.sinar.co.uk
Sinalnd Moisture Probe.
Model 6600
The performanceof this MoistureAnalyseris dependenton the correctuse and
instrumentcare by the customer.lt is importantto checkthe calibration(both
commodityand hardware)periodically
and, if necessary,make adjustments
followingthe procedurein this manual. The commoditycalibrationcan be
checkedby comparingthe MoistureAnalyserresultsagainstreferencesamples,
e.g. oven testedsamples(pleaseensurethat testedsamplesare basedon the
correctoven test specification).
3
PAGE
CONTENTS
1.0
INTRODUCTION.
4
2.4
B A S I CP R I N C I P L E
OF OPERATION.
4
3.0
OPERATINGINSTRUCTIONS.
5
4.0
5.0
3.1
3.2
Takinga singlemoisturereading.
Takingcontinuousmoisturereadings.
(Log mode).
5
5
3.3
3.4
Measuringsampletemperature.
Usingthe Averagemoisturecontentfacility.
6
6
CALIBRATIONADJUSTMENTS.
7
4.1
7
% Moisturecontent.
CALIBRATION
TRANSFERS.
5.1
5.2
Remoteaccessmode.
Continuousmode.
5.2.1 Singlecurvetransfer.
5.2.2 Curveset transfer.
6.0
9
I
9
I
11
HARDWARESECTION.
12
6.1
6.2
12
13
Checkinghardwarecalibrations.
Resettinghardware.
7.0
CHANGINGDEFAULTSETTINGS.
15
8.0
TECHNICALSPECIFICATION.
17
8.1
8.2
17
1B
D i s p l a yu n i t .
Sensor.
9.0
SINARMOISTUREPROBEACCESSORIES.
1.0
INTRODUCTION.
19
4
The SinarrM
MoistureProbe,moisture Analyserhousesthe latestmoisture
measuringtechnologyin a compactpackage.lt has been designedto provide
fast moistureresultsusingwholegrainsamples.ln additionto % moisture
content,the MoistureProbealso measurestemperature.
Each instrumentis pre-calibrated
for up to seven commoditieseitherchosenfrom
package
programmes
a standard
of
or selectedfrom the SinarrMcalibration
library.The calibrationof any productcan be optimisedusinga biasfacility.
The SinarrMMoistureProbeis one of a familyof moistureanalysers.All models
have the facilityto transferand receivecalibrations
eitherfrom each other,via a
Sinar'MAcousticCouplerand telephonelinkor via the Internet.Similarlynew
commoditiescan be transferredor existingcalibrations
can be updatedwith new
information.
The SinarTM
MoistureProbehas been calibratedusingcleansamples. Accuracy
can be affectedby the presenceof stones,dirt, weeds, seeds,admixture,chaff
or otherforeignmatter.
Cleanthe sensorwith a soft brushto preventmaterialbuild-upon the fins.
NEVER USE WATER.Take care not to damagethe temperaturesensor.
2.0
BASIC PRINCIPLEOF OPERATION
The designconceptof the Sinar'MMoistureProbeis basedon the simultaneous
sensingof capacitanceand temperatureof the samplebeingtested,providinga
correctedmoisture(%) readingin a few seconds. lt worksaccuratelyon
productswith a moisturecontentrangingfrom approximately1o/oto 35%
dependingon the application.
The instrumentincorporates
2 sensors:
1.
Capacitance
The moisturein a sampleabsorbsthe electricalenergybetweenthe sensorfins.
The electricalsignalknownas "Capacitance"
increaseswith the moisturecontent
of the sample.
2.
TemperatureCorrection
The capacitanceof a sampleincreaseswith temperature.A temperaturesensing
thermistoris mountedin the samplecell and the microprocessor
carriesout an
automaticcorrection.
SinarrMrefer to a capacitancereadingcorrectedfor temperatureas a code 0
reading.
3.0
OPERATINGINSTRUCTIONS
5
Holdthe displayunit in one hand.Holdthe spearvia the black"mushroom"
cap in
the other hand.Selectthe requiredcrop as detailedbelow.Insertthe spear into
the crop to be measuredensuringthat the blacksensorfins are completely
covered.Proceedas detailedbelow.
3.1
T A K I N GA S I N G L EM O I S T U R EC O N T E N TR E A D I N G .
Displayshows.
I H I
Switchon
S e l e c tc h a n n e 1
l - 7e . 9 . 2 .
f
2
14.5
Press l%H20| button.Moisturecontent
will be displayedafter5 seconds.
3.2
I
T A K I N GC O N T I N U O U S
M O I S T U R EC O N T E N TR E A D I N G S .
Displayshows.
I H I I
Switchon
S e l e c tc h a n n e 1
l - 7e . 9 . 2 .
Pressandhotdm
button.
f
2
LOG
Displayshows,
6
Afterapprox.5 secondsthe unit will
displaya moisturereading.The
reading
is updatedevery4 seconds.
14.5
To end continuousmode,proceedas follows:-
Pressandhotd|"z"rrz;l
button
3.3
-LOG
MEASURINGSAMPLETEMPERATURE.
I rEMPI
I buttonwhen the
Sampletemperaturecan be measuredby pressingthe I
sampleis coveringthe sensor. lf the sampletemperatureis very differentfrom
the ambienttemperature,leavethe samplefor 30 secondsbeforeyou press
TEMP.
Alternatively,
keep on pressingthe TEMP button,untila stabletemperatureis
d isplayed.
Displayshows.
Press
f
3.4
button
tr
21.0
USINGTHE AVERAGEMOISTURECONTENTFACILITY.
A maximumof 254 samplescan be averaged. lt the AVER buttonis helddown,
the displaywill show the numberof measurements
that have been made,e.g.
Pressandhotdt^r*l button.
t
l
n
3
When this key is released,the average% moisturecontentwill be displayed,e.g.
u
10.6
I
The averagecan be resetto zero by switchingthe analyseroff and on or by
changingchannels.
NOTE.
lf usingthe averagefunctionensurethe sensoris alwayscoveredwith sample.lf
a readingis takenwith the sensorhalf covered,the readingwill addedto the
averagestack and effectthe accuracyof the final result.
4.0
CALIBRATIONADJUSTMENTS.
4.1
% M O I S T U R EC O N T E N T .
Sometimesit is usefulto be able to adjustthe moisturereading,for instance,
when a differentoven test is used,or when the particlesize of a productis
different,or when 2 instrumentsare checkedagainsteach other.
significantly
However,beforeadjustingthe moisturereading,checkthat the hardwaresettings
are correct.(Section.6.1).Havingdone thissurroundthe sensorwithsampleand
selectthe appropriatecalibrationchannel.
The moisturereadingmay be adjustedfor each individualchannel
usingthe up
anddown
M
arrowkeys.Theadjustment
appliesto all pointsof the selectedchannel.
Determinethe averageadjustmentneededby comparingat least3 different
samples.
Displayshows.
I H I I
Switchon
Pressand hold
button.
Enterpasswordand press
CAL.
P
Note:The Analysergivesan audiblealarm if the wrong passwordis entered.
Press
10.9
button.
After 5 secondsthe moistureresultis displayed.
pressup arrow
lf the averageadjustmentneededis +0,3o/o,
timesso that the displayreads.
key three
11.2
Pressand hold
button,this displaysthe channelnumber
that has been adjusted.Releasethe key and the displaywill show the adjustment
that has been made.
Note: When the instrumentleavesthe factorythe passwordis 123.
In orderto checkto see whethera channelhas been adjusted,proceedas
follows:
Displayshows.
I H I
Switchon
Pressand hold
S e l e c tc h a n n e le, . g . 1 .
I
CAL.
button.
f
1
Displayshows.
Press
@
0.0
button
(0.0 meansthat no adjustmenthas been made).
5.0
CALIBRATIONTRANSFERS.
5 . 1 R E M O T EA C C E S SM O D E .
The MoistureProbecan be put into remoteaccessmode or "PLUG"mode.This
is a remotemode to enablecalibrationdata to be importedor exportedfrom the
MoistureProbeto a PC with the SinarrMMNET'IM
(Pt No 1900-6309)software
installed.
Datacan also be transmitted
via telephoneline usingthe Sinar'M
AcousticCouplertu(Pt No 6230-001).
Displayshows.
Pressand holdthe I rEMPI Outton
whileswitchingon
I
I
I
I
PLUg
I H I I
All operationsare now carriedout via the PC.
5.2
CONTINUOUS
MODE.
The followinginstructions
relateto communicating
with a SinarrMAP moisture
instrumentonly. Detailsof communications
with othermodelsare includedin
their respectiveuser manuals.
5 . 2 . 1 S I N G L EC U R V ET R A N S F E R .
In orderto transferone calibrationto an AP analyser,proceedas follows.
DisplayShows.
On receivingunit.
f
1
Presschannelnumber,e.g. 7 in which
new calibrationis to be installed.
Press
E
IN
button.
O n t h e s e n d i n ou n i t .
n
1
q
J
I
On the receivingunit.
After 6 secondsboth unitswill display
PASS
The transferis now complete.Switchoff both units and removecable.
t2
5.2.2 CURVESET TRANSFER.
Displayshows.
Set both unitsto display.
COPA
OUT
On the sendingunitpress
Displayshows
IN
On the receivingunit press
OUT
Sendrngunitchangesto -
IN
Receivingunit changesto -
When the transferis completedboth
instruments
willdisplay
PASS
6.0
HARDWARESECTION.
6.1
CHECKINGHARDWARECALIBRATIONS.
To checkthat the instrumentis in good workingorderthe sensors,(Temperature
and Capacitance)
shouldbe checkedas follows:
Temperature:
Pour the samplearoundthe sensorcoveringthe fins totally.Leavefor 30
secondsso that the sampleand sensortemperaturereachequilibrium.
l3
Checkthe temperatureof grain using
an accuratethermometer.Switchon
the instrumentand pressTEMP. The two readingsshouldnot differby more
t h a n 1. 5 " C .
Capacitance:
This is checkedusinga €pacitance referencesample(code0 sample).Contact
your instrumentsupplierfor this sample.Pour the samplearoundthe sensor
coveringthe fins. Pressthe 0 buttonand then the%H20 button.The displayed
resultshouldbe no greaterthan 10.3 from the valueof the code 0 sample.The
code 0 value is writtenon the containerthe samplewas suppliedin.
lf any of these measurements
are out of tolerance,the instrumentshouldbe
recalibrated.
6.2
RESETTINGHARDWARE.
Ensurethere is no samplearoundthe sensor.
Displayshows.
I H I I
Switchon
|
^ ^ r
CAL.
I
Press and hold| .:'e* | button.
I'rurv'l
Enter passwordand press P.
t-cAL I
Press and holcJ
button
lAUroI
Pressandholdt^r* I untilunit
bleeps.
I
I
P
HCAL
1
l
1
t4
l
1
Surroundthe sensorwith a capacitancereferencesample(e.g. 28.1). Allow 1
minutefor the sensorand sampletemperatureto equalise.EnterReference
V a l u e( e . g .2 8 . 1 ) .
Displayshows.
Press2
tr27
Press7
Press
E
once
Press1.
f28
f
281
Displayshows.
llb/trr l
Press
|**l
'28.1
EnterTemperature.
Insertthermometeror temperatureprobeinto grainand note reading,(e.g.
21.0"C).
Press2
r
Press1
f 2 1
2
l5
f
Press0
Press
E
button.
210
" 2 1. 0
Displayshows.
Pressand hold|"z"rrz;luntitanatyser
bleeps
f
l
2
2
This completesthe hardwareresetting.Now checkthe temperatureand
capacitancereadings.
7.0
CHANGINGDEFAULTSETTINGS.
The followingoptionsare available:
Temperature- oC or oF.
a)
b)
Baud rate settingof 300 or 4800.
Highor low frequencymoisturemeasurement.
c)
The procedureto changefrom one defaultsettingto the other is as follows:
Displayshows.
Switchon
I H I
I
CAL.
t6
Pressand hotd
@
button.
Enter passwordand press
P
Press
@
COPA
button
Displayshows.
Press
@
buttonagain.
SEt
In this mode the followingkeys have specificfunctions:
When this key is held down,the displaychangesfrom USA to Euro or vice versa.
In Euro unitsthe readingsare oC for temperature.ln USA units,the readingsare
oF for temperature.
When this key is held down the baud rate changesfrom 300 to 4800 or vice
versa.
8.0 TECHNICALSPECIFICATION.
8.1
D i s p l a yu n i t .
l7
D i m e n s i o n s( m m ) :
H195xW154xD33
D i s p l a yU n i tW e i g h t :
0.6 KG
Max. Numberof Sensors:
1
DisplayUnit Construction:
Fabricatedaluminiumalloy,powdercoated.
OperatingEnvironment:
0 to +55
StorageTemperature:
-20"C to +55 "C; Humidityto 95% non condensing.
Humidity:
Up to 95% noncondensing.
Display:
3.5 character20mm LCD.
Processor:
Intel80C31 microprocessor.
Memory:
EPROM and RAM
Calibrationssupplied.
(Upgradablevia the RS232 port).
7
'C.
Max. calibrationcapacity:
Data Output Format:
RS232 C, ASCII code, 300 Baud.
MoistureAccuracy:
!0.5o/odependanton applicationand moisturelevel.
ReadoutInterval.
4 seconds.
TemperatureAccuracy:
+10C.
DisplayedTemperature:
"C or oF
DisplayResolution:
1 Decimalplace.
TemperatureCorrection:
Temperaturesensor mounted on fin. Correctionfactor is software
programmable.Correctionrange 0-40 "C.
l8
8.2
Sensor.
Sensor Dimensions(mm):
O80 x 380
SensorWeight:
0.8 KG
OperatingEnvironment:
0 to +65"C.
StorageTemperature:
-20 "C to +g0 oC; Humidityto 95% non condensing.
Humidity:
Upto 95% noncondensing.