1
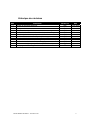
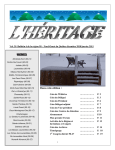
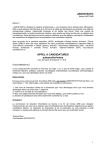
MICRO THERMO TECHNOLOGIES™ MT Alliance – User Manual Document No. 75-MTA-1005-R2.5 MTA V4.0 No part of this publication may be reproduced, stored in a retrieval system, or transmitted, in any form or by any means, electronic, mechanical, photocopying, recording, or otherwise, without the prior written permission of Micro Thermo Technologies. © 1997-2015 by Micro Thermo Technologies. All rights reserved worldwide. Local Phone: (450) 668-3033 | Fax: (450)668-2695 Toll Free Canada: 1-888-664-1406 | Toll Free USA: 1-888-920-6284 www.sporlanonline.com/micro-thermo TABLE OF CONTENTS OVERVIEW .................................................................................................................. 3 ACKNOWLEDGING ALARMS ................................................................................... 7 HOW TO ..................................................................................................................... 12 NAVIGATE IN THE MAIN WINDOW .............................................................................................. 12 LOG OUT .......................................................................................................................................... 16 LOG IN AS A TEMPORARY USER .................................................................................................... 16 CHANGE SUBSYSTEMS .................................................................................................................... 17 CHANGE THE SUBSYSTEM MODE ................................................................................................. 17 DISABLE ALARM MONITORING TEMPORARILY .......................................................................... 19 DISABLE ALARM MONITORING PERMANENTLY ........................................................................ 20 CHANGE LIGHTING OR HVAC SCHEDULES ............................................................................... 21 ADJUST HVAC TEMPERATURE OR HUMIDITY ........................................................................... 25 OBTAIN ALARM STATISTICS ........................................................................................................... 26 SEE ALL ACTIVE ALARMS ............................................................................................................... 27 REVIEW ACKNOWLEDGED EVENTS ............................................................................................. 27 ADJUST THE SOUND LEVEL ............................................................................................................ 28 TURN OFF THE SOUND ON THE PC .............................................................................................. 28 DELETE A USER ............................................................................................................................... 33 FIND THE ALARM SETTINGS OF A SENSOR.................................................................................. 37 FIND A COMPONENT BY NAME .................................................................................................... 41 CHANGE YOUR SITE INFORMATION ............................................................................................ 42 CHANGE ALARM COMPANY INFO ................................................................................................ 43 CHANGE REFRIGERATION COMPANY INFO................................................................................ 44 PREVIEW REPORTS .......................................................................................................................... 45 PRINT DAILY GRAPHS AUTOMATICALLY..................................................................................... 46 GET IN TOUCH WITH SUBCONTRACTORS .................................................................................... 48 CHAT WITH A REMOTE TECHNICIAN ........................................................................................... 49 SELECT A PREFERRED PRINTER .................................................................................................... 51 EXPORT DATA INTO EXCEL .......................................................................................................... 52 MAKE A BACKUP .............................................................................................................................56 USE ADD-ONS ................................................................................................................................. 57 EXIT THE MT ALLIANCE ............................................................................................................... 58 ALARM CONCEPTS .................................................................................................. 60 TIPS FOR KEYBOARD USERS ................................................................................ 63 GLOSSARY .................................................................................................................. 64 75-MTA-1005-R2.5 MT Alliance - User Manual.doc 1 1 Chapter Overview 75-MTA-1005-R2.5 MT Alliance - User Manual.doc 2 Overview Think of the MT Alliance as your assistant. It provides you with up-to-date, complete and relevant information. It notifies you whenever a problem arises. T he MT Alliance Information and Control System is a software platform that interacts with distributed intelligent electronic modules (called nodes). The nodes provide full monitoring and control of your refrigeration, HVAC, lighting and energy subsystems. They control your refrigeration racks and continuously monitor the food cases to prevent product loss 24 hours a day. You will be warned when perishable food products are in danger and that action must be taken before loss occurs. They also control all HVAC equipment such as rooftop units, air handler units, zone controllers, etc. You can adjust room temperature and humidity setpoints. You can adjust lighting schedules or manually set lights on or off. You can get a detailed profile of electrical power consumption. MT Alliance is the state-of-the-art in monitoring technology for refrigerated cases. Each case can be installed with one or more temperature sensors. Sensors measure the discharge air temperature, the actual product temperature, or a simulated product temperature. Each monitored point is assigned a low limit, a high limit, an alarm delay, etc. MT Alliance is a tireless assistant with a phenomenal memory: years worth of logged data, up to one-minute intervals, may be retrieved instantly for each point. It also supports dual temperature cases. Toggling the switch on your dual temperature case does not create false alarms. MT Alliance can also send complete alarm information to your alphanumerical pager. MT Alliance is user-friendly because it displays your site graphically. Red buttons located directly on the floor plan indicate the location of active alarms. By simply pointing and clicking, you get detailed information about each sensed point. It is easy to review alarm limits, to browse the graphical log of measured values, to determine when alarms occurred and who acknowledged them. A new employee can be trained to use the MT Alliance in less than one hour. 75-MTA-1005-R2.5 MT Alliance - User Manual.doc 3 MT Alliance is safe because each user has his own specific access permissions. It is possible to give your personnel access to only that portion of the system appropriate to them. Each user must log in with his account. The MT Alliance keeps a complete record of who did what and when. MT Alliance is open because it supports electronic modules from other manufacturers (LonWorks® and MT Alliance Compatible). It is open because it is possible to export monitored points to Microsoft Excel®. It is open because a wide variety of sensors from many manufacturers are supported. MT Alliance is forgiving because it automatically turns monitoring back on if the user forgets to. It also automatically logs the user out if he or she fails to do so. MT Alliance is flexible because it is possible to communicate with the system from a remote location. With a modem and a phone line, everything a user can see and do at the MT Alliance workstation can be done remotely. MT Alliance is a time saving tool for experienced refrigeration technicians. They can diagnose problems and fine-tune the refrigeration system simply by looking at the graphical temperature log of a given refrigerated case. This means better adjustments of the refrigeration process, greater energy savings and lower maintenance costs for you. MT Alliance is robust because the intelligence is built into distributed electronic modules. Alarms are received even if the personal computer is turned off. Furthermore, the built-in watchdog restarts the system if, for some reason, the PC becomes inoperable. MT Alliance grows with your needs. Whenever additional equipment needs to be monitored and controlled, simply add sensors, sensor nodes, alarm relays and alarm relay node: MT Alliance can handle it. 75-MTA-1005-R2.5 MT Alliance - User Manual.doc 4 T he MT Alliance Information and Control System consists of several components. The MT Alliance software runs on a Windows-based PC usually located in an office environment. The network components, on the other hand, have been spread out across your site. They can be above or below refrigerated cases, in the mechanical room, in the electrical room, on the refrigeration racks, inside controlled equipment, on the roof, etc. They are all linked together with a data cable (a twisted pair wire). Some may share a low voltage power cable or be powered independently. Nodes can measure things via sensors connected to them. Nodes can control things via controllers connected to them. Nodes can also measure or control things by talking or listening to other nodes via the data cable. For example, you can have nodes to do the following tasks: 8 inputs alarm sensor node 4 outputs alarm relay node Real-time clock node HVAC scheduler node Lighting scheduler node Suction pressure controller Node Compressor controller Node 5 Circuits controller Node Condenser controller Node HVAC controller Nodes (RTU, AHU, ZCU, etc.) Light controller Node Case temperature display node Rack pressure display node Others 75-MTA-1005-R2.5 MT Alliance - User Manual.doc 5 2 Chapter Acknowledging Alarms 75-MTA-1005-R2.5 MT Alliance - User Manual.doc 6 Acknowledging Alarms This quick tour will walk you through a typical alarm acknowledgment process so that you can get back to your business right away. Can you hear it? When the MT Alliance audible alarm signal is on, it means that at least one active alarm is present. If you are currently hearing the alarm signal, the first thing to do is to determine on which Subsystem and View the alarm occurred. This is accomplished almost instantaneously by simply turning your attention to the red portions of the window. Each active alarm is displayed on a red line in the "Recent Events" list. Subsystem in alarm Number of Active Alarms Click here to acknowledge Active Alarms Acknowledged Alarm View in alarm Sensor in alarm Click on a red line in the list to select an alarm and then click on the Acknowledge button. 75-MTA-1005-R2.5 MT Alliance - User Manual.doc 7 Check it to acknowledge all alarms for the subsystem. If you are already logged in, simply enter your password and click OK. If you are not logged in but want to acknowledge the alarm, enter both your account & password and click ‘OK’. That’s it! Now it is up to you to take whatever action is necessary to remedy the cause of the alarm. Thanks to the floor plans, you know precisely where to go. Alternatively you can move the mouse over the red squares and click. The floor plan will be zoomed and the red squares become red buttons (see next page). Click on a red button and then click the red Acknowledge button. The above window will come up. 75-MTA-1005-R2.5 MT Alliance - User Manual.doc 8 Refrigerated case alarms: There are various causes for alarms in refrigerated systems. Here is a brief list to help you in the identification process: SYMPTOM POSSIBLE CAUSES REMEDY Ice is accumulating around cooling elements in the case. The air flow can’t be felt or the fan can’t be heard. The air is flowing but not sufficiently. The defrost system is not working properly. Room humidity is too high. Contact Refrigeration Company. Attempt to reduce room humidity. Fan is defective. Electrical problem inside case. Food products are blocking the air vents. Fan is defective. The food products A door has been left open are not as cold as for too long. Compressors they should be. have been stopped for a while (electrical power shortage). Contact Refrigeration Company. Move food products. Contact Refrigeration Company. Close door (if not already done) See if you had compressor alarms. Refer to the ‘Alarm Concepts’ chapter for more information about refrigeration alarms. 75-MTA-1005-R2.5 MT Alliance - User Manual.doc 9 A GOOD TIP Want to save money and keep product freshness? Never exceed the load line of refrigerated cases. Do not obstruct the air discharge vent or the air return vent. Doing this degrades the performance of the case, causes uneven distribution of temperature inside the case and wastes energy. Alliance System Problems: There are a few occasions when the Alliance can malfunction as listed below: SYMPTOM POSSIBLE CAUSES REMEDY Sensor values are ridiculously too low Sensor wire cut (opened), or defective. Possibly a defective electronic module or a defective sensor. Sensor wire short-circuited. Possibly a defective electronic module or a defective sensor. Defective electronic module. Problems with network wiring between modules. Network terminator defective. Call Technical Support displayed in About Window. Sensor values are ridiculously too high Sensors are displayed in black. Malfunction is spoken or Node test failed is displayed in the events list. 75-MTA-1005-R2.5 MT Alliance - User Manual.doc Call Technical Support displayed in About Window. Call Technical Support displayed in About Window. 10 3 Chapter How To 75-MTA-1005-R2.5 MT Alliance - User Manual.doc 11 How To This section will show you how to perform all your tasks. Navigate in the Main Window The “Main Window” is displayed below Menu Bar Toolbar Recent Events List Views Status Bar Current user Current Date and Time From the “Main Window”, everything is just a few clicks away. The Menu Bar contains all functions you can perform. Note that certain functions are allowed only to certain users. Often you will find “grayed” menu items and buttons. You will also find text fields with a gray background and white text. There are basically three reasons why menu items, buttons and fields may be disabled: 75-MTA-1005-R2.5 MT Alliance - User Manual.doc 12 You do not have the permission to access this function. This function can only be accessed in “Maintenance Mode” or "Configuration Mode" by a qualified technician The context is not right to activate the function (e.g.: the Acknowledge button is disabled when there is no active alarm.) The Tool Bar gives buttons for your most often used menu items. By moving the pointing device over a button, a hint is displayed to remind you what the button means. About Log In HVAC Subsystem Refrigeration Subsystem (in alarm) Energy Subsystem Lighting Subsystem Acknowledged Events Other Subsystem Trend Graphs Export to Excel Change Measurement Units The Recent Events List contains active alarms or recent acknowledged alarms. Active alarms are always displayed on a red line. If there are more than three active alarms you may have to scroll through the list to see more. The number of active alarms is displayed to the right of the list. Alarms are always listed with the highest priority and newest event on top. If you click on an event line and then click the acknowledge button, you will be able to immediately acknowledge the alarm. If you click on the Information button instead, you will be brought directly to the historical sensor data at precisely the moment of the alarm. If you have acknowledged an alarm a few hours ago, it will still be listed but will no longer be in red. If you click on it and then click and hold the “Find” button, the sensor that generated the alarm will be highlighted momentarily. The Store Views depict graphically what your store looks like. Green circles represent sensors. Simply click on the View name to move from one view to another. If the view displays a rectangle as you move your mouse over it, then the view can be zoomed on. Simply click on a region inside a view for an instant zoom of the area. 75-MTA-1005-R2.5 MT Alliance - User Manual.doc 13 Notice how you instantly get access to crucial information such as what is being monitored and what the current sensor values are: the zoom and go back to an entire view, simply click on any view name or on the "Return To" button below the mini display. Mini Display Views Navigate inside the zoomed view Return to Store View (zoom out) Once zoomed, click anywhere on the mini display to the right to instantly move to that region. Or use the arrows that are located inside the zoomed view. To remove the zoom and go back to an entire view, simply click on any view name or on the "Return To" button below the mini display. 75-MTA-1005-R2.5 MT Alliance - User Manual.doc 14 The mini display shows you two rectangles. The magenta rectangle indicates where you have zoomed. You can move the green rectangle and click to zoom elsewhere on the same view. The Status Bar contains the name of the “logged in” user and always displays the current date and time. 75-MTA-1005-R2.5 MT Alliance - User Manual.doc 15 Log In From the main menu, select Access – Log in… or click on the “Key” on the toolbar. Enter your account and your password. You can optionally specify how long before the Alliance logs you out. By default, Alliance will log you out after 15 minutes. Your password may consist of any characters except $. The password is not case sensitive (a = A). If you have forgotten your account or password, contact your immediate superior. If you are a supervisor, manager or owner and have forgotten your account or password, contact technical support as described in the About Window (Help – About). Log Out Click on the “Key” on the toolbar. Don’t do anything more, just leave the “Log In” window there Log In As a Temporary user The first time you are login in the system you need a temporary account name and password to go in the system and create your MT Alliance user. There is a temporary user account available for this. The account “temp”, password “temp” let you get in the system to create your new account. This temporary account will be automatically disable 60 days after the installation of MT Alliance. 75-MTA-1005-R2.5 MT Alliance - User Manual.doc 16 Change Subsystems In order to reduce the amount of information presented to you, only one subsystem is active at a time. The currently active subsystem and its mode of operation is displayed on a gray line just below the "Recent Events List" and above the Views. Let’s say your current subsystem is “Refrigeration” and you want to see “HVAC”, you can: 1. Click on the HVAC button in the toolbar or … 2. Go to the main menu and select Subsystem – HVAC Click on the subsystem button that you want… … or select the subsystem that you want Change the Subsystem Mode Subsystem Modes control the actions that a user can take while in a given subsystem. The modes are: Overview Maintenance Configuration 75-MTA-1005-R2.5 MT Alliance - User Manual.doc 17 When you change the mode of operation, you are doing it for the currently active subsystem. Each subsystem remembers its mode of operation. You can be in "Refrigeration - Overview". Changing the subsystem to HVAC may bring you to "HVAC - Maintenance". To change the subsystem mode, use the "Mode" menu item. If you do not see the "Mode" menu item, it is because you do not have the permission to change the mode. If "Maintenance" or "Configuration" are grayed out, you do not have permissions to use these modes. Note that every time you log in, all subsystem modes are maintained to the last user setting if you have the proper permissions. Otherwise, the mode rolls back to your highest mode permissions. Select the desired subsystem operating mode. 75-MTA-1005-R2.5 MT Alliance - User Manual.doc 18 Disable Alarm Monitoring Temporarily If you are performing maintenance on a refrigerated case for example, you may not want to have an alarm recall every hour or so. In these situations, it is best to temporarily disable the alarm monitoring for the sensor. Simply click on the sensor button. In the “Alarm settings” tab, select “Disable Alarm Temporarily”. On the right hand side, select for how long (from 1 minute to 22 days). Optionally enter the reason. Click the OK button and keep your changes. If "Disable Alarm Temporarily" is grayed out, you do not have the permission to do this. The Sensor button will be displayed in light blue to indicate monitoring has been turned off. The view where the sensor is located will also be shown in light blue. After the time has elapsed, monitoring will be enabled automatically. To re-enable monitoring before the time has elapsed, simply select “Enable Alarm”. 75-MTA-1005-R2.5 MT Alliance - User Manual.doc 19 Disable Alarm Monitoring Permanently If you are renovating and physically removing a refrigerated case for example, then you will want to disable the alarm monitoring permanently. A technician can come later and completely delete the sensor or move it elsewhere. Simply click on the sensor button. In the “Alarm Settings” tab, select “Disable Alarm Permanently”. Click the OK button and keep your changes. The Sensor button is displayed in light blue to indicate monitoring has been turned off. The view where the sensor is located is also shown with a light blue circle 75-MTA-1005-R2.5 MT Alliance - User Manual.doc 20 Change Lighting or HVAC Schedules First select the desired subsystem (HVAC or lighting). Click on the "Schedules" button at the right side of the screen. Select lighting or HVAC to set up schedules Click here to define or modify schedules The “Lighting schedules” window shown below appears. Select a schedule from the list and click the “Edit” button: 75-MTA-1005-R2.5 MT Alliance - User Manual.doc 21 The “Edit Lighting schedule” window appears as follow for a typical week: Select typical week, to define the weekly schedule 1. To select a time range, simply click and drag the mouse The delay will shift the whole schedule by the time specified Days of a typical week 2. Choose a lighting state: click High, Medium, Low or Off Select a time range by clicking and dragging the mouse. Select "High, Med, Low or Off" for your selection. The result will look like the picture above. If your site is equipped with 2-states lighting (on/off only) then selecting "Medium" or "Low" will be equivalent to "High". 75-MTA-1005-R2.5 MT Alliance - User Manual.doc 22 You can also define holidays that will override the typical weekly schedule. Select "Holidays" as shown below: Click here To be able to add holidays, you must select maintenance mode before attempting to modify schedules. There are two types of holiday schedules: those that "repeat every" year and those that are executed "only on" a specific year/month/day. The "only on" holiday schedules can override those that "repeat every" year. If you want to add a periodic holiday Choose “repeat every” and select a date 75-MTA-1005-R2.5 MT Alliance - User Manual.doc 23 If you want a holiday schedule to be executed only once, choose “Only on” and select a unique date. You will then see a new holiday schedule appear. Modify it to suit your needs just as you did for the typical week. If the holiday is periodic, the year is not displayed. In order to define a new schedule for a part of your store, you must enter in configuration mode first. This is usually reserved to experimented lighting technicians. To set up HVAC schedules, proceed exactly the same way. There is only one difference. The HVAC schedule status can only be Occupied or Unoccupied The Hardware tab let you see technical specification of your lighting scheduler. 75-MTA-1005-R2.5 MT Alliance - User Manual.doc 24 Adjust HVAC Temperature or Humidity Click on an HVAC Command button. You will get a window such as the one below: The setpoint is displayed as a blue line on the graph. Increase or decrease the setpoint Or drag this cursor Adjust the temperature or humidity to the desired value and click "OK". The HVAC system will react immediately. However, it will take several minutes before the room temperature reaches your newly specified setpoint. Be patient and avoid "cranking up" or "cranking down" the setpoint. A humidity setpoint works just the same way. If you cannot change the setpoint, it means you do not have the permission to do so. 75-MTA-1005-R2.5 MT Alliance - User Manual.doc 25 Obtain Alarm Statistics You can easily find out how many alarms there were over a given period of time. First select the appropriate subsystem. Then select Events – Acknowledged Events Statistics from the Main menu. Select events for current subsystem or all subsystems Specify the start and end date. Acknowledged events outside the period you specify will not be included in the report. Press the “Print” button to see an on-screen preview of the report. The report includes the total number of alarms for each sensor in the specified period and the specified subsystem. For example, you can immediately identify refrigerated cases that are giving you more problems. A supermarket chain can track down which stores generate the most alarms. 75-MTA-1005-R2.5 MT Alliance - User Manual.doc 26 See all Active Alarms When there is more than 3 active events in the "Recent Events List", you can view all active events by selecting Events – Active Events from the main menu. Number of active events Review Acknowledged Events From the main menu, select Events – Acknowledged Events or click on the green checkmark on the Tool Bar to display the Acknowledged Events Window. By default, this list displays the most recent acknowledged event at the top. By clicking on some column headers, you can sort this list by ascending or descending order of the column content. For example, to find all alarms acknowledged by a particular user, click on the “acknowledged by” column header or click on a “Sort By” radio button. Select the sorting order Select the Period to restrict the content of the list Include your company logo on every page of the report Print what you have selected to see 75-MTA-1005-R2.5 MT Alliance - User Manual.doc 27 By selecting an event in the list and clicking on the information button, you will get instant access to the sensor graph at the precise moment in time when the event occurred. Adjust the sound level The MT Alliance audible alarm signal is usually a female voice that says “Alarm…Alarm…”. The sound level can be adjusted to best fit your working environment. In the main menu, select Tools – Sound Level. Adjust the sound level and save your changes. The MT Alliance will remember your preferred sound level until you change it again. Turn off the Sound on the PC If you do not want to acknowledge the alarm immediately but the audible alarm signal disturbs you, select Tools – Sound Off on the Main menu. If a new alarm comes in, the audible alarm signal will automatically start again. Do not forget to take action and acknowledge the alarm. 75-MTA-1005-R2.5 MT Alliance - User Manual.doc 28 Manage Users From the main menu, select Access – Manage Users…. You will see a list of the currently defined users, showing their user name and account information. There is no limit to the number of users you can define. Each user must have a unique User Name and Account. When you log in with your account and password, your user name appears on the status bar at the bottom of the main window. Every action or change you make is logged with your user name on it. 75-MTA-1005-R2.5 MT Alliance - User Manual.doc 29 Add a User To add a user, click on the “Add” button. The “Add User” window will appear: If you do not have the permission to manage technicians, you will not see the “Technician Permissions” tab. Give to your new user a full name (e.g.: James Woodbridge). If you have two employees with the same name, add something to the full user name to distinguish between the two. Give your new user an account that nobody else has used (if you do, the MT Alliance will tell you). The account may consist of any characters except $. The account is not case sensitive (a = A). Then give your new user a new password. You need to re-enter the password a second time to confirm it. 75-MTA-1005-R2.5 MT Alliance - User Manual.doc 30 By default, the account is permanent. If you select a temporary account, you will be able to specify and exact date at the end of which the account will be automatically delelted. The “User Permissions” tab let you specify permissions the new user will have in the MT Alliance. Most permissions are self-explanatory. “Change Site Information” gives a user the power to edit benign site information. Avoid giving your users the permission to “Exit Alliance”, because when they exit the MT Alliance, all historical data gathering is stopped. You may optionally copy the permissions from one existing user to other users you create. Once you have copied the user permissions, you only have to click on the “Paste” button to apply permissions to a new user. If you want a user to adjust HVAC temperature or humidity setpoints, select the “Change HVAC Setpoints” permission. If you want a user to override or modify lighting schedules, select the “Change Lighting Setpoints” permission. The “Change Refrigeration Setpoints” permission allows the user to fine tune things like rack suction pressure setpoint. Needless to say, give that permission only to qualified refrigeration technician. In the “Technician Permissions” tab, you can grant a user the permission to perform configuration tasks in a particular subsystem. Maintenance permissions should only be given to experienced technicians. Entering maintenance mode allows a technician to fine-tune the control system. In the same tab (not shown here), you can also grant a user the permission to perform configuration tasks in a particular subsystem. Configuration permissions should only be given to experienced installers of the system. Entering Configuration mode allows the installer to add or remove electronic control modules. The “Configure Alliance” and “Connect Subsystems” permissions should be given to experienced installers. 75-MTA-1005-R2.5 MT Alliance - User Manual.doc 31 Edit a user In the “Manage Users” window, select the User Name / Account you want to modify and click on the “Edit” button. In this mode you can either change the user name, the account information, the password, the account type and the user/technician permissions. Once completed, click the “OK” button to proceed. 75-MTA-1005-R2.5 MT Alliance - User Manual.doc 32 You can also modify the password information by selecting from the main menu Access – Change Password. Provide the old password and enter the new password twice in order to confirm the modification of your Password. Then click the “OK” button to save your modification. Delete a User In the “Manage Users” window, select the user you want to delete and click on the “Delete” button. You will be able to confirm or cancel the deletion. 75-MTA-1005-R2.5 MT Alliance - User Manual.doc 33 Check a Sensor Graph When an alarm occurs, it may be useful to consult the sensor graph. To do so, simply select the alarm event in the Event List and click on the “Information” button. Alternatively, you can click directly on the sensor button. In the “Graph & Log” tab, you will see the following: Current sensor Value To change time drag cursor or click in the graph Current Sensor Status Time and Value at cursor position Statistical Value Change Time Span To move backwards in time In the top right corner, you see the current status (Normal, In Alarm, Still Outside Limits, etc). You can also see the current value. Moving around in time is very easy. Simply click on the left or right arrows below the graph. Each click moves you in time by half the current time span of the graph (e.g.: with a 24 hours time span, you move forward or backward by 12 hours). To see one complete day at a time, simply change the graph date in the upper right corner. You can move the cursor above the graph or click anywhere in the graph to position the graph cursor. The “Time” field will display the exact time of the day where the cursor is located and the “Value” field will display the sensor value at that time. By clicking on the “Daily Graph” button, you can preview and print what you are currently looking at. 75-MTA-1005-R2.5 MT Alliance - User Manual.doc 34 Notice that in addition to the values, the alarm settings are also shown in the graph. The high limit and the low limit are shown as red lines. The optimal value is shown as a dark blue line. The limit changes are also kept over time and you will see these lines change on the graph if a user changed them. The graph is color-coded. A green line means the sensor was in a normal state. A red line indicates the sensor was in alarm. A yellow line indicates the sensor was still outside limits after the alarm was acknowledged. A light blue line indicates that the alarm monitoring was turned off for this sensor. No line at all indicates that the MT Alliance was not running. To see less than 24 hours, use the combo box located underneath the graph. You can select 12 hours, 6 hours or 2 hours. The vertical scale where the sensor values are displayed is by default autoscaling to show you all sensor values. Remove “Auto Vertical Scale” check button and it will allow you to zoom into a more interesting portion of the graph. To zoom, click, drag and release to create a rectangle Uncheck this box to allow zoom As shown above, zooming is achieved by clicking the mouse in a corner of interest and then, while holding down the mouse, drag the other corner of interest. The end result will look like: 75-MTA-1005-R2.5 MT Alliance - User Manual.doc 35 Events related to the sensor Click here to go to the 24 hours time span The “Undo Zoom” button will return you to the 24 hours period showing all sensor values during that period. The bottom part of the window is displaying the sensor log. This includes any changes you (or a technician) have made to the sensor, and also includes external events like alarms. The sensor log is always synchronized with the graph. If you click an event in the log, the graph will position itself precisely at that time. If you click anywhere in the graph, the sensor log will position itself to the nearest event. Click on the “Options” button to make “Log Options” window appear: View the log only for a specified period Select user changes or events from the sensor Add your own log entry (e.g.: cleaned-up case, performed repairs, etc.) 75-MTA-1005-R2.5 MT Alliance - User Manual.doc 36 If you select “Changes” you will see any modifications done to this sensor as a result of user actions. If you select “Events” you will also see external events like sensor alarms. Click on “add log entry” to add your own entry in the sensor log: Defaults to current date and time Enter a description Find the Alarm Settings of a Sensor If you want to find out what the alarm settings are for a particular sensor, simply click on the sensor button. In the “Alarm settings” tab, you will see the following: 75-MTA-1005-R2.5 MT Alliance - User Manual.doc 37 The current high limit, optimal value, low limit, alarm set time and alarm recall time are all displayed in this window. Refer to the “Alarm Concepts” section for a detailed explanation of all these parameters. Compare Trend Graphs Select Tools – Trend Graphs or the corresponding toolbar button to compare sensor values of various sensors against each other. Select the desired date Select the desired time span Move forward in time Drag cursor or click in graph to move in time Sensor value at cursor position When adding or removing a graph, each graph is resized vertically so that all graphs fit in the windows. A maximum of 7 trend graphs can be used on the same screen. In order to add a new graph at the bottom of the screen, click the following button: . You can remove any graph simply by clicking the following button: . You can save your current configuration by clicking the appropriate button: . You can then load this configuration again later by clicking the following button . Each graph has an associated combo box. The combo box can be filtered to show sensors of a particular subsystem or all subsystems. It can be filtered to show 75-MTA-1005-R2.5 MT Alliance - User Manual.doc 38 sensors of a certain type (temperature, pressure, etc) or all types. Can’t find a sensor? If it is not in the sensor list, look for it in the point list. Besides their obvious use as a correlation tool, trend graphs can also be used to obtain a bigger graph than usual. Simply remove all graphs except one and maximize the trend graph window. Trend graphs can also be used to quickly scan sensors. For example, you can quickly see all refrigeration sensors. Change the graph filter to “Refrigeration Temperature Sensors”. Then click on the combo box and use the down arrow on the keyboard to scan through all sensors. You can also move a selected graph on the screen. Simply click this button to bring up the Reorder screen. This screen allow you to change graph order by selecting the graph you want to move and then click on the corresponding arrows to move it higher or lower 75-MTA-1005-R2.5 MT Alliance - User Manual.doc 39 The following button let you combine all graph on the screen in one big graph. This feature is fairly useful for a general overview of all sensors you want to monitor. Each graph has a distinct color, so you can easily see each sensor. Simply click on the button to go back to previous view. 75-MTA-1005-R2.5 MT Alliance - User Manual.doc 40 Find a Component by Name If you know a component (sensor, equipment, Alarm Relay , etc.) by its name and know in which subsystem it is visible, you can quickly find out where it is by selecting the proper subsystem and then select Tools – Find Components from the Main menu. The “Find Component” window looks like this: When you select a component in the “Find Component” list, MT Alliance selects the view where the component is and highlights it in a different color. Find components only display the components of the active subsystem. First select the component type: Sensors, Alarm Relays, Equipment, View Links or Points. The list will be updated to show all components of the type you selected. As you select a component in the list, MT Alliance will automatically select the view where the component is and will highlight the component in magenta. If you can't find a component, you may be in the wrong subsystem or in the wrong subsystem mode. If you select a component in the list and click on the information button, the Component Information Window will be shown. The effect is just the same as if you had clicked on the component button. Ignore the Object Key, it is useful only for system troubleshooting by qualified technicians. 75-MTA-1005-R2.5 MT Alliance - User Manual.doc 41 Change Your Site Information You can change the Information about your own site by selecting Configure – Customer from the Main menu. The “Configure Customer” window looks like this: You can now edit phone numbers, your address, etc. Be sure not to change the "Customer ID" since this is a reference number from your Technical Support Company. 75-MTA-1005-R2.5 MT Alliance - User Manual.doc 42 Change Alarm Company Info You can change the Alarm Company Information by selecting Support – Alarm Company from the Main menu. The “Configure Alarm Company” window looks like this: Correct the information related to the Alarm Company. Note that the e-mail and web site information will work only if the PC has access to the Internet. 75-MTA-1005-R2.5 MT Alliance - User Manual.doc 43 Change Refrigeration Company Info You can change the Refrigeration Company Information by selecting Support-Refrigeration Company from the Main menu. You can proceed the same way with the other support companies: HVAC, Lighting, Energy, etc. The “Configure Refrigeration Company” window looks like this: 75-MTA-1005-R2.5 MT Alliance - User Manual.doc 44 Preview Reports Every time you bring up a report, the Print Preview Window appears. This window allows you to browse the pages of the report, make the page smaller or bigger on the screen and finally print the report. Most reports are accessible from the “Reports” menu. Some are only accessible from certain components. Scroll through current page Maximize Window Size page inside window Previous and Next Page Go directly to a page Select Printer Print Close Report By default, the Alliance prints to the preferred printer which you can set using the Main Menu File – Select Preferred Printer. By clicking on "Print Setup" in the "Print Preview Window", you can print the report on any printer. This is only a temporary override of the preferred printer. 75-MTA-1005-R2.5 MT Alliance - User Manual.doc 45 Print Daily Graphs Automatically You can activate the automatic printing of daily graphs for selected sensors by selecting Reports – Daily Report Start Time from the Main menu. If you select “Enable printing of Daily Reports”, you can also select the time of day when graphs will start printing. Select a time of day where there is little printer activity. Every day, at the time you selected, daily graphs start printing for each sensor that you have selected for automatic reports. The daily graphs are always yesterday’s graphs of course. To add or remove a sensor in the daily graph printout, click on the sensor button and select the “Details” tab. Select if this sensor will auto-print or not The graph can be accompanied by the log of daily events for the sensor (e.g.: alarms and acknowledgements). This causes two pages to be printed for each sensor. 75-MTA-1005-R2.5 MT Alliance - User Manual.doc 46 An automatically printed daily graph for a single sensor without the log looks like this: 75-MTA-1005-R2.5 MT Alliance - User Manual.doc 47 Get in Touch with Subcontractors If you get a refrigeration alarm, you should contact the refrigeration company. If you have an HVAC alarm, you should contact the HVAC company. If you have problems with the MT Alliance itself, you should contact the technical support company. You may also need to talk to your alarm company from time to time. To find out this information, select Help – About from the main menu. The following window appears: Select the company… … and click here to get the info 75-MTA-1005-R2.5 MT Alliance - User Manual.doc 48 You will get detailed information about the support company such as: Chat with a Remote Technician A technician can call into your site if you require help. Using his computer and a telephone line, the technician can establish communication with the PC located on your site. Once the technician is connected, he can see exactly what you are currently seeing on your PC. He can also use your keyboard and your pointing device. He essentially becomes an invisible man next to you. Because the technician is connected over phone lines, a little delay exists between what you are seeing and what he is seeing. If you open and close windows continuously, the technician will not see everything you see. Slow down a little. You and the technician can initiate a chat. From the main menu, select Help – Chat to bring up the chat window. 75-MTA-1005-R2.5 MT Alliance - User Manual.doc 49 The top part of the window is reserved for the remote technician. The bottom part is where you can type your messages. When the bottom text field is white, it is your time to chat. Type your message and click on the “Over” button to indicate you have finished your point. Do not forget that both you and the remote technician are “fighting” for the same keyboard and mouse. Be patient when waiting for an answer, the connection over phone lines is not always fast. 75-MTA-1005-R2.5 MT Alliance - User Manual.doc 50 Change Units of Measure If you want for instance to change temperatures from Celsius to Fahrenheit or pressures from Kpa to Psi, select Options – Change Measure Units on the Main menu or click on the "Earth" on the toolbar. It may take a short while before all sensors display the newly selected units. The MT Alliance will remember this setting until you change it again. Select a Preferred Printer In the main menu, select File – Select Preferred Printer. The following window will appear: Select the printer where you want all reports to be printed. The MT Alliance will use this printer for all reports instead of the Windows Default printer. For each report, you can also choose to temporarily print elsewhere using the “Print Setup” button. 75-MTA-1005-R2.5 MT Alliance - User Manual.doc 51 Export Data into Excel Exporting data into Microsoft Excel provides you with the ability to create your own customized reports. Your Excel sheet may even contain additional formulas based on the historical data exported. A typical example is to calculate the demand in Kwh by integrating the instantaneous power in Kw over a time period. In the main menu, select Report – Export to Excel or click on the toolbar icon that looks like Excel. The MT Excel Wizard will come up as shown below. The first step consists of selecting an export configuration. You can create a new (and empty) configuration by pressing the “New” button. Give a name to your new configuration and press “Next”. Alternatively, you can select an existing configuration and press “Next”. You can also select an existing configuration and press “Copy”. Give your copy a meaningful name and press “Next”. You can also rename or delete a selected configuration. The second step consists of selecting the sensors and points to export. As shown below, the top list contains all sensors and points available through all subsystems. You can sort the items by selecting the column header and moving it to the left. This allows you to sort by identification, view, subsystem or physical type. The bottom list shows the sensor and points you have selected to export. Use the arrow buttons to select or remove items. Alternatively you can drag and drop the desired sensors from the Alliance views directly in the bottom list. 75-MTA-1005-R2.5 MT Alliance - User Manual.doc 52 Click on an available item… ..then click here to select it. Or drag and drop buttons into this list The third step consists in selecting the period of exportation. There are two selection modes. “Selection by period” allows you to specify a “from date” and a period. The averaging interval and the “to date” are calculated automatically. This is the easiest method. 75-MTA-1005-R2.5 MT Alliance - User Manual.doc 53 The other selection mode “by end date/time” allows you to specify the averaging interval, the “from date/time” and the “to date/time”. Specify the interval first, then the “from date/time” and finally the “to date/time”. You must understand that the MT Alliance can keep a tremendous amount of data over time (a few GigaBytes). You will be warned if you have selected a huge amount of data to export. Data gathered by the MT Alliance over the period will be averaged on each interval to reduce the amount of information exported to Microsoft Excel. The fourth step consists of selecting a few options. A graph can automatically be created if you desire. If that is the case, you can select to display vertical or horizontal gridlines. The “display Min / Max” option will draw a vertical bar corresponding to the lowest and highest values found in each interval. Although the Alliance is supposed to be running 24 hours a day, 7 days a week sometimes it is stopped (power outage or technician on site). Check the “Interpolate if No Data” option if you want to draw a straight line between the last known values. This is useful if you want to estimate Kwh based on Kw over a long period. You can also change the measurement units before exporting the data. 75-MTA-1005-R2.5 MT Alliance - User Manual.doc 54 The final step is to select a filename to export the data. If you select an existing filename, the exportation will overwrite previous exportation data. If you specify a new filename, MT Excel will create it. Press “Finish” to start the exportation. 75-MTA-1005-R2.5 MT Alliance - User Manual.doc 55 If Microsoft Excel 97 or greater has not been installed on the PC, you will only be able to export to a text file. A utility named "MTRemoteExcel" is located in the c:\Alliance directory. You can copy it to another machine where Microsoft Excel is installed. It will be able to read the text files created and export them to Excel. MTRemoteExcel is shown below: Make a Backup It is strongly recommended to make a backup after a technician has adjusted or changed things such as alarm limits, etc. Making backups allows the Technical Support personnel to recover from a known working point. For example, if the PC power fails unexpectedly, files on the hard disk can get corrupted. If this happens to the MT Alliance database, it may no longer be able to start properly. An uninterruptible power supply (UPS) that can keep the PC powered during short electrical shortages is highly recommended. So how do you perform a backup? First you must close the MT Alliance. Then click on the "MT Backup" icon on the desktop (it runs c:\Alliance\MTBackup.exe). Simply press "OK" and the backup will proceed. 75-MTA-1005-R2.5 MT Alliance - User Manual.doc 56 Once completed, an information window will indicate the name given to the backup file and where it is located. The file name contains the date and time when the backup is made. Since backups are not automatically deleted, you are advised to delete backups that are too old because backup files may be huge. Do not forget to restart the MT Alliance! Use Add-Ons Add-ons are links to other applications that can be invoked from the MT Alliance toolbar without minimizing the MT Alliance. An add-on can start an application such as Microsoft Word or a document that in turn opens up the associated application. Be careful because every time you click on an add-on button, a new instance of the application is started (you can end-up with 3 opened Microsoft Word for example). Add-Ons 75-MTA-1005-R2.5 MT Alliance - User Manual.doc 57 Exit the MT Alliance If you exit the MT Alliance, you will lose one very important feature: historical data logging. The MT Alliance is supposed to be running 24 hours a day, all year long so that it can keep detailed historical data about each sensor in your store. If you must exit the Alliance then select File – Exit from the main menu. If you cannot exit, it is because you were not granted the permission to exit. Never abruptly turn off the PC while the Alliance is running. 75-MTA-1005-R2.5 MT Alliance - User Manual.doc 58 4 Chapter Alarm Concepts 75-MTA-1005-R2.5 MT Alliance - User Manual.doc 59 Alarm Concepts Understanding alarm concepts is essential for timely intervention and for taking actions when the alarm condition will not go away. T he MT Alliance Information and Control System uses predefined alarm settings for most types of food products. However, your site may have special requirements: this is why the MT Alliance allows a technician to override the predefined setting for a given sensor. The Alarm Scheme used by the MT Alliance is as follows: each sensor has a low and high temperature limit. It also has a “set time”, a “recall time” and an Alarm Relay. If the sensor value is outside the limits longer than the specified “set time”, then an alarm is generated. The MT Alliance will sound the audible alarm signal and show the sensor as a red square. The Alarm Relay associated with the sensor is energized so that your local alarm service company can notify you of an alarm condition. The Alarm Relay can also be connected to a flashing light, a buzzer or some other indicator panel. For refrigerated cases, the alarm “set time” is always selected to be slightly longer than a typical defrost cycle. If you react to an alarm within 10 or 15 minutes, you should have time to take action to prevent food losses (e.g.: by moving food products to another refrigerated case). ALARM Normal Defrost Cycle Acknowledgment ALARM Failure of refrigerated case High Limit Low Limit Start time outside limits 75-MTA-1005-R2.5 MT Alliance - User Manual.doc Set Time exceeded Recall Time exceeded 60 By the time you acknowledge an alarm, some time may have passed. At the moment of the acknowledgment, the sensor value is either inside the specified limits (the problem is no longer present) or outside the specified limits (the problem is still present). If the problem is no longer present when you acknowledge the alarm, you are strongly encouraged to check the sensor graph to find out how long the sensor value was outside limits. For a refrigerated case, this allows you to assess the state of your food products as the result of this temperature excursion. Upon acknowledgment, the sensor button turns into a green circle and the MT Alliance will start alarm monitoring on the sensor right away. If the problem is still present when you acknowledge the alarm, take immediate action to verify the source of the problem (e.g. : is the fan working? was a door left open too long?). After the acknowledgment, the sensor button turns into a yellow diamond if the sensor value is still outside the alarm limits. When the sensor value returns inside the limits, the sensor button turns into a green circle and the MT Alliance starts alarm monitoring on the sensor immediately. If the problem is still present on this unit and you believe it can be fixed within the “recall time” (usually one hour), acknowledge the alarm. From there, only two things can happen: the sensor value will come back within limits and the MT Alliance restarts alarm monitoring, or the sensor value stays outside the limits past the “recall time” and you get another alarm. The purpose of the “recall time” is to remind you to take an action to prevent food losses. If you know for a fact that fixing the problem will take longer than an hour, acknowledge the alarm, then click on the yellow sensor button. Select the “Alarm Settings” tab and temporarily disable monitoring on this sensor. You should select a realistic time period. After the time has elapsed, the MT Alliance automatically turns monitoring back on. If the sensor has been removed or the refrigerated case taken out, you can also disable monitoring permanently. A service technician can later remove the sensor button altogether. 75-MTA-1005-R2.5 MT Alliance - User Manual.doc 61 5 Chapter Tips for Keyboard Users 75-MTA-1005-R2.5 MT Alliance - User Manual.doc 62 Tips for Keyboard Users Pointing and clicking with a mouse is easier but if you prefer the keyboard, this chapter is for you. Y our mouse is not working? Or perhaps you do not like using the mouse? Using the keyboard is more tedious than using the mouse for certain tasks but you can use it to navigate through all the windows of the MT Alliance. Activating menu items is achieved by pressing and holding the <Alt> key (left of the spacebar) and then using the left, right, down and up arrows to navigate through the menu structure. Press Enter to activate the menu item. Moving from one field or button to another is achieved by pressing the <Tab> key (left of the Q key). You cannot tab to a field or a control that is disabled. Moving back one field or button is achieved by pressing and holding the <Shift> key and then pressing the <Tab> key. Clicking on a button is achieved by pressing on <Enter> or <Spacebar> when the button has the focus (rectangle shown on button). Keyboard limitations: in some windows you cannot get to all fields and buttons using the <Tab> key. You cannot zoom with the keyboard: however, you can still access all components using the Search – Find Component menu item. 75-MTA-1005-R2.5 MT Alliance - User Manual.doc 63 GLOSSARY Account An account is like a key. Each defined account is associated with a user name and a set of permissions. This way the MT Alliance can keep track of who did what and when, and also restrict access to critical functions. Alarm Company The company responsible for contacting you when the MT Alliance generates an alarm. Alarm Relay An alarm relay can be a relay in an alarm company box, a flashing light, a buzzer or anything else that can be turned on or off. An alarm relay can be associated with one or more alarm sensors. Backup A backup takes the current MT Alliance configuration and zips it to another location. Component A component can be an alarm sensor, an alarm relay, an equipment, a view link, etc. Components are dropped on views by the technician. Equipment An equipment is a component that cannot be alarmed on. It does not have a state. Equipment can be anything. They are usually used to indicate the location of the PC, network power supply and network terminator inside your store. If you are interested in showing where your electrical outlets are, then a technician can define an electrical outlet and drop it on any view. Event List The event list is always displayed on the top part of the Main Window. The event list contains all active alarms. It also contains recent acknowledged alarms (usually not older than 24 hours). If alarms do not occur for many days, the event list will still display a few old acknowledged alarms. Graph A sensor or point value plotted against time. Log A time tagged event list. 75-MTA-1005-R2.5 MT Alliance - User Manual.doc 64 Log Entry One event in a time tagged event list. Point A point can be of three types: a command point (setpoint), a measure point, or a command/measure point. Measure points are like sensors except they cannot generate any alarm and cannot have automatically printed daily reports. Command points allows you to change a setpoint (e.g.: room temperature). A measure point allows logging of historical data. A command and measure point allows both features on the same button. Points can be temperature, humidity, switch, gas, pressure, power, power factor, current, etc. Points allow electronic modules from any manufacturer to be integrated into the MT Alliance. For example, a Siebe Rooftop Unit module can be added to the network, and a temperature command point can be used to allow you to select the desired room temperature. Refrigeration Company The company responsible for all refrigerated cases and rooms in your store. Alarm Sensor An alarm sensor can measure temperature, humidity, pressure, particle levels, switch, power, power factor or current. Alarms can be generated for all sensors. Status Bar The status bar is located at the very bottom of the Main Window and displays the name of the user currently logged in, the current date and time and some other information. Subsystem A subsystem can be: Refrigeration, HVAC, Energy, Lighting or can be defined by the technician. Each subsystem has its own operation mode (overview, maintenance and configuration). Technical Support The company responsible for providing support about the MT Alliance system. View A view is usually a floor plan of your store. Views can be made zoomable by the technician. View link A view link is a button that is dropped on a view that brings you to another view. 75-MTA-1005-R2.5 MT Alliance - User Manual.doc 65 75-MTA-1005-R2.5 MT Alliance - User Manual.doc 66 Historique des révisions REV 1.1 1.2 1.3 1.4 1.5 1.6 2.0 2.1 2.2 2.3 2.4 2.5 Description Création et formatage document Début de la rédaction du document Mise à jour du document Suite de la mise à jour du document Modification suite à la correction addendum par Yves Roy Correction du document et préparation de la table des matières Première diffusion du document pour révision Correction suite à la révision de Jean-Raymond Touchette Nouvelle formule d’accès lors du « log on » (New feature XP) Révision de la table des matières Révision et mise à jour pour publication (PDF intérimaire) Cover page and formatting 75-MTA-1005-R2.5 MT Alliance - User Manual.doc Révisé Par CBC CBC CBC CBC CBC CBC CBC CBC CBC CBC CBC ER Date 5 Juin 2003 6 Juin 2003 9 Juin 2003 11Juin 2003 11Juin 2003 13 Juin 2003 16 Juin 2003 7 Juillet 03 7 Juillet 03 4 Août 03 13 nov. 03 10-Mar-2015 67