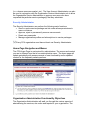
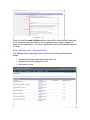
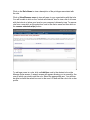
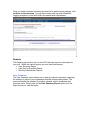
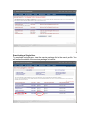
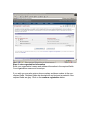
1
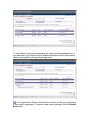
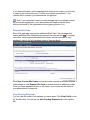
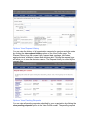
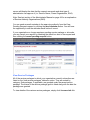
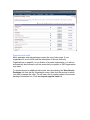
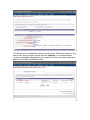
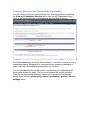
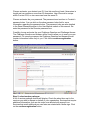
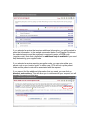
covisint
Covisint Connection
and Administration
User Manual
Release date: November 30,
2003
CCA Version Number 4.0
Copyright 2003 Covisint LLC:
All Rights Reserved
Confidential and Proprietary
I. INTRODUCTION ...............................................................................................4
Primary Objectives ............................................................................................4
Icons..................................................................................................................4
II. USER MANUAL ................................................................................................5
Objectives .........................................................................................................5
Home Page Navigation and Menus...................................................................5
My Profile ..........................................................................................................6
View My Profile ..............................................................................................6
View Service Packages .................................................................................7
Request Service Packages and Sub-Packages.............................................9
Request Site Code.......................................................................................11
View Pending Requests...............................................................................11
View Request History ..................................................................................12
Edit My Information......................................................................................13
Change Password .......................................................................................13
My Organization ..............................................................................................14
View My Organization Profile.......................................................................14
View My Organization Services ...................................................................15
View My Organization Administrators ..........................................................15
90-Day Inactivity Functionality.........................................................................15
III. ADMINISTRATOR MANUAL .........................................................................15
Objectives .......................................................................................................15
Administrator Roles and the Delegated Model ................................................16
The Delegated Model ..................................................................................16
Administrator Roles .....................................................................................16
Organization Password Administrator..........................................................16
Organization Service Administrator .............................................................17
User Account Administrator .........................................................................17
Home Page Navigation and Menus.................................................................18
Organization Administration Functionality Objectives......................................18
My Organization ..............................................................................................19
My Organization...........................................................................................19
View Organization Profile ............................................................................19
Options ........................................................................................................20
Options: Edit Organization Profile................................................................20
Options: View Grant History.........................................................................20
Options: View Request History ....................................................................21
Options: View Pending Requests ................................................................21
View Service Packages ...............................................................................22
View Hierarchy.............................................................................................23
View Users...................................................................................................24
Request a Service or Site Code for My Organization ..................................24
Request a Service Package.........................................................................24
Request a Sub-package ..............................................................................25
Request a site code .....................................................................................26
Remove a Service or Site Code from My Organization ...............................28
Search.............................................................................................................29
Search for Users in My Organization ...........................................................29
Search for Divisions in My Organizations Hierarchy ....................................30
Administration..................................................................................................30
Pending Requests → User Requests ..........................................................30
View Details of a Pending User Request .....................................................31
Pending Requests → Organization Requests .............................................32
Invite Users..................................................................................................33
Roles and Services → Manage Roles .........................................................34
Audits → Audit Users...................................................................................36
Audits → Audit Users Grants .......................................................................38
Reports............................................................................................................40
User Summary.............................................................................................40
User Service Summary ................................................................................41
Security Administrator Reports ....................................................................42
Service Authority Organization Designation ....................................................44
User Administration .........................................................................................45
Objectives ....................................................................................................45
Add Service Package to User ......................................................................45
Move Users..................................................................................................46
Modify Roles ................................................................................................47
View Grant History.......................................................................................48
View Request History ..................................................................................49
View Pending Requests...............................................................................50
Specify User Password................................................................................50
Reset User Password ..................................................................................51
Reactivating an Inactive Service Package ...................................................53
Inactivity Report .......................................................................................53
Reactivating a Single User .......................................................................55
New Organization and New User Registration ................................................57
Objectives ....................................................................................................57
General Registration Information .................................................................57
Organization Options: Registering a New Top-level Organization ...............57
Step 1: Select the New Top-Level Organization Option ...........................57
Step 3: enter organization information .....................................................59
Step 4: enter user information ..................................................................59
Step 5: select service packages...............................................................60
Organization Options: Registering a new Organization (Division) ...............64
Step 4: enter organization information .....................................................67
Step 5: enter user information ..................................................................68
Step 6: select service packages...............................................................70
User Registration .........................................................................................72
Additional Resources ......................................................................................78
Glossary of Terms .......................................................................................78
I. INTRODUCTION
The Covisint Connection and Administration (CCA) User Manual aims to provide
CCA Users, Security Administrators and Organization Service Administrators
with a step-by-step guide to using the CCA application to maintain user profiles,
to manage service package access, to perform administrative duties and other
registration procedures.
This manual is divided into two major sections:
• User Manual
• Administration Manual.
ALL users, even those with Administration capabilities will find the User Manual
helpful. The Administration Manual is directed to those with an administrative
role.
Primary Objectives
After reading the USER MANUAL portion of this document, ALL users will be
able to:
• Update their Covisint user profile
• Routinely change passwords
• Reset a forgotten password by answering a 'Challenge Question'
• View and contact the organization’s Security Administrators
• Request additional applications or request additional site codes
associated with a service - for themselves
After reading the ADMINISTRATION MANUAL portion of this document,
Security Administrators will be able to:
• Understand various Administrator roles and the associated responsibilities
• Approve or reject users requests
• Maintain user and organization profile information
• Delegate tasks to other administrators in the organization hierarchy
After reading the ADMINISTRATION MANUAL portion of this document,
Organization Service Administrators and Security Administrators will be
able to:
• Grant or revoke access permissions to active internal users
• Manage your organization’s subscription to service packages
• Request additional applications or request additional site codes
associated with a service for the organization
Icons
The following list explains each icon used throughout the guide to help you better
understand CCA processes:
Important information regarding a topic
Warning message
Help regarding a specific functionality
II. USER MANUAL
Objectives
This section of the manual will explain:
• User Home Page content and Navigation
• How to view and edit your profile
• How to view your current service packages and request new ones
• How to change and reset your password
• How to find your administrator’s contact information
Home Page Navigation and Menus
The CCA Home Page contains content and quick links that will assist you in your
use of the CCA tool. As a standard user, most of your tasks can be preformed
using the My Profile and My Organization menus at the top of the Home Page.
The Common Actions list, displays the most popular links from the menus. A list
of Frequently Asked Questions is available on the home page. The four sections
of the home page that you should understand are:
• Dropdown menus (A)
• Important Announcements (B)
• Common Actions (C)
• FAQs (D)
A
C
B
D
My Profile
The My Profile menu contains the following functions:
• View My Profile
• View My Service Packages
• Edit My Profile
• Change My Password
• Request a Service Package
View My Profile
The My Profile menu section houses all of your user information including: user
status, user profile and assigned roles (if applicable).
The User Profile option contains all of your personal information including your
address, email and phone number.
You may edit your user profile at any time by clicking the edit profile link at
the top of the tab.
Finally, under the 'User Assigned Roles' section, you will find all roles you
currently have relating to Covisint administration. Most users do not have any
administrative roles.
Your Security Administrator is the only person able to modify your assigned
roles.
View Service Packages
All service packages to which you have access are listed on the View Service
Packages screen and are organized by category.
To view details of any service package grant, simply click the package name. If
you subscribe to any Partner Portals, detailed information about the associated
codes is accessible by clicking the package name.
Your organization's Security Administrator is able to modify your permissions
to these service packages. To request a new service package, click the Request
Service link.
Request Service Packages and Sub-Packages
Some Service Packages contain Sub-Packages. Sub-packages are designed
such that the parent package must be granted before the sub-packages become
available. You can request a Service Package or a sub-package by clicking the
Request A Service Package option in the My Profile Menu
You will see a list of all requestable service packages. Click the Request button
to request the service.
Note: the following symbols will help you understand attributes of certain
packages:
Packages already owned by your parent company will be denoted by a
check mark.
Packages that require site codes are denoted with a bar code symbol.
Packages that will cause the user to incur fees are denoted with a dollar
sign.
You can request Sub Packages by clicking on the request sub-package link
under the applicable Partner Portal Service (A).
A
The request details will display. You will have the opportunity to enter a request
reason. The request reason will help your administrator make appropriate
decisions regarding your request. Click Continue to continue with the request.
If you have requested a service package that requires site codes, you will need
to select a site code at this point. Confirm your request and submit it. Your
request will be routed to your administrator for approval.
Note: If you requested a service or sub-package that is not already owned
by your parent organization, your administrator will need to request those
services on behalf of the organization before granting them to you.
Request Site Code
Some Sub-packages may require additional Site Codes. Sub-packages that
require additional Site Codes are denoted with the barcode icon . To request
site codes, which may be associated with certain service packages or subpackages, click on the sub-package name to view the details.
Click View Current Site Codes to view the codes currently associated with this
sub-package or click Request Site Code to request access to additional codes.
Once you have requested access to site codes, your request will be routed to
your administrator for approval.
View Pending Requests
You can view the status of all requests you have made. Click View Profile on the
My Profile menu. You will see the View Pending Requests link in the options
bar.
Click the Send Reminder button to email a reminder to the approving
administrator(s). You will have the opportunity to edit the text of the reminder
email before sending it to the administrator.
Click the check box next to the pending request and then click on the Cancel
Pending Request button to withdraw the request.
View Request History
You can view your request history by clicking the View Request History link on
your profile page. Your request history will detail all requests that you have
made. The name of the evaluator, the date requested, and the date of decision
are all displayed for each request. By clicking the request type you can view
additional information regarding the request.
Edit My Information
All of your personal information listed under your user profile can be edited using
the Edit my Information link on the main navigation or via the options links. To
update or change any of your information, simply type in the new information in
the text boxes provided. Once you have updated your profile, click save
changes. If, after inputting new information, you decide to keep the old
information, simply click on the undo changes button, which will reset the fields
to their former state.
It is important that you keep your user profile up to date in order for your
Security Administrator to inform you of any changes regarding your account or
your service packages.
Change Password
It is important to change your password every 90 days to keep your account
secure. To change your current password, click the change password link on
the main navigation or via the options links. You will then be required to input the
new password twice for verification.
Your password must adhere to Covisint security standards. You can view the
password rules by clicking show password rules on the password-reset page.
My Organization
The My Organization menu allows you access to the following functions:
• View My Organization Profile
• View My Organization Services
• View My Organization Administrators.
View My Organization Profile
By choosing View My Organization Profile from the My Organization menu you
will be able to view your organization’s name, address information, and the
name(s) of your Security Administrator.
View My Organization Services
You can view a list of all services, sub-packages and site codes to which your
organization has access by selecting the View My Organization Services option
from the My Organization menu. You can click any service to see what site codes
(if any) your organization has access to for that service.
View My Organization Administrators
You can view a list of all administrators for your organization by clicking View My
Organization Administrators from the My Organization menu. This page will list
not only your Security Administrator(s), but also any Organization Service
Administrators that may have been designated in your organization.
90-Day Inactivity Functionality
CCA can track how often you use Partner Portal applications. Ford, for example,
has chosen to have CCA track how often people are using the FSP applications
by opting to use the 90-Day Inactivity functionality. If you subscribe to FSP, you
must launch one FSP application at least once every 90 days or your FSP status
will become inactive. Once your status is inactive, your user ID appears on an
“Inactivity Report” used by Ford, which may be used as a basis for removing FSP
access entirely.
To check your FSP status, select View Service Packages in the My Profile
menu. You will see the status of your Ford Supplier Portal grant set to active or
inactive. If your grant is set to inactive, your Security Administrator can easily reactivate your FSP grant.
III. ADMINISTRATOR MANUAL
Objectives
The Administrator Manual explains the tasks necessary to maintain your
organization’s data and to administer your users. This manual will cover such
processes as:
• Viewing and Editing your organization profile
• Viewing and Requesting service packages on behalf of your organization
• Viewing and maintaining your organization’s hierarchy
• Viewing and issuing decisions on user requests
• Viewing reports
• Maintaining user profiles, roles, services and site codes.
• Registering a new user or organization
Administrator Roles and the Delegated Model
Before jumping into the functionality, it is good to understand the different types
of administrator roles as well as a brief overview of the delegated administration
model.
The Delegated Model
CCA is designed to give power to people who are best in a position to manage
user access and security decisions. In some companies, this may be
accomplished through a central office; while in other companies, this may be
accomplished by delegating responsibility to people spread throughout the
company. The delegated model allows each company to set up the structure
that best fits their needs for managing security.
The delegated model allows a single company to set up one or more
organizations in CCA. CCA organizations are simply groupings of users with
their own administrator(s) and their own available service packages.
Organizations that are created below the parent organization are called divisions.
Administrators in the parent organization can perform tasks on users in the
divisions below.
Administrator Roles
There are several administrator roles available in CCA that can be assigned to
users. These roles can be used independently or multiple roles can be combined
for a broader variety of administrative options. The available roles are:
✓
✓
✓
✓
Organization Password Administrator
Organization Service Administrator
User Account Administrator
Security Administrator
Each organization must have at least one Security Administrator. The Security
Administrator holds a superset of all administrator rights and responsibilities.
Your organization can have as many or as few administrators as you wish.
Organization Password Administrator
This role provides the ability to search for users, to view users’ profiles and to
reset users’ passwords. Note that users should still be encouraged to reset their
own password, using the self-reset functionality.
Organization Service Administrator
This role allows a user to administer a specific service package as well as all site
codes and sub-packages associated with it.
Granting the Organization Service Administrator role is a two-step process:
1. First, the user must be granted the role and the service package they will
be administering.
2. Once the Organization Service Administrator role has been granted, the
Security Administrator will need to “flag” the particular service package
with which to associate the role.
In order to “flag” the service package, view the user’s service packages,
then click on the service the user will administer. Scroll down to the
Security Administrator Settings. You will see the question “is user an
administrator for this package?” Click the change to “Yes” button. This
will allow the user to approve requests related to this service package,
including user and organization requests, associated site codes or sub
packages of this service package.
•
Note: The Organization Service Administrator role does not allow the
approval of new users. Thus if a new user registers and requests a service
along with their new user ID, the Organization Service Administrator will
not be able to approve or reject the service request until the user has been
approved by a Security Administrator or User Account Administrator.
User Account Administrator
This role allows the approval or rejection of new user IDs. This role is appropriate
for someone in a position to confirm that the user should have access to Covisint
(i.e. a human resources analyst, etc.). The User Account Administrator can also
be used in conjunction with the Organization Service Administrator role to allow
the Organization Service Administrator to approve new users who have
requested the particular service package(s) that they administer.
Security Administrator
The Security Administrator can perform the following major functions:
• Grant or revoke service package and site code access permissions to
users or divisions
• Approve, reject or permanently remove user accounts
• Reset user passwords
• Manage organization profiles and subscriptions to service packages
Every CCA organization must have at least one Security Administrator.
Home Page Navigation and Menus
The CCA Home Page is customized for administrators. The menus and content
you see is different from that of non-administrative users. The home page will
update periodically with announcements of new functionality and/or updated
content for the frequently asked questions.
Organization Administration Functionality Objectives
The Organization Administration will walk you through the various aspects of
administering the services, site codes and reports for your organization. The
Organization Administration section is split into five (5) sections that primarily
mirror the navigation menus:
• My Organization
• Search
• Administration
• Reports
• Service Authority Organization Designation
My Organization
My Organization
Within the 'my organization' menu and screens you are able to perform the
following functions:
• View organization profile
• View service packages
• View hierarchy
• View users
• Edit organization profile
• Add service packages
• Suspend organization
ALL administrative functions for your organization are housed in this section.
Therefore, any changes here affect the entire organization. Use the 'My Profile'
section for creating updates to your personal profile only.
View Organization Profile
All organization contact information on file is available from this page, including
the names of the organization’s Security Administrators. If you are the Security
Administrator for this organization, the option links, located across the top of the
profile screen, are accessible only to you.
Options
Four options are available to assist you in managing the information contained in
your organization’s profile:
✓ Edit organization profile
✓ View grant history
✓ View request history
✓ View pending requests
These options are available on all Organization pages.
Options: Edit Organization Profile
You can edit your organization’s contact information by clicking the edit
organization profile option.
Options: View Grant History
By clicking the view grant history option you can view the history of all service
packages and site codes granted to your organization, as well as the date of the
grant and the name of the grantor. You can search for particular grant
information by entering an event date or by selecting a service package and
clicking search.
Options: View Request History
You can view the history of all organization requests for services and site codes
by clicking the view request history option on the View Profile page. The
Request History logs the request type, request date, package, site codes,
approval status, evaluator’s name and decision date. Clicking the request type
will allow you to view the decision reason. The Request History is sorted by the
request date.
Options: View Pending Requests
You can view all pending requests submitted by your organization by clicking the
view pending requests option in the View Profile screen. The pending request
screen will display the date that the request was made and what type of
administrator can approve it (i.e. Service Owner, Parent Organization, SAO).
Note: See last section of the Administrator Manual on page 44 for an explanation
of Service Authority Organizations (SAO).
You can send an email reminder to the approving authority from the View
Pending Requests screen by clicking the send reminder button. You will have
the opportunity to edit the reminder email before it is sent.
If your organization no longer requires a pending service package or site code,
you can cancel your request by checking the check box next to the request and
then clicking the cancel pending request button.
View Service Packages
All of the service packages to which your organization currently subscribes are
listed on the 'view service packages' tab/menu option. They are sorted by
category. Sub-packages, if applicable, are grouped under the parent service
package. The status of the service package grant is listed along with the date the
package was granted.
To view details of the various service packages, simply click the more info link.
View Hierarchy
The 'view hierarchy' tab/menu option shows the current hierarchy of your
organization within CCA. This structure reflects the Covisint user administration
model, not necessarily the legal or physical structure of your organization. To
view or edit an organization, simply click on its name within the organizational
tree. To view the registered users in each organization or division, click on the
user icon.
To add an organization or division, the Security Administrator for the new
organization must add a new organization division via the registration function at:
https://us.register.covisint.com/start.html.
View Users
The 'view users' tab shows all users in your organization.
To view the details of any user, click on the user name. This will display the user
administration screen where you may perform a number of administrative
functions relevant to the user, including modifying roles and suspending the user.
All user administration tasks are most easily accessed by first Searching for
the User.
Request a Service or Site Code for My Organization
This functionality is used to request access to a new service, sub-package or site
code on behalf of your organization. Before you can grant any service, subpackage or site code to a user, it must be granted to your organization.
Request a Service Package
Request a service by clicking on the Request A Service Package for My
Organization option from the My Organization menu. A list of all service
packages not already granted to your organization will display. Click on the
request button next to the service package name. Your request will be routed to
the approving administrator and you will be notified via email once a decision has
been issued for your request.
If access has already been granted to your company you will see the words
access granted next to the service package name and description.
Icons indicating the following functionality are noted next to each service
package as appropriate:
Packages already owned by your parent company will be denoted by a
check mark.
Packages that require site codes are denoted with a bar code symbol.
Packages that will cause the user to incur fees are denoted with a dollar
sign.
Request a Sub-package
To request a sub-package (sometimes referred to as an application) of a
particular package, click the request sub-package (application package) link
beneath the package. The package must be granted to the organization before
the sub-package can be requested or granted.
A list of sub-packages will appear. Click on the request button next to the one
you wish to request.
Request a site code
Many packages and sub-packages require the use of site codes. If your
organization is a non–SAO (see the description of Service Authority
Organizations on page 44) or is a division of a parent organization, you will not
automatically have access to all site codes that your parent or SAO organization
may have.
To request access to additional site codes, start by selecting the View Service
Packages link from the My Organization menu, then click the service for which
you wish to request the code. You will see a list of supplier codes in the service
package information box. Click the request supplier code link.
You will see a list of codes from which you may select. Check the check box (es)
next to the code you wish to select and click continue. Your request will be
routed to appropriate administrator(s) for approval. Once your request has been
approved, you will be notified by email.
Remove a Service or Site Code from My Organization
You can remove a service or sub-package from your organization by selecting
the View my Organization Services option from the My Organization menu.
Click on the service package or sub-package that you wish to remove.
Click the suspend link next to the status indicator. You will be required to enter a
suspension reason. Suspension is a temporary state, however suspending a
service will make it immediately inaccessible to your users.
You can permanently remove the service if you believe your organization will
never need access to it again. First you must suspend the service package.
Once the service package has been suspended, view the service package
details again and click permanently remove organization’s grant for service
package button.
Search
Search for Users in My Organization
CCA provides two options when searching for a user within your organization:
the Basic search and the Advanced Search.
The Basic Search involves entering the user’s last name, first name, email
address, telephone number or user ID in the search box. Select the appropriate
search criteria from the drop down menu, and then click on the Search button.
Use the filter options to narrow your search. You can exclude active users,
pending users, suspended users, rejected users or users from divisions of your
hierarchy by using the search filter options.
Use the advanced search options to search for all users in your organization with
a given service package or site code.
Search for Divisions in My Organizations Hierarchy
Search for divisions in your organization by clicking on the Search for Divisions
option in the Search menu. Select the search criteria from the drop down menu,
then input the name of the organization and click Search.
Use the filter options to narrow your search. Click on the check box(es) next to
the filter options to exclude active, pending, suspended, permanently removed or
rejected companies from your search results.
Administration
Pending Requests → User Requests
Access pending user requests by clicking the User Requests sub-menu under
the Pending option in the Administration menu. User requests are broken out into
three tabs:
✓ New Users
✓ User Service Requests
✓ User Site Code requests
The number of pending user requests for each and a summary of user
information is listed in parenthesis on each tab. Services to which your
organization does not subscribe are denoted with the red X icon.
After deciding whether to approve or reject the request, simply select the radio
button for the appropriate action and click the submit decision button.
If you have more than one request pending, you do not have to submit
a decision regarding all requests at one time. If you wish to submit a
decision at a later date, simply leave the no action radio button selected
and return at any time to submit your decision.
View Details of a Pending User Request
View more specific information about a request by clicking on the View Request
icon. View the user’s profile information and approve or reject all requested
service packages individually.
If you must reject all or part of a user request, you will be required to
input a reason for the rejection before submitting your decision.
Services to which your organization does not subscribe are denoted with the red
X icon. A default rejection reason is filled in for services that the user requested
but the organization does not have access. You cannot approve user service
requests unless your organization subscribes to the requested services.
Once you have reviewed your decisions and entered in reasons for rejection (if
applicable), click the submit decisions button.
After clicking the submit decisions button, you will be prompted twice to verify
the decision. The first prompt asks you to confirm your decision. The second
prompt serves as a reminder that some Covisint services (notated with a green
dollar sign icon) are billed on a per-user license fee. Adding new users to these
applications indicates your organization's willingness to pay for the incremental
license fees. Click OK if you agree to the terms and to proceed with the
approvals.
Pending Requests → Organization Requests
The number of pending organization service request approvals and all
organization information is listed on the Organization requests screen, accessible
through the Administrator menu, the pending option, and selecting the
Organization requests sub-option.
Similar to user requests, the organization requests are broken out into three (3)
tabs:
✓ New organization
✓ Service packages
✓ Site codes
The number of pending requests for each and a summary of the requesting
organization's information are listed on each tab. After deciding whether to
approve or reject each request, select the radio button for the appropriate action
and click the submit decision button. To view the detailed organization profile
before submitting your decision, click the view request icon
Carefully consider all new organization requests, as these will become divisions
of your organization, each with their own Security Administrator.
Service Package and Site Code requests can be submitted by divisions of your
organization or by other top-level organizations requesting access to your site
codes for a particular service.
Invite Users
The Invite Users function enables you to create an email message inviting users
within your organization to register for Covisint access. Enter the email
address(es) of the user(s) you wish to invite in the email address field. You can
invite as many or as few registrants as you choose. The subject line and
message body are editable.
Once you click the send invitation button, users will be sent an email containing
a link, which will take them directly to the registration tool, ready to register as
users in your organization. The correct organization will be automatically selected
for them.
Roles and Services → Manage Roles
The Manage Roles option allows you to perform the following administrative
duties:
•
•
•
Understand privileges associated with each role
View/remove users assigned to a role
Add users to a role
Click on the Role Name to view a description of the privileges associated with
the role.
Click on View/Remove users to view all users in your organization with that role.
You will be able to click on the “Include all divisions” box to view a list of all users
with that role at or below your level on your company’s hierarchy tree. To remove
role from a user click on the select box next to the user’s name and then click on
the remove selected role(s) button.
To add new users to a role, click on Add User next to the desired role on the
Manage Roles screen. A search screen will appear allowing you to search for the
user to which you wish to add the role. Select the appropriate user. You will then
be able to check the select box next to the user’s ID and add the role to his or her
profile.
Audits → Audit Users
Some of Covisint’s portal partners require Security Administrators to perform a
periodic audit of their users. A quarterly audit reminder will be emailed to all
Security Administrators reminding them to perform the necessary audit activities.
You can perform the audit at any time using the Audit User functionality in CCA.
You can access the user audit by clicking on the Audits → audit users option
from the Administrator menu.
The Audit Users page displays your audit history. Your audit will display the date
and user id of administrators who have completed audits in the past and logged
compliance.
A list of all users in the administrator’s organization will display. Clicking the
include all divisions box will enable you to audit all organizations at your level
or below on your company’s hierarchy tree.
The user audit form allows you to either suspend or permanently remove any
user on the list. If the user is active he/she may be suspended from this screen
by clicking the suspend user checkbox. If the user is currently suspended then
he/she may be permanently removed by clicking on the permanently remove
user checkbox on this screen.
The audit form may consist of several pages. In order to complete the audit, you
must examine each page of the audit form. On the final page, you can either
confirm the audit and log completion or return later to log completion at another
time. Logging completion satisfies the quarterly audit requirement.
If, during the course of your audit, you choose to suspend or permanently
remove one or more users you will be required to enter a reason for suspensions
and/or permanent removals. A default suspension/permanent removal reason will
auto-populate. You will have opportunity to choose to send an email to the
user(s) notifying them of the change in status.
Audits → Audit Users Grants
Some of Covisint’s portal partners require Security Administrators to perform a
periodic audit of their users grants. An annual User Grant audit reminder will be
emailed to all Security Administrators reminding them to perform the User Grant
audit. You can view your audit history on the Annual User Grant Audit page. The
audit history records the date, the type of audit, and the auditor’s ID for past
audits.
Click on the service package name to view a list of user in your organizations
that have access to the service.
You may choose to download an Excel spreadsheet containing the User
Grants, perform your audit verification offline, and then fulfill your audit
requirement by skipping straight to the log audit compliance step. Click on the
link to download .csv file to access the information offline.
You can click the show all divisions button to conduct the audit for all
organizations at or below your organization in your organization’s hierarchy. To
permanently remove a service from a user, click the check box next to his or her
name. You will have the opportunity to send the users an automatic email
notifying them of the removal of the service package.
Once you have concluded reviewing the user list for each service package, click
continue to the next step. You can then confirm and log audit completion.
Logging completion of the audit fulfills the annual audit requirement.
Reports
The Reports options allow you to view CCA real-time reports, customized for
your role. Within the reports options you can view three reports:
• User Summary Report
• User Service Summary Report
• Security Administrator Reports
User Summary
The User Summary report allows you to gain at-a-glance information regarding
the number of users in your organization and the corresponding status. The
report will display the number of pending, rejected, active, suspended and
removed users. Simply click on the User Summary Report option from the
Reports menu to view the report.
User Service Summary
The User Service Summary report allows you to gather information about the
numbers and identities of users who have been granted various service
packages. You can limit your search to your own organization, or you can
broaden it to include all users above or below your organization in your
company’s hierarchy. You can select a service package to narrow your results to
all users with a specific service package or you can search for all users with all
service packages. Click the submit button to initiate the report.
A list of users who meet the report criteria will display. The report displays the
User ID, Last Name, First Name, Email Address and Company/Division name of
all users who meet the report criteria.
Security Administrator Reports
There are two Security Administrator reports: user report and user package
grants. The user report will display a list of all users in the organization. The filter
can be expanded to include all organizations at or below your organization on
your company’s hierarchy tree. The report can also be sorted by user id or by the
users’ last names.
The Security Administrator Reports can be downloaded to an Excel file. Click on
the View Report in Excel link on the results screen to display the results as an
Excel file. The Excel document will display in a browser window. Select Save As
from the file menu, and the report can be saved to your hard drive as an .xls file.
The User Package Grants report allows you to view the same information as the
User Report with the added bonus of being able to filter the results by service
package. Again, this report can be downloaded as an Excel file.
Service Authority Organization Designation
Service Authority Organizations (SAOs) are organizations that have authority
over a specific parent supplier code for a specific service. An organization
becomes the SAO by being the first to register and be approved for access with a
particular parent supplier code. The SAO designation is valuable when a
company has several entities that fall under a single supplier code, but operate
as independent top-level organizations in CCA.
If your organization is the SAO for a service package, you may receive service
package and site code requests from other top-level organizations that share the
same parent supplier code.
If your organization is not the SAO for a service package that uses supplier
codes, you should be aware that all future requests for sub-packages and site
codes will be routed to the SAO Organization’s Security Administrator for
evaluation.
User Administration
Objectives
The User Administration portion of this manual will assist you in managing userspecific issues. This section of the manual will enable you to perform the
following:
• Add a Service Package to a User
• Remove a Service Package from a User’s Profile
• Move Users to a different Organization on your Hierarchy Tree
• Modify User’s Roles
• View Grant History
• View Request History
• View Pending Requests
• Specify and Reset User Passwords
• Reactivate an Inactive Service Grant
Add Service Package to User
You can add any service package to which your organization has access to a
user’s profile. First you will need to search for the user using the search function.
Next, click the add service package link.
Select the desired service from the list of service packages. Click the add button
next to the service you would like to add.
You will then be asked to confirm your decision to add the service package to the
user’s profile. Once you have done so the user will have access to the service
package.
Note: The search function is explained in the Organization Administration portion
of this manual.
Move Users
Use the Move Users function to move a user from his current organization to any
other organization within the same hierarchy. You must be a Security
Administrator at the highest level involved in order to perform the move.
If the user has access to a service package that the destination organization
does not have, the service package, sub-package or site code will be
automatically granted to the destination organization.
First you must search for the user and view his/her profile. Click the move user
option. A list of potential destination organizations will appear. Select the desired
destination organization from the list and click the continue button.
You will receive confirmation that the user was successfully moved. The user and
the destination organization Security Administrator will receive email notification
that the ID has been moved.
Modify Roles
You can modify the roles a user has at any time using the Modify Roles option
in the user’s profile. A list of available roles will display. The Role Description field
will explain the role in general terms. The Privileges field will list the permissions
associated with the role.
Select the desired role by clicking on the select box next to the role name. Click
on the continue button at the bottom of the screen to submit your changes. The
role will be added to the user’s profile.
Note: For more information on the various roles and their associated privileges,
see the “Administration Roles and Responsibilities” section of this manual.
View Grant History
A grant history log is available in each user’s profile. Click the View Grant
History option to access the a log of each service package granted to the user,
the grantor’s name, the date granted, associated site codes and notes. You can
easily search through a long grant history log by using the search function on the
View Grant History page. You can filter your search by the date granted (event
date) or by the service package name.
View Request History
You can view any user’s request history by clicking on the View Request
History link on his/her profile page. The request history will detail all requests
that the user has made. The name of the evaluator, date requested and date of
decision is displayed for each request. By clicking on the request type you can
view additional information regarding the request.
View Pending Requests
You can view all pending requests made by any user. Click the View Pending
Request option in the user’s profile. The View Pending Request screen displays
the request type, service package and date submitted.
Specify User Password
You have the option to specify a user’s password. Specifying a password can be
used as an alternative to resetting the password if the user is not receiving their
password email or if there is an urgent situation. Once the password has been
specified, the user will need to reset it upon his or her next log in. Specifying a
password is an appropriate choice when the user needs to be able to gain
immediate access with the new password or when the user does not have
access to email and can’t use the reset password option.
To specify a password, search for the user’s profile, then click the specify
password option. The user’s challenge question and answer will display. The
challenge question and answer is intended to verify the identity of the user. If you
are unsure that the person requesting the password change is indeed the owner
of the ID, then you should require the user to answer the challenge question
before resetting the password.
Once you have verified the user’s identity, you can enter the new password in the
New Password box. Remember that the password must conform to the
password rules. You can click on the show password rules link for a detailed
explanation of the password rules, or refer to the Reset Password section of the
User Manual module of this manual for more information. Re-enter the new
password in the second New Password box. Click on the Submit password
change button to submit the changes.
Reset User Password
As Security Administrator, you have the ability to reset your users’ passwords. As
discussed in the previous section, there are two ways to change a user’s
password: specifying the password and resetting the password. When a
password is reset a new randomly generated eight-character password is
created and assigned to the user. The first four characters of the new password
are displayed on your screen, so that you can communicate them verbally to the
user. The remaining four characters are emailed to the user. The user will then
join the four characters you communicated with the four characters transmitted
via email and can log into the portal. This method is the most secure way to
change users passwords and is preferred.
To reset the password, click on the reset user password option in the user’s
profile. The user’s challenge question and answer will display. The challenge
question and answer is intended to verify the identity of the user. If you are
unsure that the person requesting the password change is indeed the owner of
the ID, then you should make sure that the user is able to answer the challenge
question before resetting the password.
Click on the reset password button to initiate the reset.
The first four characters of the password will display. To eliminate confusion,
CCA uses only numeric characters in the randomly generated passwords. The
password was successfully reset and an email containing the second half was
generated and sent to the user.
Note: Due to latency in external networks and email systems, it may take some
time for the password email to arrive in the user’s inbox. Most emails will take
less than 15 minutes to arrive, however, some can take as long as an hour to be
delivered to the user.
Reactivating an Inactive Service Package
Some of Covisint’s portal partners require that users log in and launch an
application at least once every 90-days. Users who do not log in and launch an
application within the 90–day period will lose access to their partner portal grants.
The status of the grant is automatically updated to “inactive”.
As Security Administrator, you can re-activate the user’s grant. There are two
methods of reactivating the user’s grant. You can view your organization’s
inactivity report to reactivate or suspend user’s grants en masse or you can
reactivate a single user from the user’s profile.
Inactivity Report
To take action on many users’ inactive service grants, use the inactivity report
functionality. To access the inactivity report, start by viewing your organization
service packages. Click on the applicable service package. On the service
package details page click on the view inactivity report to generate the report.
A list of all users with whose service package status is inactive will be generated.
You can sort the Inactivity Report by first name, last name, and last access date
or organization name. You can also check the Show All Divisions box to show
all users in all organizations below your own on your company’s hierarchy. The
Inactivity Report will display the organization name, the user’s name, and the
date of the instance of the user launching a partner portal application. You can
choose to either take no action, to revoke partner portal grant from the user or to
reactivate the user’s partner portal grant. If you revoke the user’s partner portal
grant the user will lose all training certification and transaction history in partner
portal applications and will not be able to re-gain that information.
Once you have made all you decisions regarding the status of the users listed on
the report, click the continue button at the bottom of the page. A confirmation
page will display. Carefully check to be sure that the right users’ service
packages are being reactivated or revoked. Confirm your decision by clicking the
submit decision button.
Reactivating a Single User
To reactivate a single user, view the service package list in the user’s profile. You
will notice the status of the service package is inactive.
Click on the service package name to view the details. In the service package
status box the status will be inactive. Click on the reactivate link next to the
user’s service package status.
A summary of your decision will display. Review your choices to be sure that you
have appropriately re-activated or revoked the access, then click the submit
decision button.
New Organization and New User Registration
Objectives
The New Organization and User Registration section of this manual will step
prospective users and Security Administrators through the registration process.
The New Organization and User Registration section will enable you to:
• Register a New Top-Level Organization
• Register a New Organization (Division)
• Register a New User
General Registration Information
All registration activities can be commenced from the Registration Tool start
page. The URL for the start page is https://us.register.covisint.com/start.html
Each organization registered in CCA must have its own Security Administrator.
For this reason all new top level organization and new organization (division)
registrations also include steps to register a Security Administrator.
Depending on the service package that you register for, you may be asked to
review and accept supplier portal specific user agreements during the registration
process.
Organization Options: Registering a New Top-level Organization
Registering a new top-level organization is a six-step process.
Step 1: Select the New Top-Level Organization Option
You may register a new top-level organization by pointing your browser to
Registration Tool Start Page. Select the New Top-level Organization Option.
Step 2: accept administrator role
Carefully review the responsibilities outlined on the accept administrator role
screen. If you do not feel that you are the right person to be the Security
Administrator, click on the no, I do not accept button. If you are comfortable with
the responsibility the role entails, click on the accept administrator role button.
Note: for more information on the Security Administrator role, please refer to the
Administration Roles and Responsibilities section of this manual.
Step 3: enter organization information
Enter your organizations name and address information in the required fields.
Your organization name must be unique in the Covisint exchange.
Required fields are denoted with red text and an asterisk. Non-required fields are
gray. You are welcome to enter information in the non-required fields if you wish.
Click on the continue registration button.
Step 4: enter user information
Fill in your name and contact information in the required fields. Select your time
zone and preferred language information. If you wish you may also fill in the
remaining non-required business card information. Click on the continue
registration button.
Choose and enter your desired user ID. User Ids must be at least 4 characters in
length and can contain no more than 20 characters. User IDs must be unique
within Covisint CCA, no two users can have the same ID.
Choose and enter the your password. The password must conform to Covisint’s
password rules. You can click on the show password rules link for more
information regarding the password rules. The password rules are also detailed
in the Reset Password section in the User Manual module of this manual. Reenter the password in the Re-enter password box.
Carefully choose and enter the your Challenge Question and Challenge Answer.
The Challenge Question and Answer will be used to allow you to reset your own
password. For security purposes, the Challenge Question and Answer should
contain information known only to you. Click on the continue registration
button.
Step 5: select service packages
A list of service package choices will display. Check the select box next to the
services you wish to request on behalf of your organization. Services that require
additional information, such as site codes, are denoted with a pencil icon.
Services that entail additional per-user fees are notated with a dollar sign. Click
on the continue registration button.
If you selected a service that requires additional information, you will be asked to
enter that information. In the sample screenshot below Ford Supplier Portal was
the selected service and the registrant is required to enter a GSDB code
(supplier code). Note that a hyperlink for additional help is available if you need
help determining your supplier code.
If you selected a service requiring a supplier code, you can enter either your
parent code or you location code. In either case, CCA will look up the parent
code and the parent code will be associated with the request.
If you cannot find the additional information that you need, you can click on
deselect and continue. This will allow you to continue with your request, but will
deselect the service at this time.
If you are the first organization to request access to the requested parent code
for the selected service, your organization will become the Service Authority
Organization (SAO) upon approval. The registration tool will display an
explanation of the SAO responsibilities. Click on the yes, I accept button to
continue. If you feel that your organization should not be the SAO, you can click
on the No, I do not accept agreement button, however, you will not be able to
complete your registration for the selected service package.
If another organization has already been granted the Service Authority
Organization designation, the registration tool will display a screen explaining
that there is already a SAO for the requested code. If a SAO exists, your request
will be routed to the SAO Security Administrator for review. Click on the yes, I
accept button to continue.
Note: For more information about the role of the SAO, please refer to the Service
Authority Organization Roles and Responsibilities section in the Administration
Manual module of this manual.
Step 6: review request and submit
The final step is to review the request. Check to be sure that your organization
information is correct and that the correct service packages were selected. When
you are confident that the request is correct, click the submit registration button
at the bottom of the page.
Organization Options: Registering a new Organization (Division)
Registering as a new division is a seven-step process. When registering as a
division it is important to understand that you are creating a hierarchy for your
organization with a delegated administration model.
Step 1:Select the New Division registration option
Step 2: accept administrator role
Carefully review the responsibilities outlined on the accept administrator role
screen. If you do not feel that you are the right person to be the Security
Administrator, click on the no, I do not accept button. If you are comfortable with
the responsibility the role entails, click on the accept administrator role button.
Note: for more information on the Security Administrator role, please refer to the
Administration Roles and Responsibilities section of this manual.
Step 3: find organization
In order to register as a new division, you must first find your top-level
organization. You can search for your organization two ways: by name or by
supplier code. To search for your top-level organization by name, enter your
company name in the organization name search box and click the search button.
To search by supplier code, enter the desired supplier code and select the
correct partner portal from the drop down menu that corresponds with the code,
then click search.
A list of organizations matching your search criteria will display. Select the
correct organization from the list displayed. If none of the organizations are
correct, you can search again from the search window on the bottom of the
screen.
Next to each organization is a hierarchy icon displayed in the org column. The
hierarchy icon will denote whether the organization is a top-level organization or
a division. If the top box on the hierarchy icon is highlighted, the organization is a
top-level organization with divisions. If the bottom right box of the hierarchy icon
is highlighted, the organization is a division of another top-level organization. You
can click on the hierarchy icon to get an exact understanding of the
organization’s hierarchy. If no hierarchy icon is displayed, the organization is not
a part of a hierarchy but is a top-level organization with no divisions.
Select the desired organization and click on the continue registration button.
Step 4: enter organization information
Enter your organization’s name and address information in the required fields.
Your organization name must be unique.
If you wish you may also enter a phone number and duns number in the nonrequired fields. Required fields are denoted with red text and an asterisk. Nonrequired fields are gray. Click on the continue registration button.
Step 5: enter user information
Fill in your name and contact information in the required fields. Select your time
zone and preferred language information. If you wish you may also fill in the
remaining non-required business card information. Click on the continue
registration button.
Enter your preferred user ID. User Ids must be at least 4 characters in length and
can contain no more than 20 characters. User IDs must be unique within the
Covisint exchange, no two users can have the same ID.
Choose and enter your password. The password must conform to Covisint’s
password rules. You can click on the show password rules link for more
information regarding the password rules. The password rules are also detailed
in the Reset Password section in the User Manual module of this manual. Reenter the password in the Re-enter password box.
Carefully choose and enter your Challenge Question and Challenge Answer. The
Challenge Question and Answer will be used to allow you to reset your own
password. For security purposes, the Challenge Question and Answer should
contain information known only to you. Click on the continue registration
button.
Step 6: select service packages
A list of service package choices will display. Check the select box next to the
services you wish to request on behalf of your organization. Services that require
additional information, such as site codes, are denoted with a pencil icon.
Services that entail additional per-user fees are notated with a dollar sign. Click
on the continue registration button.
Step 7: review request and submit
The final step is to review the request. Check to be sure that your organization
information is correct and that the correct service packages were selected. When
you are confident that the request is correct, click the submit registration button
at the bottom of the page.
User Registration
If you are an employee of an existing Covisint member organization seeking
access to a Covisint service package used by your organization, you should
register as a new user. If you don’t know if your organization is registered,
attempt to register as a new user first. The new user registration process
includes a search for existing organizations registered with Covisint. If your
organization does not exist you will have the opportunity to register a new
organization.
Step 2: find organization
There are two ways you can search for your organization: you can search by
organization name or by your supplier code. To search by organization name,
input the key part of the organization name in the text box provided. You may
also wish to use the dropdown menu to perform a more thorough search using
the 'contains' or 'begins with' option. Then, click the 'search' button to find your
results.
To search by supplier code, select a supplier portal from the drop down menu,
then enter your supplier code and click on the search button. A list of
organizations with access to the supplier code will display.
Once your search results are displayed, you will need to select the proper
administrative organization. This may be a top-level organization or a division.
The address of the organization does not need to match your office location.
The hierarchy icon, displayed in the org column, will indicate if the organization is
a parent organization, a division or a top-level organization with no divisions.
Select the appropriate organization and click the continue registration button.
Click on the perform new search button if you have not yet located your
organization.
Step 3: enter user information
Fill in your name and contact information in the required fields. Select your time
zone and preferred language information. If you wish you may also fill in the
remaining non-required business card information. Click on the continue
registration button.
Enter your desired user ID. User Ids must be at least 4 characters in length and
can contain no more than 20 characters. User IDs must be unique within Covisint
CCA, no two users can have the same ID.
Choose and enter the your password. The password must conform to Covisint’s
password rules. You can click on the show password rules link for more
information regarding the password rules. The password rules are also detailed
in the Reset Password section in the User Manual module of this manual. Reenter the password in the Re-enter password box.
Choose and enter the your Challenge Question and Challenge Answer. The
Challenge Question and Answer will be used to allow you to reset your own
password. For security purposes, the Challenge Question and Answer should
contain information known only to you. Click on the continue registration
button.
Step 4: select service package(s)
A list of service package choices will display. Check the select box next to the
services you wish to request on behalf of your organization. Services that require
additional information, such as site codes, are denoted with a pencil icon.
Services that entail additional per-user fees are notated with a dollar sign. Click
on the continue registration button.
If you selected a serviced that requires additional information, you will be asked
to enter that information. In the sample screenshot below Ford Supplier Portal
was the selected service and the registrant is required to enter a GSDB, or
supplier, code. Note that a hyperlink for additional help is available if you need
help finding the additional information required.
If you selected a service requiring a supplier code, you can enter either your
parent code or you location code. In either case, CCA will look up the parent
code and the parent code will be associated with the request.
If you cannot find the additional information that you need, you can click on
deselect and continue. This will allow you to continue with your request, but will
unselect the service, so that it is not being requested at this time.
Step 5: review request and submit
The final step of this registration process is to review all information input in the
previous steps. Thoroughly review this information before clicking the 'submit
registration' button. If you wish to edit any of this information click the 'back'
button to return to previous screens.
Additional Resources
Glossary of Terms
Security Administrator - the person able to control all aspects of security within their CCA
organization and down the entire CCA tree (if exists)
Organization Service Administrator - the person in a supplier organization able to grant and
revoke a certain (designated) Service from users within their CCA organization and down the
tree. Many Org Service Admins were created as a result of Ford / Daimler Migration.
Service Administrator - the person in a partner portal owning organization who can approve
supplier organizations to have access to their portal
Supplier Code – Covisint’s generic reference to codes used by all partners to identify their
suppliers. This term encompasses both location codes and site codes.
Site Code – refers to the supplier codes attached to user grants of partner sub-packages
Location Code – refers to the supplier code attached to user grants of partner parent packages
(i.e., the Ford Supplier Portal or the Daimler Chrysler Portal)
GSDB code - Ford’s unique term associated with their supplier codes. GSDB is an acronym for
Global Supplier Database.
SAO – Acronym for “Service Authority Organization.” Refers to the Organization Responsible for
a Parent Supplier Code in conjunction with a partner portal grant. I.e., Covisint is the SAO for the
Ford Supplier Portal code 2149, even though Covisint-Europe is a top-level company with the
same code for FSP. Although a SAO must always be a top level CCA company, all CCA top
level company are not always SAOs.
Service – An application or tool accessed via Covisint
Sub-service – An application or tool that is nested beneath a parent service. (i.e, GSDB online is
a sub-service of the Ford Supplier Portal)
Package – A grantable container that contains at least one service.
Sub-package – A grantable container that contains at least one sub-service. The sub-package
requires that the parent package be granted first.