1
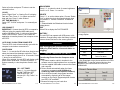
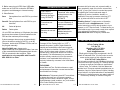
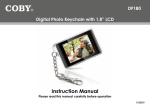
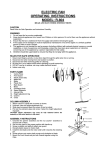
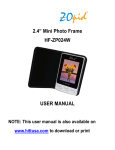
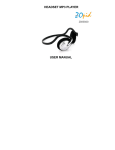
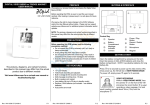
DIGITAL PHOTO ORNAMENT X’MAS BALL User Manual BUTTONS & INTERFACE PREFACE We express our sincere thanks for purchasing this Digital Photo Ornament (DPO)! HF-Z015CB Before operating this DPO, be sure to read this user manual carefully. After reading it, please keep it in a safe place for future reference. We reserve the right to make changes to this DPO, Software and/or this User Manual without notice. Please visit our support website www.hittusa.com for additional product information and/or updates. NOTE: The pictures, diagrams and certain functions described in this manual may differ from the actual product due to different models. Control Key PRECAUTIONS The pictures, diagrams, and certain functions described in this manual may differ from the actual product due to different models Visit www.hittusa.com for a revised user manual or troubleshooting tips Rev. DPO-RXB-25/10 13 GT- 22507 P.1 Battery Door On / Off / Menu / Confirm Before operating this DPO, please read the following Battery Door Forward precautions carefully: Latch Do not operate this DPO in extremely cold, hot, USB Connector Backward dusty or damp environment Avoid putting this DPO under direct sunlight Do not scrub this DPO with a hard thing; it may GETTING STARTED result in scratches on the screen and/or damage to the hardware Open the battery door by pressing on the latch. Keep this DPO and all accessories out of reach Insert two pieces of AA (LR6) batteries and close the of children under the age of 3 years. battery door. Press for 2 secs to power up the DPO. KEY FEATURES To power off, simply follow the same step. 1.5" super-bright LCD display Press button again to display the MAIN MENU. 100+ hours of non-stop slideshow (w/ new batteries & medium brightness setting) Requires 2AA batteries (not included – use alkaline batteries) Built-in memory for storage of up to 130 photos Work with Windows & Mac OSX 10.6 or older Power ON & OFF Timer Clock & date display Support PNG, TIFF, JPEG, GIF & BMP picture formats Press to scroll through the functions in the Plug-n-Play operation menu. Rev. DPO-RXB-25/10 13 GT- 22507 P.2 Rev. DPO-RXB-25/10 13 GT- 22507 P.3 Select a function and press button to set the selected function. BRIGHTNESS Press to select the level of screen brightness from 01 to 10. Press to confirm. CLOCK Select “Digital Clock” or “Analog Clock” to display Date and Time. Press to select and set the date and time. Press when finished. SET TIME MANUALLY Select “SET CLOCK” and press to manually set clock. USB CONNECT IMPORTANT: Connect the mini-DPO to computer’s USB port using the supplied USB cable and to enable USB Mode Press to bring up Main Menu. Select “USB Connect”. Select “Yes” to start the application to transfer pictures from computer to the mini-DPO. AUTO SYNC CLOCK FROM COMPUTER The mini-DPO clock will automatically sync with the computer’s clock when connected to it. SLIDE SHOW Press to set the On/Off slide show function and select the interval time between each slide. There are 16 options ranging from 00 to 15 seconds. Press button to set and confirm. When 00 is selected, the mini-DPO will display a still photo without slide show. You have to press buttons manually to view the photos stored in miniDPO. ON – OFF TIMER Press to cycle through the ON TIMER and OFF TIMER hours (00 - 24), minutes (00 - 59), Press to confirm. Rev. DPO-RXB-25/10 13 GT- 22507 P.4 DELETE Press to set the delete option. Choose “Delete One” to delete the photo that was displayed when you pressed . Choose “Delete All” to delete all photos. *** Please disable the Slideshow function before delete photos. EXIT Select Exit to display the PHOTO MODE. BATTERY The mini-DPO can operate with USB power or AA batteries. Change battery when the battery indicator become shows low-level or the screen gets dim. 6. Image Option + Zoom In - Zoom Out WARNING Clear / Rect Crop Photo / Fit Size After unplugging the mini-DPO from the PC's USB port, please wait for 10 seconds before replugging. Rotate L Rotate photo to the Left Rotate R Rotate photo to the Right Add Add Photo Setting Change background and font colors in the Menu PHOTO TRANSFER (DPFMATE) Transferring Photos from the Computer to the Frame 1. This frame contains a built-in installer for the software used to transfer photos from a computer. 2. Use the supplied USB cable to connect the frame and computer. 3. Drivers install automatically when the frame connects to a computer and USB Mode is enabled (by USB Connect option from Menu) 4. Once all drivers install, the program launches automatically, displaying all of the images currently on the frame. Supported photo formats are JPEG, GIF and BMP. 5. Browse for image on your hard drive Rev. DPO-RXB-25/10 13 GT- 22507 P.5 7. Click Download to sync photos with the mini-DPO. IMPORTANT: To transfer selected pictures from computer to the frame make sure to click on DOWNLOAD Rev. DPO-RXB-25/10 13 GT- 22507 P.6 8. Before removing mini-DPO from USB cable, make sure to Click Exit to close the DPFMate program to avoid damage to internal memory. 9. Other Buttons Save Save photos from mini-DPO to your hard disc Save All Save all photos from mini-DPO to your hard disc All Select all photos Delete Delete photo 10. mini-DPO can hold up to 130 photos, the status bar shows the numbers of photos loaded into the DPO and the maximum photo storage If photo manager does not pop up automatically (due to the autorun setting of the PC), go to My Computer, double click DPFMate CD icon and run the program manually. Note: For MAC user, please unzip MacDPFMate.zip file to application folder, from one of the removable disks that appears when the minDPO is connected to the computer. This application is only compatible with PowerPC Mac OSX 10.6 or older. TROUBLESHOOTING TIPS Can’t see the pictures that you saved to the frame using DPFMATE Frame does not power on Batteries do not last too long Make sure to click on “Download” after adding all the pictures to the selection using DPFMATE Make sure you are using new set of batteries & batteries are installed properly. Make sure to use alkaline batteries for long battery life LIMITED 90-DAY WARRANTY Coverage: Hi-Tech Trading (USA), Inc. (“HiTT”) warrants this product (“product”) against defects in materials and workmanship under normal consumer use for 90 days from the date of purchase. HiTT, at its option, will at no charge repair, replace or refund the purchase price of this product should it not conform to this warranty. This limited warranty is a consumer’s exclusive remedy, extends only to the first consumer purchaser, is not transferable and is valid only on products purchased by consumers in the United States or Canada. Miscellaneous: This warranty does NOT cover defects or damage that result from: (a) improper operation, storage, misuse or abuse, accident or neglect, such as physical damage (cracks, scratches, etc.) to the surface of the Product resulting from misuse; P.7 Rev. DPO-RXB-25/10 13 GT- 22507 R Obtaining Service: To obtain service or information, please send email to [email protected]. You will receive instructions on how to ship the product, at your expense, to a HiTT Service Center. To obtain service, you must include a copy of your receipt, receipt is not required if you registered your product on our website www.hittusa.com within 30 days of purchase date. COMPANY & CONTACT INFORMATION EXCLUSIONS: Normal Wear and Tear: Periodic maintenance, repair and replacement of parts due to normal wear and tear are excluded from coverage. Rev. DPO-RXB-25/10 13 GT- 22507 (b) contact with liquid, water, rain, extreme humidity or heavy perspiration, sand, dirt or the like, extreme heat, or food; (c) use of the Product for commercial purposes or subjecting the Product to abnormal usage or conditions; (d) service, installation, alteration, or modification in any way by someone other than HiTT and, (e) other acts which are not the fault of HiTT. P.8 Hi-Tech Trading USA Inc P.O. Box 179 Woodbury, NY 11797 U.S.A. Web: www.hittusa.com Email: [email protected] ZOpid and the Stylized Logo are registered in the US Patent & Trademark Office. All other product or service names are the property of their respective owners. © 2013 Hi-Tech Trading USA Inc The information contained in this User Manual is believed to be correct at the time of printing. HiTT reserves the right to change or modify any information or specifications without notice. The contents of this User Manual are provided “as is.” Except as required by applicable law, no warranties of any kind, either express or implied, including, but not limited to, the implied warranties of merchantability and fitness for a particular purpose, are made in relation to the accuracy, reliability, or contents of this guide Rev. DPO-RXB-25/10 13 GT- 22507 P.9