1
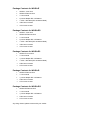
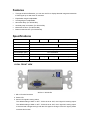
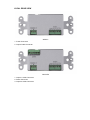
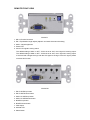
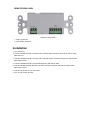
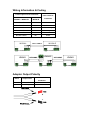
VGA EXTENDER WVGA-L / WVGA-E2 (Local) WVGA-R WVGA-RS (Remote) USER MANUAL V1.1 Package Contents for WVGA-E WVGA-L Local Unit WVGA-R Remote Unit 1 user manual 2 power adapter DC 12V/600mA 1 VGA 1.2M cable (HD-15 Male to Male) 4 M4*10mm screws 4 P6*14mm screws Package Contents for WVGA-ES WVGA-L Local Unit WVGA-RS Remote Unit 1 user manual 2 power adapter DC 12V/600mA 1 VGA 1.2M cable (HD-15 Male to Male) 4 M4*10mm screws 4 P6*14mm screws Package Contents for WVGA-E2 WVGA-E2 Local Unit 1 user manual 1 power adapter DC 12V/600mA 1 VGA 1.2M cable (HD-15 Male to Male) 2 M4*10mm screws 2 P6*14mm screws Package Contents for WVGA-R WVGA-R Remote Unit 1 user manual 1 power adapter DC 12V/600mA 2 M4*10mm screws 2 P6*14mm screws Package Contents for WVGA-RS WVGA-RS Remote Unit 1 user manual 1 power adapter DC 12V/600mA 2 M4*10mm screws 2 P6*14mm screws Any thing missed, please contact with your vendor. Features Through the WVGA Extender, you can use one PC to display identical image and extension of VGA signal up to 300 meter on monitors. Equalization length is adjustable. VGA signal gain is adjustable. 62ns total delay. (For WVGA-RS) 2ns delay step increments. (For WVGA-RS) Memorize function. (For WVGA-RS) Button locked function. (For WVGA-RS) Specifications Function WVGA-L WVGA-R VGA In/Out Connector WVGA-RS HD-15 Female x 1 Cable Connector 6 Pole Captive screw 2x 6 Pole Captive screw Max. Resolution 1280x1024 60Hz Cable Distance 300 m (Max.) Power Adapter (Min.) DC 12V 600mA Housing Metal Weight WVGA-E2 136g 136g Dimensions (LxWxH) 145g 139g 105x42x38 mm LOCAL FRONT VIEW WVGA-L / WVGA-E2 1. HD-15 Female Connector 2. Power LED 3. Control H/V signal inverting switch The default setting of SW1 is “OFF”. If SW1 is set to “ON”, the H signal is inverting output. The default setting of SW2 is “OFF”. If SW2 is set to “ON”, the V signal is inverting output. If the local end changes the logic with the H/V signal or the logic of the H/V signal, please use then this function. LOCAL REAR VIEW WVGA-L 1. Power Connector 2. Output Cable Connector WVGA-E2 1. Output 1 Cable Connector 2. Power Connector 3. Output 2 Cable Connector REMOTE FRONT VIEW WVGA-R 1. HD-15 Female Connector 2. EQ – Equalization length adjust (Adjust it and weak characters be sharp) 3. GAIN – Adjust brightness 4. Power LED 5. Control H/V signal inverting switch The default setting of SW1 is “OFF”. If SW1 is set to “ON”, the H signal is inverting output. The default setting of SW2 is “OFF”. If SW2 is set to “ON”, the V signal is inverting output. If the local end changes the logic with the H/V signal or the logic of the H/V signal, please use then this function. WVGA-RS 1. EQ / R SKEW up button 2. EQ / R SKEW down button 3. GAIN / G SKEW up button 4. GAIN / G SKEW down button 5. B SKEW up button 6. B SKEW down button 7. VGA Output 8. Indicate LED 9. Select button REMOTE REAR VIEW WVGA-R / WVGA-RS 1. Power Connector 2. Input Cable Connector Installation 1. Turn off the PC. 2. Connect WVGA-Extender Local Unit HD-15 female input connector with HD-15 male to male cable from PC. 3. Connect WVGA-Extender Local Unit HD-15 female output connector with HD-15 male to male cable from monitor. 4. Connect WVGA-Extender Local and Remote Unit with CAT.5 cable. 5. Connect WVGA-Extender Remote Unit HD-15 female connector with HD-15 male to male cable from monitor. 6. Connect the power cord on each side. 7. Turn on the monitor and PC. WVGA-RS Operation A. General Mode: The LED shines after the power is on and all buttons have no function except the select button. B. Adjust Mode: In general mode, push select button to entry EQ/GAIN adjust mode. When finish the adjust mode, push select button again to entry RGB SKEW adjust mode. Push one more select button, you can quit the adjust mode and will save the adjusted data, go into the general mode. EQ/GAIN adjust mode: (RGB SKEW function can not work) 1. Push select button and the LED extinguishment, will entry the EQ/GAIN adjust mode. 2. Push EQ up/down button to increase or decrease the signal compensation, when push two buttons at the same time, the signal compensation will go back to zero. 3. Push GAIN up/down button to increase or decrease the brightness, when push two buttons at the same time, the brightness will go back to zero. RGB SKEW adjust mode: (EQ/GAIN function can not work) 1. Push select button and the LED shines, will entry the RGB SKEW adjust mode. 2. Push R SKEW up/down button to increase or decrease the delay time, when push two buttons at the same time, the delay time is zero. 3. Push G SKEW up/down button to increase or decrease the delay time, when push two buttons at the same time, the delay time is zero. 4. Push B SKEW up/down button to increase or decrease the delay time, when push two buttons at the same time, the delay time is zero. 5. Push select button after you adjusted, the LED shines means you can quit the adjust mode and will save the adjusted data, go into the general mode. Wiring Information & Coding 6 Pole Captive screw Connector Color Code for Conductor WVGA-L / WVGA-E2 WVGA-R Ro-/Ro1-/Ro2- RI- White-Blue Ro+/Ro1+/Ro2+ RI+ Blue Go-/Go1-/Go2- GI- White-Orange Go+/Go1+/Go2+ GI+ Orange Bo-/Bo1-/Bo2- BI- White-Green Bo+/Bo1+/Bo2+ BI+ Green WVGA-L WVGA-R CAT.5 CABLE POWER DC 12V + NC POWER - Ro+ Ro- Go+ Go- Bo+ + Bo- DC 12V NC - DC 12V/600mA WVGA-E2 Bo2- Bo2+ Go2- Go2+ Ro2- Ro2+ CAT.5 CABLE POWER DC 12V NC POWER DC 12V - RI- GI+ GI- BI+ BI- DC 12V/600mA WVGA-R + RI+ RI+ RI- GI+ GI- BI+ BI- + NC DC 12V/600mA POWER DC 12V - Ro1+ Ro1- Go1+ Go1- Bo1+ Bo1- DC 12V/600mA Adaptor Output Polarity Color Code for PIN # Output Level 1 +12V Black-White 2 RTN(-) Black Conductor Red Sleeve PIN1 + Black Sleeve WVGA-R CAT.5 CABLE PIN2 + NC - RI+ RI- GI+ GI- BI+ BI- DC 12V/600mA Additional Options Select any additional options you may require. (WVGA-RS not need.) It provides perfect skew delay correction, we suggest when distances over 150M it is needed. (Item No: SK-101) Distances and Resolutions for CAT.5/5E and CAT.6 cables CAT.5/5E CAT.6 50M 2048x1536 100M 1280x1024 180M 1024x768 200M 800x600 300M 640x480 30M 1920x1440 50M 1280x1024 100M 800x600 PS. We suggest to use CAT.5 cable because the performance is better than others. © C&C TECHNIC TAIWAN CO., LTD. All rights reserved. Trademarks: All the companies, brand names, and product names referred to this manual are the trademarks or registered trademarks belonging to their respective companies.