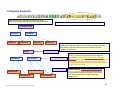
1
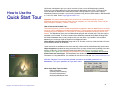
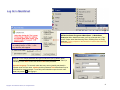
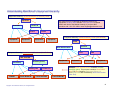
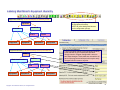
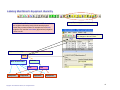
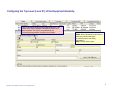
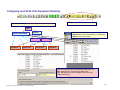
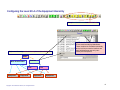
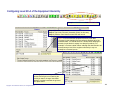
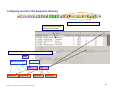
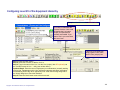
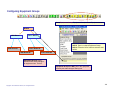
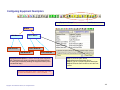
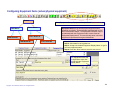
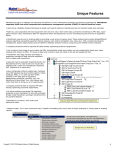
How To Use Quick Start...……………………………………………………..….2
Log On ...……………………………………………………………………......….3
Understanding the Equipment Hierarchy……………………………………..…4
Labeling MaintSmart’s Equipment Hierarchy.……………………………….....5-6
Configuring the Top-Level of the Equipment Hierarchy……………………..…7
MaintSmart
version 4.1
Equipment Hierarchy
Set-Up
Quick Start Tour
Configuring the Level 2-B of the Equipment Hierarchy……………………..…8
Configuring the Level 2-A of the Equipment Hierarchy………………….....…9-10
Configuring the Level 3 of the Equipment Hierarchy……………………….…11-12
Configuring Equipment (general description)……………………………...…..13
Configuring Equipment Groups……………………………………...……….....14
Configuring Equipment Descriptors…………………………………………..…15
Configuring Equipment Items……………………………………...……………..16-17
Get the MaintSmart User Manual (197 pages) as Adobe:
http://www.maintsmart.com/MaintSmart_User_Guide.pdf
Get the MaintSmart Purchasing/Inventory Manual
http://www.maintsmart.com/Support/MaintSmart3EPurchasingUserGuide.pdf
Have a Question? Pick Up the phone and call toll-free: 1-888-398-0450 or +1541-751-0450 or email us at [email protected] Skype ID ‘maintsmart’
Copyright © 2007 MaintSmart Software, Inc. All Rights Reserved
1
How to Use the
Quick Start Tour
Quick start is designed to give you a quick overview of one or more of MaintSmart’s powerful
features. It’s recommended that you also download the MaintSmart User Guide. The User Guide
covers all topics of MaintSmart in detail and provides a handy reference if you need to explore
MaintSmart’s features in depth. If you have any questions call (toll-free USA/Canada) 1-888-398-0450
or +1-541-751-0450. Email: [email protected] .
Important: The sample data contained in the Demo is for a manufacturing facility. However
MaintSmart works great for building, fleets, schools, hospitals, etc. Top level entity: “Plant” may be
easily changed to “Building”, “School”, “Fleet” etc.
How to Use the Quick-Start Tour:
This tutorial assumes you have already entered basic configuration data into MaintSmart or are using
one of the “demo” databases provided with MaintSmart. For the purposes of this tutorial we’ll use the
manufacturing demo database. For information on configuring MaintSmart please see the full User
Manual. The MaintSmart Demo is the full MaintSmart program with a 30 day limit. This time may be
extended once if needed. The Demo contains three databases: Manufacturing Data, Building Data
and a blank database that you may configure with your own data. If you decide to use the blank
database you can simply email the System ID as displayed under:
Help>>About>>License>>Register along with a P.O. number or call in a credit card and we’ll issue
an immediate extension of the license.
Other resources are available too such as: web help, online tutorials, MaintSmart Help (menu items:
Help>>Contents) and status bar help (set screen focus on many screen items by tabbing to the item
with the <TAB> key. For the purposes of this Quick-Start Tour topics or concepts of special
importance are in green text. Warnings are presented in red text. Items of emphasis are underlined
Screen labels are in bold type. The MaintSmart User Guide contains additional details and
information on using MaintSmart. It is available for free from our web site: http://www.maintsmart.com
Click the "Airplane" icon on several selected screens for an audible guided tour of
MaintSmart. Turn your speakers on if you have some.
Other Quick Start Topics Include:
•PM Configuration
•Inventory and Purchasing
•Preventive Maintenance
•Analyzing MaintSmart Data
Copyright © 2007 MaintSmart Software, Inc. All Rights Reserved
2
Log On to MaintSmart
If the database option ‘radio buttons’ are
not visible press the <CTRL> + <F5>
keys and they will reappear.
Step 1: Start MaintSmart from
Windows>>Start>>Programs>>MaintSmart. (or MaintSmart
Enterprise When MaintSmart starts you’ll be presented with a “Tips”
screen. Select either Manufacturing Demo, Building Demo or Empty
database. For the purposes of this tutorial we’ll use the Manufacturing
Demo database.
Step 2: For the sample databases the login is entered for you by default: When
MaintSmart starts you’ll be presented with a log in input screen. Select a "Plant" (or
"Building") Enter admin for the user ID and 1234 for the password.
Spanish Language: To see work order data entry screen (partially translated) in
Spanish enter the user name: adminsp and the password 1234. MaintSmart may be
translated into most languages. To see this partial translation open the work order
data entry screen
after logging in.
Copyright © 2007 MaintSmart Software, Inc. All Rights Reserved
3
Understanding MaintSmart’s Equipment Hierarchy
Equipment Hierarchy: General Description of Hierarchy Levels
Top-Level
Be certain that you understand the difference between the
equipment hierarchy labels and the actual data items contained
within each level of the labeled hierarchy. If you have ANY
questions call 1-541-751-0450 or email [email protected].
Level 2-A
Level 2-B
Level 3
Level 3
Equipment Hierarchy: Labeled Hierarchy Levels (User-Defined)
Equipment
Equipment
Equipment
Equipment
Plant
Process
Work Area/Location
Line
Equipment Hierarchy: Actual Hierarchy Data Items (User-Defined)
Line
GM - Plant #A
Assembly (Paint)
Paint Shop
Etching Line
Bath #1
Fanuc Robot #1
Copyright © 2007 MaintSmart Software, Inc. All Rights Reserved
Equipment
Equipment
Equipment
Example: Plant: General Motors <contains> Process:
Assembly (paint). This process <contains> Line: Primer
Line. This line <contains> Equipment: Robots 1-3.
This Equipment is also contained by Work Area/Location:
Paint Shop.
Primer Line
Fanuc Robot #2
Equipment
Fanuc Robot #3
4
Labeling MaintSmart’s Equipment Hierarchy
Equipment Hierarchy: General Description of Hierarchy Levels
Open ‘Program Configuration’ to label
the ‘Equipment Hierarchy.
NOTE: All yellow background buttons
are for configuration (set-up).
Top-Level
Level 2-A
Level 2-B
Level 3
Equipment
Equipment
Level 3
Equipment
Equipment
Equipment Hierarchy: Labeled Hierarchy Levels (User-Defined)
Plant
Work Area/Location
Process
Line
Equipment
Equipment
Copyright © 2007 MaintSmart Software, Inc. All Rights Reserved
Type in the names (labels) of the equipment hierarchy
levels that best fits your maintenance operation.
Simply close the ‘Program Configuration’ screen to
save these changes. These labels are cascaded to all
parts of the program and all reports but may be easily
changed from this screen at anytime.
Line
Equipment
Equipment
5
Labeling MaintSmart’s Equipment Hierarchy
IMPORTANT NOTE: Do not confuse the LABEL for each of
the equipment hierarchy levels with the actual physical
levels that you enter as data. For example: the level label
might be ‘Line’ and the actual data (physical level) might be
‘Oven Line #3’.
Set up Top Level(s) (Level #1) ‘Plant’.
Notice how label for Top-Level (Level
#1) changes to the text ‘Plant’..
Equipment Hierarchy: Labeled Hierarchy Levels (User-Defined)
Plant
Work Area/Location
Process
Line
Equipment
Equipment
Line
Equipment
Copyright © 2007 MaintSmart Software, Inc. All Rights Reserved
Equipment
6
Configuring the Top-Level (Level #1) of the Equipment Hierarchy
Type in all required fields (yellow background boxes). The
‘Plant Code’ may be between 100-900 but is best to let it
auto-increment. This ‘Plant’ is represented by it’s
‘Location/Unique Identifier’ throughout the program.
Copyright © 2007 MaintSmart Software, Inc. All Rights Reserved
Step 1: Click ‘New’ button.
Step2: Enter information for this ‘Plant’ in
each box on both screen tabs
(‘Location/Contact’ and ‘Billing
Information’).
Step 3: Press ‘Save’ button.
7
Configuring Level #2-B of the Equipment Hierarchy
Equipment Hierarchy: Labeled Hierarchy Levels (User-Defined)
Set up Level 2-B ‘Work Area/Location’
Plant
Work Area/Location
Process
Line
Equipment
Equipment
Step 1: Click ‘New’ button.
Step2: Enter a ‘Work Area/Location’ in yellow box.
Step 3: Press ‘Save’ button.
Line
Equipment
Equipment
Type in all required fields (yellow background boxes). The
‘Work Area/Location’ must be unique within each
‘Plant’.Equipment may be later added to this level of the
equipment hierarchy.
Copyright © 2007 MaintSmart Software, Inc. All Rights Reserved
8
Configuring the Level #2-A of the Equipment Hierarchy
Set up Level 2-A ‘Process’ and Level 3 ‘Line’
Equipment Hierarchy: Labeled Hierarchy Levels (User-Defined)
NOTE: the ‘Process Number’ and ‘Plant
ID’ are used internally by MaintSmart.
These numbers are created automatically
and you will never need to interface with
them as MaintSmart uses only userfriendly text descriptions.
Plant
Work Area/Location
Process
Line
Equipment
Equipment
Line
Equipment
Copyright © 2007 MaintSmart Software, Inc. All Rights Reserved
Equipment
9
Configuring Level #2-A of the Equipment Hierarchy
Set up Level 2-A ‘Process’ and Level 3 ‘Line’
Step 1: Press the ‘New’ button
Step 2: Type in the ‘Process’ (‘Assembly (Paint)’ in this case)
Step 3: press the ‘Save’ button to save this new record.
NOTE: In some cases the equipment hierarchy level label
(‘Process’ in this example) may not perfectly represent all of the
contained data. You should strive for a ‘best-fit’ when labeling the
hierarchy levels but don’t expect it to always fit perfectly. For
example: a ‘Process’ called ‘Offices’ although this data needs to be
entered at some level of the equipment hierarchy it may not
actually be a ‘Process’ per se.
To change (edit) an existing record left
mouse-click the grid row containing the
record you want to change. Next make
changes in yellow box below the grid and
then press ‘Save’.
Copyright © 2007 MaintSmart Software, Inc. All Rights Reserved
10
Configuring Level #3 of the Equipment Hierarchy
Set up Level 2-A ‘Process’ and Level 3 ‘Line’
These are the actual ‘Lines’
that have been created.
Equipment Hierarchy: Labeled Hierarchy Levels (User-Defined)
Plant
Work Area/Location
Process
Line
Equipment
Equipment
Line
Equipment
Copyright © 2007 MaintSmart Software, Inc. All Rights Reserved
Equipment
11
Configuring Level #3 of the Equipment Hierarchy
Set up Level 2-A ‘Process’ and Level 3 ‘Line’
This utility concatenates the
‘Process’ with the ‘Line’ to aid
in keeping the ‘Line’ name
unique. It is optional and
normally not needed. If you
want to use it you must check
this menu item.
If this box is not visible then
simply type the ‘Line’ name
into the ‘Line (unique)’ box.
Step 1: Press the ‘New’ button
Step 2: Select the ‘Process’ to add the ‘Line’ to.
Step 3: Type in the name of the ‘Line’ into the ‘Line (unique)’ box OR optionally use
the ‘Include Process in Line…’ utility (see red box above).
Optional Step 4: Enter the count of employees (non-maintenance) normally working
on this ‘Line’ if stoppages on this ‘Line’ interrupt the process and cause lost product,
manufacturing time or any other ‘opportunity cost’. Enter their average wage rate in
the ‘Hourly Wage’ box. Check the checkbox.
Step 5: Press the ‘Save’ button to save this new record.
Copyright © 2007 MaintSmart Software, Inc. All Rights Reserved
12
Configuring Equipment
Equipment Set-Up: Relationship of Equipment Groups,
Equipment Descriptors and actual physical Equipment items.
Set up Equipment Groups, Equipment Descriptors and Equipment Items
Equipment Group
Descriptor
Equipment
Descriptor
Equipment
Equipment
Equipment
Equipment Groups are used to classify and group similar equipment.
Equipment groups are used primarily for filtering equipment item dropdown boxes to limit the selections and make it easier to find the
equipment item needed.
Equipment Group
Robots
ABB Robot
Fanuc Robot
Equipment Descriptor
Equipment Items
ABB Robot #1
Fanuc Robot #1
ABB Robot #2
Copyright © 2007 MaintSmart Software, Inc. All Rights Reserved
Fanuc Robot #2
Equipment Descriptors are simply text items that are used
to help you build you equipment item list quickly and
consistently. Descriptors are NOT the actual physical
equipment and therefore when naming descriptors a general
name should be used. (see example on left). Equipment
descriptors are building blocks to use when creating actual
physical equipment items.
Equipment Items are the actual physical equipment
that are maintained. Equipment items are displayed
in user-friendly text that you configure. You may use
the equipment descriptor to help you build your
equipment list.
13
Configuring Equipment Groups
Set up Equipment Groups, Equipment Descriptors and Equipment Items
Robots
ABB Robot
ABB Robot #1
Fanuc Robot
Step 1: Press the ‘New’ button
Step 2: Type in a unique Equipment Group.
Step 3: Press the ‘Save’ button to save this new
record.
Fanuc Robot #1
ABB Robot #2
Fanuc Robot #2
Equipment Groups simply
provide a filter when looking for
an equipment item. That’s it.
Equipment Groups are NOT part of the equipment
hierarchy but rather simply a filtering tool.
Copyright © 2007 MaintSmart Software, Inc. All Rights Reserved
14
Configuring Equipment Descriptors
Set up Equipment Groups, Equipment Descriptors and Equipment Items
Robots
ABB Robot
ABB Robot #1
Fanuc Robot
Fanuc Robot #1
ABB Robot #2
Fanuc Robot #2
Equipment Descriptors are not the actual physical equipment
item. Descriptors are simply text data used as building blocks
for easily and consistently creating the equipment items (in the
next and final step)
Step 1: Press the ‘New’ button
Step 2: Select the Equipment Group.
Step 3: Type in a unique Equipment Descriptor.
Step 4: Press the ‘Save’ button to save this new
record.
Equipment Descriptors have a secondary use : call
for more information on this: 1-541-751-0450
Copyright © 2007 MaintSmart Software, Inc. All Rights Reserved
15
Configuring Equipment Items (actual physical equipment)
Robots
Set up Equipment Groups, Equipment Descriptors and Equipment Items
ABB Robot
ABB Robot #1
Fanuc Robot
Equipment Items are the actual physical equipment items
located in your facility. These items are associated with a ‘Line’
and a ‘Work Area/Location’. The Equipment Descriptor may be
concatenated with the ‘Equipment Index’ to auto-create an
‘Equipment Display Name’. This user-friendly name is how this
equipment is represented throughout MaintSmart.
Fanuc Robot #1
ABB Robot #2
Fanuc Robot #2
Step 1: Press the ‘New’ button
Step 2: Select data for each yellow box.
Step 3: Accept auto-created ‘Equipment Display Name’ or type in
your own equipment name.
Step 4: Press the ‘Save’ button to save this new record.
The ‘Equipment Index’ has
no significance other than
to help build the ‘Equipment
Display Name’.
Copyright © 2007 MaintSmart Software, Inc. All Rights Reserved
16
Example: Equipment Item and Position in Hierarchy
GM - Plant #A
Example from Work Order Data Entry screen
Assembly (Paint)
Paint Shop
Etching Line
Bath #1
Fanuc Robot #1
Below is a practical example of how the MaintSmart
equipment hierarchy works. Notice user friendly
‘Equipment Display Name’ in ‘Equipment’ box.
Primer Line
Fanuc Robot #2
Fanuc Robot #3
Left-click the filter icon to display the pop-up menu
with all ‘Equipment Groups’. Select a group and it
populates ‘Equipment’ drop-down box with
equipment from that group only OR simply select
equipment from full list without filtering.
Copyright © 2007 MaintSmart Software, Inc. All Rights Reserved
Selecting the equipment causes the ‘Line’
and ‘Work Area/Location’ to auto-populate.
17