1
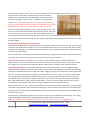
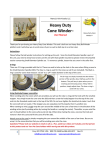
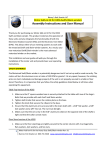
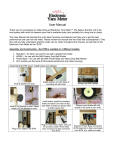
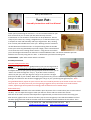
Nancy’s Knit Knacks LLC
_______________________________________________________
Yarn Pet™
Assembly Instructions and User Manual
Thank you for purchasing our Yarn Pet™. It is an innovative holder for your
balls and cones of yarn. A center pull ball, either directly from the
manufacturer or one wound on a ball winder can be problematic. Either a
clump of yarn comes out, causing a tangled mess, or as the ball releases yarn,
it collapses on itself and eventually ends up a tangled mess. Also, working
from a center pull ball adds twist to the yarn. Working from the outside of
the ball alleviates all of these issues. In the past working from the outside
meant you had to stop periodically to pull off a length, which caused the ball
to roll across the room creating uneven tension. Using the Yarn Pet allows
you to knit tangle and tension free and won’t introduce additional twist. You will be amazed at just how
effortless it is to knit by using the Yarn Pet™. It will become your favorite knitting tool.
Tools Needed: a 5/64” Allen wrench which is included.
Assembly Instructions
The Yarn Guide/Tensioner Post
Lightly press the end of the yarn guide/tensioner post into the large hole on
the platform. Do not press it is too hard or it will be difficult to remove. You
will adjust tension on your yarn by turning this post which forces the yarn to
“bend” as it comes through the “curly q”. If you don’t want to add any
tension to your yarn, then just align the curly q so the yarn has a straight
path from the ball to your needles. When done using the Yarn Pet, you can remove the post by twisting it while
pulling it out of the hole. Be careful of snagging the curly q on your yarn during storage/transport. When
using Mill Wound balls, adjust the post so that it does not extend beyond the top of the ball and do not use the
tensioner post. This will prevent the yarn from getting snagged at the top of the ball. As the ball becomes
smaller, adjust height of the platform accordingly. Mill wound balls have a football shape.
Rod and Disc Assy
The wooden disc is attached to the rod and held in place by means of the 2 small collars (one on either side of
the disc). You can adjust the height to meet your ball size. All size rods are used in this manner.
Slide one of the collars onto the rod and position it approximately 2 inches from one end. Then using your
Allen wrench, tighten the set screw in this collar (Tip: do not over tighten). Then slide the wood disc on from
the other (long) end. Then slide on the other collar and “sandwich” the disc between the two collars. Then
1
Cary, NC 27518 USA 800-731-5648 Fax 866-445-4371 Rev. 7
[email protected] www.nancysknitknacks.com
tighten the set screw on the 2nd collar. (Tip: do not position the 2nd collar tightly against the disc because we
want the disc to rotate freely around the rod. The disc should not
wobble, either. Spin the collar with your finger to make sure it spins
freely after you tighten the 2nd collar. If it doesn’t, then adjust the
collars. Note: If you did happen to want to restrict the back spinning
action, you could tighten the collars against the wood disc and also run a
#64 rubber band under the disc and around the wood yarn guide.
Insert the rod into the white plastic insert. Insert your ball of yarn onto
the rod. If you are able to locate the center hole on your ball, then slide
the center hole onto the rod and let it rest on the wooden disc. If you
cannot exactly locate the center hole, then do the best that you can and slide the ball onto the rod. As you get
near the end of the ball while knitting, you may need to reposition the ball onto the rod to avoid the yarn from
getting snagged.
Storing and transporting the Yarn Pet and parts
When you are finished knitting, simply pull both the yarn guide and the post out of the yarn pet. You may leave
the collars and wooden disc in place on the rod. The stainless steel rod is not sharp and you may place it safely
inside your knitting bag. You must be somewhat careful with the yarn guide/tensioner post, however, because
of the curly q’s pointed end.
Tip: if the vinyl feet start to slip on the table after extended use, lightly clean the bottom of the feet with soap
and water. This will remove oils and other dirt and restore the “grip” to the feet.
Options for the Yarn Pet: NKK offers the YP Cone Kit™ which includes another (smaller) wooden disc, 1
additional collar, and 2 steel washers. These are used to assist you in mounting a variety of yarn cones. If you
are a regular cone user, then you should consider this useful option. Occasional cone users don’t need it.
Usage Recommendations: Usually when working from the outside of the ball, it has to be tugged to get it
rolling and have a length to work with. With the Yarn Pet, you will not be pulling off a section to knit with, but
simply knit and the ball will unroll to meet your needs. Tugging or pulling out a length may actually cause back
spin. The yarn Pet can be used in any position, on a table next to you, on the floor, or left in your knitting bag.
The yarn guide keeps the ball from pulling off the top. Turn the yarn guide to add more tension as the yarn
comes off the ball. As the ball gets smaller, raise the disc up so that it continues to unroll off the side of the
ball. Some manufacturers make a “barrel’ shaped skein. In this case center the disc as best as you can, but
you may have to periodically adjust the yarn if it gets caught at the top or bottom of the rod.
Note for 8-14” and 11” rods - If you have purchased one of these optional rods to hold cones, you may also be
interested in the optional L-Bolt, clamp block and wing nut. Use this clamp to secure the pet to the table when
using large cones. Simply lay the unthreaded portion of the L-Bolt across the mid-section of the wood pet and
clamp it to your table.
We hope that you will enjoy using the Yarn Pet for many years to come. Despite its simple design, it is a highly
engineered product. Thank you for supporting American ingenuity and workmanship.
Note – the small black tip pictured on the end of the rod is no longer included – it snagged the yarn.
2
Cary, NC 27518 USA 800-731-5648 Fax 866-445-4371 Rev. 7
[email protected] www.nancysknitknacks.com