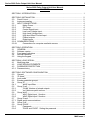
1
Series 2000 Pulse Output Unit User Manual
i
Series 2000 Pulse Output Unit User Manual.
CONTENTS.
SECTION 1 INTRODUCTION ............................................................................................... 1
SECTION 2 INSTALLATION. ................................................................................................
2.0
Panel Cutout. ..............................................................................................................
2.1
Instrument sealing ......................................................................................................
2.2
INPUT CONNECTIONS .............................................................................................
2.2.1
Mains Power ....................................................................................................
2.2.2
DC Power ........................................................................................................
2.2.3
Control Signal input .........................................................................................
2.2.4
Low Level Voltage Input ..................................................................................
2.2.5
High Level Voltage Input .................................................................................
2.2.6
High level 20mA Current Input ........................................................................
2.2.7
Pulsed outputs. ................................................................................................
2.2.8
Digital inputs ....................................................................................................
2.2.9 COMMUNICATIONS. .................................................................................................
2.2.9.1
Connections for computer read/write comms. ................................................
2
2
2
4
4
4
4
5
5
5
5
6
6
6
SECTION 3 OPERATION. ....................................................................................................
3.1
GENERAL ..................................................................................................................
3.2
Software version .........................................................................................................
3.3
Front panel indications ...............................................................................................
3.4
Normal Operation .......................................................................................................
3.5
Using the keypad ........................................................................................................
7
7
7
7
8
9
SECTION 4 LONG SCROLL ................................................................................................. 9
4.1
Modifying data ........................................................................................................... 10
4.2
LONG SCROLL ELEMENTS .................................................................................... 10
4.3
PASSWORD PROTECTION .................................................................................... 10
4.3.1 Password entry .......................................................................................................... 11
SECTION 5 SOFTWARE CONFIGURATION .....................................................................
5.0
General ......................................................................................................................
5.1
'E' Mode .....................................................................................................................
5.2
Lock mode .................................................................................................................
5.3
Emode parameter groups..........................................................................................
5.4
Group 'IP' ...................................................................................................................
5.4.1
'bIAS' Input Bias .............................................................................................
5.5
Group 'Cont' ...............................................................................................................
5.5.1
'CHAN' Number of pulsed outputs. ................................................................
5.5.2
'ton' Minimum pulse on time. ..........................................................................
5.6
Group 'dinS' ...............................................................................................................
5.6.1
'dIN1' Digital input 1 function. .........................................................................
5.6.2
'dIN2' Digital input 2 function. .........................................................................
5.7
Group 'Coms' .............................................................................................................
5.7.1 Digital serial communications ....................................................................................
5.8
Group 'CAL' ...............................................................................................................
5.9
Group 'PASS' .............................................................................................................
5.9.1
Passwords ......................................................................................................
5.9.2
'PASS' and 'CHGE' . Setting the password ....................................................
11
11
11
11
12
12
12
12
12
12
12
12
13
13
13
13
13
13
13
M42 Issue 1
ii
Series 2000 Pulse Output Unit User Manual
SECTION 6 - HARDWARE CONFIGURATION ..................................................................
6.0
General ......................................................................................................................
6.1
Gaining access to the option boards .........................................................................
6.2
Broken input drive selection. .....................................................................................
14
14
14
14
SECTION 7 - CALIBRATION ..............................................................................................
7.0
General ......................................................................................................................
7.1
Preparation ................................................................................................................
7.2.1 Main input span. ........................................................................................................
15
15
15
15
SECTION 8 - SERIAL COMMUNICATIONS........................................................................
8.0
GENERAL DESCRIPTION........................................................................................
8.1
Specification. .............................................................................................................
8.1.1 2-Wire EIA-485 Mode (RS485) ...............................................................................
8.1.2 4-Wire EIA-422 Mode (RS422) ...............................................................................
8.2
Connections. ..............................................................................................................
8.2.1 General. .....................................................................................................................
8.2.2 2 Wire EIA-485 Mode (RS485) .................................................................................
8.3
Connection reference table. ......................................................................................
8.3
COMMUNICATIONS PROTOCOL ...........................................................................
8.3.1 Message construction................................................................................................
8.3.2 Write messages ........................................................................................................
8.3.3 Read messages.........................................................................................................
8.3.4 Message header. .......................................................................................................
8.3.5 Instrument address. ...................................................................................................
8.3.6 Wildcard addresses ...................................................................................................
8.3.7 Message parameter code..........................................................................................
8.3.8 Message data field ....................................................................................................
8.4
POU read/write parameter codes ..............................................................................
8.5
Response from read or write messages ...................................................................
8.6
Error responses .........................................................................................................
8.6.1 Corrupt message response .......................................................................................
8.6.2 Syntax error response ...............................................................................................
16
16
16
16
16
16
16
17
18
18
18
18
18
19
19
19
19
19
20
20
20
21
21
APPENDIX A - Part number coding ..................................................................................... 22
APPENDIX B - Fault codes .................................................................................................. 22
M42 Issue 1
Series 2000 Pulse Output Unit User Manual
1
SECTION 1 INTRODUCTIONSECTION 1 INTRODUCTION
The FGH Pulse Output Unit (POU) is an eight channel control unit designed to split an
analog control signal from a conventional temperature controller into the digital signals
required to sequentially switch solid state relays. This is typically used to control pulsed gas
burners. The POU can handle between two and eight outputs simultaneously and provides
the ability to trim each channel output individually. Each output in the system is pulsed in
sequence to reduce the peak power demand.
The figure below shows how the pulse outputs are sequenced
A typical application for the pulse output unit is the control of gas burners. Each pulse output
is connected to one burner zone. The sequential nature of the output pulses provides the
necessary air turbulence within the furnace or kiln to ensure a better temperature
distribution and reduce the peak gas demand.
M42 Issue 1
2
Series 2000 Pulse Output Unit User Manual
SECTION 2 INSTALLATION.SECTION 2 INSTALLATION.
2.0
Panel Cutout..0 Panel Cutout.
The instrument will fit into a DIN standard 92mm +0.8 -0mm high by 45 +0.6 -0mmwide
cutout and will accommodate a panel thickness up to 15mm.
The instrument projects behind the panel by less than 150mm.
To fit the instrument into a panel first unhook the two panel clamps from the slots in the
case. If IP65 sealing is required then the gasket provided must be fitted now. See
'Instrument sealing' below.
If IP65 sealing is not required then the gasket is not required and the instrument case may
now be inserted through the panel cutout.
Hold the case against the panel and hook the panel clamps into the slots provided along the
body of the case. using a screwdriver, tighten the two clamp screws until the clutch
mechanism starts to slip. The instrument should now be clamped against the panel and the
sealing gasket (if fitted) is compressed.
M42 Issue 1
Series 2000 Pulse Output Unit User Manual
2.1
3
Instrument sealing.1 Instrument sealing
Each instrument is provided with a sealing gasket in a separate bag. This is used to seal the
instrument bezel against the mounting panel to achieve sealing to the IP65 standard. To
use this gasket, remove it from its bag and place it over the body of the instrument before
fitting the instrument into the panel. Take great care to place to gasket squarely round the
body of the instrument before passing it through the panel cutout. The instrument may now
be fitted into the panel as described by the installation instructions above.
Additional measures will be required to seal multiple instruments if they are mounted in a
common slot. These measures may consist of sealing compound or other devices at the
discretion of the installer.
M42 Issue 1
4
Series 2000 Pulse Output Unit User Manual
2.2
INPUT CONNECTIONS.2
CONNECTIONS
INPUT
All connections are made to the instrument
at the rear terminal block. Each terminal is
2
capable of accepting up to two 1mm cables
with ferrules.
To gain access to the terminals, undo the
two captive screws in the rear terminal
cover.
WARNING.
ISOLATE THE INSTRUMENT FROM MAINS VOLTAGE BEFORE
REMOVING
THE TERMINAL COVER TO GUARD AGAINST ELECTRIC SHOCK.
TAKE PARTICULAR CARE TO ISOLATE ANY HIGH VOLTAGE
SIGNALS
WHICH MAY HAVE BEEN CONNECTED TO THE INSTRUMENT
Ensure that mains power wiring is routed separately to low voltage signal wiring. This is to
avoid the possibility of electrical noise affecting the instruments performance. Never run
these two groups of cables together in the control cabinet or anywhere in the plant.
2.2.1
Mains Power.2.1
Mains Power
The mains power supply 88v to 264v A.C. is connected to
terminals 2 and 3. EARTH is connected to terminal 1. This is
safety earth and is connected to the metal case of the
instrument.
2.2.2
DC Power.2.2
DC Power
The DC power supply (24V to 48V) is connected to terminals
2 (PWR-) and 3 (PWR+) and is internally fused at 500mA.
A good earth should also be connected to terminal 1 as for
the AC power version.
WARNING
Instruments designed for on DC power supplies will be damaged if connected to mains
voltages.
M42 Issue 1
Series 2000 Pulse Output Unit User Manual
2.2.3
Control Signal input.2.3
5
Control Signal input
The pulse output unit can accept a variety of differing input signals, including current and
live zero signals. The input signal is always interpreted by the instrument as a percentage 0
to 100%, but a live zero offset may be set up in the engineers mode scroll.
2.2.4
Low Level Voltage Input
Input signals in the range 0 to 90mV may be connected
directly to the instrument as shown; positive to IN1 pin 22,
negative to IN2 pin 23 and IN3 pin 24.
2.2.5
High Level Voltage Input
For high level voltage ( or non standard current ) inputs an
external signal conditioning board is supplied. This provides
the necessary shunts or dividing components to convert from
the high level input signal down to the 0 to 90mV signal
required by the instrument.
2.2.6
High level 20mA Current Input.2.6
High level 20mA Current Inpu
For 20mA current inputs, a precision 100Ω shunt resistor is
fitted internally between terminal 20 and 24. The incoming
current signal should be connected to between these two
terminals. Link out terminal 21 and 22, and terminals 23 and
24.
M42 Issue 1
6
Series 2000 Pulse Output Unit User Manual
2.2.7
Pulsed outputs..2.7
Pulsed outputs.
The pulse outputs are open
collector devices designed to
drive solid state relays (SSRs)
directly.
Each channel output is capable of
sinking up to 10mA from the
common positive supply when the
output is switched on.
The diagram opposite shows the
typical wiring to one of the eight
output channels.
2.2.8
Digital inputs.2.8
Digital inputs
All POU versions can accept two digital inputs.
DIGITAL input 1 is connected to terminal (DI-1) 18 and input
2 connected to terminal (DI-2) 19. The common for both
inputs is terminal (DI-COM) 17.
2.2.9 COMMUNICATIONS..2.9
COMMUNICATIONS.
The serial communications option can be configured to communicate with a host computer.
2.2.9.1Connections for computer read/write comms..2.9.1
computer read/write comms.
Connections
for
The POU serial port uses the EIA-485 (RS485) or EIA-422 communications standards. This
means that a host computer may communicate directly with up to 32 instruments (S1600,
S1000 or S2000 etc) over a simple network at up to 9600 Baud. Since the communications
distance may be considerable (up to 1.2km) and the environment noisy, it is important that
the network is wired correctly.
For the best error free operation the communications cables should be screened, run in its
own conduit and separated as far possible from other high voltage cabling.
Each end of the network should have a terminating resistor ( value 220R ) fitted between
RX+ and RX- see section 8).
With careful installation communications distances of up to 1200 metres should be possible.
See section 8 for the different modes of connection
M42 Issue 1
Series 2000 Pulse Output Unit User Manual
7
SECTION 3 OPERATION.SECTION 3 OPERATION.
PULSE OUTPUT UNIT FRONT PANEL
3.1
GENERAL.1
GENERAL
The POU is designed to be flexible in application and yet straightforward to use. This
section provides all the information needed to operate it once installation and
commissioning are complete.
3.2
Software version.2
Software version
When power is first applied to the instrument the main
display shows the letters FGH, while the lower display
shows the model number and software version
number. This display is replaced after a few seconds
with the usual one described below.
M42 Issue 1
8
3.3
Series 2000 Pulse Output Unit User Manual
Front panel indications.3
Front panel indications
The large main display usually shows the value of the measured control signal input in
percent.
There is one status indicator at the top of the display
which flashes TALK when the POU is transmitting via
the serial comms port.
The lower row of status lamps shows the current state
of each of the pulse outputs one to eight.
A bar shown in the up position indicates that the output
is currently on and in the down position that the output
is currently off.
3.4
Normal Operation.4
Normal Operation
The POU powers up into its 'normal' display mode. This
mode simply shows the measured control input as a
percentage on the upper display.
Under special circumstances the top display may show
one of the following messages depending on how the
digital inputs have been configured.
COOL (flashing)
The pulse outputs are reverse
acting (pulse outputs decrease
with increasing input signal).
PurG
All of the pulse outputs are forced
to be on.
M42 Issue 1
Series 2000 Pulse Output Unit User Manual
3.5
Using the keypad.5
9
Using the keypad
The scroll is used to select parameters in the scroll.
When this button is pressed, the next parameter in the
scroll list is selected in turn. Eventually, when all of the
available parameters have been displayed, the scroll
will 'wrap around' to the first parameter.
The up and down buttons adjust the value of the scroll
parameter selected. When the button is pressed the
parameter value is changed by one at first but then at
an increasing rate. This makes it easy to make large
changes quickly.
SECTION 4 LONG SCROLLSECTION 4 LONG
SCROLL
The long scroll is a sequence (scroll) of parameters.
Only relevant parameters are held in the long scroll, so
as the setup of the instrument changes, so too will the
contents of the long scroll. Refer to section 4.2 for a
complete list.
To enter the long scroll, press and hold the right or left
button. After a couple of seconds the display will
change. You are now in the long scroll.
To return to the normal operating display, press and
hold the right or left button again for a couple of
seconds. Alternatively, if no buttons are pressed for 20
seconds then the instrument will automatically revert to
the normal operating display.
In the long scroll each parameter has a unique
mnemonic, which is shown on the lower display when
that parameter is being examined. Each press of the
right or left button will scroll forward or backwards
through the list.
M42 Issue 1
10
4.1
Series 2000 Pulse Output Unit User Manual
Modifying data.1
Modifying data
The up and down buttons are used to change the value
of the current parameter displayed. There will often be
limits to the parameter being modified, and it will only
be possible to change the value of the parameter within
these limits.
If a parameter contains illegal data, for example when
the configuration is changed, then when that parameter
is viewed the upper display consists of all bars;(- - - -)
to show this. Pressing the up or down buttons clears
this and allows the parameter to be set to the desired
value.
4.2
LONG SCROLL ELEMENTS.2
SCROLL ELEMENTS
LONG
The following list gives all the parameters which may
appear in the long scroll. In any particular installation
only those parameters which are applicable will actually
appear in the scroll.
MNEMONIC
MEANING
PASS
Password entry. Press the four key password sequence and then scroll in
order to modify any following parameter.
trn1
The trim value for channel 1 in percent.
This parameter is used to adjust the channel 1 output value to between 80%
and 120% of the measured control input value.
and so on up to
trn8
4.3
The trim value for channel 8 in percent.
This parameter is used to adjust the channel 8 output value to between 80%
and 120% of the measured control input value.
PASSWORD PROTECTION.3
PASSWORD PROTECTION
The POU is equipped with a versatile password protection system, which, when used
correctly, protects the instrument against an unauthorised person changing the settings.
The setting of a password is explained in section 5, but the following is included here to
assist the operator if a password has been set.
M42 Issue 1
Series 2000 Pulse Output Unit User Manual
4.3.1 Password entry.3.1
11
Password entry
If a password has been set then on entry to the long
scroll the password screen will be seen. At this point
the sequence of four button pushes representing the
password should be entered. The instrument will then
briefly display Good or bad depending on the correct
password being entered, and then enter the long scroll.
Unless the password is correctly entered, parameters
can be viewed but not modified.
SECTION
5
SOFTWARE
CONFIGURATION
5.0
CONFIGURATIONSECTION
5
SOFTWARE
General.0 General
The POU is capable of being configured to suit the users system. All that is required to
produce a POU customised to a specific application is to set up the number of output
channels required and the minimum pulse duration to suit the output actuators used.
5.1
'E' Mode.1 'E' Mode
'E' mode, or Engineers mode, is used to
configure the instrument and modify seldom
used parameters. It is also used for calibration.
To enter E mode, remove the instrument from
its sleeve by undoing the two screws visible on
the instrument front panel. The instrument
should now withdraw smoothly.
It will now be seen that on the left hand board, is
a two way DIL switch. Push down switch 2.
The instrument may now be replaced in its
sleeve. The instrument is now in E mode, reset
switch 2 to off to return the instrument to normal
operating mode.
5.2
Lock mode.2
Lock mode
Next to the 'E' mode switch is the 'LOCK' switch. The purpose of this switch is to provide a
means of protecting the parameters in the long scroll from unauthorised tampering. If the
switch is on then no long scroll parameters can be modified from the front panel until the
switch is turned off. In other words, the LOCK mode works as if a password had been set
M42 Issue 1
12
Series 2000 Pulse Output Unit User Manual
and could not be satisfactorily answered.
5.3
Emode parameter groups.3Emode parameter groups
The engineers mode scroll consists of a large number of parameters, so to improve ease
and speed of use, the parameters are presented to the user in groups. At the start of each
group, the group name is shown on the lower dispay and the upper display is blank.
Pressing the star button will gain access to the parameters in that group. Pressing the scroll
will advance the scroll to the start of the next group.
If the group is entered (by pressing the star button), then the group parameters are listed in
sequence in the usual way when the scroll button is pressed. At the end of the list for that
group, the group name is displayed again. This enables the user to re-enter the same group
again if required.
5.4
Group 'IP'.4
Group 'IP'
This group only contains one parameter relating to the instruments input.
5.4.1
'bIAS' Input Bias.4.1
'bIAS' Input Bias
bIAS is used to set up for live zero input signals and can be set as a percentage between
0% and 25%. This allows the input to be scaled for live zero signals such as 1 to 5V. In this
example, 1V being 20% of 5V, if bIAS1 were set to 20(%) then an input of 1V would be
taken as 0 and an input of 5V as 100%. For true zero inputs, set the bias to 0.
5.5
Group 'Cont'.5 Group 'Cont'
The control group contains the pulse output setup parameters
5.5.1
'CHAN' Number of pulsed outputs..5.1
pulsed outputs.
'CHAN'
Number
of
The value of CHAN should be set to the number of channels that the POU is required to
drive from 2 to 8.
5.5.2
'ton' Minimum pulse on time..5.2
'ton' Minimum pulse on time.
This parameter controls the minimum on pulse width which is directed to any particular
channel. The value entered is in seconds between 1.0 and 20.0.
5.6
Group 'dinS'.6
Group 'dinS'
The digital inputs group allows the user to set up the function of the two digital inputs.
5.6.1
function.
'dIN1' Digital input 1 function..6.1
'dIN1' Digital input 1
Digital input 1 may be configured to reverse the sense of the pulsed outputs.
M42 Issue 1
Series 2000 Pulse Output Unit User Manual
13
If the dIN1 parameter is set to COOL and the digital input is made then the pulse sense will
be reversed. ie for 100% input signal all the channel outputs will be off.
5.6.2
function.
'dIN2' Digital input 2 function..6.2
'dIN2' Digital input 2
Digital input 2 may be configured to override the input signal and switch all the channel
outputs on.
If the dIN2 parameter is set to PURG and the digital input is made then all the channel
outputs will be forced on. This input overrides any other function within the instrument.
5.7
Group 'Coms'.7 Group 'Coms'
5.7.1 Digital serial communications.7.1
Digital serial communications
The POU is equipped with digital serial communications as standard and requires setting up
using the following parameters.
5.8
bAUd
selects the baud rate required
1200
2400
4800
9600 Baud.
Addr
Selects the instrument address required, between 0 and 99. Bear in mind if it
is desired to address groups of instruments simultaneously by use of the
wildcard address then the address must be selected accordingly. (see section
8).
Group 'CAL'.8
Group 'CAL'
This group contains the instruments calibration adjustments. See section 7 for futher
information.
5.9
5.9.1
Group 'PASS'.9 Group 'PASS'
Passwords.9.1
Passwords
The POU is equipped with password protection, enabling the long scroll parameters to be
protected against unauthorised access.
The essence of the password is a four digit code representing a sequence of four button
presses. When the password is being entered any of the six front panel buttons are valid,
they are assigned values 1 to 6 with the left button as 1 and the star button as 6
When initially set up, the POU has its password set to 0000. This is the clear condition,
when this is set then NO password protection is provided.
5.9.2
'PASS' and 'CHGE' . Setting the password.9.2
'CHGE' . Setting the password
'PASS'
and
M42 Issue 1
14
Series 2000 Pulse Output Unit User Manual
The upper display shows the current password, or 0000 if the password is
clear.
CHGE To change or clear the password set the ALTER parameter as follows:Don't change the password.
no
CLR Clear the password ie turn off password protection.
yES Change the password.
PASS
Press the scroll button to perform the action requested.
If yES was selected then PASS is now displayed and the new password should be
entered by pressing your selection of four buttons.
SECTION 6 - HARDWARE CONFIGURATIONSECTION 6 - HARDWARE
CONFIGURATION
6.0
General.0 General
The Pulse Output Unit is capable of being configured in many ways and expanded using
option cards. Only the option cards required for performing the desired task are fitted and
waste is therefore minimised.
6.1
Gaining access to the option boards.1 Gaining access to the option
boards
In order to gain access to the option boards the instrument must be removed from its case.
This is achieved by unscrewing the two captive screws on the front panel, the instrument
may then be drawn out from the case
The instrument consists of two main boards attached to the display assembly. Each board
is held in place by two clips at the display board end. these clips should be gently eased
apart if a board is to be removed.
On the power supply board are the three input/output 'slots', slots 1 to 3. The pulse output
board is a triple width card and occupies all three of the slots.
6.2
Broken input drive selection..2
Broken input drive selection.
The input circuitry on the power supply board provides provision for broken input drive
selection. This facility is only applicable to low level voltage input signals. Current and high
level input signals have inherent down scale drive when the input signal is absent.
The broken input drive direction is selected by bridging one of the two solder pads shown.
M42 Issue 1
Series 2000 Pulse Output Unit User Manual
15
M42 Issue 1
16
Series 2000 Pulse Output Unit User Manual
SECTION 7 - CALIBRATIONSECTION 7 - CALIBRATION
7.0
General.0 General
The following procedure enables the POU input to be calibrated in the field if the reference
equipment is available.
The reference equipment consists of a precision voltage/current source with an accuracy of
at least 10 times better than the instrument.
7.1
Preparation.1
Preparation
The environment in which the instrument is to be calibrated should be clean and dry, with a
temperature between 15 and 25°C, humidity 0 to 80% Rh non-condensing.
The instrument and any reference sources being used to calibrate it should have been in
the calibration area and switched on for at least an hour prior to calibration.
7.2.1 Main input span..2.1 Main input span.
Connect the precision voltage or current source to the main input terminals and place the
instrument into 'E' mode by removing the instrument from its sleeve and setting the EMODE
switch to ON and replacing the instrument in its sleeve. (See para 5.1).
Scroll on to the SPAN parameter in the CAL group.
Set the precision voltage or current source to deliver +90.000mV or 20.000mA (full scale
input signal) as appropriate and, using the up and down keys, adjust the input span until the
display just changes from 99.9% to 100.0%
When satisfied, press the star key and note down the displayed calibration constant for
future reference (this is a hexadecimal number).
Return the instrument to its normal operating mode by setting the EMODE switch to off.
M42 Issue 1
Series 2000 Pulse Output Unit User Manual
SECTION 8 - SERIAL
COMMUNICATIONS
8.0
17
COMMUNICATIONSSECTION
GENERAL DESCRIPTION..0
8
-
SERIAL
GENERAL DESCRIPTION.
The FGH POU is equipped with serial communications as standard. This takes the form of 2
way serial assynchronous communication with a computer.
Messages consist entirely of ASCII characters and may or may not contain spaces as
desired.
All messages are terminated with a carriage return, <CR>.
The serial communications interface may be wired to conform to the 2-Wire EIA-485
(RS-485) or the 4-Wire EIA-422 (RS422) standards.
8.1
Specification..1 Specification.
8.1.1 2-Wire EIA-485 Mode (RS485).1.1
2-Wire EIA-485 Mode (RS485)
(Balanced digital multipoint communication system.)
Transmission standard:
EIA-485 (RS-485)
Data rates:
1200, 2400, 4800 and 9600 baud.
Data format:
1 start, 7 data, odd parity,
1 or 2 stop bits.
Implementation:
2 wire half duplex.
Max drivers per line: 32
Max receivers per line:
32
Max cable length:
1200 metres/3937 feet
8.1.2 4-Wire EIA-422 Mode (RS422).1.2
4-Wire EIA-422 Mode (RS422)
(Balanced digital multipoint communication system.)
Transmission standard:
EIA-422 (RS-422)
Data rates:
1200, 2400, 4800 and 9600 baud.
Data format:
1 start, 7 data, odd parity,
1 or 2 stop bits.
Implementation:
4 wire full duplex.
Max drivers per line: 32
Max receivers per line:
32
Max cable length:
1200 metres/3937 feet
8.2
Connections..2 Connections.
8.2.1 General..2.1
General.
The series 2000 may be connected to any computer or device which supports the RS422 or
RS485 interface standards. This includes any other communicating instruments such as the
series 1000 or any other instrument using the FGH standard protocol.
The instrument uses a balanced voltage communications system which will perform well
under most situations provided some simple guidlines are observed.
M42 Issue 1
18
Series 2000 Pulse Output Unit User Manual
1
The communications wiring should be implemented using screened cable containing
one or two twisted pairs. The cable screen should be earthed at one point only.
2
The cable should be routed well away from any sources of electrical noise such as
motors, contactors and any other high voltage wiring.
3
The network should be wired as a daisy chain, taking the wires into one instrument
and hence on to the next. Wiring spurs should be avoided. Take care to preserve the
continuity of the cable screen throughout the network.
4
For long cable runs or noisy environment it may be necessary to fit a terminating
resistor to the network. The terminator (a 220Ω resistor) should be fitted between
RX+ and RX- on both the computer and the furthest instrument. For two wire
networks this resistor should be fitted at the computer end only. Only one such
resistor should be fitted on each wire pair.
8.2.2 2 Wire EIA-485 Mode (RS485).2.2 2 Wire EIA-485 Mode (RS485)
This diagram shows the connection for RS485 mode. Note the use of screened cable. This
connection method may be extended further to other instruments up to the maximum
allowed.
M42 Issue 1
Series 2000 Pulse Output Unit User Manual
8.3
8.3
Connection reference table..3
19
Connection reference table.
Instrument
Terminal
Function
EIA-485
EIA-422A
13
TX-
TX-/RX-
TX-
14
TX+
TX+/RX+
TX+
15
RX+
TX-/RX-
RX+
16
RX-
TX+/RX+
RX-
1
EARTH
NC or
SCREEN
NC or
SCREEN
COMMUNICATIONS PROTOCOL.3
COMMUNICATIONS PROTOCOL
8.3.1 Message construction.3.1 Message construction
Messages to and from the POU vary in form depending on, amongst other things, the type
of message and its contents.
8.3.2 Write messages .3.2 Write messages
Write messages to the instrument take the following form.
WAAPDDDD or WAAP-DDDD
where W
= write message header
AA
= instrument address
P
= parameter code
DDDD = numeric data (preceded by - if negative)
messages to the instrument may have the fields separated by spaces. These spaces will be
ignored. Messages from the instrument however, will not contain spaces. Eg.
W 45 B 0100 <CR>
will attempt to write 100% to channel 1 trim value as well as
W45B0100<CR>
The <CR> at the end of the message is a carriage return. (Hex 0D). Each message written
to the instrument must be terminated with, and each message from the instrument will be
terminated with a carriage return.
M42 Issue 1
20
Series 2000 Pulse Output Unit User Manual
8.3.3 Read messages.3.3
Read messages
Read messages to the instrument take the following form.
RAAP
where R
= read message header
AA
= instrument address
P
= parameter code to be read from
Again the message must be terminated with a <CR>, and spaces may be included if
desired.
8.3.4 Message header..3.4 Message header.
This may be;
ASCII R signifying a Read
ASCII W signifying a Write
The R header is used whenever data is being read from the instrument. When this header
is used the data field is absent. The W header is used to write data to the instrument.
8.3.5 Instrument address..3.5
Instrument address.
Each instrument must be given a unique address between 0 and 99. This is set when the
instrument is in E mode. The address field of the message, consisting of two ASCII
characters determines to which instrument the message is directed. The S1600 ignores the
message unless it corresponds to its own address.
8.3.6 Wildcard addresses.3.6
Wildcard addresses
If desired, a group of instruments can be written to together by using a wildcard character
(large X) in place of one or more of the address characters. eg.
W6XJ0100 <CR>
would result in all instruments on the network with addresses of 60 to 69 having their
minimum pulse on times set to 10.0 seconds.
Instruments written to with wildcard addresses do not reply.
8.3.7 Message parameter code..3.7
Message parameter code.
The parameter code field of the message is a single ASCII character. In a write message
this corresponds to one of the control parameters listed in paragraph 8.4. 'parameter codes'.
8.3.8 Message data field.3.8
Message data field
The message data field consists of four ASCII characters, and may be preceded by a
'minus sign', if the data is negative. These characters represent the decimal value of that
M42 Issue 1
Series 2000 Pulse Output Unit User Manual
21
parameter in stored units. That is, if the parameter were specified as being in units of 0.1%
and read 0110 then this would indicate a reading of 11.0%. Note that there must be four
digits in the data field, if necessary use leading zeros to pad out a shorter number to 4
digits.
8.4
POU read/write parameter codes.4
POU read/write parameter codes
Each parameter within the POU is assigned a single alpha parameter code. These
parameter codes are listed in the following table.
CODE
R/W
A
R
B
R/W
C
PARAMETER
SCROLL
ELEMENT
LOW LIMIT
HIGH
LIMIT
-
0.0
100.0
CHANNEL 1 TRIM VALUE
trn1
80
120
R/W
CHANNEL 2 TRIM VALUE
trn2
80
120
D
R/W
CHANNEL 3 TRIM VALUE
trn3
80
120
E
R/W
CHANNEL 4 TRIM VALUE
trn4
80
120
F
R/W
CHANNEL 5 TRIM VALUE
trn5
80
120
G
R/W
CHANNEL 6 TRIM VALUE
trn6
80
120
H
R/W
CHANNEL 7 TRIM VALUE
trn7
80
120
I
R/W
CHANNEL 8 RIM VALUE
trn8
80
120
J
R/W
MINIMUM PULSE ON TIME
ton
1.0
20.0
K
R/W
NUMBER OF CHANNELS
chan
2
8
MEASURED INPUT
8.5
Response from read or write messages.5
messages
Response from read or write
The response of the controller to a satisfactory read or write message with the correct
address will be as follows (unless an address wildcard is used, see paragraph 8.3.6):
*AAPDDDD<CR> or *AAP-DDDD<CR>
The instrument will respond with a string of ASCII characters. The header will consist of '*'
(Hex 2A). The header will be followed by an address (AA) showing the address of the
responding instrument in ASCII numbers, 00 to 99.
after the address is a single ASCII character (P) showing the parameter selected.
this is followed by a data field of four ASCII numbers (DDDD) representing the decimal
value of the parameter selected. This will be preceded by a minus sign '-' if the data is
negative.
The units of the data field are the displayed units of that parameter.
This is followed by a <CR> to complete the message return.
M42 Issue 1
22
8.6
Series 2000 Pulse Output Unit User Manual
Error responses.6
Error responses
Two sorts of error in a received message may be detected by the instrument, these are:
8.6.1 Corrupt message response.6.1
Corrupt message response
Noise or interference during the transmission of the message causing corruption of one or
more characters so that it was no longer valid. The receiver within the instrument detects
this, and as long as it was not the address that was corrupted, the instrument responds as
follows;
?AAC<CR>
where AA is the address of the instrument responding
C = P for detected parity error
F for detected overflow error
O for detected receiver overrun
8.6.2 Syntax error response.6.2 Syntax error response
Messages that were correctly received but don't make sense, as long as the address part
was o.k. generate the following response;
?AANN<CR>
where AA = address of the instrument responding
NN = two digit ASCII HEX error code
Error code binary weightings:
bit7 = Illegal trailer
bit6 = Tx buffer overflow
bit5 = Illegal number of characters
bit4 = Illegal data
bit3 = Illegal parameter code
bit2 = Rx buffer overflow
bit1 = Illegal header
bit0 = Write to read only parameter
M42 Issue 1
Series 2000 Pulse Output Unit User Manual
23
APPENDIX A - Part number codingAPPENDIX A - Part number coding
The part number consists of two parts, the instrument type, eg M2806 and supply voltage
code.
Example 1.
M2806-34 -2PP
This describes a six channel pulse output unit with serial
communications and a 88 to 265V ac power supply.
Example 2.
M2805-34H-2PP
This describes a five channel pulse output unit with serial
communications and a dc 24V to 48V power supply.
APPENDIX B - Fault codesAPPENDIX B - Fault codes
In the rare event that one of the stored parameters is invalid, for example, after replacing
the RAM or memory back-up battery, then when power is first applied to the instrument a
fault number will be displayed. When multiple faults occur the lowest numbered fault is
generally shown first. Faults should be cleared one at a time until the fault indication
disappears. This table shows which parameter must be corrected to restore operation.
Fault number
parameter at fault
1 ......................................... Input bias biAS
2 ......................................... Number of pulse channels CHAN
3 ......................................... Channel 1 trim value trn1
4 ......................................... Channel 2 trim value trn2
5 ......................................... Channel 3 trim value trn3
6 ......................................... Channel 4 trim value trn4
7 ......................................... Channel 5 trim value trn5
8 ......................................... Channel 6 trim value trn6
9 ......................................... Channel 7 trim value trn7
10 ....................................... Channel 8 trim value trn8
11 ....................................... Minimum pulse on time ton
12 ....................................... Digital input 1 function DIN1
13 ....................................... Digital input 2 function DIN2
14 ....................................... Security password PASS
M42 Issue 1