1
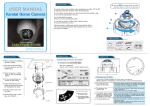
® TouchMover-XS Real-Time Touch-PLC with Xscale CPU-Modules USER’S MANUAL Rev 1.0 © CJB 2009~2012 www.cjb.it ~ [email protected] 1 GENERAL FEATURES TouchMover-XS® is a compact, rugged and powerful Real-Time TouchPLC system. It’s a fully featured, IEC-1131 SoftPLC & SoftMotion & SCADA system, capable to manage Control & Supervision applications when connected to your machine-tool or plant. Brings Automation & Supervision into your project, at a fraction of cost of competitor’s systems, giving you total design control. In fact, TouchMover-XS® embeds CJB’s “PowerPLC-Bridge” IEC-1131 Real-Time SoftPLC & SoftMotion engine, and so it’s ready to be easily programmed just after you power it up. Based upon Marvell’s Xscale PXA-300 or PXA-270 or PXA-310 (from 208Mhz up to 624Mhz) processor module, with onboard WinCE® o.s., it comes with ultrabright 7” LCD panel, LED backlight and dim-to-zero capability, in a nice tough die-cast panel-mount (or standalone) aluminium enclosure with a very nice-looking (and fully customizable) front bezel. The system can be panel-mounted or placed in a wall-mount enclosure, this latter specifically designed for Building & Home Automation. It has enhanced connectivity thanks to CANbus interface, Ethernet 10/100 interface, dual USB ports, dual COM serial ports (also RS485) and it offers wide local expandability thanks to 30 onboard GPIO’s and 4+3 Analog I/O’s. There is also a special Battery-back-up static RAM onboard (128kB) to save system’s variables with unlimited write cycle capability. Just power it up, connect to CJB’s POWERPLC-Bridge® IEC-1131 development system, design your control application, add your HMI project with CJB’s BridgeSCADA® HMI designer, download the whole project to the TouchMover-XS, debug it in real-time… …and you’re done. You’ll get your powerful control system in a snap and for a fraction of cost of alike systems. TouchMover-XS has been specifically designed to be the perfect solution for wall-mount (Building Automation) matching a special wall-mount box; but it can be also used “panelmount” for any application in Automation. (wall mount example for Building Automation) The stilish front bezel of the TouchMover-XS 2 SPECIFICATIONS • • • • • • • • • • • • • • • • Processor Modules: (see: www.toradex.com) o PXA300: 208Mhz, 64MB DDR RAM, 128MB Flash o PXA270: 312Mhz or 520Mhz, 64MB DDR RAM, 32MB Flash o PXA310: 624Mhz, 128MB RAM and 512MB Flash Optically isolated CANbus interface supports CANopen Protocol 10/100 Ethernet Interface supports TCP/Modbus 1 COM RS232 + 1 COM RS232/422/485 supports Modbus/RTU more interface protocols can be embedded upon request 1 USB Host + 1 USB Host/Client jumper selectable 128kB onboard Static RAM with Battery Backup, for PLC/NC variable storage 30 General Purpose Digital I/O’s for easy local I/O customization (need optional add-on module for signal conditioning) 4 Analog Inputs (*)(need optional add-on module for signal conditioning) 3 Analog Outputs (need optional add-on module for signal conditioning) -10ºC~+70ºC operation range (PXA270) or 0º~+70ºC (PXA300) or –20º~+85ºC (PXA310) LCD Versions: o 5.7” 640x480 or 7” 800x480 LCD Panel, LED Backlight, dim-to-zero control (default is 800x480 7” version for boxed units) Resistive Touch-screen, embedded controller (*) DC_in: 9~40Vdc wide power supply range Needs only 300mA @ 24Vdc max. (with fully lit LCD panel) 2 versions available: o w/out LCD Panel, for DIN-rail shell mount (with standard 107mm plastic shell) o with LCD Panel & touch, tough metal enclosure, for PanelMount (customizable front bezel, aluminium or hardened glass) (*) with PXA270~310 only 3 STARTUP TouchMover-XS comes ready to go, with the Xscale processor module of your choice, and with CJB’s IEC-1131 “PowerPLC-Bridge” Run-Time preloaded. What you need are: 1. one +12Vdc or +24Vdc power source (1A can be ok) to be connected to J1 power connector. Connect +V to J1 pin 1 and GND to J1 pin2. Earth ground to pin 3. See also the power connector description in the following chapter. 2. one PC (Laptop or Desktop) with Windows® o.s. and CJB’s PowerPLCBridge IDE (Integrated Development Environment) 3. one cross RJ45 UTP Ethernet cable (or you can use straight cable to Ethernet switch connected to your LAN). Or connect through LAN switch. 4. After powerup, the system is ready to communicate with PowerPLCBrdige IDE on the PC. If the TouchMover-XS is already running an application, you can take control over it, stop, modify, debug, reload and re-run. Otherwise, design your new application, download it into the TouchMover-XS system, run it, debug it and finally freeze it inside TouchMover-XS’s flash memory. 5. If the system has been purcahsed with the LCD panel, you can also design your BridgeSCADA application program for the operator interface, run it and test it along with your IEC-1131 application program. 6. If the system is blind, of course you will not be able to run a local HMI application, but remember: you can run BridgeSCADA anywhere on a PC (PanelPC) or another TouchMover-XS with LCD, connected thriugh Ethernet to the blind TouchMover-XS, and you’ll have the HMI application remotely executed on the PC or the complete TouchMoverXS with display. 7. Please refer to IEC-1131 PowerPLC-Bridge manual for how developing a control application for the TouchMover-XS, and refer to BridgeSCADA manual for developing an HMI application. WALL MOUNT TouchMover-XS can be wall-mounted to a special box which will be sealed in a building wall. The matching comes thanks to a special magnet attachment, with also a friendly panning pin for setting the unit perfectly horizontal. Follow the directions in the drawings in the Appendix. PANEL MOUNT TouchMover-XS can be panel-mounted, which is very useful for Automation applications. The front bezel back side has a special groove where a neoprene o-ring makes tight match to the panel. In this case the unit is pulled against the front panel thanks to rear-side hook-screws. Follow the direction in the drawings in the Appendix. 4 TOP SIDE – naked pcba J1 = POWER INPUT 9~30Vdc P3 = CANBUS J20 = 3 x ANALOG OUTPUTS P1 = COM1 RS232 M2 = ETHERNET J18 = 30 x DIGITAL I/O 5 P2 = COM2 RS232/422/485 J4 = USB1 & USB2 J19 = 4 x ANALOG INPUTS BOTTOM SIDE – naked pcba J10 = LCD BACKLIGHT POWER J12 = AUX GENERAL PURPOSE LCD PORT J17 = TOUCH SCREEN INTERFACE J13 = 800x480 7” LCD PORT J14 = 640x480 5.7 » LCD PORT 6 QUICK LOOK TO CONNECTIONS The TouchMover-XS has the following main connections & Controls to the outside world: User Settings Local I/O Connectors Power Connector 2 x USB Connectors RESET Switch COM1 Serial Port Connector (RS232) COM2 Serial Port Connector (RS232 or RS422 or RS485) Ethernet Connector CANbus Connector CANbus Line Termination Switch If the unit is open-frame, hosted onto a plastic DIN-rail mount shell, all such items can be seen as above. These are also accessible from the rear panel (for the unit version in the metal box with LCD). There are also some USER-Accessible settings: these are ON THE LEFT SIDE and allow the user to set some features of the system (like COM2 mode, USB2 mode, and so on). There are three Local I/O connectors ON THE RIGHT SIDE where the system brings 30 TTL Digital I/O’s, 4 Analog Inputs(*) and 3 Analog Outputs(*) which can be used locally with a custom signal conditioning board. (*) means that these I/O’s depend on the installed Colibri module version Both user settings & I/O’s, in the boxed system version, can be accessed through removable side covers of the box. Of course, no problem for the open-frame version (w/out LCD). There are also some Factory-Presets, which generally are jumpers set by the manufacturer and which must NOT be modified by the user. And finally, there are some connections ON THE SOLDER SIDE, which have been designed to support the LCD connection, so they do not matter for the openframe version, and – if used – are factory presets. All the settings & connections will be described in the following pages. 7 JUMPER SETTINGS & CONNECTORS J1 = POWER DC_IN 1 2 3 J1 is one 3.5mm pitch connector Use any DC power source, 8~40Vdc, capable to source at least 1A Pin 1 = +Vdc (8~40Vdc) Pin 2 = GND Pin 3 = Frame GND P1 = SERIAL COM1 PORT P1 is only RS232 Serial Port P1 pin assignment: 1 2 3 4 5 P1 DCD 6 DSR RX 7 RTS TX 8 CTS DTR 9 RI / NC / +5Vdc (*) GND (*)according to J7 setting P2 The function of pin 9 is set by J7 (see below) J7 = SELECTION OF THE FUNCTION OF PIN 9 OF THE P1 SERIAL COM PORT This jumper allows a DC voltage (+5V) to be on pin 9 of the P1 serial port connector. Useful for powering up external devices like customized interfaces or isolation modules. CLOSE 1+2 for +5V on pin 9 CLOSE 2+3 for RI signal on pin 9 1 2 3 WARNING! only 250mA are available, not protected. Avoid any short circuit to GND. 8 P2 = SERIAL COM2 PORT P2 can be RS232 Serial Port or also RS422 or RS485 To set P2 for the desired functionality, you must set the side switch SW2: see below P1 P2 There are 10 switches in SW2, which can be OFF (upper position) or ON (lower position). For example the upper image shows all the even switches set to ON. If you set EVEN switches to ON position, (and ODD switches to OFF) the P2 COM port will work RS232. In this case, the pin assignment of the DB9M connector is the following: 1 2 3 4 5 NC RX TX NC GND 6 7 8 9 NC RTS CTS NC / +5Vdc according to J8 setting If you set ODD switches to ON position, (and EVEN switches to OFF) the P2 COM port will work RS422. In this case, the pin assignment of the DB9M connector is the following: 1 2 3 4 5 TXDTXD+ RXD+ RXDGND 6 7 8 9 NC NC NC NC / +5Vdc according to J8 setting If you want to use the COM port as RS485, you have to make an external connection on the female plug connector of the external cable, connecting: 1+4 and 2+3 DB9F 2+3 = DATA+ FEMALE DB9 WIRED FOR RS-485 DB9F 1+4 = DATA- J8 = SELECTION OF THE FUNCTION OF PIN 9 OF THE P2 SERIAL COM PORT This jumper allows a DC voltage (+5V) to be on pin 9 of the P2 serial port connector. Useful for powering up external devices like customized interfaces or isolation modules. CLOSE 1+2 or open, for NC on pin 9 CLOSE 2+3 FOR +5V on pin 9 1 2 WARNING: J8 WORKS REVERSE THAN J7 3 WARNING! only 250mA are available, not protected. Avoid any short circuit to GND. 9 J25 = SET 120 OHM TERMINATION RESISTOR FOR RS422 AND/OR RS485 There is a 6 pin (2 x 3 pin) header on the left side of the SW2 switch array. This header is used to set the termination resistor (120 OHM) for the RS422 or RS485 when COM2 P2 port is used in such way. 2 4 6 FRONT VIEW OF J25 1 3 5 Set J25 as follows: if usage of COM PORT 2 is RS422: Close 1+3 and Close 2+4 This will set the 120 Ohm termination resistor for both TX and RX lines if usage of COM PORT 2 is RS485: Close 1+3 and Close 4+6 (or remove) This will set only one 120 Ohm termination resistor for the TX/RX line SW1 RESET PUSHBUTTON SW1 is the system reset pushbutton. In the boxed unit it can be accessed through a hole in the rear panel. Push SW1 to reset the system. 10 M2 = RJ45 ETHERNET 10/100Mb PORT M2 is the 10/100Mb Ethernet port. Use standard RJ45 plug. NOTICE: see also J3 jumper to select the type of Ethernet matching the chipset of the Colibri module (Factory preset) P1 P2 M2 J3 = LAN INTERFACE SELECTION 3 2 1 This jumper is a fectory-preset. Do not modify. This jumper selects the behaviour of the LAN interface according to the chipset of the used Colibri Module. If not properly set, Ethernet connection will not work. CLOSE 1-2 FOR PXA270 CLOSE 2-3 FOR PXA300~310 DEFAULT IS 2-3 11 J4 = USB DUAL CONNECTOR USB1 – HOST ONLY Only plug Type_A connectors 500Ma capability @ +5Vdc FOR EACH USB USB2 – HOST/CLIENT (selected by J5) J5 = LOWER USB FUNCTION SELECT 1 2 3 This jumper allows to select the function for lower USB port (USB2): standard is HOST (e.g.: to be connected to KBD or Mouse). You can also use it as Client, to enable communications between systems CLOSE 1+2 FOR USB2 = CLIENT CLOSE 2+3 FOR USB2 = HOST DEAFULT IS 2+3 12 P3 CANBUS CONNECTOR This connector (P3) is a DB9 Female and this choice has been done in order to prevent any possible confusion between P3 and P2 and P1 (COM ports). So P3 is a DB9F which may need a gender changer to transform it into a male standard CANbus connector. We do NOT advise such action, but we suggest that you wire a DB9M connector as plug-in connector for the CANbus communication line. You will always avoid to plug for mistake into one COMx port. PIN 1 Pin assignment is the following: 1 2 3 7 – 4 – 8 – 9 = n.c. = CAN_L – 5 - 6 = CAN_GND = CAN_H Metal body is shield (frame ground) There is a small slide switch (J22) aside the P3 CAN connector (black means the switch cursor): NO YES termination termination The termination setting slide switch J22 Speed selection function can be acheved by the 3-pin jumper J23 which is immediately above the switch. Close1+2 for "no filter" (= hi speed) for the CANbus line; or set 2+3 (or open) for full filter, hence bandwith/speed limit for the CANbus. 1 2 3 NOTICE: we suggest to set filter (J23 open) for Baud Rates not higher than 500kbps. 1Mbps requires J23 closed (no filter). Filtering is set by the value of the Resistance between U16 pin8 and GND. See 82C250 manual. The CANbus speed setting jumper J23 13 J10 (BOTTOM SIDE) LCD LED BACKLIGHT CONNECTOR Connect the LCD backlight cable (directly or through suitable extension cable) to this connector. BOTTOM VIEW J11 = LCD POWER SELECT 3 2 1 Normally LCD panels need 3.3Vdc (Default). Be careful to select the proper LCD voltage to avoid any damage to LCD and/or TouchMover system CLOSE 1+2 FOR +3.3Vdc (DEFAULT) CLOSE 2+3 FOR +5Vdc (Factory Preset) 14 J12 (BOTTOM) = GENERIC PORT FOR TTL LCD DRIVE (SPECIAL TTL LVDS MODULE CAN BE USED TO DRIVE PANELS UP TO 1024X768) BOTTOM VIEW The pin assignment for such connector is the following: • LDD_0 … 5 BLUE 0 … 5 • LDD_6 … 11 GREEN 0 … 5 • LDD_12 … 17 RED 0 … 5 • L_LPCLK CLOCK • L_LCLK HSYNC • L_FCLK VSYNC • L_BIAS DE Pin1…………………………………………. Pin 39 Pin 2………………………………………… Pin 40 Embedded tools can set the LCD panel resolution & clock frequencies. Dimensions are up to 1024x1024. Since most panels greater than 5.7” or 7” are now LVDS, in this case use the TTLto-LVDS converter provided by CJB. Configuring a Custom Display The default Display Driver Settings are good for VGA 640x480x60Hz (24bpp), but don't worry, if you have another display you can easily change the Display Driver Settings in the WindowS Registry. Follow the instructions you can find at: http://www.toradex.com/En/Support/Downloads The Display Driver Settings are located in: HKLM\Drivers\Display\PXA27x\Config Every setting has a default value that will be used if the setting is omitted For more info, consult the Toradex Colibri website: http://www.toradex.com/ 15 J13 (BOTTOM) = 7” CONNECTOR FOR FFC CABLE TO STANDARD 7” 800x480 TTL LCD BOTTOM VIEW This is the bottom connector for the FFC to the LCD panel, 7” 800x480, TTL. The FFC cable is 40 pins and is provided by CJB along with the LCDpanel FFC means “Flexible Flat Cable”. Be very careful when plugging the cable into both LCD and System connectors. The connectors have a hinged plastic pressure bar which must be pushed down gently. The FFC connectors stay on the lower side (oppposite side of the blue reinforcement band). 16 J14 (BOTTOM) = 5.7” CONNECTOR FOR FFC CABLE TO STANDARD 5.7” 640x480 TTL BOTTOM VIEW Use the same precautions as for J13 J15 = 5.7” LCD SELECT NORMAL/REVERSE UP-DOWN J16 = 5.7” LCD SELECT NORMAL/REVERSE LEFT-RIGHT 1 1 2 2 3 3 Setting these jumpers allow the 5.7” display panel to work UP or DOWN (image rotated 180º or normal), and/or to work NORMAL/REVERSE. Reverse mean “reflected” like you see the image on a MIRROR. J15: CLOSE 1+2 FOR NORMAL (DEFAULT) J16: CLOSE 2+3 FOR NORMAL (DEFAULT) Factory Preset 17 J17 (BOTTOM) = 4 PIN HEADER FOR TOUCH SCREEN CONNECTION This 100mils header allows the connection of the TOUCH Screen to the system, through the special extension cable. Pin assignment is: 1=Y_UP 2=X_LEFT 3=Y_DOWN 4=X_RIGHT BOTTOM VIEW NOTICE: FOR 7” SGD LCD MODEL TOUCH CONNECTION: PLACE THE LCD WITH TOUCH AT THE BOTTOM… Flat cable exiting from touch, when the LCD is placed with active area downwards 1 White reinforcement plastic tab is below here TO MAKE A SAFE CORRECT CONNECTION, USE THE SPECIAL EXTENSION CABLE INSERT THE FFC CABLE TERMINAL LIKE YOU SEE HERE: PLEASE NOTICE THE CORRSPONDANCE OF COLORS FOR J17: BOTTOM VIEW 18 1 J18 = DIGITAL I/O (44 PIN MALE HEADER) THIS HEADER CONNECTOR BRINGS 30 DIGITAL I/O SIGNALS (WHICH ARE DIFFERENT, ACCORDING TO THE MODEL OF COLIBRI MODULE INSTALLED ONBOARD) THERE ARE ALSO GND PINS AND 3.3Vdc POWER PINS 3.3Vdc POWER PINS ARE UN-FUSED – BE CAREFUL NOT TO MAKE ANY SHORT USE ONE 44PIN 2.0mm PITCH FEMALE HOUSING FOR FLAT CABLE SIGNALS LEVEL IS 0~3.3Vdc PROVIDE SAFE SIGNAL CONDITIONING & OPTICAL INSULATION 19 J19 = ANALOG INPUT CONNECTOR THIS 10-pins HEADER CONNECTOR BRINGS 4 ANALOG INPUT SIGNALS (AVAILABILITY DEPENDS ON THE MODEL OF COLIBRI MODULE INSTALLED ONBOARD). THERE ARE ALSO GND PINS FOR SHIELDING. PIN 1 PIN ASSIGNMENT: Top Row, Right to Left: 1 = Shield 3, 5, 7, 9 = Analog GND Bottom Row, Right to Left: 2, 4, 6, 8 = Analog IN 3, 2, 1 and 0 10 = Shield J20 = ANALOG OUTPUT CONNECTOR THIS 10-pins HEADER CONNECTOR BRINGS 3 ANALOG OUTPUT SIGNALS (AVAILABILITY DEPENDS ON THE MODEL OF COLIBRI MODULE INSTALLED ONBOARD). THERE ARE ALSO GND PINS FOR SHIELDING. PIN 1 PIN ASSIGNMENT: Top Row, Right to Left: 1 = Shield 3, 5, 7, 9 = Analog GND Bottom Row, Right to Left: 2, 4, 6 = Analog OUT PWM_A, _B and _C 8 = n.c. 10 = Shield An R/C network (10kOhm/0.33uF) is provided for each signal to make the analog level from the PWM output from the Colibri module. 20 J2 = DISCONNECTS BATTERY Remove jumper before changing the Battery (CR2032, 3Vdc), then close it BATTERY NOT CONNECTED IF OPENED DEFAULT IS CLOSED 21 MECHANICS & MOUNTING The TouchMover comes either open-frame (and may be hosted in a plastic DIN-RAIL Shell): or it comes fully boxed for Panel-Mount or Wall-Mount solutions. 3DCAD Font panel with standard bezel Front panel with stilish bezel Rear view, including the WallMount Box 22 WALL MOUNT When the TouchMover-XS has to be wall-mounted, at first you have to make a hole in the wall and put in there the special wall mount box: Which above you can see CLOSED by the special cover which protects the box against unwanted cement or mortar dirt. Now you can remove the cover and you can see the wall mount box cemented in the wall: Notice the snap-out side holes (for cable passing) and the brackets for keeping the box in place when cementing it inside the wall. 23 Now you can get the special WallMount frame: and mount it to the cemented box: 24 So at last you get: “B” “A” Now the wall is ready to host the system, which will be attached by MAGNETS to the frame “A” and will be easily positioned perfectly perpedicular, thanks to the panning pivot “B”. “B” 25 Following page shows how to make the TouchMover-XS perfectly horizontal even if the wall box is not perfectly perpendicular. The system stays matched to the wall thanks to 3 magnets on the rear of the front bezel: And thanks tho the upper central PIVOT, and enough room between system and wall mount frame, you can adjust the system for 100% perpendicular: 26 PANEL MOUNT If the TouchMover-XS has to be installed onto a panel (“PanelMount”) just use the supplied special screw-hooks at the rear, to PULL the system against the front panel: The O-ring gasket in the groove (rear of the front bezel) will make tight IP-65 protection between the TouchMover-XS front bezel and the panel. © CJB Computer Job Srl – 2009~2012 27