1
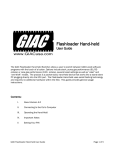
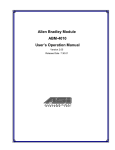
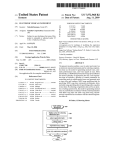
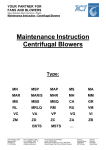
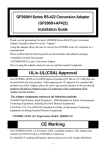
Switcher SW1 User Manual V2.2
Garrett Integrated Automotive Corporation
Table of Contents
1 Introduction.............................................................................................................................................3
2 Disclaimer................................................................................................................................................4
3 About Switcher SW1................................................................................................................................5
3.1 Compatibility...................................................................................................................................5
3.2 Privacy Firewall................................................................................................................................5
3.3 Boost Control...................................................................................................................................5
3.4 Firmware Upgrades.........................................................................................................................5
3.5 Checking the Firmware Version.......................................................................................................5
4 Using Switcher SW1................................................................................................................................7
4.1 Connecting to the Car......................................................................................................................7
4.2 Reading the Available and Current Tuning Mode............................................................................7
4.3 Switching the Tuning Mode.............................................................................................................8
4.4 Changing the Boost Setting on ECUs with the Boost Control Option.............................................9
4.5 Button Description..........................................................................................................................9
4.5.1 READ Button............................................................................................................................9
4.5.2 STOCK Button...........................................................................................................................9
4.5.3 PUMP Button...........................................................................................................................9
4.5.4 RACE Button.............................................................................................................................9
4.5.5 KILL Button...............................................................................................................................9
4.5.6 VALET Button...........................................................................................................................9
4.5.7 MTO Buttons............................................................................................................................9
4.6 Errors.............................................................................................................................................10
5 Privacy Firewall......................................................................................................................................11
5.1 About Privacy Firewall...................................................................................................................11
5.2 Setting the Privacy Firewall PIN.....................................................................................................11
5.3 Changing the Privacy Firewall PIN.................................................................................................12
6 Special Features....................................................................................................................................13
6.1 List of Special Features..................................................................................................................13
6.2 Porsche 997 Fault Code Clearing and Throttle Body Adaptation..................................................13
7 Revision History.....................................................................................................................................14
Switcher SW1 User Manual V2.2 – June 10, 2010
Page 2 of 14
Garrett Integrated Automotive Corporation
1 Introduction
The GIAC Switcher SW1 allows a user to switch between GIAC software tuning modes with the touch
of a button. Options include stock, pump gas performance (91/93-octane), race gas performance
(100+ octane), adjustable boost settings, and “valet” and “anti-theft” modes. The GIAC Switcher SW1
is a pocket-sized, stand-alone, hand-held device that works by plugging directly into the OBD-II port.
No additional hardware within the ECU is required. This user manual provides general usage
instructions for the GIAC Switcher SW1.
Switcher SW1 User Manual V2.2 – June 10, 2010
Page 3 of 14
Garrett Integrated Automotive Corporation
2 Disclaimer
Although most tuning modes can be selected while the car is in motion, GIAC does not recommend
using the Switcher SW1 while driving. In order to ensure the safety of the driver and others, switching
between tuning modes should be performed while the car is parked and out of traffic. It is against the
law in many states to use a computer, cell phone, or other device of distraction while driving. GIAC
recommends using the highest octane fuel available. At least 91-octane fuel must be used for regular
GIAC performance software when using the Pump tuning mode. For the Race tuning mode, a
minimum of 100-octane fuel must be used. Exposing the Switcher SW1 to water, extreme
temperatures, or excessive trauma may cause permanent damage. All GIAC software is for racing or
off-road use only. GIAC does not endorse its software for street use.
Switcher SW1 User Manual V2.2 – June 10, 2010
Page 4 of 14
Garrett Integrated Automotive Corporation
3 About Switcher SW1
3.1 Compatibility
The GIAC Switcher SW1 is fully compatible with GIAC U-Select, 2x, 3x, and 5x performance files.
3.2 Privacy Firewall
The Privacy Firewall feature offers a higher level of security for cars with GIAC performance software.
GIAC performance software with the Privacy Firewall feature enabled requires a unique 4-digit PIN in
order to successfully perform any switching operations. If the Privacy Firewall feature has been
purchased, the GIAC Switcher SW1 will not function properly if it has not been programmed with the
same PIN. Programming of this PIN is typically performed at point-of-sale by a GIAC authorized dealer.
3.3 Boost Control
Users who purchase the boost control option with GIAC performance software can switch between
three predefined boost settings using the GIAC Switcher SW1. The MTO buttons offer low (MT01),
medium (MT02), and high (MT03) boost settings. These settings will only affect Pump and Race tuning
modes.
3.4 Firmware Upgrades
GIAC may provide firmware upgrades for the Switcher SW1 through its authorized dealers. Firmware
upgrades provide bug fixes, new features, and support for new vehicles.
3.5 Checking the Firmware Version
The firmware version is not written on the GIAC Switcher SW1. However, the Switcher SW1 has the
ability to display the firmware version. The firmware version can be displayed by performing the
following steps:
1. The Switcher SW1 must be plugged into the OBD-II port while simultaneously pressing the
MTO2 button.
2. The red busy LED will turn on and stay lit indicating that the firmware version will be displayed.
Switcher SW1 User Manual V2.2 – June 10, 2010
Page 5 of 14
Garrett Integrated Automotive Corporation
3. The Switcher SW1 will begin to display the firmware version as soon as the MTO2 button is
released.
4. All of the LEDs will flash to indicate the major version number. This will be followed by just the
red busy LED flashing several times indicating a pause. Finally, all of the LEDS will flash again to
indicate the minor version number. For example, if the firmware version is 8.3, the LEDs will
flash 8 times (the major number), just the red busy LED will flash several times to indicate a
pause, and then the LEDs will flash 3 times (the minor number).
Illustration 1: GIAC Switcher SW1 Button Layout
Switcher SW1 User Manual V2.2 – June 10, 2010
Page 6 of 14
Garrett Integrated Automotive Corporation
4 Using Switcher SW1
4.1 Connecting to the Car
The GIAC Switcher SW1 must be connected to the car's OBD-II port, which is usually located under the
dashboard. The Switcher SW1 draws power from the OBD-II port. All the LEDs will flash once to
indicate that the Switcher SW1 has powered on successfully and is ready for use.
Illustration 2: Switcher SW1 Connected to OBD-II Port
4.2 Reading the Available and Current Tuning Mode
The READ button must be pressed in order to view the available tuning modes and current tuning
mode. When the READ button is pressed, the red busy LED will flash a few times, and the LED's of the
Switcher SW1 User Manual V2.2 – June 10, 2010
Page 7 of 14
Garrett Integrated Automotive Corporation
available modes will illuminate to indicate which modes have been purchased. The MTO1 or MTO3
LED will illuminate if the Privacy Firewall feature has been purchased. The MTO2 LED will illuminate if
the boost feature has been purchased. The LED's will turn off after a second and the LED for the
current tuning mode will remain illuminated.
Illustration 3: Reading the Current Tuning Mode
4.3 Switching the Tuning Mode
The GIAC Switcher SW1 can switch between different GIAC tuning modes in the ECU via the
corresponding buttons. Pressing one of the five tuning mode buttons will send a command to the ECU
to switch to the selected tuning mode. After switching to the new tuning mode, the corresponding
LED will illuminate.
Switcher SW1 User Manual V2.2 – June 10, 2010
Page 8 of 14
Garrett Integrated Automotive Corporation
4.4 Changing the Boost Setting on ECUs with the Boost Control Option
The boost setting in ECUs with the boost control option can be set with the GIAC Switcher SW1 when
in Pump or Race mode only. Pressing the MTO1, MTO2, and MTO3 buttons will send a command to
the ECU to set the boost value to low, medium, and high, respectively. After setting the new boost
value, the current tuning mode LED and MTO LED corresponding to the boost value will illuminate.
4.5 Button Description
4.5.1 READ Button
Reads the current mode and illuminates the corresponding LED.
4.5.2 STOCK Button
Switches the current tuning mode to stock settings.
4.5.3 PUMP Button
Switches the current tuning mode to GIAC performance tuning for high-octane pump fuel.
4.5.4 RACE Button
Switches the current tuning mode to GIAC performance tuning for high-octane race fuel.
4.5.5 KILL Button
Switches the current tuning mode to kill settings, which prevent the car from running. Safety
parameters are written into the ECU programming which prevent the Switcher SW1 from switching
into KILL mode when the car is in motion (i.e. RPMs are greater than 0).
4.5.6 VALET Button
Switches the current tuning mode to GIAC valet tuning, which substantially lowers power.
4.5.7 MTO Buttons
Sends a boost command to the ECU with predefined values while in Pump or Race mode.
1. MTO1 changes the boost setting to low.
2. MTO2 changes the boost setting to medium.
3. MTO3 changes the boost setting to high.
Note: Direct entry of boost values is possible for some ECUs with the boost control option via GIAC’s
Windows™-based Switching Software.
Switcher SW1 User Manual V2.2 – June 10, 2010
Page 9 of 14
Garrett Integrated Automotive Corporation
4.6 Errors
If the READ button or PUMP button is pressed and the corresponding LEDs continue to blink, then the
connection to the ECU has failed. If the Privacy Firewall option was purchased, it may be that an
incorrect PIN was programmed into the hand-held or the ECU. Contact your authorized GIAC dealer to
remedy this situation. If a button is pressed for a program and it fails to enter the mode properly, or if
the corresponding feature has not been purchased then the button LED will continue to blink until
another button is pressed.
Illustration 4: Failed Reading the Current Tuning Mode
Switcher SW1 User Manual V2.2 – June 10, 2010
Page 10 of 14
Garrett Integrated Automotive Corporation
5 Privacy Firewall
5.1 About Privacy Firewall
If the Privacy Firewall option has been purchased, a unique PIN is created by a GIAC authorized dealer
at the point-of-sale. At the time of installation, the PIN will be programmed into the ECU and Switcher
SW1 if purchased at the same time. If the Switcher SW1 is purchased or received after time of
installation, the PIN must be programmed by the user. GIAC maintains a copy of the PIN entered into
ECU in its database. If the PIN is ever lost or forgotten, a GIAC authorized dealer may request the last
known PIN entered into an ECU by providing GIAC with the VIN.
5.2 Setting the Privacy Firewall PIN
The Privacy Firewall PIN can be set by performing the following steps:
1. The Switcher SW1 must be plugged into the OBD-II port while simultaneously pressing the
MTO1 button.
2. The red busy LED will turn on and stay lit indicating that a password must be entered.
3. The PIN may be entered as soon as the MTO1 button is released.
4. The PIN must have a length of 4. Any of the buttons, except for the MTO buttons, may be used
for the PIN. After each button is pressed, the LEDs will light up in a circular pattern to indicate
that the button press has been accepted.
5. After the fourth and final button is pressed, the PIN entered will be displayed for verification
purposes.
Switcher SW1 User Manual V2.2 – June 10, 2010
Page 11 of 14
Garrett Integrated Automotive Corporation
Illustration 5: Switcher SW1 Waiting for Privacy Firewall PIN Entry
5.3 Changing the Privacy Firewall PIN
In some instances, the Privacy Firewall PIN may need to be reset. For example, the GIAC Switcher SW1
may have been purchased after GIAC performance software was purchased and installed; the tuning
mode in an ECU with Privacy Firewall is to be switched with a used or borrowed Switcher SW1; one
Switcher SW1 will be shared between two more cars with Privacy Firewall installed. It is important
that the user stores the PIN for each vehicle in a safe location. The PIN entered into the Switcher SW1
must always match the PIN stored inside the target ECU. The steps listed in section 5.2 must be
performed in order to change the Privacy Firewall PIN.
Switcher SW1 User Manual V2.2 – June 10, 2010
Page 12 of 14
Garrett Integrated Automotive Corporation
6 Special Features
The GIAC Switcher SW1 firmware includes special features at no additional cost. These features are
activated by entering an alternate menu. The special features menu can be entered by performing the
following steps:
1. The Switcher SW1 must be plugged into the OBD-II port while simultaneously pressing the
MTO3 button.
2. The red busy LED will turn on and stay lit indicating that special features menu has been
entered.
3. The available special features will be indicated by an illuminated LED for the corresponding
button that activates this feature.
6.1 List of Special Features
Button
Feature Performed
READ
Porsche 997 Fault Code Clearing and Throttle Body Adaptation
STOCK
None
PUMP
None
RACE
None
KILL
None
VALET
None
6.2 Porsche 997 Fault Code Clearing and Throttle Body Adaptation
This special feature will clear any fault codes found in the Porsche 997 DME and initiate the throttle
body adaptation routine.
Switcher SW1 User Manual V2.2 – June 10, 2010
Page 13 of 14
Garrett Integrated Automotive Corporation
7 Revision History
Version 2.2 – June 10, 2010
– Corrected title on cover page and footer
– Reorganized Revision History
– John Aguilar
Version 2.1 – May 5, 2010
– Added Illustrations 1 through 5
– John Aguilar
Version 2.0 – April 28, 2010
– Initial Release of GIAC Switcher SW1 User Manual
– John Aguilar
Switcher SW1 User Manual V2.2 – June 10, 2010
Page 14 of 14