1
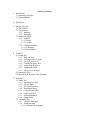
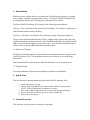
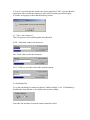
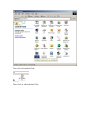
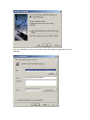
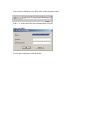
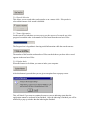
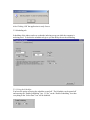
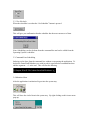
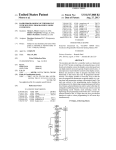
Faster Find File Indexer
Group 11
Stellar Software Solutions
User Manual
Table of Contents
1. Introduction
1.1 Statement of Purpose
1.2 Targeted Reader
2. Quick Start
3. System Overview
3.1 The Problem
3.2 The Solution
3.2.1 Indexing
3.2.2 Searching
3.3 High-level design
3.3.1 Swish-E
3.3.1.1 Usage
3.3.1.2 Credits
3.3.2 Configuration Files
3.3.2.1 Automatic
3.3.2.2 User-defined
4. Tutorial
4.1 Search Tab
4.1.1 Drag and Drop
4.1.2 Viewing in Preview Box
4.1.3 File Type Selection
4.1.4 Clearing the Query Box
4.1.5 Search Type Selection
4.1.6 Updating the Index
4.1.7 Query Line Command
4.2 Scheduling Tab
4.3 Indexing with Windows Task Scheduler
5. Reference
5.1 Search Tab
5.1.1 Document List Pane
5.1.2 Preview Pane
5.1.3 File Type Selection
5.1.4 Entering the Query
5.1.5 Clear the Query Box
5.1.6 Search Selection
5.1.7 Status Information
5.1.8 Update Index
5.2 Scheduling Tab
5.2.1 Using the Scheduler
5.2.2 Setting the Date
5.2.2.1 Schedule the Frequency
5.2.2.2 Day of Week
5.2.2.3 Hours and Minutes
5.2.2.4 Time of Day
5.2.3 Set Scheduler
5.3 Command Line Scheduling
5.4 Minimize Icon
Appendix A: System Requirements
Appendix B: Installation
Appendix C: Troubleshooting
Appendix D: Contact Information
1. Introduction
With the increase of hard disk size on common PCs, file hierarchy structures are getting
more complex, and data is getting harder to locate. The Faster Find File Indexing Tool
was designed to aid the user in locating files with specific data content.
The Faster Find File Indexing Tool consists of the following two main parts:
Indexing: This is what allows the content-based searching. File content is copied into an
index file that can be used for searching.
Searching: File index is searched for the search query string. Results are displayed.
The user must understand that indexing will be a slightly longer process and will use up
significant amounts of system resources so this should be scheduled to be done during the
night, or at a time when computer is not in heavy use. Also, the index should be kept up
to date as files are being added and deleted from the system.
1.1 Statement of Purpose
The Purpose of this document is to provide the user with instructions for using the Faster
Find File Indexing Tool. This document can be used as reference or for initial usage
instructions.
This document will describe the Faster Find File Indexing Tool, and explain its use.
1.2 Targeted Reader
It is assumed that the reader has some familiarity with Microsoft Windows.
2. Quick Start
Here are the steps to getting started using the Faster Find File Indexing Tool:
1. Insert disk and run ff_setup.
2. Choose YES when asked if you want to index all files on your system.
NOTE: This will take about 30 minutes to an hour.
3. Now click on the Program Icon and you are ready to begin searching.
4. Place a check next to the file types you want to search for.
5. Enter your search query.
3. System Overview
This Software was developed as a solution to a problem.
3.1 The problem
A common problem with search functions is that the user will type in a word to search
and then the software will access all the files every time a search is performed to check
the data for that word. The user has to wait long periods of time for the results and there
is a possibility of a failed search where no data with that word is found. If the word was
not found then the user has wasted their time.
3.2 The solution
3.2.1 Indexing
The Faster File Indexer goes through the data and compiles a file with all the words and
their relation to the data. This means that the Data is only checked through once unless
updated.
3.2.2 Searching
The index allows the user to check through the data on the fly without having to go
through every file each time a search is performed. This makes searching considerably
faster then the common search function.
3.3 High-level design
There are three main modules to the Faster Find File Indexing Tool: Search Tool,
Indexing Tool, and the Graphical User Interface (GUI). The GUI interacts with the
Search tool and the Indexing tool to provide an easy way to effectively use the tools.
3.3.1 Swish-E
The Faster File Indexer is built on the indexing power of Swish-E, an open source
command line indexing tool.
3.3.1.1 Usage
Swish-E can be used from the command line. It uses arguments on the command line to
specify its usage. Swish-E was used to power much of the Search Tool and the Indexing
Tool. For more details on this part of the software you can visit the Swish-E web site
(http://sunsite.berkeley.edu/SWISH-E/).
3.3.1.2 Credits
Swish-E was developed at the University of California at Berkeley and San Francisco.
3.3.2 Configuration Files
Configuration files provide a more advanced feature that the users could use to more
specifically define their indexes. There is one configuration file for each file type. The
filenames of the configuration files are: txt.config, html.config, pdf.config, doc.config,
cpp.config, and java.config. (Note: Only advanced users should edit configuration files)
3.3.2.1 Automatic
The software automatically changes and set the configuration files. The default is set to
find all physical partitions on the local system and index all .txt, .doc, .pdf, .html, .cpp,
and .java files on all partitions.
3.3.2.2 User Defined
The configuration files can be edited using any text editor. The first line of each
configuration file specifies the directories to be indexed:
IndexDir C:\ D:\ E:\ F:\
In the above example, all files on the C, D, E, and F drives will be indexed. These can be
set to specific drives or directories to limit the index.
This is the only line of the configuration files that should be edited.
4. Tutorial
4.1 Search Tab
4.1.1 Drag and Drop
To use the drag and drop first click and hold on the file that you want to drop.
Then move the arrow to the location where you want the file then release.
4.1.2 Viewing in Preview Pane
To preview in the preview pane all that has to be done is to click on a file in the list view
once.
The file will load up and be shown in the preview pane.
4.1.3 File type selection
To select a file type all that needs to be done is to click on the file type you would like to
index.
Now these and only these file types will be searched.
4.1.4 Clearing the Query Box
Clicking on the ‘Clear Query Box’ box can erase a word in the query box.
4.1.5 Search Type Selection
There is the choice of searching on keystroke and searching with a mouse click.
Searching on keystroke can be turned by checking the box.
4.1.6 Updating the Index
To index the documents on the hard drive(s) the ‘Update Index’ button.
This will bring up the option to cancel or continue.
If ‘Cancel’ is pressed then the search tab is shown again but if ‘OK’ is pressed then the
application will wait until the indexing is done before becoming operational again.
A window will pop up to show that the indexing is done.
4.1.7 Query line Command
There are queries can be added together using Boolean.
AND – Finds both words in the document
OR – Finds either word in the document
NOT – Finds one word but not the other in the document
4.2 Scheduling Tab
To set the scheduling first make sure that the ‘Enable schedule’ is on. If Scheduling is
disabled then time and date is also disable and can not be edited.
Select the time and date of when the indexer should be called.
When selecting the day of week use the drop down menu (This is only enabled if the
Scheduler Frequency is set for Weekly)
After selecting the time and date click on the Set Scheduler button.
This will give you confirmation that the scheduler has the most current set of time.
4.3 Indexing with Windows Task Scheduler
To Use the Windows Task Scheduler first click on the Start Menu then click on settings
then the control panel.
Then click on Scheduled Task.
Then Click on Add Scheduled Task
Now you will be in the Scheduled Task Wizard, click on next
Then Click on Browse
Now locate ‘FasterFindFileIndexer.exe’. If you do a regular install this should be under
C:\Program Files\FF File Indexer\
Now select how often you want to index
Now select what time and day you want to index
Under Win2000
Under Windows 2000 you will be asked for name and password, please enter one.
Now your schedule is set but you need to go into the advanced properties to set the
indexing.
After you have finished you will be taken to this properties sheet.
Add a ‘-u’ at the end of the run command then click OK.
Under win2000
Use the name and password from before.
5. Reference
5.1 Search Tab
This tab has all the main functions of the program.
5.1.1 Document List Pane
This is where the results from a query are shown. The file name, size of the file, location
of the file and the date modified are also shown.
There are some features from the list view.
- Single click => Takes the document and opens it in the preview pane at the
bottom of the search tool.
- Double click => Opens the document in the default viewer.
-
Focus => When focus is on the document list pane, the arrow keys can be used to
go up and down.
Drag and Drop => Can take a document outside of the application and drop onto
another application.
5.1.2 Preview Pane
The preview pane can be used to view the document with out opening another
application.
A single click from the list view can open files in the preview pane.
5.1.3 File Type Selection
This gives you the ability to select what file types you would like to search for.
The example above has only *.txt files label but any combination of the six can be used.
5.1.4 Entering the Query
The query can be entered using the query box.
Depending on the search setting the query can be sent automatically while typing or after
a mouse click.
5.1.5 Clear Query Box
This allows you to clear the query box.
5.1.6 Search Selection
This allows you to search either on keystroke or on a mouse click. If keystroke is
selected then mouse click search is disabled.
5.1.7 Status Information
On the search Tool tab there are two ways to see the success of a search, one is the
progress bar and the other is the number of files found from the total set of files.
The Progress bar is logarithmic showing useful information while the search narrows.
The number of hit from the total number of files searched shows you how often a word
appears in the total set of files.
5.1.8 Update Index
When this button is click then you want to index your computer.
After this button is pressed then you are given an option from a pop up screen.
This will check if you want to continue because as soon as indexing starts then the
application cannot be used until it has finished. After the indexing is finished you will be
notified by a pop up window that the indexing has finished.
After Clicking ‘OK’ the application is ready for use.
5.2 Scheduling tab
Scheduling of the index can be set so that the indexing can go on while the computer is
not being used. To do this the scheduler tab gives you the ability the set the scheduling.
5.2.1 Using the Scheduler
You have the option of having the scheduler on and off. The Scheduler can be turned off
and on using the “Enable Scheduling” box. If “No” on the “Enable Scheduling” box then
everything in the “Select Date” box will be disabled.
5.2.2 Setting the Date
You have four options to set the date.
5.2.2.1 Scheduler Frequency
You have “Scheduler Frequency” to set how often you want the in indexing done. You
have the choice of Weekly or Daily.
5.2.2.2 Day of Week
The “Day of Week” is used to set the day of the week if weekly is selected from the
“Scheduler Frequency” box. If daily is selected then “Day of Week” is disabled. This is a
drop down menu, select the day then click on it.
The following box will appear to confirm your select, click OK for it to go away.
5.2.2.3 Hours and Minutes
“Hours and Minutes” is used to set the time at the indexing should begin. The hour is set
using the box on the right and the minutes are set using the box on the left. The arrows
going up increment the values by one and the arrows going down decrement the values
by one.
5.2.2.4 Time of Day
“Time of Day” selects the time of day since the “Hour and Minutes” box only uses a 12hour clock.
5.3.3 Set Scheduler
When the scheduler is set then the “Set Scheduler” button is pressed.
This will give you confirmation that the scheduler has the most current set of time.
Note: Scheduling can also be done from the command line and can be called from the
Operating System’s scheduler.
5.3 Command Line Scheduling
Indexing can be done from the command line without even opening the application. To
do this the FasterFindFileIndexer.exe with its path is typed into the command line then
add the argument ‘ –u’ at the end. This will start the indexing.
5.4 Minimized Icon
After the application is minimized it goes into the system tray.
This will leave the circled icon in the system tray. By right clicking on this icon a menu
pops up.
You have the option to restore which will maximize the application. You can Shutdown
which will close the application or you can click on the ‘about…’ item.
The about item will pop up a box with information about the product.
Clicking ‘OK’ will make this box disappear.
Appendix A: System Requirements
In order for Faster Find File Indexing Tool to run optimally, certain hardware and
software is required.
Hardware Required: Pentium II 300Mhz, 128 MB RAM, 20 MB free hard disk space
(*more or less hard disk space could be required depending on the system)
Software Required: Windows NT/2000
Appendix B: Installation
1. Insert disk
2. Run ff_setup
3. Setup will ask you to index all files on your system. This is a long process that
could require up to an hour. Choose YES to begin indexing. If you choose NO,
then you must create before you can begin searching.
4. Installation Complete!
Appendix C: Troubleshooting
Problem: Search doesn’t return files of different file types.
Solution: Make sure you have all desired file types checked.
Problem: Certain files that you know should show up in the results are not
there.
Solution: These files were probably added since the index was last created. Recreate the Index and search again.
Problem: Index is taking too long to create. I want to quit the indexing.
Solution: To do this you must first close the Faster Find File Indexing Tool, then
press ALT + CTRL + DEL. Now click on Task Manager. Find the process
called ff_index.exe and click on End Process. Then answer YES. The Index has
now been aborted. You must re-create the Index before you can search. It may
be more convenient to schedule the Index to run at night or at a time when you are
not using your computer. See the section on “Scheduling an Index.”
Problem: Memory referencing error while indexing.
Solution: Un-install the Install Shield Developer program that comes with
Microsoft Visual Studio. Go to the Windows Control Panel. Click on
Add/Remove Programs. Highlight the Install Shield for Visual Studio. Click
Remove.
Appendix D: Contact Information
Authors:
Kalpesh Patel
[email protected]
Jefferson Smith
[email protected]
Other Group Members:
Saakait Mathur
[email protected]
Tony Deluca
[email protected]
Pranav Patel
[email protected]
Dr. Gary Bishop
[email protected]
Client: