1
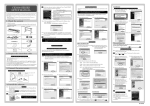
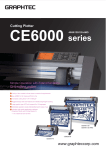
CE5000 SERIES
SETUP MANUAL
A-2 A little later, the start window is displayed. Press "Install CE5000"
button to install the software and driver.
The installed software
Print & Cut Software (ROBO Master Pro)
Cutting Plotter Controller
Plotter Driver
This Setup Manual describes the procedures required for setup. For operation procedures and
details on how to make the settings, and for any other points that are not clear, please refer
to the "CE5000 User's Manual" PDF files that are included in the CD-ROM provided with the
CE5000 plotter.
Illustrator Plug-in(Cutting Master)
* Windows and Windows XP are registered trademark of Microsoft Corporation in USA and other countries.
* Adobe Acrobat is a trademark of Adobe Systems Incorporated.
R
R
R
1. Check the content
1. Check the content
2. Following accessories are attached to the plotter. Refer to the list and
check the accessories.
Plotter - 1 unit
Acrobat Reader
Cutting Plotter Controller
Install the Cutting Plotter Controller according to the instruction on the
screen.
Note : The Cutting Plotter controller works only when installed to
Windows 2000/XP using the USB interface.
Note : E-2 and E-4 may not be displayed on certain computers.
E-1. Connect the CE5000 and the
PC using the USB cable,
then power on the CE5000.
E-2. Select "No, not this time",
then press the Next button.
The Cutting Plotter Controller is a software which enables to control
major functions of the CE5000 from PC.
C-1. Press the Next button.
C-2. Press the Next button.
Note : If it is not displayed, press START menu of the Windows, then
select the Run.
Select [CD-ROM]: \MultiSetup.exe and press OK button.
E-3. Select "Install the software
E-4. Press the Next button.
Install the item which is selected
automatically (Recommended)"
as a default.
then press the Next button.
Stand - 1 assembly
Note: If you are using the Windows95/98/Me, press START menu, the select the Run.
Then select [CD-ROM]:\English\Drive\DSETUP.exe and press the OK button.
In case of the Windows95/98/Me, it is compatible with the CE5000 driver, so skip
to the section D-1.
C-3. Press the Next button.
C-4. Press the Finish button.
E-5. Press "Continue Anyway" button. E-6. Press the Finish button.
A-3 Follow the installation wizard.
Power cable/USB cable
- 1 of each
Cutter plunger - 1 set
Cutter Blade (CB09UA) - 1 set
Water based fiber pen - 1 set
User guide CD-ROM - 1 set
Media Cutter - 1 set
Setup Manual (this manual)
- 1 set
Note : If "Software License Agreement" is displayed, check the
description. If you agree to the License agreement, press the Yes
button.
Install CE5000 Software
A-4 If you press "Install CE5000 Software" button, the
following window is displayed.
Confirm the setup items,
then press the OK button.
Note on Use - 1 set
2. Prepare the connection cable
Note : The RS-232C cable is an option.
Connect the plotter to PC with one of the following cables.
RS-232C (Serial port)
USB cable
Select the cable according to the specification of the application software
or the availability of the communication port on your PC. Use Graphtecrecommended cable for reliable operation.
If you plan to use the ROBO Master-Pro software and the Cutting Plotter
Controller, use the USB cable to connect the plotter to your computer.
D-1. Press the OK button.
D-2. Confirm that the CE5000 is not
connected with thePC, then
press the OK button.
Note: The ROBO Master Pro is an application software which has
easy-to-use drawing function and has a function to output to the
CE5000 and printers.
B-1. Press the Next button.
B-2. Press the Yes button.
To install Illustrator plug-in go to step A-5 , otherwise go to step A-6 .
Setup Illustrator Plug-in
Note : If you use the Illustrator 8 or 9 for Macintosh, please read
"Plug in for Illustrator.pdf ".
F-1. Press the English Version
A-5 Press "Setup Illustrator
button.
Plug-in" button on the Start
window.
( Refer to A-2 and A-3 )
D-3. Press the OK button.
Note : The ROBO Master Pro works only when installed to
Windows 2000/XP using the USB interface.
F-2. Press the OK button.
D-4. Select the port then press the OK button.
USB:
F-4. Select the language that you
wish to use and then press the
OK button.
Select it when using the USB cable.
COM1: Select it when using the RS-232C (Serial) cable.
FILE:
Select it when plot data is output to a file.
Note: Note: USB connection is not guaranteed for computers
running Windows 98 SE.
Please use the RS-232C (serial) connection instead.
Note : Remove all transportation tapes.
Power switch
Plotter Driver
Install the driver software according to the instructions on the screen.
Print and Cut software (ROBO Master Pro)
Install the Print and Cut software (ROBO Master Pro) according to
the instruction on the screen.
3. Connect the power source
F-3. Follow the instructions displayed
on the screen and then press the
Next button.
F-5. Press the Next button.
F-6. Press the Yes button.
F-7. Follow the instructions
displayed on the screen and
then press the Yes button.
F-9. Press the Finish button.
1. Turn the power switch to "O"
position.
2. Connect the power cord.
B-3. Press the Next button.
B-4. Press the Next button.
D-5. Press "Continue anyway"
button.
Left side of the plotter
In case of USB connection,
Power cord
If specified port isn't available on
the PC, the following window is
displayed and the distination port
is changed to "File".
4. Install the software
Note: This manual explains the case of Windows XP .
When you install the software, you need to have computer administrator's
rights.
Note: If you are using Macintosh , read "readme" file in the English folder of
attached CD-ROM.
A-1 Launch Windows, then insert the User guide CD-ROM into the CDROM drive of the PC.
(The screens that are displayed may differ
according to the operating system.
Check the contents of each screen before
proceeding with the installation.)
F-8. Press the Yes button.
B-5. Press the Next button.
B-6. Press the Finish button.
D-6. Press the OK button.
In case of COM1 and FILE connection,
A-6
In case of USB connection,
Note : At this stage, do not connect
the plotter to the PC.
To install Illustrator plug-in go to step A-5 , otherwise go to step A-6 .
A-7 Press the Exit button.
Install Acrobat Reader
The Acrobat Reader is necessary to
read attached users manual.
If the Acrobat Reader is not installed
in your PC, press
"Acrobat Reader"
to install it.
621359400
CE5000 SERIES
OPERATION MANUAL
Raise
for CE5000-60
Provide slack
in the media
Stopper
Stock shaft
Caution
To avoid bodily injury, always handle
the cutter blade with caution.
1
6. Adjusting the media
2. Setting the roll media stand
Fit in
for CE5000-120
Preparing the cutter blade and the
cutter pen plunger
1 09U
Roll media
Insert the stoppers into both end of the core.
Set the shaft
Adjusting the cutter blade length
3-1. Pull out the roll media and pass through the CE5000
(in case of roll media)
Cutter pen plunger
4 Turn on the cutting plotter
Set FORCE, SPEED and
QUALITY with reference to
the table below.
Move the cursor
Sheet media
A rough guide of the setting
Press the "|"
side of its power
switch
Pull out the roll media
Extend the blade
0 14 30 2
Extract the blade
Guide of the cutter blade length
Right
Too long
Too short
Material
Thickness(mm) Blade Cutting force
Outdoor vinyl
0.05 to 0.08 CB09UA
10-14
(for small size character cutting) 0.05 to 0.08 CB15UB
10-14
Film for decoration
0.08 to 0.1 CB09UA
14-17
Transparent/translucent film 0.08 to 0.1 CB09UA
14-20
0.08 to 0.1 CB09UA
14-20
Reflection film
Fluorescent film
0.20 to 0.25 CB09UA
20-21
Fluorescent film
0.20 to 0.25 CB15U
20-21
Speed
1-30
1-20
1-30
1-30
1-30
1-20
1-20
Quality
2
1
2
2
2
1
1
Adjust the cutting force so that the cutting trace lightly appears on the
media liner.
Cutter blade
3-2. Pass the sheet media through the CE5000
(in case of sheet media)
the media with backing sheet
Insert the cutter blade
2 Mounting the cutter pen plunger
5 Select the media mode
When using a sheet media.
Select media mode
using arrow keys.
SHEET PRESS ENTR
4. Align the media with the CE5000
Mount
CE5000-120
CE5000-60
Align the media
to the scale
Align the media to
the guide line
Loosen
3 Loading the media
When using a roll media and
setting the origin point to the
current setting position.
ROL L 1 PRESS EN TR
ROL L 2 PRESS ENTR
Origin point
Push roller position
guide mark
Move the push rollers while
the lever is in the low position.
Caution: Be sure to keep your hands, hair, and face away from
the moving parts.
Check the corners of the triangle.
Too much
1 09U - 1 14 30 2
In this case, increase the offset value.
Make sure to position the media so it covers the media sensor.
CE5000-60
Push roller
1. Lower the set lever
1 PEN
Press the COND. key.
12 30 2
Too little
Grit roller
Select the setting
condition number.
1 09U +1 14 30 2
2 09U
Media sensor
CE5000-120
If loading narrow media,
position both push rollers
above the longest grit roller.
Press the ENTER key
Move the cursor to adjust the offset value, repeat the adjustment
until the result becomes proper.
Move the cutter pen to the position where you
wish to initiate the test.
The media cannot be fed if the
push roller position is not
adjusted to the mark.
Press the TEST key
Origin point
6 Setting the cutting conditions
Tighten
0 14 30 2
PRESS ENTER KEY
5. Adjust the push roller position
Pen bracket
Pen bracket
When using a roll media and
setting the origin point to the top
of media.
Adjust the position of the push rollers to the push roller position guide mark
Flange
Origin point
Media sensor
Media sensor
Flange
Press the ENTER key
to start media size
detection.
1 09U
0 14 30 2
In this case, increase the offset value.
If you wish to use the 09U as a standard accessory, the default setting condition is
saved in the condition number 2.
Move the cursor
Push roller
Proper
Grit roller
1 09U
0 14 30 2
Select a blade
Media sensor
Corners are cut properly.
Press the ENTER key to finish.
If the ENTER key is pressed, then the setting conditions are stored
into the memory.
621359400