1
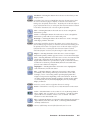
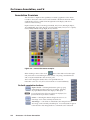
On Screen Annotation, cont’d
Annotation Overview
The Annotator's output has the capability to include a graphical tool bar which
is used for annotation. The tool bar can be enabled or disabled as desired. When
enabled, the tool bar is visible down the right side of the display and allows
selection of the following:
Inputs selection, Pointer, Auto Image, Freehand, Line, Arrow, Rectangle, Ellipse,
Text, Highlighter, Size select, Eraser, Color, Fill, Undo, Redo, Clear, Tools - Capture,
Freeze, Mute, Whiteboard, Spotlight, Zoom, and Pan.
Figure 4-4 — Annotation menu examples
When clicking on the tool bar arrow
, the tool bar slides in from the right
side, and can be accessed through a touch screen, or by using a standard mouse
and/or keyboard attached to the rear PS/2 ports.
The tool bar disappears (hides) after a user-specified time-out.
If the time-out is set to zero, the tool bar remains on-screen indefinitely.
Default annotation buttons
Input selection — Selecting this button opens a pop-up
palette displaying the Annotator's six inputs. Selecting
any input button switches the display to that input.
N A seventh input button (shown at right) is also displayed if an
optional HD-SDI input board is installed.
4-4
Pointer — Selecting this button changes the cursor to an
extra-large arrow of the currently selected color.
Auto-Image™ — On selection of this button, the unit performs an
auto image on the currently selected input. A secondary button appears
to the left of the Auto Image button to confirm the action is desired.
Annotator • On Screen Annotation
Freehand — Selecting this button allows the user to draw freely on the
display screen.
N For Freehand, Line, Arrow, and Highlighter functions, the start point is where
the screen is touched (by finger or stylus), or where the cursor starts when
holding down the primary mouse button. The finish point is where the stylus or
finger is lifted from the screen, or at the point where the mouse button is released.
For all drawn annotations, line color and weight are adjustable.
Line — Selecting this button allows the user to create a straight line
between two points.
Arrow — Selecting this button allows the user to create a straight line
between two points with an arrow at the end point.
Rectangle — Selecting this button allows the user to create a rectangle
with edges parallel to the raster.
N For Rectangle and Ellipse functions, the primary corner is where the screen is
first touched (by finger or stylus), or where the cursor starts when holding down
the primary mouse button. The opposite corner is where the stylus or finger is
lifted from the screen, or at the point where the mouse button is released.
Unless the fill option is selected, only the rectangle or ellipse outline is drawn.
Ellipse — Selecting this button allows the user to create an ellipse
between the primary and the opposite corners of a non-drawn rectangle.
Text — Selecting this button allows the user to create on-screen text with
a keyboard connected to the rear USB or PS/2 port. Text insertion
begins either at the mouse operated cursor point, or where the screen is
touched. If no insertion point is defined, then text is inserted at the
previous active function's end point.
Highlighter — Selecting this button allows the user to highlight the
video information, not the annotation.
Size — Select this button to adjust size of text and/or line weight
(not linked), after selecting a drawing or text function, such as line,
rectangle, or text. A secondary palette opens displaying either line
weight or text point size depending on the active function. From the
secondary palette select the desired size button. Functions this applies
to are Text, Line, Arrow, Freehand, Highlighter, Arrows, Rectangle,
Ellipse, and Eraser.
N Eraser size, text size, and line weight have discrete size settings.
Eraser — Select this to erase any (non saved) annotations on the screen.
Color — Select this button to choose the color of any drawing function
(fill or outline), text, or pointer color. On selection, a secondary palette
opens with 16 color swatches. Select a color as desired. The active
function now uses the selected color.
Fill — Selecting this button in conjunction with selecting the rectangle or
ellipse button, allows the user to draw a solid shape, filled with the
currently selected color.
N A drawn, unfilled shape cannot be filled afterwards, and vice versa.
Annotator • On Screen Annotation
4-5
On Screen Annotation, cont’d
Undo — Selecting this allows the user to undo the last 7 completed
annotations or undo a Clear action.
N A completed annotation is defined by lifting the finger or stylus from the touch
screen, pressing the keyboard Enter key, or releasing the primary mouse button.
Redo — If selected while using the Undo function, it recreates the last
undone annotation.
Clear — Selecting this clears the screen of all unsaved annotations, and
can be undone with the Undo function.
Tools — Selecting the Tools button opens a secondary palette containing
the following advanced tools: Capture, Freeze, Mute, Whiteboard,
Spotlight, Zoom, and Pan. On selection of any tool, the secondary
palette closes. To reopen the palette, click on the Tools button.
Capture — Select this to take a snapshot image of the current program
output, including annotations (but not any open OSD palettes). This
captured image can be saved to the Annotator's memory for later recall.
N Using SIS commands the Capture tool can be customized to send out an
unsolicited response, indicating an image is ready to be streamed directly to an
external PC.
4-6
Freeze — Select this to freeze the live video. To unfreeze the video,
reselect this button or switch inputs.
Mute — Select this to mute the video input and display a black screen.
Annotations and menus are still visible. To unmute the video, reselect
the Mute button, or select the Whiteboard tool, or switch inputs.
Whiteboard — Select this to create a white canvas for annotations. No
input video image is visible. To remove the white canvas, reselect the
Whiteboard button, select mute, or switch inputs.
Spotlight — Select this to create an ellipse to focus on a specific area of
the screen, while the outer area's brightness is greatly reduced. The
shape and size of the ellipse is adjustable by dragging the cursor while
outside of it, to any point. The ellipse can be moved to any point by
dragging the cursor while within the ellipse.
Zoom — Select this to zoom in to a specific area of the screen. Using the
cursor, create a rectangle at the desired area and the Annotator zooms in
to view that area. If the boundaries of the area are beyond the zoom
capabilities, then the view will not change. To zoom out draw a small
rectangle (<100 pixels, ~1"x 1") and the normal view is restored.
Pan — Selecting this while in zoom mode, allows the user to move the
focus to a new area. Place the cursor on a zoomed image and drag to
the desired area.
Annotator • On Screen Annotation