1
User's Manual
CIPHER 1022 SERIES
Document Number : 1022-52 Ver. 1.520
Release Date : Apr 22, 1996
1996, SYNTECH INFORMATION Co., Ltd.. All
rights reserved. CipherLab is a registered trademark
of SYNTECH INFORMATION Co., Ltd.
WARNING
Note : This equipment has been tested and found to
comply with the limits for a Class A digital device,
pursuant to Part 15 of FCC Rules. These limits are
designed to provide reasonable protection against
harmful interference in a residential installation. This
equipment generates, uses and can radiate radio
frequency energy and, if not installed and used in
accordance with the instructions, may cause harmful
interference to radio communications. However, there
is no guarantee that interference will not occur in a
particular installation. If this equipment does cause
harmful interference to radio or television reception,
which can be determined by turning the equipment off
and on, the user is encouraged to try correct the
interference by one or more of the following measures:
∗ Reorient or relocate the receiving antenna.
∗ Increase the separation between the equipment and
receiver.
∗ Connect the equipment into an outlet on a circuit
different from that to which the receiver is connected.
∗ Consult the dealer or an experienced radio/TV
technician for help.
Table of Contents
1. Introduction ................................................................. 1
2. General Programmable Features................................ 2
2.1 Buzzer Pitch / Duration........................................ 2
2.2 Inter-Character Delay........................................... 2
2.3 Symbology Setting .............................................. 2
2.3.1 Symbologies Read...................................... 2
2.3.2 Check Character Verifications..................... 3
2.3.3 Check Character Transmission.................... 3
2.3.4 Code Length Checking................................ 3
2.3.5 UPCA Adjustment........................................ 3
2.3.6 UPCE System Number................................. 3
2.3.7 UPCE to EAN13 Conversion ......................... 4
2.3.8 ISBN Conversion ......................................... 4
2.3.9 Barcode Concatenation .............................. 4
2.4 Data Output.......................................................... 4
2.4.1 Code ID....................................................... 4
2.4.2 Code Length ............................................... 6
2.4.3 Prefix and Postfix ....................................... 6
2.4.4 Trailer / Delimiter........................................ 6
3. Programmable Features Specific to 1022K.................. 7
3.1 Computer/Keyboard Type .................................... 7
3.2 Language Support............................................... 7
3.3 Capital Lock Status.............................................. 8
4. Programmable Features Specific to 1022R.................. 9
4.1 TRANSMISSION MODE......................................... 9
4.2 Baud Rate / Parity / Data Bits Setting .................. 9
5. Visual & Audio Indicator............................................. 10
6. Installing CIPHER 1022K ............................................. 11
7. 1022R Power Connection and Pin
Assignments................................................................... 13
7.1 Power Connection .............................................. 13
7.2 Pin Assignments of RS-232 connector................. 13
7.2.1 Dual-Connector Type ................................. 13
7.2.2 Single-Connector Type .............................. 14
8. Installing CIPHER 1022R ............................................. 15
9. Configuring CIPHER 1022............................................ 16
-i-
Table of Contents
9.1 Enter Configuration Mode ................................... 16
9.2 List Setting.......................................................... 16
9.3 Default Setting.................................................... 16
9.4 Change Settings ................................................. 16
9.5 Exit From Configuration Mode ............................ 17
10. Kbd Wedge Map Table ............................................. 18
11. SYSTEM DEFAULT SETTINGS ................................... 19
11.1 1022K Default Settings ...................................... 19
11.2 1022R Default Settings ...................................... 19
- ii -
CIPHER 1022 User
Manual
1. Introduction
This manual describes the operation and the
programmable features of 1022K and 1022R Bar code
Slot Readers. The two models both have bar-code
decoder built in, and they are different mainly in the way
how data is transmitted (transmission interface).
1022K is a wedge (keyboard emulation) slot reader
which transmits the decoded data to the computer
through the keyboard interface, whereas the 1022R
transmits the decoded data to the computer through
RS-232 interface.
Besides the basic functions, the 1022 also provides
various
features
to
accommodate
versatile
environments and application requirements. These
features can be programmed by reading special bar
codes and may be reconfigured at any time to account
for changing requirements. With a built-in memory
backup circuitry, these settings can be kept during
power down and are automatically restored upon
powering on the 1022.
Where "1022" appears in this document represents
both the 1022K and 1022R. And all the information
contained in this manual apply to both models unless
otherwise specified.
-1-
CIPHER 1022 User
Manual
2. General Programmable Features
This section describes various features of CIPHER 1022 which
are user selectable and can be programmed into the reader.
These features can be modified by reading some special barcode cards which are accompanied with this manual. For
detail configuration procedures please refer to the section
"CONFIGURING CIPHER 1022".
2.1 Buzzer Pitch / Duration
There are 2 different pitches (HIGH / LOW) and 2 different
duration (LONG / SHORT) could be selected for CIPHER
1022. Beside these selections, the buzzer can also be
disabled. And it will beep only when 1022 is in configuration
mode. Change of these settings will alter the audio indication
of successful readings.
2.2 Inter-Character Delay
An inter-character delay ranges from 0 to 250 mili-seconds
can be selected to match various computer response time.
Unfortunately, efforts must be taken to try out the shortest
delay time that still works properly.
2.3 Symbology Setting
This section describes the programmable settings available to
the various symbologies read by CIPHER 1022.
2.3.1 Symbologies Read
Most of the commercially available bar code symbologies are
supported,
• Code 39/Full ASCII
• Italy Pharma Code
• French Pharma Code
• Industrial 25
• Interleave 25
• Matrix 25
• CP 25
• Codabar
• Code 93
• Code 128
•
•
•
•
•
•
•
•
•
EAN8
EAN8 with ADDON 2
EAN8 with ADDON 5
EAN13/UPCA
EAN13/UPCA with ADDON 2
EAN13/UPCA with ADDON 5
UPCE
UPCE with ADDON 2
UPCE with ADDON 5
Each symbology can be individually enabled or disabled by
programming CIPHER 1022, and CIPHER 1022 will
automatically discriminate and recognize all symbologies that
are activated.
∗ Note : The CODE 39 FULL ASCII utilizes combinations of
the CODE 39 to implement full ASCII capabilities. To read
-2-
CIPHER 1022 User
Manual
CODE 39 FULL ASCII, both CODE 39 and FULL ASCII must
be enabled.
2.3.2 Check Character Verifications
For the symbologies listed below, the use of check character
(digit) is optional. Check character (digit) verification could be
enabled or disabled for these types symbologies on CIPHER
1022.
• Code 39
• Code 39 Full ASCII
• Industrial 25
• Interleave 25
• Matrix 25
• CP 25
2.3.3 Check Character Transmission
When this option is programmed to be "DISABLE", the last
character (digit) will be omitted upon transmission.
2.3.4 Code Length Checking
For Industrial 25, Interleave 25, Matrix 25 and CP 25, a
minimum and maximum length ranging from 1 to 40 can be
set to qualify data entry. This length is defined to be the actual
code length sent (excludes Code ID and trailer/delimiter).
Labels with length exceeds these limits will be rejected. Make
sure that the minimum length setting is no greater than the
maximum length setting, or all the labels of the symbology will
not be read.
2.3.5 UPCA Adjustment
Because UPCA is a subset of EAN13 (with first digit 0), all
UPCA symbols will be treated as EAN13 symbols, if the
UPCA adjustment option is disabled. When UPCA
ADJUSTMENT 1 is selected, the first digit (0) will not be
transmitted when a UPCA bar code is decoded. And when
UPCA ADJUSTMENT 2 is selected, the first 2 digits will not
be transmitted when a UPCA bar code is decoded.
2.3.6 UPCE System Number
There are two kinds of system number for UPCE labels,
system number 0 & system number 1. The transmission of
the system number could be programmable via setup. When
the transmission of the system number is enabled, the
-3-
CIPHER 1022 User
Manual
system number (1 digit, whether 0 or 1) will be prefixed to the
UPCE code.
2.3.7 UPCE to EAN13 Conversion
The UPCE to EAN13 conversion can be selected via
configuration. If this setting is enabled, UPCE labels will be
treated as EAN13 label.
2.3.8 ISBN Conversion
The 1022 can perform ISBN conversion if the setting is
enabled.
2.3.9 Barcode Concatenation
Several symbologies such as Code 39, Code 93 and Code
128 provide the function of concatenation which allows several
symbols to be concatenated and be treated as one single
data entry.
Once a symbol with the embedded concatenation code (a
leading space for Code 39 and Code 93, a "FNC2" character
for Code 128) was decoded, this data will be transmitted
without postfix and delimiter, and waits for another symbol to
be "concatenated". If other symbols with embedded
concatenation code were decoded again, these codes will
also be transmitted without Code ID, prefix, and delimiter.
When a valid code with no embedded concatenation code was
read the decoded data will be transmitted without Code ID and
prefix code but the postfix code and delimiter are appended.
Barcode concatenation can be enabled or disabled for Code
39 and Code 93. CIPHER 1022 will notify the user with a
shorter than normal beep of successful decoding upon this
kind of symbologies.
2.4 Data Output
This section describes the programmable features concerning
data output.
2.4.1 Code ID
A code ID is a character which is used to represent the
symbology being decoded upon successful reading. The code
ID is prefixed to the data being transmitted if the feature is
selected. There are 4 code ID sets selectable on the 1022.
The valid code ID and the symbologies they represent are
listed below.
-4-
CIPHER 1022 User
Manual
Code ID Set 1
•
•
•
•
•
•
•
•
•
•
A : Code 39
B : Code 39 Full ASCII
C : Code 25
D : Interleave 25
E : Matrix 25
F : Codabar
H : Code 128
I : Code 93
J : UPCA ( No addon)
K : UPCA (Addon 2)
•
•
•
•
•
•
•
•
•
•
L : UPCA (Addon 5)
M : EAN13 (No addon)
N : EAN13 (Addon 2)
O : EAN13 (Addon 5)
P : EAN8 (No addon)
Q : EAN8 (Addon 2)
R : EAN8 (Addon 5)
S : UPCE (No addon)
T : UPCE (Addon 2)
U : UPCE (Addon 5)
•
•
•
•
•
•
•
•
•
•
C : Code 39
C : Code 39 Full ASCII
E : UPCE (No addon)
E : UPCE (Addon 2)
E : UPCE (Addon 5)
G : Matrix 25
H : Code 25
I : Interleave 25
K : Code 128
L : Code 93
•
•
•
•
•
•
•
•
•
•
C : UPCE (No addon)
C : UPCE (Addon 2)
C : UPCE (Addon 5)
Y : Code 39
Y : Code 39 Full ASCII
H : Code 25
Z : Interleave 25
G : Matrix 25
K : Code 128
L : Code 93
•
•
•
•
•
•
•
•
A : UPCA ( No addon)
A : UPCA (Addon 2)
A : UPCA (Addon 5)
E : UPCE (No addon)
E : UPCE (Addon 2)
E : UPCE (Addon 5)
FF : EAN8 (No addon)
FF : EAN8 (Addon 2)
Code ID Set 2
•
•
•
•
•
•
•
•
•
•
A : UPCA ( No addon)
A : UPCA (Addon 2)
A : UPCA (Addon 5)
A : EAN13 (No addon)
A : EAN13 (Addon 2)
A : EAN13 (Addon 5)
B : EAN8 (No addon)
B : EAN8 (Addon 2)
B : EAN8 (Addon 5)
N : Codabar
Code ID Set 3
•
•
•
•
•
•
•
•
•
•
A : UPCA ( No addon)
A : UPCA (Addon 2)
A : UPCA (Addon 5)
A : EAN13 (No addon)
A : EAN13 (Addon 2)
A : EAN13 (Addon 5)
B : EAN8 (No addon)
B : EAN8 (Addon 2)
B : EAN8 (Addon 5)
X : Codabar
Code ID Set 4
•
•
•
•
•
•
•
•
M : Code 39
M : Code 39 Full ASCII
H : Code 25
I : Interleave 25
G : Matrix 25
N : Codabar
F : EAN13 (No addon)
F : EAN13 (Addon 2)
-5-
CIPHER 1022 User
• F : EAN13 (Addon 5)
• K : Code 128
Manual
• FF : EAN8 (Addon 5)
• L : Code 93
2.4.2 Code Length
There are optional 2 digits code length can be added to the
data transmitted. These 2 digits indicates the length of the
bar-code being decoded, and is placed after Code ID (if
enabled) and before bar-code data.
2.4.3 Prefix and Postfix
Up to 4 characters could be programmed for both prefix and
postfix codes. The prefix code programmed will be placed
before Code ID., and the postfix code programmed will be
placed after the bar code data and before the delimiter
characters.
For 1022R, the prefix and the postfix codes sent are the ASCII
code that programmed. For 1022K, please refer to the bd
Wedge Map Table” .
When 1022K is emulating PCAT, PS55, PS2-30, or Memorex
Telex, keystrokes can be sent without the Kbd scan code
remapping process. If the can Code in Prefix / Postfix”
setting is enabled, the prefix / postfix codes programmed will
be treated as scan code and be sent directly.
2.4.4 Trailer / Delimiter
Various trailers / delimiters can be selected and will be
automatically appended to the data being transmitted. One
out of the followings can be selected.
• NULL : no delimiter character will be appended
• SPACE : the character "space"
• HTAB : the character "tablet"
• CR : the character carriage-return
• CR + LF : the character carriage-return followed by a linefeed character
• LF : the character line-feed
• EXEC : the Exec key (if available on the target Kbd)
-6-
CIPHER 1022 User
Manual
3. Programmable Features Specific to 1022K
3.1 Computer/Keyboard Type
CIPHER 1022K is able to emulate a wide range of keyboards
to fit into the following computer systems,
• IBM PC/AT & compatibles (PS2-50/70/80, HP VECTRA PC,
etc.)
• IBM PC/XT & compatibles
• Wyse Enhance Kbd
• NEC Astra
• TeleVideo 965
• IBM 5550
• IBM PS2-30
• Hitachi Elles
• IBM PS-55
• Macintosh ADB
• Macintosh RJ11
• DEC VT series
• ADDS 1010
• Memorex
Telex (Compatible with most of the IBM
Terminals)
• NEC N5200
• NEC PC-9800
∗ Note : The "Default" label will not change the keyboard type
that had been programmed to 1022K. That is, the keyboard
type setting has no default values.
3.2 Language Support
Keyboard layout other than English (US) can be selected
when CIPHER 1022K is emulating PC/AT. This setting has no
effect when CIPHER 1022K is emulating other types of
keyboards. The supported keyboard layouts are listed below.
-7-
CIPHER 1022 User
•
•
•
•
•
US
Germany
Belgian
Norwegian
Portuguese
•
•
•
•
•
Manual
French
Italian
Swedish
Spanish
UK
The DOS command "KEYB" can be used to select the
desirable keyboard layout on PC/AT. For its usage, please
refer to your DOS user's manual.
3.3 Capital Lock Status
Because CIPHER 1022K transmits data by emulating
keyboard, it is important for CIPHER 1022K to know the
status of the capital lock of the keyboard to send the correct
case when transmitting data. Wrong setting of this option will
make upper case letters become lower case letters and lower
case letters become upper case letters.
The 1022K can also set to automatically detect the capital
lock status when emulating PCAT, PS55, PS2-30, or
Memorex Telex. This auto-detection function can work on
most of the PCs (listed above), but without guarantee
(especially for some NoteBooks). It is recommend that this
option be set to disable.
-8-
CIPHER 1022 User
Manual
4. Programmable Features Specific to 1022R
The section describes the various RS-232 transmission
settings which apply to CIPHER 1022R only.
4.1 TRANSMISSION MODE
The option is to select the way CIPHER 1022R transmits data
upon successful decoding. The supported transmission mode
and their interpretations are listed below.
•
FULL DUPLEX : The decoded data is transmitted to the
female D-type 25 pin connector. There is no RTS/CTS
handshake involved.
•
HALF DUPLEX : The decoded data is transmitted to both
the male and female D-type 25 pin connectors. There is no
RTS/CTS handshake involved.
•
SCANNER READY : CIPHER 1022R will activate the RTS
signal upon powered on, and will transmit data upon
receiving activated CTS signals.
•
DATA READY : CIPHER 1022R will activate the RTS signal
to indicate a successful decoding and will transmit data
upon receiving activated CTS signals.
•
INVERTED DATA READY : The same as DATA READY
mode except the RTS logic is reversed (deactivate RTS
signal upon successful decoding).
4.2 Baud Rate / Parity / Data Bits Setting
The selectable values of the baud rate, parity, and data bits
are listed below. The stop bits is fixed to 2 for 1022R.
•
BAUD RATE : 38400 / 19200 / 9600 / 4800 / 2400 / 1200 /
600 / 300
•
PARITY : NO PARITY / EVEN PARITY / ODD PARITY
•
DATA BITS : 7 / 8
-9-
CIPHER 1022 User
Manual
5. Visual & Audio Indicator
CIPHER 1022 provides LEDs and a BUZZER which work
synchronously to signify various status (unless the buzzer is
disabled).
•
Power On : The buzzer is activated and the red LED is
lighted for about 1 second to indicate success power-on.
•
Successful Normal Scan : The buzzer and the red LED
are activated for a short period to indicate successful
reading. The tone and duration can be configurable.
•
Successful Concatenation Scan : If a label with
embedded concatenation code was decoded, a beep and
the red LED with half the normal duration will be activated.
•
Configuration Mode Entry and Exit : A low pitch beep
followed by a high pitch beep and repeated for 2 more
times. The red LED is lighted when the buzzer beeps. The
green LED will be lighted when CIPHER 1022 is in
configuration mode.
•
Successful Normal Configuration Scan : A low pitch
beep followed by a high one. The red LED is lighted when
the buzzer beeps.
•
Value Label pending : A short beep to indicate that a
value label must be scanned to complete the configuration.
The red LED is lighted when the buzzer beeps.
•
Configuration Error : Several short beeps to indicate that
some other setting label in stead of a value label is
scanned. The red LED is lighted when the buzzer beeps.
- 10 -
CIPHER 1022 User
Manual
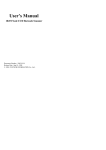
6. Installing CIPHER 1022K
This section contains a step by step procedures as well as
the expected results (LEDs and buzzer) for installing CIPHER
1022K into your systems. Some of the steps will require you
to do some configurations. Please follow these steps and
check all expected results in detail.
1. Turn off your computer, this is mandatory to prevent any
accidental damage to your computer and CIPHER 1022K.
2. Connect keyboard to the female connector of CIPHER
1022K and insert the male connector to the keyboard
connector of your computer.
3. Turn on the computer.
4. Check the following,
• CIPHER 1022K will activate a long beep (about 1 second) to
indicate a successful power on.
•
The computer should boot-up normally except "keyboard
error", this might be resulted from mismatched
computer/keyboard type. This will be discussed later.
∗ Note : If any of the above mismatched, turn off the PC
immediately and check if any incorrect or improper
connections then repeat the procedures above.
5. Enter configuration mode by reading the "ENTER SETUP"
label. CIPHER 1022K should activate a L-H-L-H-L-H beep.
6. Read the "DEFAULT" label to choose the default settings.
CIPHER 1022K should activate a L-H beep.
7. Select the appropriate keyboard type. This is important
because the keyboard type setting does not have a default
value.
8. Scan "UPDATE" label to update settings and exit from
configuration mode.
9. Turn off the host.
10. Turn on the host again, this time the host should boot up
without any error.
11. Enter configuration mode by reading the "ENTER SETUP"
label.
12. Enter text editor program (PE2, BRIEF, WORD, WORD
PERFECT, etc.)
13. Read the "LIST" label.
- 11 -
CIPHER 1022 User
Manual
14. The system settings will be shown on the screen and
CIPHER 1022K will activate a L-H beep.
∗ Note : If you got a broken display or the PC kept beeping, it
might be the problem of incorrect computer/keyboard type,
language, or the inter-character delay is not long enough.
Correct the settings now.
15. Read the "UPDATE" label to exit from the configuration
mode. CIPHER 1022K will again activate a L-H-L-H-L-H beep,
and restart normal operation.
16. CIPHER 1022K is now properly installed, you can now
read any labels available and these data will be shown on the
screen.
17. Modify system settings to meet your application
requirements.
- 12 -
CIPHER 1022 User
Manual
7. 1022R Power Connection and Pin
Assignments
This section describes the power connection and pin
assignments of CIPHER 1022R. Incorrect connections may
cause damage to both 1022R and computer.
7.1 Power Connection
There are 2 ways to provide power to CIPHER 1022R, and
they are described below. Either way is possible, but not both
in the same time.
•
Power could be provided to CIPHER 1022R through pin 25
of the D-TYPE 25 pin connector with 5 VOLTS DC.
•
Power could be provided to CIPHER 1022R by a 5 VOLTS
DC adapter through the DC JACK on the RS-232 connector.
The inner conductor is positive, and the outer conductor is
negative (ground).
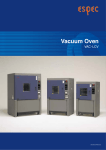
7.2 Pin Assignments of RS-232 connector
CIPHER 1022R could be equipped with one of two kinds of
connectors as it is shipped to you. The pin assignments for
each kind of connector are described below.
7.2.1 Dual-Connector Type
The connector is equipped with 2 D-Type 25 PIN connectors,
one is male type, and the other is female type. This kind of
connector is for full/half duplex transmission mode.
•
Male Connector
PIN 2 : TxD (Transmit Data)
PIN 3 : RxD (Receive Data)
PIN 4 : connects to pin 4 of female connector
PIN 5 : connects to pin 5 of female connector
PIN 6 : connects to pin 6 of female connector
PIN 7 : GND (Ground)
PIN 8 : connects to pin 8 of female connector
PIN 20 : connects to pin 20 of female connector
PIN 25 : Vcc (+5V Power Input)
- 13 -
CIPHER 1022 User
•
Manual
Female Connector
PIN 2 : RxD (Receive Data)
PIN 3 : TxD (Transmit Data)
PIN 4 : connects to pin 4 of male connector
PIN 5 : connects to pin 5 of male connector
PIN 6 : connects to pin 6 of male connector
PIN 7 : GND (Ground)
PIN 8 : connects to pin 8 of male connector
PIN 20 : connects to pin 20 of male connector
PIN 25 : Vcc (+5V Power Input)
7.2.2 Single-Connector Type
The connector is equipped with a D-Type 25 PIN female
connector. This kind of connector is used when RTS/CTS
handshake is desired.
PIN 3: TxD (Transmit Data)
PIN 4 : CTS (Clear to Send Input)
PIN 5 : RTS (Request to Send Output)
PIN 7 : GND (Ground)
PIN 25 : Vcc (+5V Power Input)
- 14 -
CIPHER 1022 User
Manual
8. Installing CIPHER 1022R
This section contains a step by step procedures as well as
the expected results (LEDs and buzzer) for installing CIPHER
1022R into your systems. Some of the steps will require you
to do some configurations. Please follow these steps and
check all expected results in detail.
1. Connect D-TYPE 25 pin connector to the communication
port of the computer / terminal. Please check pin
assignments before making the connection.
2. Provide power to CIPHER 1022R. CIPHER 1022R will
activate a long beep and the red LED will be lighted for
about 1 second to indicate a successful power on.
∗ Note : If any of the above mismatched, turn off the power
immediately and check if any incorrect or improper
connections then repeat the procedures above.
3. Enter configuration mode by reading the "ENTER SETUP"
label. CIPHER 1022R will should activate a L-H-L-H-L-H
beep.
4. Read the "DEFAULT" label to choose the default settings.
CIPHER 1022R should activate a L-H beep.
5. Select the appropriate baud rate, parity, and data bits.
6. Read "UPDATE" label to update settings and exit from
configuration mode.
7. Enter configuration mode by reading the "ENTER SETUP"
label.
8. Enter communication program if necessary.
9. Read the "LIST" label.
10.The system settings will be shown on the screen. CIPHER
1022R should activate a L-H beep.
∗ Note : If you got a broken display or the PC kept beeping, it
might be the problem of incorrect baud rate, parity, data bits,
or the inter-character delay is not long enough. Correct the
settings now.
11.Read the "UPDATE" label to exit from the configuration
mode. CIPHER 1022R will again activate a L-H-L-H-L-H
beep, and restart normal operation.
12.Modify system
requirements.
settings
to
- 15 -
meet
your
application
CIPHER 1022 User
Manual
9. Configuring CIPHER 1022
This chapter will show you how to enter configuration mode,
list settings, change settings, and how to exit from
configuration mode.
9.1 Enter Configuration Mode
CIPHER 1022 will be in configuration mode by reading the
"ENTER SETUP" label. And it will activate a L-H-L-H-L-H beep
as an echo.
9.2 List Setting
CIPHER 1022 will transmit the current setting by reading
"LIST" label, and it will activate a L-H beep as an echo. Please
be noted that the firmware version is also included on the first
line of the listing.
9.3 Default Setting
CIPHER 1022 will change all the settings to their default
values when "DEFAULT" label is read.
9.4 Change Settings
1. For most of the settings, only 1 label is needed to complete
the setting, and CIPHER 1022 will activate a L-H beep as
an echo.
2. Modification of the following settings require reading of 2
labels.
•
•
Code length setting (minimum and maximum)
Inter-char delay setting
The first label acts as the OP-CODE which selects the
desired setting, whereas the second acts as the VALUE or
the desired setting. For example, to set the minimum code
length to 5, read the label "MINIMUM CODE LENGTH" first
then read the label "5" in the VALUE LABELS.
In modifying these settings, the followings must be noted,
a.
These settings share a common group of VALUE
LABELS for selecting the values, i.e. numbers
ranging from 0 to 250.
b.
Instead of a "L-H" beep, after scanning of the first
label, CIPHER 1022 will activate a short beep to
denote an incomplete process.
c.
Upon receipt of a valid value, CIPHER 1022 will
activate a "L-H" beep.
- 16 -
CIPHER 1022 User
Manual
d.
Upon receipt of an invalid value, CIPHER 1022 will
activate a "L-L-L" beep for warning. For example,
trying to set a minimum/maximum data length larger
than 40.
e.
If the second label is not a value label, CIPHER 1022
will drop the first label as if it is never scanned. For
example, scan "INTER-CHARACTER DELAY" and
then scan "CODE 39 ENABLE" will enable the
CODE 39 reading whereas leave the inter-character
delay settings unchanged.
3. Modification of the prefix / postfix settings
a.
Read Prefix Start (Postfix Start) label. CIPHER 1022
will echo a short beep.
b.
Read HEXADECIMAL LABELS. Each prefix (postfix)
character is composed of 2 hexadecimal labels.
Please reference ASCII Table / Kbd Wedge Map
Table for correct assignment. CIPHER 1022 will echo
a short beep when scanning hexadecimal labels.
c.
Read Prefix End (Postfix End) label to complete
setting. CIPHER 1022 will echo a L-H beep.
9.5 Exit From Configuration Mode
There are 2 ways to leave configuration mode,
•
Reading the "ABABDON" label : This will leave all settings
unchanged, and CIPHER 1022 will exit from the
configuration mode.
•
Reading the "UPDATE" label : This will update all the
changes made during configuring, and CIPHER 1022 will
exit from configuration mode.
CIPHER 1022 will activate a L-H-L-H-L-H beep and restart
normal operation when leaving configuration mode.
- 17 -
CIPHER 1022 User
Manual
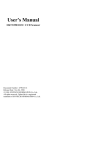
10. Kbd Wedge Map Table
0
0
1
2
3
4
5
6
7
8
9
A
B
C
D
E
F
1
F2
INS
F3
DLT
F4
Home F5
End
F6
Up
F7
Down F8
Left
F9
BS
F10
HT
F11
LF
F12
Right ESC
PgUp Exec
CR
CR*
PgDn
F1
2
SP
!
"
#
$
%
&
'
(
)
*
+
,
.
/
3
0
1
2
3
4
5
6
7
8
9
:
;
<
=
>
?
4
@
A
B
C
D
E
F
G
H
I
J
K
L
M
N
O
5
P
Q
R
S
T
U
V
W
X
Y
Z
[
\
]
^
_
6
`
a
b
c
d
e
f
g
h
i
j
k
l
m
n
o
7
p
q
r
s
t
u
v
w
x
y
z
{
|
}
~
Dly
C
D
^@ ^P
^A ^Q
^B ^R
^C ^S
^D ^T
^E ^U
^F ^V
^G ^W
^H ^X
^I ^Y
^J ^Z
^K ^[
^L ^\
^M ^]
^N ^^
^O ^_
Note :
1) CR* represents the Enter key on the Numeric Key Pad.
2) The first ^ character in entries of C0H to DFH represents
control.
3) Dly represents delay 100 ms.
4) Empty entries means undefined character.
- 18 -
CIPHER 1022 User
Manual
11. SYSTEM DEFAULT SETTINGS
11.1 1022K Default Settings
Code
Read
verif
======= ===
Code 39
[Y]
Pharma
[N]
Ind. 25
[Y]
Int. 25
[Y]
Mat. 25
[Y]
Codabar [ Y ]
Code 93
[Y]
Code 128 [ Y ]
UPCE [ 7 ] --EAN8
--EAN13
---
Check
xmit
===
[N]
--[N]
[N]
[N]
-------------
Char
===
[Y]
[*]
[Y]
[Y]
[Y]
------[Y]
[Y]
[Y]
Misc.
V87001-152
==============================================
Full ASCII:[ N ]
Concatenation:[ N ] ST/SP:[ N ]
Start/Stop:[ * ]
Min Length:[ 1 ]
Max Length:[ 40 ]
Min Length:[ 1 ]
Max Length:[ 40 ]
Min Length:[ 1 ]
Max Length:[ 40 ]
Start/Stop:[ N ]
Concatenation : [ N ]
No Addon:[ N ]
No Addon:[ N ]
No Addon:[ N ]
UPCA : [ * ]
Addon2:[ N ]
Addon2:[ N ]
Addon2:[ N ]
Addon5:[ N ]
Addon5:[ N ]
Addon5:[ N ]
Emulate Type : [ PC/AT ]
Language : [ US ]
Function Key Emulation : [ N ]
Capital Lock : [ AUTO ]
Inter_Character Delay : [ 0 ] ms
CODE ID : [ N ]
Prefix :
Postfix :
Trailer : [ CR ]
Beeper : [ LOW ] / [ SHORT ]
Code
Misc.
Read
verif
======
===
Code 39
[Y]
Pharma
[N]
Ind. 25
[Y]
Int. 25
[Y]
Mat. 25
[Y]
Codabar [ Y ]
Code 93
[Y]
Code 128 [ Y ]
UPCE [ 7 ] --EAN8
--EAN13
---
Check
xmit
===
[N]
--[N]
[N]
[N]
-------------
Char
===
[Y]
[*]
[Y]
[Y]
[Y]
------[Y]
[Y]
[Y]
V87001-152
==============================================
Full ASCII:[ N ]
Concatenation:[ N ] ST/SP:[ N ]
Start/Stop:[ * ]
Min Length:[ 1 ]
Max Length:[ 40 ]
Min Length:[ 1 ]
Max Length:[ 40 ]
Min Length:[ 1 ]
Max Length:[ 40 ]
Start/Stop:[N]
Concatenation:[N]
No Addon:[ N ]
No Addon:[ N ]
No Addon:[ N ]
UPCA:[ * ]
Transmit Mode : [ FULL DUPLEX ]
Baud Rate :[ 9600 ]
Parity : [ NONE ]
Data Bit : [ 8 ]
Inter_Character Delay : [ 0 ] ms
Addon2:[ N ]
Addon2:[ N ]
Addon2:[ N ]
Addon5:[ N ]
Addon5:[ N ]
Addon5:[ N ]
CODE ID : [ N ]
Prefix :
Postfix :
Trailer : [ CR ]
Beeper : [ LOW ] / [ SHORT ]
11.2 1022R Default Settings
- 19 -