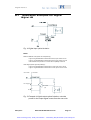
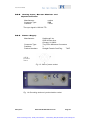
1
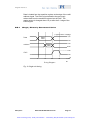
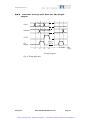
Artisan Technology Group is your source for quality new and certified-used/pre-owned equipment • FAST SHIPPING AND DELIVERY • TENS OF THOUSANDS OF IN-STOCK ITEMS • EQUIPMENT DEMOS • HUNDREDS OF MANUFACTURERS SUPPORTED • LEASING/MONTHLY RENTALS • ITAR CERTIFIED SECURE ASSET SOLUTIONS SERVICE CENTER REPAIRS Experienced engineers and technicians on staff at our full-service, in-house repair center WE BUY USED EQUIPMENT Sell your excess, underutilized, and idle used equipment We also offer credit for buy-backs and trade-ins www.artisantg.com/WeBuyEquipment InstraView REMOTE INSPECTION LOOKING FOR MORE INFORMATION? Visit us on the web at www.artisantg.com for more information on price quotations, drivers, technical specifications, manuals, and documentation SM Remotely inspect equipment before purchasing with our interactive website at www.instraview.com Contact us: (888) 88-SOURCE | [email protected] | www.artisantg.com PZ 94E User Manual E-661.CP NanoAutomation® Controller with Parallel Interface Release: 3.2.0 Date: 2006-10-25 This document describes the following product(s): E-661.CP LVPZT Servo-Controller with Parallel Interface, Rear Side Digital Bus Data Load DAC S 1/4-8 Address Decoder DAC Address A0..A4 Control Master / Slave Jumper JP 6 Data D0..D15 Front Side Digital Input Address 25-pin Sub-D Control (Chip Select) TP101 Status Insulation ServoLoop S 1/1 S 1/3 Analog Input J6 Slew Rate P 401 / JP 11 OFF TP401 TP402 J5 -20 .. 120 V ON S 1/2 On Target Generation JP9 + Sensor Monitor J7 I-Term P403 Loop Gain P 402 / Jp10 - + + Notch Frequ. P 406 / JP 12 LV-Piezo Time Constant P 408 Sensor TP302 Reference Voltage Low Pass Filter S 301 Analog Ground TP502 TP503 Sensor Gain P301 Polarity JP2 + Volt. Range JP7 + JP8 + + Zero P302 +5V TP201 -5V TP202 Sensor Linearization P303 (ILS) Range Adjust JP3 JP4 JP5 Sensor Target J4 Sensor Probe J3 100 Khz TP203 Oscillator 1.6 Mhz © Physik Instrumente (PI) GmbH & Co. KG Auf der Römerstr. 1 ⋅ 76228 Karlsruhe, Germany Tel. +49 721 4846-0 ⋅ Fax: +49 721 4846-299 [email protected] ⋅ www.pi.ws Artisan Technology Group - Quality Instrumentation ... Guaranteed | (888) 88-SOURCE | www.artisantg.com Int./ Ext. Clock JP1 Physik Instrumente (PI) GmbH & Co. KG is the owner of the following company names and trademarks: PI®, PIC®, PIFOC®, NanoAutomation® The following designations are protected company names or registered trademarks of third parties: Windows, LabView Copyright 1999–2006 by Physik Instrumente (PI) GmbH & Co. KG, Karlsruhe, Germany. The text, photographs and drawings in this manual enjoy copyright protection. With regard thereto, Physik Instrumente (PI) GmbH & Co. KG reserves all rights. Use of said text, photographs and drawings is permitted only in part and only upon citation of the source. First printing 2006-10-25 Document Number PZ 94E, Release 3.2.0 E-661_UserPZ94E320.doc Subject to change without notice. This manual is superseded by any new release. The newest release is available for download at www.pi.ws. Artisan Technology Group - Quality Instrumentation ... Guaranteed | (888) 88-SOURCE | www.artisantg.com About this Document Users of this Manual This manual is designed to help the reader to install and operate the E-661.CP NanoAutomation® Controller with Parallel Interface. It assumes that the reader has a fundamental understanding of basic servo systems, as well as motion control concepts and applicable safety procedures. The manual describes the physical specifications and dimensions of the E-661.CP NanoAutomation® Controller with Parallel Interface as well as the installation procedures which are required to put the associated motion system into operation. Updated releases are available from www.pi.ws or email: contact your Physik Instrumente sales engineer or write [email protected] Conventions The notes and symbols used in this manual have the following meanings: DANGER Indicates the presence of high voltage (> 50 V). Calls attention to a procedure, practice or condition which, if not correctly performed or adhered to, could result in injury or death. CAUTION Calls attention to a procedure, practice, or condition which, if not correctly performed or adhered to, could result in damage to equipment. NOTE Provides additional information or application hints. Related Documents The stages which might be delivered with the E-661.CP NanoAutomation® Controller with Parallel Interface are described in their own manuals. All documents are available as PDF files. Updated releases are available from www.pi.ws or email: contact your Physik Instrumente sales engineer or write [email protected]. Artisan Technology Group - Quality Instrumentation ... Guaranteed | (888) 88-SOURCE | www.artisantg.com ! Contents 1 Introduction 1.1 1.2 1.3 3 Features .....................................................................................3 Safety Precautions .....................................................................4 Product and Accessory Part Numbers .......................................4 2 Quick Start 5 3 Front and Rear Panel Layout 7 3.1 3.2 4 Front Panel Elements.................................................................7 Rear Panel Elements .................................................................8 Operating Notes 4.1 4.2 Synchronization and Networking................................................9 Operating Modes........................................................................9 4.2.1 4.2.2 4.3 4.4 4.5 5 Indicators and Signals ..............................................................10 Zero Adjust ...............................................................................11 DIP-Switch Settings..................................................................12 Single, Directly Connected Units.............................................. 16 Multiple Units with Synchronized Update................................. 17 Interface Timing with Wait for On-Target Signal ...................... 18 Servo-Loop Calibration 6.1 6.2 6.3 6.4 6.5 13 Application Examples for Digital Signal I/O .............................14 Data Code ................................................................................15 Digital Interface Timing.............................................................15 5.3.1 5.3.2 5.3.3 6 Analog Operation ....................................................................... 9 Digital Operation ...................................................................... 10 Digital Interface 5.1 5.2 5.3 9 19 Equipment Needed for Calibration ...........................................19 Preparations .............................................................................20 Zero-Point Adjustment..............................................................20 Static Gain Adjustment.............................................................21 Dynamic Calibration .................................................................21 6.5.1 6.5.2 6.5.3 Finding Resonant Frequency and Setting Notch Filter ............ 22 Step Response Optimization (empirical method)..................... 22 Step-Response Optimization (Calculation Method) ................. 24 Artisan Technology Group - Quality Instrumentation ... Guaranteed | (888) 88-SOURCE | www.artisantg.com Contents 7 Block Diagram 25 8 Adjustment Elements and Test Points 26 8.1 8.2 8.3 9 Adjustment Potentiometers ......................................................27 Switches & Jumpers.................................................................27 Test points................................................................................29 Technical Data 9.1 9.2 9.3 30 Specifications ...........................................................................30 Dimensions ..............................................................................31 Pin Assignment ........................................................................33 9.3.1 9.3.2 9.3.3 9.3.4 9.3.5 Internal Connector.................................................................... 33 Analog Input, Sensor Monitor and Synchronization................. 34 Power Supply ........................................................................... 34 Grounding Stud ........................................................................ 35 Digital Input .............................................................................. 35 Artisan Technology Group - Quality Instrumentation ... Guaranteed | (888) 88-SOURCE | www.artisantg.com Introduction 1 Introduction This manual describes the function and use of the E-661.CP PZT Servo-Controller with parallel interface The E-661.CP is a single-channel servo-controller for piezoelectric translators (PZTs). It has both an analog and a 16bit parallel digital input for commanded target values, as well as on-target and near-overflow signal outputs; it includes circuitry for excitation and readout of capacitive position sensors, motion control and power amplification for PZT loads. All low-voltage actuators with 2-plate capacitive sensors can be operated with the E-661.CP controller. They have PI-standard cable connectors (LEMO-type) with separate lines for sensor signals (target and probe) and operating voltage. 1.1 Features Controls low-voltage nanopositioners and actuators with capacitive displacement sensors. On-board LVPZT amplifier supplying up to 8 W average power Position servo-control circuit Opto-isolated, 30 μs, parallel, digital target input 16-bit DAC for digital target control Indication of near-overflow conditions On-target indicator with selectable position window size The device is built in a compact, bench-top chassis. For special automation purposes, the internal controller board can be used in various configurations, with or without the front panel. The board and front panel without the housing is available as a plugin module for OEM applications from PI as E-612.C0. PI also offers a compatible chassis capable of holding a number of such modules. See the E-612 User Manual for details. In the standard configuration, connectors for interface and signal lines are located on both front and back panels. www.pi.ws E-661.CP PZ 94E Release 3.2.0 Page 3 Artisan Technology Group - Quality Instrumentation ... Guaranteed | (888) 88-SOURCE | www.artisantg.com Introduction 1.2 Safety Precautions DANGER High Voltage Can Cause Injury E-661s are amplifiers generating voltages up to 120 V for driving LVPZTs. The output power may cause serious injury. When working with these devices or using PZT products from other manufacturers we strongly advise you to follow general accident prevention regulations. All work done with and on the devices described here requires adequate knowledge and training in handling High Voltages. Any cabling or connectors used with the system must meet the local safety requirements for the voltages and currents carried. Procedures involving working on the device with the voltages of up to 120 V on the board exposed, should be carried out by qualified, authorized personnel only. CAUTION ! PZT Actuator Damage Most PZT actuator types used with this controller can be permanently damaged by even short-duration operation at or near their resonant frequencies. If you observe resonant behavior, shut down the system immediately 1.3 Product and Accessory Part Numbers E-661.CP High Speed NanoMotion Controller E-661.PS Power Supply, 100-240 VAC/15 VDC /30VA E-692.SMB Adapter Cable SMB-BNC Contact PI for information on the following options: www.pi.ws PZT extension cable Digital interface cable kit E-661.CP PZ 94E Release 3.2.0 Page 4 Artisan Technology Group - Quality Instrumentation ... Guaranteed | (888) 88-SOURCE | www.artisantg.com Quick Start 2 Quick Start DANGER High Voltage Can Cause Injury E-661s are amplifiers generating voltages up to 120 V for driving LVPZTs. The output power may cause serious injury. When working with these devices or using PZT products from other manufacturers we strongly advise you to follow general accident prevention regulations. All work done with and on the devices described here requires adequate knowledge and training in handling High Voltages. Any cabling or connectors used with the system must meet the local safety requirements for the voltages and currents carried. Procedures involving opening the case should be carried out by qualified, authorized personnel only. This quick start assumes your E-661 were factory calibrated with the PZT actuators to be used in your application. If you have more than one E-661, make sure you always connect the same actuator axis with the same E-661 (see label on back with PZT serial number). 1 Make sure the jumpers (p. 26) and DIP switches (p. 12) are set for the desired operating mode and unit address. 2 Connect the sensor target (T) and probe (P) lines to the corresponding sockets. Do not mix up the T and P lines. 3 Connect your control electronics (digital or analog) to the corresponding connectors. CAUTION ! PZT Actuator Damage Most PZT actuator types used with this controller can be permanently damaged by even short-duration operation at or near their resonant frequencies. If you observe resonant behavior, shut down the system immediately. www.pi.ws E-661.CP PZ 94E Release 3.2.0 Page 5 Artisan Technology Group - Quality Instrumentation ... Guaranteed | (888) 88-SOURCE | www.artisantg.com Quick Start www.pi.ws 4 Set servo-control to OFF. 5 Connect the power supply and switch the unit ON. 6 Command a safe position with the control electronics (e.g. analog input enabled and 0 V on control input). 7 Connect the PZT stage to the controller. Make sure that the controller is connected to the actuator with which it was calibrated. 8 Set servo-control to ON and command the PZT axis over its full travel range (e.g. with analog input enabled, let control in run from 0 to 10 V). If overflow occurs, then try to correct the situation by adjusting the zeropoint through the front panel (typical adjustment might have -5 V PZT output voltage at 0 position) E-661.CP PZ 94E Release 3.2.0 Page 6 Artisan Technology Group - Quality Instrumentation ... Guaranteed | (888) 88-SOURCE | www.artisantg.com Front and Rear Panel Layout 3 3.1 Front and Rear Panel Layout Front Panel Elements Fig. 1: Front panel www.pi.ws PZT and sensor (target and probe) connectors. Analog input. Sensor monitor. Connector for digital interface. Controller settings (input type, servo mode, address) Zero adjustment potentiometer. LEDs for Power, Overflow and On Target E-661.CP PZ 94E Release 3.2.0 Page 7 Artisan Technology Group - Quality Instrumentation ... Guaranteed | (888) 88-SOURCE | www.artisantg.com Front and Rear Panel Layout 3.2 Rear Panel Elements Fig. 2: Rear panel www.pi.ws Connectors for power supply and synchronization. External synchronization input/output Switch for internal/external synchronization E-661.CP PZ 94E Release 3.2.0 Page 8 Artisan Technology Group - Quality Instrumentation ... Guaranteed | (888) 88-SOURCE | www.artisantg.com Operating Notes 4 Operating Notes If a power supply other than the original PI P/S order # E661.PS is used, it must supply 2 A @ 15 VDC. Upon power-up, the digital-to-analog converter (DAC) may have an unpredictable output value. Before operating the system, a safe target value should be sent. 4.1 Synchronization and Networking To avoid interference between sensors in a multi-axis system, the sensor excitation signals should be synchronized. This requires that one controller in the system act as master and the rest as slaves. With E-661.CP and E-612.CO controllers, the following settings must be made: All units must have the “Single/Multiple” jumper set to “Multiple” (default on E-661s) One unit must be set to Master, the others to Slave (rearpanel switch on E-661, “internal” for master) The Sync. lines of all units must be connected in parallel (rear-panel connector on E-661s). Be sure that only one unit is set to master to avoid improper operation. If multiple E-661 and/or E-612s are also connected to the same digital input lines (and all in digital mode), they can all be controlled from a single digital input source. This is accomplished with the use of address lines in the digital input cable. Each device recognizes the digital input only if the signals on the address lines match the address set in the device’s DIP switches. 4.2 Operating Modes 4.2.1 Analog Operation For analog operation, an analog voltage can be applied to the "Analog Input" input socket (SMB connector). Front-panel DIP switch 2 must be set accordingly (see p. 12). Input range: www.pi.ws 0 to +10 V (closed-loop) -2 to + 12 V (open-loop) E-661.CP PZ 94E Release 3.2.0 Page 9 Artisan Technology Group - Quality Instrumentation ... Guaranteed | (888) 88-SOURCE | www.artisantg.com Operating Notes Closed-Loop Mode In closed-loop mode, the minimum input corresponds with zero position (no displacement) and the maximum input corresponds with nominal displacement. Open-Loop Mode In open-loop mode, the minimum input corresponds with the most negative output voltage (-20 V) and the maximum input signal corresponds with the most positive output voltage (+120 V). Sensor Monitor Output The sensor monitor output signal ranges from -2 to +12 . 0V +10 V 4.2.2 = no displacement = nominal displacement Digital Operation For digital operation a parallel digital output device like a PC with DIO-board is required. Front-panel DIP switch 3 has to be activated (see p. 12). Digital TTL signals required to control the E-661.CP: Signals read by E-661.CP: 16 active-low data lines 1 strobe line 5 active-low address lines (optional) Signals provided by controller (need not be connected; power from user side): 1 on-target line 1 near-overflow line 4.3 Indicators and Signals Power LED: indicates proper input supply voltage. Error LED: position error signal (also on digital interface pin 13) indicates when the axis is within the jumper-set on-target window centered on the target. In closed-loop operation the ontarget LED should be lighted. If the LED is dark, the position www.pi.ws E-661.CP PZ 94E Release 3.2.0 Page 10 Artisan Technology Group - Quality Instrumentation ... Guaranteed | (888) 88-SOURCE | www.artisantg.com Operating Notes error is larger. During open-loop operation—and dynamic operation in closed-loop—the LED may be off. In applications where mechanical forces can disturb the actuator the on-target indicator may also be instable. In such cases, the on-target window can be enlarged with jumper JP9 (see p. 26). The near-overflow LED indicates a piezo drive voltage that exceeds the nominal range. In the E-661.CP, this occurs when the voltage is below –15 V and higher than +100 V. For a long piezo lifetime, PI recommends operating the piezo inside the nominal range. Because the usable voltage output is from –20 to +120 V, it is possible that the overflow-LED is on at the same time as the on-target LED. This behavior is not an error, but shows a non-optimal operation point. 4.4 Zero Adjust The PZT drive voltage can be adjusted for various different operating points. For standard operation, PI recommends that a piezo voltage of -5 to 0 V correspond to the 0 position value (closed-loop mode). With this setting, the nominal displacement should be reached at a PZT voltage of 70 to 100 V. This value is highly dependent on the mechanical design of the attached application. If the PZT voltage is not in this range, the operation point can be readjusted with the ZERO potentiometer on the front panel, as follows: Procedure: 1. With the unit in open-loop mode, exercise the PZT over its nominal travel range to wring out any hysteresis, 2. Apply a control input of 0 (0 V or digital 0). 3. With a voltmeter on the sensor monitor output, adjust the ZERO potentiometer until you obtain a value from 0 V to +0.5 V. 4. If possible, check the PZT voltage in closed-loop mode for inputs of 0 V and 10 V (or digital 0 and 65535). www.pi.ws E-661.CP PZ 94E Release 3.2.0 Page 11 Artisan Technology Group - Quality Instrumentation ... Guaranteed | (888) 88-SOURCE | www.artisantg.com Operating Notes 4.5 DIP-Switch Settings Many controller settings can be made by an 8-bit switch labeled "SETTINGS" accessible through the front panel. Default settings are shown in bold. SW8 to SW1 8 7 6 5 4 3 2 1 1 = ON 0 = OFF Fig. 3: DIP-Switch Settings (switch slider shown in black) SW 1: Open-loop ON: open-loop OFF: closed-loop mode (no servo-control) SW 2: Analog IN OFF: disable ON: enable SW 3: Digital input ON: enable OFF: disable SW 4-7: Address setting=sum of ON’s: SW4-ON=1 (to match line A0) SW5-ON=2 (to match line A1) SW6-ON=4 (to match line A2) SW7-ON=8 (to match line A3) SW 8 Must be OFF (internal use) www.pi.ws E-661.CP PZ 94E Release 3.2.0 Page 12 Artisan Technology Group - Quality Instrumentation ... Guaranteed | (888) 88-SOURCE | www.artisantg.com TDigital Interface 5 Digital Interface The digital interface contains lines for parallel input of 16-bit target and 4-bit address specifications as well as a strobe loaddigital-to-analog-converter line (LDAC). It also provides ontarget and PZT-out-of-nominal-range output signals. The digital input and output lines on the sub-D connector, including the signal ground there, are isolated from the other analog and digital circuitry. (The outputs draw power from the user side). This design avoids interference from analog, digital or ground lines with the ultra-precise analog signals used elsewhere. This electrical isolation is maintained only if none of the digital interface lines is connected with the chassis, cable shield, connector shell, or otherwise grounded. NOTE Data and address lines are active low. www.pi.ws E-661.CP PZ 94E Release 3.2.0 Page 13 Artisan Technology Group - Quality Instrumentation ... Guaranteed | (888) 88-SOURCE | www.artisantg.com TDigital Interface 5.1 Application Examples for Digital Signal I/O Controller Fig. 4: Digital input optical isolation Notes: Data and Address Lines (active low and pulled up): Logical 0 is generated with an electrical 5V-level, input current is 0 mA Logical 1 is generated with an electrical 0V-level, input current is 12 mA User interface must provide a +5 V level with a capability of 250 mA LDAC Signal (active high and pulled up): Logical 0 is generated with an electrical 0 V level, input current 12 mA Logical 1 is generated with an electrical 5 V-level, input current is 0 mA User Side On Target 0V Controller 13 25 TLC3702 (TI) Fig. 5: Example of digital output optical isolation: note that power for the output signal comes from the user side. www.pi.ws E-661.CP PZ 94E Release 3.2.0 Page 14 Artisan Technology Group - Quality Instrumentation ... Guaranteed | (888) 88-SOURCE | www.artisantg.com TDigital Interface 5.2 Data Code Table 1 shows the data code as bit pattern for a 15 µm actuator using the full 16-bit resolution. In this example, the full 15 µm stroke is resolved in 216 steps corresponding with a step resolution of 0.23 nm. A digital 0 is physically equal to a 5 V level. A digital 1 therefore is equal to a 0 V level. Example (15 µm travel range): Data Position D0 D1 D2 D3 D4 D5 D6 D7 D8 D9 D10 D11 D12 D13 D14 D15 µm 0 0.0 0 0 0 0 0 0 0 0 0 0 0 0 0 0 0 0 1 0.00023 1 0 0 0 0 0 0 0 0 0 0 0 0 0 0 0 2 0.00046 0 1 0 0 0 0 0 0 0 0 0 0 0 0 0 0 3 0.00068 1 1 0 0 0 0 0 0 0 0 0 0 0 0 0 0 4369 1.0000 1 0 0 0 1 0 0 0 1 0 0 0 1 0 0 0 32767 7.49989 1 1 1 1 1 1 1 1 1 1 1 1 1 1 1 0 32768 7.50011 0 0 0 0 0 0 0 0 0 0 0 0 0 0 0 1 65535 15.0 1 1 1 1 1 1 1 1 1 1 1 1 1 1 1 1 All 16 data lines must be connected with a defined TTL level. Open data lines represent digital 0 and produce discontinuities in the data code. If less then 16-bit resolution is to be used, see next section. 5.3 Digital Interface Timing The digital interface timing is slower than that of the DAC, due to the opto-isolation feature. The average access time for the DACs is about 30 μs. This access rate is much faster than the average response time of 10 ms of the analog system. The average delay time of the optocouplers is about 3 µs for a 0-1 (low-high) transition and about 50 µs for a 1-0 (high-low) transition. The resulting minimum signal times of 10 µs are shown in the diagram: www.pi.ws E-661.CP PZ 94E Release 3.2.0 Page 15 Artisan Technology Group - Quality Instrumentation ... Guaranteed | (888) 88-SOURCE | www.artisantg.com TDigital Interface Data is loaded into the transition register at the edge of the valid address signal. The LDAC signal transfers the previously written data from the transition register into the DAC. The analog output is changed about 10 µs after the 0-1 edge of the LDAC signal. 5.3.1 Single, Directly Connected Units Logical Level / Voltage 1/0V Data valid Data 0/5V 1/0V Address valid Address 0/5V 1/5V LDAC 0/0V 0 10 20 Timing Diagram 30 t / us 80 Fig. 6: Single-unit timing www.pi.ws E-661.CP PZ 94E Release 3.2.0 Page 16 Artisan Technology Group - Quality Instrumentation ... Guaranteed | (888) 88-SOURCE | www.artisantg.com TDigital Interface 5.3.2 Multiple Units with Synchronized Update Data Ch1 Data Address 0 Data Ch2 1 0 0 2 LDAC 0 10 20 30 40 50 T [μs] Timing Diagram Fig. 7: Synchronized multi-unit timing www.pi.ws E-661.CP PZ 94E Release 3.2.0 Page 17 Artisan Technology Group - Quality Instrumentation ... Guaranteed | (888) 88-SOURCE | www.artisantg.com TDigital Interface 5.3.3 Interface Timing with Wait for On-Target Signal Data Valid Data Address Address valid LDAC Stage in Motion On Target 0 10 20 30 Stage on Target t [μs] Timing Diagram Fig. 8: Timing with wait www.pi.ws E-661.CP PZ 94E Release 3.2.0 Page 18 Artisan Technology Group - Quality Instrumentation ... Guaranteed | (888) 88-SOURCE | www.artisantg.com Servo-Loop Calibration 6 Servo-Loop Calibration Static servo-loop calibration makes it possible to accurately drive the PZT system to absolute positions in closed-loop mode with an external analog control signal ranging from 0 to +10 volts. This signal can either be input directly, or it can be generated by computer-control electronics in the system Static servo calibration establishes the relationship between a sensor input of 10 V and the voltage necessary to drive the PZT to its nominal expansion. Dynamic servo-loop calibration optimizes step response and suppresses resonance, overshoot, and oscillation (see section Dynamic Calibration beginning on p. 21). Dynamic performance of the PZT system is determined by the maximum output current of the amplifier and by the mechanical properties of the PZT mechanics, like moving mass, damping and resonant frequencies. In order to match the circuitry and the mechanical characteristics to achieve the desired performance, the system has to be adjusted for both static and dynamic operations. The full calibration and adjustment procedure includes adjustment of the zero point, sensor gain, slew rate and step response. All these basic adjustments are done in our lab before shipment. NOTE If PI has sufficient information about your application, your PZT system will be shipped ready for operation. Only the zero point will have to be realigned from time to time to compensate for temperature changes. Further adjustments are not required as long as system components are not replaced or modified. 6.1 Equipment Needed for Calibration For adjustment of the zero-point, only voltmeter is needed and no access to internal elements is required. For additional calibration procedures it will be necessary to open the case. www.pi.ws E-661.CP PZ 94E Release 3.2.0 Page 19 Artisan Technology Group - Quality Instrumentation ... Guaranteed | (888) 88-SOURCE | www.artisantg.com Servo-Loop Calibration DANGER High Voltage Can Cause Injury Procedures involving working on the device with the voltages of up to 120 V on the board exposed, should be carried out by qualified, authorized personnel only. Static displacement calibration requires an external expansion gauge with 0.01 µm resolution (or an interferometer) and a precision voltmeter. Dynamic calibration procedures require an oscilloscope (a digital storage oscilloscope is recommended), frequency generator to output square and sine functions from 1 Hz to 1 kHz, an ohmmeter with a range from 0.1 to 100 k-ohm. 6.2 Preparations Mount the PZT actuator in exactly the same way and with the same load as during normal operations in the application. 6.3 Zero-Point Adjustment Correct zero-point adjustment allows the PZT to be used within the full displacement range without reaching the output voltage limits of the amplifier. A proper zero-point calibration ensures that in closed-loop operation the full output voltage swing of the amplifier can be used and prevents overflow conditions. Procedure: www.pi.ws 1 Adjust the sensor zero point with servo mode OFF and a commanded position of 0. 2 Set servo mode to SERVO ON. 3 Connect a voltmeter to the PZT operating voltage in parallel with the PZT. 4 Readjust the PZT operating voltage to 0 V using the ZERO potentiometer. E-661.CP PZ 94E Release 3.2.0 Page 20 Artisan Technology Group - Quality Instrumentation ... Guaranteed | (888) 88-SOURCE | www.artisantg.com Servo-Loop Calibration 6.4 Static Gain Adjustment The objective of the static servo-loop adjustment procedure is to ensure that the PZT actuator expands to its nominal expansion when the control signal input is at its nominal maximum (10 V analog or 65,535 digital). Preparations: An adjustable voltage source from 0 to +10.0000 V and a displacement gauge with 0.01 µm resolution or an interferometer is needed. Procedure 1 Make sure that any DC-offset is set to zero or disabled (see main board manual). 2 Set SERVO ON mode. 3 Check whether the PZT oscillates. If it does, you cannot miss hearing it, and dynamic gain adjustments have to be done prior to continuing with static gain adjustment. 4 Apply 0 V to the CONTROL INPUT. 5 Adjust the external position probe and set the expansion reading to zero. 6 Command a position equal to the nominal expansion (i.e. apply the nominal maximum to the control input). The external gauge should show the PZT at nominal expansion and the sensor monitor output should be 10 V. 7 To adjust the expansion without changing the sensor monitor output (servo-control is on!) use the gain adjustment potentiometer, P301. Repeat the last steps several times until stable results are achieved. 6.5 Dynamic Calibration A summary of the equipment needed for calibration can be found in section 6.1 on p. 19. www.pi.ws E-661.CP PZ 94E Release 3.2.0 Page 21 Artisan Technology Group - Quality Instrumentation ... Guaranteed | (888) 88-SOURCE | www.artisantg.com Servo-Loop Calibration 6.5.1 Finding Resonant Frequency and Setting Notch Filter Evaluate the resonant frequency of the actuator while installed at the operation site. For this purpose a square wave is applied to the input with servo-control set to OFF. Connect the sensor monitor output with one channel of the oscilloscope and watch the step response. The resonant frequency of the system can be estimated by the induced oscillations. If, for example, the period of the oscillation is 3 ms, then the resonant frequency is 1/period length or 1/3 ms = 0.33 kHz or 330 Hz. 6.5.2 Step Response Optimization (empirical method) Either this method or the calculation method (described in Section 6.5.3) can be used. Standard Tuning For dynamic operation, the step response of the mechanical system is important. The amount of damping and overshoot can be optimized by tuning the differential and integral term of the amplifier. Either the empirical or the calculating method can be used. Procedure www.pi.ws 1 Mount the PZT exactly as it will be operated. 2 Set Servo ON. 3 Use a square wave function generator and supply the input with a square wave of 5 Vpp and a frequency of 5 to 10 Hz. 4 Connect an oscilloscope to the monitor output. 5 Adjust P402 (loop gain) until resonant frequency becomes apparent. 6 Adjust the notch filter frequency using DIP switches S401 and potentiometer P401 (see p. 26 ff.) until the oscillation amplitude becomes a minimum. E-661.CP PZ 94E Release 3.2.0 Page 22 Artisan Technology Group - Quality Instrumentation ... Guaranteed | (888) 88-SOURCE | www.artisantg.com Servo-Loop Calibration 7 Adjust P402 (loop gain) and P403 (I-term), alternating to optimize step response. The settling curve seen on the scope could look like one of the following: Case 1: Large overshoot, unstable Case 2: Optimal Case 3: Settling time too long Fig. 9: Settling curve Fine Tuning Target Signal A B C Fig. 10: Fine Tuning The objective of the drift fine tuning is curve B of the diagram. Because the curve is exaggerated, a high-resolution oscilloscope (12-14 bits) is required as well as a precise voltage generator. www.pi.ws E-661.CP PZ 94E Release 3.2.0 Page 23 Artisan Technology Group - Quality Instrumentation ... Guaranteed | (888) 88-SOURCE | www.artisantg.com Servo-Loop Calibration First, adjust the step response without overshoot. Using P408 curve shapes A, B and C can be attained. If the overshoot can not be eliminated by using P408, the loop gain has to be reduced. The result may be different at rising and falling edges, so a compromise has to be found. 6.5.3 Step-Response Optimization (Calculation Method) Either this method or the empirical method (described in Section 6.5.2) can be used. Characterizing Servo Parameters Servo-loop parameters depend on each and every component used in the system. Amplifier, PZT actuator and sensor have to be treated as a complete system, and the best way to calculate the system servo parameters is the use of a simulation program. If no simulation program is available, typical assumptions can be made in order to get stable servo parameters—not optimized, but good enough to work with. Proportional term: Integration time: KP = 0.3 TI = (2πƒres)-1 Example: ƒres = 330 Hz -> TI = 0.48 ms CAUTION ! If the PZT resonant frequency is above 1 kHz, the system bandwidth is limited by the amplifier and the sensor. In no case should a higher frequency be used. www.pi.ws E-661.CP PZ 94E Release 3.2.0 Page 24 Artisan Technology Group - Quality Instrumentation ... Guaranteed | (888) 88-SOURCE | www.artisantg.com Block Diagram 7 Block Diagram Rear Side Digital Bus (not used in E-661) Data D0..D15 Load DAC S 1/4-8 Adress Decoder DAC Data Digital interface mode Adress JP6 Adress A0..A4 Front Side Digital Input 25-pin DSUB Control (Chip Select) TP101 Status Insulation ServoLoop S 1/1 S 1/3 Analog Input J6 Slew Rate P 401 / JP 11 OFF TP401 TP402 J5 -20 .. 120 V ON S 1/2 On Target Generation JP9 + Sensor Monitor J7 I-Term P403 Loop Gain P 402 / Jp10 - + + Notch Frequ. P 406 / S 401 LV-Piezo Time Constant P 408 Sensor TP302 Analog Ground TP502 TP503 Reference Voltage Low Pass Filter S 301 Sensor Gain P301 Polarity JP2 Volt. Range JP7 + JP8 + + + +5V TP201 -5V TP202 Sensor Linearization P303 (ILS) Zero P302 Range Adjust JP3 JP4 JP5 Sensor Target J4 Sensor Probe J3 100 Khz TP203 Oscillator Int./ Ext. Clock JP1 1.6 Mhz Fig. 11: E-661.CP Block Diagram www.pi.ws E-661.CP PZ 94E Release 3.2.0 Page 25 Artisan Technology Group - Quality Instrumentation ... Guaranteed | (888) 88-SOURCE | www.artisantg.com Adjustment Elements and Test Points Adjustment Elements and Test Points N6 P601 N4 C15 S1 + R14 C5 V7 300 Hz 3000 Hz P101 J1 P301 DAC Offset P102 TP101 C10 1 X2. JP11 Digital Interface Mode TP203 V15 R23 JP2 C12 JP7 1 Sensor Gain L2 1 R20 P303 X1. R2 C1 + C8 TP302 1 JP3 JP4 JP5 Sensor range adjust GND S1 Settings + Sync. JP8 S301 Sensor bandwidth + C8A 1 TP301 TP204 6 1 J2 1 1 ILS 7 TP502 T1. Sensor Zero TP501 X3. TP202 P302 12 3 TP209 Ref/Frequ. 100kHz TTL TP201 C6 S401 Notch filter JP1 Clock sync range Single Multiple C7 JP6 + on 8 + C16 off + C21 P401 Loop Gain 1 + C24 1 JP401 C2 P402 P408 P-Term C13 1 + I-Term P403 C4 P406 Notch filter center freq. TP407 TP402 Slew rate 1 TP1 TP401 R10 JP9 on-target Window 32 0.2% 0.1% 0.05% (0.025% open) N3 8 Power Supply DAC Gain 1000 Hz Fig. 12: Adjustment elements and test points For P-752.1Cx Stage For general use Sensor Bandwidth www.pi.ws E-661.CP PZ 94E Release 3.2.0 Artisan Technology Group - Quality Instrumentation ... Guaranteed | (888) 88-SOURCE | www.artisantg.com Page 26 Adjustment Elements and Test Points DANGER High Voltage Can Cause Injury Procedures involving working on the device with the voltages of up to 120 V on the board exposed, should be carried out by qualified, authorized personnel only. 8.1 Adjustment Potentiometers P101 P102 P301 P302 P303 P401 P402 P403 P406 P408 8.2 DAC Gain DAC Offset Sensor Gain Sensor Zero (front panel) Sensor Linearization (ILS) Slew Rate Loop Gain Integral Term Notch filter center frequency fine adjust Drift compensation Switches & Jumpers S1 DIP block with 8 switches (operating mode); accessible from front panel: see p. 12 for settings S301 Sensor bandwidth; see inset in Fig. 12 above for settings S401 Notch filter range DIP block (slider in black): range: 1 2 3 4 5 min. max. 70 210 140 450 340 1100 950 3100 2900 9300 Notch filter center frequency in Hz, adjustable between min. and max. with potentiometer P406 www.pi.ws E-661.CP PZ 94E Release 3.2.0 Page 27 Artisan Technology Group - Quality Instrumentation ... Guaranteed | (888) 88-SOURCE | www.artisantg.com Adjustment Elements and Test Points JP1 Clock single: slave mode not possible multiple: master/slave mode set elsewhere JP2 Sensor Positive (min. slope separation gives polarity smallest voltage) See JP7-JP8 for sensor output range Sensor range extension JP5 JP4 JP3 Factor Digital Interface Mode Negative (for use with PI stage P-751K001) OFF 0.56 0.68 0.75 1.0 1.25 2.13 3.0 JP6 Local* Auto* Bus** Master* Bus** Slave* *Modes explained: Local: Digital I/O from D25 socket Auto: Bus** Master if in slot 1, else Bus** Slave Bus Master: Digital input from D25 socket, output to rear bus** Bus Slave: Digital I/O from rear bus** **Rear bus not accessible in E-661 Sensor output voltage range JP8 JP7 volts -10 to +10 (See JP2 for sensor slope polarity) On-target window -5 to +5 JP9 % of full range JP11 Max. slew rate (can be reduced with P401) www.pi.ws 0 to 10 0.025% Standard 0.05% max. 15 ms / 100 V E-661.CP PZ 94E Release 3.2.0 0.1% 0.2% 5 ms / 100 V Page 28 Artisan Technology Group - Quality Instrumentation ... Guaranteed | (888) 88-SOURCE | www.artisantg.com Adjustment Elements and Test Points 8.3 Test points TP101 TP201 TP202 TP203 TP204 TP209 TP301 TP302 TP401 TP402 TP407 TP501 TP502 www.pi.ws DAC output (analog value) Reference voltage +5 V Reference voltage -5 V 100 kHz square wave signal, 5 V AC-Reference, 100 kHz sine 100 kHz TTL reference frequency Sensor AC-signal Sensor output Target signal after slew rate limitation Control output On target signal (internal) Digital GND Analog GND E-661.CP PZ 94E Release 3.2.0 Page 29 Artisan Technology Group - Quality Instrumentation ... Guaranteed | (888) 88-SOURCE | www.artisantg.com Technical Data 9 Technical Data 9.1 Specifications General Models E-612.CO Function Bench-top high-speed NanoAutomation controller with parallel interface Channels 1 Power-on-current: 2 A max Master Clock: 1.6 MHz Switched power supply: 100 kHz ® Capacitive Sensor Circuit Clock Frequency: 1.6 MHz Bandwidth (fixed) 1.5 kHz Amplifier Output Voltage Range: -20 to +120 V Output Current, peak: 140 mA (5 ms) Output current, continuous: 70 mA Bandwidth (no load). 500 Hz or better Analog Input www.pi.ws Voltage range: 0 to +10 V Input Impedance: 50 k-ohm parallel 1 nF Linearity (closed-loop): within 0.05% E-661.CP PZ 94E Release 3.2.0 Page 30 Artisan Technology Group - Quality Instrumentation ... Guaranteed | (888) 88-SOURCE | www.artisantg.com Technical Data Sensor Monitor Output Voltage Range: 10 V active range, jumper settable to 0 to 10, -5 to +5 or -10 to 0; 20% reserve Output resistance: 10 k-ohm Bandwidth: 1.5 kHz Digital Circuit 9.2 Data. 16 bits Input level: 5V Input Current: 12 mA Timing. THmin 10 µs, TLmin 10 µs Over Voltage Indication: -14 to +100 V (OK), -20 to -14 V (overflow), +100 to +120 V (overflow) On Target indication: True position within jumper settable window of 0.025% to 0.2% of full range of target Dimensions Dimensions in mm, decimal places separated by commas in drawings 45 120,0 265 125,0 www.pi.ws E-661.CP PZ 94E Release 3.2.0 Page 31 Artisan Technology Group - Quality Instrumentation ... Guaranteed | (888) 88-SOURCE | www.artisantg.com Technical Data www.pi.ws E-661.CP PZ 94E Release 3.2.0 Page 32 Artisan Technology Group - Quality Instrumentation ... Guaranteed | (888) 88-SOURCE | www.artisantg.com Technical Data 9.3 Pin Assignment 9.3.1 Internal Connector The pinout of this internal connector is included for completeness only: the user will not usually be concerned with these lines. Digital I/O lines are jumper deactived on E-661. +5V c1 Digital Ground c2 +15V c3 -15V c4 Analog Ground c5 +130V c6 -30V c7 Power Ground c8 NC c9 Clock In 1.6MHz c10 Clock Out 200KH z c11 Position Error Output c12 NC c13 Piezo Monitor Output c14 NC c15 NC c16 Control Input C0 c17 Control Input C2 c18 Data D1 c19 Data D3 c20 Data D5 c21 Data D7 c22 Data D9 c23 Data D11 c24 Data D13 c25 Data D15 c26 NC c27 NC c28 Address A1 c29 Address A3 c30 NC c31 NC c32 a1 a2 a3 a4 a5 a6 a7 a8 a9 a10 a11 a12 a13 a14 a15 a16 a17 a18 a19 a20 a21 a22 a23 a24 a25 a26 a27 a28 a29 a30 a31 a32 +5V Digital Ground +15V -15V Analog Ground +130V -27V Power Ground NC Clock Out 1.6MHz Clock Out 100kHz Voltage Error Output NC Sensor Monitor Output NC NC LDAC Control Input C1 Data D0 Data D2 Data D4 Data D6 Data D8 Data D10 Data D12 Data D14 NC NC Address A0 Address A2 Address A4 NC NOTE The digital ground A2 is for the digital signals on the internal connector and not to be confused with the digital ground on the sub-D socket, which should be kept electrically isolated from other circuitry. www.pi.ws E-661.CP PZ 94E Release 3.2.0 Page 33 Artisan Technology Group - Quality Instrumentation ... Guaranteed | (888) 88-SOURCE | www.artisantg.com Technical Data 9.3.2 Analog Input, Sensor Monitor and Synchronization Manufacturer: Connector Type: Positions: various SMB 1 coax The sync signal is 100 kHz TTL. 9.3.3 Power Supply Manufacturer: Connector Type: Positions: Product Numbers: Switchcraft, Inc. 5555 N.Elson Ave. Chicago, IL 60630 Tiny Q-G® Miniature Connectors 3 Straight Female Cord Plug TA3F 1: 0 V 2: +15 V 3: n.c. Fig. 13: View of power socket Fig. 14: Grounding stud and synchronization socket www.pi.ws E-661.CP PZ 94E Release 3.2.0 Page 34 Artisan Technology Group - Quality Instrumentation ... Guaranteed | (888) 88-SOURCE | www.artisantg.com Technical Data 9.3.4 Grounding Stud The E-661 case is provided with a grounding stud which must be connected to protective ground to assure compliance with safety requirements and EMC guidelines. 9.3.5 Digital Input The digital inputs and outputs on this connector are optically isolated from other circuitry. Power is provided from the user side (pins 11 and 25). See p. 14 for application examples. Activation of these lines depends on the Digital Interface Mode jumper setting (see p. 27) Ground LDAC Adress A3 Adress A1 Data D15 Data D13 Data D11 Data D9 Data D7 Data D5 Data D3 Data D1 25 24 23 22 21 20 19 18 17 16 15 14 13 12 11 10 9 8 7 6 5 4 3 2 1 Position Error Output Voltage Error Output Common (+5V) Adress A2 Adress A0 Data D14 Data D12 Data D10 Data D8 Data D6 Data D4 Data D2 Data D0 NOTE Pin 25 (digital signal ground) should not be connected to the shielding or connector housing if digital signal isolation is to be maintained www.pi.ws E-661.CP PZ 94E Release 3.2.0 Page 35 Artisan Technology Group - Quality Instrumentation ... Guaranteed | (888) 88-SOURCE | www.artisantg.com Artisan Technology Group is your source for quality new and certified-used/pre-owned equipment • FAST SHIPPING AND DELIVERY • TENS OF THOUSANDS OF IN-STOCK ITEMS • EQUIPMENT DEMOS • HUNDREDS OF MANUFACTURERS SUPPORTED • LEASING/MONTHLY RENTALS • ITAR CERTIFIED SECURE ASSET SOLUTIONS SERVICE CENTER REPAIRS Experienced engineers and technicians on staff at our full-service, in-house repair center WE BUY USED EQUIPMENT Sell your excess, underutilized, and idle used equipment We also offer credit for buy-backs and trade-ins www.artisantg.com/WeBuyEquipment InstraView REMOTE INSPECTION LOOKING FOR MORE INFORMATION? Visit us on the web at www.artisantg.com for more information on price quotations, drivers, technical specifications, manuals, and documentation SM Remotely inspect equipment before purchasing with our interactive website at www.instraview.com Contact us: (888) 88-SOURCE | [email protected] | www.artisantg.com