1
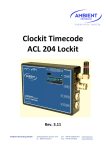
Lockit Timecode Master Lockit ACN-ML Rev. 1.3/3.48 experience quality. experience quality. ACN-ML Version 1.3 / 3.48 Table of contents page 1. Introduction 2 2. Package Contents 3 3. Safety instructions 3 4. Powering 4 5. Description 5 6. Quick Start Guide 6 7. Setup Menu Diagram 10 8. Menu Description 13 8.1 Generator Menu 15 8.2 Sync Menu 18 8.3 Time Code Menu 19 8.4 System Menu 20 8.5 ACN Menu 21 9. LED Indications 25 10. Firmware Update 25 11. Physical Specifications 26 12. Warranty & Approvals 27 13. Recommended accessories 29 www.ambient.de/en 1 ACN-ML Version 1.3 / 3.48 1. Introduction The ACN-ML Master Lockit combines the state of the art, high-accuracy Lockit timecode technology by Ambient with advanced metadata administration and sharing over the Lockit Network. It implements a dual-system design through a full-featured ACN Lockit circuitry with adapted software for no-compromise, fail-safe timecode integrity and a powerful multi-core CPU platform for unsurpassed mobile metadata processing. Providing local and set-spanning, line-level accurate timecode and metadata over ACN plus WiFi routing for Lockit Network apps and certified devices it can work both autonomously as hub or satellite in your timecode and metadata network. An integrated backup cell with automatic charge-when-supplied will keep both systems alive for even lengthy set reconstructions or breaks and secure a coordinate shutdown on power drain. 2 ©Ambient Recording GmbH 2015 experience quality. ACN-ML Version 1.3 / 3.48 2. 3. Package Contents ACN-ML Master Lockit ACN Antenna (attached to ACN-ML) USB WiFi Stick (attached to ACN-ML) Manual Safety instructions For your own safety and trouble-free use of your ACN-ML Master Lockit, please carefully read through the instructions below. Always keep a copy of these instructions and hand them out with the unit to other users. This unit is exclusively intended for indoor use. Keep it safe and away from water, rain and humidity and dry under all circumstances even when powered off. Clean gently with a slightly moistened cloth and never let water, detergents or liquids of any kind get into the unit as this will imply the risk of short circuits and electrical hazard. Keep distant from sources of heat and never expose to direct sunlight. Admissible ambience temperature is from +5° to +50° Celsius. Do not throw or expose to mechanical impact and keep it safe from hard vibrations. Only use genuine accessories such as cables antennae etc. which have been included with the unit or supplied by an authorized dealer. Always observe integrity and the pertinent compatibility with all units connected to. Powering from external sources is exclusively limited to the use of LPS sources in compliance to part 2.5 of EN 60950-1 with correct polarity, voltage range, and current rating. Disregarding recommended power requirements may damage the product or even risk explosion of the internal backup cell. Do not perform software updates in situations in which the integrity of mains supply cannot be granted such as thunderstorms and remove connections from and to all devices directly or in directly connected to mains. When using the wireless connection, place it centrally and keep it distant from sources of possible interference such as microwaves or electrical devices with large metal surfaces. Only use the original external antenna directly and firmly attached to the socket. Extension or use of 3rd party accessories is not permissible. Only use the included WiFi dongle that was carefully evaluated for best performance, and leave it connected all the time. (Re-) attaching the WiFi dongle during operation will require a system restart. Never open the unit. Inappropriate and unauthorized access will void the warranty and imply possible risk of harm to the user. When disposing the unit, follow the legal requirements for recycling electronic equipment. www.ambient.de/en 3 ACN-ML Version 1.3 / 3.48 4. Powering The ACN-ML can be powered by 5 to 24 Volts DC via either indicated Hirose 4-pin connectors, pin 1 carrying GND pin 4 positive voltage. The connectors are configured loop-through. Only apply power through one socket. Upon applying external power the internal battery will automatically be charged. The power source must be capable of supplying 1.5A for charging the internal battery. While in operation, the active power source is indicated in the upper right corner of the display, EXT means external power is applied with appropriate voltage and current, whereas INT indicates that the unit is running on its integrated backup cell. Typical values in operation with backup cell charged: ~ 500mA @ 5V DC ~ 220mA @ 12V DC ~ 120mA @ 24V DC 4 ©Ambient Recording GmbH 2015 experience quality. ACN-ML Version 1.3 / 3.48 5. ① ② Description ③ ④ ⑤ ⑥ ⑦ ⑬ ⑧ ⑩ ⑪ ⑫ ⑭ ① WiFi adapter, attached to USB A port (do not remove or replace) ② USB A port, not in use ③ DC IN / through, 4 Pin HRS (see page 4) ④ Ethernet port for metadata transfer, RJ45 ⑤ OLED display (see page 14 ff) ⑥ IR transceiver, communication port for ACC501 controller ⑦ 3-function configuration switch (3-function:↓ pushing in, ⑧ Status LEDs (see page 26) ⑨ ACN antenna, SMA type, attached to unit (do not remove) ⑩ Lemo / ACN socket (see page 27) ⑪ Lemo / TC socket (see page 27) ⑫ DC IN / through, 4 Pin HRS (see page 4) ⑬ Reset button (see page 13) ⑭ 3/8” thread mount www.ambient.de/en ⑨ toggle left/right) 5 ACN-ML Version 1.3 / 3.48 6. Quick Start Guide Prepare for a new project 1. Supply adequate power source. The red LED should blink slowly in a 2 seconds interval. This indicates charging of the internal backup battery is in progress. If battery is filly charged red and green LED will come on solid. 2. Switch on the Master Lockit by pressing down the 3-function wheel and holding it until the OLED display comes on. 3. You can now immediately start to manually set the required timecode frame rate. Manually enable the ACN by selecting C-Jam and choose an ACN channel. NOTE: make sure that all your Lockit Devices on set are in the same ACN channel 4. Wait until the square indicator on the left bottom of the display has become solid blue to indicate the metadata server has completed booting. Use a smartphone, tablet or computer to log in to the Master Lockit’s WiFi. The password for log in will be the same as the WiFi name. The default setting will be displayed in the format ML-xxxxx (representing a 5 digit random phrase). This can be changed by the user. 5. Open a browser and enter http://masterlockit.local respectively http://10.0.0.1. or open the Master Lockit Web Interface in TonMeister or LockitSCRIPT App. 6. Hit ”System Reset“ in the System Menu. This will clean the Master Lockit from all old clip metadata and ACN connections for a fresh start. 7. Rename WiFi if desired for better identification. Especially for multi-camera shoots, it is highly recommended to rename the Master Lockit’s WiFi name to clearly identify its position and determine whether or not the unit is set to hub mode. You do that in the “WiFi Settings” within 6 ©Ambient Recording GmbH 2015 experience quality. ACN-ML Version 1.3 / 3.48 the “Settings” Menu, or by just hitting the WiFi symbol in the header. After hitting reconfigure, the Master Lockit will reset its WiFi so you will need to log in again with new credentials. NOTE: This name must be at least 8 digits long. Names like “soundcart_HUB”, “camera-1”, or simply ascending numbers can later greatly help to better identify the individual units. This works well with the option to assign unit names in the ACN radar page of the hub. 8. Continue with the next Master Lockit – one after another. After that enable Hub Mode on ONE – and ONLY ONE – of your Master Lockits by switching it to “Hub” on the upper right corner of the headline. Now the interface will turn from blue to orange and you should see all other ACN enabled Lockit devices in range are then displayed in ACN radar. www.ambient.de/en 7 ACN-ML Version 1.3 / 3.48 WARNING: Only one Master Lockit is allowed to be set to hub mode for proper metadata networking. Also, only one unit must be sending out a C-Jam broadcast. Although not mandatory, it’s still advised to be the hub. Make sure that all the others are in “satellite mode” (blue interface). 9. Enter the tab “Timecode” in your hub’s interface to set TC and enable C-Jam broadcast. All other Lockit devices on set will switch to the hub’s TC. Now you are ready to shoot. Congratulations, you have successfully configured your Lockit Network! All you need to do now is switch on the units every morning, set TC on your hub, enable it’s C-Jam transmission, and look at the battery status of the remote units within the web interface every so often to know when replacement is required. Other functions in the Master Lockit Web Interface Timecode Remote Control (hub mode only) As you already know, one of the Master Lockits on set is the hub. This will enable the options in the “Timecode” tab to enter a TC manually, or by the system clock of the device to which you are accessing the interface. When the Master Lockit has jammed to the desired time, the running TC in the upper left corner will pulse. Now, you’re set to push the “Start C-Jam Broadcast” and sync up the set. NOTE: C-Jam Broadcast can only be triggered after the generator set, which is indicated by a green flashing LED on the unit. Doing this will help you avoid messing up the timecode when the C-Jam master has accidentally run out of power and restarted during a camera roll. In 8 ©Ambient Recording GmbH 2015 experience quality. ACN-ML Version 1.3 / 3.48 this case you may also re-jam the generator and activate the C-Jam broadcast directly on the Master Lockit. It is important you only do this with no units in active record. ACN Radar (hub mode only) You can add all ACN enabled Lockit devices to be monitored and controlled by the ACN Radar. Just make certain the correct timecode rate and sync format (if applicable) of the camera/recorder are selected, and enable the ACN by selecting the C-Jam mode using the ACN channel used on the hub. Ultimately, all units should be blinking blink green to indicate correct sync while displaying the same timecode. At the same time, they will appear on the ACN radar on the hub’s web interface showing you additional valuable information. The hub will list all Lockits ever logged in. A green header indicates there is an active connection through ACN while a gray header indicates a unit is offline. NOTE: Remove any units that are not or no longer in your active setup by clicking on the trash can. You may also rename the remaining Lockits freely or according to their WiFi name - just make sure you monitor each unit for battery replacement. If the heading is gray, the unit has lost power. Metadata Network If the Master Lockit is connected to a supported camera or recorder with metadata interface, go to the “Metadata Network” tab. This is where to select the connected camera from the supported devices. This version of firmware only supports the Arri ALEXA. Follow the instructions on the screen. Note: The required serial number for Arri ALEXA can be found on top of the camera as well as within the system menu. The “Metadata Network” tab, allows monitoring of proper connections from other Lockit devices to cameras or recorders if present. LockitSCRIPT or TonMeister apps logged into the hub’s WiFi will also be displayed. Metadata Export The “Metadata Export” tab allows you to watch the collected clip metadata from all devices in the Lockit Network. The Master Lockit in hub mode will display all transmitted clip metadata from all Lockit devices connected to a supported camera. NOTE: Master Lockits in “satellite mode” stores clip metadata from the camera to which it is connected while transmitting it to the hub mode enabled Master Lockit as well. To get an overview of all the clips on set, always check the hub’s web interface. www.ambient.de/en 9 ACN-ML Version 1.3 / 3.48 The clip, contains technical camera metadata – the amount and specific content is determined by the camera type. When the LockitSCRIPT app is connected to the Master Lockit, this technical metadata is supplemented by the content metadata of this script supervising app. You are able to filter clips by camera, TC or shooting day. Monitor them or export the information in one of the provided export formats. 10 ©Ambient Recording GmbH 2015 experience quality. ACN-ML Version 1.3 / 3.48 7. Setup Menu Diagram This passage will guide you through the menu structure of the Master Lockit as accessible via the three function wheel on the top and OLED display. All TC related adjustments such as frame rate, level, and offset, as well as selecting correct ACN settings, must be performed here. Main Display will always show jam mode, timecode, frame rate, and power status in the upper section. Mid-section gives sync info if applicable, lower section displays either ACN related info such as server status, mode and channel or menu. ↓ push select switch down to enter the main or sub menu and to confirm, ↔ toggle left/right to navigate or increase/decrease value. ↓ push again to confirm selected value. Default settings are highlighted. Main Menu: GEN ↔ SYNC ↔ TC ↔ SYS ↔ ACN ↔ EXIT ↓ GEN ↓ JamTC ↔ EDIT ↔ OffSet ↔ UB JamTC ↓ AUTO ↔ Off ↔ manual/once Edit ↓ HH:MM:SS:FF Offset ↓ Offset: + 00.00 UB ↓ JamUB ↔ EDIT-UB ↔ EXIT +/-10 frames in 0.05 increments JamUB normal ↔ manual ↔ insert ↓ EDIT-UB ↓ 00:00:00:00 EXIT ↓ SYNC ↓ TC ↓ back to main menu ↓ PPF ↔ OFF PPF ↓ OFF ↓ 1x ↔ 2x ↔ ↓ HIGH 4x LOW NO SYNC OUTPUT ↓ FPS ↔ Level ↔ 1-4 Pulses Per Frame, rising/falling edge www.ambient.de/en 11 ACN-ML FPS ↓ Level ↓ Version 1.3 / 3.48 FPS: 23.976 ↔ 24 ↔ 25 ↔ 29.97 ↔ 30 ↔ 29.97D ↔ 30D Select TC level: 0 dB to -45 dB ↓ Display ↔ Info ↔ Factory-Reset ↓ SYS Display ↓ INFO ↓ Brightness: 1↔ 3 ↔ 10 ↓ AutoOff: never ↔ 5sec ↔ … 5min displays device information: serial no., firmware version, mac address ↓ Factory-Reset ↓ loads default settings ↓ ACN MODE ↓ MODE ↓ ACN: OFF ↔ JAM ↔ C-JAM ↔ TX ↔ RX JAM ↓ one time jam C-JAM ↓ continuous jam / autosync TX ↓ transmit external free or rec run TC RX ↓ receive free- or rec run TC ↓ Select ACN channel: 11 ↔ 20 ↔ 26 ACN ↓ MODE* ↓ MODE ↔ CHNL ↔ ANT ↔ PWR ↔ SYNC* ACN: OFF ↔ JAM ↔ C-JAM ↔ TX ↔ RX OFF ↓ disables ACN CHNL ↓ select ACN channel 11 to 26 ANT ↓ Select LNA: off ↔ on PWR ↓ ACN RF power 8 to 18 dBm* SYNC* Exit 12 *not available in TX or RX JAM ↓ Send sync broadcast? yes ↔ no C-JAM ↓ Start continuous jam? yes ↔ no ↓ ↓ Back to ACN Returns to main screen ©Ambient Recording GmbH 2015 *Selected mode highlighted experience quality. ACN-ML Version 1.3 / 3.48 8. Menu Description POWER The Master Lockit must be powered from either of it’s 4-pin Hirose sockets. The operating voltage range is 5-24V DC regulated, with pin 1 being GND and pin 4 carrying V+ per the industry standard. NOTE: The two power sockets are wired in parallel for loop through of voltage. It is mandatory that only one socket must carry supply voltage at any given time! With power applied, red LED over the display will slowly blink to indicate charging of the integrated backup cell. Fully charged, red and green LED will be lit permanently. The battery will keep the unit powered for a couple of hours, depending on the processing load of the unit. To turn on the ACN-ML, press and hold the config switch for four seconds. The unit will come on showing basic system information such as model, Serial number and Firmware version. After boot up has completed you will be greeted by the home screen: If the unit has not been configured the only additional information will be a rectangle in the lower left corner indicating the metadata server status. No icon means server is offline, blank booting, solid online and ready. If the unit had been configured, it may display the last settings and look something like this. NOTE: After a complete power loss C-Jam broadcast will be suspended and can only be started after re-jamming the internal generator indicated by a green blinking LED. To turn off the unit, press and hold the switch for 4 seconds while on the home screen. The display will show: To power down confirm by pressing again. Release the button to abort and the unit will revert to the main screen after 3 seconds. Note: if the unit becomes stuck displaying “powering down” due to indifferent server status you may keep the button pressed for 10 seconds (count the LED blinks) until a message should appear to release the button for a failsafe shutdown. If everything fails, gently pinch www.ambient.de/en 13 ACN-ML Version 1.3 / 3.48 into the reset hole on the bottom side with a SIM release tool, paperclip or similar. This will immediately cut the power. Just press gentle and briefly! MAIN SCREEN The main screen is displayed during normal operation mode. It displays the most important status information. These include following: The upper left corner indicates the jam mode “A” is for “auto”, “M” for manual / once, while the lock symbol in this example would indicate “off”, blocking jamming of the internal generator from external. +03:50 on the top right beside the battery indicates the TC generator to Lemo output offset. EXT shows that the unit is powered from external. If the external source is switched off or depleted the integrated backup cell will take over, indicated by “INT” Note: the cell is automatically charged when external power is applied, regardless of the unit being switched on. To keep the meta data server running and accessible always make sure you start your day with a backup fully recharged over night. 25F is the selected frame rate for the timecode generator. PPF 4x High informs that the sync output on Lemo B is set to 4 pulses per timecode frame with rising slope. LNA indicates active Low Noise Amplification of the ACN receiver improving range performance in critical situations at the sacrifice of increased power drain. As ACN is switched on this will be reflected accordingly in the bottom line, the rectangular icon next to it gives information about the server. It will start blank and soon change to solid after boot-up. C-Jam indicates the selected ACN mode, 11 the radio channel. If the unit is configured to be the C-Jam master, these indicators will change to sync sent with each CJam broadcast every couple of seconds. If the display is switched off (power save), pushing the config switch once will turn it on again without doing any changes. Also, a timecode jam activates the display. 14 ©Ambient Recording GmbH 2015 experience quality. ACN-ML Version 1.3 / 3.48 MAIN MENU Pushing the config switch briefly will replace the lower line with the main menu. You can navigate forth and back through the various sections by toggling the 3 function wheel in the corresponding direction and select the highlighted sub menu by pushing again. Pressing the config switch when EXIT is highlighted exits to the main screen. If no action is performed the unit will revert to the main screen after a few seconds. GEN MENU This menu will lead you through a subset of parameters regarding the timecode generator. GEN > JamTC First sub-menu is to configure how the generator can be jammed from external. AUTO is the default setting. When activated, the screen will display an A to the left to the running timecode. The generator will automaticaly jam to externally fed timecode and will not re-jam as it has consistent, present signal displayed by a lock symbol that has replaced the A. It will revert to a ready for re-jam when the external TC source stops and restarts for 3 seconds, or is disattached for the same time. Off defeats the Jam mode completely. The generator will not react to incomming TC. This is useful to protect your TC master becoming accidentially misadjusted when using it to jam other equipment with a bi-directional cable. Note the jam indicator on the main screen is permanently changed to a lock. The manual/once option will let you jam the generator one time only and is indicated by an M that the unit is ready to accept a TC jam. Once jammed, the unit will switch “Off” mode with an according lock symbol. To reopen the input for jamming with present external timecode, repeatedly press the config switch to toggle through the modes. Of course, you can also change the mode or reboot the unit. www.ambient.de/en 15 ACN-ML Version 1.3 / 3.48 GEN > EDIT This allows manual editing of timecode values. Decrease or increase by toggling left/right. Hold for fast forward/backward. Push to select. Pushing while on the frames position sets time and takes you to the confirm screen. Per default the cursor sits on old. This prevents resetting your timecode inadvertently. To keep the previous time just press while the cursor is on old. To accept the edited TC, move the cursor to highlight new and press down. Either way will take you back to the main menu. CAUTION! Resetting the generator will restart the sync signal. Doing this while recording will result in a corrupted file. GEN > OFFSET An offset can be entered between the jammed timecode and the timecode on the output of the ACN ML. Use this to compensate the processing delay that some file base cameras produce. If offset is enabled, it will be displayed in the main screen. This shifts only the timecode while the sync signal stays locked to the frame start of the jammed timecode running in background. The offset has a range of +/- 10 frames in 0.05 frames steps (equals 2 ms at 25 fps). GEN > UB In the UB menu, the user bits are being displayed. The user bits can be edited manually and the jam behavior managed. GEN > UB > JamUB Under JamUB, the jamming behavior is managed. normal: the user bits are being taken from external timecode. manual: the user bits are not being overwritten by external timecode. This mode is to be used if you want a custom entry, such as date and camera Id. insert: user bits can be inserted “on the fly”. Note: if the source time code was unplugged for more than 3 seconds and reconnected, the ACN-ML will re-jam. If inserting changed user bits after interrupted timecode, you must also set the ACN-ML to “jam once” or “off” in the JamTC menu. 16 ©Ambient Recording GmbH 2015 experience quality. ACN-ML Version 1.3 / 3.48 GEN > UB > Edit-UB In Edit-UB, the user bits can be edited manually. Decrease or increase by toggling left/right. Holding left/right is fast backward/forward. Push to select value, curser jumps to next digit. When finished, the selected new value needs to be confirmed. Select new to apply, or the cancel by selecting old. GEN > UB > EXIT EXIT takes you directly back to main menu without changes. www.ambient.de/en 17 ACN-ML Version 1.3 / 3.48 SYNC MENU The SYNC menu enables setting of the sync signal format, type and rate. Select the different settings by pushing the config switch. Navigate by toggling the config switch left or right. Defaulted Off PPF selects a “pulse per frame” signal. This is used to trigger certain video cameras. The PPF signal is available on pin 3 of the Lemo socket. For the PPF signal, rate (single, double, quad) can be selected, along with a “high-low” or low-high transition. Pushing the config serves the function of selecting items or parameters. If any changes have been selected, you will be asked to confirm. If changes have been selected with active sync, you need to reconfirm before apply. OFF – deactivates any sync signal. This is the default setting and should be used if timecode only is required. 18 ©Ambient Recording GmbH 2015 experience quality. ACN-ML Version 1.3 / 3.48 TC MENU Enter the TC menu to adjust the timecode frame rate timecode output level for pin 5 Lemo/TC. TC > FPS Select TC for adjusting the frame rate. Adjust by toggling the config switch left/right, push in to select new frame rate. Available values: 23.976, 24, 25, 29.97, 30, 29.97D, 30D fps (D = drop frame) And, again, changes need to be confirmed. TC > Level Select Level to adjust output level on Lemo/TC. The adjustable range is from -45 dB to 0 dB. Default level is 0 dB. This equals 3 Vpp without load; 1,5 Vpp or 0 dBu into 1 K Ohm. Select by toggling left/ right, select by pushing in the config switch. www.ambient.de/en 19 ACN-ML Version 1.3 / 3.48 SYS MENU The SYS menu lets you adjust OLED brightness, displays info about the device and lets you reset the Lockit to factory defaults. SYS > Display Enter the configuration by pushing in the config switch Adjust display brightness from 1 to 10 and push in to select value. The curser will jump to the Auto-off settings to select the time out Choices are: Never – 5 seconds – 30 seconds – 1 minute – 5 minutes. SYS > INFO Select INFO to display information about the ACN-ML: Serial Number Main firmware version Mac address SYS > Factory-Reset Selecting yes and pressing the config switch restores factory defaults to: JamTC Auto, Sync Off, TC 25 fps, ACN Off, Display brightness 3, display auto-off 30 sec., TC-offset NULL. 20 ©Ambient Recording GmbH 2015 experience quality. ACN-ML Version 1.3 / 3.48 ACN MENU The ACN menu accesses Lockit Network configuration. ACN > MODE = Off Per default this is OFF, so all options will be hidden. To change, hit MODE and select the desired option. ACN > MODE > JAM The JAM mode enables sending of a sync command to other ACN ready devices on same mode and channel, or to receive a sync command from them. This serves to remotely one-time jam sync all units on the set from one arbitrary unit. ACN > MODE > C-JAM C-JAM, as continuous jam, builds up on jam. Repeated bursts of timestamps are sent out every couple of seconds, jamming previously unset devices which adjust their clock reference to the received information and re-transmitting status information. This is also the metadata mode and thus the one in which the Master Lockit will mostly be used, either as hub or as satellite. ACN > MODE > TX This mode converts the unit into a timecode transmitter that will distribute external TC through ACN to units in RX mode. If progressing timecode is detected, the ACN-ML jams to it and sends out a jam command to the slaves. When the external timecode stops, a stop command is sent to the slaves. If static timecode value is recognized, as sent by a video camera or similar, the timecode is stopped while a static timecode is sent on the timecode output of the slaves as well as on the output of the unit that is in TX. This feature enables synchronized remote roll of devices that support recording triggered by timecode. www.ambient.de/en 21 ACN-ML Version 1.3 / 3.48 ACN > MODE > RX This is the corresponding receiver setting for the TX mode as described above. Note: in TX / RX record run timecode mode, no sync signal will be generated. After switching from OFF to any of these 4 modes, you will be redirected to pick an ACN channel from 11 through 26. NOTE: all devices communicating via ACN need to be on the same channel AND firmware version! You also can run different modes each on a dedicated channel on the set. ACN > MODE = ON After having picked an ACN channel for radio transmission, the ACN menu will show several options. ACN > CHNL Lets you reconfigure the previously chosen transmission channel. ACN > ANT Lets you enable a Low Noise Amplifier for enhanced range. NOTE: This comes at the expense of backup battery life ACN > PWR PWR lets you increase the output power of the transmitter between 8 to 18dBm. For changes, a PIN is required. 22 ©Ambient Recording GmbH 2015 experience quality. ACN-ML Version 1.3 / 3.48 The default of 8 dBm is globally permissible. Check if your local regulations allow higher output before requesting a PIN. ACN > SYNC Selecting SYNC opens the screen for sending out a sync command to all ACN devices that are one the same JAM mode and channel. Depending on the mode the confirm page reads slightly different. Default is on no; to adjust, toggle to yes and push to enter. NOTE: Only ONE unit is allowed to send out C-JAM sync broadcasts. It is recommended to choose the Master Lockit that also serves as metadata hub. After sending out the sync command including timecode and user bits, the other units reply and the number of units which replied and were successfully synced are displayed. After this, the display falls back to main screen. In C-JAM mode the sync is repeated every 5 seconds and the display will indicate the transmission (or reception). EXIT Exits to the main operation screen www.ambient.de/en 23 ACN-ML Version 1.3 / 3.48 9. The C-JAM Mode C-Jam is an enhanced jam algorithm for maximum operation comfort and safety. One unit frequently sends out broadcasts to which the other devices intelligently align and adjust their clock speed. Once established accuracy falls within one video line or 10uS, but even when radio cuts out, Lockit accuracy of one frame drift per day is still maintained. Thus, you never have to worry about misaligned timecode. This is also the mode used for enhanced metadata transfer over ACN. Any ACL 204 or ACN-ML in range that has not been synced, or has an offset bigger than 0.5 seconds will be jammed. After the initial c-jam, the master sends a sync command every five seconds. Slave units display “sync rcvd” and their LED goes to solid green for a second. If synching fails, the LED goes red and “sync failed” will be displayed. The slave Lockits now compare their own time with the regularly received time stamps and will adjust their tune value to stay closely in sync with the master, the system latency is down to half a video line (SD) if all Lockits are well in tune to each other initially. The latency in µs, measured time in seconds since start of C-Jam, current tune value, and proposed tune value are displayed in an “expert view” window that is accessed by selecting SYS>INFO and then pushing the toggle switch to right (line 1). Line 2 is debug info, line 3 is used for tune value. In this mode, a unit that was slave and has been power cycled (for instance for changing batteries) will automatically re-sync when booted. The master unit will be in C-Jam mode, but not send sync signals after reboot. Should it become necessary to reboot the master, a former slave may be used to initiate the C-Jam and become master. This way, the set timecode is maintained. It is recommended maintaining one master, and to re-sync the set after power cycling to avoid complications caused by more than one master in operation on location which may lead to unpredictable errors. Troubleshooting: “sync failed” messages: For timecode: If the frame rates of sending and receiving device differ in integer vs. non-integer frame rates (or PAL vs NTSC e.g. 25 fps and 29.97 fps) the sync command is rejected. If “OFF” is selected in the GEN>JamTC settings. If “manual/once” is selected in the GEN>JamTC settings and the device has already been jammed before. For user bits: if the GEN>UB>JamUB is set to “manual” 24 ©Ambient Recording GmbH 2015 experience quality. ACN-ML Version 1.3 / 3.48 10. LED Indications As used to from former devices of the Clockit Time Code family, the ACN-ML has a red and a green flashing LED to display operation and battery status: ● red slowly blinking: power applied, unit switched off, silent charge of backup cell ● ● red and green constantly lit: unit switched off, external power connected, backup battery fully charged. Trickle charge current at 12V typical 35mA 0 1 2 3 4 seconds: ● ● ● ● ● red flashing in 1 second intervals: running, but not jammed or set. ● ● ● ● ● green flashing in 1 second intervals: running, jammed or set manually. This is the normal operation mode. ● ●● ●● red double flash every 2seconds: battery low, not jammed or set. ● ●● ●● green double flash every 2seconds: battery low, jammed or set. ● ●● ●● ●● ●● red double flash every second: TC / video not sync, not jammed or set. ● ●● ●● ●● ●● green double flash every second: TC / video not sync, jammed or set. The double flash on every second is shown while invalid combinations are configured or while syncing the genlock signal to time code after configuration changes or jamming. ● ●●● ● ●●● combination of not sync and low battery, not set or jammed. ● ●●● ● ●●● combination of not sync and low battery, set or jammed. ●●●●●●●●●● alternating colors during firmware update. www.ambient.de/en 25 ACN-ML Version 1.3 / 3.48 11. Firmware Update New features, improvement and fixes for the ACN-ML will be available for download from our website: http://ambient.de/en/product/master-lockit/ Download the update file to a WiFi capable computer and log in to your Master Lockit’s web interface. Make sure your WiFi adapter is set to DHCP, and use the WiFi’s SSID name as password. And enter masterlockit.local or 10.0.0.1 in the address line pf your browser. Select “Firmwareupdate” from the “System” dropdown menu on the upper right corner. Select “Choose File”, browse the location of the file just downloaded, it should read “update-xxxx.tar.gz”, then click on “Upload & Restart”. Your Master Lockit should now automatically update and reboot when finished. Note: if the update involved changes to the TC generator firmware the Lockit circuitry will sequently shut down until both LEDs start to flash alternating and finally goes into charging mode with the red LED on solid and the green flashing. Do not interrupt this process or remove power until this stage has completed. Now reboot the Master Lockit by pressing the 3 function wheel as usual. The display should now welcome you with a new firmware version. 26 ©Ambient Recording GmbH 2015 experience quality. ACN-ML Version 1.3 / 3.48 12. Physical specifications Dimensions: (L / W / H): 91/102* x 65 x 33 mm (*net/incl. sockets, not incl. antenna or WiFi Stick) Weight: 0.282 Kg Power: 35mA - 1.5A Connectors: “Lemo/TC”: Lemo series 0B 5-pin (matching connector FGG/JGG.0B.305.CLADxx) pin 1: GND pin 2: LTC IN pin 3: ASCII IN / OUT pin 4: Tune reference 1.92 MHz out pin 5: LTC OUT (adjustable output level) “Lemo/ACN”: Lemo series 0B 5-pin (matching connector FGG/JGG.0B.305.CLADxx) pin 1: GND pin 2: LTC IN pin 3: currently not used pin 4: currently not used pin 5: LTC OUT / 3.3 Volts DC OUT Lemo/ACN remarks: GPO is a timer-driven output with TTL output signal (47 Ohm series resistor) GPI is a timer-driven input and even a timer-driven output with an open-drain transistor. It has configurable pull-up (30k) and pull-down (20k) resistors. The event switch has a 200 mA fuse between pin 3 and 4 Antenna: SMA-F www.ambient.de/en 27 ACN-ML Version 1.3 / 3.48 IEEE 802.15.4 2.4 GHz Band ACN Channel Center Frequency [MHz] 11 2405 12 2410 13 2415 14 2420 15 2425 16 2430 17 2435 18 2440 19 2445 20 2450 21 2455 22 2460 23 2465 24 2470 25 2475 26 2480 28 ©Ambient Recording GmbH 2015 experience quality. ACN-ML Version 1.3 / 3.48 13. Warranty & Approvals Warranty Ambient Recording GmbH warrants the Master Lockit ACN-ML synchronizer against defects in materials and workmanship for a period of ONE (1) year from date of original retail purchase. This is a non transferable warranty that extends only to the original purchaser. Ambient Recording GmbH will repair or replace the product at its discretion at no charge. Warranty claims due to severe service conditions will be addressed on an individual basis. THE WARRANTY AND REMEDIES SET FORTH ABOVE ARE EXCLUSIVE. AMBIENT RECORDING GMBH DISCLAIMS ALL OTHER WARRANTIES, EXPRESS OR IMPLIED, INCLUDING WARRANTIES OF MERCHANTABILITY AND FITNESS FOR A PARTICULAR PURPOSE. AMBIENT RECORDING GMBH IS NOT RESPONSIBLE FOR SPECIAL, INCIDENTAL, OR CONSEQUENTIAL DAMAGES ARISING FROM ANY BREACH OF WARRANTY OR UNDER ANY OTHER LEGAL THEORY. Because some jurisdictions do not permit the exclusion or limitations set forth above, they may not apply in all cases. For all service, including warranty repair, please send the ACN-ML, along with proof of purchase date to your retailer, or, if not applicable, to: Ambient Recording GmbH Schleissheimer Str. 181 C DE – 80797 Muenchen, Germany Please obtain a return authorization through the contact form on our website before sending in a unit. May 2015 Klaus Grosser Ambient Recording GmbH Approvals CE Conformity Statement: Declaration of Conformity According to ISO/IEC Guide 22 Manufacturer’s Name: Manufacturer’s Address: Ambient Recording GmbH Schleissheimer Str. 181 C, DE – 80797 Muenchen, Germany declares that the product: ACN-ML Master Lockit is in conformity with: - EN 60950-1:2006 + A11:2009+A1:2010+A12:2011+AC:2011 - EN 300 440-1 V1.6.1 - EN 300 440-2 V1.4.1 - EN 301 489-1 V1.9.2 - EN 301 489-3 V1.4.1 which is indicated and affirmed by the applied CE marking. www.ambient.de/en 29 ACN-ML Version 1.3 / 3.48 FCC Statement The FCC requires that the following statements be included in this manual for ACN-ML: FCC § 15.19 This device complies with Part 15 of the FCC rules. Operation is subject to the following two conditions: (1) This device may not cause harmful interference, and (2) this device must accept any interference received, including interference that may cause undesired operation. Canada CNR-Gen Section 7.1.3 This device complies with Industry Canada licence-exempt RSS standard(s). Operation is subject to the following two conditions: (1) this device may not cause interference, and (2) this device must accept any interference, including interference that may cause undesired operation of the device. Le présent appareil est conforme aux CNR d'Industrie Canada applicables aux appareils radio exempts de licence. L'exploitation est autorisée aux deux conditions suivantes: (1) l'appareil ne doit pas produire de brouillage, et (2) l'utilisateur de l'appareil doit accepter tout brouillage radioélectrique subi, même si le brouillage est susceptible d'en compromettre le fonctionnement. FCC § 15.21 Any changes or modifications not expressly approved by the party responsible for compliance could void the user’s authority to operate the equipment. FCC § 15.105 Note: This equipment has been tested and found to comply with the limits for a Class B digital device, pursuant to part 15 of the FCC Rules. These limits are designed to provide reasonable protection against harmful interference in a residential installation. This equipment generates, uses and can radiate radio frequency energy and, if not installed and used in accordance with the instructions, may cause harmful interference to radio communications. However, there is no guarantee that interference will not occur in a particular installation. If this equipment does cause harmful interference to radio or television reception, which can be determined by turning the equipment off and on, the user is encouraged to try to correct the interference by one or more of the following measures: —Reorient or relocate the receiving antenna. —Increase the separation between the equipment and receiver. —Connect the equipment into an outlet on a circuit different from that to which the receiver is connected. —Consult the dealer or an experienced radio/TV technician for help. ICES-003 This Class B digital apparatus complies with Canadian ICES-003. Cet appareil numérique de la classe B est conforme à la norme NMB-003 du Canada. May 2015 Sebastian Fell Ambient Recording GmbH 30 ©Ambient Recording GmbH 2015 experience quality. ACN-ML Version 1.3 / 3.48 14. Recommended accessories ACM-TL Mounting accessory for attaching the device to a 3/8” thread ACM-FS Adapter 3/8” to cold shoe MLC-L1B10 Ethernet cable Master Lockit to Arri Alexa RJ45 to Lemo Series 1B 10-pin, 0.5 m MLC-L1B10P Ethernet cable Master Lockit to Arri Alexa and powering RJ45 to Lemo Series 1B 10 pin, 0.5 m, with breakout to Hirose 4-pin for powering www.ambient.de/en 31 ACN-ML Version 1.3 / 3.48 AK-HS4 Adapter cable Hirose 4-pin to Hirose 4-pin, 0.5 m AK-HS4-LOB2 Adapter cable 12 V to Hirose 4-pin, 0.5 m AK-HS4-PC2M Adapter cable Hirose 4-pin / Anton Bauer D-Tap male, 0.6 m LTC-OUT Adapter cable Lemo Series 0B 5-pin to BNC LTC-OUT/ Epic Adapter cable Lemo 5-pin to Lemo series 00 4-pin for use with RED Epic/ Scarlet 32 ©Ambient Recording GmbH 2015 experience quality. ACN-ML Version 1.3 / 3.48 TC-I/O Adapter cable Lemo 5-pin to Lemo 5-pin for use with ARRI Alexa LTC-OUT35/35F Lemo 5-pin to TRS-3.5 mm 90 right angle & jack For feeding microphone and timecode into DSLR, microphone cable to left channel, length 20 cm, TC cable to right channel, length 40 cm. Pad 20 dB ANT-2.4-SMA-M Antenna straight ANT-2.4-SMA-M90 Antenna right angle www.ambient.de/en 33 experience quality. MADE IN GERMANY Ambient Recording GmbH Schleissheimer Straße 181 C | D – 80797 Munich | vox +49 89 36005510-0 | fax +49 89 651855 www.ambient.de | [email protected] © 2015, Ambient Recording GmbH