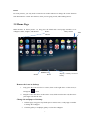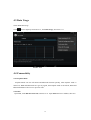
1
3nStar, Inc. Model: T1002S USER MANUAL Content Content ...................................................................................................................................... 1 1 Introduction ............................................................................................................................ 3 1.1 Acknowledgement ....................................................................................................... 3 1.2 Announcements ........................................................................................................... 3 2 PC - Tablet Introduction ......................................................................................................... 4 2.1 Startab T1002S Operation and Preparation.................................................................. 4 2.2 Startab T1002S Status and Reminder ........................................................................... 4 3 Quick Start Guide ................................................................................................................... 5 3.1 Keys Function .............................................................................................................. 5 3.2 Startup and Shutdown .................................................................................................. 5 3.3 Open and Close of the Screen ...................................................................................... 5 3.4 Usage of Touch Screen ................................................................................................ 6 3.5 Home Page ................................................................................................................... 7 3.6 Visit Application Procedures........................................................................................ 8 3.7 USB Connection .......................................................................................................... 8 3.8 Typing words ............................................................................................................... 9 4 Basic Setting ..........................................................................................................................11 4.1 Wireless and Internet ..................................................................................................11 4.2 Bluetooth.....................................................................................................................11 4.3 Data Usage ................................................................................................................. 12 4.4 Connectivity ............................................................................................................... 12 4.5 Display ....................................................................................................................... 14 4.6 Storage ....................................................................................................................... 15 4.7 Battery........................................................................................................................ 17 4.8 Application program .................................................................................................. 17 4.9 Account and Sync ...................................................................................................... 19 4.10 Location service ....................................................................................................... 19 4.11 Safety setting............................................................................................................ 20 4.12 Language and Input Method .................................................................................... 22 4.13 Backup and Reset ..................................................................................................... 23 4.14 Date and Time .......................................................................................................... 23 4.15 Fixed-time Startup and Shutdown ........................................................................... 24 4.16 Assistance Function ................................................................................................. 24 4.17 Engineer Selection ................................................................................................... 25 4.18 About Tablet ............................................................................................................. 26 5 Multi-Media.......................................................................................................................... 27 5.1 Music ......................................................................................................................... 27 5.2 Video .......................................................................................................................... 28 5.3 Photo Gallery ............................................................................................................. 28 5.4 Camera ....................................................................................................................... 29 5.5 FM Radio ................................................................................................................... 30 1 6 Internet.................................................................................................................................. 31 6.1 Browser ...................................................................................................................... 31 6.2 Email .......................................................................................................................... 31 7 Other Application Procedures............................................................................................... 33 7.1 Clock .......................................................................................................................... 33 7.2 Calculator ................................................................................................................... 33 7.3 File Manager .............................................................................................................. 33 7.4 Recorder ..................................................................................................................... 35 8 Installation of Procedures ..................................................................................................... 36 8.1 Installation ................................................................................................................. 36 8.2 Uninstall ..................................................................................................................... 36 9 Troubles Shooting................................................................................................................. 37 2 1 Introduction 1.1 Acknowledgement Thanks for your purchase of our product. 3nStar-T102S, high definition tablet PC, CPU Rockchip 3026, Cortex-A9, dominant frequency is 1.0GHz, OS Android 4.4.2. The product is designed with various functions, including, WIFI, BT and so on. It is easy to achieve wireless communication and internet, you have access to surf in the internet anytime and anywhere;There are many sensors which offer you brand-new operation and entertainment; besides, it has camera shooting, which leads electronic consumption to enter into a fresh palm internet entertainment time. The manual systemically introduces the functions, use techniques and announcements, please read this manual carefully before use. 1.2 Announcements Preventive maintainance Please always keep the tablet PC dry. To avoid the device short trouble, corrosion fault and electric short, please prevent the device, battery and charger from water and moisture, and don’t operate the device or charger with wet hand. To avoid failure of device, battery and charger, please prevent the device, battery, charger from violent shock, shake, over heating or cold temperature. Never disassemble the device and accessories arbitrarily, otherwise the device and accessories are not in our company warranty scope. 3 2 PC - Tablet Introduction 2.1 Startab T1002S Operation and Preparation Battery Charging Before using this device, proceed to charge it. 1. Apply the power adaptor to charge. 2.2 Startab T1002S Status and Reminder Reminder icons When some remind message appears in your reminder window, please click column and slip the screen to open the reminder list. Choose the menu you need, and confirm the information. Then you can close the reminder window through clicking the column to slide up. Please refer to below status icons: New email Airplane Mode on USB connected USB debugging connected Return button Downloading Show recently-used application Home button Current electric volume. WIFI connected, Reminder board Reminder icons will work while receiving emails, WI-FI is open, you can open the reminder board to view the detailed information. Open the reminder board When the reminder column shows new reminder icon, please hold the column and slip down your finger, then the reminder board is opened. 4 3 Quick Start Guide 3.1 Keys Function Keys Funcction Description: Power button Short press to sleep/wake up, long press to startup and shutdown. Volume +(up) increase the volume Volume -(down) decrease the volume Click it in any interface will return to main interface. HOME button (home) Back button(back) Menu button Setting button click it in any interface will return to previous menu This button will display in menu interface. display recently browsed history 3.2 Startup and Shutdown Startup Long press POWER key for three seconds, you can enter into startup picture. The system enters into screen lock status, please unlock it. Shutdown 1. Long press POWER, it will popoup shutdown window. 2. Shutdowm window contains mute mode, airplane mode,reboot mode and shutdown four options. 3. Click Shutdown is the last step. 3.3 Open and Close of the Screen 1. Screen will be closed automatically when is not being used in order to save battery power 5 2. When screen is open, press POWER key, the screen will be closed immediately. Open the screen when it is closed. If the screen is closed, short press POWER to open the screen. The screen will be locked open it, it will show the picture as below picture, left slide to unlock and enter into camera, right slide the unlock icon to unlock the screen. Picture 3.1 3.4 Usage of Touch Screen T1002S operating methods: There are below methods to view the main screen, menu and application procedure in your PCtablet. Click When you want to use the screen keyboard or choose application in the main interface, you only need to touch it by your finger. Press on If you want to open some item( textbox or the link in the webpage), or shortcut and main procedure move, you can press on this item. Quickly slide or slide Quickly slide or slide indicates make quick vertical or horizoncial movement by finger. Pull Before you pull, you need to hold the it with strenghth until you pull it into the position you want. 6 Rotate For most pictures, you only need to rotate the PC Tablet sidewise to change the screen direction from horizontal to vertical. For instance, when you are typing words, and watching movies. 3.5 Home Page Main interface as below picture 3.2, long press the blank and it will popup windows to set wallpaper, folder, widgets, and shortcut. Notice Batty volume Time column Return Picture 3.2 Home Display recently browsed history Remove the icons in desktop 1. Long press the icons need to be remove, then on the right above of the screen, it will appear icons. 2. Drag the icon to the above of the remove icon, till the icon become red, then move your finger to delete the icon. Change the wallpaper of desktop 1. In home page, long press any blank space in main screen, it will popup a window to change the wallpaper. 2. Click the gallery or wallpaper gallery to select the wallpaper. 7 3.6 Visit Application Procedures Click in right top of Picture 3.2, enter into main interface as Picture 3.3, choose the application procedure you want to visit. Picture 3.3 Return to home page 3.7 USB Connection Storage configuration Before transmitting documents, you have to conduct storage configuration for your PC Tablet: 1. Connect the PC-Tablet and computer by USB cable, the reminder column will show the remind information. 2. Open the reminder board; please view the PC-Tablet status and reminder to learn how to open the board. 3. In the reminder board, click the “USB Connected”, it will as below Picture 3.4, then click “open USB storage configuration”. 4. Now the USB is connected successfully. 8 Picture 3.4 Copy the document into memory card 1. Connect the PC Tablet to computer with USB cable. 2. As the PC Tablet storage configuration, it is connected with computer successfully. 3. Open the “My computer” in your computer, check the items in “removable disc”. 4. Copy the documents you need into “removable disc”. 5. After copying finishes, click “shutdown the USB storage configuration” to uninstall. Notice: When the PC Tablet is connected with USB cable, and you open the USB storage configuration, you can’t view the memory card. Only after you detach the USB cable, you can view the memory card. 3.8 Typing words Use the screen keyboard When you start the procedure or choose the words or numbers edition, it will show the screen keyboard. The keyboard contains below typing options: 1. Android keyboard 2. Google Pinyin Choose the typing method you want 1. Click Setting pocedure application. 2. Click Language and Keyboard. 9 3. In the text setting area will reveal all the installed words-typing methods in your PC Tablet. 4. Tick the typing method you want. Use and switch of input method ⑤ ① ④ ② Picture 3.5 ③ 1 switch the capital and small letter 2 switch the mode of words input 3 click to insert the space 4 click input to execute 5 delete the character in the left of cursor, click and hold to delete all the characters in the left og the cursor. 10 4 Basic Setting 4.1 Wireless and Internet 1. Connect Wi-Fi (1) In the main menu or interface, choose setting application procedure. (2) Click WLAN, open Wi-Fi, The PC Tablet will automatically search the available Wi-Fi wireless internet. Choose the Wi-Fi internet you want to connect, if it has password, it will pop up the password window, enter password, click connect. 2. Add Network 1. Click icon in right top 1) Input network SSID, the wireless network name, click save. 2) Click user name already saved, click connect to use network. 2. Network Notice If you open Network Notice, when WIFI signal appears, the right bottom will remind you available WLAN network, as Picture 4.6 3. Keep WI-FI on during sleep... (1) Click icon in right top of Picture 4.8, select advanced. (2)Click Keep WI-FI on during sleep, and choose” always” option. 4.2 Bluetooth Bluetooth function operation 1. Click setting application in main menu interface 2. Click bluetooth and open it. 3. If somebody open bluetooth in your surroudings, click search device in right above, then MID will automatically search the bluetooth device nearby. 4. Click the available Bluetooth device, it will popup request window, enter into related password, and match the device to connect. 5. After match successfully, choose the operation you want to, click Bluetooth setting center. 11 to enter into 4.3 Data Usage Check WIFI data usage Click icon in right top of Picture 4.15, click Data Usage, as Picture 4.3.1 Picture 4.3.1 4.4 Connectivity 4.4-1 Airplane Mode Airplane Mode can turn off WI-FI and Bluetooth function quickly, when airplane mode is turned on, WIFI and Bluetooth can’t get any signal, then airplane mode is turned off, WIFI and Bluetooth module will recover to previous state. 4.4-2 VPN Open VPN, click add VPN network, as Picture 4.4.1. Input name and server address, then save. 12 Picture 4.4.1 Click VPN, as Picture 4.4.2, input VPN user name and password, click connect. Picture 4.4.2 4.4-3 Network sharing and portable hotspots Portable WI-FI hotspots 1. Click setting application in main menu. 2. Click more when Wi-Fi is well connected, open network share and portable hotspot 3. Click keep WI-FI hotspots on, choose open time. 13 4. Return to previous menu, open portable WLAN hotspots, and click set up WI-FI hotspots. 5.Set passwords you want to, password should be more than 8 numbers. 4.5 Display 4.5-1 Adjust the screen brightness 1. Click Setting application procedure. 2. Click display, choose brightness, 3. Drag the portlito to adjust the brightness volume.As Picture 4.5.1 Picture 4.5.1 4. Click OK after brightness is adjusted. 4.5-2 Wallpapers 1. Click setting application. 2. Click display, click wallpaper. 3. You can choose different wallpapers as you like—live wallpapers---gallery(user defined)---wallpapers (system defect)---video wallpaper, as Picture 4.5.2 14 Picture 4.5.2 4.5-3 Auto rotation System is defaulted as open auto rotation, when it is turned off, system won’t rotate the PC Tablet screen by G-sensor. 4.5-4 Sleep 1. Click setting appliation. 2. Click display. 3. Click sleep. 4. Set the sleep time as you want, 4.5-5 Font size Click font size to adjust the font size 4.6 Storage Open setting function, click memory, click preferred install location, you can choose isntall new application to choose preferred install location. Check SD card and PC Tablet storage space. 5. Enter into setting application. 6. Click storage, check storage space. 1. Storage (1) System storage System storage is the space available in the PC Tablet, as Picture 4.6.1. it can’t be viewed. 15 Picture 4.6.1 (2) Internal storage Internal storage for the PC Tablet is local NAND storage, as Picture 4.6.2, if you need to check the storage content, you can check it in main menu. Picture 4.6.2 2. SD card You can check storage space, SD card available space, unmount SD card and erease SD card, as Picture 4.6.3 16 Picture 4.6.3 Safely remove SD card 1. Click setting application. 2. Click memory. 3. Click uninstall SD card. 4. Now you can remove SD card safely. Note: Removing SD card safely can protect SD card and increase its lifetime. 4.7 Battery Click setting function, select battery, you can view the battery situation 4.8 Application program 1. Click setting application in Apps. 2. Select application, after enter, you can manage and delete installed application and check system used storage space and left space. (As Picture 4.8.1) 17 Picture 4.8.1 3. View internal storage used space and left space, as Picture 4.8.2 Picture 4.8.2 4. View the working device, used space and available space, as Picture 4.8.3 18 Picture 4.8.3 4.9 Account and Sync 1. Select setting application 2. Open account and sync 3. Click add an account 4. After successfully load, it will open the sync function 4.10 Location service Click setting, select Mode, as Picture 4.10 19 Picture 4.10 4.11 Safety setting Set locked screen Lock the touch screen by unlock icon or password to protect your PC Tablet. Note: After setting screen locked, you should enter the passcode each time when you startup or screen is locked Set unlocked picture 1. Click setting application in main interface. 2. Click safe. 3. Click locked the screen. 4. Choose picture in text setting area. 5. Click next following the remind message. 6. The unlocked pattern board pop up, there are nine touch spots, connect 4 points from vertical, horizontal or diagonal direction. As Picture 4.10, move your finger from the screen when finish. The system will record yous new unlock pattern. 7. Click continue. 8. When you see the reminder, enter the unlock pattern, then click confirm. Picture 4.11.1 Set unlock PIN code 20 1. Click setting application in main interface. 2. Click safe. 3. Click screen locked. 4. Choose PIN in text setting area. 5. Enter new PIN code(numbers) and click continue. 6. Ener new PIN code again and click confirm. Set unlock password 1. Click setting application in main interface. 2. Click safe. 3. Click screen locked. 4. Set password in text seting area. 5. Set new password(letters and numbers) and then click continue. 6. Enter the password again and the click confirm. Unknown source 1. In main interface, click setting. 2. Click safety. 3. Click unknown source,as Picture 4.11.2 Picture 4.11.2 Note: Manual installing APK files needs to turn on unknown source. 21 4.12 Language and Input Method Click setting, select language and input method, choose language to switch language, as picture 4.12.1 Picture 4.12.1 Click setting, choose language and input, choose Android keyboard setting, click input language, as Picture 4.12.2 Picture 4.12.2 Choose the language you want to change in the language list, 22 4.13 Backup and Reset Connect WI-FI and login your google account, choose backup my data, system will backup your data into google server. If you need to recovery factory reset, please click reset, as Picture 4.13.1, if you need to formulate NAND, please click reset tablet. Picture 4.13.1 4.14 Date and Time According to the preset, system will voluntarily apply the date, zone, and time provided by internet. Manual set date, time and zone 1. Click Setting application procedure. 2. Slide down the screen, then click date and time. 3. Turn off “auto setting of date and time”. 4. Turn off “auto setting zone’. 5. Click Zone Selecting, then choose the zone lists. Slide down the list to view more zones. 23 6. Click Date setting, then click upper or down buton to adjust date, month, and year, click setting when you finish selection. 7. Click Time setting, then click upper or down button to adjust hour and minute, click AM or PM to change morning or afternoon ( there is no such selection when you se 24-hour format). Click Setting to finish. 8. Click 24-hour format, switch between 12-hour or 24-hour formay, the time format you choose will be used on the alarm clock. 9. Click date format setting, then choose the time format you want to show on MID. Note: If you use the time internet provided, you will not able to set the date, time and time zone. 4.15 Fixed-time Startup and Shutdown Click it into fixed-time. 1. Click Setting application procedure 2. Click fixed-tine startup and shutdown. 3. Operate as below Picture 4.15 Click it into fixed-time shutdown Turn on/off Turn on/off fixed-time shutdown Picture 4.15 4.16 Assistance Function 4.16-1. Large size Click it to make system font large size 4.16-2. Click power button to end calls 24 When Click call, press “power” button, call will end but not hold. 4.16-3. Touch and hold delay Click touch and hold delay to increae time, as Picture 4.62 Picture 4.16.1 4.16-4 Install webpage script It will allow you install webpage scrip when you open system, but it will increase the risk when you are browsing webpage. 4.17 Engineer Selection 4.17-1 USB adjustment After opening USB adjustment, you can use some software to read the PC Tablet software, but when USB adjustment is turned on, USB storage needs to manual adjust. 4.17-2 Keep awaken state If you open keep awaken state, it wll never auto sleep when your PC Tablet is charging. 4.17-3 Pointer Location If you open pointer location, it will display touch vertical and horizontal direction. 4.17-4 Show touches If you open display touch screen operation, it will display touch opeation on the screen. It is suggested to use with same direction as pointer location. 4.17-5 Show screen update If you open screen refresh, it will display related area when the area is refreshing. 25 4.17-6 Show CPU usage After open CPU usage, in the right top of the PC Tablet will show CPU usage situation. Picture 4.17 4.18 About Tablet Check the PC Tablet state 1. Check Setting application. 2. Click about tablet, check state message, model, Android version, version No and so on. 3. Click state message, check battery state, battery volumne,, IP address. 26 5 Multi-Media 5.1 Music Enter into music player: in menu or desktop click music icon to enter into music player, click the music you want to play, as Picture 5.1: Picture 5.1 Random play Album Song name Pause/play Artist Album Previous song 27 Next song Picture 5.2 Drag the progress bar to adjust play progress. Operation of music player button as Picture 5.2 5.2 Video Enter video player: choose to play. Operation of video player button as Picture 5.3 application in main menu, choose the video you want Adjust play progress Play/pause Choose the screen mode Picture 5.3 5.3 Photo Gallery Photo gallery application can auto search photos and video files in SD card, and photo gallery will classify these photos and videos in folder. You can apply photo gallery to view and edit photos, set the photos as wallpaper and watch the video. View pictures 1. Click gallery application in main interface. 2. Enter into gallery, click the folder you want to view. 3. Click the picture you want to view, the system will play it in full screen mode automatically. 4. The pictures can be zoom in and zoom out, put two fingers on the screen, the 28 separete the fingers(gather up the fingers, the picture will be zoom in) or double click the screen. Note: when you browse the pictures, slide left or right to view more pictures. Edit and set pictures When check the pictures in full screen mode, click menu key to display menu selection, you can choose the selection you need to edit and setting pictures. Slide Show 1. 2. Open a picture, use virtual key to click menu key, display menu selection. Click slide show, it will auto loop play(or choose button in picture folder) Crop 1. Click menu key to display menu selection. 2. Then click crop, click and drag related area to adjust the cropper. 3. Click cropper and drag it inside and outside to adjust the image. 4. After adjust the size you want, click crop. 5. If you wish to give up to crop, click cancel to return to picture browse. Edit 1. Click menu key, display the menu selection. 2. Click edit. 3. Adjust teh brightness, style, color, antialias setting in selection. 4. Click save. 5. If you want to give up edit, click return key, click not to return to picture browse. 5.4 Camera In the main interface or desktop, click camera application procedure , enter into camera Operation of camera ,Switch camera: choose Menu key, click switch front/back camera, as Picture 5.4 29 View the pictures and videos Normal Camera mode Switch front/back Click it to take pictures Camera shooting mode Full screen play mode. Picture 5.4 Sub menu 5.5 FM Radio in the main interface or desktop to enter into FM radio interface: Click Radio button operation instruction as Picture 5.5: Exit FM Open speaker Save button Current frequency Next channel Previous channel Picture 5.5 30 Play/pause 6 Internet 6.1 Browser In case of Wi-Fi or mobile internet is connected well (Please refer to Chapter 4.1 for wireless and internet setting), click IE browser in the main menu or desktop to enter the IE interface. 6.2 Email Email application procedure contains email setting guide, you can add the external POP3 OR IMAP email account of normal web email service provider (For instance, Yahoo, Gmail, Hotmail and 163),as Picture 6.2 Picture 6.2 a. Email Setting 1. After you click the sending email icon , you can see the email setting guide, which can help you to set. 2. Input your email address and password. 3. Click “Next step” button, choose your email type is POP3 or IMAP. 4. Click “Next Step” button to check whether the email box servicer can receive or 31 send emails 5. Input the email account and display the email subiject, and click finish. 6. If the email box is available, you will enter into your mail box automatically. b. Delete the email account You can delete setted POP3 or IMAP email account from your PC-Tablet. 。 Click 1. 2. 3. 4. 5. Enter into your mail box. Press Menu key. Click Account Press the account you want to delete. Click confirm to remove. c. Send E-mail 1. Click to display your mail box. 2. Click the inbox, it will refresh the new emails automatically; click it to read new email. 3. Press Menu key. Menus will popup. 4. Click Edit to enter into new email editing interface. 5. Input the receiver’s email address. 6. Input the subject and email content. 7. If you want to add attachment, click menu key, the menu popup. 8. Click “Attach file” (photo, music, video, contacts). 9. Click “send” to send the email out. 32 7 Other Application Procedures 7.1 Clock Click Clock procedure, enter into below interface as Picture 7.1. There are clock, picture, music and homepage buttons. Set alarm Picture 7.1 7.2 Calculator 1. Click . 2. Enter into the basic board of calculator. 3. Soft touch the numbers or operator in calulator to calculate. 7.3 File Manager File manager will copy, cut, delete, rename the documents or the folder in the TF card, it also will share the files, install apk etc. In the main menu or desktop, click the document manager icon manager. 33 to enter into documents a、Copy, cut, delete, rename the files and folder: choose the file or folder, long pressthe file or folder to enter into the interface as Picture 7.2, you can operate the file or folder. Picture7.2 b、Paste the copy or cut file: choose the file you want to paste, choose right top enter into Picture 7.3, choose right top icon to enter into Picture 7.4 Picture7.3 34 icon to Picture 7.4 C. Share file:choose any file, long press it, it will popup “share”, choose the share way you want in the list D. Install apk file Choose the file suffixed .apk in the file manager, you can install the third part software as reminder. E. Build new folder: Choose the menu you want to build the file, click icon in right top, choose new folder, you can build new folder as reminder. 7.4 Recorder In the main interface or desktop, click recorder icon record key to start record. Click Stop key to enter into record interface, click to stop recording. Click Play key to play the recorded sound. The system will auto remind you to use or abandon this record, please choose it manually. Play the record: choose the video player to play the recorded sound, choose the recorded sound in the source manager, and click it to play. 35 8 Installation of Procedures 8.1 Installation Install the third party application procedure 1. Click “file manager” application procedure; choose the application procedure you need to install. 2. Hold the application procedure you need to install. 3. It popup install, click install apk. 4. Finish the installation as guide, it will operate. Note: The third party procedure searched from internet to use on the system are all suffixed with .apk. 8.2 Uninstall Uninstall application procedure 1. Click setting icon in main interface. 2. Click manage application procedure, list all the application procedures insralled in the system. 3. Click the APK you want to uninstall, click uninstall. 4. Click confirm to finish uninstallation. Skill: The procedure manager installed by system has many convinent methods to uninstal after opening procedure manager, click uninstall, it will list all the application procedures installed by system. 36 9 Troubles Shooting 1. Slow the first startup of the PC Tablet After the PC tablet system upgraded, the first startup need to install the pre-installed application softwares, the lead time is around 2-3 minutes, the startup afterwards will be much quicker. 2. 3. The PC Tablet can’t connect Wi-Fi Make sure the wireless router of internet service is working. Ensure the PC Tablet and wireless router in certain distance, and no wall or other barrier between them. Ensure the user name and password are correct. The PC Tablet feels hot When many application procedures are used or the brightness of screen open to the lightest or under charging the PC tablet may gets hot. It is normal. 4. 5. Email can’t be set or Registeration of application procedure. Ensure your internet is well connected. Make sure your email setting way is correct. Keep your system time and local time consitent. The system is abnormal and can’t work. When you install some third party application procedure, it may cause abnormal work, you can press Reset key(next to power port) to reset the system. 6. The webpage can’t be opened Please keep the distance between from route to the PC Tablet in effective range. Please restart WI-FI and try again. 7. The PC Tablet works terribly slow sometimes It is normal phenomenon. Please turn off some application you don’t need in advanced task management, or uninstall some third party application to release more system resource. 37