1
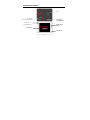
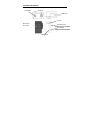
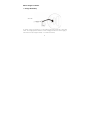
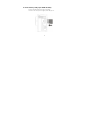
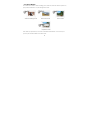
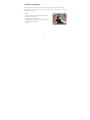
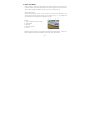
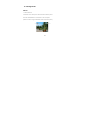
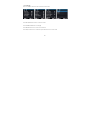
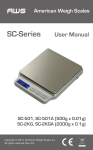
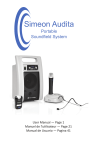
Quick Start Guide
V1.06
1
THANK YOU
Thank you for purchasing the Villain™ by Monster Digital! This Quick Start Guide will help get
you using your camera in no time.
We hope you take awesome videos and amazing photos.
Feel free to share them with us and we might post them on our website, YouTube™ channel,
Facebook, Instagram etc.
If you ever have any issues or want to learn more please reach out to us through any number
of means all listed on our website.
We will get your question answered or problem solved
right away. Also be sure to register your camera at www.MonsterDigital.com
Please be safe and have tons of fun!
The Villain Team at Monster Digital
2
FEATURES AND BUTTONS
Lens
IR receiver
(for optional remote)
Charging or
Recording LED
Power on or
Recording LED
Display/Menu
Button
LCD Display
Microphone
3
FEATURES AND BUTTONS
Power/Mode
OK/Shutter
Battery Door
Speaker
WiFi Indicator/
MicroSD Card Slot
Down Button
Micro USB Port
Mini HDMI Port
4
Before Using the Camera
1. Charge the battery
USB cable
To charge, connect the camera to a 1-amp minimum USB power source with a micro USB
cable.
The charging indicator will be in on when charging and will turn off after charging. It
takes 2-4 hours to fully charge the battery.
It is a Lithium-ion battery.
5
2. Insert memory card (up to 32GB microSD)
Push the microSD card into the slot until it clicks.
To remove the card, push it in slightly and it will pop out.
6
3. Turn it on
To turn ON press and hold the power/mode button for 3 seconds.
To turn OFF the camera press and hold the power/mode button for 3 seconds when the
camera is not recording
When the battery is very low, this icon
will appear.
When the battery is out of power the icon turns red and flashes.
Finally, the camera turns off
automatically.
The camera will record for approximately 1.5 hours based on Monster Digital engineering
testing. Actual performance may vary based on settings, environmental conditions and other
factors. Maximum battery capacity will normally decrease with time and use.
7
4. Camera Modes
The camera has 4 modes - video recording, photo, dash-cam, and view. After the power is on,
press power/mode button to cycle through each mode.
Video recording mode
Dash-cam mode
Photo mode
Playback mode
Note: When you power down, the current mode will be remembered.
power up the camera it will be in the same mode.
8
The next time you
5. Video Recording Mode
When powered on and in video mode press the OK/shutter button to start recording,
Press it again to stop recording. If the memory card is full or battery is low, it will stop
recording automatically.
DISPLAY
1. Icon of mode, indicating video recording mode;
2. Indicate quality of video;
3. Resolution and Frame Rate
FHD 1080p(30fps) / HD 720p(60fps) / HD 720p(30fps)
4. Recording time available
5. Power
9
6. Dash-cam Mode
When powered on, press the power/mode button to select dash-cam mode. In dash-cam
mode the camera continuously creates files three minutes long. When the memory card is
full, the oldest file will be overwritten then the next, etc. in a continuous loop.
DASH-CAM AUTO ON
After choosing dash-cam mode, turn the camera off and connect a USB cable to the
camera and a switched power outlet that is on when the car is on.
The camera will
automatically start recording when the ignition is turned on.
DISPLAY
1. Car icon indicates dash-cam mode
2. Video Quality
3. Resolution
4. Recording time left
5. Power
NOTE: Dash came mode is set up inverted for mounting near rearview mirrors.
easily be flipped in software like QuickTime (under “edit” select “flip vertical”).
10
Videos can
7. Photo Mode
With the power on press the power/mode button to select photo mode.
Press the OK/shutter button to take a picture.
DISPLAY
1. Photo mode Icon
2. Image size in Mega Pixels
3. Photo Quality Icon
4. Counter, indicating number of photos left
5. Power
11
8. Playback Mode
With the power on press the power/mode button to select View mode then chose the type of
files to view.
SELECT
Dash-cam to play videos recorded in dash-cam mode
Video to play videos
JPG to see photos
12
9. Viewing Videos
1. View Mode icon
2. Number of the current video and the total number of videos
3. Total video time
4. Date and time of the video
5. Playback time
When playing a video push the OK/shutter button to pause. Push the MENU button to stop.
13
10. Viewing Photos
DISPLAY
1. View mode icon
2. Number of the current photo and the total number of photos
Press the down/WiFi button to advance to the next photo.
(There is no button to go backward to view the previous photo)
14
11. Screen Saver
To save power the display can turn off automatically.
You can select the length of
time the screen is on before it goes into Screen Saver mode.
The LED on the upper left will indicate the camera is on when the display is off.
15
12. Settings
There is a different menu for each mode as shown below:
Video Mode
Photo Mode
General Settings
Press DISP./MENU Menu button to view the menu
Press POWER/MODE button to tab right
Press WIFI/down button to move the cursor down
Press OK/shutter button to confirm and press Menu button to return or exit
16
Play Mode
13. Playback on an HDTV
You can connect your Villain to an HDTV with a mini HDMI cable.
When connected and
powered on you can view all the photos and videos available on the camera’s memory card.
17
14. The Apps
From Google Play ™ or the App Store SM download SYMAGIX2” and install them or
scan these codes.
After installing the application, press the WIFI button on the Villain and the Screen will say
“Waiting for WiFi Connection…”
On your mobile device settings select VILLAIN
When connecting for the first time, enter the password: monsterdigital
The Villain will then display “WiFi Connection Ready!”
Tap the
icon on your mobile device to open the app and control the Villain.
18
iPhone/iPad Screen View
1. Resolution
2. White Balance Settings
3. Settings Menu
4. View-Mode Button
5. OK/Shutter Button
6. Photo Mode
7. Video Mode
8. Wi-Fi Signal
9. Villain’s Battery Status
To download videos and photos directly to your mobile device press the View-Mode button,
select, then download.
19
Android Screen View
1. Villain’s Battery Status
2. Resolution
3. White Balance Settings
4. Settings Menu
5. View-Mode Button
6. OK/Shutter Button
7. Photo Mode
8. Video Mode
To download videos and photos directly to your mobile device press the View-Mode button,
select, then download.
20
Specifications
Image Sensor
5.0 Million Pixels
Function Modes
Video Camera, Dash-cam, Photo and View
Lens
F2.4, f=3.1mm
Display
2.0 inch LCD Screen
Photo Definition
12MP, 10MP, 8MP, 5MP, 3MP
Video Definition
FHD (1920x1080 30fps), HD (1280x720 30fps), HD (1280x720 60fps)
Storage Media
microSD Card (up to 32GB)
File Formats
Video - MOV (H.264), Photos - JPG
USB Port
USB 2.0
Power
External, 3.7V1200mAh rechargeable lithium battery
Language
English、Simplified Chinese、Spanish、Portuguese、German、Italian、
French、Dutch
Auto Shut-down
1, 3, 5, minutes or OFF
Dimensions
59 W x 44 H x 25.5 D, 2 5/16” W x 1 ¾” H x 1 D, 74g 2.55oz w/battery
21
System Requirements
Operating
System
MSDC
Microsoft Window 2000,XP, Vista, 7,8, 10
Mac OS X version: 10.0.0 or above
CPU
Intel Pentium of more than 1GB Hz or equivalent
Internal Memory
Larger than 1GB
Sound Card and Video
The sound card and video card supports DirectX8 or higher
Card
CD Driver
Speed of 4x or faster
Hard Disk
Free space of more than 2GB
USB
One available USB 2.0 or 3.0 port
22
23
Monster, the MC logo, the Monster logo, and Monster Digital, are trademarks or registered
trademarks of Monster Products, Inc., or its subsidiaries in the U.S. and other countries.
Villain is a trademark of Monster Digital.
iPhone, and iPad, are trademarks of Apple Inc., registered in the U.S. and other countries.
App Store is a service mark of Apple Inc. Windows and Vista are registered trademark of
Microsoft Corporation in the United States and other countries.
Android and Google Play are trademarks of Google Inc. Trademarks and registered trademarks
are property of their respective owners.
1-year Limited Warranty – See website for details
www.MonsterDigital.com/warranty
©2015 Monster Digital
P.O. Box 941774 Simi Valley,
CA 93094
24