1
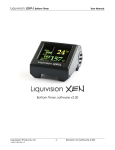
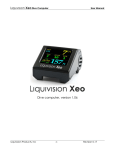
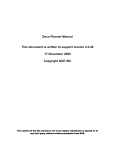
™ Air Integrated Dive Computer User Manual ™ Air Integrated Dive Computer U-2 and L1 Transmitters™ Abbreviated Manual For full manual please visit: http://liquivision.com/lynx_manuals.php Liquivision Products, Inc -1- LYNX Manual ™ Air Integrated Dive Computer User Manual CONTENTS IMPORTANT NOTICES ................................................................................................................. 4 MENU TREE.................................................................................................................................... 6 USER AGREEMENT AND WARRANTY ...................................................................................... 8 GETTING STARTED – BEFORE DIVING THE LYNX ................................................................... 8 Turning the LYNX on/off ........................................................................................................ 8 Register Your Unit/Activate Your Dive Software ............................................................ 8 Setup Time/Date & Battery Type ........................................................................................ 8 Unlock the Locator Feature of the LYNX ......................................................................... 9 GETTING STARTED – FEATURES OF THE LYNX ...................................................................... 10 GETTING STARTED – FEATURES OF YOUR U-2/L1 TRANSMITTER ...................................... 10 GETTING STARTED – SETTING UP A TRANSMITTER PRE-DIVE ............................................ 11 Setting up a U-2 or L1 Transmitter .................................................................................... 11 Transmitter Positioning ........................................................................................................ 11 Turning the U-2 Transmitter On/Off .................................................................................. 12 Turning the L1 Transmitters On/Off .................................................................................. 13 Checking Your Transmitter Pre-Dive .............................................................................. 13 Optimizing Battery Life ........................................................................................................ 13 MENUS ......................................................................................................................................... 14 Shut Off .................................................................................................................................... 14 LOCK/UNLOCK ...................................................................................................................... 14 Dive Planning ........................................................................................................................ 14 Mode ....................................................................................................................................... 14 Conservatism ................................................................................................................... 15 PO2 dive ............................................................................................................................ 15 PO2 deco .......................................................................................................................... 16 Last deco stop ................................................................................................................. 16 Gases (only in Rec & Tec Modes) ................................................................................... 16 Compute NDL (only in Rec & Tec modes) .................................................................... 17 Runtime (only in Tec mode) ............................................................................................. 17 Alarms ..................................................................................................................................... 17 Your Saturation (only in Rec & Tec modes) .................................................................. 18 Simulate Dive ........................................................................................................................ 18 Liquivision Products, Inc -2- LYNX Manual ™ Air Integrated Dive Computer User Manual Pre-Dive Check (only if you are using one or more transmitters) ......................... 18 Air Integration ....................................................................................................................... 19 Mode ....................................................................................................................................... 19 Transmitter .............................................................................................................................. 20 Compass ................................................................................................................................ 22 Calibrate................................................................................................................................. 22 Check...................................................................................................................................... 22 Dive Log .................................................................................................................................. 22 Connect to PC ...................................................................................................................... 23 Locator PIN............................................................................................................................. 23 Sidemount PIN....................................................................................................................... 23 DIVE DISPLAYS ........................................................................................................................... 24 Basic Information ................................................................................................................. 24 Battery Indicators ................................................................................................................. 24 “Battery Savings” mode ..................................................................................................... 24 Ascent/Descent Indicators & Alarms ............................................................................. 25 Decompression Stop Information .................................................................................... 25 CNS Loading.......................................................................................................................... 26 N2 Loading............................................................................................................................. 26 Gas ........................................................................................................................................... 27 TTS (Total Time to Surface) and Max Depth Display ................................................... 28 Locator Feature .................................................................................................................... 28 Exiting the water ................................................................................................................... 29 Last dive information ........................................................................................................... 29 ALTITUDE COMPENSATION/SURFACE PRESSURE ADJUSTMENTS ................................... 29 COMPUTER POSITIONING....................................................................................................... 30 Other Computer Position: .............................................................................................. 30 Dry Suit Cuff: ...................................................................................................................... 30 LYNX Strap:......................................................................................................................... 30 LYNX PC INTERFACE................................................................................................................. 30 CONTACT INFORMATION ....................................................................................................... 31 Liquivision Products, Inc -3- LYNX Manual ™ Air Integrated Dive Computer User Manual IMPORTANT NOTICES Abbreviated Manual This manual is a shortened version of the manual for quick setup and reference. For the full detailed user’s manual, please visit: http://liquivision.com/docs/LYNX_User_Manual.pdf. WARNING – DANGERS OF DIVING Scuba diving is a dangerous sport, and can lead to injury, disability or death. Always dive within the limits of your training, skills and experience. Technical diving activities, including decompression diving, mixed gas diving, rebreather diving, wreck and cave diving, all substantially increase the risks of scuba diving. The LYNX dive computer is capable of calculating decompression requirements based on the Bühlmann ZH-L16C algorithm first published in 19901. Decompression is an inexact science. It is possible to follow a decompression plan exactly and still suffer decompression sickness. Following a decompression plan does not, in any way, guarantee the avoidance of decompression sickness. The same profile that gets you out of the water safely one day may cause decompression sickness another day, and lead to temporary or permanent injury or death. You can die while diving. WARNING – ELECTRONICS CAN FAIL – ALWAYS CARRY BACKUP The LYNX dive computer hardware, U-2 and L1 Transmitter hardware will eventually fail, like any electronic equipment whose components mature and age. If they fail during your dive, they can stop providing you with critical information. You must have a plan to handle the failure of the LYNX dive computer or the U-2 or L1 Transmitters during your dive. You should carry backup instruments, including a depth gauge, submersible pressure gauge, digital bottom timer or dive watch, a compass, and have access to decompression tables. Do not risk your life on only one source of information. WARNING – CONDUCT PRE-DIVE CHECKS It is your responsibility to perform all pre-dive checks recommended in this manual, including checking for software updates, running the Pre-Dive Check function to make sure your LYNX is receiving U-2 or L1 Transmitter signals, checking battery voltage to ensure the LYNX dive computer and the U-2 or L1 Transmitters have enough battery life to complete your planned dive and checking that each diver is wearing the U-2 Transmitter associated with his or her name. Liquivision Products, Inc -4- LYNX Manual ™ Air Integrated Dive Computer User Manual WARNING – ALWAYS CHECK FOR SOFTWARE UPDATES The LYNX dive computer software likely still has bugs. We have looked for them and tried to eliminate them, but they can still appear during use. Bugs can cause the units to provide inaccurate or incomplete information, or cause the unit to reset or turn off and stop providing any information at all. You should always check for software updates (http://liquivision.com/downloads/LYNXSoftwareHistory.php) and install all applicable updates, every time you prepare to use the LYNX dive computer. Liquivision Products, Inc -5- LYNX Manual ™ Air Integrated Dive Computer User Manual MENU TREE 1. Shut Off 2. Lock 3. Dive Planning 3.1. Rec 3.1.1.Gas 3.1.2.Compute NDL 3.1.3.Alarms 3.1.3.1. Alarms 3.1.3.2. Depth 3.1.3.3. Time 3.1.3.4. Ascent Rate 3.1.3.5. Descent Rate 3.1.4.Your Saturation 3.1.5.Simulate Dive 3.1.5.1. Depth 3.1.5.2. Time 3.1.5.3. Speed 3.1.5.4. Start 3.1.5.5. Cancel 3.2. Tec 3.2.1.Dive Setup 3.2.1.1. Conservatism 3.2.1.2. PO2 dive 3.2.1.3. PO2 deco 3.2.1.4. Last deco 3.2.1.5. Gases 3.2.1.5.1. Dive gas 3.2.1.5.2. Deco gas 1 3.2.1.5.3. Deco gas 2 3.2.2.Compute NDL 3.2.3.Runtime 3.2.3.1. Remain. SI 3.2.3.2. Add 3.2.3.3. Compute Deco 3.2.3.4. Delete All 3.2.4.Alarms 3.2.4.1. Alarms 3.2.4.2. Depth 3.2.4.3. Time 3.2.4.4. Ascent Rate 3.2.4.5. Descent Rate 3.2.5.Your Saturation 3.2.6.Simulate Dive 3.2.6.1. Depth 3.2.6.2. Time 3.2.6.3. Speed 3.2.6.4. Start Liquivision Products, Inc 4. 5. 6. 7. 8. 9. -6- 3.2.6.5. Cancel 3.3. Gauge 3.3.1.Alarms 3.3.1.1. Alarms 3.3.1.2. Depth 3.3.1.3. Time 3.3.1.4. Ascent Rate 3.3.1.5. Descent Rate 3.3.2.Simulate Dive 3.3.2.1. Depth 3.3.2.2. Time 3.3.2.3. Speed 3.3.2.4. Start 3.3.2.5. Cancel Pre-Dive Check Air Integration 5.1. Mode 5.2. Units 5.3. Transmitter 5.3.1.Set All Units 5.3.2.A0000 YOU 5.4. Advanced 5.4.1.Packet Test 5.4.2.Graphic Test 5.4.3.Phase Test 5.4.4.Locator Test 5.4.5.Message Test Compass 6.1. Check 6.2. Calibrate Dive Log Display Settings 8.1. Brightness 8.2. Auto Dim 8.3. Refresh 8.4. Layout 8.5. Velocity 8.6. Stopwatch DF 8.7. Dark Mode 8.8. Show Hours 8.9. Simulate Dive 8.9.1.Depth 8.9.2.Time 8.9.3.Speed 8.9.4.Start 8.9.5.Cancel Preferences LYNX Manual ™ Air Integrated Dive Computer 9.1. 9.2. 9.3. 9.4. 9.5. 9.6. 9.7. 9.8. Units Log Period Tap Sens. Tap Count Min. dive Min. SI Status Battery Type 9.8.1.White ER144335M 9.8.2.Blue ER17335M 9.8.3.Green ICR1340 9.9. Battery Meter 9.9.1.Symbol Liquivision Products, Inc 10. 11. 12. 13. -7- User Manual 9.9.2.Volts 9.10. Battery Test Salinity Time/Date 11.1. 12h/24h 11.2. Time 11.3. Date 11.4. Year 11.5. Calibrate Time 11.6. Exit Connect to PC Exit LYNX Manual ™ Air Integrated Dive Computer User Manual USER AGREEMENT AND WARRANTY Please go download our user agreement and warranty: http://liquivision.com/lynx_manuals.php. You must accept the User Agreement and Warranty in order to active the software and begin using your product. If you do not, you must return your unused product within 30 days. GETTING STARTED – BEFORE DIVING THE LYNX Turning the LYNX on/off To turn the unit on, simply install a new or charged battery and tap on the top three times. To turn the LYNX off, select “Shut Off” from the main menu. Register Your Unit/Activate Your Dive Software To register your unit, you must visit: http://www.liquivision.com/activate.php. Before registration, you can navigate through your unit’s menus, but it is not ready to dive. You will see the “Unit is locked” screen (below, left). Once you enter your information and agree to our User Agreement and Warranty, you will be given a PIN number. Once you select the “Enter PIN” option you will be able to type this PIN into your unit by tapping up and down on the LYNX. Setup Time/Date & Battery Type Once you have registered and unlocked your LYNX unit, the main screen will still say “NOT Ready to Dive: Edit Your Time/Date, Battery Type”. This information must be entered before the unit is dive ready. To do this, go to “date/time” on the main menu. You will also need to set the battery to the type you are using. Please go to “preferences” and select “battery type” to select the correct battery. Battery types and names are below: DISPOSABLE RECHARGEABLE ER 17335M LFP123A ICR16340 1700mAh 530mAh 650mAh Blue White Green Liquivision Products, Inc -8- LYNX Manual ™ Air Integrated Dive Computer User Manual Installation of IMR18350: Use the WHITE spacer provided with the batteries: Insert the battery into the spacer Insert the spacer with the battery into the battery compartment Installation of ER17335M/LFP123A batteries: Use the BLACK spacer provided with your U-2 Insert the battery into the spacer Insert the spacer with the battery into the battery compartment Unlock the Locator Feature of the LYNX The locator option for the U-2 and/or L1 transmitter can be unlocked at: http://www.liquivision.com/activate_lynx_locator.php. Once you have done so, you will receive a Locator PIN. This PIN can be entered into your LYNX at the “Locator PIN” option on the main menu. Liquivision Products, Inc -9- LYNX Manual ™ Air Integrated Dive Computer User Manual GETTING STARTED – FEATURES OF THE LYNX Ultrasonic Transducers. NOT A BUTTON! Do not push! Battery Compartment Color OLED Display Front Bungee Holes Front Strap Holes Infra Red Aperture (for connection to PC Interface) Serial Number & CE Mark GETTING STARTED – FEATURES OF YOUR U-2/L1 TRANSMITTER Cap Oring – replace if damaged Label L1 – attachment loop Liquivision Products, Inc -10- LYNX Manual ™ Air Integrated Dive Computer User Manual GETTING STARTED – SETTING UP A TRANSMITTER PRE-DIVE Setting up a U-2 or L1 Transmitter The U-2 and L1 Transmitter Serial Numbers are marked on the stickers near their base. To setup the transmitter, go to “air integration” in the LYNX menus. You must then select a transmitter and enter the serial number. Note that next to “type” you will have to select “tank” for a U-2, or “location” if it is an L1. Ultrasonic transmitters have a much greater range both underwater (up to 100m/330 ft) and on land (up to 1m/3.3ft) than existing radio-frequency transmitters. Under the specific transmitter page you will have to scroll down to “battery” and select the correct battery type. This is similar to setting up the battery for the LYNX wrist unit. Do not cover the existing label with tape or other material as this could interfere with the transmitter operation! Make sure to clear mark your transmitter and to always use an analog SPG as a backup. Transmitter Positioning The ultrasonic signal comes from the transducer displayed by the arrows in the above images of both the U-2 and L1 transmitter. It is important to keep this area clear to get a strong signal. Weak Signal Strong Signal Strong Signal Weak Signal The above displays the areas where the signal will be the strongest. Liquivision Products, Inc -11- LYNX Manual ™ Air Integrated Dive Computer Signal Signal Shadow Shadow User Manual When mounting the transmitter it is important to keep the unit vertical in order to minimize the shadow. It is also important to connect the unit directly to the first stage. Signal strength will also be weaker directly in front of the diver, while at a distance. Turning the U-2 Transmitter On/Off For U-2 transmitters with serial number A2800 or over, they can be turned on simply by installing a battery. For those with numbers under A2800 they must be pressurized on a first stage. Once you start hearing the audible “chirps” you know the transmitter is on. Your Tank Transmitter turns “On” within 30 seconds of sensing 200 PSI (14 BAR) of pressure. It keeps transmitting until the pressure drops to 100 PSI (7 BAR) or less. It then keeps transmitting for another 10 minutes. This is what we call “Lost Diver Mode”. If a diver is lost, the Locator feature of his Buddy’s LYNX can help the Buddy locate the diver underwater, as long as the diver’s Tank Transmitter keeps transmitting. Since your Tank Transmitter keeps transmitting when tank pressure is above 100 PSI (7 BAR), it will keep transmitting between dives until the battery dies! To stop your Tank Transmitter from transmitting between dives, you must shut your tank valve and depressurize your first stage after every dive! This is an important battery saving measure, and a good habit to get into. NOTE: this is different from the operation of competitive radio-frequency transmitters. Liquivision Products, Inc -12- LYNX Manual ™ Air Integrated Dive Computer User Manual Turning the L1 Transmitters On/Off The L1 turns on by securely screwing on the cap. The L1 is specially designed for this mode of activation. It has 2 O-Rings on its base. To turn it off simply loosen the cap so the second o-ring is visible. 1. L1 Transmitter Fully Open – 2. L1 Transmitter OFF – unscrewed 3. L1 Transmitter ON – showing 2 O-Rings so one O-Ring is sealed, the other screwed down all the way. Once you screw down your L1 Transmitter top, after about 30 seconds you should hear the first transmission – a quiet “chirp” coming from the transmitter. Checking Your Transmitter Pre-Dive . Do not start your dive without running the Pre-Dive Check! Optimizing Battery Life The battery life is significantly affected by the Air Integration mode you select and the brightness setting of your display. Liquivision Products, Inc -13- LYNX Manual ™ Air Integrated Dive Computer User Manual MENUS Tap 3 times on the top of your unit to enter the menus. 1 Shut Off Tap left on this option to turn your LYNX off. 2 LOCK/UNLOCK This menu item allows you to lock all your menu settings so they cannot change accidentally, though you will still be able to tap through the menus. To lock, just select the “LOCK” menu item and enter “123”. Your LYNX is now locked, and the menu item changes to “UNLOCK” To unlock, just select “UNLOCK” and enter “123” once again. When a unit is put in “LOCK” mode, the scrollbar will turn Red. Once you unlock, the scrollbar will turn back into green. 3 Dive Planning This menu is devoted to planning your dive in Rec, Tec or Gauge mode. You will also be able to enter your gases, set up alarms, compute your No Deco Limit (NDL) or your ascent schedule. All modes use the Buhlmann model with ZH-L16C M-values. 3.1 Mode 3.11 Rec Mode In Rec mode, the LYNX functions as a one gas computer. The default mix is air. You can set up any mix from 21%-40% oxygen. The PO2 can only be set in Tec mode (see below). The LYNX will provide you with a NDL; the amount of times you can spend diving without incurring any decompression. If you complete your dive within the NDL period, the LYNX will prompt you to perform a 3 minute safety stop at 5m/15ft. If at any time you drop out of this zone, the unit will reset the stop. If you have a U-2 Transmitter set up and are using the air integration feature, you will be able to track your tank pressure in PSI/BAR and obtain Air Time value. It will estimate the dive time remaining based on your breathing rate and current depth. WARNING In a No Decompression dive, your remaining Air Time takes precedence over remaining NDL time. If your Air Time is less than your No Decompression (NDL) time, always follow the Air Time value. Start your no decompression ascent before or immediately when Air Time reaches zero (700 PSI/48 BAR). WARNING The Air Time feature is NOT designed for use with decompression diving. 700 PSI/48 BAR will likely not be enough gas to complete your decompression schedule! You must make your own gas calculations if you are planning a decompression dive, and you must plan to have sufficient gas to complete your decompression safely. Liquivision Products, Inc -14- LYNX Manual ™ Air Integrated Dive Computer User Manual Finally, if you have more than one Tank Transmitter set up in Rec mode, on a Buddy’s tank, for example, you will be able to monitor your Buddy’s tank pressure. If you activate the Locate feature, then you will also be able to get a directional indication of your Buddy’s location. 3.12 Gauge Mode In Gauge mode, the LYNX acts as a bottom timer and provides information on dive depth and time. It does not keep track of your No Decompression Limit, decompression obligations or tissue saturation. IMPORTANT NOTE ON SWITCHING TO/FROM GAUGE MODE In Gauge Mode, surface off-gassing continues when the device is above water. Once the device is underwater, all deco calculations are suspended. When switching from Gauge Mode to Rec/Tec Mode, the deco information will no longer be accurate, since previous tissue values are used. When you switch out of Gauge Mode, you will see this warning: Tap Left to continue. 3.13 Tec Mode In Tec mode, the LYNX allows up to three nitrox gas mixes, each from 21%-100% oxygen. The first mix will be your Dive Gas, the second and third will be Deco Gas 1 and Deco Gas 2. In this mode the LYNX assumes that you are planning to incur some decompression and allows you to control a number of additional settings. You can edit your conservatism by going to “Dive Setup”, then “Conservatism”. During the dive the LYNX will display your NDL. If it is completed within the NDL you will be prompted for a 3 minute safety stop at 5m/15ft. If you dive beyond your NDL the LYNX will calculate your decompression obligation and indicate the depth and duration of any necessary stops. During your dive, the LYNX will begin by displaying your No Decompression Limit (NDL). If you complete your dive within the NDL time, the LYNX will tell you to complete a safety stop for 3 minutes at 5m/15ft. During these 3 minutes, if you drop below 6.5m/21ft, the safety stop counter will turn off and reset. It will begin again once you return to the safety stop depth of 5m/15ft. Conservatism Your LYNX calculates No Decompression Limits (NDLs) or your decompression times based on the proven Bühlmann ZH-L16C1 algorithm. This menu item allows you to add conservatism to the LYNX decompression calculations using three pre-set levels: Level “0” - standard Bühlmann ZH-L16C with no added conservatism (Gradient Factors 100/100) Level “1” - Bühlmann ZH-L16C with some added conservatism (Gradient Factors 30/85) Level “2” - Bühlmann ZH-L16C with more added conservatism (Gradient Factors 30/75) PO2 dive Here you can setup the maximum PO2 for your Dive Gas. This will define how deep your Dive Gas will still be considered breathable. The default (and maximum) value is 1.40. You can set it to any value between 1.0-1.40 bar, in 0.05 increments. Liquivision Products, Inc -15- LYNX Manual ™ Air Integrated Dive Computer User Manual PO2 deco Here you configure the maximum PO2 for your Deco Gas. This will define how deep your Deco Gas will still be considered breathable. The default (and maximum) value is 1.60. You can set it to any value between 1.0-1.6 bar, in 0.05 increments. Last deco stop Here you can set up the depth of your last decompression stop. The default value is 3m/10ft, but you can also set it to 6m/20ft, so you won’t be affected as much by wave action during your last stop. Please note this will only affect the depth of you last decompression stop if you incur decompression during your dive. This will NOT affect the depth of the safety stop in a No Decompression dive (3 minutes at 5m/15ft). 3.2 Gases (only in Rec & Tec Modes) Here you can configure your one gas in Rec Mode, and up to three gases in Tec Mode. 3.21 Rec Mode The default gas in Rec Mode is “Air”: To modify it, tap Left and the cursor will highlight the gas: Then tap Up to increase the oxygen % to your desired value. The gas will switch from “Air” to 22%, then 23% and so on with each upward tap. The maximum value is 40%. Once you have reached your desired value, say 32%, tap Left again and the value will be set. 3.22 Tec Mode The default Dive Gas in Tec mode is “Air”. The default setting for Deco Gas 1 & 2 is “Off” Liquivision Products, Inc -16- LYNX Manual ™ Air Integrated Dive Computer User Manual In Tec-Mode you can increase oxygen% up to 100%. You can also increase it in increments of 10. By tapping into the various menu items, you could set up this sample gas setup: Dive Gas: Air Deco Gas 1: Nx 50 Deco Gas 2: O2 3.3 Compute NDL (only in Rec & Tec modes) This computes the No Decompression Limit you can expect at a given depth. The depth values can be provided in feet or metres, depending on the units you select in the Preferences menu of the LYNX. In Rec Mode, these values will only be affected by the gas you select: In Tec mode, these values will be affected by the gases you select and the level of conservatism. NDL on Air NDL on 36% Nitrox 3.4 Runtime (only in Tec mode) In this section you can enter your dive plan and see what ascent schedule will LYNX compute underwater, assuming that you follow the dive plan precisely. You can configure two types of waypoints: - Normal: where you set a target Depth and a Time spent at that depth, and your LYNX uses this information to create a dive plan - Switch: where you set a target Depth and a Gas you want to switch to at that depth, and your LYNX uses this information to create a dive plan 3.5 Alarms Your LYNX can display visual alarms when you exceed any of the following parameters: Maximum depth Maximum dive time Maximum ascent rate Maximum descent rate When the alarm is activated for any parameter, that piece of information will start blinking on your screen for one minute. If you do not correct the situation within one minute, the parameter display will invert (i.e. it will appear as black letters on colored background) until you correct situation causing the alarm. Once you do that, the alarm will turn off. The only exception is a time alarm. It will blink for 1 minute, after which it will go back to normal. Liquivision Products, Inc -17- LYNX Manual ™ Air Integrated Dive Computer User Manual 3.6 Your Saturation (only in Rec & Tec modes) This menu item displays a screen with your current saturation calculated with the Bühlmann ZHL16C algorithm. The information presented here takes into account data from dives you have actually completed. Your Saturation screen after a period of no diving Your Saturation screen after a deep dive Your current CNS (Central Nervous System) oxygen saturation OTU (Oxygen Toxicity Units) left for today Time to full desaturation from inert gases Your Allowed Pressure is a theoretical value, calculated with the Bühlmann ZH-L16C algorithm, which describes the lowest ambient pressure your body could tolerate without experiencing decompression sickness (DCS). The Altitude value is a translation of the allowed pressure into a theoretical maximum allowed altitude, which is based on average pressures at altitudes. As a rule of thumb, if the allowed pressure is 2400m or 8000ft, you should be able to fly on a commercial airliner, as this is the target cabin pressure. However, it is important to remember that a plane cabin can lose pressure for a variety of reasons and this could be a risk factor. These numbers coincide with the Buhlmann algorithm. Following this information does not guarantee that you will avoid decompression sickness. 3.7 Simulate Dive This option is here so you can experiment with ascent schedule calculations, gas switches, emergency modes, etc., without getting yourself or your LYNX wet. When you enter “Simulation”, it will open sub-menu asking you for depth and time of the dive, its speed and then you can select “Start”. 4 Pre-Dive Check (only if you are using one or more transmitters) Once your gear is on (including any transmitters) select “Pre-Dive Check” from the main menu. This will show the transmitter signals from whichever transmitters are currently configured as “On”. Any Tank Transmitter will show up with its name, the PSI value, and the battery status. Any Location Transmitter will show up named “Boat”, “SigOK”, and the battery status. Ultrasound travels very far underwater, but on land, in air, it doesn’t travel far. When transmitting in air, the LYNX-AI has a range of around 1m/3.3ft with a good line of sight. Thus, if you want to check the status of any Tank or Location transmitter, make sure you move within range of its transmission and then wait around 10 seconds. If you do not see a pressure from a configured Tank Transmitter, the 1 st stage that Tank Transmitter is on may not be pressurized, or transmitter battery may be dead. If you do not see a signal from a configured Location Transmitter, it may not be fully screwed down and turned on, Liquivision Products, Inc -18- LYNX Manual ™ Air Integrated Dive Computer User Manual or the transmitter battery may be dead. If you do NOT see a signal on land, most likely you will not see it underwater either. Fix any issues BEFORE entering the water! WARNING Important! Check That Everyone Has The Correct Transmitter! When running pre-dive check, ask another diver to verify that the transmitter on YOUR tank has YOUR name on the label. It is possible for you to get a signal from your transmitter even if it gets mounted on your buddy’s tank and your buddy is standing next to you. Mixing up transmitters could be fatal! 5 Air Integration To setup the transmitter please see the “Getting Started – Setting up a Transmitter Predive” section. 5.1 Mode This is where you select the mode that you wish to display depending on the amount of transmitters you are using. The screen layouts are displayed below. Dive Mode Air Integration Mode REC TEC GGE Directional Location Function Off: Air Integration and Directional Location is off and your LYNX operates very similarly to the stand-alone KAON, providing dive time and decompression information only. NOTE: Setting Air Integration to “Off” turns off the entire AI feature set and you will not see any tank icon displayed on your dive screen. This is different to having AI “On” and your tank transmitter(s) “Off” then you will see blue inactive tank information on your screen with the word “Off”. Air Integration Solo (Rec): The LYNX monitors your own transmitter only. It shows a graphical tank icon which depletes as you use up your air. Below it there is your tank pressure value in PSI or BAR, and a battery indicator for your tank transmitter battery. The LYNX also shows your Air Time, which is an estimate of how much longer the air in your tank will last for. The one gas mix you have configured before your dive displayed to the lower-right of the tank icon. Solo (Tec): The LYNX Tec Dive Mode allows you to configure up to 3 gas mixes, so Tec-Solo Air Integration Mode allows you to configure up to 3 tanks. Your LYNX monitors the transmitter on the tank you are breathing from. When you switch other gases, it will monitor the tank you switch to, provided that tank has a transmitter. Liquivision Products, Inc -19- SCREEN LAYOUT NDL LYNX Manual ™ Air Integrated Dive Computer Directional Location: You can locate any other Tank or Location Transmitter you have configured, but you cannot view gas data from other divers’ tank transmitters in Solo Rec or Tec mode. Air Integration Buddy: The LYNX monitors your Tank Transmitter and one other Tank or Location Transmitter. The big tank icon gives you a visual status of your own tank, while your Buddy’s tank pressure is shown in PSI or BAR in the upper left corner, along with a battery indicator for your Buddy’s transmitter battery. If you using a Location transmitter, the corner label will be “Boat”, “SigOK” and the battery icon. Directional Location: Available to locate your Buddy or Boat. Air Integration Group 4: The LYNX monitors your Tank Transmitter and up to four other Tank or Location Transmitters. In this mode, the LYNX displays your dive information at the top of the screen (depth, time, NDL, and your tank pressure in PSI or BAR) and displays other tank names (“Stu1” is for “Student 1”) tank pressures in PSI or BAR and transmitter battery indicators below. If you are running a Location Transmitter, the label will be “Boat”, “SigOK” and the battery icon. Directional Location: Locate up to 4 Tank or Location transmitters. Air Integration Group 9: The LYNX monitors your Tank Transmitter and up to nine other Tank or Location Transmitters. In this mode, the LYNX displays your dive information at the top of the screen (depth, time, NDL, and your tank pressure in PSI or BAR) and displays other tank names (“Stu1” is for “Student 1”) tank pressures in PSI or BAR and transmitter battery indicators below. If you are running a Location Transmitter, the label will be “Boat”, “SigOK” and the battery icon. Directional Location: Locate up to 9 Tank or Location transmitters. User Manual - - - - 5.2 Transmitter In this menu you can setup your tank or location transmitter. You will see a list of ten spaces to enter a transmitter. To start the setup, select the first option by tapping on the left side of the LYNX. 5.21 Type This refers to the type of transmitter. Select either “tank” for a U-2 tank transmitter or “location” for an L1 location transmitter. Liquivision Products, Inc -20- LYNX Manual ™ Air Integrated Dive Computer User Manual 5.22 Serial # This is an important piece of information as it tells the LYNX which transmitter to communicate with. The serial number should be entered here that is found on the outside label of the U-2 or L1 transmitter. 5.23 Name Here you can set up the name you wish this transmitter to have. We recommend that you keep “You” as a default for your own transmitter, but you can set up your Buddy’s to be called “Buddy” or to use your Buddy’s actual name, say “Mark” for example. You can name up to 9 other transmitters for group 9 mode. 5.24 PSI Settings The following options appear only if you are configuring a Tank Transmitter. They will NOT appear if you are configuring a Location Transmitter. Max: Full pressure for this tank (default 3000 PSI/200 BAR) Mid: Pressure at which tank icon turns YELLOW in dive screen (default 1500 PSI/100 BAR) Low: Pressure at which tank icon turns ORANGE in dive screen (default is 1000 PSI/66 BAR) Reserve: Pressure at which tank icon turns RED in dive screen (default is 500 PSI/35 BAR) Max Pressure Liquivision Products, Inc Mid Pressure Reached -21- Low Pressure Reached RESERVE!!! LYNX Manual ™ Air Integrated Dive Computer User Manual 5.25 Battery It is very important that you set your transmitter to the correct battery type, so that your LYNX computer can accurately predict transmitter battery life. The following chart shows Transmitter batteries, and which ones are compatible with each device: DISPOSABLE ER 17335M 1700mAh Blue LYNX U-2 ER26300M 3200mAh Blue (FAT) U-2 RECHARGEABLE LFP123A 530mAh White LYNX U-2 ICR16340 650mAh Green LYNX U-2 IMR18350 800mAh Red U-2 IMR26500 3000mAh Red (FAT) U-2E, L1 6 Compass This is where you can setup and access your compass. It is necessary to do so in order to use the locator function. 6.1 Calibrate To Calibrate the compass in the LYNX, take the unit outdoors away from any metal objects, and run enter the Compass > Calibrate menu. You will be asked to wait a moment, then to rotate the LYNX unit slowly in every direction, twisting it, turning it, over and over until the calibration screen says “Done” and the unit returns to the Compass main menu. This can take about 1 minute. 6.2 Check Then enter the Compass > Check to verify the functioning of the compass. Twist the LYNX around, tilt it, and make sure that it is within 10° of your analog compass. If not, re-run the calibration process and re-check it. 7 Dive Log The Dive Log keeps track of dives you did with your LYNX, including their depth and temperature profiles. With use of a LYNX PC Interface and related software you can download this information to your desktop or laptop. When you review downloaded dives, you will also be able to see the pressure profile of any tanks that were being monitored during the dive. The number of dives recorded by the Dive Log depends on the Log Period you select. The default setting is 10 seconds and on this setting you will be able to record approximately 1500 Liquivision Products, Inc -22- LYNX Manual ™ Air Integrated Dive Computer hours of dive time with one tank. transmitters. User Manual The amount of dive time will diminish with additional 8 Connect to PC Tap into this menu item before starting the download of your dive logs in your PC application of choice. Refer to its manual for more information. If you tap into this item accidentally, don't worry – the wait for PC communication will time out after 30 seconds, and you will be back to main menu. Note that you don’t have to select this option to update your firmware. 9 Locator PIN In this menu, you can enter the Locator PIN number you have obtained from the Liquivision website. The Locator feature allows a diver using a LYNX to obtain directional location information (an approximate bearing) towards other divers who are using a Liquivision Tank Transmitter or towards a Location Transmitter. Once you have unlocked the Locator feature, it will appear in the LYNX underwater menus. You can learn more about how it works by reading the section that describes the Locate underwater menu item. 10 Sidemount PIN The LYNX has the ability to use the transmitters in a sidemount setup. To activate the sidemount mode, please visit http://www.liquivision.com/activate_lynx_sidemount.php and enter your email address and serial number of your LYNX. You will retrieve a PIN that will need to be entered into the LYNX under “Sidemount PIN”. To turn it on, go to “air integration” on the main menu of your LYNX menu and select either “SiMnt-Solo” or, “SiMnt-Buddy” if you are tracking a buddy’s transmitter as well. In REC mode Sidemount diver uses 2 tanks, left and right of identical size and gas mixture. In TEC mode Sidemount diver uses 2 tanks of dive-gas and 2 tanks of deco-gas. In deco there are no more tank pair, only individual tanks. In both TEC and REC mode transmitter names are not user changeable. They are as follows: o L-You, R-You – the diver dive-gas o L-Buddy, R-Buddy – the buddy dive-gas o Y-DG1, Y-DG2 – the diver deco-gas (TEC mode only) o B-DG1, B-DG2 – the buddy deco-gas (TEC mode only) Air time remaining is calculated using both left and right diver’s tanks. No air time remaining is calculated for TEC mode. There are two additional Sidemount tank pressure warnings: o Pressure differ warning: If the pressure in the Left and Right tanks differs by more than 500 PSI, then the tank and pressure with the HIGHER pressure FLASH with WHITE replacing the black background behind the pressure number and around the tank. The alarm clears when the tanks pressure is differ by less than 500 PSI. o Pressure no change warning: If the tank pressure has not changed for ONE minute or more, the thank PSI value background will turn WHITE until it changes. Liquivision Products, Inc -23- LYNX Manual ™ Air Integrated Dive Computer User Manual DIVE DISPLAYS 1 Basic Information Dive Time Visual Air Remaining Depth PSI 2 Battery Indicators Transmitter battery information will only appear when Air Integration is “On”. If the battery icon is yellow on the surface, you should change your battery before beginning your next dive. If the battery icon is yellow underwater, you have enough battery life to complete your dive. If the battery icon is red on the surface, you MUST change your battery immediately. If the battery icon turns red during your dive, you should stop your dive and begin your ascent immediately, while still following proper ascent protocols (proper ascent speed, respect the Safety Stop) - Solo/Buddy Mode Group 4/9 Mode Your transmitter battery icon Your Buddy’s transmitter battery icon Your Students’ transmitter battery icons Your transmitter battery icon 2.1 “Battery Savings” mode In the event that your battery is very low during the dive, your LYNX will go into “Battery Savings” mode. It is a mode that tries to preserve the battery as much as possible, so that the LYNX keeps functioning as long as possible. This mode changes the following things: all the information on the display will turn green (the color that is most powereconomical) the display brightness will be set to low Liquivision Products, Inc -24- LYNX Manual ™ Air Integrated Dive Computer User Manual 3 Ascent/Descent Indicators & Alarms The LYNX provides you with a number of graphical cues to help you manage your descent and ascent rates, based on the Alarms you have set up. 1. Descent Rate 2. Descent Rate Alarm 3. Ascent Rate 4. Ascent Rate Alarm 4 Decompression Stop Information In certain modes, the LYNX provides you with graphical cues to help you execute your decompression plan correctly. In REC Mode, they appear when Air Integration is “Off” or in Solo mode. They are not available in Buddy, Group 4 or Group 9 modes, as the space is taken up by Air Integration information. The following screenshots show the graphical decompression symbols in REC Mode with Air Integration “On”. The large “Up” arrow appears when you need to ascend to your next stop. The small “Up” arrows and starfish show that you are arriving close to your next stop. Once the starfish shows fully in the box on your screen, it means you have reached your decompression stop depth. If you overshoot your decompression stop, i.e. ascend farther than you should, you will see small down arrows telling you to descend, and the decompression stop alarm will be activated (flashing depth). 1. Large Up Arrow 2. Small Up Arrows & start of Starfish 3. Hold Starfish in box! 4. Small Down Arrows & Stop Alarm The horizontal section in the middle of the screen is reserved for your No Decompression Limit or decompression information. No Deco: Early in the dive, the NDL value is very large and shown as “---“. Once it is less than one hour, the NDL value is shown in minutes. Liquivision Products, Inc -25- LYNX Manual ™ Air Integrated Dive Computer User Manual Planned Deco: Once you run out of NDL time, your LYNX will show the deepest planned deco stop depth and its duration in minutes:seconds. The “Hand” symbol means “Stop” and the “Clock” symbol means “Time”. In this case, you have a planned stop at 3m for 10 seconds. During Deco: When you reach your deco stop, your LYNX will show your Stop Depth (here: 6m) and your Stop Time (here: 1 mins 10 sec) NDL – No Decompression Limit is the maximum time you can stay at your current depth before you will incur a decompression obligation. You should NEVER exceed this time, unless you have specific training in decompression diving. Stop Depth/Time – These values will appear together once you reach your first/deepest decompression stop. The stop time is in minutes:seconds. If you are shallower than this stop, the depth value will blink to remind you to go deeper. 5 CNS Loading Your LYNX offers a visual indicator of Central Nervous System (CNS) oxygen loading when Air Integration is “Off” only. When Air Integration in “On”, the CNS tracker is not visible. However, the CNS information is being recorded and can be reviewed after your dive in the Dive Log. 6 N2 Loading Your LYNX offers a visual indicator of Nitrogen (N2) loading. During the NDL (No Deco Limit) period, the N2 indicator will be green. As you exceed your NDL, the N2 indicator will add yellow and red bars. This means you have excess nitrogen that you must release through decompression. You should not enter decompression unless you have adequate training and sufficient gas reserves to execute a decompression plan! Liquivision Products, Inc -26- LYNX Manual ™ Air Integrated Dive Computer User Manual 7 Gas When AI is “Off” or in “Solo” or “Buddy” mode, your current gas is shown on the bottom left of the screen. Your current gas is NOT shown in Group 4 or Group 9 modes. To check your gas when diving in Group modes, briefly switch to Solo mode. AI Off Solo/Buddy Mode Group 4/9 Mode NOTE: None of these alarms are available in Group 4 or Group 9 Air Integration modes. To view gas and gas alarm information while diving in a Group mode, please momentarily switch to Solo mode, and then switch back to Group mode. AI Off Solo/Buddy The gas alarm will be displayed in the lower left corner of the screen, and it will blink when the gas you are breathing is not appropriate for some reason. The most common reason will be that you have exceeded the maximum allowable PO2 for your gas (PO2 is 1.4 in one-gas Rec mode) The PO2 alarm will be displayed in the lower left corner of the screen, and it will flash when you exceed the maximum allowable PO2 given the gas you are breathing. The PO2 setting is 1.4 in Rec Mode. The CNS alarm will be displayed if you have exceeded your CNS limit. For more information on this alarm, please refer to the Oxygen loading section of the manual. WARNING You must change your battery immediately when the indicator turns red Lithium batteries sustain high power for a long time, but once the power starts to drop, it does so very fast. A red battery indicator means that the battery power will drop to insufficient power within a few minutes. Liquivision Products, Inc -27- LYNX Manual ™ Air Integrated Dive Computer User Manual 8 TTS (Total Time to Surface) and Max Depth Display If you turned the “Show TTS” or “Show MAX” features on in the surface Display Settings menu, you will see these values displayed on your screen. If you only selected one of them, it will appear continuously. If you selected both, they will alternate. TTS Max Depth TTS: Your Total Time To Surface including decompression stops and assuming safe ascent rates Max Depth: This is the maximum depth you have reached on this dive 9 Locator Feature Once you have begun your dive, tap into the underwater menus and select Locate. You will be prompted to select the person you want to locate. For The Locator to work, the LYNX must be kept horizontal. Since it is sometimes hard to tell what is horizontal or level underwater, the Locator feature has a tool to help you do that. The blue dot that moves around the screen tracks your tilt: • If the dot is in the middle circle, near the intersection of the two lines, it will appear as light blue. This means your LYNX is level and will receive packets. If the dot is in the outside circle, and dark blue, this means your LYNX is NOT level and will NOT receive packets. Once you select whom or what you want to locate, you will see this type of locator screen: Your dive information is in the top of the screen. The locator information is the bottom of the screen. The white cone gives you the approximate direction to swim in to locate your Buddy. On the right hand side, the LYNX tells you the bearing – about 330° NW. It also gives you a distance estimate to your Buddy – between 0-250m - and your Buddy’s tank pressure – 700 PSI. To get useful data from the locator screen, you must turn your arm so the LYNX is held level. If you tap your LYNX three times while in the locator screen, this will pull up the following options: Liquivision Products, Inc -28- LYNX Manual ™ Air Integrated Dive Computer User Manual STOP LOCATOR: turns the locator off and returns you to your dive screen. FREEZE LOCATOR: prevents the locator from getting any more data packets from the transmitter, and keeps the direction cone oriented towards the source of the last received packet. CLEAR LOCATOR: clears any data received by the locator so far, allowing you to start the location process anew. LOCATE OTHER: allows you to locate a different diver COMPASS: switches to the compass 10 Exiting the water Once you are shallower than 0.6 meters/2 feet, your LYNX will go back into surface mode and offer you access to surface menus. However, for next few minutes, it will remain in post-dive mode. You can control length of this period, in menu setting Minimum Surface Interval. This means that if you resume your dive within that period, it will be counted as continuation of previous dive, instead of a new one. This also means, that all the numbers, such as maximum depth, average depth, dive time, etc. will not be reset. 11 Last dive information When on the surface, and not in Sleep Mode, your LYNX will display information about the last dive that you have done. Max: max depth of your last dive Tank Pressure Icon: visual depiction of the last tank pressure received PSI/BAR Value: numerical depiction of the last tank pressure received Tank Battery Icon LYNX Battery Icon Dive Time: duration of your last dive Surface: time in hours and minutes since you last surfaced No Fly: counts down no-fly-time Gas: Gas you currently have set up Clock: current time of day Temperature: ambient temperature ALTITUDE COMPENSATION/SURFACE PRESSURE ADJUSTMENTS Your LYNX continuously tracks atmospheric pressure to determine the surface pressure at the start of your dive. When it senses a sudden change in ambient pressure, it understands that you have entered the water and that a dive is beginning. Your LYNX can generally distinguish between a sudden change in pressure caused by water entry, vs. other types of sudden changes in pressure, such as a plane taking off, or driving up a mountain. You can always check what LYNX assumes as the current surface pressure by going to the “Status” screen. Liquivision Products, Inc -29- LYNX Manual ™ Air Integrated Dive Computer User Manual COMPUTER POSITIONING Other Computer Position: Ideally, your LYNX should be worn with no devices on that arm. Wearing another device next to the LYNX will obstruct one of the three sensors. If you must wear another device next to your LYNX, make sure it is at least 15cm/6” away on your arm, secured tightly so that it doesn’t drift around during the dive. Dry Suit Cuff: Your dry suit cuff could partly obstruct one of the sensors. Keep your LYNX far away from the cuff for best reception. LYNX Strap: The LYNX can be attached to your arm with a strap or bungee cord. In some cases, when using a thin wetsuit, the strap may be so long that it curls around the back of the LYNX and obstructs the topmost sensor. This is not ideal. If you routinely use this setup, bungee may be a better option, or you may trim the strap. LYNX PC INTERFACE The LYNX PC Interface can be used to download your dives and to update your LYNX software. Connect the USB cable provided to your PC and to the PC Interface At this point, you should get a message “New Hardware Detected” Place the LYNX unit on its side, with the PC interface aiming for the eight holes on the backplate The distance from the PC interface to the LYNX should be 2-4 cm or 1-2 inches You need to install the drivers onto your PC in order to perform the update. Please see www.liquivision.com for more details. Liquivision Products, Inc -30- LYNX Manual ™ Air Integrated Dive Computer User Manual CONTACT INFORMATION 200-3731 North Fraser Way Burnaby, BC, Canada V5J 5J2 (604) 299 0167 [email protected] www.liquivision.com Liquivision Products, Inc -31- LYNX Manual