1
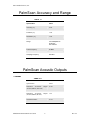
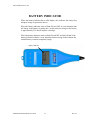
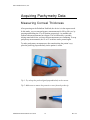
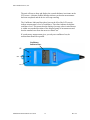
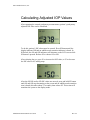
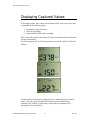
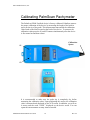
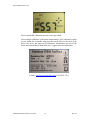
Micro Medical Device, Inc.
PalmScan P2000 FastPach
User Guide
010-0079-01 A2
PalmScan P2000 FastPach User Guide
1
Rev A2
Micro Medical Device, Inc.
Copyright 2010 Micro Medical Devices, Inc. All Rights Reserved. No part of this publication may be reproduced,
transmitted, transcribed, stored in a retrieval system, or translated into any language or computer language in any format
or by any means, electronic, mechanical, magnetic, optical, chemical, manual, or otherwise, without prior written
permission of Micro Medical Devices, Inc. Copyright violators may also be subject to civil penalties.
North America
Micro Medical Devices, Inc.
23945 Calabasas Road, Suite 110
Calabasas, CA. 91302
Toll-Free Phone: 866.730.0663 Local: 818.874.0000 Fax: 818.337.1952
Micro Medical Devices, Inc. makes no warranties, either express or implied, regarding the contents of this document, its
merchantability or fitness for any particular purpose. Micro Medical Devices, Inc. reserves the right to revise the
information in this document at any time without notice.
PalmScan P2000 FastPach User Guide
2
Rev A2
Micro Medical Device, Inc.
About PalmScan
P2000 FastPach
•
Indication for Use
•
PalmScan Accuracy and Range
•
PalmScan Acoustic Outputs
•
Caring For Your PalmScan
•
Warranty
•
Service
Indication for Use
PalmScan P2000 FastPach may be used to accurately measure the central corneal
thickness (CCT) of the human eyes. PalmScan P2000 Pachymeter shall be used solely by
qualified medical professionals. Clinical considerations and professional judgment should
be applied when using this or any other testing device used for patient diagnosis or
treatment.
The PalmScan device is for prescription use only (Part 21 CFR 801 Subpart D),
and not for over-the-counter use (21 CFR 801 Subpart C).
PalmScan P2000 FastPach User Guide
3
Rev A2
Micro Medical Device, Inc.
PalmScan Accuracy and Range
TABLE 1-1
Specification
Value
Accuracy (+/-)
4 um
Precision (+/-)
1 um
Resolution (+/-)
1 um
Range
Corneal/Epithelium
Thickness
250-1000 um
Probe Frequency
50 MHz
Sampling Frequency
200 MHz
PalmScan Acoustic Outputs
1-2P2000
TABLE 1-2
Specification
Value
Maximum Acoustical Output
(In-Situ) ISPTA (mw/cm2)
0.189
Maximum Acoustical
(In-Situ) ISPPA (W/cm2)
1.99
Output
Mechanical Index
PalmScan P2000 FastPach User Guide
0.155
4
Rev A2
Micro Medical Device, Inc.
PalmScan P2000 FastPach User Guide
5
Rev A2
Micro Medical Device, Inc.
Caring For Your PalmScan
Read and understand the following topics that describe how to care for your PalmScan
before using the device:
•
Cl ea n i n g I n str uc tio n s
•
Op er a ti n g Co nd it io n s
•
Sto r a ge Co nd itio n s
Cleaning Instructions
Keep the probe tips clean using sterile distilled water and gauze. To prevent
patient-to-patient infection, after each patient wipe the probe with a cotton swab soaked
in 70% isopropyl alcohol, and then immerse the probe tip for 10 minutes in 70%
isopropyl alcohol. Rinse the tip in sterile distilled water before using to rinse the alcohol.
The PalmScan can be cleaned by wiping with a damp cloth with mild soap. Do not
immerse in water.
Operating Conditions
The PalmScan should be operated between the temperatures of 0 degrees C to +40
degrees C.
CAUTION:
The probe should NEVER be autoclaved or subjected to intense
heat. As a general rule, the cleaning instructions described
above are sufficient to disinfect the probe during ordinary use.
Storage Conditions
The PalmScan and probe may be stored in temperatures between -20 degrees C
to +50 degrees C.
PalmScan P2000 FastPach User Guide
6
Rev A2
Micro Medical Device, Inc.
PalmScan P2000 FastPach User Guide
7
Rev A2
Micro Medical Device, Inc.
Warranty
Micro Medical Devices, Inc. warrants each new PalmScan and its accompanying
accessories (hereinafter called “Equipment”) to be free from defects in material and
workmanship for twelve (12) months from the date of delivery to the original purchaser.
This warranty is not applicable to any defect which is the result of an accident, misuse,
mishandling, neglect, improper installation, improper repair or improper modification by
persons other than Micro Medical Devices.
This warranty does not apply if the Equipment has not been operated and maintained in
accordance with the operating and maintenance manuals and instructions or bulletins
issued in respect thereof by Micro Medical Devices, Inc.
It is further understood that the cost of servicing replaceable and expandable items
including parts and labor made in connection with the routine maintenance services as
described in such Operator’s Manual is not covered under this warranty and is the
responsibility of the purchaser.
This warranty is strictly limited to replacement or repair of the part which is found to be
defective in material and workmanship. At the option of Micro Medical Devices, said
part shall be replaced or repaired free of charge, F.O.B. from our factory. Micro Medical
Devices reserves the right to make changes in the design and material of Equipment
without incurring any obligations to incorporate such changes in Equipment already
completed on the effective date of any such change or changes.
This is the only warranty of this product and is expressly in lieu of all other warranties,
expressed or implied by law or otherwise, including any implied warranties of
merchantability and of fitness for a particular purpose. Without regard to the alleged
defect, Micro Medical Devices does not, under any circumstances, assume any
responsibility for the loss of time, inconvenience or other consequential damages,
including but not limited to, loss of damage of personal property, or loss of revenue.
Micro Medical Devices has neither assumed nor authorized any other person (including
any distributor authorized to sell its Equipment) to assume for it any other liability in the
connection with the sale of Equipment.
An extended warranty is available.
PalmScan P2000 FastPach User Guide
8
Rev A2
Micro Medical Device, Inc.
Service
Should service be necessary, contact the customer service department at:
Micro Medical Devices, Inc.
23945 Calabasas road, Suite 110
Calabasas, CA. 91302
[email protected]
Phone: (818) 222-3310
Fax: (818) 337-1952
EU Authorized Representative:
LUNEAU SAS
Jean-Noel Young
BP 60252
28005 Chartres Cedex
France
phone: +33 2 37 25 25 22
fax: +33 2 37 25 75 99
PalmScan P2000 FastPach User Guide
9
Rev A2
Micro Medical Device, Inc.
PalmScan P2000 FastPach User Guide
10
Rev A2
Micro Medical Device, Inc.
2
Charging PalmScan
PalmScan P2000 FastPach utilizes a built-in rechargeable Lithium-Ion battery
to power the system. Use the provided external 5V DC wall mount charger to
recharge the battery when needed. When the charger is plugged in, the battery
outline Indicator will remain solid and the left half of the battery indicator will
flash on and off. The battery indicator will stop flashing when charging is
completed.
Charger Plug
PalmScan P2000 FastPach User Guide
11
Rev A2
Micro Medical Device, Inc.
BATTERY INDICATOR
When the battery-indicator has a solid display, this indicates the battery has
adequate charge to operate the device.
When the battery-indicator starts to flash ON and OFF, it is an indication that
the charge in the battery is getting low. At this point, the charge in the battery
is approximately 25% and it requires a recharge.
When the battery-indicator starts to flash ON and OFF and the left half of the
battery indicator is blank, it is an indication that the charge in the Lithium-Ion
internal battery is almost completely empty.
Battery Indicator
PalmScan P2000 FastPach User Guide
12
Rev A2
Micro Medical Device, Inc.
3
Using the Pachymeter
Switching Power ON and OFF
To turn on the device, toggle the red ON/OFF switch, located on the right
bottom side of the unit, to ON position. The ON position is when the switch is
moved towards the bottom of the device.
ON
OFF
ON/OFF Switch
PalmScan P2000 FastPach User Guide
13
Rev A2
Micro Medical Device, Inc.
Acquiring Pachymetry Data
Measuring Corneal Thickness
After powering on the PalmScan FastPach, the device is in the capture mode.
In this mode, you can start pachymetry measurements for OD or OS eyes, by
pressing and holding the S1 or S3 buttons respectively. An audible tone
indicates that measurements have begun. This is followed by a periodic
ticking sound which lets you know that measurements are continuing. To stop
pachymetry measurements, the S1 or S3 switches can be pressed again.
To make pachymetry measurements, after anesthetizing the patient’s eye,
place the probe tip perpendicularly on the patient’s cornea.
Tip 1: Try to keep the probe aligned perpendicularly to the cornea.
Tip 2: Make sure to remove the protective cover form the probe tip.
PalmScan P2000 FastPach User Guide
14
Rev A2
Micro Medical Device, Inc.
The unit will start to beep and display the corneal thickness in microns on the
LCD screen. A distinct audible indicator informs you that the measurement
has been completed and the device will stop scanning.
The Confidence Indicator Bars (three bars on the left of the LCD screen)
indicate measurement’s level of confidence. Three bars indicate the highest
confidence level. This means that the displayed average value in micrometers
is within one standard-deviation of the sampled group of measurements and
that the standard error from the mean is within 4 um.
If a pachymetry measurement gives you only one confidence bar, the
measurement should be repeated.
Confidence
Indicator Bars
S1
S2
S3
PalmScan P2000 FastPach User Guide
15
Rev A2
Micro Medical Device, Inc.
Calculating Adjusted IOP Values
After capturing the corneal pachymetry measurements, patient’s pachymetry
adjusted IOP value can be calculated.
To do this, patient’s IOP values must be entered. Press S2 button until the
display indicates IOP and an audible mode transition indicator is heard. In
IOP mode, the OS and OD indicators will alternate on the LCD screen while
S2 button is pressed. Release S2 to choose OS or OD.
After selecting the eye, press S1 to increase the IOP value, or S3 to decrease
the IOP value in 0.5 mmHg steps.
After the OS IOP and/or OD IOP values are entered, press and hold S2 button
until OS and OD stop alternating on the screen and an audible mode transition
tone is heard (this takes about 2.5 seconds), then release S2. This action will
transition the system to the display mode.
PalmScan P2000 FastPach User Guide
16
Rev A2
Micro Medical Device, Inc.
Displaying Captured Values
In the display mode, three values will be displayed for each eye on the screen
sequentially in the following order:
1. Pachymetry value in microns
2. IOP value in mmHg
3. Adjusted IOP (AIOP) value in mmHg
Each value will remain on the display for about 2 seconds and then will scroll
through continuously.
To see the alternate OS or OD measurements, press S1 for OD and S3 for OS
buttons.
To take another measurement, change the device mode back to the Capture
mode. To do this, press and hold the S2 button until an audible mode
transition tone is heard. A pachymetry measurement is commenced by
pressing the S1 or S3 buttons.
PalmScan P2000 FastPach User Guide
17
Rev A2
Micro Medical Device, Inc.
Calibrating PalmScan Pachymeter
The PalmScan P2000 FastPach device is factory calibrated. PalmScan ensures
the proper calibration of the device, by measuring the length of the built-in
spacer on the tip of the probe. This measurement must match the calibration
value listed on the label located on the back of the device. To measure the
calibration value press the S1 and S3 buttons simultaneously after the device
is first turned on and then release.
Calibration
Spacer
S1
S3
It is recommended to make sure the probe tip is completely dry before
measuring the calibration value. Upon performing this action, the calibration
value is measured and displayed on the LCD screen. In addition, you will see
4 arrows and the word “CONF.” displayed on the device screen. You can
repeat this measurement as many times as needed.
PalmScan P2000 FastPach User Guide
18
Rev A2
Micro Medical Device, Inc.
The recommended calibration interval is once per month.
After multiple calibration verification measurements, if the calibration values
are not within the acceptable range provided on the label on the back of the
device, the device has gone out of calibration. Immediately stop use of the
device and contact Micro Medical Devices’ support team for instructions.
Contact: [email protected] or (818)222-3310
PalmScan P2000 FastPach User Guide
19
Rev A2