1
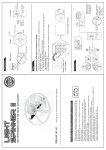
Smokenator™ 1000
Efficient means of converting your Kettle to a
full featured
Smoker
~Patent No.: US 7,832,330 B1~
www.smokenator.com
Congratulations on your purchase of the Smokenator™
1000. It is the first product of its kind to efficiently convert a kettle barbecue into a smoker, giving you a smoker that exceeds the
traditional vertical water smoker in both performance and cost.
Features
* Efficient design
* Shields food from direct heat radiation
* Ability to add moisture to cooking environment
* When properly used can cook food up to 30% faster
with same results as traditional vertical smoker
* Avoids messy clean up associated with vertical
smokers
With the Smokenator’s™ thoughtful design, even a 25
pound turkey can be smoked. Using the Smokenator™ you will
be able to control temperature and moisture to achieve a final
product that is very well smoked, yet moist. The Smokenator™
is well suited for smoking fish (especially salmon), ribs, roasts,
tri-tips, chicken, and turkey. The following instructions describe
how to set up the Weber and Smokenator™ to achieve low and
slow temperature consistently.
Warning
When in use, all of the Smokenator’s™ surfaces are extremely hot! Always wear protective gloves or mitts when handling the Smokenator™ when it is in use. Be especially careful if
you are removing the steam pan if it contains water or if you have
been partying or drinking. Burns are very painful.
Baffle
Steam
Pan
1
Skewer
Items included:
* Smokenator™ 1000 Baffle
* Stainless Steel Pan
* 12” Skewer for Pushing Coals
Installing the Smokenator™
Starting with a clean kettle lid, make sure the interior of the
kettle top is brushed clean of accumulated smoke flakes. Keep the
lower kettle free of accumulated smoke residue, ash, and soot.
This keeps each smoking session free of harshness.
Arrange the coal support grill (1 the lower grill + support
rods) so that the base of the baffle fits in between the main rods (1)
of the coal support grill. The top outer edge of the Smokenator™
(2) is supported by two of the upper cooking grill’s support tabs
(3). Arrange the baffle so that the bent tabs of the baffle (4) are
positioned directly over the kettle tabs (3) that are used to support
the cooking grill. This allows the baffle to be lightly secured to the
kettle.
Key:
1-Lower Grill
2-Outer Edge
3-Support Tabs
4-Kettle Tab
5-Water Pan
2
Setting Up the Weber Vents to Cook
Low and Slow
The approach to smoking “low and slow” requires setting
up the draft restriction on the Weber kettle. As you know the Weber has two controllable vents – a lower and an upper vent.
Shown below is a photograph of the lower vent system. Take a
common pencil, place it in the slot where the arrows are in the
photograph, and slide the vane or spoke against the pencil, the result is about a 3/8” gap in each lower vent, which is the minimum setting! We currently use the lower vent fully open and
have no problem regulating temperature. The lower vent gap can
be varied to compensate for a leaky kettle. You can calibrate the
vanes on the Weber Gold’s ash catcher and can regulate temperature via the lower vent. On the less expensive Weber Silver
model it’s difficult to set the vents with any precision. Regardless
of model, we use the upper vent to control temperature in the kettle. It is the most reliable when running dry the lower is set very
narrow.
3
This photo shows the setting of the upper vent system.
Charcoal is very sensitive to fluctuations in oxygen. A gap of
5/16” in the upper vent as shown will maintain a temperature of
about 230 °F dome temperature (210 °F food support grill temperature), depending on ambient temperature (70-90 °F), humidity, and smaller cooking loads. You will vary temperature by
opening and closing this vent. To double the air intake from the
5/16” setting, open the vent to 8/16”. To increase the air intake
50% more, open the vent from 8/16” to 11/16”. The outer boundary for our management of low and slow is 11/16”. Temperature
control can be maintained by using these three settings and the
3/16” setting.
You will need a thermometer set in the dome vent (see picture on page 13 for thermometer set up).
If during a cook, temperature drops by 10 °F, open up the
upper vent about 1/16” to 1/8”. If there is no response in 10 minutes, stir the coals and check the condition of the unburned charcoal. If cavity is low on coals (about 5 hours) replenish, figuring
8-10 briquettes are burned in an hour.
When adding unlit coals, you can see a drop in dome temperature as the water evaporates and the more volatile components
of charcoal ignite. This effect lasts for about 15 minutes; you can
compensate a bit if you want, but we usually don’t worry about it.
4
The following table shows the relationship between the
maximum width of the ellipse (seen between the two arrows in
the picture on page 4 and is the actual opening) and its relationship to the total venting area of the 4 holes. You see that the relationship is not a one to one basis. One open hole on the Weber is
about 0.60 square inches, and 0.58 is very near one open hole or a
setting of 5/16”. We have found that choking the upper vent to
3/16” will allow a burn to proceed. A common pencil has a diameter of .30”; 5/16” is 0.31 square inch. Once you discover
how damping works in your kettle you can whittle a stick or find
various pencils of varying widths to set your vents. 5/16” is your
initial starting point.
5
Charcoal Briquettes or Lump Charcoal?
All of the original testing was done with Kingsford Charcoal. Kingsford is a very consistent product from bag to bag and is
available in most places. It’s a decent product that is formulated to
start fast and provide enough heat for one decent grilling session.
It works well for low and slow cooking. The biggest complaint
about it is the issue of purity. Kingsford is an admixture of carbon
made from wood and processed mineral char to form nearly pure
charcoal, sawdust, sodium nitrate (for easy ignition) and some
starch to hold it all together.
Lump charcoal is used by many experienced BBQ Chefs
for the simple reason that it is pure wood charcoal derived from
hardwood. We have found the best way to burn lump in a controlled manner is to break it up. The goal is to make as many
pieces close to the size of a briquette, or 2” x 2” x 1.5”. These
pieces are laid down on the coal support grill, with smaller chips
and wood chunks layered on top of this first layer. In our personal
experiments, breaking up the lump in this manner makes for plenty
of surface area to ignite, creating the environment for an even and
consistent burn rate. When using lump charcoal with the Minion
method, expect burns to last 5 to 6 hours.
6
Long Cook Times - Set Up and Temperature Management
A loaded Smokenator™ box will fuel a cook of about 6
hours, if the dome temperature is kept near 230 °F. This six-hour
time is valid for briquettes and varies for lump charcoal. The idea
was introduced by Ray Minion on The BBQ Forum.
The concept is simple:
* Pack the Smokenator™ to the maximum with up to 60
charcoal briquettes (50 work just fine) or your processed
lump charcoal and about 5-7 oz of wood.
* Remove about 16 briquettes (20 if ambient is under 50
degrees) and light them in a chimney starter (never use petroleum
based charcoal starter fluid). When they are about three quarters
lit (after 15-20 min using Kingsford, a bit longer for Royal Oak),
set them back into Smokenator™.
* Use skewer provide to arrange coals.
* Set the water pan in place and fill with water.
* Set food support grill in place (if not doing a turkey).
* Put kettle lid in place and set the upper vents to 5/16”.
·
* Let the kettle come up to temperature.
* Place the food on the grill once dome temperature is up
to 220-230 °F. Food support temperature is about 210 °F.
* Place lid on the kettle with the upper vent opposite the
Smokenator™.
* Make sure your upper vent is set to 5/16”! This is a
critical setting and the start point.
When you put cold food (having a temperature of 50 °F) on
the Hovergrill in the kettle, fully expect the temperature not to stay
at 230 °F dome at the beginning of the cook.
Dome temperature will probably drop to 180 or 190 °F
when food is added to the grill. In this situation you can take no
action and let the meat absorb the heat, which will take about 60 to
90 minutes. Or you can open the vent to ½” opening (a doubling
of vent surface area) which will raise temperature some. Do remember to watch the temperature after each adjustment until you
know your kettle and how it responds. All temperature management is done using the dome temperature! Food support grill
temperature is 10 to 20 °F less than dome temperature, relatively speaking.
7
Critical Point: When the upper vents are set at 5/16”
and dome temperature is 230-240 °F, the water will be simmering (not a vigorous boil). Until you understand and are familiar
with your tools and how fast water evaporates, quickly check the
water level every 30 minutes. This is entirely precautionary; at the
5/16”–3/8” setting, water will last about 70 to 90 minutes. Opening up the upper vents increases heat production and also evaporates the water faster!
It is our observation that after about 1.5 to 2 hours, smoke
production will decrease with the Minion Method. We find that
stirring the coals will usually help smoke production. When this
doesn’t work, we add more wood to keep a light blue smoke venting from the dome.
We strongly advise that every hour you tend to the coals:
open the kettle lid and use the skewer to shift the coals. This ultimately means a more even and controllable temperature. The first
hour the Smokenator™ cavity is still very full, but you knock the
ash off the charcoal and keep its surface area exposed to air. If you
have a one touch system, at about 4 hours, sweep the ash out of the
kettle. This can be done with the lid closed.
Many people worry about lifting the kettle lid and losing
temperature. We don’t worry about it too much. At the most, the
lid is off for only about 2 minutes. The food doesn’t lose temperature since it is mostly water. (Put a thermometer into a quart of
your hottest tap water and watch how fast the temperature drops in
2 minutes; it’s not very much). Kettle dome temperature recovers
in 5 to 10 minutes.
Shorter Cook Times and More Observations in Temperature
Management
We would recommend using the Minion method, exclusively. If you cook only for a couple hours, closing off the upper
and lower vents will save your unburned charcoal and wood
chunks for the next time.
You can place fewer briquettes in the cavity for shorter
cooks at the start-up; just make sure there are unlit coals on the
floor of the charcoal support grill and proceed as the section on the
Minion Method outlines. Figure 10 briquettes at start-up plus 10
per hour, as a rule of thumb.
8
The Smokenator™ set up consumes about 8 to 10 briquettes every hour to keep temperature at 230-240 °F. We would
recommend that if you have a very long cook, such as a turkey or
pork butt, that at 5 hours you refill the cavity with briquettes and
add wood chunks according to what you are cooking. Beef
doesn’t need heavy smoke. If you use lump, you might have to
replenish sooner. If there are less than 8 briquettes by weight in
the cavity, the temperature will not be sustained and will drop.
Vent setting management
If you load the kettle with cold meat on the food support
grill and the Hovergrill, the dome temperature as mentioned will
drop to 180-190 °F. If, for time reasons, you decide to compensate for this drop in temperature and open the vents to full open,
several things will happen. First, it increases the amount of steam
produced in the kettle, and this steam condenses on the colder
food, warming it. Secondly, this causes more coals to ignite as
temperature moves near 210-220 °F. We advise closing the upper
vents to 5/16” to choke the fire. If you don’t, you risk creating a
mass of charcoal generating too much heat, causing the internal
temperature to over shoot. This leaves you with a hot kettle that is
slow to cool and the water pan furiously boiling. As long as water
is in the pan, humidity is maintained; water will eventually evaporate and the temperature will spike to over 330-340 °F.
On occasion, we have set the upper lid askew. This floods
the kettle with air, and the rise in temperature will cause water to
evaporate very quickly (15 minutes or so), and then the temperature spikes to over 340 °F. This results in a hot kettle that cools
slowly. It take over 40 minutes to cool down to 230 °F! Just be
careful to close the upper lid the right way all the time.
For users who are completely new to temperature management, we recommend that you do a test run. Start a session without cooking any food and follow the Minion Method to see how
your Weber functions. You will be glad you did and your anxiety
level will be much less when you actually do those ribs or roast.
The directions outlining the Minion Method start with a fire that is
under performing, and letting the upper vent supply the right
amount of oxygen to bring the kettle up to the right temperature.
9
What to Expect
The Smokenator™ creates a huge amount of humidity in
the kettle. If you are used to other methods of low and slow cooking, the results in the Smokenator™, when followed at 230 °F
dome temperature, will be very moist and tender. It is possible to
control the degree of juicy-ness. By removing water in the last
hour you can place a dryer finish on the outside of the meat, keeping a juicy interior. If you want deep interior dryness, then keep
water in the pan for ¼ of the cooking time to enhance smoke ring
flavor.
Using the Smokenator™ Without Water
In this situation you will have to close the upper vents
down to 1/8” to 3/16”. Secondly, the lower vents will have to be
closed down even more in order to control excess air entering. Use
an 8d nail as a gage to initially set the lower vents.
An issue that raises concern is temperature control. The
reason why the Weber with the Smokenator™ is so stable, is due
to water absorbing heat energy, allowing the vents to be open
more; this allows more control.
Without water, the kettle is harder to control. Since it has
such a low air intake, ash build up interferes with efficient burning.
If you are going to do this, let the kettle come to temperature at ¼”
opening. Then using the table, use the halving and doubling of
openings to control temperature. We usually don’t smoke without
water since the results are superior in terms of tenderness and
moisture content of the meat or poultry when using water. We will
use dry setting for finish of brisket and pulled pork.
Dry Environment Settings
There is no guarantee that the temperatures cited below will
be exact, since every kettle is different. Start with the lowest setting first so that you understand how your particular kettle functions at the base line and work up to wider openings.
10
The picture above shows the cross section size of wood
chunks. All chunks are 1 3/8” to 1 5/8” high. We never soak
them. We try to avoid using wood chips since they can introduce
huge amount of smoke and turn food harsh. Use these sparingly
until you get a handle on smoke production.
What if I use the initial settings for the kettle and my
temperature is too low or too high?
We have had several customers comment that their food
took too long to cook. This most likely happened because the customer jumped right into low and slow cooking without doing two
things:
1) They did not make sure they had a dome thermometer.
2) They did not do a test run of the settings and temperatures with just coals and an empty kettle, and instead
jumped right into cooking their meat.
11
How to Calibrate Your Weber Low and Slow
The Weber kettle cooker with a Smokenator™ has six factors that can vary and cause temperature to misbehave:
* Amount of fuel
* Amount of air
* Pan filled with water or no water
* Wood chunks
* Ambient temperature
* Wind conditions
For example, if the ambient temperature is 75 °F, and you have
your Weber in a relatively enclosed space unaffected by any
breeze, two of the variables become constant.
The Test Run
The goal will be to limit all the variables except for one:
the air vents will be opened and closed to determine the effect.
Adjust the lower kettle vents to half open and the upper
kettle lid vents to 3/16” open. Adjust the thermometer so that the
tip extends about 1/2” under the kettle lid surface. Using either
processed lump charcoal as described previously or briquettes, put
about 20 to 25 percent (12 briquettes) into a chimney charcoal igniter and bring them to a hot, red color.
During the 20 minutes needed to bring the igniter coals to a
good burn, pack the Smokenator™ with the remaining coals (40
briquettes). You are providing an “unlimited” source of fuel.
When the ignition coals are red hot and well lit, place them
into the Smokenator™. Push the coals into the sides to allow the
water pan to fit into the Smokenator™. Then place the water pan
in the Smokenator™ and fill with water. Place the upper lid over
the kettle bottom with the upper vent opposite the Smokenator™.
It will take about 10-15 minutes for the water and kettle to
heat up. Let the unit come to a stable temperature, and let it stay at
that temperature for 10-20 minutes so you know for sure that it is
at the steady state temperature. Make a note of the temperature.
Open the lid, fill the pan with water, stir the coals to knock off ash,
and put the kettle lid back on. Adjust the upper vents to 5/16” and
the temperature will rise. Wait for 20 to 30 minutes and watch
where the temperature settles to.
12
Repeat the procedure of knocking the ash off the coals, filling the pan again with water, and replacing the lid; now open the
upper vents to 8/16”. Again, wait till it is clear that temperature
has stabilized.
You may want to play with your Weber and close the vents
to the 5/16” setting and see what happens in your kettle.
A regular Weber with minimal leaks, set with upper vents
at 5/16” and lower vents better than 3/8” should reach steady state
temperature with simmering water at about 230-240 °F dome temperature. If your kettle is at 260 °F at this setting, then you probably have a leak in the lid-base seal. If you suspect you have a
leaky lid to kettle bottom, purchase about 4 1.5” Binder clips these
work really well as clamps.
We know this sounds tedious to do, but knowing how your
Weber works will pay off in confidence, give you better timing,
and will allow you to focus on something other than temperature
management, like consuming your favorite beverage and having
fun. It will leave you rested to enjoy the fruits of your culinary
intention.
Link to the Minion Method
http://www.virtualweberbullet.com/fireup2.html#minion
Placement of a Taylor Bi Metal Candy Thermometer
Model #5911N, cost at Ace Hardware is typically less than $10.00
13
Turkey
The Smokenator™ was originally designed to allow a
huge turkey to be smoked. The set up for doing a turkey is very
simple. Place a medium coating of salt, dry rub, or spices on the
skin of the turkey. If you use salt, lightly spray some cooking oil
spray on the skin to ensure that the salt adheres to the skin. This
provides the smoke a means to transfer flavor into the meat.
Place the turkey breast side down in a small roasting pan
that will fit in the kettle. Raise the pan about 3 inches off of the
coal supporting grill. (Try using two upside down bread pans
wrapped in foil). Rotate the turkey 180 degrees every hour. At
the end of the second hour of smoking, turn the turkey, breast side
up. The temperature of the kettle is normally between 225 and
250 °F when smoking and using water to keep moisture levels up.
A turkey can take upwards of 6 to 8 hours to smoke. After 4
hours, the turkey is well smoked, and it can be moved to an oven
to complete cooking, if you desire. If you do this, wrap your
smoked bird tightly in foil so it doesn’t dry out!
14
Salmon
Salmon is a wonderful fish that smokes really well. Lay
two sheets of foil on the counter and set the fillet’s skin surface
down on the foil. Salt the exposed side well, since having a salty
base on the fish brings out the smoke flavor. After coating the fish
with salt, lightly spray with a cooking oil spray. Set it on the food
support grill.
Salmon cooks rather quickly in the Weber. We generally
let the fish remain in the kettle for about 2 hours, making sure that
the water pan is never empty. We don’t overload the kettle with a
huge number of coals. Try 20 briquettes or so, and add extra when
you see the temperature dropping.
We also keep the Weber heavily stocked with wood
chunks to make sure smoke is always present. The result is a pronounced slightly salty smoky salmon. This is not a cold smoke
process, which takes a lot longer and is done at much lower temperatures.
15
Ribs
This picture shows three slabs of ribs cooking on the food
support grill and on a Hovergrill. This is roughly 15 pounds of
food. Most of your cooking is done on the food support grill,
where the temperature is about 210-220 °F when the dome temperature is 230-240 °F.
In this example ribs have to be rotated about midway
through the typical 4 hour cook from the Hovergrill to the food
support grill. Customers have reported using two rib rack smoking 8 racks of spare ribs, 4 on lower, 4 on upper grill. It took
about 7 hours.
Www.amazingribs.com is a great site for pointers. Craig
Goldwyn is one of the best in providing clear and concise directions in preparing ribs right.
Finishing off: The high humidity output keeps ribs moist.
An hour before the ribs are done, we recommend that you remove
the water and operate in dry mode low and slow. This will put a
dryer finish on the ribs.
16
Chicken
The Smokenator™ does chicken right! The results will
pretty much astound you with the moistness of the meat. If you
have ever cooked chicken and it comes out dry, you know the feeling. You take a bite and all the moisture is sucked out of your
tongue. Chewing dry chicken is like chewing a dry sponge.
A pair of chickens, either halved or whole, take about four
and a half hours at 230- 240 °F. The pan is always filled with water through the entire process. Note that these birds are in a
roasting pan raised up 3” above the coal support grill. Always
check your chicken with a meat thermometer that has been calibrated so that you know it is accurate! Chicken is done at 170 °F
with the thermometer placed into the middle of the thigh meat.
You can also do split chicken halves on the food support
grill.
There are many spice mixtures you can try with chicken.
Our favorite is always slipped under the skin of the chicken. The
spice soaks into the meat along with the smoky flavor. Brining is
not needed for chicken or turkeys if water is kept in the pan.
17
Pulled Pork
Follow your preparation method and add your rub to the
meat the night before. Set the Weber to sustain 230-240 °F dome
temperature. It’s smart to let the meat warm up to room temperature, but that is hard to do, given that these meats can take over 7
to 9 hours to do.
Place the pork butt on the food support grill. When the
pork in deepest part registers between 165 to 170 °F (about 4 to 5
hours), we foil wrap ours and let the Weber run up to the 350 °F
area till the meat thermometer registers 200 °F (1 to 1.5 hours).
Then we unwrap the meat and set it back into a dry kettle environment about 30 minutes to let a crust form.
You can also just smoke low and slow till the meat reaches
190-200 °F. It just takes a lot longer, but it can be worth it.
Brisket
It is also a tough cut of meat that is cooked the same way:
up to 165 °F, then foil wrapped, and brought up to 190 to 200 °F.
Cooking times are about the same as pulled pork, but a little less
since a brisket is not as thick. No foil? Expect to cook 7 to 10
hours and for meat to be be a bit drier.
------------------------------------------------------------------------Our favorite book for sauces, marinades, dry and wet rubs and
mops is:
Championship Barbecue Sauces
By Paul Kirk. This book is well written by an accomplished and
experienced chef.
Andy’s Rub
1 cup cane sugar
½ cup seasoned salt
3 tablespoons garlic salt
3 tablespoons celery salt
2 tablespoons onion salt
1/3 cup paprika
2 tablespoons black pepper 1 tablespoon lemon pepper
1 teaspoon ground celery seed
1 teaspoon dry mustard powder
1 teaspoon ground thyme
½ teaspoon each of allspice, cayenne, dried chives
18
This is another rub but a different skew in the
last section of the recipe.
Mitch’s Fantastic Barbecue Rub
¾ cup cane sugar
¼ cup light brown sugar
6 tablespoons celery salt
¼ cup seasoned salt
¼ cup onion salt
2 tablespoons garlic salt.
1/3 cup paprika
2 tablespoons chili powder
2 tablespoons black pepper
1 tablespoon cayenne
1 teaspoon ground allspice
½ teaspoon ground cloves
½ teaspoon ground bay leaf
We like this rub since it has sweet, salt, and some complex spices.
If you have questions please email us at
[email protected] or call us at
408-340-3976.
Visit the Smokenator™ Forum at
www.smokenatorforum.proboards.com
Barbecue Kettle Accessories
6189 Mancuso Street
San Jose, CA 95120
Good Luck and Thank You for Purchasing the
Smokenator™ 1000
Revised January 15, 2011
19