1
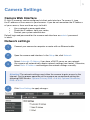
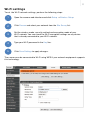
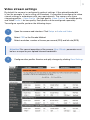
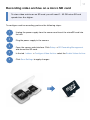
Cloud Video Surveillance User Manual D-Link IP-cameras with built-in Ivideon software Table of Contents Ivideon: Basic concepts What is Ivideon? What is an IP camera with built-in Ivideon software? How do I access my surveillance cameras? 3 3 3 3 Attaching an IP camera to your Ivideon account 4 Camera Settings 5 Camera Web Interface 5 Network settings 5 Wi-Fi Settings 6 Motion Detector 7 Sound Recording 8 Elimination of the "traveling wave" effect 8 Video stream settings 9 Date and time settings 10 Recording video archive on a micro SD card 11 3 Ivideon: basic concepts What is Ivideon? Ivideon is a system that allows you to easily organize video surveillance at any place: office, apartment, house, shop, enterprise. Ivideon features: • • You only need a computer and web or IP-camera; Installation is extremely simple: Connect the camera to your computer, configure the Internet connection and attach the camera to your Ivideon account. What is an IP camera with built-in Ivideon software? The camera connects to the Internet directly, there's no need to connect it to a PC. It is an independent element of your video surveillance system, you can just to attach it to your Ivideon account — and you will be able to access it from anywhere over the Internet. How do I access my surveillance cameras? If you attach your camera to your Ivideon account, you will be able to access it from any place and any way you like: via your personal account on the Ivideon web site. on Android devices via Ivideon for Android. on your iPhone®, iPad® or iPod® via Ivideon mobile application for iOS. on other mobile devices and cell phones using the mobile version of our website. on your computer via desktop version of the Ivideon Client application. 4 Attaching an IP camera to your Ivideon account To use your camera with built-in Ivideon, please attach it to your personal account. If you do not have an Ivideon account yet, please visit www.ivideon.com and sign up. 1 Prepare the camera for connection. Connect it to your router with an Ethernet cable. Get ready to plug the power cable into the camera. 2 Log in to your account at www.ivideon.com. 3 Go to My cameras tab and click Add a camera or a DVR. Follow the instructions. Attention! If you need to reattach your camera, follow the instructions above, but first delete the camera from your personal account. You can also attach your camera via its web-interface (see Camera Web Interface section of the manual): 1 Open the camera web interface. Click Ivideon Attach Camera to Ivideon Account. 2 Type the name of your camera and your Ivideon account. Click Attach this camera to Ivideon Account. 5 Camera Settings Camera Web Interface D-Link IP-cameras can be configured via their web-interface. To access it, type the IP address of the camera in your browser. If you do not remember the IP address of your camera, there are three ways to find it: • • • Use a network scanner application; Check the IP address from your router; Contact your system administrator. Default login and password for the camera web interface are admin / password is blank. Network settings 1 Connect your camera to computer or router with an Ethernet cable. 2 Open the camera web interface. In the Setup tab, click Network. 3 Select Automatic IP Address if you have a DHCP-server on your network (the camera will automatically receive network settings from router). Otherwise, select Static IP Address and configure the network settings manually. Attention! The network settings must allow the camera to gain access to the Internet. For the proper operation of the camera we recommend setting the following DNS Servers: Optional Primary DNS – 8.8.8.8, Optional Secondary DNS – 8.8.4.4. 4 Click Save Settings to apply changes. 6 Wi-Fi settings To set the Wi-Fi network settings, perform the following steps: 1 Open the camera web-interface and click Setup Wireless Setup. 2 Click Rescan and select your network from the Site Survey list. 3 Set the wireless mode, security method and encryption mode of your Wi-Fi network. You can check the Wi-Fi encryption settings on any device that is already connected to your Wi-Fi network. 4 Type your Wi-Fi password in the Key line. 5 Click Save Settings to apply changes. The camera can be connected to Wi-Fi using WPS if your network equipment supports this technology. 7 Motion Detector Ivideon starts the archive recording only when the motion detector is triggered. If the motion detector is disabled, the video feed will not be stored on the SD-card nor in the cloud. To configure the motion detector on your camera, perform the following steps: 1 Open the camera web-interface and click Setup Motion Detection. 2 To activate motion detection select the Enable Video Motion checkbox. To activate infrared sensors on the camera select the Enable PIR checkbox. 3 In the Sensitivity window you can set the desired level of detector's sensitivity. 4 Select Draw Motion Area and choose areas in which motion will be detected. If you want to exclude a section from the detection area, select Erase Motion Area. Click Save Settings to apply changes. 5 Click Ivideon Configure Video Archive. Select the Enable Video Archive checkbox and click Save Archive Settings. 8 Sound Recording If your camera is equipped with a microphone, you may need to enable and configure sound, which will be broadcasted along with the video feed and recorded on the SD card. 1 Open the camera web-interface and click Setup Sound Detection. 2 To activate sound detection, select the Sound detection checkbox. 3 Click Save Settings to apply changes. 4 Click Setup Audio and Video Audio Setup, select the Microphone checkbox and adjust Volume from 10 to 100. 5 Click Save Settings to apply changes. Elimination of the "traveling wave" effect If you use your camera indoors, you may notice a “wave” effect on the picture. To remove it, follow these steps: 1 Open the camera web interface. Click Setup Image Setup Image Settings. 2 In the Frequency line select "50Hz". 9 Video stream settings By default the camera is configured in optimal settings. If the upload bandwidth is low (for example, if you're using a 3G-modem), it's possible to configure the video stream settings in accordance with your requirements. The camera uses three streaming profiles - Video Profile 1 for high quality, Video Profile 2 for middle quality and Video Profile 4 for low quality. Each profile can be configured separately. To configure a profile, perform the following steps: 1 Open the camera web interface. Click Setup Audio and Video. 2 Select CBR as the Encode Method. Select resolution, number of frames per second (FPS) and bit rate (BPS). Attention! For correct operation of the camera, Max. Bitrate parameter must be less or equal to your upload Internet bandwidth. 3 Configure other profiles likewise and aplly changes by clicking Save Settings. 10 Date and time settings For proper SD-card recording, set correct date and time settings: 1 Open the camera web interface. Click Setup Time and Date. 2 Choose your Time Zone. 3 In the Automatic Time Configuration section select the Syncronize with NTP Server checkbox and choose one of NTP servers. Time Settings can be configured manually in the Set Date and Time Manually section. However, that is not recommended. 4 Click Save Settings to apply changes. 11 Recording video archive on a micro SD card To store video archive on an SD card, you will need 1 - 32 GB micro SD and speed class 6 or higher. To configure archive recording, perform the following steps: 1 2 3 Unplug the power supply from the camera and insert the microSD card into the slot. Plug the power supply in the camera. Open the camera web interface. Click Setup SD Recording Management and format the SD-card. 4 In the tab Ivideon Configure Video Archive select the Enable Video Archive. 5 Click Save Settings to apply changes.