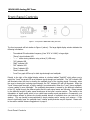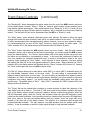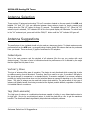
1
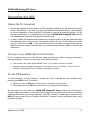
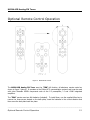
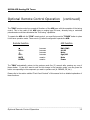
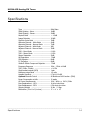
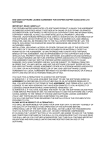
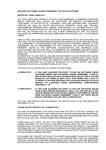
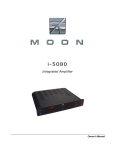
AIR Analog FM Tuner ___________________________________________________________________________ Owner’s Manual MOON AIR Analog FM Tuner Table of Contents Congratulations........................................... 3 Introduction ............................................... 4 Unpacking and Warnings .............................. 5 Installation Tips ........................................ 6 Front Panel Controls .................................... 7 Antenna Selection & Suggestions .................. 9 Rear Panel Connections.............................. 10 Operating the AIR .................................... 11 Optional Remote Control Operation.............. 12 Specifications .......................................... 14 Service and Warranty ................................ 15 www.simaudio.com IMPORTANT: Please read this entire manual before using this product. Installation and operating instructions inside. ____________________________________________________________________________________ MOON AIR Analog FM Tuner Congratulations! Thank you for selecting the MOON AIR Analog FM Tuner as a part of your hi-fi reproduction system. This tuner has been designed to offer state-of-the-art high-end performance in an elegant package, while retaining all the sonic hallmarks on which Simaudio has made its reputation. We have spared no effort to ensure that it is among the finest FM tuners available. We have been building high performance audio equipment for over 20 years, and the know-how gained through our cumulative experience is an important reason why the MOON AIR is so musically satisfying. The reasoning behind an analog design (as opposed to a Phase Locked Loop digital circuit) was threefold: 1) a more precise adjustment to the center of a desired station frequency, which in turn maximizes stereo separation 2) the ability for minimizing on-frequency interference by tuning slightly off center in certain situations such as when operating in urban centers and 3) superior sonic performance by maintaining the audio signal in the analog domain throughout the entire circuit. The performance of your AIR will continue to improve during the first four weeks of use. This is the result of a “break-in” period required for the numerous high quality electronic parts used throughout this tuner. Please read this manual thoroughly to acquaint yourself with this product’s features prior to using it. We hope you enjoy listening to the MOON AIR Analog FM Tuner as much as the pride we have taken in creating this fine audio product. We understand the power and emotion of music and build our products with the goal of reproducing these elusive qualities. ____________________________________________________________________________________ Congratulations 3 MOON AIR Analog FM Tuner Introduction Your MOON AIR Analog FM Tuner incorporates many significant design features to achieve its “world class” level of performance. This is an abbreviated list of the more important features: Large easy-to-read digital display for station frequency. OFC (oxygen free copper) wiring throughout the entire audio signal path. A power supply using a shielded toroidal transformer, ultralinear capacitors and precision voltage stabilizers. Two selectable RF antenna inputs. Dual automatic gain control (AGC) stage which eliminates a local/distant signal switch. Five stage analog front end for improved station separation. Bar graph LED array for signal strength and multipath measurements. Three LED array for center tuning indicator. Selectable “narrow” and “ultra wide” IF bandwidth settings to control adjacent channel interference. LED indicators for Stereo/Mono, IF Bandwidth setting and antenna input. Standby mode allows for always powered up circuit stability. Tunable matched precision IF amplifiers for consistent sonic performance. Optional remote controlled functions include Bandwidth selection, Antenna input selection, Mono or stereo selection, Signal path or multipath display, FM muting on/off and Power on/off. Extremely rigid chassis construction to minimize the effects of external vibrations. Designed to be powered up at all times for optimal performance. Low operating temperature for a longer than normal life expectancy. ____________________________________________________________________________________ Introduction 4 MOON AIR Analog FM Tuner Unpacking and Warning! The MOON AIR Analog FM Tuner should be removed from its box with care. The following accessories should be included inside the box with your preamplifier: AC power cable 4 Pointed screw-on tips (for the tuner’s legs) This owner’s manual Warranty card (USA and Canada only) As soon as the tuner is safely removed from its box and placed down, perform a thorough physical inspection and report any physical damage to your dealer immediately. We suggest that you keep the original packaging, and that it should be stored in a safe, dry place in case you’re required to transport the preamplifier. The customized packaging is specially designed to protect the tuner from potential damage that can arise when shipping such a product. ________________________________________________________________ WARNING! To reduce the risk of fire or electric shock, do not expose this product to rain or moisture. Do not attempt to “lift the ground” by removing the ground pin from the AC cable. Make sure that your household electrical wiring supports proper AC grounding techniques before plugging in this product. Keep the heat sinks and top cover free of dust to allow for proper heat dissipation. Never expose this product to extreme temperatures. Always connect the audio signal path cables prior to connecting the AC mains. CAUTION! No user-serviceable parts inside. Do not remove top cover, as severe electrical shock may result. IMPORTANT! Make sure that your local AC voltage complies with the unit’s label. Damage caused by plugging thus amplifier into an AC receptacle of the wrong voltage will not be covered by warranty. ____________________________________________________________________________________ Unpacking and Warning 5 MOON AIR Analog FM Tuner Installation Tips The MOON AIR Analog FM Tuner should be placed on a rigid surface to prevent any accidents such as falling over. It is highly recommended that it sits on its own dedicated shelf. This tuner has side-mounted heat sinks; Consequently, it should both be placed in a location with empty space around it for proper heat dissipation. You should never place another component on top of ths tuner. As well, you should avoid placing it near a heat source or inside a closed cabinet that is not well ventilated. This could compromise the the preamplifier’s performance and reliability. Once you have decided on a location for your AIR, you should install the fout (4) pointed screw-on tips onto the cones of the chassis. These tips will easily scratch most surfaces, therefore it’s advisable to follow these instructions: 1) Place your AIR on a soft surface (i.e. carpet) and carefully turn it so that it rests on its side. 2) Screw one tip onto each of the four cones. 3) Carefully move your AIR to it’s pre-determined location. Included with these tips is a small metal rod, intended for final adjustments (if necessary) by simply threading it through the tiny hole of each of these tips and then gently turning. These adjustable screw-on tips serve two purposes: Mechanical grounding of the chassis and compensation for surfaces that aren’t perfectly level. Since household dust is an excellent insulator of heat, we suggest that you clean both of the curved side-mounted heat sinks on a regular basis. A smooth nylon brush with long bristles (ie. paint brush) is recommended for this task. Finally, you should make all of your audio signal connections prior to making the AC connection between the AIR and the AC wall outlet. ____________________________________________________________________________________ Installation Tips 6 MOON AIR Analog FM Tuner Front Panel Controls Figure 1: Front panel of MOON AIR Analog FM Tuner The front rear panel will look similar to Figure 1 (above). The large digital display window indicates the following information: - The selected FM radio station frequency (from ’87.6’ to ‘108.6’) in large digits. “Stereo” signal indicator LED “ ” center tuning indicator using a three (3) LED array. “A2” indicator LED “BW2” indicator LED “MP” indicator LED “Mono” indicator LED “Mute” indicator LED “Level” bar graph LED array for both signal strength and multipath. Directly to the right of the digital display window is a button labeled “Sgnl/MP” which allows you to switch the “Level” bar graph LED array between signal strength and multipath. The “MP” indicator LED will illuminate when the array is showing the multipath level of the incoming signal. Conversely, when the array is showing the incoming signal strength, the “MP” indicator LED will not illuminate. When the “Level” shows signal strength, a higher reading is more desireable. When the “Level” shows multipath, a lower reading is more desireable. The multipath phenomenon is caused by the different reflections of the R.F. signal through the different paths that the radio signal waves are following. Delays caused by the different lengths of paths cause interference at the tuner’s receiver section. This results in the degradation of signal quality which in turn yields lower quality sound reproduction. Consequently, you should always attempt to achieve the lowest possible amount of multipath when you tune into your stations. This can usually be accomplished by simply rotating and/or moving your antenna – if this doesn’t significantly lower the multipath level, a better quality antenna may be required. Please refer to the section entiled ‘Antenna Suggestions’ on page 9. ____________________________________________________________________________________ Front Panel Controls 7 MOON AIR Analog FM Tuner Front Panel Controls (continued) The “Stand by/On” button disengages the output section from the rest of the AIR’s circuitry and turns off the digital display. However, when in “Stand by” mode all audio circuitry remains powered up to help maintain optimal performance. When switching back from “Standy by” to the “on” mode, all prior settings, including the tuned FM radio station’s frequency, will be restored from the previous listening session. The blue pilot LED will not be illuminated when the AIR is in “Stand by” mode. The “Mute” button, when activated, eliminates signal noise between FM stations; When the signal strength falls below the mute threshold, there will be no audible output from the tuner. This function is highly recommended when changing/scanning stations, however, once you have selected a station, it is recommended that you turn off the “Mute” function by simply pressing the button again. The “Mute” indicator LED in the display window will illuminate when this function is active. The “Mono” button alternates the AIR between stereo and mono output. Most FM radio stations broadcast in stereo, and to achieve the best sound reproduction, you should operate the AIR in stereo mode (the default setting). The “Stereo” signal indicator LED in the display window will confirm that the station you are listening to is broadcasting in stereo. In the event that a particular FM station has very noisy reception (ie. excessive background noise), it might be worthwhile to switch to the mono mode by simply pressing the “Mono” button. At the expense of stereo separation, the mono setting will capture less than half of the noise typically captured in stereo mode. When activated, the “Mono” indicator LED in the display window will illuminate and the “Stereo” indicator LED will turn off. Pressing the “Mono” button again will return the AIR to stereo mode. The “BW 1/2” button allows you to select either a wide (BW 1) or narrow (BW 2) bandwidth setting for the Intermediate Frequency section of the tuner circuit. The wide setting is recommended when adjacent channel interference is not an issue. The narrow setting is preferable when adjacent channel interference is a factor; this setting has less high frequency extension, but is less sensitive to noise and interference from nearby stations. You should choose the bandwidth setting which best suits your specific setup. The default setting is “BW 1”. When “BW 2” is selected, the “BW2” indicator LED in the display window will illuminate. The “Tuning” dial can be rotated either clockwise or counter-clockwise to select the frequency of the radio station you wish to listen to. The three (3) LED array center tuning indicator located in the upper right of the display window should be used as a guide to achieve a center-tuned position; When the left LED illuminates, gently rotate the ‘Tuning” dial clockwise; When the right LED illuminates, gently rotate the dial counter-clockwise. You’re precisely tuned into a station when the center LED illuminates. Now you’re ready to fine tune the selected station using the vertical “Level” bar graph LED array, located on the right side of the display window; The objective is to maximize signal strength and minimize/eliminate multipath. This may require a very slight deviation from the precise center tuned position; it may be necessary to sacrifice a higher signal strength to help eliminate multipath. ____________________________________________________________________________________ Front Panel Controls 8 MOON AIR Analog FM Tuner Antenna Selection There are two (2) antenna inputs using 75 on F-connectors located on the rear panel of the AIR, and labelled “A1” and “A2”. You can alternate between these antenna inputs by simply pressing and holding down the “BW 1/2” button for three (3) seconds. The default setting is “A1”. When the “A2” antenna input is selected, “A2” indicator LED on the front panel display will illuminate. To switch back to the “A1” antenna input, press and hold the “BW1/2” button until the “A2” indicator LED goes off. Antenna Suggestions The small piece of wire included should only be used as a temporary device. To obtain maximum sonic performance from the AIR tuner, we suggest using a better quality FM antenna that can be purchased from your dealer There are three (3) types of antennas for FM reception: Folded dipole This is the most common and the simplest of all antennas (like the one you receive with most electronic gear). This piece of wire is bi-directional and the performance of it is affected by the angle that the signal hits the piece of wire. Vertical ½ Wave This type of antenna offers ease of operation. The design is omni-directional which means that it picks up stations coming from all directions. Therefore, there’s no need for a rotor. It provides 2.5dB gain to the signal strength in comparison to a standard dipole. If excessive multipath is a common reception problem try laying the antenna down on the horizontal plane as opposed to standing up in the vertical plane. This type of antenna can be used both indoors and outdoors. The performance of this type of antenna will greatly benefit from being mounted at the highest possible altitude, regardless of whether it’s installed indoors or outdoors. Yagi (Multi-elements) The Yagi type of antenna is a unidirectional antenna capable of pulling in very distant stations due to its high gain. Due to its very directional nature, it should be used with a rotor to get the maximum benefits. The directional feature significantly helps eliminate multipath problems. ____________________________________________________________________________________ Antenna Selection & Suggestions 9 MOON AIR Analog FM Tuner Rear Panel Connections Figure 2: Rear panel of MOON AIR Analog FM Tuner The rear panel will look similar to Figure 2 (above). On the far left side is the AC mains power switch. Beside it is the IEC type AC receptacle. Towards the center of the rear panel are two (2) female F-type connectors for antenna inputs, labeled “A1” and “A2”. On the far right side is one (1) pair of singleended RCA output connectors labeled ‘Left Out’ and ‘Right Out’ that are intended as an input to either a preamplifier or integrated amplifier. Don’t hesitate to use high quality interconnect cables. Poor quality interconnect cables can degrade the overall sonic performance of your system. You will notice that the RCA output connectors on the rear panel have been color coded: ‘white’ for the left channel and ‘red’ for the right channel. ____________________________________________________________________________________ Rear Panel Connections 10 MOON AIR Analog FM Tuner Operating the AIR Making the AC Connection 1. Connect the supplied AC power cable to the IEC receptacle, located on the rear panel of the tuner’s chassis. Alternatively, if you wish, you may use a dedicated high-performance AC cable designed for source components. Ensure that the AC wall outlet you use has a functioning ground. For the best sonic performance, it is preferable that you plug your MOON AIR Analog FM Tuner directly into a dedicated AC outlet and avoid using an extension cord. 2. In order to obtain the maximum performance from your audio system, we strongly recommend that the detachable power cord not come into physical contact with any of the interconnect cables running to and from your AIR. In the event that this can’t be avoided, you should ensure that any cables coming into contact with each other are crossed at ninety degree angles to minimize the contact area. Turning on your MOON AIR for the first time Prior to turning the tuner on for the first time, make sure that every cable is properly connected to avoid any problems. Then turn on your tuner in the following manner: 1) Flick the main rocker switch labeled “POWER” to the ‘1’ (on) position on the rear of the AIR. 2) Press the push button labeled “Stand by/On” on the center of the front faceplate. The blue LED will illuminate and the digital display will indicate a tuned station frequency. On and Off Sequence To avoid having any annoying noises (ie. “thumps” and “pops”) eminate from your speakers when powering your AIR on or off, you should 1) Always power up your AIR before powering up your preamplifier and/or amplifier. 2) Always power down your AIR after powering down your preamplifier and/or amplifier. We recommend that you leave your MOON AIR Analog FM Tuner powered up at all times to maintain optimal performance. In the event that you plan to be away from your home for a few days, powering off the tuner may not be a bad idea. Once fully “broken-in”, please keep in mind that your AIR will require several hours of playing time before it reaches its peak performance after you’ve powered it up again. ____________________________________________________________________________________ Operating The AIR 11 MOON AIR Analog FM Tuner Optional Remote Control Operation Figure 3: FRM Remote Control The MOON AIR Analog FM Tuner uses the “FRM” full function, all aluminum remote control as shown in figure 3 (above). It operates on the Philips RC-5 communication protocol and is can be used with other Simaudio MOON components such as the P-3 preamplifier, i-5 and i-5080 integrated amplifiers. The “FRM” remote uses two AAA batteries (included). To install them, use the supplied Allen key to remove the three screws located on the back plate; insert the batteries in the correct direction and then screw the back plate back into place. ____________________________________________________________________________________ Optional Remote Control Operation 12 MOON AIR Analog FM Tuner Optional Remote Control Operation (continued) The “FRM” remote control can operate all functions of the AIR tuner with the exception of the tuning control. This is the result of the AIR being an analog type FM tuner, whereby using a motorized potentiometer would have eliminated the “fine tuning” capabilities. To operate the AIR with the “FRM” remote control, you must first press the “TUNER” button to place it into tuner operation mode. There are six (6) buttons configured to operate the AIR: Remote Function VOL + VOL MUTE POWER AIR Function becomes becomes becomes becomes remains remains BW1/BW2 A1/A2 Mono Sgnl/MP Mute Power The “FRM” automatically returns to the previous mode five (5) seconds after pressing any one of theses button. If you don’t want to wait for this change in the operation mode, you may press the button corresponding to the component you want to operate next (ie. PREAMP, CD, etc.). Please refer to the section entitled “Front Panel Controls” of this manual to for a detailed explanation of these functions. ____________________________________________________________________________________ Optional Remote Control Operation 13 MOON AIR Analog FM Tuner Specifications Type ....................................................... 50db Quieting - Mono ................................ 50db Quieting - Stereo ............................... Capture Ratio .......................................... Image Rejection ...................................... Signal-to-noise Ratio ................................ Alternate Channel – Wide Mode ................ Alternate Channel – Narrow Mode ............ Adjacent Channel – Wide Mode ................ Adjacent Channel – Narrow Mode ............. THD – Mono Mode ................................... THD – Stereo Mode ................................. Stereo Separation .................................... AM Supression ......................................... SCA Rejection ........................................... I.F. Rejection ............................................ 19kHz & 38kHz Component Rejection ......... Frequency Response ................................ THD (20Hz - 20kHz) ............................... Single-ended outputs (RCA) ..................... Maximum output level .............................. Useable Sensitivty .................................... Optional Remote Control ......................... Power Consumption at idle ........................ AC Power Requirements ........................... Fuse Replacement - 120V .......................... Fuse Replacement - 230V ......................... Shipping Weight ...................................... Dimensions (W x H x D, inches) ................ Solid State 10dBf 25dBf > 1.5dB 110dB 78dB 42dB 72dB 3dB 35dB 0.10% 0.15% 50dB -70dB 80dB 80dB -75dB 15Hz - 17kHz ±1.0dB < 0.03% 1 pair 1.0 volts 0.7µV @ 10.dBf All Aluminum Full-Function (FRM) 12 watts 120V / 60Hz or 240V / 50Hz 1A short slow blow 0.5A short slow blow 20 lbs / 9 Kgs 17 x 4 x 15 ____________________________________________________________________________________ Specifications 14 MOON AIR Analog FM Tuner Service and Warranty (U.S.A and Canada only) Please take the time to complete and mail the warranty card supplied with your MOON AIR Analog FM Tuner. This card is necessary to activate your full warranty, as well as allowing you to receive information on new products and services. Alternatively, you may visit our website www.simaudio.com and go to the “warranty registration” section where you can register on-line. If you experience a problem with your AIR, contact your dealer first. Most often, problems are merely minor oversights that are easily solved, and this will save you both the time and the cost of shipping the amplifier back to us. If your dealer is not able to diagnose the problem, please feel free to contact our service department. If required, service must be performed by a Simaudio Ltd. authorized center such as your national distributor. In order to prevent any damage during transport, the AIR must be packed with all of its original internal materials and shipped in the original box. Please keep your box and shipping materials. MOON AIR Analog FM Tuners are guaranteed against defective materials and workmanship for a period of THREE (3) years, parts and labor, to the original owner. Upon receiving your registration card (either by mail or via our on-line warranty registration), this warranty is immediately upgraded to TEN (10) years, parts and labor to the original owner only. Additionally, your AIR must be purchased from an authorized MOON dealer to qualify for warranties. These warranties are voided in the case of accident, or if the unit was tampered with, somewhere other than at an authorized Simaudio service center. This warranty is valid only in Canada and USA. In other countries, the warranty conditions are defined and limited only by the local distributor. Simaudio Ltd. limits its liability to the repair or replacement of the MOON AIR Analog FM Tuner. Simaudio Ltd. cannot be held responsible for any damages caused to any other equipment, whatever the circumstances and/or causes arising thereof. Canada Simaudio Ltd. 95 Chemin Du Tremblay, Unit 3 Boucherville (Québec) J4B 7K4 USA Simaudio USA 21 Lawrence Paquette Drive Champlain, NY 12919 Tel. (450) 449-2212 Fax (450) 449-9947 E-mail: [email protected] ____________________________________________________________________________________ Service and Warranty 15