1
ImageWare® Systems, Inc.
™
IWS Law Enforcement Web
User’s Manual
Version 1.0
i
IWS™ Law Enforcement Web User’s Manual
October 2006
ImageWare® Systems, Inc.
ImageWare® Systems, Inc. 10883 Thornmint Road, San Diego, CA 92127
Copyright © 2005 by ImageWare Systems, Inc. All Rights Reserved.
No part of this document may be copied or reproduced in any form or by any means without the prior written
consent of ImageWare Systems, Inc. ("ImageWare"). ImageWare makes no warranties with respect to this
documentation and disclaims any implied warranties of merchantability or fitness for a particular purpose.
Information in this document is subject to change without notice. ImageWare assumes no responsibility for any
errors that may appear in this document. From time to time changes may occur in the file names and in the files
actually included on the distribution disks. ImageWare makes no warranties that such files or facilities as
mentioned in this documentation exist on the distribution disks or as part of the materials distributed.
Restrictions
This software is furnished to you under a license agreement and its use is expressly conditioned upon the user
assent to the terms of that license agreement. IWS™ Law Enforcement is protected by the copyright laws that
pertain to computer software. It is illegal to make copies of the contents of any disk(s), except for your own
backup, without written permission from ImageWare. It is illegal to give a copy to another person.
Copy Protection
This computer program is protected by copyright laws and international treaties. Unauthorized reproduction or
distribution of this program, or any portion of it, may result in severe civil and criminal penalties.
Trademarks
IWS™ Law Enforcement, IWS™ Facial Recognition, Suspect ID, and Face ID are registered trademarks of
ImageWare Systems, Inc. IBM is a registered trademark of International Business Machine Corporation.
Microsoft and Windows are registered trademarks of Microsoft Corporation. All other product names and
companies are trademarks of their respective corporations and licensees.
This manual belongs to:
Name: __________________________________
Date of Installation: _______________________
ii
IWS™ Law Enforcement Web User’s Manual
October 2006
ImageWare® Systems, Inc.
Contents
LAW ENFORCEMENT WEB INTRODUCTION ....................................................................................... 1
DOCUMENTATION CONVENTIONS .................................................................................................... 1
Screen Icons ............................................................................................................................. 1
STARTING THE PROGRAM ............................................................................................................... 3
Changing Your User Password ................................................................................................. 3
Database Details ....................................................................................................................... 4
Law Enforcement Web Main Menu ........................................................................................... 4
SEARCHING.................................................................................................................................... 5
Record Search .......................................................................................................................... 5
Search Results Screen.............................................................................................................. 7
Search Results List Options ...................................................................................................... 7
Viewing Record Detail ............................................................................................................... 8
Viewing Bookings ...................................................................................................................... 8
Exporting and Saving Search Results ....................................................................................... 8
Printing the Search Results List ................................................................................................ 8
Creating a Line Up from the Search Results List ...................................................................... 9
E-mailing Results Lists .............................................................................................................. 9
Printing a Record Details Report............................................................................................... 9
Searching on SMT Fields .......................................................................................................... 9
Facial Recognition Searching.................................................................................................. 10
Loading an Image and Initiating a Search............................................................................ 10
IMAGES ........................................................................................................................................ 12
Viewing Booking Images ......................................................................................................... 12
Viewing Booking Image Properties ......................................................................................... 12
Printing Booking Images ......................................................................................................... 12
Saving/Exporting Booking Images .......................................................................................... 13
MUG BOOK .................................................................................................................................. 14
Searching for Mug Shots......................................................................................................... 14
Mug Book Viewing Options ..................................................................................................... 15
Selecting/De-Selecting Possible Suspects.............................................................................. 15
Single/Multi Viewing ................................................................................................................ 16
Locking/Unlocking a Mug Book ............................................................................................... 17
Saving a Mug Book ................................................................................................................. 18
Viewing an Existing Mug Book ................................................................................................ 18
Printing a Mug Book ................................................................................................................ 18
Viewing the Booking Record for a Particular Mug Shot .......................................................... 19
PHOTO LINEUP ............................................................................................................................. 20
Creating a New Photo Lineup ................................................................................................. 20
Creating a Photo Lineup Using SMT Images .......................................................................... 22
Creating a Photo Lineup from an Imported Image .................................................................. 24
Selecting Similar Images......................................................................................................... 25
Adjusting Images in a Photo Lineup........................................................................................ 26
Saving a Photo Lineup ............................................................................................................ 27
Printing a Photo Lineup ........................................................................................................... 27
Exporting a Photo Lineup ........................................................................................................ 28
iii
IWS™ Law Enforcement Web User’s Manual
October 2006
ImageWare® Systems, Inc.
Viewing an Existing Photo Lineup ........................................................................................... 28
Photo Lineup Single Mug View ............................................................................................... 29
Adding Photo Lineup Viewings................................................................................................ 30
Displaying Photo Lineup Viewing Detail .................................................................................. 30
Creating a New Photo Lineup Using Existing Lineup Images ................................................. 31
SYSTEM LOGOFF .......................................................................................................................... 32
iv
IWS™ Law Enforcement Web User’s Manual
October 2006
ImageWare® Systems, Inc.
Law Enforcement Web Introduction
Welcome to IWS Law Enforcement Web (LE Web), the easy-to-use, browser-based retrieval system for law
enforcement. LE Web allows you to automatically search for a particular arrestee along with locating any
previous booking records for the given subject. The system allows for the storage and retrieval of an unlimited
number of images for a single record enabling your agency to display multiple mug views (i.e. front and side
photo shots) as well as SMT (Scars, Marks and Tattoos) stored images and evidence photos. You may enhance
the investigative process by easily searching for similarities between suspects, such as tattoo descriptions and
gang affiliation details. Law Enforcement Web also enables you to easily select photos for use in electronic mug
books or photo lineups.
Being browser based, LE Web allows you access, through your agency’s intranet, from any terminal in the
department. Login ID’s and passwords determine the types of detail and functions you may perform within the
program.
Documentation Conventions
Various icons and program buttons allow you to navigate easily through the Law Enforcement Web program.
On the Main Menu, click the task name (such as Record Search) to begin the task. You may return to the main
LE Web menu by clicking on the Main Menu button at the bottom of each screen. The <<Previous button, also
located on each screen, will allow you to move backwards, one screen at a time.
Program links are located in the lower right corner of the Main Menu. These include the Database link for
selecting which database should be used, and Exit which returns the cursor to the Login screen.
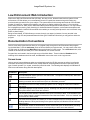
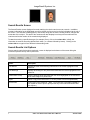
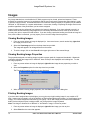
Screen Icons
Various screen icons and buttons assist you navigating through the LE Web screens as well as in performing
such tasks as selecting field information from a drop down list, selecting dates and times or specifying which
type of search operator (i.e. equals, sounds like) should be used. The following table displays the standard LE
Web icons and buttons along with their descriptions.
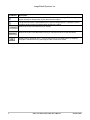
Icon/Button
Description
Provides additional search options for the search field. The options include Equals, Starts with,
Contains and Sounds like.
Provides a date menu for easily selecting either a specific date or a range of dates when
booking or another date oriented event (such as a birth date) occurred.
Provides a time menu for easily selecting a specific time or a range of times to be included in
the search.
This option displays a single selection pick list. Selecting from the pick list again will replace the
first option chosen with the last item selected.
The checkbox states whether a situation is true (box is checked) or false. If the checkbox next
to the “Sealed” option is selected it means the record has been sealed. If it is not “checked” the
record has NOT been sealed.
The multi select drop down box allows you to select multiple items from the drop down list.
Holding down the Ctrl key and clicking on the options required, will allow the field to hold more
than one entry.
The east/west arrows are located above various section tabs (such as Identification) and bring
the first or last tab for that section into view depending on which arrow was selected.
1
IWS™ Law Enforcement Web User’s Manual
October 2006
ImageWare® Systems, Inc.
Icon/Button
Description
The north/south arrows are located next to such fields as age and height. They allow you to
quickly increase or decrease the number that has been entered.
The plus/minus feature is associated with the height and weight options. It allows the user to
provide a range for these field options when performing a search.
Returns the cursor to the last screen you viewed.
Returns the cursor to the Main Menu so that you may perform other LE Web operations.
Displays the LE Web Help menu. You may search through help detail either by navigating
through the Contents tree or by searching the index for a word or phrase.
2
IWS™ Law Enforcement Web User’s Manual
October 2006
ImageWare® Systems, Inc.
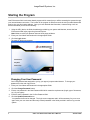
Starting the Program
Law Enforcement Web is a browser based program which means that you will be accessing the system through
your internet/intranet connection. The location of the program is different at each site and your administrator will
need to give you this location address. Once you have obtained that information, to start and log onto Law
Enforcement Web you will do the following:
1. Using the URL (that is, the Web site address) provided by your system administrator, access the Law
Enforcement Web logon page using Internet Explorer.
Note: Make sure that your browser does not block popup windows.
2. Enter your User Name and Password in the appropriate fields
3. Click the Login button.
The main LE Web menu appears.
Changing Your User Password
1.
2.
3.
4.
5.
3
Your initial password was assigned to you by your agency’s system administrator. To change your
password from the main login screen:
Enter your User Name and Password in the appropriate fields.
Click the Change Password button.
Enter a new password in the New Password field which meets the requirements (length, type of characters,
etc.) of your agency.
Enter the same password in the Confirm Password field.
Click the Update Password button.
Your password will now be changed. The login screen reappears and it will be necessary for you to once
again enter your user name and the newly created password in the fields provided in order to log onto the
system.
IWS™ Law Enforcement Web User’s Manual
October 2006
ImageWare® Systems, Inc.
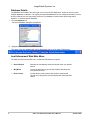
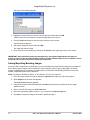
Database Details
The Database link located in the lower right corner of the LE Web Main Menu, allows the user to access
multiple databases if available. If an agency has separate databases for such categories as Adult, Juvenile
and Sex Offender, the user may easily move from one database to another when performing search
activities. To select a specific database:
1. Click the Database link.
The Select Database dialog box is displayed.
2. Highlight the database you require and click OK.
The name of the new database will now be displayed at the top of the main LE Web menu.
Law Enforcement Web Main Menu
The main Law Enforcement Web menu contains the following three options:
4
•
Record Search
Searches for and displays arrest records that meet your specific
criteria
•
Mug Book
Creates an electronic mug book that includes individuals who
meet specified criteria
•
Photo Lineup
Creates and/or prints a photo lineup (both for external and
internal use) using photos of those subjects who meet specified
criteria
IWS™ Law Enforcement Web User’s Manual
October 2006
ImageWare® Systems, Inc.
Searching
Once records have been added using the Capture component in the thick client, you can easily locate a single
record or group of records matching the same criteria using the Search feature. You can search any field for a
text string, date field or a date range. Fields such as height or weight provide an additional “give or take” range
feature.
You may limit or increase the number of records matching the search criteria which will be displayed on the
screen. The Max Results field at the bottom of the screen allows you to set the record display from between 1
and 1000. This option may only be changed if your system administrator has given users the right to alter this
field.
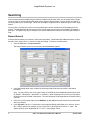
Record Search
A Record Search allows you to search on field value information. Some fields offer additional options, such as
Sounds Like for names and a +/- option for height and weight. To perform a record search:
1. From the Main Menu, click Record Search.
The Record Search screen for the currently selected database appears.
2. In the appropriate fields, enter or select the information that will be used as criteria in the search
procedure.
Note: You may click the icon to the right of many of the fields to select additional search options (such
as “Equals”, “Sounds like”, “Starts with” or “Contains”). When selecting from a pick list you may select
multiple items to be included in the search. The various options will be separated in the search field by
commas.
3. Click on any of the search tabs (such as Address) to add additional search criteria using known detail
about your subject.
4. In the Appr Data 1 tab, the +/- boxes next to the Height and Weight fields allow you to select a “Give or
take” value if needed. For example, you can select 5’9” for the height and 2” as the +/- value. The
system will then use a height range of 5’7” to 5’11” as the height criteria.
5
IWS™ Law Enforcement Web User’s Manual
October 2006
ImageWare® Systems, Inc.
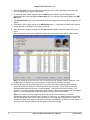
5. Click the Appr Data 2 tab to enter search criteria into any of the custom appearance fields that have
been configured by your system administrator.
6. To search for scars, marks or tattoos, click the SMT tab then select the type of marking and its
description/location from the Type and Description lists. You may also enter search detail in the SMT
Notes field.
7. The UDF tabs/fields allow you to enter search criteria into categories which have been created by your
agency.
8. If necessary, enter a larger number in the Max Results (from 1 – 1000) field to increase the number of
records that may be displayed in the search results list.
9. When all criteria have been entered, click the Search button located in the lower right corner of the
screen.
The Summary Information screen appears showing all records matching the search criteria entered.
Note: If no matching records are found, the “no matching records” dialog box will be displayed. Click
the OK button and edit the search criteria before clicking the Search button once again.
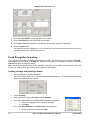
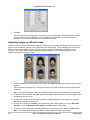
10. If all matching records cannot be displayed on one screen, the system will display the first twenty
records along with the number of screens required to view all records. This is shown in the image
displayed above where two screens (1 2) are necessary. Click on the next screen number (in our
example “2”) in order to see the next grouping of 20 records. If scroll arrows appear under the mugshot
photos, you may view additional images by clicking on the right and left scroll arrows.
Note: On occasion, photos for a particular record may be blocked from view by your System
Administrator due to the individual’s status (juvenile). In such cases, the image window would be black
and state “Image Blocked”. In other cases, the release of an image may be limited and the system will
not allow the image to be printed or exported. In that case, the statement “No Release” would appear on
the bottom of the photo as displayed by the images on the following page.
6
IWS™ Law Enforcement Web User’s Manual
October 2006
ImageWare® Systems, Inc.
Search Results Screen
The Search Results screen displays all records matching the criteria used to execute a search. In addition,
summary information for the highlighted record (by default, the first record on the list) is displayed at the top of
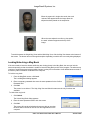
the screen. This includes a booking photo (if one exists) along with the name, booking number, charges and
arrest date of the subject. This area of the results screen also displays how many total records match the
criteria as well as the number of the records being displayed.
To sort the results by a specific data type (for example, Race), click on the column title. Initially, the
information is sorted in ascending alphanumeric order (i.e. numbers followed by letters). Clicking on the
column title once again will sort the data in descending order.
Search Results List Options
Once a search results list has been produced, a menu is displayed at the bottom of the screen listing the
numerous options that may now be performed.
Option
Description
View Record
Displays the most recent booking information for the record highlighted on the
results list
View Bookings
Displays all bookings for the person associated with the record highlighted on the
results list
Create Photo Lineup
Uses the booking photo associated with the record highlighted on the results list
as the base image for a photo lineup
Export
Places a copy of the results list in a .csv file (similar to an Excel spreadsheet).
Print Results
Prints a copy of the results list. (Note: You must have a pdf reader installed on
your system in order to print or print preview any of the Law Enforcement Web
print reports.)
7
IWS™ Law Enforcement Web User’s Manual
October 2006
ImageWare® Systems, Inc.
Viewing Record Detail
To use the menu options displayed on the previous page to view record detail:
1. Click the record that should be involved in the procedure.
2. Click View Record to access details about the selected record.
The arrest record for the select subject will now be displayed.
Viewing Bookings
The View Bookings option will provide a search results list displaying all arrest records for the selected
subject. Previous arrest records for an individual are tied together by information entered in the Master Key
field located on the Person tab. Results when using this function are dependent on the Master Key detail
being assigned to the appropriate records.
1. From the search results list, click the record whose previous bookings should be displayed.
2. Click View Bookings to access all booking records related to the selected person.
A search results list will be displayed for all records related to the subject allowing you to view, edit,
print, etc. as required.
Note: Any previous booking records for the selected subject that do NOT contain the Master Key detail
will not be displayed when the View Bookings option is used.
Exporting and Saving Search Results
The text data of the search results list may be exported to a .csv file for use in court or another reporting
application. Only the fields of data that are displayed in the results list will be exported. “.csv” files resemble
MS Excel spreadsheets and the data may then be used for creating charts and graphs if necessary.
1. Conduct a search to locate the appropriate records.
The Search Results screen appears.
2. Click Export….
The File Download dialog box is displayed.
3. Click Save.
The Save As dialog box appears.
4. Enter a name for the file and select the location where the file should be saved.
5. Click Save.
The exported results list has now been stored in the location and under the name provided in step 4.
Printing the Search Results List
The entire search results list (regardless of the number of screens required to display the data) may be
printed at one time. The system will automatically print the column data for each record which has been
displayed on the screen. The user cannot add additional fields to be viewed or printed. The report will be
sent to your default printer immediately after you have entered report title information.
Note: You will need a pdf reader installed on your system in order to print or print preview any of the Law
Enforcement Web print reports.
To print the Search Results list:
1. Click the Print Results button at the bottom of the results listing.
2. Highlight the List option from the Select Format dialog box and click OK.
8
IWS™ Law Enforcement Web User’s Manual
October 2006
ImageWare® Systems, Inc.
3. Enter a title for the report in the Get Print Information Report Title: box and click OK.
A PDF version of the printout is now displayed. The report title entered in step 3 will appear below the
print report header.
4. Click the Printer icon
at the top of the page.
5. Edit any required print settings and click OK.
6. Close the print preview window by clicking on the close X in the upper right corner of the screen.
Creating a Line Up from the Search Results List
A photo lineup may be created from a mugshot assigned to a search results list record by using the Create
Lineup button. Complete details on photo lineups begin on page 23 of this manual and instructions for
creating a lineup from the search results list are detailed there.
E-mailing Results Lists
You can e-mail a search results list or any other object that may be exported (such as a photo lineup). This
is accomplished by adding the exported file to your e-mail as an attachment.
Printing a Record Details Report
You may print the main elements of a record along with a mug photo using the Print/Details report. To print
detailed records, perform these steps:
1. Conduct a search to locate the record you wish to print.
The Search Results screen appears.
2. From the list, select the record you wish to print, and then click View Record.
The Booking Record for the subject you selected in step 2 now appears on the screen.
3. Click Print.
The Choose Print Report dialog appears.
4. Select Detail from the drop down list then click OK.
A PDF version of your report is now displayed.
5. Click the print icon
located on the toolbar at the top of the screen.
6. Make the appropriate changes to the print menu and click OK.
Note: If your report format contains the Age field, be aware that the number that appears on the printout
will not be the subject’s current age, but the age he/she was at the time of booking. For example, if the
year of birth was 1965 and the record was created in 1995, the Age field will show "30".
Searching on SMT Fields
Users may enter text data describing the type of SMT (mole, needle mark, scar, tattoo) along with a description
(Ankle, left) and any desired notes onto the search screen to produce an appropriate results list. Notes could
contain a verbal description of a tattoo (eagle, red, white and blue flag, etc.) or the size or placement of a mole.
Searching on SMT field information does not guarantee that a picture of the SMT was captured. SMT searches
may be used to locate a given SMT that should be used in an SMT photo lineup. Instructions on performing
lineups of this type are located on page 25. To search on SMT text information:
1. From the Main Menu, click Record Search.
The Record Search screen appears.
2. Click on the SMT search tab.
9
IWS™ Law Enforcement Web User’s Manual
October 2006
ImageWare® Systems, Inc.
3. Select the Type of SMT from the drop down box provided.
4. Select a Description from the drop down box provided.
5. Enter Notes criteria that will assist in narrowing down the search results list if applicable.
6. Click the Search button.
The results list will now be displayed. You may select and view individual records as required using the
View Record option at the bottom of the screen.
Facial Recognition Searching
If your system is connected to a database that supports the IWS™ Facial Recognition functionality, the FaceID
search options will be enabled on the Appr tab. Using this functionality you may load an image from outside the
database with which to initiate the search.
Note: The Facial Recognition module is sold separately as an add-on to the IWS™ Law Enforcement Suite, and
as such, you must have the appropriate license to access its functionality.
Loading an Image and Initiating a Search
1. From the Main Menu, click Record Search.
The Record Search screen for the currently selected database appears. The Facial Recognition search
options are displayed on the Appr tab.
2. Click Load Image.
3. Select whether the image is From File or From Database.
10
•
If you select From File, the FaceIDMasterWin dialog box is displayed.
Browse and highlight the file containing the image.
Click Open.
•
If you select From Database, the Subject Search dialog appears.
Specify the search criteria and click OK.
IWS™ Law Enforcement Web User’s Manual
October 2006
ImageWare® Systems, Inc.
A list of mug shots appears.
Select an image by clicking on it, using the scroll bar to view additional images when
necessary.
The selected image will appear with a red border.
Click OK.
The image appears awaiting eye find.
Click OK to add the image to the search criteria screen.
4. Select Use FaceID and either the Fast or Thorough option.
5. Click Search.
Face ID Search Results Options
Once the Face ID search has been completed a list of images matching your base image will be displayed. The
image of the subject selected for the search appears with a red border. The subject’s image is also displayed on
the right side of the dialog box.
Various options are provided for
locating those closely related to the
base subject.
Normalize – this option removes
color from the images and adjusts
the framing of each image to make
the headshots appear the same
size.
Confidence – this option displays a
value approximating how closely the
image matches the target image.
Lock – this option allows you to
protect the image search using a
password, preventing users from
accessing record information without
proper authorization.
IMPORTANT: Be certain to make
careful note of your password, as
there is no way to recover it.
Search – this function allows you to
select a different image then click
the Search button to create a new search based on the newly selected image.
11
IWS™ Law Enforcement Web User’s Manual
October 2006
ImageWare® Systems, Inc.
Images
Any image attached to a record within the LE Web program may be viewed, printed and exported. These
activities are controlled, however, by permissions and the user must have the appropriate authorization in order
to perform image functions. As mentioned earlier in this manual, booking images (or mugshots) may be labeled
“Blocked” or “No Release” by a system administrator. In that case, viewing or exporting the image would not be
possible regardless of the permissions you have been assigned.
Image functions may be performed from wherever the image is displayed. If you have selected a record in a
search results list and a booking image appears in the Summary Information section at the top of the screen,
you may view, print or export from that location. If you are viewing a particular booking record and an image of a
scar, mark or tattoo is contained, you may export, print or view the image from that position.
Viewing Booking Images
1. From any screen where an image is displayed (i.e. view record screen, search results list), right-click
the image you wish to view.
2. Select the View Image option from the drop down box provided.
The image will appear in an enlarged format on the screen.
3. To exit the image, click on the Close X in the upper right corner of the zoomed image.
Viewing Booking Image Properties
The properties assigned to a booking image include the system paths for images and thumbnails. Watermark
verification (whether the image HAS or HAS NOT been verified) is also displayed on this dialog box. To view
the image properties:
1. From any screen where an image is displayed, right-click the image whose properties you wish to
view.
2. Select the Properties option from the drop down box provided.
The Thumbnail Properties dialog box is now displayed.
3. When finished reviewing image properties, click the Close button on the dialog box.
Printing Booking Images
If you have been assigned the required rights, you may print any single booking image for use outside of LE
Web. Images can be printed in one of the default Law Enforcement Web report formats (i.e. Small Image, Large
Image), or a custom designed format used by your agency. All LE Web image print formats contain additional
detail (such as subject’s name, booking number, etc.) along with the image requested.
Note: If an image is identified as a “Blocked” or “No Release” image, it will not be printed.
1. From any screen where an image is displayed, right-click the image you wish to print.
2. Select Print from the menu that appears.
12
IWS™ Law Enforcement Web User’s Manual
October 2006
ImageWare® Systems, Inc.
The Select Format dialog appears.
3. Highlight the report format you wish to use from the list provided and click OK.
A PDF version of the information to be printed will appear on the screen.
4. Click the Print icon located on the tools menu at the top of the screen.
A print dialog box appears.
5. Alter printer settings as required and click OK.
The image will now be printed.
6. Close the print preview window by clicking on the close X in the upper right corner of the screen.
IMPORTANT: Report formats have been preconfigured by your System Administrator and may not
appear as shown in this document. Please contact your System Administrator if you are offered a choice
of reports and are unsure as to which format you should use.
Saving/Exporting Booking Images
If you have been assigned the required rights, you can save/export any single booking image for use outside of
the LE Web program. Images may be exported in either a bitmap (*.bmp) or jpeg (*.jpg) graphic file format.
Images are displayed in the Summary Information portion of the search results listing, as well as in the View
Record, mugbook and photo lineup selections.
Note: If an image is identified as “Block” or “No Release”, it will not be exported.
1. From any screen where an image is displayed, right-click the image you wish to save/export.
2. Select Export from the menu that appears.
The Save Picture dialog box appears.
3. Using the drop down arrow associated with the Save In field, select the location where the image
should be saved.
4. Enter a name for the image in the File name field.
5. Select the appropriate graphic format (i.e. .jpg, .bmp) from the Save as Type list.
6. Click Save to export the image to the location specified in step 3.
13
IWS™ Law Enforcement Web User’s Manual
October 2006
ImageWare® Systems, Inc.
Mug Book
The Mug Book is an on-line photo database of all mug shots in the IWS™ Law Enforcement Web system. It can
be filtered to display only subjects with certain characteristics (e.g., white males, 30-35 years old, brown hair and
mustaches). Witnesses can then scroll through the photos produced from the search criteria allowing them to
identify/select potential suspects.
Special features within the Mug Book function allow you to lock the witness onto the Mug Book section of the
program. Using this option, you may feel free to leave the witness alone with the computer without being
concerned that they will see suspect booking details or view information on your hard drive or network.
Searching for Mug Shots
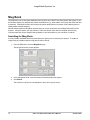
A list of possible candidates should be produced by the system prior to review by the witness. To create an
image listing of possible suspects using specific search criteria:
1. From the Main Menu, click the Mug Book option.
The Mug Book Search screen appears.
2. In the appropriate fields, enter information that best describes the suspect.
3. Click Search.
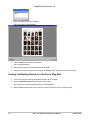
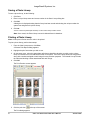
The electronic mug book is now displayed in the multi mug view format.
14
IWS™ Law Enforcement Web User’s Manual
October 2006
ImageWare® Systems, Inc.
4. Click the scroll arrow to the right of the images to view additional images if available.
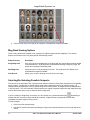
Mug Book Viewing Options
Three viewing options are available once a grouping of subject images has been displayed. The viewing
buttons at the bottom of the mug book perform the following actions:
Button/Function
Description
Single Mug View
Only one mug shot is displayed at a time along with any images that have been added
to the selection bar. Once this button is selected and viewing is image by image, the
button name changes to Multi Mug View.
Multi Mug View
Allows the user to view 24 images per screen. The scroll arrow then allows you to
view additional images if available.
View Record
Allows you to view the booking record of the current image.
Selecting/De-Selecting Possible Suspects
The column on the right side of the mug book screen allows a witness to select those images that could possibly
be the suspect. Occasionally, a mistake will be made and the witness will want to de-select an image. All
changes should be made prior to the mug book being saved and/or printed. A subject cannot be selected twice
in one mug book. The word “selected” will be printed on the original mug book image once that image has been
used so the witness does not try to select the same image twice.
If you are viewing in Single Mug View mode, you will click the mug view directional arrows
depending on
whether the next or previous image should be presented. Image selection is performed the same way
regardless of how the image is being viewed.
To select images:
1. Click on the first required image.
2. Hold the left mouse button down and drag the image to the vertical selection bar on the right side of the
screen.
15
IWS™ Law Enforcement Web User’s Manual
October 2006
ImageWare® Systems, Inc.
3. Release the mouse button.
The selected image will now reside in two places. It will appear in the vertical “selected” column with a
small icon in the lower left corner. It will also appear in its original location with the word “selected” over
the top of the image.
To remove (deselect) an image from the “Selected” column:
Click the deselect icon
in the lower left corner of the image.
OR
Use the right mouse click and select <-Remove from the drop down list provided.
Single/Multi Viewing
Multiple images may be viewed at one time or the system may be set to display a larger version of a single
image for selection purposes. The witness/victim may switch back and forth when viewing the detail even if
the computer has been locked.
16
IWS™ Law Enforcement Web User’s Manual
October 2006
ImageWare® Systems, Inc.
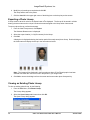
When the system is in single view mode, the word
“selected” will appear below the image when the
subject has been placed on the suspect list.
When the user selects the multi mug view option,
the word “selected” appears at the top of the
image.
To switch between the Single Mug View and the Multi Mug View, click the Mug View button at the bottom of
the screen. The button name will change description depending on which view is currently being displayed.
Locking/Unlocking a Mug Book
If the user needs to leave the witness while they are viewing photos in the Mug Book, the user can lock the
screen temporarily so that the witness is unable to leave the Mug Book portion of the program. The witness may
continue to scroll through and select possible images, but they will not be able to view detailed arrest records or
access any other information contained on the computer.
To lock the mug book:
1. From the Mug Book screen, click Lock.
The Lock Mug Book dialog appears.
2. Enter a temporary password then enter the same password in the Confirm
Password field.
3. Click OK.
The screen is now locked. The Help, Mug View and Unlock buttons are the only functions now
available.
To Unlock the mug book:
1. Click Unlock.
The Unlock Mug Book dialog appears.
2. Enter the same password used to lock the screen.
3. Click OK.
The screen will now be unlocked and users are able to use other
functions within LE Web as well as use other applications on the
computer.
17
IWS™ Law Enforcement Web User’s Manual
October 2006
ImageWare® Systems, Inc.
IMPORTANT: Be certain to make careful note of your password as there is no way to reverse the
lock procedure if the password is forgotten. If you forget the password, you will need to exit LE
Web and log back into the program. The mug shot detail will be lost if the information had not
previously been saved.
Saving a Mug Book
A mug book must be saved or the system will not allow the contents to be printed.
Note: Once saved, the Mug Book cannot be deleted from the database.
1. From the Mug Book screen, click Save.
The Save Mug Book dialog appears.
2. Enter a unique name for the Mug Book
3. Enter the case number to which the mug book should be associated.
4. Click OK.
The Mug Book Saved dialog is displayed.
5. Click OK once again and continue with further Mug Book operations.
Viewing an Existing Mug Book
1. From the Main Menu, click Mug Book.
The Mug Book Search screen appears.
2. Click the Open… button at the bottom of the screen.
The Open Mug Book Search dialog appears.
3. Click the down arrow and select the name of the Mug Book you wish to open.
4. Click OK to display the Mug Book.
Printing a Mug Book
When a mug book is printed, the entire image base provided to the witness is created in hard copy. The word
“Selected” appears above those images that were selected by a witness.
Note: You must save a Mug Book in order to print it.
1. From the Mug Book screen, click Print.
The Select Format dialog box appears.
18
IWS™ Law Enforcement Web User’s Manual
October 2006
ImageWare® Systems, Inc.
2. Select “Mug Book” and then click OK.
The Print Preview screen appears.
3. Click the Print icon at the top of the screen.
The Print dialog appears.
4. Alter the printer settings as required and then click OK.
5. Close the print preview window by clicking on the close X in the upper right corner of the screen.
Viewing the Booking Record for a Particular Mug Shot
1. Click on the mug shot of the person whose record is to be reviewed.
2. Click the View Record button at the bottom of the screen.
The record for the subject selected in step 1 is now displayed.
3. When finished reviewing the record, click the <<Previous button to return to the Mug Book.
19
IWS™ Law Enforcement Web User’s Manual
October 2006
ImageWare® Systems, Inc.
Photo Lineup
Law Enforcement Web allows you to create a photo lineup for witness viewing using any photos in the system
database. Photo Lineup includes an automated search for similar photos and easy drag and drop control for
creating the lineup.
Creating a New Photo Lineup
There are two ways to search for the images that will make up the photo lineup:
•
Search Database – This option will make existing database images available for lineup selection once
search criteria has been established.
•
Import Image – This option loads an image from an external source (such as your hard drive or a flash
device) then matches possible subjects to the image.
Note: Lineup Import File must be enabled in the System Configuration.
To create a new photo lineup, perform these steps:
1. From the Main Menu, click Photo Lineup.
The Lineup dialog appears.
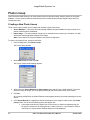
2. Select New Lineup and then click OK.
The Lineup Suspect Search dialog appears.
3. Select either the Search Database or Import Image option and fill in any criteria required. If you have
chosen to import an image, you will be prompted to enter the first and last names of the subject.
4. Click OK.
As in creating a Mug Book, the Search Results screen appears showing all records matching the search
criteria.
5. In the Search Results list, highlight the desired record/photo of the suspect, and then click the Create
Lineup button. One of the two following options will appear next:
•
20
If the suspect has been the subject of a previous lineup, a dialog box appears giving you
the option to select from an existing lineup or create a new one. If you choose to create a
new lineup, the Lineup Search Settings dialog box will be displayed.
IWS™ Law Enforcement Web User’s Manual
October 2006
ImageWare® Systems, Inc.
•
If the suspect has not been the subject of a previous lineup, the Lineup Search Settings box
appears with the appearance information for the selected suspect displayed.
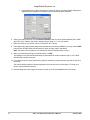
6. Select your search criteria or click the Restore Defaults button to use the system defaults (Sex, Racial
Appr, Eye Color, Glasses, Hair Color, and Age using a range of +/- 4) to your search.
7. Enter the values for your search criteria, for example, Sex = M(ale).
8. If the target image was imported rather than selected from the existing database, you may click the SMT
button to use the SMT Notes field to search for notes on scars, marks, and tattoos.
Note: This option will not appear if you selected the Search Database option in step 3.
9. When you’re finished entering your search criteria, click OK.
This displays a set of photos whose booking records match the criteria entered in step 7. An LE Web
default lineup contains six photos.
10. If your station has the Lineup Size feature (optional), select the number of photos you want to include in
the lineup.
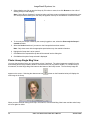
The suspect subject’s photo is always displayed in the lower left corner of the screen. To create your
lineup, continue with the following:
11. Click and drag one of the images you want to include to one of the available boxes in the lineup.
21
IWS™ Law Enforcement Web User’s Manual
October 2006
ImageWare® Systems, Inc.
12. Release the mouse button and the selected image is marked as “Selected” on the images portion of the
screen and added to the lineup.
13. Click the up or down scroll arrows
to the right of the images to bring more photos into view.
14. Repeat steps 11 and 12 for each image you want included in the lineup.
Note: To replace an image in the lineup, drag a different image into the same box.
15. When you are done creating the lineup, click View Lineup to display only those images selected in a
Photo Lineup format.
Creating a Photo Lineup Using SMT Images
Law Enforcement Web allows you to create SMT lineups with scars, marks and/or tattoos that are similar in
nature and body placement. An SMT photo must exist in the database which the system can use as a basis for
comparison. You determine from a list of possible images, which items are added to the lineup. The actions for
creating an SMT lineup are almost identical to the practices you just performed for a photo lineup.
Note: If the system cannot find enough SMT photos for a full lineup (6, 8 or 12 depending on your system
setup) a message stating that you must expand your criteria will be displayed. The system will NOT
create a lineup with less than the required number of photos available.
1. From the Main Menu, click Record Search.
The Record Search screen for the currently selected database appears.
22
IWS™ Law Enforcement Web User’s Manual
October 2006
ImageWare® Systems, Inc.
2. Fill in the appropriate search detail to locate the suspect with the SMT to be the base for the photo
lineup and click Search.
3. Highlight the record containing the SMT image and click the View Record button.
The record selected in step 3 is now displayed.
4. Click the SMT tab located in the upper right portion of the dialog box.
The SMT image associated with this record is displayed at the top of the screen.
5. Click the Create Lineup button at the bottom of the screen.
The photo lineup screen is displayed along with the Lineup Search Settings dialog box.
23
IWS™ Law Enforcement Web User’s Manual
October 2006
ImageWare® Systems, Inc.
6. Select the appropriate criteria to display similar SMT’s and click OK.
SMT image options are displayed.
7. Click and drag one of the images you want to include to one of the available boxes in the lineup.
8. Release the mouse button and the selected image is marked as “Selected” on the images portion of the
screen and added to the lineup.
9. Click the up or down scroll arrows
to the right of the images to bring more photos into view.
10. Repeat steps 7 and 8 for each image you want included in the lineup.
Note: To replace an image in the lineup, drag a different image into the same box.
11. When you are done creating the SMT lineup, click View Lineup to display only those SMT images
selected in a Photo Lineup format.
Creating a Photo Lineup from an Imported Image
You may import an image from an outside source and use this as the base for your photo lineup. To import the
image and create a new lineup:
24
IWS™ Law Enforcement Web User’s Manual
October 2006
ImageWare® Systems, Inc.
1. From the Main Menu, click Photo Lineup.
The Lineup dialog appears.
2. Select New Lineup and then click OK.
The Lineup dialog box is displayed.
3. Select the Import Image radio button.
4. Click the Browse… button.
5. Click the Browse… button once again when the ImportImageMasterWnd dialog box is displayed.
6. Highlight the name of the image to be imported and click OPEN.
7. Click OK to accept the image.
8. Enter a first and last name for the image.
9. Click OK.
10. Click OK.
The imported image is now the first image in the photo lineup selection row. The search criteria menu is
displayed.
Selecting Similar Images
Whenever the Photo Lineup search criteria menu is displayed, you may choose to have the system search for
Similar Images rather than field data. To have the system look for those images that match the physical
appearance of your suspect:
1. Using the Photo Lineup Main Menu option, create a new lineup.
Either method (searching database or importing an image) may be used for this procedure.
2. When the Lineup Search Settings menu is displayed, select the Similar Images checkbox.
25
IWS™ Law Enforcement Web User’s Manual
October 2006
ImageWare® Systems, Inc.
3. Click OK.
The suspect photo is now displayed in the lower left corner of the screen. All images that the system
believes match the general appearance of the suspect will be displayed. You may now select the
remainder of your lineup and perform any lineup actions required.
Adjusting Images in a Photo Lineup
Options on the View Photo Lineup screen allow you to adjust the size, position, and background fill of individual
photos to ensure that they conform to the appearance of the other photos. The first position on the lineup may
NOT be used for your suspect. Trying to move the suspect’s image to that position will result in an error
message. Your system administrator may also mark the last position as non-suitable depending on your
agency’s regulations concerning lineups.
1. To move an image to another position in the lineup, click Swap then drag and drop the image to its new
location.
The two images will swap places. The system will stay in the Swap mode until another function button
is selected.
Note: You may not be able to “swap” your suspect’s image with the first or last locations on the lineup.
2. To adjust the size of a photo, click Size. A sliding bar appears beside the photos. Click and drag the bar
to change the size of a photo.
3. To adjust the background fill on a photo, click Fill. A sliding bar appears below the photos. Click and
drag the bar to change the sensitivity.
4. To undo your changes, click Revert. In the Revert dialog box, select whether you want to Revert All
Changes, or only the Background Fill, Sizing or location (Swap) of the images.
5. To seal the lineup so that only users with Administrator privileges can view it, select the Sealed option.
Note: You must have Administrator privileges in order to mark the lineup in this manner.
26
IWS™ Law Enforcement Web User’s Manual
October 2006
ImageWare® Systems, Inc.
Saving a Photo Lineup
To save a photo lineup, do the following:
1. Click Save.
2. Enter a unique lineup name and a case number in the Save Lineup dialog box.
3. Click OK.
A dialog box is displayed stating that the lineup has been saved and showing the unique number the
system has assigned to the photo lineup.
4. Click OK.
You are now free to print/export the lineup or return to the lineup creation screen.
Note: Once saved, the Photo Lineup cannot be deleted from the database.
Printing a Photo Lineup
Note: A lineup must first be saved in order to be printed.
To print a photo lineup, perform these steps:
1. From the View Lineup screen, click Print.
A Choose Print Report dialog appears.
2. Highlight the print format that you wish to use.
3. On the same menu, select the appropriate radio button describing whether you wish to print a photo
lineup for internal use or one that can be shown to the public. The Public Lineup shows the mug photos
along with a number assigned to each image for easy selection purposes. The Internal Lineup includes
the name and booking number associated with each image.
4. Click OK.
The Print Preview screen appears.
5. Click the print icon
at the top of the screen.
The Print dialog appears.
27
IWS™ Law Enforcement Web User’s Manual
October 2006
ImageWare® Systems, Inc.
6. Modify the print settings as required and click OK.
The lineup will be sent to the printer.
7. Click the close X in the upper right corner of the dialog box to exit the print preview screen.
Exporting a Photo Lineup
A lineup must be saved in order for the Export button to be displayed. The lineup will be stored in a folder
bearing the same name as the unique id number that was assigned to the lineup when it was saved.
To export a photo lineup, perform these steps:
1. From the View Lineup screen, click Export.
The Windows Browse menu is displayed.
2. Select the export location (i.e. My Documents) for the lineup.
3. Click OK.
A dialog box is displayed showing the location path of the newly saved photo lineup. Double clicking on
the folder name will display the lineup in the format shown below.
Note: The images will be displayed in the format shown above IF the Filmstrip option has been
selected from either the View icon or menu drop down in your image folder.
4. Click OK to remove the dialog box from the screen and resume other photo lineup activity.
Viewing an Existing Photo Lineup
To view an existing photo lineup, do the following:
1. From the Main Menu, click Photo Lineup.
The Lineup dialog appears.
2. Select the Open Lineup radio button then click OK.
The Open Lineup dialog appears.
28
IWS™ Law Enforcement Web User’s Manual
October 2006
ImageWare® Systems, Inc.
3. Select whether you wish to open the lineup by ID number or name, then click Browse to view a list of
existing lineups in that category.
Note: Lineup IDs are displayed in numerical order and lineup names are displayed in alphabetical order.
If no lineup name has been given, the lineup ID appears at the top of the Name list in numerical order.
4. To view only the lineups created by the currently logged on user, select the Show only the lineups I
created checkbox.
5. Select the Sealed checkbox if you want to view lineups that have been sealed.
Note: Only those users with the appropriate permissions may view sealed information.
6. Highlight the lineup that is to be opened.
7. Click OK and the requested lineup data will be entered into the dialog box.
8. Click OK and the photo lineup selected is displayed.
Photo Lineup Single Mug View
You may view the photo lineup, one mug shot at a time, if preferred. The photo images are magnified in size
and scrolling arrows are provided to allow for movement from one mug shot to another. To view the lineup in
this manner, click the Single Mug View button at the bottom of the lineup screen. The first lineup image will
appear on the screen. Selecting the down arrow icon
next image in the lineup.
(shown on the illustration below) will display the
When you have finished viewing the lineup in this manner, click the Multi Mug View button and the entire lineup
will once again be visible.
29
IWS™ Law Enforcement Web User’s Manual
October 2006
ImageWare® Systems, Inc.
Adding Photo Lineup Viewings
Detail concerning a witness/victim viewing the photo lineup may be documented using the Add Viewing …
button. The dialog box allows you to record case information (such as the case number, photo selected by
viewer, etc.) along with such witness detail as the witness’ name, address and phone number. Unlimited
“viewings” may be added to a given photo lineup allowing for the fact that multiple witnesses may be shown the
photo array.
Note: The only field in the Viewing dialog box that is mandatory is Witness Selection.
To add viewing information:
1. From the View Lineup menu, select the Add Viewing … button.
The Viewing dialog box is displayed.
2. Enter the appropriate Viewing detail making sure that the Witness Selection field contains the numbered
image selected by the witness.
3. Click Save.
The photo lineup is once again displayed. A new button, Viewings, is now added to the button line at
the bottom of the screen. This button may be used to view previously entered viewing detail.
Repeat steps 1-3 until all viewing information has been entered.
Displaying Photo Lineup Viewing Detail
You may view the witness/victim detail previously entered for a given photo lineup. The Viewings… button is
provided to allow the display of detail entered after a witness reviews the lineup.
1. From the View Lineup menu, select the Viewings button.
The Viewing dialog box is displayed.
2. Review the detail as necessary and click the Next button (when active) to view other witness selections.
3. When finished viewing, click OK to return to the photo lineup.
30
IWS™ Law Enforcement Web User’s Manual
October 2006
ImageWare® Systems, Inc.
Creating a New Photo Lineup Using Existing Lineup Images
A new lineup may be generated using the same photo images in the currently displayed lineup. This allows you
to specify a new case number and witness viewing detail without going through the image selection process
once again. Be sure the current lineup has been saved prior to performing the following actions.
4. From the View Lineup screen, click the New… button.
A dialog box is displayed asking if you would like to create a new lineup using the images displayed on
the screen.
5. Click Yes.
The system rearranges the photo images and redisplays the function buttons for altering the size,
location and fill levels of the images as well as the Save button. This is an entirely new lineup and must
be saved once again before printing may be performed.
31
IWS™ Law Enforcement Web User’s Manual
October 2006
ImageWare® Systems, Inc.
System Logoff
Users should log off the system whenever they are not actively working in LE Web. The Law Enforcement Web
license will not be released for others to use until the user has completely logged out of the system. To perform
this action:
1. From any screen within the LE Web program, click the Main Menu button.
2. Click the exit link
located in the lower right corner of the screen.
The main login screen is displayed.
3. Click the Exit button.
32
IWS™ Law Enforcement Web User’s Manual
October 2006