1
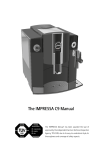
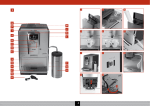
Welcome to the Sprada One Touch Cappuccino Dear Customer, Congratulations on purchasing a high-quality SPRADA coffee machine. To get the most out of your SPRADA machine, please read this manual carefully before use. Please start by reading the safety notes. Keep this manual in a safe place as a reference guide or to give to any other users of your machine. Future One Touch Cappuccino Fully Automatic Coffee Centre team is here to support you as we are dedicated to your The SPRADA Operating Instructions and Useful enjoyment of greatTips coffee from this high-quality SPRADA product. Retailer: Date & Place of Purchase: i Familiarising yourself with your Future OTC K M L M N O P Q A B C D E F R G S H I J A.Display B. Rotary Control Knob C. Button “>” D. Button “Exit” E. Height Adjustable Spout F. Nameplate with Specifications (inside) G. Coffee Grounds Container (inside) H. Mains Switch (on side panel) I. Cover Panel J. Drip Tray ii K. Removable Water Reservoir L. Bean Container (inside) M. Pre-Ground Coffee Chamber (inside) N. Cup Holding Plate O. Cup Warming On/Off Button P. On/Off Switch Q. Service Door (side panel) R. Rear Rollers (underneath at the back) S. Milk Cooler Thermos Important areas on your Future OTC Water Reservoir (K) Water Filter Bean Container (L) Height Adjustable Spout (E) Up/Down Position Drip Tray & Cover Panel (I & J) Milk Cooler Thermos (S) Connector on Drip Tray Brewing two cups Cappuccinotori access Grinder Setting Control Brewing Unit Release iii iv Contents 1. SAFETY INSTRUCTIONS 1 2. 2.1 2.2 2.3 2.4 2.5 SETUP Preparing the Machine The most important Controls Adding Water and Beans The Cappuccinotori (Milk Frother) Pre-Warming your Cups 3 3 3 4 4 5 3. 3.1 3.2 3.3 3.4 3.5 3.6 SWITCHING ON AND GETTING STARTED Mains Switch On/Off Switch Brewing with Factory Settings Brewing two Cups of Coffee Emptying the Drip Tray and the Coffee Grounds Container Hints for First Time Users 4. ADVANCED SETTINGS FOR BREWING Speciality Coffees 4.1 The Main Menu 4.2 Coffee Recipes 5. 5.1 5.2 5.3 5.4 5.5 5.6 5.7 5.8 5.9 THE SETTINGS MENU Coffee Recipes - using the Settings Menu Operating the Machine with or without the Water Filter Setting the Water Hardness Level Setting the Temperature Setting Time and Timer Functions Setting the Language Setting the Switch-OFF Rinsing Function Setting the ECO Mode Reading Statistics 6 6 6 6 7 8 18 9 9 9 11 11 12 14 14 15 16 16 17 17 6. MANUAL ADJUSTMENTS 6.1 Setting the Grinder 6.2 Preparing Pre-Ground Coffee 18 18 18 7. 7.1 7.2 7.3 7.4 7.5 7.6 7.7 7.8 20 20 20 21 21 22 24 25 25 CARE: CLEANING AND MAINTENANCE Rinsing the Cappuccinotori (Milk Frother) Cleaning the Cappuccinotori (Milk Frother) Rinsing the Spout Cleaning the System Descaling the System Regular Manual Cleaning of the Machine Cleaning the Brewing Unit Changing the Water Filter 8. SYSTEM MESSAGES 9. TROUBLESHOOTING 10. ACCESSORIES 11. FURTHER INSTRUCTIONS 12.GUARANTEE 26 27 28 29 29 v 1. Safety Instructions 1. Safety Instructions • The SPRADA Future One Touch Cappuccino (OTC) is a domestic machine and not guaranteed for commercial use - see guarantee conditions. • Operating voltage is 220 - 240 V. • Do not operate the machine if the Power Cord or machine case is damaged. If damaged it should be replaced by a qualified technician. • Do not pull or let the Power Cord come into contact with hot parts. • Do not pull on the Power Cord to disconnect the machine. • Observe the cleaning & descaling instructions provided. Otherwise, claims under the guarantee may not be accepted. • Make sure to switch off and unplug the machine before maintenance or cleaning. • The SPRADA Future OTC is for indoor use only and should be located on a firm and level surface. • Do not place the machine on a hot surface or near an open flame. • Keep out of reach of children and ensure that they do not play with the appliance. • Unplug the machine during extended periods of absence. • Do not leave the machine switched on unnecessarily. • Never allow the machine to become submerged in water. • Do not use a dishwasher to clean the machine or individual parts. • Unplug immediately if there is a defect. • Liability for damage cannot be accepted if the machine is incorrectly operated or serviced by non-accredited service agents. • Make sure there is nothing but roasted coffee beans in the beans container. • This machine is not suitable for individuals (including children) with physical, sensory or mental impairments, including individuals who do not have sufficient experience or knowledge, unless they are shown how to operate the machine or initially supervised by someone responsible for their safety. • Please contact the retailer from whom you purchased the machine for repair or send the machine to a SPRADA national customer service centre. 1 1. Safety Instructions ! Caution: Electrical appliances should be repaired only by qualified personnel as non-professional repairs can expose the user to significant risk. Liability for damages cannot be accepted if the machine is used for anything other than the intended purpose or is incorrectly maintained or serviced. ! Caution: Using the On/Off Switch or Mains Switch during brewing can damage the machine. Only switch off the appliance when in Standby mode. ! Caution: Splashes from the Spout can cause scalding when drawing steam or hot water. Leave to cool for a few minutes before touching. Specifications Mains voltage: 220 - 240 V Power requirement: 1465 W 2 2. Set up 2. Set up 2.1 Preparing the machine The following items are packaged with the machine: • User Manual • Milk Cooler Thermos with separate Connecting Pipe • Measuring Spoon with Assembly Tool for Filter • 2 Cleaning Tablets • 1 Claris Water-Filter • 1 Water Hardness Test Strip Unpacking: • Carefully remove the machine and all parts from the packaging. Please keep all packaging including the styrofoam inserts in case you need to return the machine for service. • Place the machine on a level, dry and stable work surface. • Connect the machine to a properly installed mains socket. • Place the Milk Cooler Thermos upright next to the machine and connect pipe. 2.2 The most important controls Your SPRADA One Touch brews a range of Speciality Coffees according to your own personal taste. For easy use, the most important controls are common to the various Speciality Coffees and machine setup functions. • The Main Power Switch is on the lower left-hand front side of the machine. • The On/Off Switch is on the top of the machine. • The multi-function turn-and-press control knob (Rotary Control Knob for short) is the most important control. Rotating it selects options and menu items while pressing it confirms the selection or initiates the machine cycles. • The “>” Button: Press the “>” Button to move to the next menu or item. UP • The “Exit” Button: Press the “Exit” Button to move one menu level back or abort a process in progress. • The Height Adjustable Spout moves up and down to accommodate different sizes of cups or glasses. DOWN 3 2. Set up 2.3 Adding water and beans Water: • Open the cover on the left side of the machine and remove the Water Reservoir. • Rinse and fill the Water Reservoir with cold water up to the maximum mark and click into place on the machine. ! Caution: only fill the Water Reservoir with cold, clear water! Never use carbonated water or other liquids! i Note: The machine will not function if the water level is too low. The display will indicate “Fill up water”. Beans: • Open the cover on the right-hand side of the machine. Remove the Bean Container lid and fill with untreated, roasted coffee beans. Close the lid and the cover. ! Caution: Do not use beans treated with supplements, such as sugar, either during or after roasting. Supplements can damage the grinding mechanism. i Note: The machine automatically detects when the bean level is low and will not function. The display will indicate “Fill up beans”. 2.4 The Cappuccinotori (Milk Frother) The SPRADA One Touch is supplied with an insulated Milk Cooler Thermos which attaches directly to the machine to make delicious milky coffee and hot milk drinks. Connect one end of the pipe to the top of the Milk Cooler Thermos. Make sure it is pushed down firmly into the grommet on the removable lid of the container. Connect the other end of the pipe to the grommet on the right-hand side of the Height Adjustable Spout. Unscrew the top of the Milk Cooler Thermos and make sure that the steel pipe is firmly inserted in the grommet from the inside. This ensures that milk is sucked up right to the bottom of the container. Fill the Thermos with cold milk. Screw the lid back on the Milk Cooler Thermos and make sure the pipe is not stretched tight as this might impede the flow of milk. The milk in the container should remain cold for some hours because of the high quality insulation. 4 2. Set up Always empty and clean the Milk Cooler Thermos a minimum of once a day. Rancid milk can cause blockages that will cause malfunction of the machine. ! Caution: Do not wash the Milk Cooler Thermos in a Dishwasher as this will damage it. Hand wash the Milk Cooler Thermos with warm soapy water to keep it in perfect condition. 2.5 Pre-Warming your cups Your machine is equipped with a high-quality active Cup-Warming Function that can be switched on and off while power is applied. Press the button to turn on the Cup-Warming Function. (The Mains Switch must also be on.) The Display Screen will show the message “Cup Heater On”. By pressing the button again you can turn the Cup-Warming Function off. The Display Screen will show the message “Cup Heater Off”. Tip: Use the warming function to optimise the temperature and aroma of your coffee to enhance your coffee experience. 5 3. Switching on and getting started 3. Switching on and getting started 3.1 Mains Switch Switch on the Mains Switch, located at the lower left-hand front side of the machine, to put the machine in Standby Mode. An on/off symbol will move across the display if the Clock Function has not been setup. If the Clock Function has been initialised, the time will be displayed. i Note: If you are switching on a brand new machine, first skip forward to Section 5 to set up the basic functions. 3.2 On/Off Switch Press the On/Off Switch on top of the machine to bring the machine out of Standby. The message “Heating” will appear on the Display Screen, accompanied by a rotating hourglass icon to indicate that an action is happening inside the machine. If the machine has been off for more than a few minutes a message, “Please rinse”, will appear on the Display Screen, accompanied by a flashing semicircular icon in the bottom centre of the display to indicate that the Rotary Control Knob should be pressed. Press the Rotary Control Knob. The system rinses and the Main Menu is displayed. 3.3 Brewing with Factory Settings The Main Menu on the Display Screen is a visual representation of the different Speciality Coffees that your SPRADA One Touch can make. You can start making coffee immediately as each icon represents a coffee brewed according to Factory Settings. • Espresso - the world’s best • Café Crème - black with superior crème and aroma • Caffe Lungo - for the BIG coffee lover • Cappuccino - delicious frothy coffee • Latte Macchiato - layered milk and coffee as you like it • Warm Milk - for hot chocolate • Hot Water - for tea …… all at the touch of one button. Place the cup under the Height Adjustable Spout Turn the Rotary Control Knob to highlight an icon. Press the Rotary Control Knob to start the brewing process. The brewing light will illuminate and a delicious cup of coffee will be dispensed. 6 3. Switching on and getting started “BAR” 40ml 1x While the brewing cycle is in process, the icons below the bar on the display will flash. Turning the Rotary Control Knob will change the setting of the flashing icon. At any stage the process can be aborted by pressing the “Exit” Button next to the Rotary Control Knob. For instance, if the cup size does not correspond to the capacity of the cup under the Spout, press “Exit to stop it overflowing. Hint: You may notice a delay between the grinding and dispensing of coffee when making milky drinks. This extra time is for the Cappuccinotori (Milk Frother) to heat up in order to prepare warm, rich and creamy milk. After a set amount of time, the machine reverts to energy saving mode. “Save Energy” is displayed on the display panel. Touching any control will immediately bring up the Main Menu again. 3.4 Instructions for brewing two cups of coffee To brew two cups of coffee one after the other, press the Rotary Control Knob twice in quick succession when starting the brewing process. Another method is to press the “>” Button until the 1x/2x icon below the display bar is highlighted and then use the Rotary Control Knob to select “2x”. Press the “Exit” Button to save the setting. Two consecutive grinding processes will automatically occur. If the water or bean supply runs out, or the trays have to be emptied after the first grinding process, you will be notified on the Display Screen and the second cup of coffee will not be brewed. Follow the message on the Display Screen and then press the Rotary Control Knob once to brew the second cup of coffee. 7 3. Switching on and getting started 3.5 Emptying the Drip Tray and Coffee Grounds Container The Drip Tray and Coffee Grounds Container are integral to the machine and require emptying on a regular basis or when the display indicates that this should be done with the message “Empty Drip Tray”. Move the Height Adjustable Spout to its uppermost position. Grasp the Drip Tray assembly in the middle and carefully pull outwards. The message “Insert Tray” will be displayed and the machine will not operate. Remove the Coffee Grounds Container, empty and rinse with clean water. Empty the Drip Tray and rinse with clean water. Remove the stainless steel Drip Cover and wash with clean water. Re-assemble the components of the Drip Tray assembly. Gently push the Drip Tray all the way in and seat. The display will return to the Main Menu and the machine can be used. 3.6 Hints for First Time Users If the message “Fill Up Pipe System” appears on the display when the SPRADA Future OTC is used for the very first time: (Refer to section 2.3) Place a receptacle or large cup with its centre under the Spout. Press the Rotary Control Knob. The system will now be filled. Water may come out of the Spout. After the system has heated up, the message, “Please Rinse”, will appear on the Display Screen. Press the Rotary Control Knob again. The system is now filled with water. If the message, “Fill up beans” appears on the display. Fill the bean hopper. Select any coffee. Press the Rotary Control Knob. If the Grinder does not grind it is because it is still empty. Press the Rotary Control Knob again. The Grinder is now full and grinding will take place. 8 4. Adjusting the Basic Settings 4. Adjusting the Basic Settings - For the more advanced coffee lover Once you have mastered the basic settings and to get the most out of your machine, you can change the basic settings to match your own preferences. 4.1 The Main Menu The Main Menu is the key to making the SPRADA One Touch your own. Each speciality coffee is represented by an icon: Espresso, Café Crème, Caffe Lungo, Cappuccino, Latte Macchiato. In addition there are icons for Warm milk and Hot water. For ultimate ease, the “My Coffee” icon can be assigned to any coffee recipe from the list above. The “Settings” icon explained in Section 5 and the “Care” icon explained in Section 6 allow even greater control of the internal functions of the machine. Highlighting the icon with the Rotary Control Knob and then pressing the Rotary Control Knob, initiates the brewing process. While highlighted, the recipes and functions can be personalised as explained below. 4.2 Coffee Recipes Your SPRADA machine enables you to brew a range of speciality coffees just how you like them. There are two methods of changing the Factory Settings to suit your preference: (1) Using the icons under the” Display Bar” on the display. (2) Using the “Settings” icon for sophisticated control of your personal tastes (refer to Section 5.1). (1) Using the “Display Bar” Icons: All Speciality Coffees, Warm Milk, Hot Water and My Coffee can be adjusted by pressing the “>” key next to the Rotary Control Knob. The icons below the bar on the display represent the current settings and can be adjusted to suit individual taste and cup sizes. The icon below the Display Bar will flash when selected to indicate that modifications of the settings are in progress. The Rotary Control Knob is then used to modify the setting and the “Exit button” pressed to store the modifications. 40ml 1x 40ml 1x Pressing the “>” Button, first selects the coffee strength and is adjustable from one bean to five beans. 9 4. Adjusting the Basic Settings Pressing the “>” Button again allows setting of the cup volume from 20ml to 240ml according to the cup size. Pressing the “>” Button again highlights 1x/2x and either one cup or two cups can be made automatically. If a milky coffee setting is being modified: Pressing the “>” Button will allow the ratio of milk to coffee to be changed. A higher percentage equals more coffee and less milk and a lower percentage equals more milk and less coffee. The taste is preserved by automatically changing this ratio if the cup size is changed. Press the “Exit” key and the icon on the Main Menu flashes to indicate that the new settings are being stored and all subsequent drinks will be made using this setting. i 10 Please note: If you start brewing your coffee inadvertently or too early, you can actually change some parameters while the coffee is being brewed. The parameter that you can change with the Rotary Control Knob will flash in the bottom line of the Display Screen. 5. The Settings Menu 5. The Settings Menu The Settings menu allows access to many other functions that are integral to the operation of the SPRADA One Touch. Scroll through the options using the Rotary Control Knob and select by pressing: • • • • • • • • • • Coffee recipes Filter Water Hardness Temperature Times Language Off rinse ECO mode Statistics Exit 5.1 Coffee Recipes - Using the “Settings” menu You can do everything you have learnt so far and more, by accessing the recipes under the “Settings icon”. Scroll through the list of options with the Rotary Control Knob and press to select. Highlight “Coffee Recipes” and confirm selection by pressing the Rotary Control Knob. Classic coffees: Espresso, Café Crème and Caffe Lungo have three items in the recipe that can be selected using the Rotary Control Knob. • Flavour: Very Mild, Mild, Normal, Strong, Very strong • Amount Total: Dependant on cup size and can be set from 20ml to 240ml • Temperature: Normal, High, Maximum The display item flashes when it can be set with the Rotary Control Knob. Press the Rotary Control Knob when you have set your preference. Milky drinks: Cappuccino and Latte Macchiato have five parameters that can be selected and customized using the Rotary Control Knob. • Flavour: • Amount Very Mild, Mild, Normal, Strong, Very strong Total: Dependant on cup size and can be set from 20ml to 240ml. Changing this will affect the Prop coffee and the Amount Frothy milk. • Prop coffee: The amount of coffee in the drink expressed as a percentage. Changing this will not affect the Amount Total but will change the Amount Frothy milk. 11 5. The Settings Menu • Amount Frothy milk: The amount of milk in millilitres. Changing this will not affect the Amount Total but will change the Prop coffee. • Temperature: Normal, High, Maximum. Hot Water: Used for making tea for instance. Has no settable items. Warm Milk: Two items can be changed. • Amount total: The amount of hot water and milk together. • Prop. Frothy milk: The amount of milk in the mixture expressed as a percentage from 0% to 87% My coffee: Can be set to brew any of the classic coffees or milky coffees. To return to the Main Menu select “Exit” or press the “Exit” Button. 5.2 Operating the machine with or without the Filter Operating the machine with a Filter: A Claris Filter and an Assembly Tool are supplied with the machine as accessories. If you use this Filter, you will not have to descale your machine as often. However, using the Filter is only an option and will depend on the water quality in the your area. “Filter inserted?No” is the default setting. You must set the filter setting to “Filter inserted?Yes”. Highlight and select “Filter” with the Rotary Control Knob Turn the Rotary Control Knob to select “Insert Filter? Yes”, so that the machine knows that the Filter is being inserted. Press the Rotary Control Knob. The message, “Insert Filter”, appears on the Display Screen. Empty the Water Reservoir and carefully screw the Filter into the holder provided in the Water Reservoir using the Assembly Tool on the end of the Measuring Spoon. ! Caution: Do not overtighten as it could snap off. Fill the Water Reservoir with fresh water and put it back into the machine. Place a receptacle with at least 0.5ℓ capacity under the spout and slightly to the left and press the Rotary Control Knob. The message “Rinsing Filter” appears on the display screen. 12 5. The Settings Menu Wait until water stops coming out of the spout. The message “Please Rinse” appears on the Display Screen. Press the Rotary Control Knob. The machine rinses and is ready for use. i Note: ALWAYS TAKE THE FILTER OUT before descaling! The Filter loses its efficiency after precossing about 50 litres of water. i Note: Even if the Display Screen does not show the message “Replace Filter” and even if the machine is only used occasionally, the filter must be changed every two months. Operating the machine without a Filter: If you wish to operate the machine without the filter, you must set the filter setting to “Filter inserted? No”. This is important because the machine needs to be descaled more often if operated without a filter, depending on water hardness. The machine’s default factory setting is “Filter inserted? No”. Press to confirm “No” and the machine reverts to the “Settings menu”. Turn the Rotary Control Knob to select “Insert Filter? No”, Press the Rotary Control Knob to confirm your selection. The water hardness setting will now appear on the Display Screen. i Please note once again: It is possible that the machine’s pipe system will still be empty when it is set up. This will be indicated when the machine is turned on using the On/Off Button, as the message, “Fill up pipe system”, will appear on the display screen. Place a receptacle with at least 0.5l capacity with its centre under the spout. Press the Rotary Control Knob. The system will now be filled. Water may come out of the spout. After the system has heated up, the message, “Please rinse” will appear on the display screen. Press the Rotary Control Knob. The system will now be filled with water. 13 5. The Settings Menu 5.3 Water Hardness Using the Test Strip: A Water Hardness Detection Strip is supplied with the machine as an accessory. It is used to determine Water Hardness. Dip the Test Strip in the water and shake off excess water. After about a minute, count the number of Red Dots on the Test Strip. The number of dots correspond to the hardness level: Test Strip / Degree of hardness = display 1 Red Dot = (HARDNESS) LEVEL 1 2 Red Dots = (HARDNESS) LEVEL 2 3 Red Dots = (HARDNESS) LEVEL 3 4 Red Dots = (HARDNESS) LEVEL 4 i Note: If no Red Dot appears, set Water Hardness to Level 1. Setting the Water Hardness Level: The basic factory setting for Water Hardness is LEVEL 3 but this depends on Water Hardness in your area. The machine detects when descaling is necessary but the correct Water Hardness level must be set before using the machine. Setting the Water Hardness Level: Turn the Rotary Control Knob to select “Water Hardness”. Press the Rotary Control Knob to confirm your selection. Match the flashing “Level” to that measured with the Water Hardness Testing Strip with the Rotary Control Knob. Press Rotary Control Knob to confirm selection 5.4 Temperature The Temperature can be set with the Rotary Control Knob to: “Normal”, “High”, “Maximum” or “Individually”. The factory setting is “High” for all Speciality Coffees. The setting selected will apply to all drinks and only if you select “Individually” will you be able to set different temperatures for different drinks. Turn the Rotary Control Knob to select your desired Temperature. Press the Rotary Control Knob to confirm your selection. i 14 Note: If the Temperature is not set to “Individually” in this menu, the Temperature option will be removed on the Coffee Recipes menu. 5. The Settings Menu 5.5 Setting Time and Timer Functions “Time” is a versatile method of controlling the The SPRADA One Touch. There are a number of options in this menu which must be set in sequence. Clock: Options are “Disabled” or “Set Clock”. “Disabled” disables all Clock Functions and a small on/off icon will appear on the Display Screen when the SPRADA Future OTC is in Standby mode. To disable, scroll down to the option with the Rotary Control Knob and press to select. Select “Exit” to return to “Times” menu. “Set Clock”: When this is set, the time will be displayed when the SPRADA One Touch is in Standby mode. Select by pressing the Rotary Control Knob. The “hours” display flashes. Set to current hours with Rotary Control Knob. Press to select. The “minutes” display flashes. Set the current minutes and press to select. The display returns to the “Times” menu to confirm that the clock has been successfully set. i Note: Once the clock time has been set, it will appear on the display screen when the machine is in standby mode. If the clock time has not been set, the on/off symbol will appear on the display screen in standby mode. “Unit Auto ON at”: The SPRADA One Touch can be programmed to switch itself on every day at a set time. Select either “Disabled” or set the time at which you wish the machine to come on automatically using the same method as detailed above. Press Rotary Control Knob to confirm selection. The display will return to the “Times” menu automatically when the Auto ON has been successfully set. i Note: If you Select “Disabled” you must “Exit” to return to the “Times” menu. Unit Auto OFF after: Select with the Rotary Control Knob from 0.5 hours to 12 hours. Press Rotary Control Knob to confirm selection. Display will return to “Times” menu when the Auto OFF has been successfully set. 15 5. The Settings Menu Cup Heater Auto ON: Select Disabled/Enabled with the Rotary Control Knob. Press the Rotary Control Knob to confirm selection. Time format: Select either “24 hours” or “am/pm” with the Rotary Control Knob. Press the Rotary Control Knob to confirm selection. Select ”Exit” or press “Exit” Button to return to Settings Menu. i Note: If the machine has been switched off at the mains or if there has been a power failure, the clock and the Auto ON functions must be set again. 5.6 Setting the Language The language used on the display can be changed with the Rotary Control Knob. Select and highlight language of preference with the Rotary Control Knob. Press to confirm selection. 5.7 OFF-Rinse The Switch-On Rinsing Function is pre-programmed by the manufacturer. Each time it is switched on when cold, the machine will first rinse to ensure that the machine always dispenses fresh water. The Display Screen indicates when rinsing is required, and the rinsing function must be started manually by pressing the Rotary Control Knob. The option can be set to also rinse the machine on switching off. Select “Enabled/Disabled” using the Rotary Control Knob. Press to confirm selection. i 16 Note: If the OFF-Rinse Function is enabled, the machine will only be rinsed if it has brewed at least one drink before being switched off. 5. The Settings Menu 5.8 ECO Mode A unique feature of the SPRADA Future OTC is the power saving ECO Mode where the machine uses minimal power but is ready for use at the touch of a button. This can either be “Disabled” or the delay set from 3 minutes to 15 minutes before going into ECO Mode. Touching any control on the machine brings the machine out of ECO mode but will take a few seconds longer to heat up. Select the function using the Rotary Control Knob. Press to confirm selection. 5.9 Statistics “Statistics”, shows an interesting breakdown of the drinks that the machine has brewed since it was set up. Select using Rotary Control Knob Press to confirm selection Scroll down list using Rotary Control Knob for information on: “Espresso” - “Café Crème” - “Caffè Lungo” - “Cappuccino” - “Latte Macchiato” “My coffee” - “Powder Coffee” - “1 cup” -”2 cups” - “Total” (= sum of all coffees) - “Hot water” - “Milk” - “Cleaning” - “Descaling” - “Filter replace” Press “Exit” to return to the “Setup” menu. 17 6. Manual Adjustments 6. Manual Adjustments 6.1 Setting the Grinder ! Caution: The Grinder setting can only be changed while the Grinder is operating. The Grinder can be adjusted to suit the roast of your coffee beans. It is advised that you always keep the Grinder on a medium setting. To change the grinding level: Open the service door on the right side of the machine. The Grinder Setting Control is on the top right (Image). Place a cup under the Height Adjustable Spout. In the Main Menu, turn the Rotary Control Knob to “Espresso” / the Espresso symbol. Press the Rotary Control Knob. While the Grinder is grinding, change the Grinder setting by moving the Grinder Setting Control. The smaller the dot, the finer the ground coffee. • a light roast requires a finer setting (control further to the left). • a dark roast requires a coarser setting (control further to the right). You can try different settings to find the one which best suits your taste. Close the service door, guiding the projections at the rear of the door into the corresponding recesses and pressing the door to click it shut. 6.2 Preparing Pre-Ground Coffee Open the cover on top of the machine. Open the lid of the Pre-Ground Coffee Chamber. After a moment, the Display Screen will show the message, “Fill in Coffee Powder” alternating with the message “ Close Powder Shaft”. Add one level Measuring Spoon of pre-ground coffee. Close the lid and the cover. The display will now show the message, “Powder is ready”. Place a cup under the Height Adjustable Spout, In the Main Menu, turn the Rotary Control Knob to the drink of your choice. Press the Rotary Control Knob to start brewing your coffee. 18 6. Manual Adjustments i Please note: If you start preparing your coffee inadvertently or too early, you can actually change the “amount” while the coffee is being brewed. If you wish to abort a brewing process, press the Exit button. i Please note: if you inadvertently open the pre-ground coffee chamber – or did not press the Rotary Control Knob after adding pre-ground coffee – the machine will automatically be rinsed approximately one minute after the lid is closed, and it will then be ready for use again. ! Caution: The pre-ground coffee chamber is not a storage unit, so please only add one portion at time, and only use fresh or vacuumpacked pre-ground coffee produced from coffee beans. Do not use water-soluble instant coffee! 19 7. Care 7. Care: Cleaning and Maintenance 7.1 Rinsing the Cappuccinotori (Milk Frother) ! Caution: Do not interrupt the rinsing program whilst it is running! Rinse the Cappuccinotori (Milk Frother) after every milky drink or when a message appears on the display alternating with the selected drink message. Turn the Rotary Control Knob to select the “Care” icon. Press the Rotary Control Knob . Turn the Rotary Control Knob to “Rinse Frother”. Press the Rotary Control Knob. The Display Screen will now show the message, “Connect hose pipe with Spout and put in Drip Plate”. Remove the hose end connecting the Milk Cooler Thermos with the Height Adjustable Spout and connect to the Drip Tray grommet at the right rear of the Drip Tray (Image). Place a receptacle with at least 0.5ℓ capacity under the Height Adjustable Spout as this cleaning takes place under high pressure and can cause splashing. Press the Rotary Control Knob. The following message will appear on the Display Screen: “Rinsing Frother do not remove h.p.” (hosepipe). The rinsing cycle will start automatically and last approximately twenty seconds. As soon as the rinsing cycle has finished, the machine will heat up and be ready for use again. 7.2 Cleaning the Cappuccinotori (Milk Frother) ! Caution: Do not interrupt the cleaning program whilst it is running! Clean the Cappuccinotori (Milk Frother) from time to time or as indicated automatically on the display. Select “Clean Frother” with the Rotary Control Knob and press to select. The Display Screen will show the message, “Connect hose pipe with Spout and put in cleaner”. Put some water and cleaning agent (available separately) with a total volume of at least 0.3ℓ in a container. Follow the cleaning agent manufacturer’s instructions to obtain the correct mixing ratio. 20 7. Care Connect one end of the hose to the Height Adjustable Spout and submerge the other end of the hose in the cleaning solution. Place a receptacle with at least 0.5ℓ capacity under the Height Adjustable Spout. Press the Rotary Control Knob. The machine will now start the cleaning process and the Display Screen will show the message, “Cleaning Frother do not remove h.p.” After a short time, the Display Screen will show the message, “Connect hose pipe with Spout and put in Drip Plate”. Connect one end of the hose to the Height Adjustable Spout. Place the other end of the hose in the Drip Tray at the rear on the right. The Display Screen will now show the message, “Cleaning Frother do not remove h.p.”. As soon as the cleaning cycle has finished, the machine will heat up and be ready for use. 7.3 Rinsing the Spout You should rinse the Spout from time to time. Rinse the Spout as follows: Turn the Rotary Control Knob to the maintenance symbol. Press the Rotary Control Knob. Turn the Rotary Control Knob to “Rinse Spout”. Press the Rotary Control Knob. The Display Screen will now show the message, “Rinsing”. As soon as the rinsing cycle has finished, the machine will heat up and be ready for use again. 7.4 Cleaning the system The machine detects when it should be cleaned. “Please Clean” will appear on the Display Screen. You can still brew coffee or prepare hot water and steam, but we would advise you to run the cleaning program as soon as possible. The cleaning process takes about 10 minutes. ! Caution: You must not interrupt the cleaning program whilst it is running. Only add Cleaning Tablets when indicated by the machine. Turn the Rotary Control Knob to “Clean system”. Press the Rotary Control Knob. The Display Screen will now alternately show the messages, “Empty trays” and “Fill up water”. 21 7. Care Raise the Height Adjustable Spout to its top position. Remove the Drip Tray and the Coffee Grounds Container and empty them both. If necessary, fill the Water Reservoir with fresh water and put the Water Reservoir, Drip Tray and Coffee Grounds Container back in the machine. The machine will now start rinsing twice. The display will now show the message,“Cleaning Tablet in powder shaft”. Open the cover on top of the machine. Open the lid of the pre-ground coffee chamber. Place one Cleaning Tablet (available separately, see Section 9) in the pre-ground coffee chamber and close the lid and cover. Place a receptacle with at least 0.5ℓ capacity under the Height Adjustable Spout. The Display Screen will now show the message “Start Cleaning”. Press the Rotary Control Knob. The machine will now start the cleaning process, and the Display Screen will show the message “System Cleans”. The cleaning cycle will start automatically and last approximately ten minutes. As soon as the cleaning cycle has finished, the Display Screen will show the message “Empty Tray”. Remove, empty and clean the Drip Tray and the Coffee Grounds Container and put them back in the machine. If necessary, refill the Water Reservoir with fresh water. The machine will now heat up and be ready for use again. 7.5 Descaling the system When the machine needs to be descaled, the following message will appear on the Display Screen, “Please Descale”. You can also start the descaling program manually at any time. 22 ! Caution: Please follow the instructions below exactly as given! You can continue to prepare drinks, but we would advise you to carry out the descaling program as soon as possible. ! Caution: You must not interrupt the descaling program whilst it is running. Never use vinegar or vinegar-based products for descaling. Always use the liquid products normally recommended for fully automatic coffee centres. 7. Care ! Caution: You must remove the Filter from the Water Reservoir before starting the descaling program. Turn the Rotary Control Knob to the maintenance symbol. Press the Rotary Control Knob. Turn the Rotary Control Knob to “Descale system”. Press the Rotary Control Knob. The Display Screen will now show the message, “Empty Tray”. Remove the Drip Tray and the Coffee Grounds Container and empty. Put the Drip Tray and the Coffee Grounds Container back in the machine. The Display Screen will now show the message, “Remove Tank”. Fill the Water Reservoir up to the 0.5ℓ mark with fresh water and add the Descaling Agent (available separately, see Section 9). Put it back in the machine. ! Caution: Always first add water up to the 0.5ℓ mark and then add the Descaling Agent - never the other way round! Follow the Descaling Agent manufacturer’s instructions. Connect one end of the hose to the Height Adjustable Spout. Place the other end of the hose in the Drip Tray at the rear on the right. The Display Screen will now show the message, “Start Descaling”. Place a receptacle with at least 0.5ℓ capacity under the Spout and slightly to the left. Press the Rotary Control Knob. The machine will now start the descaling process, and the Display Screen will show the message, “System Decalcifies”. The descaling process will start automatically and will last approximately twenty minutes. The Descaling Solution will flow through the system at intervals. Once all the Descaling Solution has flowed through the system, the Display Screen will show the message, “Empty Trays”. Remove the Drip Tray and Coffee Grounds Container and empty them both. Put the Drip Tray and the Coffee Grounds Container tray back in the machine. Remove the Water Reservoir and rinse it out with clear water. Replace the Filter in the Water Reservoir if used. Fill the Water Reservoir with fresh water and put it back in the machine. Connect one end of the hose to the Height Adjustable Spout . Place the other end of the hose into the Drip Tray at the rear on the right. The Display Screen will now show the message, “Start Rinsing”. 23 7. Care Press the Rotary Control Knob to start the rinsing process. The Display Screen will now show the message, “Rinsing”. The rinsing cycle will start and run automatically for approximately two minutes. As soon as the rinsing cycle has finished, the Display Screen will show the message, “Empty Tays”. Empty and clean the Drip Tray and the Coffee Grounds Container and put them back in the machine. The machine is ready for use. ! Caution: Please always remove all descaling residue left on the machine with a damp cloth. 7.6 Cleaning the machine regularly by hand ! Caution: Never submerge the machine in water and do not use scouring agents. Clean the machine inside and out using only a soft damp cloth. Move the Height Adjustable Spout to the uppermost position and empty the Drip Tray and the Coffee Grounds Container regularly or when indicated to do so on the Display Screen. (This will only be indicated when the machine is on!). Ensure that both metal contacts and the areas between them at the rear of the tray are always clean and dry. The Water Reservoir should be rinsed with clear water and refilled with fresh, cold water every day. Clean the Cappuccinotori (Milk Frother) Hose and Spout regularly. If the machine is to be left unused for a period of time the Cappuccinotori (Milk Frother) must be dismantled and rinsed under clear running water. Remove the Cover Panel of the Height Adjustable Spout. The display will indicate “Attach Frother”. Remove the pipe to the Milk Cooler Thermos and rinse. Remove the Cappuccinotori by pulling it downwards and dismantle it. Clean the components thoroughly and reassemble. Push the Cappuccinotori back up into the Height Adjustable Dispenser and carefully seat. Attach the cover panel. Reconnect the pipe to the Milk Cooler Thermos. The machine is ready for use and the Main Menu will be displayed. i 24 Please note: Your machine is equipped with moving rear rollers and can be moved on a level work surface. So you can also clean underneath the machine. 7. Care 7.7 Cleaning the Brewing Unit ! Caution: Only remove the Brewing Unit when the machine is in Standby mode. Open and remove the service door on the right of the machine. To unlock the Brewing Unit, press the red button and turn the handle all the way to the left until it unlocks. Remove the Brewing Unit carefully using the handle. Clean the Brewing Unit under clean running water and leave it to dry. Do not use detergents to clean and never put it in the dishwasher. Carefully put the Brewing Unit back in the machine and lock it in by pressing the red button and turning the handle all the way to the right until the unit clicks into place. Close the service door by first guiding the projections at the rear of the door into the corresponding recesses and then pressing the door to click it shut. 7.8 Changing the Filter Filters lose their efficiency after processing about 50ℓ of water. The Display Screen will then show the message “Replace Filter”. You can continue to prepare drinks but it is advisable to change the Filter immediately. Select“Settings” with the Rotary Control Knob and press to confirm. Select “Filter” with the Rotary Control Knob and press to confirm. Select “Insert Filter? Yes” so that the machine knows that the Filter is being inserted. Empty the Water Reservoir and unscrew the old Filter using the Assembly Tool at the end of the Measuring Spoon. Remove it from the holder provided in the Water Reservoir. Press the Rotary Control Knob. The message, “Insert Filter” or “Filter Inserted?” will now appear on the Display Screen. Carefully screw the new Filter (available separately) into the holder provided in the Water Reservoir using the Assembly Tool at the end of the Measuring Spoon. Caution: Be careful not to turn too far or to cause it to snap off. ! Fill the tank with fresh water and put it back into the machine. Place a receptacle with at least 0.5ℓ capacity under the Spout and press the Rotary Control Knob. The message “Rinsing Filter”, will appear on the Display Screen and the machine will rinse. Thereafter, the message “Heating” will appear on the Display Screen and the machine will then be ready for use. ! Caution: Even if you use only a small amount of water, you must change the Filter at least every two months. You will not see a message on the Display Screen in this case. Using the dial at the head of the Filter (the month display), you can set the Filter change date. 25 8. System messages 8. System Messages Message Meaning FILL-UP PIPE-SYSTEM Fill or rinse out water hoses (inside) Press the Rotary Control Knob FILL UP WATER FILL UP BEANS What to do Fresh water Filter in use may be faulty Remove or change the Filter cartridge Water Reservoir is empty Add fresh water Water Reservoir is absent or incorrectly positioned Correctly position Water Reservoir (see point (2.3) Not enough coffee beans Add beans to the container (see point 2.3) Coffee beans do not fall into Grinder (stuck) Stir beans, e.g. with a spoon,to loosen Note: The message “FILL UP BEANS” only disappears when coffee has been brewed after refilling! EMPTY TRAYS Drip Tray and / or used coffee tray are full Empty Drip and / or used Coffee Tray Contacts on back of Drip Tray are not clean and / or dry Clean / dry contacts Drip Tray and Coffee Grounds Container used are absent or not correctly positioned Position drip and coffee trays correctly Contacts on back of Drip Tray are not clean and / or dry Clean / dry contacts PLEASE CLEAN Cleaning programme is needed Clean machine (see point 7.4) PLEASE Descale Descaling programme is needed Descale the machine (see point 7.5) REPLACE Filter Filter is no longer efficient Replace Filter (see point 7.8) Brewing Unit REMOVED Brewing Unit is incorrectly positioned / inserted Check and insert/lock Brewing Unit correctly (see point 7.7) TRAYS MISSING 26 9. Troubleshooting 9. Troubleshooting Fault Meaning No hot water / steam comes Milk Frother is blocked out of jet What to do Disassemble and clean Milk Frother thoroughly Too little milk foam or foam The system may have a build-up of Please use a large dose of too liquid lime scale descaler (see point 7.5) Coffee only comes out in drips Coffee without ‘crema’ Unsuitable milk Use cold milk Milk Frother is blocked Disassemble and clean Milk Frother thoroughly The system may have a build-up of Please use a large dose of descaler (see lime scale point 7.5) Grinder setting is too fine Select coarser Grinder setting Pre-ground coffee is too fine Use coarser pre-ground coffee The system may have a build-up of Please use a large dose of descaler (see lime scale point 7.5) Grinder makes loud noise Unsuitable coffee type Change coffee type Beans no longer fresh Use fresh beans Grinder settings not adjusted to coffee beans Optimise Grinder settings Other substances in Grinder, e.g. little stones Contact Customer Service, meanwhile pre-ground coffee can be used If you are unable to correct a fault / system message yourself, call a SPRADA Service Centre and please consult the Guaratee details in Section 13. ! Caution: If the display reads “Error / Service-Tel”, note the code. Switch off and unplug the machine and call a SPRADA Service Centre and with the helpof the code, they will be able to suggest the best course of action. 27 10. Accessories 10. Accessories You can purchase new accessories from any well-stocked specialist retailer or contact SPRADA directly. CLARIS Filter Cartridge: The CLARIS Filter Cartridge is filled with purely organic material without chemical additives and if changed regularly, it ensures that you will have to descale your SPRADA machine less often. SPRADA Cleaning Tablets: Your fully automatic coffee centre provides an integrated cleaning programme. Cleaning Tablets are specifically designed for this purpose and completely remove stains from coffee residues. SPRADA Descaling Tablets: Your fully automatic coffee centre provides an integrated descaling programme. The descaler will reliably remove lime scale without damaging the machine. SPRADA Milk Cleaning Powder: SPRADA Milk Cleaning Powder easily cleans all Milk Frothers of milk residues. 28 11. Further instructions 11. Further instructions Customer service: SPRADA products are designed to meet the highest quality standards. If you have questions as to the operation of your machine, please consult your dealer or contact the SPRADA Service Centres. Guarantee and customer service conditions: Please consult the detailed guarantee and customer service conditions in the appropriate information booklet. Please visit our website, www.sprada.ch for additional information on this product. 12. Guarantee Your SPRADA Future OTC is a precision device manufactured to the highest European standards and is guaranteed against manufacturing defect for a period of one year from the date of purchase or until it has made 7500 cups (whichever comes first). The machine is not guaranteed against damage caused by normal wear and tear, neglect or misuse arising from operation not in accordance with that described in the manual or lack of routine cleaning as specified and furthermore it is not guaranteed against damage caused by power fluctuations or surges or lightning strikes. To ensure that your guarantee is valid, please retain your proof of purchase. In addition you can submit your details via the easy to use Electronic Guarantee Option on the website (www.sprada.ch) with the date of purchase and attach a copy of the original invoice from your retailer. Should you wish to claim under this guarantee, please return the SPRADA Future OTC in its original packaging together with a detailed description of the fault to one of our service centres that can be found on www.sprada.ch. A downloadable repair form is available from the website to facilitate this process. Upon receipt, our technicians will inspect the machine and deliver a full report on the probable cause of the defect. Should this be attributed to a manufacturing fault, the machine will be repaired at no charge. Should the fault have been caused by one of the above circumstances not covered by the guarantee a quotation will be submitted for the repair. Courier fees will be for the account of the purchaser. 29