1
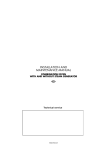
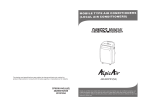
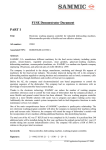
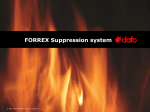
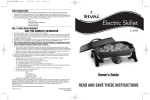
USER'S MANUAL
COMBINATION OVEN
WITH STEAM GENERATOR
The Cube
H VERSION
EN
Technical service
00000000rev00
CONTENTS
1 •
2 •
3 •
4 •
5 •
6 •
7 •
8 •
9 •
10 •
11 •
GENERAL WARNINGS
SPECIAL NOTES
DESCRIPTION OF PUSHBUTTONS
MANUAL SETTINGS FOR “MANUAL” COOKING CYCLES
MANUAL SETTINGS FOR MANUAL COOKING UP TO 9 PHASES IN SEQUENCE
SAVING A PROGRAM
SELECTING AND STARTING A SAVED PROGRAM
CHANGING A STORED PROGRAM TEMPORARILY
SETTING THE CORE PROBE
AUTOCLIMA AUTOMATIC HUMIDITY CONTROL SYSTEM
SPECIAL PROGRAMS
11.1 • MAINTAINING THE SET TEMPERATURE WHEN COOKING IS COMPLETED
11.2 • REHEAT PROGRAM
12 • OPERATING DETAILS
13 • PRACTICAL TIPS
14 • DAILY CLEANING
15 • ROUTINE MAINTENANCE
16 • DESCALING THE BOILER
17 • SPECIAL MAINTENANCE
18 • SELF-TEST AND TROUBLESHOOTING
ELECTRIC MODELS
PAGE
3
4
5
7
9
11
13
14
15
17
18
18
18
19
21
22
23
23
25
25
GAS MODELS
ME 061
ME 201
MG 061
MG 201
ME 101
ME 202
MG 101
MG 202
ME 102
MG 102
VERSIONS
H
Electronic programmable units, 99 programs, 9 cycles in automatic sequence, numerical display, Autoclima, self-test,
core probe, oven lighting.
The manufacturer accepts no liability for any inaccuracies in this manual
attributable to printing or copying errors. The manufacturer reserves the
right to modify products as deemed necessary, without impairing the basic
features of the original design.
The reproduction or photocopying of any part of this manual by any
means whatsoever is strictly forbidden unless previously authorised in
writing by the manufacturer.
ALI S.p.A. - 01.10.2001
2
00000000rev00
1 • GENERAL WARNINGS
Repairs may become necessary over
time; these and all special maintenance
operations must be performed
exclusively by technicians employed by
the manufacturer or an authorised
service centre.
1.1
• Carefully read the directions given in this
manual; they contain important information
on safety during installation, operation and
maintenance.
Keep the manual in a safe place for
future consultation.
1.2
• This appliance must only be used as
specified in the design, i.e. cooking
foods. Any other type of use is improper
and therefore dangerous.
1.3
1.4
8
IPX 5
2000
1.6
• Ask the installer for information on correct
operation and use of the water softener;
incorrect or incomplete maintenance can
cause the for mation of scale and
consequent damage to the appliance.
1.7
• If the assistance of a service technician is
requested, specify the ser ial number
printed on the dataplate on the front control
panel.
TYP.
NR xxxxxxxxxx
AC 230 V
1.00 kW
18
kPa
50 - 500
A1
IT
• The oven must not be left unattended
during operation.
• Some oven surfaces become hot during
operation. Take care!
kPa
150 - 500
kW
- 98
LX TYP. MG 101 "H"
• Only suitably trained kitchen personnel
should be allowed to use the appliance.
1.5
1.8
3N
TYP. ME 061 "H"
2000
NR xxxxxxxxxx
AC
400
V
50 Hz
IPX 5
1.9
B21
P mbar
20; 28-30/37
8; 20
0085
• In the event of requesting technical
assistance, describe the fault in as much
detail as possible, so that a ser vice
technician can immediately identify the
problem.
1.10 • In the event of breakdown or faulty
operation, switch off the oven
immediately.
1.11 • The room where the oven is used must
be well ventilated at all times.
• Each appliance is equipped with a
dataplate identifying the model and main
technical data. An example is given below
of a dataplate for an electric oven and one
for a gas oven.
3
00000000rev00
2 • SPECIAL NOTES
2.1
• Before cooking food in a new oven, the
interior must be cleaned thoroughly (see
section “Daily Cleaning”).
2.2
• At the end of the working day, clean the
oven thoroughly inside and out; this will
ensure correct operation of the appliance
and prolong its useful life.
2.3
• Do not use high pressure water jets
when cleaning the oven.
2.4
• For daily cleaning, use non-corrosive
products (alkali based) suitable for the
purpose. Abrasive materials and products
should not be used as they can damage
the surfaces.
2.5
• Always switch off the appliance when work
is finished, and shut off all power sources
(electricity, water, and gas if connected).
2.6
• Avoid dropping cooking salt on the steel
surfaces of the oven; if salt is accidentally
spilled, r inse off immediately and
thoroughly.
2.7
• After steam cooking, open the door
carefully to avoid contact with residual
steam escaping from the oven. Failure to
observe this warning may be dangerous for
the operator.
2.8
• To ensure safe operation of the oven do
not obstruct the vents or any other
openings in the casing!
2.9
• To ensure extended lifetime and
efficiency of an oven, scheduled
maintenance must be performed at
least once a year. With this in mind,
customers are recommended to sign a
service agreement.
Failure to obser ve basic safety
guidelines may jeopardize operation of
the oven and expose the operator to
serious hazards.
The manufacturer accepts no liability for
modifications to the original design of
the oven, tempering or failure to
observe the instructions given in the
manuals.
4
00000000rev00
3 • DESCRIPTION OF PUSHBUTTONS
ON-OFF (PUSHBUTTON1)
Enables activation of the control panel and relative
self-test function.
Pushbutton led lit: appliance ready to use.
Pushbutton led off: appliance powered, control
panel switched off.
START-STOP (PUSHBUTTON 16)
START-STOP pushbutton: enables cooking in
progress to be started and stopped as required.
• Pushbutton led lit: START, cooking started.
• Pushbutton led flashing: TEMPORARY STOP
activated when the door is opened pushbutton is
pressed. Cooking and remaining time are stopped.
Cooking is resumed when the door is closed or
when pushbutton 16 is pressed once.
• Pushbutton led off: PERMANENT STOP
activated by pressing and holding pushbutton16for
three seconds: cooking is shut down in the same
way as when the time interval elapses.
CONVECTION (PUSHBUTTON 2)
CONVECTION cooking mode pushbutton.
STEAM (PUSHBUTTON 3)
STEAM cooking mode pushbutton.
COMBINED(PUSHBUTTON 4)
COMBINED cooking mode pushbutton.
vent, allowing excess moisture in the oven
to escape. It should then be closed
manually (led ON = vent open; led off =
vent closed, flashing led = vent in
operation).
3.1 • OVEN LIGHT PUSHBUTTON
(PUSHBUTTON 22)
Press to activate the oven light and enable
inspection of cooking in progress.
The light turns off automatically when the
door is opened. When the door is closed,
press the pushbutton again to turn off.
The position of the vent (open/closed) can
also be stored in several cycles of a
program.
3.2 • RAPID COOLING KEY WITH OVEN
DOOR OPEN (PUSHBUTTON 21)
This function is activated only with the oven
door open. Pressing the key activates the
fan, which rapidly lowers the temperature in
the oven to 50 °C. This function is
particularly useful if one cooking operation
at high temperature is followed by another
using a much lower temperature, or when
the oven needs cleaning immediately after
a cooking operation (see section ”Daily
cleaning” ).
3.3 • OVEN STEAM VENT OPEN
PUSHBUTTON (PUSHBUTTON 24)
This function is only activated in convection
mode. Pressing the key opens the oven
5
00000000rev00
3 • DESCRIPTION OF PUSHBUTTONS
OPERATIONS
3.4 •
Note: The appliance is equipped with an
automatic system to lower temperatures,
enabled in all cooking modes. If the
temperature exceeds 30 °C over the
s e t t i n g o n d i s p l ay, t h e h u m i d i f i e r
automatically delivers water to the oven
for rapid temperature decrease. This
prevents start-up of a cooking cycle at
excessively high temperatures. Delivery
of moisture also prevents drying of the
food.
OVEN
MOISTURE
INLET
PUSHBUTTON (PUSHBUTTON 14)
The “AUTOCLIMA” pushbutton also serves
as a manual moisture function if pressed
during a cooking cycle (pushbutton led lit).
This function is useful for products
requir ing additional moisture dur ing
cooking. Keep the pushbutton pressed for
the required time of moisture delivery to
the oven; the corresponding led illuminates
while the pushbutton is pressed.
6
00000000rev00
4 • MANUAL SETTINGS FOR SINGLE COOKING CYCLES
OPERATIONS
4.1
4.2
• SWITCH ON
Press pushbutton 1. If a symbol appears
in the fault warning display, (display 5-6)
refer to the section “Self-test and
troubleshooting”. page ...
Note: approx 10 seconds after releasing the
knob, the display shows the current oven
temperature.
• SELECT
I led dei pulsanti modalità di cottura
lampeggiano: press the required cooking
mode pushbutton (2-3-12) . The led of
the selected cooking mode remains
permanently lit, and the other two turn off.
4.4A • SET TIME
Time display 6 shows [ 000 ]. Turn knob
25b:
- to the right to set the cooking time;
- to the left to set infinite time.
Or
4.3
4.4B • SET THE CORE PROBE
Refer to the section “Setting the core
probe”.
Values are saved approximately 10
seconds after the last entry.
• SET TEMPERATURE
The temperature display shows a value of
130 °C. Rotate knob 25a to set the
temperature (turn right to increase and left
to decrease); the setting appears on
display.
7
00000000rev00
4 • MANUAL SETTINGS FOR SINGLE COOKING CYCLES
STARTING THE COOKING PROGRAM
OPERATIONS
Place the food in the oven. Refer also to
section “Practical tips”. page ...
On selection of a cooking cycle using the
core probe, refer to sections ”Setting the
core probe ” and “Tips for using the core
probe”. page ...
4.5
Displaying and changing saved values
To check set values during a cooking cycle,
press pushbutton 19, and the displays
flash.
If modifications are required to the flashing
values, use the relative knob or
pushbuttons.
After approx. 10 seconds the new entries
are saved automatically and the displays
return to the current values.
• START
Press pushbutton 16 to start cooking; the
corresponding led on the pushbutton
remains lit.
Note: when the oven is first switched on at
the start of the day, the steam generator
drains the water inside, activates timed
cleaning of the generator and then after the
water has been loaded, activates
AUTOMATIC PREHEATING of the steam
generator. In the case of a program with
steam or combined cooking cycles,
activation of the program is automatic
when the generator has reached the set
pre-heating temperature,to avoid program
start-up without steam. The flashing led on
pushbutton16 indicates that the steam
generator has not yet reached the set preheating temperature.
At this point ...
the temperature display indicates the
current oven temperature.
The time display indicates the time
remaining to complete cooking.
The luminous dot alongside the value
indicates:
if flashing = cooking in progress;
if steady = cooking suspended. This occurs
for example if the door is opened (see
section “Operating details”). page ...
4.6
• END OF COOKING
If infinite cooking time has been selected,
manually stop cooking by pressing
pushbutton 16 for a few seconds (led
alongside pushbutton off).
If a cooking time has been set or a core
probe temperature, on elapse of the set
time or when the core probe temperature
has been reached, an acoustic signal
indicates that cooking is complete (led
alongside pushbutton 16 off).
Open the door to shut off the acoustic
signal. Remove the food from the oven
according to the instructions in paragraph
2.7 of section “Special notes”. page ...
8
00000000rev00
5 • MANUAL SETTINGS FOR COOKING WITH
MULTIPLE CYCLES IN SEQUENCE (UP TO 9)
section ”Setting and saving a program” ).
page ...
Manual entry of multiple cooking cycles
cannot be saved; for cooking cycles to be
repeated, use stored programs (see
OPERATIONS
5.1
• SWITCH ON
Press pushbutton 1. If a symbol appears
in the fault warning display, refer to section
“Self-test and troubleshooting”. page ...
5.5B • SET THE CORE PROBE
FOR CYCLE 1
Refer to the section ”Setting the core
probe”. page ...
N o t e : m a nu a l c o o k i n g w i t h mu l t i p l e
phases in sequence enables pre-heating
before placing the food in the oven: set
the cycle time 1a “ [ INF ] “, and when the
pre-heating temperature is reached, a
sequential acoustic signal notifies the user
that food can be placed in the oven. When
the door is closed display 9 shows “2” to
indicate activation of cooking cycle 2.
5.3
• SELECT
The LEDs of the cooking mode keys all
flash. Press the required cooking mode
pushbutton (2-3-4) for cycle 1: the cooking
mode led remains lit, while the other two
turn off.
5.4
• SET THE TEMPERATURE OF
CYCLE 1
Rotate knob 25a to set the cooking
temperature, which is shown on the
relative display.
5.6
5.5A • SET THE TIME OF CYCLE 1
The time display shows [ 000 ]. Turn knob
25b:
to the r ight to set the cooking
time;
to the left for infinite time, thus using the
first cycle for pre-heating.
Or
9
00000000rev00
• SELECT CYCLE 2 AND FOLLOWING
CYCLES (UP TO 9 CYCLES)
Press pushbutton 19 again and cycle
display 9 shows the number [ 2 ]. Return to
step 6.3 and make the various settings for
this second phase. Repeat the sequence
for further phases if required.
5 • MANUAL SETTINGS FOR COOKING WITH
MULTIPLE CYCLES IN SEQUENCE (UP TO 9)
STARTING THE COOKING PROGRAM
OPERATIONS
5.7
• START
Press pushbutton 16. The relative led
remains permanently lit.
5.8
At this point ...
the temperature display indicates the
current oven temperature.
The time display
indicates the time remaining to complete
cooking (the sum of set times for each
phase). The luminous dot alongside the
value indicates:
if flashing = cooking in progress;
if steady: cooking suspended. This occurs,
for example, when the oven door is opened
(see section “Operating details” ).
10
00000000rev00
• END OF COOKING
an acoustic signal indicates that cooking is
complete (led alongside pushbutton 16 off).
To shut off the signal, open the oven door.
Remove the food from the oven, following
the directions in paragraph 2.7 of the
section “Special notes” .
Displaying and changing saved values
To check set values during a cooking cycle,
press pushbutton 19 and the displays flash
for 10 seconds..
If modifications are required to the flashing
values, use the relative knob or
pushbuttons, or press pushbutton 19 again
to skip the next cycle.
After approx. 10 seconds (TIME-OUT) the
new entries are saved automatically and
the displays return to the current values.
6 • SETTING AND SAVING A PROGRAM
FOREWORD
The example given in this section
compr ises a preheat stage and three
consecutive cooking phases, controlled
both by time and by the core probe.
OPERATIONS
6.1
• SWITCH ON THE OVEN
Press pushbutton 1.
6.2
• SELECT THE PROGRAM
Use pushbuttons 18 to select the number
to attribute to the cooking program (e.g.9),
shown on program display 8.
6.3
• SET OVEN PRE-HEATING (CYCLE 1)
To access the temperature settings, press
pushbutton 2 (CONVECTION) and turn
knob 25a to the required value (140 °C),
turn knob 25b left to set infinite time[ inf ].
6.4
• SET CYCLE 2: COOKING
Press pushbutton 19. Cycle display 9
shows the number [ 2 ].
Warning
The program is “new” when time display 6
shows no values. Therefore proceed with
programming from point 7.3.
The program is “engaged” when time
display 6 shows values.
6.4a •
6.4b •
6.4c •
SELECT
SET CYCLE 2
SET CYCLE 2
CYCLE 2
TEMPERATURE
TIME
COOKING
As cycle 2 is
for steam
cooking mode
and the
temperature of
100 °C is
already set, go
to the next
point.
Turn knob 25b
and set the
cooking time to
10 minutes.
MODE
Press the
steam cooking
mode
pushbutton 3
11
00000000rev00
6 • ISETTING AND SAVING A PROGRAM
OPERATIONS
6.5
• SETTING CYCLE 3
Press pushbutton 19;
Cycle display 9 shows
the number [ 3 ].
6.5a •
6.5b •
6.5c •
6.5d •
SELECT CYCLE
SET CYCLE 3
SET PRODUCT
VENT OPENING
3 COOKING
TEMPERATURE
CORE
MODE
Turn knob 25a
to right and set
180 °C.
TEMPERATURE
Press
pushbutton 24
to open the
vent,
(corresponding
led remains lit).
Press
convection
mode cooking
pushbutton 2.
6.6
• SET CYCLE 4
Press pushbutton 19 . Cycle display 9
shows the number [ 4 ].
6.6a •
6.6b •
6.6c •
SELECT
SET CYCLE 4
SET THE
CYCLE 3
TEMPERATURE
PRODUCT
COOKING
Turn knob 25a
to the right and
set
160 °C.
CORE
MODE
Press
combined
mode cooking
pushbutton 4.
6.7
Mode
Oven
preheating to
Convection
TEMPERATURE
Press
pushbutton 12
and display 6
flashes; set
82°C
by means of
knob 25b.
Summary table for entering and
saving the cooking program
• SAVING THE
PROGRAM
Wait 10 seconds to save the data entered,
or press pushbutton 16 to start the multiphase cooking cycle.
Cycle
Press
pushbutton 12
and display 6
flashes; set
68 °C (the time
is not set when
the core probe
is used) turning
knob 25b.
Temperature C
Time h : m
Core probe C
Vent
140
Infinite time
“m”
(not enabled
in this phase)
Closed
Cycle 1
Cycle 2
Steam
100
10 min.
--
Closed
Cycle 3
Convection
180
--
68
Open
Cycle 4
Combined
160
--
82
Closed
12
00000000rev00
7 • SELECTING AND STARTING A SAVED PROGRAM
OPERATIONS
7.1 • SWITCH ON
Press pushbutton 1.
7.2
• RECALL
Select the required cooking program by
pressing pushbutton 18 “UP” (e.g. 09).
WARNING: if the program involves use of
the core probe, connect the probe to the
front panel, otherwise the error message
“ERR SS” (Core probe error) is displayed.
Refer to the self-test and troubleshooting
section) page ...
7.3
• START
Displaying entered values
To check set values during a cooking cycle,
press pushbutton 19. To see the settings
for subsequent phases, press key 6 and
then key8, until the display shows the
required phase.
7.3a •
7.3b •
7.3c •
STARTING A PROGRAM WITH
STARTING A PROGRAM WITH
STARTING A PROGRAM WITHOUT
PREHEAT
PREHEAT EXCLUDED
MEMORIZED PREHEAT
If the selected program
involves the preheating phase
display 6 shows [ INF ]
press pushbutton 16 to
start pre-heating.
A sequential acoustic signal
indicates when the oven has
reached the set temperature.
Place the food in the oven (if the
program includes cooking phases
with the core probe, insert the
probe in the product).
Close the door.
Cycle display 9
shows [ 2 ] and the oven is turned
on automatically.
Place the food in the oven (if the
program involves phases with the
core probe, insert the probe in the
product).
On program selection (cycle
display 9 shows[ 1 ]). Press
pushbutton 16to start cooking (led
lit and steady). Press and hold
pushbutton 19 for 3 seconds;
cycle display 9 shows [ 2 ] (cycle
2).
The preheat stage has now been
skipped.
Warning: pre-heating should only
be skipped when the oven is
already at the set temperature.
Place the food in the oven (if the
program involves phases with the
core probe, insert the probe in the
product).
On program selection, cycle
display 9 shows [ 1 ]); start the
first cooking cycle by pressing
pushbutton 16 (led lit ).
13
00000000rev00
8 • CHANGING A STORED PROGRAM TEMPORARILY
stored for a different food size, in which
cooking times need to be extended,
temperatures increased or any other
parameters modified as required.
Foreword
The appliance enables temporar y
modifications to stored program for a
cooking cycle in progress only. It is
essential that the selected program is
already started (pushbutton 16 with led
lit). It may be used when the program is
OPERATIONS
AUTOCLIMA Value
increase/decrease
... press pushbutton 14; the led flashes,
set the new value by means of knob
25b, wait 10 seconds (TIME OUT), and
modifications are saved automatically.
Select the program and start cooking,
as described above.
press pushbutton 19; cycle display 9
flashes; after which:
Cooking mode
... press the pushbutton corresponding
to the required cooking mode, wait 10
seconds
(TIME
OUT),
and
modifications are saved automatically.
Note: program display 8 shows the
temporar y changes with two fixed
luminous dots.
Modifications are deleted on
completion of cooking.
Temperature
and/or
time
increase/decrease
... Rotate knob 25a to set the new
temperature, wait 10 seconds (TIME
OUT), and the modifications are saved
automatically.
Increase/decrease core probe
temperature
... press pushbutton 12, the led flashes,
set the new value by means of knob
25b, wait 10 seconds (TIME OUT), and
modifications are saved automatically
14
00000000rev00
9 • SETTING THE CORE PROBE
probe on connection 26 in any timed cooking
mode with the oven in operation, if pushbutton
12 is pressed for a few seconds, display 6
shows the probe temperature for a brief
interval. This enables the user to check the
temperature at the core of the product not
being cooked and outside the oven.
Foreword
The core probe enables controlled cooking by
monitoring the temperature at the core of the
product. This device overrides the time setting,
and cooking stops as soon as the temperature
at the core of the product reaches the selected
value.
The core probe can conveniently be used as
portable thermometer; in fact by inserting the
OPERATIONS
9.1 •
COOKING WITH THE CORE PROBE
Warning: in the case of cooking with the core
probe and display of the signal “ERR SS” on
display 6, connect the core probe to
connection 26. If the first cycle is used as preheating, the core probe must be kept outside
the oven; otherwise the program cannot be
started.
AUTOMATIC MODE
HOLD
To maintain the product at the same
temperature at the end of cooking: set infinite
time: [ INF ], and press pushbutton 12, after
which set the required core temperature by
means of knob 25b. The food is kept hot,
ventilation is activated intermittently until the
hold function is stopped (e.g. by opening the
door).
After setting the oven temperature (as
described in the setting sections), press
pushbutton 12 and use knob 25b to set the
required core temperature. Connect the probe
to connection 26, insert the probe in the
product (see section “Tips for using the core
probe”), and then proceed according to the
selected cooking mode.
Therefore, if the following has been selected...
9.1 a •
9.1 b •
9.1 c •
SINGLE
MANUAL
PROGRAMS TO
MANUAL
COOKING
STORE
COOKING
CYCLE WITH
CYCLE:
MULTIPLE
press
pushbutton 16
to start the
cooking cycle.
PHASES IN
move on to the
next phase or
wait for the
program to be
saved
automatically.
SEQUENCE:
proceed with
settings of next
phase or press
pushbutton 16
to start the first
set cooking
phase.
PRACTICAL EXAMPLE
Setting
Mode: Convection (10)
Oven temperature: 140 °C (18)
Time: Infinite (21)
Core temperature: 78 °C (23)
What happens
Once the temperature at the core of the food
reaches 78 °C, with the oven temperature at
140 °C, the heat source shuts off and will
automatically come into operation again when
the core temperature drops by 1 °C. In
practice, heating is no longer based on the
temperature selected for the oven, but
functions according to the selected core
temperature.
Caution: wait for a few seconds after inserting
the probe in connection 26 (time required for
the electronic card to acknowledge presence of
the probe) and then start cooking by means of
pushbutton 16 START.
15
00000000rev00
9 • CORE PROBE SETTINGS
Optional: on request, and without the
need of special modifications, a core
probe can be inserted in connection
(26) to control temperatures of vacuumpacked or small items.
The position of the core probe in
cooking modes using this device is very
important: the probe must be positioned
from top to bottom in the centre of
gravity of the product to be cooked and
inserted fully. When cooking items with
a thickness that is less than twice that of
the probe, insert the latter horizontally
with respect to the support surface so
that the probe is centred correctly in the
product (see figure).
Insert the probe so that it is positioned
in the centre of the oven.
NO
YES
NO
YES
Advantages
• improves cooking control, eliminating
risks of product loss or waste;
• enables accurate cooking irrespective of
the quality or mass of the product;
• saves time as cooking control is
automatic;
• guarantees strict hygiene as when the
precise core temperature is known, the
food does not need to be handled or
tested;
• ideal for large items;
• precision to one degree centigrade
when cooking delicate products, such as
ROAST-BEEF;
• full compliance with essential
requirements specified in HACCP
standards.
16
00000000rev00
10 • AUTOCLIMA AUTOMATIC HUMIDITY CONTROL SYSTEM
will remain with the same appearance and
consistency.
This system achieves the same cooking
results regardless of the quantities of the
same product.
Foreword
The AUTOCLIMA humidity control system
enables the user to maintain a constant
degree of humidity in the oven both in
convection and combined cooking modes. It
performs a dual function; it not only delivers
moisture, but also removes it when the
product exceeds the set value.
It is par ticularly beneficial with fresh
products that cannot always have the same
degree of moisture, but which, once cooked,
“AUTOCLIMA” Symbol
OPERATIONS
Note: the vent must be closed; if opened
(pushbutton 24) the automatic humidity
control system settings would no longer
be valid.
10.1 • COOKING WITH THE AUTOCLIMA
HUMIDITY CONTROL SYSTEM
Note: cooking mode must be convection
or combined
After setting the oven or core probe
temperature (as described in the setting
sections), press pushbutton 14 to enter the
required “AUTOCLIMA” value, from H00
(very dry) to H99 (very moist). Place the
food in the oven, and insert the core probe if
required (see section “Tips for using the
core probe” ), then connect the probe to
connection 26 and then proceed according
to the selected cooking mode.
Therefore, if the following has been
selected...
10.1 a •
10.1 c •
10.1c •
SINGLE
PROGRAMS TO
PROGRAMS TO
MANUAL
STORE
STORE
COOKING
move on to the
next phase or
wait 10 seconds
for the set
program to be
saved
automatically
(TIME OUT).
move on to the
next phase or
wait 10 seconds
for the set
program to be
saved
automatically
(TIME OUT).
CYCLE:
press
pushbutton 16
to start the
cooking cycle.
Advice
Definition of the automatic humidity control
value requires a certain amount of practical
experience.
Nonetheless, it is impossible to commit a
catastrophic error, and this function
undoubtedly enhances the appearance of
the food.
Ideal for:
products that tend to dry, small items or
products that release excessive moisture
(e.g. roast chicken) and reheating above all
on plates.
Advantages
Repeatable results, even when foods are
cooked together with others having
different characteristics.
17
00000000rev00
11 • SPECIAL PROGRAMS
results in terms of presentation, degree of
cooking, weight loss reduction and taste of
the final product.
Foreword
These have the aim of completing a
cooking process without the direct
inter vention of the user, with optimal
OPERATIONS
11.2 • MAINTAINING the set temperature when
cooking is complete
This function enables the user to hold food
at the same temperature as soon as the
LAST CYCLE is completed, to enable the
product to be served “hot at the right time”.
The cooking process stops, and
dehydration is prevented by means of the
AUTOCLIMA humidity control system.
The taste of the temperature is kept
unchanged, precision is down to one
degree centigrade and very little energy is
consumed...
11.3 • REHEAT PROGRAM
Foreword
The reheating temperature is part of an
organised cooking control system:
cooking
cooling
storage
reheating
service.
Foods can be reheated either in a pan or
on a plate.
Settings are made in the same way as a
normal cooking program and the
AUTOCLIMA function is recommended
for perfect control of humidity inside the
oven. This is ideal for reheating food on
plates, to avoid the for mation of
condensation on the plate or for products
that need extra moisture in the oven to
maintain their original characteristics.
The best results of the HOLD function are
obtained when the last cooking phase
envisages temperature control by means of
the core probe.
18
00000000rev00
12 • OPERATING DETAILS
FOREWORD
During cooking (LED permanently lit), the
displays show the current values. The set
values can be checked when required. In
this case, proceed as follows:
OPERATIONS
12.1 • DISPLAYING SET VALUES
DURING COOKING
(without stopping)
press cycle 19pushbutton; the displays
flash and show the previously set values.
After 10 seconds the current values (TIME
OUT) return to the display, i.e.:
flashing display: set value.
fixed display : current value.
12.2 • CHANGING SET VALUES
DURING COOKING
(WITHOUT STOPPING)
12.2 a •
TEMPERATURE
AND TIME
To modify value
press cycle pushbutton
19, and turn the
relative knob to
set the new
value (turn right to
increase, left to
decrease); the
displays shows the
values entered,
after 10 sec.
the current values
return on display.
12.2 b •
COOKING MODE
Press the required
cooking mode
pushbutton and the
relative led illuminates.
12.2 c •
AUTOMATIC
HUMIDITY CONTROL
press cycle pushbutton
19 followed by
pushbutton 14 for the
automatic humidity
control function (the
display shows[ H.. ], the
value entered
previously). Turn knob
25b to set the new value.
After 10 seconds the
current values return to
the display.
19
00000000rev00
12.2 d •
CORE PROBE
press cycle pushbutton
19 followed by core
probe pushbutton 12;
display 6 shows the core
probe setting.
Turn knob 25b to set the
new value. After the 10second TIME OUT the
current values return to
display.
12 • OPERATING DETAILS
OPERATIONS
12.5 • OVERRIDING COOKING PHASES
IN A MANUAL PROGRAM
WITH MULTIPLE PHASES IN
SEQUENCE
To skip a cooking phase or stop a phase in
advance, press and hold pushbutton 19 for
approx. 3 sec.; the display will
automatically show the next phase.
12.7 • PERMANENT STOP
To stop a cycle with infinite time settings or
permanently interrupt the cycle, press and
hold key16 for approx. 3 seconds. The
continuous buzzer notifies the user of the
end of cooking and the led on pushbutton
16 turns off.
12.6 • TEMPORARY STOP
Open the door or press key16: the relative
led flashes. Cooking is stopped, the time
pending completion is interrupted until the
door is closed again or when pushbutton
16 is pressed again. Cooking will resume
automatically from the point at which the
interruption occurred.
20
00000000rev00
13 • PRACTICAL TIPS
13.1 • PREHEATING THE OVEN
The oven preheating phase is extremely
impor tant and useful for successful
cooking.
As a general rule, always preheat the oven
when empty, setting the temperature
approx. 20% higher than that to be used
during cooking.
In the case of steam cooking, preheat the
empty oven using convection mode as this
will allow temperatures of over 100°C to be
selected.
13.2 • COOKING LOADS
The depth of the tray must be suitable for
the height of the food.
To achieve uniform cooking distribute the
load over several shallow trays rather than
loading just one extremely deep tray.
Keep to the weights specified in the
following table:
13.3 • FROZEN/DEEP-FROZEN PRODUCTS
The oven must be preheated and loaded
respecting the quality and type of these
Maximum
oven
load
Model
No. pans
Load
per pan
ME 061.
MG 061.
6 x GN 1/1
4 kg
24 kg
ME 101.
MG 101.
10 x GN 1/1
4 kg
40 kg
ME 102.
MG 102.
10 x GN 2/1
20 x GN 1/1
8 kg
4 kg
80 kg
ME 201.
MG 201.
20 x GN 1/1
4 kg
80 kg
ME 202.
MG 202.
20 x GN 2/1
40 x GN 1/1
8 kg
4 kg
160 kg
foods. For example, frozen spinach must
not be cooked at excessively high
temperatures as this would cause the
spinach to dry on the outside.
13.4 • TYPES OF TRAYS
For optimal results trays used must be
based on the various types of products to
be cooked; aluminium or aluminium coated
trays for confectioner y and bread,
perforated trays for steam cooking, racks
for pre-fried foods such as potatoes.
13.5 • CLEARANCE BETWEEN
CONTAINERS
When loading the oven with the food to
cook, take care that there is sufficient
clearance between containers. This
enables uniform distribution of heat and air
and improved results, which would not be
possible if the food in one tray is in contact
with the tray above.
13.6 • LESS SEASONING
By using this type of oven it is possible to
virtually eliminate the use of seasoning, oil,
butter, fat and flavouring. Minimizing the
use of such ingredients in cooking,
enhances the natural flavours of the food
and the nutritional content remains intact,
to produce healthier and tastier food.
Note: When loading the oven you should clearly consider not only
the weight of the product, but also its size, firmness and thickness.
21
00000000rev00
14 • DAILY CLEANING
14.1 • THOROUGH CLEANING ...
... is a prerequisite for faultless cooking
and better yields:
• the food’s own flavour remains unchanged;
• dur ing operation, there are no fumes
caused by bur ning of remains from
previous food;
• energy saving;
• less maintenance work and a longer
service life;
• in addition, the simplicity of the procedure
means that a thorough clean can be
carr ied out quickly and with minimum
inconvenience to the operator:
- 5 minutes approximately to spray clean
- 20 minutes steam cycle
- 5 minutes rinsing
- 5 minutes drying
14.2 • WARNING
Never use direct or high-pressure jets of
water to clean the outside of the oven.
Never use corrosive and/or abrasive
substances on steel surfaces, and avoid
scouring or scrubbing with steel wool or
wire brush, as irreparable damage could
occur. Similarly, aggressive non-alkaline
detergents containing high percentages of
sodium and ammonia can soon damage
the seals, jeopardizing oven efficiency
and operation.
The outside of the oven is washed with a
sponge and warm water with an ordinary
detergent suited to the purpose.
14.3 • Use the LAINOX detergent specially
produced for this purpose.
OPERATIONS
14.3 • CLEANING THE OVEN
AT THE END OF WORK,
PRE-SET PROGRAM “CL”
Proceed as follows:
5 • At the end, an acoustic signal notifies
the operator that the cycle has finished.
At this point, switch off the appliance
completely and open the oven door slowly;
1 • Switch on the oven;
6 • rinse the oven thoroughly with clean
water and wipe the door seals with a damp
sponge (use of the -optional- shower head
is recommended).
2 • press pushbutton 17 until program “CL”
is displayed; press pushbutton 16; the oven
is heated or cooled automatically to bring
the temperature to 50 °C.
A buzzer war ns the user that the set
temperature has been reached;
7 • Switch on again, and select a
convection cycle of about 5 minutes.
8 • Stop and shut off all utilities (electrical
power supply, water, and gas if connected).
Leave the door slightly ajar when the
appliance is not in use.
3 • Open the door and proceed to remove
any cooking residue, using a spatula that
will not scratch the steel surface, then
spray the inside with a proprietary oven
cleaner. Use a non-corrosive alkaline
product. Close the door and allow the
chemical to act for the time indicated by the
manufacturer, generally between 5 and 10
minutes,
4 • press pushbutton 16: to start the preset program in steam cooking mode at 100
°C for 20’.
22
00000000rev00
15 • ROUTINE MAINTENANCE
15.1 • PERIODICALLY ...
... the deflector and tray racks should be
cleaned as required.
In this case, proceed as follows:
• Stop and shut off all utilities (electrical
power supply, water, and gas if connected);
• remove the tray guides;
• use a suitably sized screwdriver or a coin
to unscrew the deflector screws to enable
cleaning behind the latter; use the shower
head to r inse all par ts thoroughly
(optional);
• dry with a clean cloth;
• the deflector should be removed when a
significant amount of dirt has accumulated;
never use abrasive products or steel pads
which damage the steel surface; if
dimensions allow, clean the deflector in a
dishwasher.
Secure the deflector inside the oven and
ensure that the right-hand fixing screws are
tightened fully down.
15.2 • PROLONGED PERIODS OF DISUSE
If the oven is not used for a prolonged
interval (e.g. holidays or seasonal closing)
it must be cleaned thoroughly, to remove all
traces of food or dir t. Leave the door
slightly ajar so that air can circulate inside
the oven. Be absolutely certain to shut off
all utilities (electrical power supply, water,
and gas if connected). To complete
cleaning, the exter nal surfaces can be
treated with any commercially available
protective product.
SOLLEVARE
RAISE
TO REMOVE
PER
TOGLIERE
THE
DEFLECTOR
IL
DEFLETTORE
16 • DESCALING THE BOILER
Bear in mind that the steam generator
automatically drains and performs a selfcleaning cycle daily to regenerate the water
contents. The descaling interval is defined
by the var ious parameters set on the
electronic card by the technician at the
time of installation, on the basis of the
water supply used (upline of the watersoftener) and the technical characteristics
of the system.
The message “CAL” appears when the
appliance is switched off. Completion of the
“de” descaling cycle enables the hour
count to be reset and the message
disappears from the display.
Descaling should be performed with the
appliance cool and clean (see section
“Daily cleaning”), and the assistance of an
authorised technician is recommended for
this procedure.
The appliance is designed to count the
hours of steam generator operation and
therefore warns the user with the message
“CAL” when the boiler needs to be
descaled by means of the special cycle
“de”.
The message “CAL” does not shut down
the appliance per manently for obvious
reasons of safety, but the “de” program
should be run within the next few hours of
use after the message appears. To check
hours pending display of the message
“CAL” in advance, switch off the oven by
means of pushbutton 1, and press and hold
pushbutton 3 (STEAM) for 3 seconds, to
show the remaining time.
The presence of scale can cause a
reduction in circuit power and can cause
serious damage to the steam production
system.
23
00000000rev00
26 • DESCALING THE BOILER
Activation of the “de” descaling cycle
Switch on the appliance by means of
pushbutton 1, press key 17, and the display
shows the last program available”de”
“data”, display 5 shows the standby “ATT”
function, the automatic boiler drain and
washing functions are activated and then
the message “det” “IN” is displayed with
a sequential acoustic signal to notify the
user to fill the container with scaler via cap
A (the solution per litre, if necessary, is
specified by the product manufacturer)
according to the boiler capacity (see table):
Models
Litres
Models
Litres
ME 061.
3.5
MG 102.
5.7
MG 061.
2.5
ME 201.
16.5
ME 101
11
MG 201.
7.7
MG 101.
3.7
ME 202.
29
ME 102.
12.3
MG 202.
--
;;
16.1 • DESCALER ACTION
press pushbutton 16; the boiler loads a
quantity of water to fill up completely,
mixing the water with descaling detergent.
“CYCLE 1”: This is the first automatic
cycle that enables the boiler to heat and
maintain the temperature for 30 minutes
(the countdown is shown on display 6) and
ensure descaler action. After this time
inter val, the boiler drains all contents
(impur ities plus detergent mixed with
water); ensure that the contents flow out
freely; otherwise contact technical services
as the drain outlet may be blocked and
boiler maintenance may be necessary. This
problem is also indicated on displays 5-6
(see
section
”Self-test
and
troubleshooting”).
The boiler then removes more stubborn
scale deposits by flushing through normal
mains water and then loads with purified
water.
“CYCLE 2”: This is the second automatic
cycle which enables activation of the oven
in steam mode for 25 minutes to ensure
thorough cleaning of the steam generator
and steam delivery pipelines to the oven.
The cycle is completed with the phases:
boiler drainage, boiler washing with normal
mains water and loading of purified water.
A
5 • Refit cap “A”.
24
00000000rev00
16 • DESCALING THE BOILER
Important:
The above detailed sequence ensures
thorough cleaning of the steam generator
and subsequent re-use; any faults
detected dur ing the cycle appear on
display 8; if this occurs, the appliance
must NOT be used until an authorised
technician has checked the appliance!
The operator must strictly observe all
precautions (face mask, gloves etc.) in
relation to the product used.
The operation of descaling should not
be interrupted for any reason
whatsoever.
Interrupting it makes the whole process
pointless, wasting descaler and risking
contamination if the descaler has not
entirely been eliminated from the boiler.
An interruption will also prevent the
electronic control from resetting the
boiler hour-counter to zero.
the correct conclusion of the program is
indicated by display of the message “END”;
press pushbutton 1 to exit program “de”,
and reset the descaling hour count.
On completion of the program, rinse the
oven thoroughly with the shower.
Warning:
This operation should only be carried
out under strict super vision of the
operator.
17 • SPECIAL MAINTENANCE
17.2 • With this in mind, customers are
recommended to sign a ser vice
agreement.
17.1 • To ensure correct and safe operation, the
oven must be inspected and serviced at
least once a year by a technician from the
technical service centre.
18 • SELF-TEST AND TROUBLESHOOTING
18.2 • In the event of malfunctions or faults, these
are shown on displays 5-6. Error codes are
extremely important when faults cannot be
remedied by the operator, as they provide
the service technician with an indication of
the type of fault. The message on display is
accompanied by an acoustic signal, the
frequency of which depends on the gravity
of the fault.
18.1 • Whenever the appliance is powered up by
pressing the main switch, an electronic test
routine is run automatically to check the
principal functions. On completion of the
self-test function, if the appliance is in
correct operating condition, the oven
temperature display shows the current
oven temperature and the leds on the
cooking mode pushbuttons flash. The
cooking mode parameters can then be
entered as required.
25
00000000rev00
18 • SELF-TEST AND TROUBLESHOOTING
The main fault warning messages are:
MESSAGES
“ Err Sc “
Shown on displays 5 and 6. Oven temperature probe
faulty, Switch off the oven immediately and contact a
technical service centre.
“ no H2o “
This means no water is delivered; check that the shutoff
valve is open and that there is water in the mains. If the
lack of water supply is due to a fault on the mains, notify
the relative authorities; otherwise if water is present in the
mains, contact the technical service centre. In the
meantime, the oven can still be used in convection mode.
“ Er 1 “
A motor overload cutout has tripped. Switch off the
oven immediately and contact a technical service centre.
“ Er 2 “
Activation of the oven safety thermostat. Switch off the
oven immediately and contact a technical service centre.
“ Err Sd “
Vapour condensation temperature probe faulty. Steam
condensation is continuous, but the oven may still be used
under strict supervision (increased water consumption)
until the technical service centre can intervene.
“ Er 7 “
An abnormally high temperature has been detected in
the compartment housing electrical components. The
oven can still be used under close supervision, until a
service technician can intervene.
“ Er 8 “
An excessive temperature is detected in the electrical
components compar tment which could damage
components. Switch off the oven immediately and contact
a technical service centre.
26
00000000rev00
18 • SELF-TEST AND TROUBLESHOOTING
The main fault warning messages are:
MESSAGES
“ Err Ss “
Core probe fault. If a fault is displayed, check that the
connector is inserted correctly in the socket (26). In this
case the oven can be used in timed mode until technical
services arrive, but without use of the probe.
“ Er 6 “
WARNING FOR GAS MODELS.
No gas. Check that the shutoff valve is open and that
there is gas coming from the mains. If there is no supply
from the mains, inform the gas company or authority. If
there is no problem with the mains, contact a technical
service centre.
“ no ign “
Gas appliances are fitted with ignition devices
incorporating an automatic reset function. If automatic
reset is not performed after several attempts, displays 5
and 6 show the error code [ NO IGN ] as shown alongside.
An acoustic signal notifies the operator. press pushbutton
16 to reset ignition. If the fault persists, contact a technical
service centre.
Note: Burner shutdown is a safety condition. Therefore,
this situation is not a sign of the appliance malfunctioning.
If, after carefully carrying out these checks, the
appliance still does not function properly, contact a
technical service centre.
Note: when contacting service technicians, describe the
fault in as much detail as possible, referring all the
information indicated on the identification data plate (see
page 3).
“ Err Sb “
Boiler pre-heating probe fault; oven can only be operated in
convection mode; steam and combined modes are
disabled. Contact technical services for assistance.
27
00000000rev00
18 • SELF-TEST AND TROUBLESHOOTING
The main fault warning messages are:
MESSAGES
“ Er 3 “
Boiler safety thermostat activation; switch off the oven
immediately and contact technical services for assistance.
“ no VAP “
Indicates steam generator heating failure on gas models.
Switch off by means of pushbutton 1, reset the cooking
mode; if the signal re-appears, contact technical services
for assistance.
“ no drn “
Indicates steam generator water drain failure. The
appliance can still be used, bearing in mind that the water
has not been regenerated. press pushbutton 15 to
temporarily bypass the fault. If the fault appears during the
descaling program “de” the fault interrupts appliance
operation; in this case contact technical services for
assistance.
“ CAL “
This appears when the appliance is switched off and
indicates that the steam generator descaling cycle is
required. See section 19. Press pushbutton 15 to
temporarily bypass the fault.
“ doP “
This appears when the door is open, to indicate that the
door microswitch cannot close the contact. Ensure that the
door is closed correctly; if the signal persists, contact the
technical services centre.
“ no con “
Indicates connection failure between the base card and
keyboard card; check fuses.
28
00000000rev00
NOTES
29
00000000rev00
NOTES
30
00000000rev00
NOTES
31
00000000rev00
NOTES
32
00000000rev00
DESCRIPTION OF THE DISPLAYS AND KEYS
DISPLAYS
VERSION H
KNOBS AND KEYS
1 ON/OFF Main switch
9 Cycle display
8
Program display
3 Steam mode key
2 Convection mode key
12
5 Oven temperature display
25 Set/selection control knob
7
Combination mode key
"Autoclima" display
time display (time remaining/set)
6 Cooking
Core temperature display (actual/set)
25 Set/selection control knob
12 Core temperature setting key
14
"Autoclima" setting key
21 Rapid cooling key, oven door open
16 Start/Stop key
22 Oven light key
24 Opening oven steam vent key
26 Core probe connection
Core probe