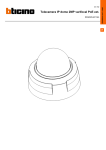
1
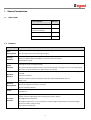
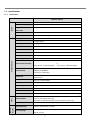
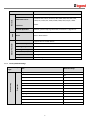
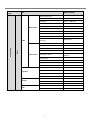
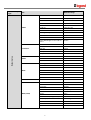
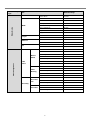
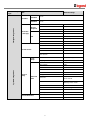
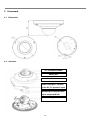
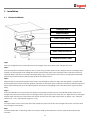
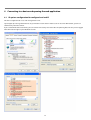
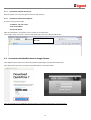
1,3 Megapixel IP dome camera
4 306 32
LE05639AA
USER MANUAL
Sommaire
1 General Introduction.......................................................................................................3
1.1
Accessories.....................................................................................................................................3
1.2
Features ...........................................................................................................................................3
1.3
Specifications .................................................................................................................................4
1.3.1
Performance..............................................................................................................................................................................................................4
1.3.2
Factory Default Settings .....................................................................................................................................................................................5
2 Framework ......................................................................................................................10
2.1
Dimensions....................................................................................................................................10
2.2
Structure ........................................................................................................................................10
3 Installation.......................................................................................................................11
3.1
Device Installation........................................................................................................................11
4 Connecting to a device and opening the web application ...................................12
4.1
IE options configuration for config tool and and IE..............................................................12
4.1.1
Connection with the Search Tool................................................................................................................................................................ 13
4.1.2
Connection with Internet Explorer .............................................................................................................................................................. 13
4.2
Connection with Mozilla Firefox or Google Chrome.............................................................13
5 Quick Configuration Tool ............................................................................................14
5.1
Introduction...................................................................................................................................14
5.2
Searching/Connecting.................................................................................................................14
5.2.1
Connecting to the device’s web interface............................................................................................................................................... 14
5.3 Connecting with the configuration tool (to change the IP address or upgrade the
device software. ......................................................................................................................................16
5.4
Main interface of the tool............................................................................................................18
5.4.1
Network settings .................................................................................................................................................................................................. 18
5.4.2
System Information ............................................................................................................................................................................................ 18
5.4.3
System Upgrade .................................................................................................................................................................................................. 19
6 Resetting the camera....................................................................................................19
2
1 General Introduction
1.1
1.2
Accessories
Accessory Name
Amount
IP Camera
1
Accessories bag (screws and
installation template)
1
Quick Start guide
1
CD
1
Features
Functions
User
Management
Storage
Function
Alarm
Function
Features
Different user rights for each group, one user belongs to one group.
The user right shall not exceed the group rights.
Central server backup function in accordance with your configuration and setup in schedule settings.
Record via Web and the recorded file are stored in the client-end PC.
FTP Network storage.
Real-time respond to video detect as user pre-defined activation setup and exert corresponding
message in screen and audio prompt.
Real-time video detect(motion detect, camera masking) shows message in screen and audio prompt.
Generates an alarm when finds an abnormality in the system.
One-channel video data transmit to network terminal. Delay is 270ms (network bandwidth support
needed)
Network
Monitor
Max 20 connections.
Audio and video transmission protocol: HTTP, TCP, UDP, RTP/RTCP, RTSP and etc.
Web access.
Network
Management
Power
Configuration and management via Ethernet.
Device management via web or client-end.
Various network protocols.
External power adapter DC12V
PoE 802.3af.
Log function
System resource information and running status real-time display.
Assistant
Function
Day/Night mode auto switch.
Backlight compensation: screen auto split to realize backlight compensation to adjust the bright.
Electronic shutter and gain setup.
Video watermark function.
3
1.3
Specifications
1.3.1
Performance
Video Parameter
System
Parameters
IP dome camera
Main Processor
TI Davinci high performance DSP
OS
Embedded LINUX
System
Real-time network, local record, and remote operation at the same time.
Resources
User Interface
Remote operation interface such as WEB, VMS software
System Status
Bit stream statistics, log, and software version.
Image Sensor
1/3-inch CMOS
Pixel
1280(H)*960(V)
Day/Night Mode
Day/night mode switch.
Gain Control
Fixed/Auto
White Balance
Manual/Auto
BLC
On/off
Electronic Shutter
Manual/Auto (ranges from 1/3 to 1/10000).
Video Compression
H264 /MJPEG
Main stream(1280*960@15fps)/ extra stream(704*576@15fps)
Max Video Frame Rate
or
Main stream(1280*720@25fps)/ extra stream(704*576@25fps)
H.264: 64-6144Kbps.
Video Bitrate
MJPEG: 64-10240Kbps.
The bitrate is adjustable.
Record /
Backup
Video
Video Flip
Mirror function.
Flip function.
Snapshot
Max 1f/s snapshot (JPEG).
Privacy Mask
Max 4 privacy mask zones
Video Setup
Brightness, contrast, colors, etc...
Video Information
Channel title, time title, motion detection, privacy mask.
Lens
2.8mm Megapixel
Lens Interface
M12. Lens
Motion Detect
396 (18*22) detection zones: sensitivity level ranges from 1 to 6 (The 6th
level has the highest sensitivity)
Activation event: Video storage, image snapshot, log, email, etc...
Video Loss
Activation event: Video storage, image snapshot, log, email etc…
Record Priority
Manual> Video detect>Schedule
Local Storage
No SD card port
4
Network
Parameters
General Parameter
AUX
Wire Network
1-channel wire Ethernet port, 10/100 Base-T Ethernet
Network Protocol
Standard HTTP, TCP/IP, IPv4/IPv6, ARP, IGMP, ICMP, RTSP, RTP, UDP,
SMTP, FTP, DHCP, DNS, DDNS, PPPOE, UPNP, NTP, Bonjour, SNMP.
Platform interface
Standard
ONVIF
Remote Operation
Monitor, system setup, log information, maintenance , upgrade etc
Reset
Built-in RESET button
Power
Support DC12V and PoE 802.5af.
Power Consumption
1.5W MAX
Working Temperature
-10℃~+50℃
Working Humidify
10%~90%
Dimensions(mm)
¢110×54
Weight
0.25Kg
Installation
Wall or ceiling mount
Factory Default Settings
Properties
Function Setup
Type
Camera Setup
1.3.2
IP dome camera
Item
Default Settings
Brightness
50
Contrast
50
Hue
50
Saturation
50
Gain Mode
Auto
Gain Max
80
Exposure Mode
Auto
Scene Mode
Auto
Day/night mode
Auto
BLC
Off
Mirror
Disable
Flip
Disable
5
Function Setup
Type
Item
Default Settings
Main stream
Code-Stream Type
General
Encode Mode
H.264B
Resolution
720P(1280*720)
Frame Rate(FPS)
PAL: 25 / NTSC:30
Bit Rate Type
CBR
Reference Bit Rate
1536-6144Kb/s
Bit Rate
4096
I frame Interval
50
Watermark Settings
Enable
Watermark
Video
Camera Setup
Video
character
Extra stream
Snapshot
Overlay
Path
DigitalCCTV
Enable
Enable
Code-Stream Type
General
Encode Mode
H.264B
Resolution
CIF(352×288/352×240)
Frame Rate(FPS)
PAL: 25
NTSC:30
Bit Rate Type
CBR
Reference Bit Rate
192-1024Kb/S
Bit Rate
1024
I frame Interval
50
Snapshot Type
General Snap
Image Size
720P(1280*720)
Quality
5
Interval
1picture/s
Privacy Mask
Disable
Channel Title
Enable
Time Title
Enable
Snapshot path
C:\PictureDownload
Record path
C:\RecordDownload
6
Function Setup
Type
Item
TCP/IP
Network setup
Connection
PPPoE
DDNS
IP filter
SMTP (email)
Default Settings
Host Name
IPC
Ethernet Card
Wire (Default)
Mode
Static
MAC address
Depends on the device
IP version
IPV4 and IPv6
IP address
192.168.1.108
Subnet mask
255.255.255.0
Default gateway
192.168.1.1
Preferred DNS
8.8.8.8
Alternate DNS
8.8.8.8
Enable ARP/Pingto to set IP address
service
Enable
Max connection
10
TCP port
37777
UDP port
37778
HTTP port
80
RTSP port
554
Enable
Disable
User Name
N/A
Password
N/A
Server Type
Disable, CN99 DDNS
Server IP
none
Port
80
Domain Name
none
User Name
none
Password
N/A
Update Period
5m
Trusted Sites
Disable
SMTP Server
none
Port
25
Anonymity
Disable
User name
anonymity
Password
N/A
Sender
none
Authentication (Encrypt mode)
N/A
Title (Subject)
IPC Message
Main Receiver
N/A
Interval
0s
Health Mail
Disable,interval=60m
7
Function Setup
Type
Item
Default Settings
UPnP
Network setup
SNMP
Bonjour
Multicast
QoS
Event management
Motion
Detect
Video
detect
Video
Masking
Disconnec
tion
Abnormity
IP Conflict
Enable UPnP
Disable
SNMP v1
Disable
SNMP v2
Disable
SNMP port
161
Read community
public
Write community
private
Trap address
N/A
Trap port
162
Enable
Enable
Server name
Depends on the device.
Multicast address
239.255.42.42
Port
36666
Real-time monitor
0
Command
0
Enable
Disable
Anti-dither
5 seconds
Sensitivity
3
Record Channel
Enable
Record Delay
10 seconds
Send Email
Disable
Snapshot
Disable
Enable
Disable
Record Channel
Enable
Record Delay
10 seconds
Send Email
Disable
Snapshot
Disable
Enable
Disable
Record
Enable
Record Delay
10s
Enable
Disable
Record
Enable
Record Delay
10s
8
Function Setup
Type
Item
Storage management
Schedule
Default Settings
Record
Schedule
To Set
Snapshot
Schedule
To Set
Path :
Timer
Disable
Record
Snapshot
Motion Detect
Disable
Alarm
Disable
FTP enable
Disable
Server IP
N/A
Port
21
User name
anonymity
Password
N/A
Pack duration
8m
Pre-record
5s
Disk Full
Overwrite
Record Mode
Auto
Destinatio
n (Storage )
FTP
Record control
Main Stream
System management
Local
setup
General
setup
Date and
time
Auto maintenance
Main Stream
Device Name
Device factory SN
Language
English
Date Format
Y-M-D
Time Format
24H
Time Zone
GMT+08:00
Current Time
Sync PC
DST
Disable
DTS type
Week
Start time
00:00:00 of the first Sunday
of the month
End time
00:00:00 of the second
Monday of the month
Synchronize with NTP
Disable
NTP server
clock.isc.org
Port
37
Update period
10m
Auto reboot
Enable
Auto delete old files
Disable
9
2 Framework
2.1
Dimensions
2.2
Structure
X-Y-Z rotation module
Device lens
Dome camera enclosure
Power input port : Connect
to the DC 12+ power to input
Network port :Network data
input, output and PoE.
Inner hexagonal wrench
10
3 Installation
3.1
Device Installation
Ceilling or wall
Expansion bolt
Dome camera body
ST3 self-tapping screws
Dome camera enclosure
Enclosure secure screws
Step1
Use inner hexagonal wrench to loose the three inner hexagon screws in the dome cover and open the cover.
Step 2
Take the installation installation template in the accessories bag, and then paste it on the ceiling or the wall according to your
monitor area requirements. Draw and dig three plastic expansion bolts holes in the installation surface and then insert three
expansion bolts in the holes. Secure these three bolts firmly. Dig a “cable exit hole” in the surface according to the installation
position map and draw out the cable from the top of the installation surface.
Step 3
Adjust the device to the proper position and draw the cable through the cable exit, dug in the ceiling (wall). Line up the TOP
direction of the device to the installation position map and then line up the three screw holes in the device pedestal to the three
plastic expansion bolt holes in the installation position. Put the three self-tapping screws in the three plastic expansion bolts
firmly.
Step 4
Loosen the two M3 secure screws of the lens rotation structure (do not remove, loosen a little bit will be OK.). Use the inner
hexagonal wrench to insert them to the inner hexagonal holes and use the wrench to turn the lens. Adjust the lens to the proper
monitor angle and secure the screws of the lens rotation structure. The lens adjust angle ranges are: flip (0°~+75°), video pan
rotation (-15°~+15°) , video rotation angle(-15°~+15°).
Step 5
Line up the dome camera cover to the cable exits and put the cover back. Use the inner hexagonal wrench to secure the three
inner hexagonal screws firmly.
Note:
The device GND cable can effectively enhance the device reliability. The GND hole is near the cable exit of the back of the
enclosure.
11
4 Connecting to a device and opening the web application
4.1
IE options configuration for config tool and and IE
This device supports web access and management via PC.
System pops up warning information to ask you whether install control “webrec.cab” or not. Click “OK” button, system can
automatically install the control.
If you can’t download the ActiveX file, you can lower the IE security level or disable anti-phishing filter. Be sure you are logged
with administrator rights in your Windows session.
12
4.1.1
Connection with the Search Tool
Refer to chapter “5.2.1 Connecting to the device’s web interface”
4.1.2
Connection with Internet Explorer
IP camera factory default setup: :
- IP address: 192.168.1.108
- User name: admin
- Password: admin
Open Internet Explorer and input IP camera address in the address bar.
For example, if your camera IP is 192.168.1.108, input http://192.168.1.108 in IE address bar.
Input DVR IP address in
the URL.
4.2
Connection with Mozilla Firefox or Google Chrome
Go to Apple web site, download and install QuickTIme (www.apple.com/quicktime/download)
Then open Firefox or Chrome and input the IP DVR address in the browser URL.
Nota: These browsers can modify the display interface and some function buttons could not appear
13
5 Quick Configuration Tool
5.1
Introduction
Quick configuration tool is used to search for current IP address, modify IP address. It can also be used to perform a software
upgrade or to modify settings. This tool only applies to the IP addresses in the same network segment.
Before using the Quick Configuration Tool, please check that this software is in updated version.
5.2
Searching/Connecting
Select and double click the “ConfigTool.exe’” in the application directory.
The version of Config tool should be at least 1.0.5.
5.2.1 Connecting to the device’s web interface
To find connected devices in the same segment network, click the “refresh” button. The tool will search for the connected devices
and display the device IPv4 and IPv6 in the form list.
In the device list interface, you can view device IP addresses (IPv4 and IPv6), port number, subnet mask, default gateway and MAC
address.
1 - Select IPv4 address, the IPv6 addresses disappear and right click on the highlighted line.
14
2- Select “Open Device Web” item to go to the web interface:
2
If you can’t connect, ckeck you internet explorer security settings as described in chapter 4.
15
5.3
Connecting with the configuration tool (to change the IP address or upgrade the device
software.
To find devices connected to the network, click the “Refresh” button. The tool will search for devices connected to the network
and display them in the form of the list.
1
2
7
3
4
9
8
N
5
6
10
11
Description
1
Number.
2
Device IP address.
3
Device TCP port.
4
Device subnet mask.
5
Device default gateway.
6
Device MAC address.
7
Select “IPv4” or “IPv6” or “All”.
8
“Upgrade” button opens the interface to upgrade the device firmware See below (8).
9
Refresh the list.
10
“Login” button opens the login interface to confirm login, password and port and
configure the device. See below (10).
11
Disconnect.
16
(8) “Upgrade” button opens the interface to upgrade the device firmware:
1
2
3
4
5
6
N
Description
1
Select a check box of a device or several devices with same commercial references into this list.
2
Click “Open” button and select the new firmware in the PC directory.
3
Click “Upgrade” button, the devices will be upgraded. Be careful don’t cut off the network
connection.
4
Click “Cancel” button to stop the upgrade.
5
“Add” button configures manually s a new device IP and port.
6
“Return” button comes back to the previous interface.
(10) “Login” button opens the login interface.
- Highlight the network information device (single click in the list)
- Click the “Login” button (or double-click the highlighted line)
- The following page opens:
Note: Here any information cannot be modified. Click the “Login” button in login popup window to open the main interface
mode where the network and system settings can be changed.
17
5.4
5.4.1
Main interface of the tool
Network settings
Functions
Description
DHCP
Enable
Enables or disables the DHCP function.
IPv4/IPv6
Select IPv4 or IPv6 in the combo list.
The IP addresses can be changed.
IP Address
IP address of the device.
Subnet
Mask
Gateway
Gateway of the device.
Mac
Address
MAC address of the device.
Save
Return
5.4.2
Subnet mask of the device.
Save the modifications.
Comes back to the previous interface.
System Information
Before using the camera, please check that its software is in updated version.
Functions
SN
Software Version
Device Name
Synchronization
with PC
Description
Serial number of the device
Software version of the device
User name
Synchronisation of the device’s date
and time the PC.
Click on “Sync” to synchronise, then
on “save”.
PC Date
Date on the PC.
PC Time
Time on the PC.
Manal Setup
Manual setting of the device’s date
and time.
Enter the required date and time.
Click “Sync” button to synchronise
and “save”
Return
18
Return to the previous interface.
5.4.3
System Upgrade
Before using the Camera, please install its updated software version.
Functions
Description
Upgrade
File/Open
Click here to select the file to be
upgraded
Current
Progress/Upgrade
Click here to start the upgrading
procedure
Return
Return to the search interface
Steps to upgrade the intertnal software
-
Click the “Open” button.
-
Select and add the *.bin internal software file (firmware)
-
Click the the “Upgrade” button. Then the file is transmitted to the device and the device automatically upgrades itself.
-
Then, click the “OK “button to end the procedure.
6 Resetting the camera
-
Click on the "Reset" button (located inside the camera ) during 10 seconds
-
Wait for the auto reboot of the camera
-
The camera is now in factory default settings
19