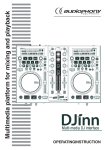
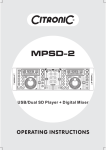
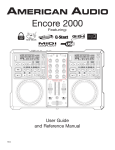
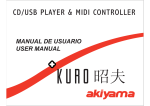
1
SYNCRON Dual USB MP3 Media Player + Midi controller + Mixer Owner's Manual Syncron user manual. Warnings. The exclamation point within the equilateral triangle is intended to alert the user to the presence of important operation and maintenance (servicing) instructions in the literature accompanying this appliance. The lightning flash with arrowhead symbol within the equilateral triangle is intended to alert the user to the presence of un-insulated “dangerous voltage” within CAUTION: TO REDUCE THE RISK OF ELECTRIC SHOCK, DO NOT REMOVE ANY COVER. NO USER-SERVICEABLE PARTS INSIDE. REFER SERVICING TO QUALIFIED SERVICE PERSONNEL ONLY. WARNING: TO PREVENT FIRE OR SHOCK HAZARD. DO NOT EXPOSE THIS APPLIANCE TO RAIN OR MOISTURE. 15. Damage Requiring Service. The appliance should be serviced by qualified service personnel when: SAFETY INSTRUCTIONS WARRANTY INFORMATION A: The power-supply cord or the plug has been damaged; or B: Objects have fallen, or liquid has been spilled into the appliance; or 1. Read Instructions All the safety and operating instructions should be read before this product is operated. C: The appliance has been exposed to rain; or 2. Retain Instructions. The safety and operating instructions should be retained for future reference. D: The appliance does not appear to operate normally or exhibits a marked change in performance; or 3. Heed Warnings. All warnings on the appliance and in the operating instructions should be adhered to. E: The appliance has been dropped, or the enclosure damaged. 16. Servicing. The user should not attempt any service to the appliance beyond that described in the operating instructions. All other servicing should be referred to qualified service personnel. 4. Follow Instructions. All operating and use instructions should be followed. 5. Water and Moisture. The appliance should not be used near water - for example, near a bathtub, washbowl, kitchen sink, laundry tub, in a wet basement, or near a swimming pool, and the like. 17. Ventilation Slots and openings in the cabinet are provided for ventilation and to ensure reliable operation of the product and to protect it from overheating, and these openings must not be blocked or covered. The openings should never be blocked by placing the product on a bed, sofa, rug, or other similar surface. This product should not be placed in a built-in installation such as a bookcase or rack unless proper ventilation is the manufacturer's instructions have been adhered to. 6. Carts and Stands. The appliance should be used only with a cart or stand that is recommended by the manufacturer. An appliance and cart combination should be moved with care. Quick stops, excessive force, and uneven surfaces may cause the appliance and cart combination to overturn. 18. Attachments do not use attachments not recommended by the product manufacturer as they may cause hazards. 19. Accessories do not place this product on an unstable cart, stand, tripod, bracket, or table. The product may fall, causing serious injury to a child or adult and serious damage to the product. Use only with a cart, stand, tripod, bracket, or table recommended by the manufacturer, or sold with the product. Any mounting of the product should follow the manufacturer's instructions, and should use a mounting accessory recommended by the manufacturer. 7. Heat. The appliance should be situated away from heat sources such as radiators, heat registers, stoves, or other appliances (including amplifiers) that produce heat. 8. Power Sources this product should be operated only from the type of power source indicated on the rating label. If you are not sure of the type of power supply to your home, consult your product dealer or local power company. For products intended to operate from battery power, or other sources, refer the operating instructions. 20. Lightning For added protection for this product during a lightning storm, or when it is left unattended and unused for long periods of time, unplug it from the wall outlet and disconnect the antenna or cable system. This will prevent damage to the product due to lightning and power-line surges. 9. Grounding or Polarization This product may be equipped with a polarized alternation-current line plug (a plug having one blade wider than the other). This plug will fit into the power outlet only one way. This is a safety feature. If you are unable to insert the plug fully into the outlet, try reversing the plug. If the plug should still fail to fit, contact your electrician to replace your obsolete outlet. Do not defeat the safety purpose of the polarized plug. 21. Replacement Parts when replacement parts are required be sure the service technician has used replacement parts specified by the manufacturer or have the same characteristics as the original part. Unauthorized substitutions may result in fire, electric shock, or other hazards. 10. Power-Cord Protection. Power-supply cords should be routed so that they are not likely to be walked on or pinched by items placed upon or against them, paying particular attention to the cord in correspondence of plugs, convenience receptacles, and the point where they exit from the appliance. 22. Safety Check Upon completion of any service or repairs to this product, ask the service technician to perform safety checks to determine that the product is in proper operating condition. 11. Cleaning the appliance should be cleaned only as recommended by the manufacturer. Clean by wiping with a cloth slightly damp with water. Avoid getting water inside the appliance. TERMS OF USE 12. For AC line powered units - Before returning repaired unit to user, use an ohm-meter to measure from both AC plug blades to all exposed metallic parts. The resistance should be more than 100,000 ohms. The device comes with a serial number. Do not rip you may lose your warranty rights. 13. Non-use Periods. The power cord of the appliance should be unplugged from the outlet when left unused for a long period of time. 14. Object and Liquid Entry. Care should be taken so that objects do not fall and liquids are not spilled into the enclosure through openings. 1 Syncron user manual. Safe and efficient operation. This product shall not be treated as household waste. Instead it shall be handed over to the applicable collection point for the recycling of electrical and electronic equipment. By ensuring this product is disposed of correctly, you will help prevent potential negative consequences for the environment and human health, which could otherwise be caused by inappropriate waste handling of this product. FIRST STEPS The recycling of materials will help to conserve natural resources. Be sure the player is mounted in a well-ventilated area where it will not be exposed to direct sunlight, high temperatures, or high humidity. Install Place your unit on a flat surface or mount it in a secure case. For more detailed information about recycling of this product, please contact your local city office, your household waste disposal service or the shop where you purchased the product. FOR SAFE AND EFFICIENT OPERATION Select the installation location of your unit carefully. Avoid placing it in direct sunlight. Also avoid locations subject to vibration and excessive dust, heat, cold or moisture. Keep away from sources of hum such as transformers or motors. The apparatus shall not be exposed to dripping or splashing and that no objects filled with liquids, such as vases, shall be placed on the apparatus. The MAINS plug is used as the disconnected device, the disconnect device shall remain readily operable. WARNING: The user shall not place this apparatus in the confined area during he operation so that the mains switch can be easily accessible. Do not open the cabinet as this might result in damage to the set or electrical shock. When disconnecting the power cord form the AC outlet, always grasp it by the plug. Never pull the cord. Do not use force when operating the switches and buttons. Before moving the set, be sure to disconnect the power cord and all connecting cables. Do not attempt to clean the unit with chemical solvents as this might damage the finish. Use a clean, dry cloth. Keep this manual in a safe place for future reference. PRELIMINARY Please, open the package to ensure that the content is correct. In reviewing the contents of the box should have: 1-The main unit 1- Akiyama CD 1- USB Cable (PC/MIDI) 1- AC cable 2 Syncron User Manual. Connections. CONNECTIONS ATTENTION. Be sure to unplug the computer before connecting the cables, otherwise it could damage the equipment. 1. Before making or changing connections, turn the device off and disconnect the power cord from the outlet. 2. We recommend using quality cables. You get a big difference in fidelity of reproduction. 3. Do not use excessively long cables. Make sure the footage of them are secure. Loose connections can cause hum, noise or flashing that could damage the speakers. 4. Connect the RCA cables (unbalanced) or XLR (balanced) inputs to your amplifier. NOTE: Be sure to use the supplied power cable. The use of another type of cable can cause damage to equipment. 3 Syncron User manual. Functions description. Top panel. FUNCTIONS DESCRIPTION Top panel - Loop Manual: press IN when you want to start the Loop. Press the OUT button when you want to finish it. At this time the Loop will play continuously. IN and OUT buttons flash and RELOOP button is illuminated. 1. VFD DISPLAY. This high-quality VFD display shows all functions are active. The screen icons are explained in the VFD display section (see page 11). 2. SEAMLESS LOOP (Loop without interruption). To exit the LOOP press Loop. The buttons IN / OUT / RELOOP remain illuminated indicating that we have a Loop. To replay the Loop press RELOOP. If not stored the Loop created (SAVE), it will only be available while we do not create another LOOP. IN BUTTON. This button lets you create a CUE point without pause. This type of cue point is often called "hot cue" or "Cue on the fly". In addition, simultaneously determines the starting point of a Loop. OUT BUTTON. This button is used to set the end point of a loop. A loop starts by pressing the IN button. A selected Loop will repeat continuously until you press a second time OUT (EXIT LOOP). Finally, in AUTOLOOP mode (page 4, point 3) this button will also serve to set the Loop at the time we press the button. RELOOP BUTTON. If we made a loop and we're not playing (IN / OUT / RELOOP are lit), pressing the RELOOP button, the Loop instantly begin to play (buttons IN / OUT / flash). To exit the Loop and continue playback, press the OUT button. When RELOOP is available (we have a loop) in the display will read RELOOP. When the loop is playing, RELOOP word flashes on the display. When the Loop is requested but is not playing RELOOP fixed appears in the display. EDIT A POINT. In loop mode, hold down RELOOP at least 2 seconds, the OUT button flash and the display shows the time point of the loop OUT (output), can now turn the wheel (JOG-WHEEL) to edit out point. Then press OUT to exit the editing or RELOOP press again, the button IN blinks and IN "IN EDIT" is displayed on the VFD, you can now spin the wheel to adjust the IN point. Then press IN button to exit the edit. 3. CONTROL TRACK. This control has four functions: a) Turn the control: selection of tracks in a folder. Turning forward later in the list of tracks and turning backwards, backwards in the track list b) Repeatedly pressing the control, we can see on the display information on the current track: name / title / Artist / Album / Genre. In Loop editing mode, you can switch between modifying entry loop (IN) and final loop (OUT) by pressing the RELOOP button. How to edit a LOOP? 4 Syncron User manual. Functions description. Top panel. >> This search button allows you to quickly scan forwards through a track. To find tracks quickly press the TRACK control and turn the wheel (Jog Wheel (8)) 2-speed search is available. One speed only pressing the search buttons. And a second faster search speed is obtained by pressing the search button while moving the wheel (JOG-WHEEL). c) Autoloop mode To create a loop with a determinate size is necessary to go into default mode AUTOLOOP. In this case we can only establish the extent of the loop indicating the number of beats. During a quick search, the direction is determined by the direction you move the wheel. The direction of the SEARCH button is pressed (<</>>) is ignored. To enter this mode by pressing the TRACK control for 2 seconds. To exit AUTOLOOP mode we have to push out the same control again but this time for a minimum period of time. When you stop pressing the SEARCH buttons, fast search is cancelled. Once inside AUTOLOOP mode, we can resize the loop by the encoder control TRACK. 7. JOG MODE BUTTONS. The jog wheel has 3 effect functions: a) VINYL, b) CDJ c) A.CUE SCRATCH. As we rotate the control, the display will show the different values that can take the size of the loop being the possible values: 1/32, 1/16, 1/8, 1/4, 1/2, 1, 2, 4, 8, 16, and 32 beats. a) VINYL MODE – When wheel mode is set to VINYL, use the JOG WHEEL to activate the scratch effect by touching the surface of Jog Wheel. In this mode, use the metal top of the wheel to activate SCRATCH, and moving the wheel while keeping your finger on the metal part, emulating the effect of a vinyl SCRATCH in real time. If you manipulate the wheel touching only the outside will make a pitch bend. To set the loop we first make sure you are within AUTOLOOP mode and then press the IN button. In this case the loop will be executed at the size indicated on the display at that very moment. Entering the AUTOLOOP mode while playing a loop manually set by the user via the IN and OUT buttons, the loop will automatically adjust the size of beats that has been set in that time within the mode. b) CDJ MODE – When wheel mode is set to CDJ, scratch mode is exit, JOG WHEEL can be used to pitch bend and frame search. The Pitch Bend will be held regardless if we play the metal centre of the wheel or the outside. 4. SAVE BUTTON. We can use this control in two ways. Press PAUSE and move the wheel, play a short loop (frame) of the track. Moving the wheel may put the player in the exact spot of your choice, used to select with great accuracy CUE points. a) Press the SAVE button to activate the MEMORY mode, the button lights to be active MEMORY function. With active mode press SAVE BANK (See (20)) required to store the last set cue point or the last loop created. * We mean by "frame" a piece of the track of very short duration (1/75 seconds). b) To store your LOOP or CUE points that are stored in the BANK role in system memory, press the SAVE button for one second and the button will flash. c) A. CUE SCRATCH MODE: 1- While in play mode and when the touch sensitivity function is active, the JOG WHEEL can be used to return the unit to last IN point. Simply touch the metal part of the JOG WHEEL and unit will immediately return to the last set CUE point and playback without music interruption. There are two possibilities for this: RECALL MEMORY: The player can store 4 programmed cue points or loops per track in the USB device. The memory points in the USB device are depending on available memory space. These setting may be recalled at any time, even when an audio source has been removed and loaded at a later time. To recall the bank memory with USB device as following: Press the SAVE button, the button is lighted up, and turns the TRACK knob to select the TRACK with BANKS that you would like to recall for a cue point, or a loop when in the loop mode (press the RELOOP button to activate loop mode). 1.1 There have saved (See SAVE in point 4) no cue point. We conducted a cue point using "IN" (See IN in point 2) is used to create a cue point touching the metal top of the wheel the player is in the CUE point made. 1.2 We saved (see SAVE in point 4) one or more cue points. 5. X BUTTON (TIME) – This button is used to adjust the parameter time value. You can push the TIME button, LED on, and turn the JOG WHEEL to adjust the parameter time value. If BANK LED (where we kept the points CUE) is not blinking, touching the metal top of the wheel the player is in the CUE point made, without interrupting playback. 1) If the HOLD function is not active, any changes to the effect parameters will be momentary. If BANK LED (where we kept the points CUE) is blinking, touching the metal top of the wheel the player is in the CUE point stored in the BANK button flashing. 2) If the HOLD function is active, any changes to the effect parameters will be permanent. 2 - While in PAUSE mode and while the CUE button lit, touch the metal top of the wheel went into PLAY or playback mode from the last cue point. The device will playback mode until you withdraw your finger off the wheel, when the playback point back to the last point CUE and PAUSE mode. Regarding at what point playback will begin CUE see paragraph a and b of A. CUE SCRATCH. In the drawing is shown a diagram explaining the function of the wheel depending on the type of manipulation in each case: NOTE: Part of the PLAY mode. 6. SEARCH BUTTONS. These buttons allows you to search fast backward or forward through the current track whether in play mode or not. << This search button allows you to quickly scan backwards through a track. 5 Syncron User manual. Functions description. Top panel. A-Using the wheel in PAUSE mode: CDJ, VINYL or A. CUE mode, can hear a small loop called "Frame" for a period of 1/75 seconds. Moving the wheel can emulate playback and position with high accuracy at a given point of the track where we will create the CUE point. Press PLAY / PAUSE to store the cue point. Pause mode, pressing the CUE button starts playback from the last set cue point while pressing the button. When the player is positioned at the CUE point, CUE button lights up. B-In PLAY mode, press the IN button (2), the CUE button (10) will light up briefly indicating that the last point made with IN CUE is available on the CUE button to use. Pressing the CUE button enter PAUSE mode in the last set cue point. Pressing the CUE button during playback (Play) the player enters Pause mode immediately and return to playing point where they scored the last point CUE (remember that cue points are set with the IN). 11. PLAY/PAUSE BUTTON. Each time you press this button, the unit will pass to Play mode to pause mode, and vice versa. PLAY mode, button is lit, PAUSE mode button flashes. 12. BPM BUTTON TAP. This button is used to replace and adjust BPM manually. Occasionally the automatic BPM cannot detect BPM properly. This button allows you to replace the rhythm of the timer and manually set a BPM. 8. JOG WHEEL. Syncron has two 105mm-diameter wheels. The metal top is "Touch Sensitive" and responds to touch with sensitivity that you can determine the internal menu. To manually set the BPM, press this button several times to the beat of the music, the unit will automatically calculate the rate of touches on the button, and turn it into the BPM of the song that is playing. The BPM is shown on the VFD. You can also hold BPM TAP button and turn the TRACK or FOLDER button to adjust the value of BPM. To return to automatic BPM counter, hold down the TAP button for at least one second and release. When you switch on SYNCRON, the default mode is AUTO BPM. The wheel "Wheel" has various functions: 8.1. The wheel as a search engine: The wheel acts as a search of "frames” when we are in PAUSE or CUE mode. Allowing us to position ourselves at one point with complete accuracy. - VINYL mode: To achieve the reproduction of "frames" we spin the wheel touching the perimeter (not the metal center). 13. PITCH BEND BUTTONS. Speeds up or slows down playback while holding the button down. When released, returns to its original playback speed. We can change the Pitch Bend range from 100% to +16% in the "menu system”. The default pitch bend range is +/-10%. These buttons can be used to synchronize the beats of two tracks. - CDJ mode: To achieve the reproduction of "frames" we spin the wheel touching any of the two parts (metal core and perimeter). - A.CUE SCRATCH mode A. In order to achieve the reproduction of "frames" we spin the wheel touching the perimeter (not the metal center). See further information on “internal menu" section, page 12. 8.2. The wheel as a modifier of playback speed: While in PLAY mode, the wheel also acts as a "Pitch Bend" (the playback speed is varied temporarily) by turning the wheel in one of two ways to increase the percentage to +100 /-100%. The change in speed will continue while we manipulated the wheel. To stop turning the wheel back to its original playback speed. This function is performed differently depending on the selected wheel mode: 14. PITCH SLIDER. This control is used to adjust the pitch rate of reproduction in a defined range. The slider is a setting that will remain fixed until the pitch is moved or the pitch function is turned off. This adjustment can be made with or without music source device on the player. The pitch setting is maintained even if a source music device has been removed and will apply to any device inserted into the player. That is, if you set a pitch of 6% on one source of the device and remove the USB device and insert another, the latter will have a pitch of 6%. In the VFD display the pitch range is applied. - VINYL mode: to get Pitch bend, we must turn touching only the perimeter of the wheel. - CDJ mode: to get Pitch bend we turn the wheel touching any of the two parts (metal core and perimeter). 15. KEY LOCK BUTTON. Active Key Lock mode. Key Lock mode allows us to alter the value of PITCH in a track without changing the perception of the original note. When the Key Lock mode is activated KEY LOCK button lights. Press the button again to disable Key Lock. - A. Not at SCRATCH CUE: to get Pitch bend, we must turn playing only the perimeter of the wheel. 8.3. The wheel as a modifier of effect parameters: The wheel is also used to modify the parameters TIME and RATIO of the effects. For more information about this return to point 5 and point 23 below. 16. PITCH RANGE SELECTOR. Press this button to choose a percentage of the pitch range. You can choose between: +/-6 %, +/10%, +/-16% and -100%. Note that the pitch range value will be 100% when all three LEDs are lit at once. 9. CUE/PLAY BUTTON. Pressing CUE/PLAY Button playback returns to the last cue point without interrupting playback. Pressing this button with the beat called "Stutter” effect is performed. DJ Softwares call it CUE CUP or CUP. 17. PITCH ON / OFF. This button is used to activate the PITCH SLIDER on and off. The percentage can be changed between +/-6%, +/-10%, +16%/-100%. - 100% will allow the minimum amount of pitch variation and 16% will allow the greatest amount of variation in pitch. 10. CUE BUTTON. A cue point is a time stamp on the track so that we can store and make the player return to this cue point when we want. The following graph we can see the time development of a track with 4 cue points stored. 18. SOURCE SELECT BUTTON. This button lets you switch between USB 1 and 2. In other words, you can select which USB port is 6 Syncron User manual. Functions description. Top panel. active. The LED associated with each USB source will glow when selected. The function can only be selected while in pause mode. 19. CONTROL FOLDER. Turn FOLDER knob to search the desired folder. Turning the control clockwise the clock we forward in the list of folders. Turning in the opposite direction to clockwise, we backwards. To search folders quickly press the FOLDER and turn the control wheel (Jog Wheel (8)). Keep the button pressed for 2 seconds to enter the internal menu (Setup Mode). Further information on “internal menu” section on page 12. SKID EFFECT. This button is used to activate and deactivate the slide effect. Skid effect simulates the sudden stop of a turntable, such as pressing the stop button on a turntable. This effect is supported only in CDJ mode. 20. BANK BUTTONS 1 to 4: These buttons are used to store 4 points CUE / Loops / CUE-loops. Each button can store a CUE POINT or a LOOP. When SAVE button is lit, select the desired bank button (1, 2, 3, 4) which store a cue point, the LED will turn red, or if you store a LOOP will turn green. Once stored CUES or LOOPS pressing the desired bank (1, 2, 3, 4) the music will instantly play and the LED of the selected bank will begin to flash. SKID function is enabled by default in the SCRATCH VINYL and A. CUE mode. Therefore in this case the start and stop speed is determined by the parameters X and Y we have previously established, without having to select SKID. 21. EFFECTS AND HOLD BUTTONS. SYNCRON has four configurable effects in time and ratio. Being TIME (X) the parameter that determines the acoustic behavior of the effect. Ratio (Y) the parameter that determines the effect signal ratio versus the original sound effect is played. You can modify the start time of your player. Start: With the skid button activated (LED lit) select the TIME button (X). See that in the upper part of the display shows the nomenclature ST (start) followed by time in milliseconds. Moving the Jog Wheel you will be able to modify the start from 0 (maximum speed boot) to 9999msec (maximum slow start.) ECHO EFFECT. This button is to activate and deactivate the ECHO effect. The ECHO effect provides an echo to output signal. Stop: With active skid button (LED lit) select the RATIO (Y). See that in the upper part of the display shows the nomenclature BT (brake) followed by time in milliseconds. Moving the Jog Wheel can change the stop from 0 (maximum speed stop) until 9999msec (maximum slow stop). To understand the ECHO effect, first we will introduce the DELAY concept: This function allows a delay sound with beat. The delay effect is repeated only once. NOTE: If the HOLD function isn’t activated, changes in the parameters of the effect will be momentary, that is to sat not be memorized 22. CLEAR BUTTON. Press the CLEAR button, the button lights up, then select the buttons BANK (1 ~ 4) to be deleted. Or hold down the CLEAR button and click through the buttons BANK to be deleted. ECHO effect allows a delay sound depending on TIME parameter. 23. Y BUTTON (RATIO). This button is used to adjust the parameters relationship value. You can press the RATIO (Y) and turn the JOG WHEEL to adjust the parameters relationship value. When the HOLD function is not activated, the changes in effect parameters are momentary, therefore not be stored. The delayed signal will be repeated several times upon the setting of the Time parameter. FLANGER EFFECT. This button is used to activate and deactivate the flanger effect. FLANGER effect distorts the output signal and creates an effect similar to the frequency of progressive and out of it. Also similar to that produced by an oscillating phase change (some people call it “jet” effect). We can represent the effect by the following graph (representing the original wave form versus the amended and added to the original): (Y) RATIO PARAMETER MODIFICATION BY THE WHEEL (Y) RATIO PARAMETER button (Y). Parameter Balance Dry / Wet This button sets the parameter "Ratio" of the effect we are applying. Press the RATIO button, it lights up, while we manipulated the wheel, we modify the parameter. 1) If the HOLD button is not active any change of the parameter will be momentary 2) If the HOLD button is active any change of the parameter is permanent. HOLD BUTTON. For the correct explanation of this section we must advance the HOLD function, activated by the HOLD button. Pressing the button is light up. Once down, we set the value of the effect parameters we are using. If the HOLD button is not selected, the buttons doesn't lit, any manipulation of effects parameters be temporary. When stop manipulating this parameter, it backs to its original value. FILTER EFFECT. This button activate/deactivate the filter effect. This effect changes the tonality of the music depending on the type of filter applied and the value of time parameter. We can represent the effect by the following graph: 7 Syncron User manual. Functions description. Front panel. 24. TIME BUTTON. This button changes the value of playing time between: "Elapsed" time played. The display will light "Elapsed". (More information on page 11). "Remain" time remaining on track. The display will light "Remain". (More information on page 11). The display shows a red bar sections formed giving us a visual reference to the time played (elapsed) or “remaining". The way the bar will show the time will vary depending on "Elapsed" or "Remain " mode. 25. BUTTON SGL/CTN. This button has two functions: 1. We can select the play mode between: - SGL (Single): a track is playing and the player enters PAUSE - CTN (Continue): all tracks are played in order This function remains active in Relay Mode 2. Pressing the button more than 1 second, activate and deactivate the "Auto Cue. " Depending on whether or not active A. CUE (7.c.) appears on the display. FUNCTIONS DESCRIPTION. Front panel 5. CUE PAN CONTROL. This function allows you to monitor the CUE level as well as the Program (main output) level in your headphones. When you turn the CUE PAN to the full left position, you will only hear the CH 1 signal you playing, on the contrary you will only hear the CH 2 signal you playing. If the CUE PAN KNOB is set to the center position, you can cue the both signal channels you playing. 1. MIC 1 (JACK). This jack is used to connect a microphone to the mixer. Connect your microphone via 1/4 inch jack. The volume output level for microphone will be controlled by its own respective VOLUME KNOB (2) 2. MIC LEVEL CONTROL. These rotary knobs control the output volume of MICROPHONE 1 and MICROPHONE 2 (on the rear). However, master volume is controlled by the MASTER VOLUME CONTROL. 6. CUE LEVEL CONTROL. This rotary knob is used to adjust the headphone volume output level. Turn the knob in a clockwise direction to increase the headphone volume. 3. MIC TONE CONTROL. This rotary knob controls the frequency response of MICROPHONE. 7. PHONES JACK. This jack connector is used to connect your headphones to the device allowing you to monitor the cue channel. Always be sure the CUE LEVEL VOLUME (6) is set to minimum before you put the headphones on. 4. MIC ON/OFF/TALKOVER SWITCH. To set MIC on and off. When we switch at the TALKOVER position, the mic1 and 2 on, the sound level for everything other than that from the MIC will decrease to around 20dB. 8 Syncron User manual. Functions description. Rear panel. Rear panel position, and when using line level input devices be sure the switch is in the “LINE” position. 1. POWER INLET (AC IN). Use the accessory power cord to connect to an AC power outlet. 9. CHANNEL LINE/PHONO INPUT CONNECTORS. Turntables equipped with MM pickup cartridge (All DJ turntable use MM pickup cartridges) may be connected to these jacks as long as the LINE/PHONE selector switches are in the “PHONE” position. CD players, Tape Decks and other line level instruments may only be connected to these jacks as long as the LINE/PHONE selector switches are in the “LINE” position. Input volume will be controlled by the Channel gain control knob. 2. POWER SWITCH. Turn this unit power ON/OFF. 3. USB 2 PORT. This is the USB port where you insert your USB mass storage device for playing Mp3/ WAV files. 4. USB MIDI PORT. After hooking up your computer with the USB 1.1 port, your computer will detect them respectively as an external sound card (USB AUDIO CODEC). See on page 17 more info about this point. 10. GND (GROUND TERMINAL). Be sure to connect turntable ground leads to either or both of the two available ground terminals. This will reduce the humming and popping noises associated with magnetic phono cartridges. 5. BALANCED XLR MASTER OUTPUT JACKS. The Master Output includes a pair of XLR Balanced jacks. The 3-pin XLR jacks send a high current balanced output signal. These jacks should be used when you will be driving an amp or other audio equipment with a balanced input, or whenever you will be running a signal line greater than 15 feet (4,5meters). We recommend you that always use these jacks whenever possible. 11. MICROPHONE 2. This combo jack will accept a standard ¼”plug or XLR 3-pin balanced male plug. The volume output level for microphone will be controlled by its own respective VOLUME KNOB. MIXER PANEL Before to start with the mixer’s panels there are a few thinks you should know… Setting input levels: Gain pot adjusts the input sensibility or so to speak the level of the input signal inside the mixer. It is paramount to set the right input level on every channel. Why is so important setting the correct input level? First, we have to understand the concept of Dynamic Range of an audio signal. The Dynamic Range of an audio signal is defined as the ratio between the maximum level before distortion and the minimum audible level. It is measured in decibels and gives us an idea of the amplitude of the signal. 6. UNBALANCED MASTER OUTPUT. The RCA jacks send a low current unbalanced output signal. These jacks connectors should only be used for shorter cable runs to signal processors or looping to another mixer. For cable runs greater than 15 feet (4,5meters) use the XLR BALANCED JACKS. 7. BOOTH OUTPUT JACKS. Connect to inputs of your active monitors using cables with RCA connectors. . 8. LINE/PHONO SELECTOR SWITCH. These switches are used to change the voltage line levels of their respected LINE/PHONO RCA inputs jacks. When connecting turntables with magnetic cartridges to these jacks be sure the corresponding switch is in the PHONO” 9 Syncron User manual. Functions description. Mixer Panel and VFD Display. We want the audio signal to fluctuate away from the maximum level (distortion begins) and away from the minimum level (or background level), where some noise is present due the nature of the ICs used in the electronic circuit (all ICs induce noise into the audio signal). compress music require a power amplifier delivering a power value slightly bigger than the rated maximum power of the speakers. However, we recommend the power amplifier rated power be 1.5 times bigger than the rated maximum power of the speakers. Example: if the power amplifier rated power is 200W RMS at 8 , the rated maximum power of the speakers should be 200x1/1,5=133,4W RMS at 8 . At the draw, we depict this “safe” level within two discontinue lines. Using the power amplifier: Saturation and input levels. We have to set the level of input signal so that the signal peaks do not reach saturation levels and the lower amplitude parts of the signal are not too near the background noise level. In order to make the most of your power amplifier you must watch two things: 1- Set the volume controls in a way that the saturation LED lights up only occasionally (peaks). We have to acknowledge that a professional audio system is a serial bounded group of professional audio devices and that saturation or other signal deterioration present in one device will appear someway or another at the serial bounded following devices. 2- Feed the power amplifier with an audio signal of the appropriate level. What is the appropriate level? Professional Power Amplifiers are set for an input level of 4 dBu. Do not panic, it is easy to get to it. 4 dBu is just a fixed measure of the audio signal that professional audio community uses as reference level, it can be expressed also in Volts 4dBu equals 1.23 Volt RMS. So to speak, the Power Amplifier will work at its best if feed with a signal of a level near the 4 dBu or 1.23 Volt RMS. How do we set this level? Easy, using the mixer appropriately. Incidentally, the nominal level for a professional audio mixer is also 4dBu. Therefore, if we set the master output level of the mixer carefully monitoring the output level meters (normally LED bars), we will ensure that the level of the audio signal fed to the Power Amplifier is near 4dBu because the nominal level of the mixer is 4dBu and we set correctly the output level or the mixer. If we deliver saturated signal from the mixer to the power amplifier we will not be able to get rid of this saturation whatsoever. The power amplifier will amplify all what is given and if noise is given (saturation at mixer), it will be amplified. Naturally, that is bad. Why we should avoid saturation? Obvious reasons aside there is a more “material” reason. Saturated signal can damage your speakers. Although some speakers have overload protection, a highly saturated signal can deliver D.C. and this phenomenon can easily shatter your speakers. Mixer Panel Protection of power amp and speakers. Power amplifiers and loudspeakers: Current professional power amplifiers are quite reasonably protected against signal deterioration and excessive levels and shortcuts. Loudspeakers are not that well protected, hence a rule or some must be devised to use the correct speakers with a given power amplifier. Well, that rule is not a straightforward statement but more of an understanding of the principles and nature of the audio signal. The nature of the audio signal refer to the type of music you are playing and more specifically of its Dynamic Range. The bigger the Dynamic Range the bigger the power amplifier needed. If the Dynamic Range of a give audio signal is big, the difference between the minimum level and maximum level of this audio signal will be big as well. Therefore, we will need an oversized power amplifier with enough power to amplify the maximum levels without reaching the saturation level at the power amplifier (normally, power amplifiers have red LEDs to let you know when they start saturating). As a vague rule we can say that Rock and highly 10 Syncron User manual. Functions description. Mixer Panel. the player to the preset cue point. In OFF mode fader start function is deactivated and we enter in CROSSFADER mode (8). 8. CROSSFADER. This fader is used to blend the output signals of channels 1 and 2 together. When the fader is in the full left position (channel 1), the output signal of channel 1 will be controlled by the master volume level. The same fundamentals will apply for channel 2. Sliding the fader from one position to another will vary the output signals of channels 1 and 2 respectively. When the crossfader is set in the center position, the output signals of both the channel 1 and channel 2 will be even. 9. CF CURVE SWITCH. Allows adjusting the “shape” of the crossfader response from a gentle curve for smooth, long running fades, to the steep pitch required for top performance cut and scratch effects. 10. LEVEL METER. The dual LED's indicators are used to detail either the master output level, a combination of the master output level or the PGM monaural level. 11. CHANNEL EQ CONTROL. Both of the channels include a threeband signal EQ. These controls are used to increase or decrease the HI's, MID's, LOW's and frequency of the output signal. HIGH frequency control. This knob is used to adjust the high levels of a channel allowing for a maximum high gain of 10dB or maximum decrease of –30dB. Turning the knob in a counterclockwise direction will decrease the amount of high applied to a channel signal, turning the knob in a clockwise direction will increase the amount of high applied to a channel signal. MID frequency control. This knob is used to adjust the midrange levels of a channel allowing for a maximum midrange gain of 10dB or maximum decrease of –30dB. Turning the knob in a counterclockwise direction will decrease the amount of midrange applied to a channel signal, turning the knob in a clockwise direction will increase the amount of midrange applied to a channel signal. LOW frequency control. This knob is used to adjust the low levels of a channel allowing for a maximum bass gain of 10dB or maximum decrease of -30dB. Turning the knob in a counter-clockwise direction will decrease the amount of low applied to a channel signal, turning the knob in a clockwise direction will increase the amount of low applied to a channel signal. KILL EQ control. Press the EQ knob to activate the KILL function to the lowest level “-30dB”. 1. USB 1 PORT. This is the USB port where you insert your USB mass storage device for playing MP3/WAV files. 12. CHANNEL GAIN CONTROL. This adjustment is used to adjust an audio source signal input gain for a channel. Never use the gain control to adjust output volume. Setting the gain level properly will ensure a clean output signal. To properly set the gain level controls: 2. MASTER VOLUME CONTROL. This rotary knob is used to control the master output level (volume). To avoid distorted output try to maintain an average output signal level +4 dB. Be sure this volume control is always set to zero before turning the unit on. (1) Be sure the MASTER VOLUME CONTROL is set to minimum. 3. BOOTH CONTROL. This rotary knob is used to adjust the level of the BOOTH outputs. (2) Set the CHANNEL FADER to level 7. (3) Begin play on an audio source connected to the channel you are adjusting. 4. RELAY BUTTON. This button is used to switch the RELAY function on and off. If we enable this function (LED lights) will play tracks alternate between DECK A and DECK B, entering the pause mode the DECK which does not reproduce. 13. SOURCE SELECTOR SWITCH. These switches are used to select the input source assigned to each channel. Each channel may only be assigned one input source at a time. 5. MASTER METER BUTTON. This button is used to choose between master level indicators and channel level indicators. CH1 selected to MIDI A + CH2 selected to MIDI B. Both decks work like midi controller. The mixer works internally or as a MIDI controller according to the option you have selected in the internal menu (4. Mixer Setup). 6. CHANNEL FADER. These faders are used to control the output signal of any source assigned to its particular channel. However, master volume is controlled by the MASTER VOLUME CONTROL. Ch1 selected to MIDI A + CH2 selected to DECK B. The Deck A works as a MIDI controller, the mixer works internally with Deck B. 7. FADER START SWITCH. This function works in conjunction with a compatible player. When used with a compatible player, you can use the crossfader to start and stop a player with the mixer's crossfader. The ON/OFF switch activates the FADER START feature. If this function is activated, the FADER START automatically returns CH1 selected to MIDI A + CH2 selected to LN2/ Ph2. The Deck A works as a MIDI controller, the mixer works internally with LN2/PH2 input. Fuente Condición CH1 DECK A DECK A DECK A L1/P1 L1/P1 L1/P1 MIDI A/B CH2 DECK B L2/P2 MIDI A/B DECK B L2/P2 MIDI A/B DECK B DSP Input 1 — — — L1/P1 L1/P1 L1/P1 USB Input 1 11 MIDI A/B L2/P2 USB Input 1 MIDI A/B MIDI A/B USB Input 1 Syncron User manual. Functions description. Mixer Panel. DSP Input 2 — L2/P2 USB Input 2 — L2/P2 USB Input 2 — L2/P2 USB Input 2 DSP Output 1 REC REC REC REC REC REC REC REC REC DSP Output 2 PHONES PHONES PHONES PHONES PHONES PHONES PHONES PHONES PHONES L1/P1 L1/P1 L1/P1 USB Output 1 USB Output 2 L2/P2 L2/P2 12 L2/P2 Syncron User manual. Functions description. VFD Display. FUNCTIONS DESCRIPTION. VFD DISPLAY 1. AUTO CUE. This will indicate if the Auto Cue is on or off. Press and hold the SGL/CTN button for one second to turn the Auto Cue function on and off. 14. ALPHANUMERIC DISPLAY. Indicates the current name of the track, of the folder. All kinds of other interactive information are also shown. 2. RELOOP INDICATOR. The display shows the word RELOOP when we have a loop created but not played. When you play the loop RELOOP icon flashes. Before continue describing the Display functions, we would like to talk a little bit on Track Search 3. SINGLE INDICATOR. This indicates that the player is in single play mode: the track will play once and return to CUE/PAUSE mode. If the single indicator is not on, the unit is in CONTINUOUS mode. In continuous mode the device will play all the remaining tracks. TRACK SEARCH The chart shows the method for selecting tracks once the database using DB Generator program. Will be presented with an example: 4. MP3 INDICATOR. Appears when a USB device has MP3 files on it. We seek the Track Artist: PROPELLERHEADS Title: DECK & DRUMS & ROCK & ROLL in "Artist Playlist" mode and so "Playlist Album mode“. 5.TRACK DISPLAY. This indicator describes which track is currently cued or is playing. Indicators 14 and 15 will also inform on the search displaying tracks we are selecting when FOLDER and TRACK controls are being manipulated. "Artist Playlist” Mode In the internal menu we have established "Artist" as a search mode between "NORMAL / TITLE / ARTIST / ALBUM / GENRE.” Once inserted the USB device the display, in the front row, will show the name of the first "Artist" in alphabetical order and in the second row the name the track or tracks (Title) belonging to the "Artist”. By moving the TRACK control we browse all tracks belonging to the "Artist" starting with the first letter of the alphabet (in case our USB device has no "Artist" begins with the letter "A" the first letter the alphabet will be the name of "Artist"with the letter closest to "A" in the alphabet). 6. REMAIN/ELAPSED INDICATOR. When REMAIN is indicated in the VFD Display the time meter will show the current track's remaining time. When ELAPSED is indicated in the VFD Display the time meter will show the current track's elapsed time. 7. TIME METER. The meter will detail either the elapse or remaining time of a track in Minutes, Seconds and Frames. The display time will depend on the selected time mode. The selected time function will be displayed beside the TIME METER as either remaining track time or elapsed track Time. Press and turn the FOLDER control up to the letter P. In the case of the drawing we have assumed that the ARTIST is the first in the track list started with the letter P. After less than a second after you select a letter appears in the display the information artist name and track artist that begins with the first letter of the alphabet. Turn the TRACK control we move through the tracks below. 8. TIME BAR INDICATOR. This bar gives a visual approximation of a track's remaining time. This bar will begin to flash when a track is ending. The flashing bar is great reminder that time is running out to get that next track ready to go. 9. PITCH INDICATOR. This meter will indicate how much pitch is either being applied or will be applied. (See point 14 on Top Panel. Controls and functions) 10. KEY LOCK. This will indicate the KEY Lock function is active. 11. MEMORY INDICATOR. This meter serves two functions. (a) The bucket outline indicates your CUE memory status. A full outline lets you know the cue memory is full. (b) The five bars inside the bucket represent the digital buffer. Each bar represents 2 seconds. SEARCH buttons (Functions Description. Front (6)) will not activate until the five bars are not on. 12 and 13. BPM INDICATOR. This meter will display the BPM's of the current track (beat per minute). AUTO BPM and MANUAL BPM are available - AUTO BPM: This will indicate that the AUTO BPM counter is active. AUTO word will appear in red before the BPM. We can go from an Auto BPM to Manual BPM by pressing the TAP button. And we can go from Manual BPM to Auto BPM holding the TAP button down longer than a second. The display shows the selected mode. 13 Syncron User manual. Functions description. Internal menu. You can turn the TRACK knob to select “Normal / Title/ Artist / Album/ Genre” and press the FOLDER knob again to memorize your setting and exit the internal menu. “Playlist Album” Mode In the internal menu we have established "Album" as a way to search. The search process is: Press and turn the control FOLDER up to the letter P. In the case of the drawing we have assumed that the ARTIST is the first in the track list started with the letter P. Turn the TRACK control we move through the next tracks belonging to this album. Normal: This is the default setting. The tracks are played corresponding to the established hierarchical data structure. Title: It is possible to continuously and alphabetically browse track database through the title structure. Artist: It is possible to continuously and alphabetically browse track database through the Artist's name structure. Album: It is possible to continuously and alphabetically browse track database through the Album structure. Genre: It is possible to continuously and alphabetically browse track database through the Genre structure. 2. REPEAT MODE. 3 different mode exist: Play All / Folder / Track 3. MIDI Setup. - TAP = HOLD/TOGGLE. Allows us to determine how the TAP button acts in MIDI mode. We must bear in mind that the MIDI mode function TAP button takes SHIFT function. "Hold" works only as long as we keep it down. "Toggle" has two states, on / off. - I/O = Hide/ DIS. (hide/display MIDI I/O value). We can determine if the MIDI parameters are displayed on the display. DISPLAY means will appear on the display and HIDE that do not appear. 4. MIXER SETUP To facilitate the reading of the two rows of alphanumeric characters we can set the speed at which they move and the time between shifts. - Mixer: The mixer will always works as internal mode. - MIDI CTRL: When MIDI A and MIDI B are selected, the mixer also functions as a MIDI controller. For all other configurations, the mixer works as internal mode. NOTE: If you want to toggle between MIDI and USB, you should select as MIXER one of the decks to avoid changes in volume when switching between computer and equipment 5. CROSSFADER - Lock = To lock the crossfader in the middle of two channel. Which is equivalent to disable it. - Unlock = The crossfader is back to normal status. 6. CROSSFADER REVERSE 15. FOLDER INDICATOR. This indicates which folder you are in. - ON = Reverse the crossfader 16. TOUCH INDICATOR. This appears when anything touches the jog wheel. - OFF = Normal mode 7. DISPLAY TIME. 0,5 ~ 12,0 sec. 17. CUE INDICATOR. This indicator will glow when the unit is in CUE mode. 0.5 ~ 12.0 sec. Determines the time that the text on the display remains fixed before starting his shift in order to read information that spans more characters (letters) of the display there. – 0.5 ~ 12.0 sec. (line name start/stop time adjustment) 18. PLAY/PAUSE INDICATOR. Indicates the player is in play mode, or the player is in pause mode. 8. SCROLL SPEED. INTERNAL MENU Determines the speed with which the text scrolls by line alphanumeric display character. Among the values 50 ~ 2000 msec. 9. SENSITIVITY. The internal menu allows you to configure the operation of many of the controls. In addition, it allows a MIDI mapping directly from your computer. Touch Wheel Sensitivity Adjustment (Adjustment range is -20~+20). A. INTENSITY. Hold the FOLDER knob for 2 seconds to enter the internal menu, and turn FOLDER knob to search through the different menu. Each menu brings together various submenus. Turn the TRACK button, or rotate the wheel (JOG WHEEL) to enter submenus. VFD Brightness (Brightness range is 1~4). B. A.Cue Level. Change the AUTO CUE level (Level range is -36~-78dB). Save and exit internal menu: turn the FOLDER button to find Exit & Save function, and press the TRACK button, the display indicates “Saving”. C. Bite Rate. Display ON/OFF. Display ON. You can specify if you want to display the "Bit Rate" indication of the track played. NOTE: Anytime you can exit the internal menu just press the FOLDER button. However, the modified setting would not be saved. D. Version. CXX (Control version) & DSPXX (DSP version). 1. PLAYLIST - Normal / Title/ Artist / Album/ Genre. E. Load Defaults. The DB Generator can generate “Playlist” for USB device. You can adjust various criteria in order to filter the track. Press track knob to enter load defaults. It allows you to charge your 14 Syncron User manual. Database installation. Step 2, press NEXT player's "settings" or original default settings (made by manufacturer). Being in the "LOAD DEFAULT" menu, "Enter Load " appears in the second row. Press the TRACK control and the default parameters will be charged. F. Exit & Save. If you have changed the parameters of your device using the internal menu and want to save them for another session, go to "SAVE & EXIT" menu. In the second line reads "Enter Save". Press the TRACK control and the parameters dictated by the user will be saved. Nota: Below is the list of controls that you can edit and save (Save) and the default value of these controls (Default). Save. The parameters you can save are: U1/U2, PITCH ON/OFF, PITCH RANGE, SGL/CTN, AUTO CUE, TIME MODE, HOLD, KEY LOCK, EFFECTS ON/OFF, PLAYLIST, REPEAT MODE, MIDI CHANNEL, MIDI SETUP, CROSSFADER, CROSSFADER REVERSE, DISPLAY TIME, SCROLL SPEED, SENSITIVITY, INTENSITY, A.CUE LEVEL, DISPLAY Defaults. Default value of the parameters is: U1/U2(U1), PITCH (OFF), PITCH RANGE (10%), SGL/CTN(CTN), AUTO CUE(ON), TIME MODE (REMAIN), HOLD(OFF), KEY LOCK(OFF), EFFECTS(OFF), PLAYLIST (NORMAL), REPEAT MODE(ALL), MIDI CHANNEL(1-5-2), MIDI SETUP(TAP=HOLD, I/O=HIDE), CROSSFADER (UNLOCK), CROSSFADER REVERSE(Off), DISPLAY TIME(3ms), SCROLL SPEED(400ms), SENSITIVITY(0), INTENSITY(4), A.CUE LEVEL(48dB),Bit rate display(ON). Step 3, press INSTALL DATABASE INSTALLATION Minimum Hardware Requirements: CPU: Intel Pentium 4, 1GHz processor or above, Intel Centrino Mobile Technology 1.6GHz RAM: 512MB RAM DISK SPACE: 100MB of free disk space need OS: Microsoft Windows XP SP3, Vista SP2, W7. The player includes a database management software that enables you to search for your files by Normal / Title/ Artist / Album/ Genre). Installation: Access DB Generator. Run it. Your screen displays the following charts to help you during installation. Step 4, wait while it is Installing Step 1, press NEXT 15 Syncron User manual. Creation of Database. Step 5, press FINISH. Step 2: Automatically will begin the analysis process (Processing). Once installed the DB Generator plug your USB device to your device and run DB Generator on it. Then see a set of charts to indicate how to perform this operation. Step 3: Upon completion of the analysis, in the Creator window will appear database analysis report. This indicates that the creation of the database has been performed. CREATION OF THE DATABASE - Scan and create database: Follow the instructions outlined in each of the graphs will encounter during the creation of the database. The database created will simplify the search for clues through SYNCRON controls. Step 1: Select on your computer the USB device to be sorted for later use on your SYNCRON. Click “Generate” NOTE: Each time you modify the contents of your USB device is necessary to redo the above process to create a new database according to the new content. We recommend you regularly connect to the www.akiyamadj.com to check for updates to the database. web IMPORTANT Akiyama Syncron USB-PLAYER can use hard drives with a maximum capacity of 500 GB if these are formatted to FAT32. Most hard drives are formatted in NTFS when you buy them, and Windows can’t format drives over 32GB to FAT32 format, therefore it is necessary that these hard drives are formatted with the program DB Generator that you can find at: http://www.akiyamadj.com/781/syncron-midi#descargas 16 Syncron User manual. Database Operation. In the text line appears the artist whose name starts with the letter of the alphabet next to the initiation, for example the letter "A" or below in alphabetical order. The search may be performed in two ways, A and B A. TURN TRACK> We moved along the tracks ordered alphabetically by the "Artist ". Or ... Select the Format Tool of DB GEnerator as you can see in the picture above. Chose the device which needs to be formatted and write the device name on “Volume Name:”. Click “Format” to start the format process. You will be asked to confirm that you know that all the files will be deleted. B. Press TRACK and turn the wheel. We move through the tracks ordered alphabetically by the "Artist ". NOTE: Do not use this tool if you're not really sure how it works, otherwise you could lose all the information contained in the storage units that are connected to your computer. We recommend making a backup before you format your hard drive. DATABASE OPERATION. PLAYLIST. It is important to know the functioning of the search mode provided by the DB Generator program. In a "Pen Drive" or "HDD" you can have thousands of tracks and quick access to them is very timely. To determine the search type from "Normal / Title / Artist / Album / Build, the two basic operations to be performed are: 1. Press and hold the FOLDER button for 2 seconds to enter your device's internal menu. Turn the TRACK control to enter the submenu 1.PLAYLIST. 2- Search Mode 1.Playlist> "Album" First select "Album" as a way to search. You will see the steps to follow in the accompanying graph. 2. After selecting the submenu PLAYLIST (see it on display) first press and then turn the TRACK to select between "Normal / Title / Artist / Album / Genre". Up to your choice the searched will be done in your DECK 1 device. Press the FOLDER button again to save the settings and exit the internal menu. Case Study: The chart shows the method for selecting tracks once the database is created using the DB Generator program. Will be presented with an example: We seek the Track> Artist: PROPELLERHEADS Album: DECK & DRUMS & ROCK & ROLL Title (Track): SPYBREAK in "Playlist / Artist" mode and so "Playlist / Album." 1 - Search Mode 1.Playlist> "Artist" First select "Artist" as a way to search. You will see the steps to follow in the accompanying graph. In the text line appears the album whose name starts with the letter of the alphabet next to the initiation, for example the letter "A" or below in alphabetical order. A. Turn FOLDER> We moved by albums sorted alphabetically by the "Artist ". Or ... 17 Syncron User manual. Akiyama ASIO Drivers. Select "Next" to start the installation. Then opens the license agreement. B. Press FOLDER and turn the wheel. We move through the albums sorted alphabetically by the "Artist ". You must select the box in which you accept the license agreement and click "Next". AKIYAMA ASIO DRIVERS Installation Run Setup.exe clicking on Akiyama_ASIO_Driver_Setup.exe file The installation starts with below image You must select the folder you want to install the drivers. By default the folder will be installed: C:\Program Files\Akiyama ASIO Driver\ To select another folder, click "Browse ..." and locate the folder in which to install the drivers. Then select "Install". Before selecting “Next” read the information displayed on the Welcome image. It is recommended that you close all open applications before starting the installation. This will make it possible to update important system files without having to restart your computer. " 18 Syncron User manual. Sound card setup To end a window pop up to show you that it is installed successfully. Click "Finish" to exit. Configuration When using DJ software we select Akiyama configuration will open the following window. ASIO drivers The inputs correspond to the SYNCRON LINE / PHONE 1 and 2 analog inputs. The outputs correspond to the MASTER outputs (outputs 1 and 2), BOOTH (outputs 1 and 2) and Headphones (Outputs 3 and 4). To better understand how you must configure the SYNCRON audio USB inputs and outputs, below are examples for use with most popular dj software. Here we do not explain how to set Akiyama ASIO drivers but as the software must be configured once the drivers are configured. More information about the ASIO drivers Akiyama under "ASIO Drivers Akiyama" in this manual or the manual that came with the drivers. We recommend that you select only the sound card Syncron. To use multiple cards, consult to the manual found in the installation folder of drivers. Select Syncron (see Syncron within a white rectangle as in the figure) and set the value of "ASIO Buffer Size". There isn't an optimum buffer size as this depends not only on the device but the computer you are using. You must lower the value of the buffer until start to hear crackling or distortion when playing music. When this happens you will have found the minimum buffer and must select a value a little higher so you do not hear unwanted sounds. Virtual DJ To exit press "OK" Select Setup / Audio Configure and configured it as follows: Virtual DJ can only use the inputs if you use ASIO drivers. You can download free ASIO4 drivers (www.akiyamadj.com). The following explains how to configure the outputs in case you do not use ASIO drivers: - Inputs NONE. Once done, you need to configure the inputs and outputs of your software as described at the point of setting the sound card on this manual. -Outputs: HEADPHONES: Master: Front output / Headphones: Rear Output (when mixer panel is in MIDI mode). EXTERNAL MIXER: Deck 1: Front output / Deck 2: Rear output (when mixer panel is in internal mode). SOUND CARD SET UP - CARD 4.1 sound card Speakers: (2-SYNCRON). After connecting your computer to the USB port, your PC will detect it as an audio device (USB Audio Codec). You can play music on your computer or send it, through the USB connection, as a signal source to the device. SYNCRON has 2 stereo inputs and 2 USB outputs. In point 13 of "mixer panel" explains all the possible combinations of inputoutput in function of the selected source. NOTE: (1) The signal sent to the master output is not influenced by the position of the volume controls. To use the USB connection, please also refer to your computer manual operation and software programs you use. (2) It is recommended not to use USB cables shorter than a metre long. Windows setup Windows automatically installs drivers compatible with SYNCRON. However, it is advisable to use ASIO drivers to reduce latency. In the examples listed below we use the Akiyama ASIO drivers (www.asio4all.com). Once installed the drivers from your computer will have access to 4 mono inputs and 4 mono outputs. Despite the names given by Virtual to sound cards, input and output, in this configuration will have the master output of Virtual DJ in the rear outputs of SYNCRON (Master balanced, unbalanced and Booth) and the headphones output by the Front headphone jack of SYNCRON device. 19 Syncron User manual. Sound card setup When using ASIO drivers need to configure Virtual DJ as explained below: Select Settings / Sound Configuration sound and configured as follows: - LINE-INs inputs. -Outputs: HEADPHONES: Master: Channels 1 & 2/ Headphones: Channels 3 & 4 (when mixer panel is in MIDI mode). EXTERNAL MIXER: Deck 1: Channels 1 & 2/ Deck 2: Channels 3 & 4 (when mixer panel is in internal mode). - ASIO Sound Card: ASIO Driver: Akiyama ASIO. With this configuration we have the master output on the rear outputs of SYNCRON (Master balanced, unbalanced and Booth) and Monitor output for the front headphone jack of SYNCRON. NOTE: This output configuration is possible only for 1.2.7 Traktor post versions. In lower versions without using ASIO drivers will only have two outputs (1 stereo). In Input Routing must select the "Microphone In 0" and "Microphone In 1" on the Input Channel in which you want to make available the entry. Without using ASIO drivers there is available only one input. LINE-INs inputs are activated by selecting AUX on the deck you want. From this standard configuration you can make any changes it deems useful. If you want to use an external mixer must select EXTERNAL MIXER on output and assign to each channel 1 & 2 and 3 & 4 a deck. You should select the MIDI CTRL option in the mixer panel if you want available the analog outputs. When we have selected Mixer, the digital outputs of the sound card are directly routed to the internal mixer and the analog outputs of the equipment will have Master and Headphones. Remember that channels 3 & 4 are accessible only on the front output for headphones. To use inputs for time-code must change the option INPUTS to a TIMECODES (If you are using a turntable, please be sure you have selected phono). Then explain how to configure Traktor with the Akiyama ASIO drivers in internal mixer mode. Other configurations see the manual for your Virtual DJ. Select Preferences / Audio Setup / Audio Device tab Akiyama ASIO. Traktor As with Virtual DJ, with Traktor we recommend installing ASIO drivers for reducing latency. The following explains how to configure the outputs in case you do not use ASIO drivers: Select Preferences / Audio Setup / SYNCRON Audio Device tab. Select in Preferences/ Output Routing/ Mixing mode the Internal option if the mixer panel is set to "MIDI CTRL" and External if we have selected the Mixer option in the 4th option of the internal menu. In Output Monitor (Internal) or Output Deck B (External), we must select the 3th output to left channel and 4th output to right channel. In Output Master (Internal) or Output Deck A (External) must select outputs 1 and 2 for left and right channel respectively. Select in Preferences/ Output Routing/ Mixing mode the Internal option if the mixer panel is set to "MIDI CTRL" and External if we have selected the Mixer option in the 4th option of the internal menu. In Output Monitor (Internal) or Output Deck B (External) must select the "Speaker Out 2" output to the left channel and the "Out Speakers 3" output to the right. In Output Master (Internal) or Output Deck (External) must select "Speaker Out 0" outputs and "Speakers Out 1" to the Left and Right channels, respectively. 20 Syncron User manual. Sound card setup This configuration we have the master output on the rear outputs of SYNCRON (Master balanced, unbalanced and Booth) and Monitor output for the SYNCRON front headphone jack. Your Mac will detect SYNCRON controller as an external device with 4 inputs/4 outputs. In Input Routing must select input 1 and 2 in Input Channel A for the left-right respectively. Similarly associate Input Channel B to SYNCRON inputs 3 and 4. Virtual DJ We can use both inputs and outputs depending on the settings you want. 1. - MIDI Mode: Sends Channel 1 & 2 to Master, and channels 3 & 4 to headphones Select> Setup / Audio Configuration and configured it as follows: - INPUTS NONE. - HEADPHONES Master-Out: Channel 1 & 2 / Headphones: Channels 3 & 4. - Sound Card> SYNCRON 4 OUT CARD From this standard configuration you can make any changes it deems useful. If you want to use an external mixer must select External Preferences / Output Routing / Mixing mode and assign each channel to a SYNCRON output. You should select the MIDI CTRL option in the mixer panel if you want available the analog outputs. Remember that channels 3 and 4 are accessible only on the front headphones output. For other configurations see the Traktor manual. Mac Configuration Connect your SYNCRON to an USB on your Mac using the supplied cable. Open the MIDI Audio Setup application. You will find it in the Utilities folder within the Applications folder on your Mac. The Audio MIDI Setup window will open. 2. - AUX mode: We can send through the SYNCRON controller inputs any external source directly to the master/headphones of the mixer. For example, two KURO or K2 players in USB or CD mode (if used a turntable be sure to select Phono). Select: Setup / Audio configuration and configured it as follows: - Inputs LINE/INs. - HEADPHONES Master-Outputs: Channel 1 & 2 / Headphones: Channels 3 & 4. - Sound Card: 4-IN/4-OUT SYNCRON. 21 Syncron User manual. Virtual DJ 7 LE Installation have selected the Mixer option in the 4th option of the internal menu. In Output Monitor (Internal) or Output Deck B (External) must select the output "1: Front Left" of SYNCRON for the left channel and the output "2: Front Right" to the right channel. In Output Master (Internal) or Output Deck A (External) must select "3: Back Left" and "4: Right Back" to the left and right respectively. On the front part of the Virtual DJ screen, you should select the AUX control. 3. - Time Code MIDI mode: To work with TC (time code) need to have the Cd's or Vinyl time code recommended by each manufacturer's software. This configuration we have the master output on the rear outputs of SYNCRON (Master balanced, unbalanced and Booth) and Monitor output on SYNCRON front headphone jack. Connect the inputs of SYNCRON, CD players or turntables with their respective vinyl or CDs time-coded. Select Setup / Audio Configure and configured it as follows: In Input Routing must select the input "1: Front Left" and "2: Front Right" in Input Channel A for the left-right respectively. Similarly associate Input Channel B to the inputs "3: Front Center" and "4: Low Frequency Effects " of SYNCRON. - TIMECODES inputs, Chan 1 & 2: Deck 1 / Chan 3 & 4: Deck 2. - HEADPHONES Master-Out: Channel 1 & 2 / Headphones: Channels 3 & 4. - Sound Card 4-IN/4-OUT CARD SYNCRON. From this standard configuration you can make any changes it deems useful. If you want to use an external mixer must select External Preferences / Output Routing / Mixing mode and assign to each channel a SYNCRON output. You should select the MIDI CTRL option in the mixer panel if you want available the analog outputs. Remember that channels 3 and 4 are accessible only on the front output for headphones. In case the mixer panel works in internal mode, we should select EXTERNAL MIXER instead of HEADPHONES in Outputs. Other configurations see your Virtual DJ manual. Other configurations see your Traktor manual. VIRTUAL DJ LE INSTALLATION Traktor Select Preferences / Audio Setup / Audio Device SYNCRON (4 In, 4 Out) tab. Here are the steps to follow to install Virtual DJ NOTE: To install a new version of Virtual DJ LE need to uninstall any version of Virtual DJ LE you have installed on your computer. One computer only may have installed one version of Virtual DJ LE. Windows Run the Virtual DJ LE installer by double clicking the file icon install_virtualdj_le_vx.yzmsi where x.y.z indicates the version of software. Installation will begin with the welcome screen shown in the figure below Select in Preferences/ Output Routing/ Mixing mode the Internal option if the mixer panel is set to "MIDI CTRL" and External if we 22 Syncron User manual. Virtual DJ 7 LE Installation Select “Install” and installation begins. Select "Next" to start the installation. Then opens the license agreement. Once installed you can select whether or not to start Virtual DJ. Select "Launch VirtualDJ" to start the program. Select the box in which you accept the license agreement and click "Next”. The first time you launch the program pops up a window like the figure above. You must enter the serial number provided with your Syncron and click OK. The serial number will find it stuck to the protector of his CD. Will then open Virtual DJ LE for Syncron: You must select which type of installation you want. We recommend that you first select the "Typical" in order to install the default components. Later, if you want to select that utilities should be installed can use the "Custom". 23 Syncron User manual. Virtual DJ 7 LE Installation . Once Virtual Dj started, selects CONFIG and below image appears. Select “Agree” to continue You only have to select Syncron in "Sound card" to load the default settings. For more information about configuring the sound card to read the point of this manual. Then you will see information about the type of installation. You can change the location of the facility or press "Install" to begin installation. MAC Run the Virtual DJ LE installer by double clicking the file icon install_virtualdj_le_vx.yzpkg where x.y.z indicates the version of software. Installation will begin with the welcome screen shown in the figure below. For the installer to make changes you must enter your Name and Password. Select "Continue" to begin installation. Then opens the license agreement. 24 Syncron User manual. Virtual DJ 7 LE Installation Will then open Virtual DJ LE for Syncron: While installing Virtual DJ LE see next image: Once Virtual Dj started, selects CONFIG and below image appears. At the end of the installation a message appears reporting that the installation is complete. You only have to select Syncron in "Sound card" to load the default settings. For more information about configuring the sound card to read the point of this manual. The first time you launch the program, a window like the figure below appears. You must enter the serial number provided with your Syncron and click OK. You will find the serial number stuck on the protector of the CD. 25 Syncron user manual. Virtual DJ LE functions. DESCRIPTION OF VIRTUAL DJ. FUNCTIONS Top panel 3. TRACK: Turning the control we move through the list of songs and press charges the song on the deck in question. 1. VFD DISPLAY: The VFD display will show the MIDI MODE channel number MIDI deck 1 - channel number MIDI mixer - channel number MIDI deck 2. SHIFT pressed while turning the control select the size of the Loop and pressing create or exit the Loop. 2. LOOP: this three buttons let you create and modify loops. When we are in video mode, with this control we can select and activate the desired transition. IN BUTTON: This button lets you create a CUE point without pause playback (real time cue). In addition, simultaneously determines the starting point of a loop. 4. FOLDER: Turning the control we move through folders and pressing it will show or hide the subfolders. SHIFT pressed while turning the control we move the Loop in the direction you turn the control. The movements that occur are the same size as the Loop. Pressing, activate or deactivate the Loop. Pressing IN while holding SHIFT enter edit mode for the starting point of the Loop. The modification is performed by turning the wheel. To exit this mode will need to press SHIFT and one of three buttons, OUT or RELOOP to change the mode or IN to exit the current mode. When we are in video mode, with this control we can select and activate the desired effect. If while holding down the play SAMPLE button, we turn on the control, the sample size will be multiplied or divided by 2, and pressing it, change the playback mode of the single sample playback to continuous playback. While staying on the way to change the starting point the led of the IN button blinks. OUT BUTTON: This button is used to set the end point of the Loop. The Loop will repeat continuously until you press a second time OUT (loop exit). Pressing OUT while holding SHIFT entered edit mode end point Loop. The modification is performed by turning the wheel. 5. DECK SELECTOR: Pressing this button will select the Virtual DJ deck controlled from the deck of Syncron. The LEDs are at the top of the button indicate which deck we are currently handling. To exit this mode will need to press SHIFT and one of the three buttons, IN or RELOOP to switch modes or OUT to exit the current mode. 6. HOT CUE / SAMPLE SELECTOR MODE: This button will select the way the buttons labeled with a (7) are. When the LED is lit so we're in Sample mode and when the LED is off in Hot Cue mode. While we are in change mode endpoint OUT button LED blinks. 7. HOT CUE / SAMPLES: Depending on which mode we are, these four buttons can have two functions. The mode is selected with the SAMPLE button (see point 6). RELOOP BUTTON: If we made a loop and we are not playing by pressing RELOOP Loop playback starts instantly. To exit the Loop and continue playback, press the OUT button. HOT CUE MODE: In this mode, pressing a button is not lit it will create a cue point at the moment is pressed and stored in the corresponding position. The button will be lit red. Pressing a button lit up the playback jumps to the cue point corresponding to the button without stopping playback. To delete a stored cue point will need to press the button while holding down DELETE (see item 8). Pressing RELOOP while holding down SHIFT we enter in Loop shift mode. The modification is performed by turning the wheel. To exit this mode will need to press SHIFT and one of the three buttons, IN or OUT to change the mode or RELOOP to exit the current mode. SAMPLE MODE: The main function of these buttons is play or pause playback of a given sample. When a sample is playing, the button for the sample will glow green. The four buttons on the left deck While we are in shift mode endpoint RELOOP button LED blinks. 26 Syncron user manual. Virtual DJ LE functions. correspond to samples 1 to 4. Buttons 1 to 4 from the right deck samples correspond to 5 to 8. pressed the current song will be skipped in the mixture if the automatic mixture is activated. In addition to enabling / disabling the reproduction of a sample, these buttons also allow you to set certain parameters for the sample while maintaining pressure. If for example you hold down the 4 button from the left deck can modify parameters for this sample. Below is a list of controls that modify these parameters for the sample: 17. WHEEL: The main functions of the wheel are explained in item (14) although it can be used to adjust multiple parameters for loops or effects. Below is a list of parameters that can be adjusted with the wheel: - Search: Quick Search (by holding down TIME). - Loop IN Adjust: Change the starting point of the loop (press SHIFT + IN). - Turn FOLDER (4): multiplied or divided by 2 the size of the sample. - Loop OUT Adjust: Change the end point of the loop (press SHIFT + OUT). - Press FOLDER (4): Change the playback mode of the sample of continuous to simple and vice versa. - Loop MOV: Moving loop (press SHIFT + RELOOP). - Rotate the wheel (17): Adjust the volume of the sample. - Parameter 1 effect (hold X). If you press one of these buttons while holding down SHIFT will start recording a sample and record what is playing on the deck selected (see point 9). Meanwhile, the button will illuminate intermittently. To stop recording press the button again while holding down the SHIFT. In case when recording starts and has an active loop on the deck selected, the Loop will be recorded immediately and will not be necessary to stop recording. - Parameter 2 effect (hold Y). - Key: Parameter setting key (hold HOLD). - Filter: filter parameter setting (press FILTER) - Video FX Control: Adjust video effect parameter (in video mode hold SHIFT). - Sample Volume: Modify sample volume (hold the play button for the sample of what we want to change the volume). 8. DELETE (CLEAR): We must press a Hot Cue button while holding down this button to delete the corresponding cue point. We need to be in Hot Cue mode as in Sample mode this button has no function. 18. CUE PLAY: When you press this button, if the playback is paused playback begins. If you are playing, the playback point jumps to the last CUE point has been established and continuous play. SMART CUE on or off by pressing this button while holding down the SHIFT. When the function is active the LED will light. 9. PRE LISTENING: Enable or disable the pre listening to the channel to the deck upon which we are acting. 19. CUE: If we are in pause ( || ) at a point where there is no cue point and press the button, setting a new cue point. If we're playing, it pauses and skips to the place where the last set cue point. If we are in a cue point and pause by pressing the button will play the song from the cue point until you release the button, when it returns to the cue point. Pressing the button while holding down SHIFT select the channel. The channel is selected will be recorded when recording a sample and its waveform is superimposed on the others. 10. RANGE: Select the value of RANGE between 6, 10, 16 and 100% values. The corresponding LED will light. 20. PLAY / PAUSE: Pressing begin playback. In case you are playing the song, it pauses. To reset the pitch must press this button while holding down SHIFT. While it is resetting, the 10% LED lights. 21. SHIFT / TAP: taping it at the beat rhythm sets a new value to beat for the track being played. 11.KEY LOCK: Lock the tone of the song. The LED will illuminate to indicate that it is locked. While holding down this button, the rest of the controller buttons change their function. Pressing this button while SHIFT is pressed select the deck on which we act 1 or 3 on the left as the left deck. Functionally equivalent to the right deck. This affects the automatic crossfader function. 22. PITCH BEND: accelerate or decelerate playback while keeping the button pressed. When you release it back to its original playback speed. 12. EFFECTS: Pressing the buttons ECHO, FLANGER and SKID select and activate the corresponding effect. If before activating the effect we need to adjust its parameters can press the buttons while holding down SHIFT to select but not activate the effect. 23. PITCH SLIDER: This control is used to adjust the pitch rate of reproduction in a defined range. If you change the pitch by software, the hardware will never change its value until it reaches the current value of pitch. Should you wish to select an effect for which we have no direct access will press Y or X while holding down SHIFT. With X go to the following effect on the list and with Y to the prior effect. To enable the effect need to hold down SHIFT while you press HOLD. To configure the parameters of the effects, we must hold X and move the wheel to the parameter 1 or hold down Y and move the wheel to parameter 2. FILTER and KEY (HOLD) work differently from other effects. Pressing Filter is activated and through the wheel can adjust its value. When you press the button again, the Filter value is reset and the wheel returns to its previous operation. A short press on the button HOLD resets KEY value, and if held down by the wheel can adjust its value. 13. SEARCH: These buttons allow you to perform a fast search backwards or forwards through the selected topic, either in play mode or not. 14. WHEEL MODE: Allows you to select between three modes of operation of the wheel. VINYL: In this mode when you touch the metal top of the wheel playback stops and you can “scratch” moving the wheel. If you move the wheel without touching the metal part, there will be a "PITCH BEND." A. CUE: This mode is very similar to VINYL but in this case touch the metal of the wheel the playback point jumps to the last cue used. CDJ: In this mode even touch the metal part will be a "PITCH BEND” 15. TIME: If you turn the wheel while holding down this button will perform a quick search through the subject. Pressing the button while holding down SHIFT lock the PITCH. 16. SGL / CNT: Pressing enable or disable the automatic blending of the themes of the playlist. If you press SGL/CNT while SHIFT is 27 Syncron user manual. Virtual DJ LE functions. Mixer panel 2 and 3. F. START: If Fader Start is enabled, moving the crossfader from one side to another, on the other side decks with this feature turned on will start playing automatically. To be active is necessary to produce a transition from OFF to ON to the computer to send the corresponding MIDI signal, not enough that the switch is in the ON position. For example, if the deck 1 and 3 is off and being on deck 1 move the switch to ON will be enabled to deck 1. If, after we switch to deck 3, the switch will remain in the ON position, but for this deck, the Fader Start function will remain disabled. To activate it necessary to move the position of the control ON to OFF and move from OFF to ON again be activated. If, when the switch is OFF we change to Deck 1 again, will not change the state of the deck 1, which will remain disabled Fader Start. Most of the functions of a mixer are standard and therefore the operation of this part of the device is basically the same as when it operates as a player. Therefore in this section will explain only certain controls. Front panel The controls for the microphone are working independently and therefore do not control any function of Virtual DJ. 1. MIX: This control selects the percentage of MASTER we want to hear through headphones. Move the slider to the left (CH1) to not hear MASTER through headphones. Move the slider to the right (CH2) to listen MASTER through headphones 1. VIDEO MODE: Pressing the mode RELAY enter Video. In this mode some of the controls change its function. To deactivate press the button again. When Video mode is active RELAY LED lights. 2. LEVEL: Turn this control can adjust the headphone volume. If we press the button while holding down SHIFT button the Virtual DJ switches to the SCRATCH page. 28 Syncron user manual. Virtual DJ LE functions. Quick guide. QUICK GUIDE This point provides two schemas that represent graphically all the functions of Virtual DJ Syncron controls. We recommend that you use them only once you have read the rest of the paragraph and fully understand the operation of all functions. 29 Syncron User manual. Midi section. NOTE (LED): This column contains the value of the note under the control LED if the LED available. MIDI SECTION Select the MIDI on the source selector (Page 11, item 13). Enter MIDI mode. The display shows "MIDI MODE" SHIFT (TAP): This column contains the value of the note or control for the control when we are in SHIFT mode (we have or hold down the TAP button, as if it is set to hold or toggle). In MIDI mode our device is no longer a player to become a controller. Control a PC-resident software where we connect our device via USB. ACTION: Here we find the value of action. The different values that can take are explained in points a) to d). To make this possible, we assign functions to the Software to the various controls of our device. Each control generates a MIDI message that can be found in the MIDI MAP chart on the next page. NOTE: MIDI MAP is expressed in hexadecimal> NOTE or CC. To map SYNCRON controls to the DJ Software functions you would need the equivalent hexadecimal value. A DJ Software has a function of "mapping" or edit MIDI. Where each function of the software is assigned a physical control. For this we assign to each function of the MIDI software to the physical control of our device we want to control this feature. This mapping is done on the computer. DJ Software currently uses two types of MIDI messages. These are: - "Control Note" (switch): A physical control should be a button and have a standard nomenclature NOTE C2. - Control Change (CC): The physical control is a potentiometer or an Encoder and have a standard nomenclature Cc53. Its controller sends to the computer an identifier indicating whether to send a message of type "Note" or "Control Change". It then sends the value of the note or control for the physical control is triggering (C2 and 53 in the examples above). Then it sends a number that indicates the action we are doing on the control, such as pressing or releasing a button or the position of a potentiometer. Depending on the value to take action figure classify the controls on your controller SYNCRON as follows:... a- CC-ABSOLUTE (potentiometer) (VR) - CC “Control Change” Absolute. VR To convert a hexadecimal number to decimal we must first locate the column that contains the number that appears on the left. Then identify the row that contains the letter that accompanies the number. The intersection of row and column is the equivalent decimal number. Conversely to convert a Decimal number to its equivalent Hexadecimal number, we must first locate the number on the table. The column that is gives us the first hexadecimal digit. The second hexadecimal digit corresponds to the one we have in the row which is the decimal number. The message "Control Change" absolute are those generated by a potentiometer-type controls. In this case the message sends a value from 0 to 127 according to the position he finds the potentiometer. b- CC-RELATIVE (ENC) - CC “Control Change” Relative. ENC (Encoder) The message “ControlChange" Relative are generated by the encoder type controls. Unlike potentiometers such kind of controls regardless of their position, but if you turn left or right. Sends the value 63 (3F hex) if the encoder is turned lleft clockwise or 65 (41 hexadecimal) if the encoder is turned right clockwise. Example: Control Folder, made two applications SW (switch) which is a "Control Note" and ENC (Encoder) is a "Control Change. “ c-SWITCH ON / OFF (SW, CENTER, CW, CCW) - CN "Control Note ON / OFF. Where SW is Button, CENTER is the point of arrest in potentiometer, CW direction of clockwise rotation and CCW is direction of counter clockwise rotation. These messages are used for buttons and are of the "Note" type. The action values that send are 127 if you press the button or 0 if we are not pressing a button. The MIDI direction of the MIDI Folder ENC control is 31. Convert it to Decimal using the Hexa-Dec conversion table: d-LED ON / OFF (LED) In DJ Software we will apply the function to: CC # 49 (Cc49). These messages are used to determine which LED should light. These are messages such as "Note" and as in the case of push action values they receive are 127 if you want the LED is turned on or 0 if we want the LED off. In the case of LEDs is the software which sends messages to the controller. The MIDI direction of SW 2B Folder control in Hexadecimal base. Converting from hexadecimal to decimal using the Hexa-Dec tab: Column 3 / Row 1 is the number 49 decimal. Column 2 / Row B: represents the number 43 in decimal. In the case of controls C.N. we must convert the decimal value to a MID value Note Numbers for Different Octaves. "This conversion is done through the table below: DJ Software exists that do not need to know the value of the notes or controls, as these are read automatically. In these cases you need only select a software command and act on the control that you want the software monitor while the software is in learning mode. For other software where you have to manually enter values or out going messages (power LEDs) in which the self-learning is not possible, will be necessary to understand the nomenclature table MIDI MAP perfectly. TABLE: “MIDI Note Numbers for Different Octaves” The following explains the contents of each of the columns of the table MIDI MAP: FUNCTION: Here you will find the control name of the SYNCRON controller. Type: This indicates what kind of message we are sending as explained in points a) to d) above. CHn MIDI FUNCTION CODE (DECK n): This column contains the value of the note or control for the control. 30 Syncron User manual. Midi map. MIDI parameterization using the SHIFT button: As you can see from the table MIDI MAP (hexadecimal) controls have a second address in case to be handled when you press the SHIFT button (TAP). The allocation is performed as indicated, using the value set for SHIFT (TAP). Thus we can assign two different functions of DJ software to the same control. We can configure SHIFT to operate in toggle mode (by pressing once is active and pressing again is disabled) or HOLD (active while being pressed) in the internal SYNCRON menu. MIDI map. In the following MIDI map you can find the values in hexadecimal and decimal base. The placement is as follows: 44>G#4/56>86: 44 Hexadecimal value of the first control function; > G # 4 (cn) Note. 56 Hexadecimal value of the second function; >86 (cc) corresponding Decimal value. 31 Syncron User manual. Midi map. The MIDI Map has been implemented so that SYNCRON is divided into five areas. Each area will send the MIDI messages by a particular channel. The five areas as following: DECK A for MIDI CH1 DECK C for MIDI CH3 DECK B for MIDI CH2 DECK D for MIDI CH4 MIXER for MIDI CH5 Since the DECK A & C and DECK B & D share controls we can select each Deck or MIDI channels using the controls: Physically Deck A and Deck C share the left SYNCRON player. When you select Deck A corresponding LED illuminates. Also for Deck C. By default we are in Deck A. DECK A & C DECK B & D Physically Deck B and Deck D share the right SYNCRON player. When selecting Deck B the corresponding LED lights. Also for Deck C. By default we are in Deck B. 32 Syncron User manual. Specifications. SPECIFICATIONS GENERAL SECTION PRODUCT Dual USB Mp3 Player + Digital Mixer POWER SOURCE AC 100-240V, 60/50Hz POWER CONSUMPTION 21 WATTS DIMENSIONS 420mm (W) X 299mm (D) X 90mm (H) WEIGHT 4,42kg INPUT/OUTPUT IMPEDANCE & SENSITIVITY: (EQ FLAT, MAXIMUM GAIN, LOAD=100K OHM) INPUT IMPEDANCE AND REFERENCE INPUT LEVEL LINE: 47K OHM /-14dBV (200mV) +/-0.1dB PHONO: 47K OHM /-50dBV (3.16mV) +/-0.1dB MIC: 10K OHM /-50dBV (3.16mV) +/-0.1dB OUTPUT IMPEDANCE AND LEVEL MASTER: 1K OHM /0dBV (1V) +/-2dB MASTER BAL. (load=600 ohm): 600 OHM /+4dBm (1.23V) +/-3dB (BETWEEN HOT AND COLD) BOOTH: 1K OHM /0dBV (1V) +/-2dB PHONES (load=32 ohm) 33 OHM /0dBV (1V) +/-2dB FREQUENCY RESPONSE: (EQ FLAT, MAXIMUM GAIN, LOAD=100K OHM LINE: 20 - 20K Hz +/-2dB PHONO: 20 - 20K Hz +2/-3dB (RIAA) MIC: 20 - 20K Hz +2/-3dB THD + N: (EQ FLAT, MAXIMUM GAIN, w/20kHz LPF, A-WEIGHTED, LOAD=100K OHM) LINE: More than 0,06% @ 1 KHz PHONO: More than 0,08% @ 1 KHz MIC: More than 0,15% @ 1 KHz MAXIMUM INPUT: (1KHz, THD=1%, EQ FLAT, MAXIMUM GAIN, LOAD=100K OHM) LINE: More than +0dBV PHONO: More than -36dBV MIC: More than -36dBV MAXIMUM OUTPUT: (1KHz, THD=1%, EQ FLAT, MAXIMUM GAIN, LOAD=100K OHM) MASTER: More than +15dBV (5.62V) LOAD=100K OHM PHONES: More than +4dBV (1.6V) LOAD=32 OHM S/N RATIO: (MAXIMUM GAIN, EQ FLAT, W/20KHz LPF, A-WEIGHTED) LINE: More than 73dB PHONO: More than 73dB MIC: More than 63dB CROSSTALK: (MAXIMUM GAIN, EQ FLAT, W/20KHz LPF, A-WEIGHTED, MASTER=0dBV OUTPUT) LINE, PHONO: More than 63dB @1KHz BETWEEN L AND R CHANNEL More than 70dB @1KHz BETWEEN CHANNELS FADER KILL: (MAXIMUM GAIN, EQ FLAT, W/20KHz LPF, A-WEIGHTED, MASTER =0dBV OUTPUT) CHANNEL FADER: More than 70dB AT 1KHz CROSSFADER: More than 70dB AT 1KHz 33 Syncron User manual. Specifications. SPECIFICATIONS TONE, EQ MIC: -14 +/-3 dB at 100Hz CHANNEL: 10 +/-2dB, below -30dB at 70Hz -12 +/-3dB at 10 KHz 10 +/-2dB, below -30dB at 1 KHz 10 +/-2dB, below -30dB at 13 Khz CHANNEL BALANCE Within 2dB TALKOVER: -20dB +/- 2dB USB HOST PLAYER SECTION: (SIGNAL FORMAT: M P3, 128KBPS) - OUTPUT LEVEL: 0dBV +/-2dB (TCD782 TRK16, GAIN MAXIMUM, EQ FLAT) - FREQUENCY RESPONSE: 17-16KHz +/-2dB (TCD781 TRK1,4,16, SET GAIN TO 0dBV OUT, EQ FLAT) - THD+N: Less than 0,08% (TCD782 TRK16, GAIN MAXIMUM, EQ FLAT, W/20KHz LPF, A-WEIGHTED) - SN RATIO: More than 70dB (TCD782 TRK2,8, SET GAIN TO 0dBV OUT, EQ FLAT, W/20KHz LPF, A-WEIGHTED) - LR SEPARATION: More than 63dB AT 1KHz (TCD782 TRK2,9,11, SET GAIN TO 0dBV OUT, EQ FLAT, W/20KHz LPF, A-WEIGHTED) USB SLAVE PLAYER SECTION: (SIGNAL FORMAT: MP3, 128KBPS) - OUTPUT LEVEL: 0dBV +/-2dB (TCD782 TRK16, GAIN MAXIMUM, EQ FLAT) - FREQUENCY RESPONSE: 17-16KHz +/-2dB (TCD781 TRK1,4,16, SET GAIN TO 0dBV OUT, EQ FLAT) - THD+N: LESS THAN 0.08% (TCD782 TRK16, GAIN MAXIMUM, EQ FLAT, W/20KHz LPF, A-WEIGHTED) - SN RATIO: MORE THAN 70dB (TCD782 TRK2,8, SET GAIN TO 0dBV OUT, EQ FLAT, W/20KHz LPF, A-WEIGHTED) - LR SEPARATION: MORE THAN 63dB AdBVT 1KHz (TCD782 TRK2,9,11, SET GAIN TO 0dBV OUT, EQ FLAT, W/20KHz LPF, A-WEIGHTED) RECORDING & PLAYBACK: (LINE 1KHz, -14dBV INPUT, GAIN MAXIMUM) - OUTPUT: 6dBV (2V) +/-2dB - THD+N: Less than 0,08% (GAIN MAXIMUM, W/20KHz LPF, A-WEIGHTED) MP3 FORMAT USB Format MP3 Format File System Applicable file extensions Max. number of Folders Max. number of files MPEG 1 Layer 3 standard (ISO/IEC 11172‐3), which provides for single channel (‘mono’) and two‐channel (‘stereo’) coding at sampling rates of 32, 44.1 and 48kHz. MPEG 2 Layer 3 standard (ISO/IEC 13818‐3), which provides for similar coding at sampling rates of 16, 22.05 and 24 kHz. MPEG 2.5 Layer 3 standard, which provides for similar coding at sampling rates of 8, 11.025 and 12 kHz. FAT 12/16/32 mp3. MP3. mP3. Mp3 999 Max. 999 files 32/40/48/56/80/96/112/128/160/192/ 224/256/320 kbps Xing/VBRI VBR 32/40/48/56/64/80/96/112/144/160 Kbps Xing/VBRI VBR 32/40/48/56/64/80/96/112/144/160 Kbps Xing/VBRI VBR WAV FORMAT WAV Format Chunk ID Format Audio Format Num Channels Sample Rate “RIFF” “WAVE” 16‐bit PCM Mono/Stereo 48000/44100/32000/24000/22050/16000/12000/11025/8000 34 C/ Praga, nº 11. Pol. Cova Solera 08191. Rubí - Barcelona (Spain) www.akiyamadj.com [email protected]