1
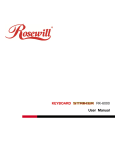
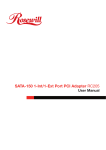
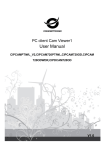
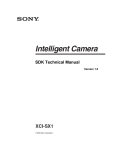
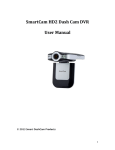
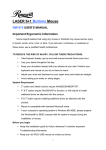
SHIELD SmartCam USER MANUAL Limited Warranty Terms & Conditions Rosewill Limited warrants this product against defects in workmanship and material for a period of one (1) year from its original purchase date. You must present your receipt as proof of date of purchase for warranty validation. Any unit which proves defective during the stated period will be repaired without charge for parts or labor or replaced at the sole discretion of Rosewill. The end user is responsible for all freight charges incurred to send the product to Rosewill’s repair centers. The end user is responsible for all shipping costs incurred when shipping from and to any country other than the country of origin. The warranty does not cover any incidental, accidental or consequential damages arising from the use of or the inability to use this product. Any costs associated with the fitting or removal of this product by a tradesman or other person or any other costs associated with its use are the responsibility of the end user. This warranty applies to the original purchaser of the product only and is not transferable to any third party. Unauthorized end user or third party modifications to any component or evidence of misuse or abuse of the device will render all warranties void. By law some countries do not allow limitations on certain exclusions in this warranty. Where applicable by local laws, regulations and legal rights will take precedence. FCC Verification NOTE: This equipment has been tested and found to comply with the limits for Class B digital device, pursuant to part 15 of the FCC Rules. These limits are designed to provide reasonable protection against harmful interference in a residential installation. This equipment generates, uses and can radiate radio frequency energy and, if not installed and used in accordance with the instructions, may cause harmful interference to radio or television reception, which can be determined by turning the equipment off and on, the user is encouraged to try to correct the interference by one or more of the following measures: Reorient or relocate the receiving antenna Increase the separation between the equipment and the receiver Connect the equipment into an outlet on a circuit different from that to which the receiver is connected Consult the dealer or an experienced radio/TV technician for help These devices comply with part 15 of the FCC Rules. Operation is subject to the following two conditions: These devices may not cause harmful interference, and These devices must accept any interference received, including interference that may cause undesired operation. Important Note: All jurisdictions have specific laws and regulations relating to the use of cameras. Before using any camera for any purpose, it is the buyer’s responsibility to be aware of all applicable laws and regulations that prohibit or limit the use of cameras and to comply with the applicable laws and regulations. WARNING Modifications not approved by the party responsible for compliance could void user’s authority to operate the equipment. IMPORTANT SAFETY INSTRUCTIONS Make sure product is fixed correctly and stable if fastened in place. Do not operate if wires and terminals are exposed. 2 SHIELD SmartCam USER MANUAL CONTENT CONTENT 3 PRODUCT INTRODUCTION 4 OVERVIEW 4 PACKAGE CONTENT 5 INSTALLATION GUIDE (WIRED CONNECTION TO THE LAN) 6 SHIELDEYE SOFTWARE INSTALLATION 7 INSTALLING SHIELDEYE ON YOUR WINDOWS PC 7 DEFAULT USERNAME AND PASSWORD 7 SHIELDEYE LIVEWATCH UI 8 ADDING TO THE CAMERA LIST 8 WATCH YOUR VIDEO AND SETTINGS 10 BASIC CAMERA CONTROLS 10 LOCAL MENU 11 CAMERA WIFI SETUP 12 CONNECTED VIA YOUR PC WITH WEB INTERFACE 12 CONNECT BY IPHONE OR ANDROID SMARTPHONE 14 INSTALLING THE SHIELDEYE SMARTPHONE APP 14 RUNNING THE SHIELDEYE APP 14 SHIELDEYE APP INTERFACE 15 SHIELDEYE APP CAMERA SETUP 16 ADDING A CAMERA VIA SMARTPHONE 16 SHIELDEYE APP INTRODUCTION 17 ADVANCED SETTINGS 18 ACCESSING THE CAMERA VIA WEB BROWSER 20 THE LIVEWATCH UI 20 SETTING UP EMAIL ALERTS VIA WEB BROWSER (1/2) 21 SETTING UP EMAIL ALERTS VIA WEB BROWSER (2/2) 22 TECHNICAL SUPPORT DETAILS 23 APPENDIX 24 CONNECTING TO WAN 24 3 SHIELD SmartCam USER MANUAL Congratulations on your purchase of this SHIELD Pan & Tilt IP camera. With this IP camera, you can secure your home day and night, watch your pets and family everywhere and every moment you want, and interact with your families anytime by online with smart phone viewing. With the easy to set up process, you can set your IP camera by yourself easily. It is very suitable for homes, shops, office building and so on. Note: To better this camera, we will keep on improving the software and user manuals. Hence, if users found the user manual doesn’t match with the IP camera, please download the latest files at www.rosewill.com. Product Introduction Overview 1 2 7 3 6 4 5 1. Infrared LEDs: Illuminates targeted areas when in almost total darkness. 2. Illumination Sensor: Detects the light and turns the IR LEDs for night vision when necessary. 3. Microphone: Allows the camera to hear nearby sounds and interact with ones nearby. 4. Power LED: Indicates if the camera is powered. 5. Network LED: Blinks when connected between the camera and network. 6. DC In Power: To connect power adapter. 7. Antenna Connector: To attach Wi-Fi antenna. 8 9 12 10 11 8. Reset Button: Press and hold for 5 seconds to reset all settings back to the factory defaults. 9. Network (LAN) Port: Connect the Ethernet cable to a router for wired connections. 10. Audio In: To connect an external microphone. 11. Audio Out: To use the intercom function, connect speakers to the audio output. With this camera, you can talk via your mobile device and your voice will be heard on the speakers on the camera. 12. Alarm I/O Block: external alarms and sensors connection. 4 SHIELD SmartCam USER MANUAL Package Content What’s in the box IP camera * 1 CD * 1 5V Power Adapter * 1 Network Cable * 1 Antenna * 1 User Manual * 1 Bracket * 1 If any of the items are missing, please contact your reseller. Before You Install In order to install your camera successfully, please make sure you have the following: • An Internet connection • A wireless router connected to your broadband modem • A PC running Windows XP/ Vista/7/8 with Internet Explorer® 6 or higher and ActiveX® controls enabled 5 SHIELD SmartCam USER MANUAL Installation Guide (Wired Connection to the LAN) 1. Connect the power adapter to the camera’s DC in port and plug the power adapter to an electrical outlet. 2. Connect the camera’s Network port to any available LAN port on your wireless router with supplied Ethernet cable. 3. Connect the computer that you want to use to configure and/or access the camera to any available LAN port on the same wireless router. 6 SHIELD SmartCam USER MANUAL SHIELDeye Software Installation The camera is equipped with SHIELDeye software. SHIELDeye is an easy way for users to set up and control the camera that is connected on your home network from your computer. SHIELDeye allows you to connect multiple IP cameras, simultaneously record and playback videos you have just taken while your current recordings continue uninterrupted. A mobile app version of this software is also available for Android and iPhone smartphones. The SHIELDeye app can be downloaded for free from the Apple App Store or Google Play Store. See “Have an iPhone or Android Smartphone?” on page 12 for more details. Installing SHIELDeye on your Windows PC Follow the instructions below to install SHIELDeye onto your computer. Windows Users 1. Insert the CD into your PC and follow the on screen prompts to install the software. At this moment, we suggest you open the user manual for following setup. 2. If the prompt didn’t show up, you can access it from “My Computer” then select the amplayer file in the CD and run the software directly. 3. After installation, you should see the icon below appear on your desktop. You may click on it and start the SHIELDeye PC monitoring software to view and record from your camera and other functions. Default Username and Password Username: admin Password: 123456 The Way you start your IP camera 1. If you like to setup the detailed configuration of the IP camera from your computer; then we suggest you can start from P8 or, 2. You can easily start the IP camera with you smartphone from P14. Note: Startup via smartphone may not provide all the functions of the IP camera, but it’s easier and provides enough functions that users can view via their mobile devices. 7 SHIELD SmartCam USER MANUAL SHIELDeye LiveWatch UI When you launch SHIELDeye, you will see the screen below which is LiveWatch UI. When you finish installing the SHIELDeye, it allows you to connect multiple cameras up to 16, record videos, take snapshots, configure Wi-Fi settings, and use 2-way audio conversation remotely. If you feel confused with the button, you can move and hover your mouse cursor over the button to see a detailed explanation of it. Adding to the Camera List The camera contains a unique device ID (DID) code that’s embedded on a QR code sticker. The DID helps you to connect your PC or Smart phone to the camera in just a few simple steps using SHIELD’s Peer-to-Peer (P2P) network technology. Before you begin the following steps, look for the QR sticker on the bottom of the camera and write down the DID code. Click the button. This displays the Add Device Mode window (shown next page) 1. Search to Add: Select “Smart P2P” in Device Type and search. The name of the corresponding camera will appear. Enter the DID and password and save; the DID will then be saved in Camera List. 2. Add device manually: Select “Add device manually” to edit device information The item marked * must be filled out. (Suggest naming your camera for easy identification in the device alias field) 3. The camera you’ve just added will appear in the camera list in the LiveWatch UI. Since it’s the first camera added, it will occupy the number 1 row in the list. If more cameras are added, these cameras will be listed in the order they are added. 4. Double click on the camera name to start watching live video on the corresponding channel number. 8 SHIELD SmartCam USER MANUAL Select to add your devices. (Option 2 is suggested) 1 2 Select Smart P2P and Search 1 Enter the Account and Password. Default: admin, 123456 then Save 3 2 The camera you just added shows here. Make sure box with * are filled out and Save 9 SHIELD SmartCam USER MANUAL Watch Your Video and Settings Right click “Play Video” or Double click the camera to start the video. Basic Camera Controls You can control the image, audio, PTZ or others basic setting of your camera while you are watching the video via the functions below. Speaking Listening Snapshot Record and status display record manually; scheduled record Image Setting. You may setup the resolution of your image, video and something more. Note: If the video doesn’t run smoothly due to bandwidth, you may lower the resolution for better video. PTZ Control Cruise vertically, horizontally and center. 10 SHIELD SmartCam USER MANUAL Local Menu Play All Devices in the List Stop All Devices in the List Eyeplayer is playback of recording Multiple Image Window Device Log records video history Full Screen Mode System Setting Set up Trigger Alarm options Note: Trigger Alarm performs only motion detection and the Select where your videos are trigger alarm that are set up. stored, Play automatically after You can create a recording reboot, it will connect plan as following and save it automatically and play the with local record plan. cameras in device list after the software is rebooted. 11 SHIELD SmartCam USER MANUAL Camera WiFi Setup So, you have got the camera installed successfully and been able to view what you want via the network but you may also want to avoid the cable running down the hallway? You could setup your IP camera wirelessly. Before start your wireless setup, please check if your wireless router works, and remember to connect your router, desktop and the IP camera as page 6. There are 2 methods to build up your wireless connection. Note: Wireless viewing only works while the IP camera locates in your wireless network, while the connective signal is weak, the video may be disruptive. Please make sure your IP camera is in the wireless network or we suggest you to view with Ethernet cable connected. Connected via your PC with Web Interface To setup the wireless connectivity, you need to enter the Web Interface to finish your wireless setup and check the IP camera is connected with your wireless router wirelessly. To get into the Web Interface, you need to know the IP address of your IP camera. 1. You can find SearchTool.exe in the Installation CD. Double click it and you will see the image below. Click Search and you can see the IP address of your device in the device list, and write down the IP address for further setup. 2. Here is the IP address you need to take note of. Http Port 1. You can find SearchTool.exe in the CD. Double click to run, and click Search to get the IP address of the IP camera. 2. Open your Internet browser and enter the IP address of the camera to get into the Web Interface. Choose your language and browser to enter the Web Interface, and find the Advanced Settings for Network Configuration. ↓ 3. Enter the IP address you recorded in step 2 to your browser, and choose the model based on different browsers you use. Then enter the Advance Settings for Network Configuration. Note: If you changed the port# (80 as default), please be sure to add at the end in IP address you enter in IP address box. EX: 192.168.0.198:port# 12 SHIELD SmartCam USER MANUAL 3. After entering the Advanced Settings, you can find the Network Configuration in the left. Click on the Basic Network Settings, you can either choose DHCP or enter the Static IP connection which is applied to your wireless network and while using Static IP, enter the Http port as SearchTool shown for the IP camera. And then turn to Wireless LAN Settings, you need to select the WiFi you want to connect to your IP camera and enter the Share Key with the password of the WiFi you picked. Remember to click on Setup while you finish the settings. 4. Select types of your network configuration. If it’s DHCP, just enable it☑. As for Static IP, you need to enter the IP address provided by your ISP and Http port as SearchTool shown. 5. Select WiFi you want to connect to the IP camera, and enter Share Key as the password of the WiFi. After you finish the WiFi Settings, please wait for 90 seconds for system reboot. After system reboot, you may re-enter the Web-Interface and unplug the Ethernet cable to enjoy your wireless viewings. Notice: 1. When the device is connected by both WiFi and wired, it will connect to the wired network first. 2. If users enable DHCP to obtain IP address automatically, the IP address would change while users restart the router. It may cause failure of wireless viewing. We recommend users to use Static IP and DDNS settings to avoid it. 13 SHIELD SmartCam USER MANUAL Connect by iPhone or Android Smartphone Go to the Apple App Store or Google Play, search for SHIELDeye and download it for free and start watching live camera videos from your mobile device. Make sure you download the latest version of the SHIELDeye app. The following images are captured from the iOS version of the mobile app. You may notice a slight layout difference in the Android version of the app but otherwise they both behave in the same manner. Installing the SHIELDeye Smartphone App Go to Apple Store or Google Play Store. Search SHIELDeye Tap Free to download iOS 1. Tap 2. 3. APPLE Store Android 1. Tap Google Play Store Search SHIELDeye 2. Search SHIELDeye Tap to download 3. Tap to download Or Scan the QR code on the bottom of the IP camera to download the app with your smart phone. Running the SHIELDeye App 14 SHIELD SmartCam USER MANUAL SHIELDeye App Interface 1. Camera: View camera list and setting some functions of the camera. 2. Pictures: View the snapshots of the mobile phone at viewing video. 7 6 3. Records: View recording file in mobile phone, and in storage card of remote camera when you view video. 4. About: Check the relative version for the APP. 5 5. Add: Add new and more cameras. 6. Delete: Delete the camera you pick. Select from the list. 7. Grid: Multiple channels viewing (up to 4). 1 2 3 4 15 SHIELD SmartCam USER MANUAL SHIELDeye App Camera Setup Before you can actually start watching anything on your smartphone, you need to first register the camera with the app as following: Adding a Camera via Smartphone 3 methods to add cameras: (a) Search in LAN to add, (b) Scan ID to add a (c) Add manually 1. If Phone and IP camera are connected to the same Wi-Fi network, click search. Tap the DID of the camera found and finish the details as per steps 4 and 5. Note if you have more than one camera in your network you see more camera UIDs in this list, set each one up separately. 2. Phone and camera in different networks, simply tap Scan ID and use your smartphone’s camera to scan the QR code sticker you will find on the bottom of the camera. This automatically populates the DID box with the camera’s DID; then just follow steps 4 and 5 to finish off. 3. Or if you prefer to add it manually, tap in the boxes and type the camera’s DID in the DID box carefully. Note that the DID is case sensitive so make sure you b use the correct types of letters and number or it will fail to connect. 4. Enter the camera’s password (default is 123456 but we recommend you change this using the software on your PC as soon as possible). 5. Tap the Name box and we suggest you to name a unique name for the camera that can help you identify it easily. When you’re finished, tap back to the Camera List screen. QR Code Sample Limitations of SHIELDeye App - you can’t record videos and there is no split screen display. For these, you have to use the Windows software 16 SHIELD SmartCam USER MANUAL SHIELDeye App Introduction Tilt Cruise Snapshot Pan Cruise Record Listen PTZ setting Talk Contrast Flip Brightness Mirror Default Resolution Setting Quit Anamorphic Note: Clicking Default, Note: If the video lags, we the screen may return to suggest you to change the default. if the video is resolution to QVGA for distorted, please adjust smooth video. Click on VGA Contrast. to change it. 17 SHIELD SmartCam USER MANUAL Advanced Settings Advanced Setting WiFi Setting Enter to the following screen to setup the Advanced Setting. In WiFi Setting, you can search for available WiFi SSID automatically for the IP camera to connect to. User Setting Time Setting In User Setting, you can set username Click Time Setting, you can calibrate local and password of the camera. timezone of the camera, and then it will work at the timezone you set. 18 SHIELD SmartCam USER MANUAL Alarm Setting FTP Setting You can setup Motion Detect Armed, Click FTP Setting, you need to setup Alarm input Armed, IO Linkage on Alarm user information of FTP server in here and Alarmed Mail Notification. before you start it. Mail Setting In Mail Setting, you need to setup the email domain of sender and receiver in here before using mail alarm. SDCard Setting In SDCard Setting, you can get storage information of the camera at here. 19 SHIELD SmartCam USER MANUAL Accessing the Camera via Web Browser Open a web browser such as Internet Explorer (IE), Chrome, Firefox or Safari and enter the IP address of your camera in the address bar. Make sure your camera is connected to the network, otherwise nothing will show up. To find out the IP address of your camera, please use the Lsearch_en.exe in the CD to figure out the IP address. Log in using the current username and password of your camera (Default is admin / 123456). Next, select your viewing mode. Mode 1 for Internet Explorer and Mode 2 for Chrome, Firefox and Safari. Note that certain functions are only available in Internet Explorer. If you’re using IE and connecting to a camera for the first time, you will need to download and install a plug-in first. The IE browser plug-in is quite small and installation does not take long. Your operating system and/or virus protection program may ask you for permission to run the file. Select the relevant options available to complete installation. Restart your browser after installation. The LiveWatch UI The LiveWatch UI on the web browser is almost exactly the same as the main interface for the SHIELDeye software on the computer - it just looks slightly different but operates in the same manner with a few additional features such as vertical & horizontal patrolling and brightness & contrast adjustments. Note: Remember to disable ActiveX Filter or the video may not appear. You can listen, record videos, talk to or take photos in IE browsers with this IP camera. Note: IE browser is recommended, other browsers may not be supported. Click to listen the voice from the IP cam Click to record the videos Note: The default of the video recording is mute. If you want to record videos with voice, please click first. While you leave the browser, the recording will end. Press to take pictures. Press to say something via IP cam Note: Microphone must be plugged into the Sound input. Advanced Settings 20 SHIELD SmartCam USER MANUAL Setting up Email Alerts via Web Browser (1/2) When you camera detects some events, it can send alert and snapshots to your appointed email address. Please configure your email service details correctly and motion detection via camera’s web interface. Then click “Submit” to save these settings, and then you can click “Test” to check if the setting is successful. 1. Click at the bottom of the LiveWatch UI on the web browser to Advanced Settings. Configure Email 2. Click Mail Service Settings on the left navigation bar. 3. Enter your email account details into the appropriate fields. Sender: The email address that you want your camera to send alerts from. For example, [email protected] SMTP Server: Select the SMTP address of your email server from the dropdown list. If you want to use an email server other than the ones provided, manually enter it into the field. SMTP Port: The SMTP port of your email server. This field will automatically self-populate if you use any of the preset email servers. Need Authentication: If the SMTP server requires authentication, check this box and then enter the username (for example, [email protected]) and password for your email account. SSL: Whether the email server you’re using requires a secure link. If you’re not sure what settings to use, check with your email service provider. Receiver: The email address that your alerts will be sent to. You can specify up to four (4) different email recipients. Test: Click to send a test email to the “Receiver” email address specified above. Note: Your SMTP settings might fail due to different protocols in mail standard, hereby we suggest using gmail.com for mail server. 21 SHIELD SmartCam USER MANUAL Setting up Email Alerts via Web Browser (2/2) 4. When you have completed the email configuration, click the Setup button to save your settings. Enable Motion Detection, Email Notifications and Schedules 5. Now that your email account has been set up, it’s time to configure the motion detection settings of your camera. Click Alarm Service Settings on the left navigation bar. 6. Tick the Motion Detect Armed box to enable the motion detection function and then adjust the sensitivity of the motion detection. The lower the value, the more sensitive the motion detection will be. 7. Tick the Send Mail Notification When Alarm box. If you want a small snapshot to be included with each email alert, tick the Upload Image When Alarm box. You can also specify how frequently email alerts with snapshots are sent to you during a motion detection event via the Upload Interval (in seconds) field. 8. Tick the Time Schedule box to display a timetable showing a 24-hour timeline for each day of the week. Each box in the timeline represents 15 minutes in the 24-hour period. The timetable allows you to choose the specific times and days to receive email alerts. If you want to always receive email alerts, tick the Select All box. 9. To save the motion detection settings, click the Submit button. Note: Each time your update the firmware of the IP camera; please clear the Cookies in your browser as well. (IE Browser→Internet Options→Delete) 22 SHIELD SmartCam USER MANUAL Technical Support Details SHIELD Technical Support Global E-mail: [email protected] http://www.rosewill.com 23 SHIELD SmartCam USER MANUAL Appendix Connecting to WAN Connecting to WAN is the way for users who want to view by their desktops or notebooks. The settings will be complicated and differ from various wireless routers. If users only intend to view by smartphones or other mobile devices, we suggest users to follow P14 for mobile devices settings. If you want to visit IP Camera on desktop or laptop outside the local network, you must do port forwarding on your router. Get into your router settings by clicking default gateway in the address box. 2 1 1. Enter the advanced settings of your router, and click on Port Forwarding (or Port mapping/ Port Triggering) to enter virtual server? (For some routers, you can just choose Port Forwarding and start Step2 below.) 2. Please designate the Service Port and Internal Port the same as Http port of your IP camera. Then enter the IP Address of your IP camera to IP address box. Please refer to page12, you can find all the information via SearchTool.exe 3. Finish all the settings; you need to click Save to enable the settings. After saving the setting, you can visit the IP camera via WAN by xxx.xxx.xxx.xxx:Port# ( IP address: port#). Note: Different routers might have different interface displays, so the settings might be different. Please refer to the user manual of your router or consult with router manufacturer. 24