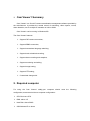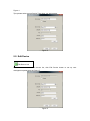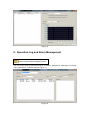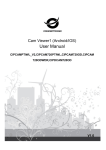
1
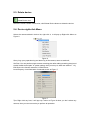
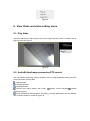
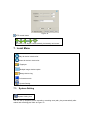
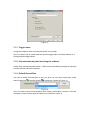
PC client Cam Viewer1 User Manual CIPCAMPTIWL_V2,CIPCAM720PTIWL,CIPCAM720OD,CIPCAM 720ODWDR,CIPDCAM720OD V1.0 Statement If the user manual doesn’t help you to resolve the problem, please contact us via our website for technical support. Notice 1、 Installation Environment Keep away from the places of high-temperature, heat sources and direct sunlight. Keep away from water and if wet, cut off the power immediately. Avoid using in a damp environment; the reference range for operation humidity is below 85%RH. Avoid using in too hot or too cold environments, the reference range for operation temperature is -10℃~ +50℃. Please install it horizontally or wall mount, avoid strenuous vibration and do not place other items on top of the unit. 2、 Transport and Handling Please handle the item with care. Do not use in areas around condensation. Please disconnect the item from the mains before moving. Notice: 1. Be careful not to damage the camera or subject it to strong impacts or shocks. 2. Do not touch the optical components for the image sensor, such as the lens, if necessary, please place a clean and moistened cloth with alcohol and wipe the dirt gently; When not in use, please place the dust cover on to the item to protect the image sensor. 3. Do not aim the camera directly into the sun or at other intense light sources that could affect the image quality, this will also shorten the service life for the image sensor. 4. Keep away from laser when it is working, otherwise the image sensor can be damaged. 5. If the equipment is not working properly, please contact the store or the service centre, do not disassemble or modify the equipment in any way. Index 1. 2. 3. 4. 5. 6. 7. 8. 9. Cam Viewer1 Summary......................................................................................................... 4 Required computer................................................................................................................. 4 Installing Cam Viewer1 .......................................................................................................... 5 Cam Viewer1 Application ...................................................................................................... 5 Device list menu ..................................................................................................................... 6 5.1. Add device ................................................................................................................. 6 5.1.1. Search to add device in LAN.................................................................... 6 5.1.2. Add device manually ................................................................................. 6 5.2. Edit Device ................................................................................................................. 7 5.3. Delete device .............................................................................................................. 8 5.4. Device right-click Menu............................................................................................. 8 View Video and video setting menu .................................................................................... 9 6.1. Play Video .................................................................................................................. 9 6.2. Audio&Video/Image parameters/PTZ control ........................................................... 9 Local Menu ............................................................................................................................ 10 7.1. System Setting .......................................................................................................... 10 7.1.1. Trigger alarm............................................................................................. 11 7.1.2. Play automatically after launching the software .................................. 11 7.1.3. Default Record Plan ................................................................................ 11 Operation Log and Alarm Management ............................................................................ 12 Play back recording and inquire recording file ................................................................. 13 1. Cam Viewer1 Summary Cam Viewer1 is a Cloud IP camera centralization management software provided by the manufacturer. It provides the central control of monitoring, video capture, record, alarm detection, etc for multiple IP cameras on LAN or WAN. Cam Viewer1 can be running in Windows OS. The Cam Viewer1 features: Support P2P camera connection; Support DDNS connection; Support international language switching; Support local scheduled recording; Support alarm recording and snapshot; Support monitoring and talking; Support image setting; Support PTZ setting; Customized change skin. 2. Required computer For using the Cam Viewer1 stably,your computer should meet the following configuration,recommend minimum computer configuration: CPU:Dual core CPU RAM: above 1G Hard Disk: above 500G OS:Windows XP or above Monitor resolution:≥1024*768 3. Installing Cam Viewer1 Obtain Cam Viewer1 installation software: Obtain the software from attached CD Download the software from our website Please create desktop shortcut icon when installing the Cam Viewer1. Desktop shortcut icon 4. Cam Viewer1 Application Double click the Cam Viewer1 desktop shortcut icon to run the Cam Viewer1, it shown as below. F E A B D C Figure 1 A:Camera list area B:View video and video setup area C:Local Menu setting area D:Camera operation log E:Search bar F: System language switching functions etc 5. Device list menu 5.1. Add device Add device icon Figure 2 5.1.1. Search to add device in LAN Select “Search to Add” to access search interface, and then select corresponding device type to search, fill in correct username and password in searched device and save as Figure 3. Tips: The device will be displayed in device list after saving. Figure 3 5.1.2. Add device manually Select “Add device manually” to access add interface, the item marked * must be filled as Figure 4 Tips: please select correct Device Type when you add camera. Figure 4 5.2. Edit Device Edit Device icon Select the camera added in device list, click Edit Device button to set up user management parameters as Figure 5. Figure 5 5.3. Delete device Delete Device icon Select the camera added in device list, click Delete Device button to delete the device. 5.4. Device right-click Menu Select the camera added in device list, right click it, it will pop up Right-click Menu as Figure 6. Figure 6 Query Log: query operation log and alarm log of the camera, same as section 8; Set Plan: You can perform single camera recording plan after adding recording plan.(need to add “default record plan” in system setting, then you set up it, detail see section 7.1.3); Edit Device: the function same as 5.2 Edit Device; Local Property: view information of selected device as Figure 7 Figure 7 Tips: Right click any here, it will pop up a menu as Figure 8 when you don’t select any camera, then you can use one key to perform all operation. Figure 8 6. View Video and video setting menu 6.1. Play Video Select the camera you want to play in device list, right click “Play Video” or double click to play the video as Figure 9. Figure 9 6.2. Audio&Video/Image parameters/PTZ control You can perform monitoring, talking, snapshot, record, image parameter setting and PTZ control etc when viewing video. Talking button; monitoring button; Snapshot button; Record and status display (two mode: scheduled record); indicate record manually, indicate Image Parameters Setting button, the setting of image parameters may be different due to camera model or series as Figure 10. Figure 10 PTZ control button Up, Down, Left, Right, cruise vertically, horizontally and center. 7. Local Menu Play all device in device list Close all device in device list Eyeplayer Multiple image window option Mange device Log Full screen mode System Setting 7.1. System Setting System Setting icon You can set up snapshot, alarm recording, recording save path, play automatically after reboot and recording plan here as Figure 11. Figure 11 7.1.1. Trigger alarm It supports snapshot, alarm recording and alarm voice prompt Tips: You need to set up motion detection and the trigger alarm of camera website, so it will be performed trigger alarm. 7.1.2. Play automatically after launching the software Ticked “Play automatically after reboot”, it will connect automatically and play the cameras in device list after reboot the software. 7.1.3. Default Record Plan You need to create recording plan to set up it when you use local record plan; record status indicate as record manually, record plan, shown as Figure 12. Figure 12 Tips: You need to select record property when creating record plan, consider if cover the recording or stop recording after the space is full, shown as Figure 13 Figure 13 8. Operation Log and Alarm Management Device log and alarm manage log icon You can query work log and alarm log for a camera, example for, what time is it played video, what time is it closed video as Figure 14. Figure 14 9. Play back recording and inquire recording file Play back recording and inquire recording file icon Launch Eyeplayer, the user can check recording file of each camera by recording path as Figure 15 Figure 15