1
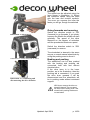
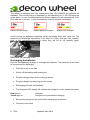
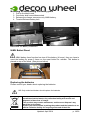
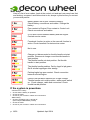
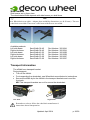
Updated: April 2014 p. 2/26 Preface Many thanks for choosing the e-walk braking and pushing aid. The e-walk’s well thought-out design, functionality and quality will not disappoint you. To get the most out of the e-walk, please read the instructions for use carefully before beginning to use it. These instructions contain important safety information and valuable tips on correct use and care of the e-walk. The e-walk helps the person accompanying the wheelchair user to brake and push, and is operated exclusively by the accompanying person. If you have any questions, please contact the dealer from whom you purchased your e-walk and who adapted it to your wheelchair. The dealer will also be happy to provide information about our other products. p. 3/26 Updated: April 2014 Table of contents Preface........................................................................................................................................................................................ 3 Table of contents 4 Safety information 5 Signs and symbols ........................................................................................................................................................... 5 General safety information .............................................................................................................................................. 5 Information on electromagnetic compliance (EMC) 6 General information 7 Intended area of use ......................................................................................................................................................... 7 Indication/Contraindication ............................................................................................................................................. 7 Responsibility .................................................................................................................................................................. 7 Declaration of conformity ................................................................................................................................................ 7 Identification of the eWalk .............................................................................................................................................. 7 Delivery check ................................................................................................................................................................. 8 Scope of delivery ............................................................................................................................................................. 8 Packaging and freight ...................................................................................................................................................... 8 Fitting 10 Fitting the adapter plates ................................................................................................................................................ 10 Adjusting the seat width ................................................................................................................................................ 11 Attachment to the wheelchair ........................................................................................................................................ 12 Removal from the wheelchair ........................................................................................................................................ 13 Extended handles 13 Alternative assembly of the control unit 14 Using the controller 15 Controller ....................................................................................................................................................................... 15 Fitting the controller ...................................................................................................................................................... 15 Switching ON and OFF ................................................................................................................................................. 15 Selecting the speed ........................................................................................................................................................ 15 Driving........................................................................................................................................................................... 16 Going forwards and reversing ........................................................................................................................................ 16 Braking and pushing ...................................................................................................................................................... 16 Batteries 17 Recharging the batteries................................................................................................................................................. 17 Mounting or dismounting the battery pack 18 NiMH Batteri Reset 18 Replacing the batteries ................................................................................................................................................... 18 Self help ................................................................................................................................................................................... 19 If the system is powerless. 19 Side beams ............................................................................................................................................................................... 20 Transport information .............................................................................................................................................................. 20 Technical data 21 Care instructions for users 22 Cleaning......................................................................................................................................................................... 22 User inspections............................................................................................................................................................. 22 Maintenance instructions for dealers Repairs Disposal Passing the unit on Guarantee Briefing Own notes 22 22 23 23 23 24 25 Updated: April 2014 p. 4/26 Safety information Signs and symbols NB: Denotes information of particular relevance to safety. Observe instructions for use! Important! Denotes particularly useful information for the particular context. Transport bracket for a secure transportation of the eWalk. Hazardous Goods! Select particularly useful information in the respective context. General safety information Before use, always check that all attached parts are properly secured and that the adaptation to the wheelchair is safe. To avoid falls and dangerous situations you should initially learn to use your ewalk on an even surface allowing good visibility. It is absolutely necessary that the operator be briefed on the handling and given an explanation of all functions. The accompanying person must be mentally and physically able to operate the braking and pushing aid safely and without endangering the wheelchair occupant, him- or herself or third parties. A record must be kept of the briefing, and the dealer and the user must sign it. The manufacturer's specifications for the wheelchair, such as air pressure, maximum incline and maximum user load, must be observed. Only authorised dealers may attach the mounting for the e-walk. Ensure that the mounting fits the model of wheelchair. The instructions for use of your wheelchair must be adhered to. When using the braking and pushing aid, the maximum user load for your wheelchair must not be exceeded. Anti-tilt wheels are advisable for inclines of 7° and greater. The e-walk may only be operated by an accompanying person. The wheelchair user must under no circumstances use the e-walk to power the wheelchair. The e-walk must not be used for uphill or downhill slopes of over 10%. Uphill and downhill slopes must under no circumstances be tackled in pushing mode (disconnected negative drive). Ledges and pavement edges are to be handled with the e-walk switched off and disconnected. Only use your e-walk on a smooth, firm surface. If possible charge your e-walk's batteries after each trip. When eWalk is mounted onto a wheelchair it should be in a condition of a new eWalk. Remember that a wheelchair is not built for use of an engine and this because it is increase the load of the wheelchair. In particular, care should be taken when the road surface is tilted, and where the ground is uneven or soft. Something that will have greater strain is the link wheels. It reduces the load on these to increase the diameter size of the link wheels. The link wheels shall have a minimum diameter of 150 mm. More advanced wheelchairs with seat/back tilt functions can sometimes not be exploited to the full and tilt functions can be hindered by the eWalk assembly. Caution so that these features will not be damaged by the eWalk assembly. NB: Any misuse of the e-walk may cause injury to the wheelchair occupant, the accompanying person or third parties. p. 5/26 Updated: April 2014 Information on electromagnetic compliance (EMC) Since electromagnetic disturbances become stronger the closer you get to emitting aerial, electromagnetic fields from portable radio sources are of particular significance. It is possible for high levels of electromagnetic energy to accidentally come too close to a control system whilst these devices are in use. This can affect the braking and pushing aid's movement or braking, so please observe the following recommendations in order to avoid adversely affecting the functioning of your braking and pushing aid: The following warnings should reduce the risk of accidentally triggering braking or forward motion of the braking and pushing aid, which could lead to serious injury. No use of portable transmitting/receiving devices such as CB radios or other portable devices in operational mode, e.g. mobile phones, whilst you’re braking and pushing aid is switched on. Beware of nearby transmitters, e.g. radio and TV transmitters, and try to avoid them. Should the brakes accidentally be applied or should the eWalk accidentally move forwards, and then switch it off as soon as it is safe to do so. Note that adding accessories and components or modifying the braking and pushing aid may make it more liable to react to electromagnetic waves. Tell your dealer about any unintentional movements and braking, and determine whether there are any sources of electromagnetic radio disturbance nearby. NB: The e-walk itself can also cause disturbances as a result of electromagnetic fields. If you observe any such disturbances, remove the e-walk from operation and tell your dealer or notify Decon Wheel directly. Updated: April 2014 p. 6/26 General information Intended area of use The eWalk is intended as a supplementary drive for manual wheelchairs, and for indoor and outdoor use. The eWalk is intended exclusively for the conveyance of others, that is to say, to help an accompanying person push and brake a wheelchair with occupant. Indication/Contraindication The eWalk helps an accompanying person push and brake the wheelchair, and facilitates longer trips. Use of the eWalk is advisable if the wheelchair user cannot propel him- or herself and the accompanying person is not strong enough to push the wheelchair. The accompanying person must be physically and mentally able to operate the eWalk safely in all situations. Responsibility As the manufacturer, we are only responsible for the safety, reliability and suitability of our products if modifications, additions, repairs and maintenance are carried out solely by persons we have authorised and use of the braking and pushing aid is in accordance with all the instructions for use. Declaration of conformity As the manufacturer of the product Decon Wheel AB declares that the eWalk braking and pushing aid fully meets the requirements of EU Council Directive 93/42. Identification of the eWalk Identification sticker is placed on top of the engine plate, see pictures below. Model Serial Number Production year + month Illustration 1: Identification sticker p. 7/26 Updated: April 2014 Product and delivery overview Delivery check The eWalk braking and pushing aid is supplied by your dealer ready for operation. This includes: Adapter mounted on wheelchair, ready for attachment of the eWalk Installation of the battery pack Attachment of the controller to the right- or left-hand side of the wheelchair's pushing arm Illustration 2: Product overview Scope of delivery The scope of standard delivery includes: 1. 2. 3. 4. 5. 6. 7. Battery pack Controller Drive unit Charger Extended handle Instructions for Use Adapter for attachment to wheelchair Packaging and freight Please contact your dealer or contact Decon Wheel directly, if the eWalk needs to be sent separately (for repair or return). We will send you a freight container or will collect the device ourselves. Updated: April 2014 p. 8/26 Adapter plate Illustration 3: Product description p. 9/26 Updated: April 2014 Fitting Fitting the adapter plates Since you can attach the eWalk to all common types of wheelchair using different adapter plates, the adapter plate attached to your wheelchair may differ from the one shown in these instructions. To make the eWalk function with your wheelchair, the appropriate adapter plates must be attached. If there are drill holes in the wheelchair frame, these must be used to attach the adapter. If there are none, clamp adapters must be used. This makes it possible to remove the eWalk from the wheelchair completely and without leaving anything behind, and if necessary use it again with another wheelchair. NB: Only authorised dealers should fit adapter plates and carry out adjustments. Adapter plate Illustration 4: Adapter plate Important! Check that the adapter plates are securely seated every week. Contact your specialist supplier if any screw connections have worked loose. The drive lock and/or the lever to activate the braking and pushing aid will be fitted and adjusted by your dealer. Updated: April 2014 p. 10/26 Adjusting the seat width The eWalk braking and pushing aid can easily be adjusted to wheelchairs of various widths. Please make sure the adapter plates are correctly fitted for your wheelchair. This will allow the eWalk to be used by various wheelchair users. Required tool: SW4 Allen key Illustration 5: Each of the two side sections is attached using two grub screws. First unscrew the screws on the two side sections Illustration 6: Unscrew grub screws Push the side sections in so that you can push the drive unit into a central position between the adapter plates. Pull the side sections outwards so that they fit closely against the adapter plates. Tighten the grub screws again so that the side sections are secured. Illustration 7: Adjust the side sections p. 11/26 Updated: April 2014 Attachment to the wheelchair Connection of the braking and pushing aid to the wheelchair is simple. Proceed as follows: NB! Activate the wheelchair's parking brakes. 1. Assemble the control unit. 2. Lift up and push the eWalk onto the wheelchair from behind and make sure that you lift over the rear pins of the bracket. 3. Keep pushing until you ensuring that the front recesses in the side sections of the eWalk fit snugly to the adapter plates' front attachment pins. 4. Lower the eWalk onto the rear pins of the bracket until you hear a locking click. 5. Initially set the drive to pushing mode by using the handle. See picture below Attaching the eWalk Illustration 8: Sticker of Attaching the eWalk NB: The connecting cables must not restrict the accompanying person's freedom of movement. Also avoid bending or jamming them in. Updated: April 2014 p. 12/26 Removal from the wheelchair Removing the eWalk is straightforward and easy. NB! Activate the wheelchair's parking brakes. 1. Pull up the handle until the drive wheels are up. NB! Beware of the clip risk! 2. Activate one of the yellow locking lever, by pressing the lever with the feet thereby releasing the locking device on the adapter plates. 3. Keep the feet on lever, while you lift up the eWalk. 4. Now pull the eWalk from the guide. 5. Release the controller from the wheelchair. Illustration 9: Sticker of Removing the e-walk Extended handles Illustration 10: Assembly of Extended handles p. 13/26 Updated: April 2014 Alternative assembly of the control unit Illustration 11: Assemble the control unit on the handle. Updated: April 2014 p. 14/26 Using the controller Controller The eWalk is equipped with a programmable controller. Acceleration, deceleration and speed can be adjusted, thereby changing the braking and driving properties. NB! Only your dealer or Decon Wheel in consultation with your doctor or therapist may change the programming. Warning! You should not open the control unit, because it is calibrated with precision. If you do so it may cause mail functions, which are not included in warranty! Fitting the controller Illustration 12: Fitting the controller The controller can be fitted either to the left-hand or the right-hand pushing arm. To do so, push the controller on to the tube of the pushing arm and tighten the attaching screw underneath. Make sure the controller is securely attached and does not wobble. To remove the controller, simply unscrew the attaching screw. Switching ON and OFF Switch on using the toggle switch (arrow) in order to drive using the ewalk. The battery readout shows the ewalk's battery level and operational status. Selecting the speed Illustration 13: Toggle switch Illustration 14: Speed knob p. 15/26 The maximum speed can be set independently of the throttle. The maximum speed (5.5 km/h) is reached by turning the knob clockwise to the maximum setting to the right (hare symbol) and moving the throttle as far as it will go. The maximum speed can be reduced by turning the knob anticlockwise (tortoise symbol), maximum speed will not be exceeded. The motor will automatically brake if you release the lever. Updated: April 2014 Driving The speed can be adjusted using the lever shown in Illustration 11. Select the maximum speed using the knob with the hare and tortoise symbols. The more you squeeze the lever the faster you will go, though the selected Going forwards and reversing Switch the direction switch to 'FW' (forwards) to go forwards. If you slowly squeeze the throttle the eWalk will start gradually. The speed of the drive depends on the degree of activation and the preselected maximum speed. Illustration 1: Speed lever Switch the direction switch to 'RW' (rearwards) to reverse. The wheelchair is steered in the same way as a normal manual wheelchair by using the pushing arms to direct it. Illustration 2: Select direction of travel Illustration 17: Connecting and disconnecting the drive function Braking and pushing The wheelchair can be also pushed with the braking and pushing aid connected, both with and without electrical drive. If the drive lever is in the lower position, as in the illustration, then the pushing aid is connected. If you push the drive lever upwards it will be disconnected and the wheelchair will be in pushing mode without motorised support. NB: Never remove the drive on downhill slopes! The occupant will be at risk of falling over if the wheelchair's parking brakes are not activated. Updated: April 2014 p. 16/26 Batteries The eWalk is equipped with two maintenance-free 12V/12AhC20 gel batteries as standard. The current charge is displayed on the operating unit. If the LED bars are in the green (+) area, the batteries have sufficient capacity for an extended trip. If the LED bars are in the red (–) area, the batteries must be charged immediately. Battery almost empty Battery partially charged Battery fully charged Avoid running the batteries completely flat by recharging them after each use. The batteries can discharge themselves if not used for a time, and lose their capacity. After a few recharging/discharging cycles they will be at full capacity again. Illustration 18: Charging socket Recharging the batteries Use the accompanying charger to recharge the batteries. The batteries do not have to be removed for recharging. Push the cover to the side. Switch off the braking and pushing aid Plug the charger plug into the recharge socket Plug the charger's mains plug into the socket Recharging will start automatically The charger's LED display will indicate the charger's current operational status Red light on: Yellow light on: Charging Charger not connected/not charging Remove the plug from the socket after recharging the batteries Close the cover back p. 17/26 Updated: April 2014 Mounting or dismounting the battery pack 1. 2. 3. 4. Pull up the black hood. Connector shall mount/dismounted. Release the charger connector only NiMH battery. Tension/Release battery belt. Illustration 19: Battery connectors NiMH Batteri Reset When NiMH battery timer function has turn off the battery (4 hours), then you have to reset the battery by press 2 times on the reset button for activate. The button is placed on top of the hood. (See picture bellow) Illustration 20: NiMH Batteri Reset Replacing the batteries Please consult your dealer about replacing the batteries. NB: Only authorised dealers should replace the batteries. NB: EU directive WEEE 2002/96/CE states that battery chargers constitute electrical waste. Any collection facility will receive and disposed of them free of charge. This product may contain substances, and incorrect disposal may harm the environment. Protect your environment by taking the product and the batteries to an official collection facility for recycling at the end of their life. Updated: April 2014 p. 18/26 Self help Here is a list of error codes. Look at the control unit and see how many bars that are flashing, compare it and follow what to do, always try this before you contact your service partner. Battery power low or poor contact to battery. Check battery connections and cables / Charge the battery. Poor contact to Engine/ Poor contact to Control unit Check connections and cables It is a short circuit between Battery and the engine. Contact service center. Freewheel function is active or the manuell function is active. Check handles/ Contact service center. Not in use. Charger not disconnected or throttle handle not start position. Disconnect charger or set throttle handle in start position. The throttle handle not start position. Set throttle handle in start position. The throttle handle problem. Det är något fel på gasen. Se till att alla kopplingar sitter stadigt. Parking brake has poor contact. Check connection between sDrive/Engine. Control unit had been exposed for to high voltage/ Throttle handle not in start position, when power switch on. Check charger, cable and connectors. Check throttle handle position. If the system is powerless. 4 Lead/LiFePO battery Check that the battery is uploaded. Check the fuses. Check for poor contact in cables and connections. NiMH battery Check if the battery only is turned off. (See Chapter NiMH Battery Reset) Check the fuses. Check for poor contact in cables and connections. p. 19/26 Updated: April 2014 Side beams Side beams are in three sizes. The wheelchairs Width depends with side beams you shall have. NB! Ex. Wheelchairs seat width – Adapter plate scalability dimensions (ca: 40-50 mm) = The new wheelchair seat width. Those now a side beam with the new seat width. Left side beam Available products: Left side beam Right side beam Left side beam Right side beam Left side beam Right side beam Right side beam Seat Width 38-45 Seat Width 38-45 Seat Width 45-53 Seat Width 45-53 Seat Width 53-60 Seat Width 53-60 Part Number: 350160A Part Number: 350155A Part Number: 350160B Part Number: 350155B Part Number: 350160C Part Number: 350155C Transport information The eWalk have transport bracket. During transport: Turn off the eWalk. For transporting the wheelchair, see Wheelchair manufacturer’s instructions. Secure the eWalk by tie the eWalk in the transport brackets and round the front axle. NB! This transport brackets are not for secure the wheelchair. Left side Right side Remember to always follow the wheelchair manufacturer’s instructions about transportation. Updated: April 2014 p. 20/26 Technical data Controller Motor Battery Charger Frame Dimensions / Weight Total length Total width Total height Width of wheelchair frame Weight of drive unit Weight of batteries Tyres Driving properties Forward speed Reverse speed Range S-drive PG 200W Lead 24 V / 12 AH NiMH 24 V / 9.6 AH LiFePO4 24V / 15Ah Mascot Steel, protected against corrosion through lacquering 474 mm 316 mm 362 mm 38-60 cm 15,4 kg Lead 8 kg NiMH 2.5 kg LiFePO4 3,95 kg Solid rubber Max. gradient Max. obstacle height 5.5 km/h 2.6 km/h 16 km lead 19 km NiMH 22 km LiFePO4 8° 6 cm User load 150 kg p. 21/26 Updated: April 2014 Care instructions for users Use a standard mild cleaning agent to clean the e-walk. Standard surface disinfectants are suitable for disinfection. Cleaning To clean the e-walk, switch it off and disconnect it from the wheelchair. Clean the drive wheels using compressed air or a dry plastic brush. Wipe the frame and operating unit of the drive unit clean with a damp cloth, using a mild cleaning agent it they are very dirty. Disinfect the operating unit using a standard surface disinfectant. NB: Make sure the electrical and electronic components do not come into contact with water! Do not use high-pressure or steam cleaners! User inspections Before starting each trip check that the tyres are intact. Once a month check the tyre tread, which should be at least 1 mm. Defective or worn tyres must be replaced by a dealer. Maintenance instructions for dealers We recommend that a dealer inspect the braking and pushing aid at least once a year. If the braking and pushing aid is faulty or defective, it should immediately be repaired by a dealer. Repairs Please contact your dealer or Decon Wheel directly for repairs and to order spare parts. Settings and repairs are to be left to the authorised dealer, who will be given detailed instructions and tool lists on request. Updated: April 2014 p. 22/26 Disposal Please contact your dealer when yours braking and pushing aid is no longer in use and is to be disposed of. If you wish to undertake disposal yourself, please contact the local waste-disposal company in accordance with local waste-disposal regulations. Passing the unit on The eWalk has been designed for reuse. When passing on the braking and pushing aid, please remember to give the new user all the technical documentation necessary for safe handling. The product must be cleaned by a dealer and, if necessary, disinfected and completely checked. Guarantee The guarantee covers all product defects that can be proven to be attributable to material or manufacturing faults. The guarantee and product liability do not cover damage caused by natural wear, negligence, deliberate actions and/or improper operation or use. The same applies to the exchange or replacement of original components with third-party parts or copies of the original parts and the use of unsuitable cleaning agents, lubricant oils and/or greases. This guarantee expires 24 months after delivery of the braking and pushing aid. We guarantee a battery life of 12 months. p. 23/26 Updated: April 2014 Briefing Briefing by the dealer will make for safe use of the product. Please have all functions and usage explained, and the first time carry them out under the supervision of a dealer. Note the following points during the briefing Connecting the braking and pushing aid Removing the braking and pushing aid Connecting the operating unit Functions of the operating unit Driving forwards and reversing Driving uphill and downhill Pushing operation Recharging Reference to the contents of the instructions for use Date / Signature / Stamp Dealer Signature Accompanying person Please use for copies if several people are to be given a briefing. Updated: April 2014 p. 24/26 Own notes p. 25/26 Updated: April 2014 Guarantee Model: SN: Dealer: __________________________ Date and stamp Decon Wheel AB Södra Ekeryd 115 SE-31493 Hyltebruk, SWEDEN Tel.: +46 (0)345-40880 Fax: +46 (0)345-40895 [email protected] www.decon.se Updated: April 2014 p. 26/26