1
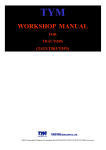
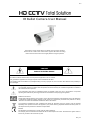
671z IR Bullet Camera User Manual The product image shown above may differ from the actual product. Please use this camera with a DVR which supports HD video recording. Please read the instructions thoroughly before using the product. CAUTION RISK OF ELECTRIC SHOCK CAUTION: To reduce the risk of electric shock, do not expose this apparatus to rain or moisture. Only operate this apparatus from the type of power source indicated on the label. The company shall not be liable for any damages arising out of any improper use, even if we have been advised of the possibility of such damages. The lightning flash with arrowhead symbol, within an equilateral triangle, is intended to alert the user to the presence of uninsulated “dangerous voltage” within the product’s enclosure that may be of sufficient magnitude to constitute a risk of electric shock to persons. This exclamation point within an equilateral triangle is intended to alert the user to the presence of important operating and maintenance (servicing) instructions in the literature accompanying the appliance. ROHS Announcement All lead-free products offered by the company comply with the requirements of the European law on the Restriction of Hazardous Substances (RoHS) directive, which means our manufacture processes and products are strictly “lead-free” and without the hazardous substances cited in the directive. The crossed-out wheeled bin mark symbolizes that within the European Union the product must be collected separately at the product end-of-life. This applies to your product and any peripherals marked with this symbol. Do not dispose of these products as unsorted municipal waste. CE Mark This apparatus is manufactured to comply with the radio interference. The company does not warrant that this manual will be uninterrupted or error-free. We reserve the right to revise or remove any content in this manual at any time. t553_V0.9 FEATURES 1. 2. 3. 4. 5. 6. 7. 1/2.8” CMOS Sensor with 1080P video output Motorized zoom lens equipped to allow focal length and focus adjustment remotely via DVR External alarm I/O device connection WDR to increase image recognizability in overexposure and dark areas Solid Light series featuring better overexposure prevention (Advanced Smart Light Control), automatic adjustment of image brightness, and longer lifetime of LEDs IR effective distance up to 30 meters for 24-hour surveillance IP66 for weather-proof application PACKAGE CONTENT IR camera Sun shield User manual Accessory kit DIMENSIONS* *Dimensional Tolerance: ± 5mm SPECIFICATIONS* Pick-up Element Number of Pixels Video Frame Rate Min. Illumination S/N Ratio Shutter Speed Lens Lens Angle IR LED IR Effective Distance IR Shift Smart Light Control IRIS Mode White Balance AGC WDR External alarm I/O IP Rating Operating Temperature Video Output Power Source (±10%) Optional Peripherals 1/2.8" SONY CMOS image sensor 1936(H) × 1096(V) 1080P@30fps / 1080P@25fps 0.1 Lux / F1.4(Wide)~F2.8(Tele), 0 Lux (IR LED ON) More than 48dB (AGC OFF) 1/10,000 ~ 1/7.5 (Slow shutter) f2.8 ~ 12mm / F1.4 ~ F2.8 Wide: 103° (Horizontal) / 54° (Vertical) / 122° (Diagonal) Tele: 31° (Horizontal) / 17° (Vertical) / 36° (Diagonal) 2 units Default mode: up to 20 meters IR enhanced mode: up to 30 meters YES YES AES ATW Auto YES (120dB) YES (1 input / 1 output) IP66 -20℃ ~ 50℃ 1.0 Vp-p composite, 75Ω DC12V / 1A Ceiling-mount bracket (AVM552C-BBKT) / Connector (BULLETCON1) * The specifications are subject to change without notice. INSTALLATION Step1: Locate where you want to install this camera, and fasten the camera to the ceiling or wall. NOTE: It’s recommended to slightly loosen the screw on the bracket as indicated below to move the camera down a little bit. It's easier for bracket installation to the ceiling or wall. Slightly loosen Step2: Adjust the viewing angle of the camera, as indicated below. Vertical Horizontal Slightly loosen Rotate Slightly loosen Slightly loosen Step3: Slide the sun shield to the camera, and fasten it with the supplied screw. Step4: Connect the camera to a DVR which supports HD recording, and power on the camera. NOTE: Please use the correct power adaptor, DC12V (regulated), to operate this unit. The power tolerance of this unit is DC12V ± 10%. Over maximum DC 12V power input will damage this unit. NOTE: To ensure the camera has sufficient protection against moisture, an extra waterproof measure, such as by using an insulating tape, must be used to cover the power and video connectors after connection. Step5: Follow the steps in the next section “ADJUST FOCAL LENGTH & FOCUS” if necessary. NOTE: In order to make the best performance, please adjust the angle of IR shift up and down within 30 degree respectively, left and right within 15 degree respectively. FOCAL LENGTH & FOCUS ADJUSTMENT This camera supports remote focal length and focal adjustment remotely from our HD CCTV DVR. On the DVR live view, click the channel which connects this camera to display in the full screen mode, and select to show the functions: / / / Zoom in / out max Click to zoom in on the image to the largest / zoom out on the image to its original size. Zoom in / out Click to zoom in / out the image. Focus near / far Click to adjust the focus of the image. This function is used to memorize the focus parameters you’ve made after Manual Focus you use / / / to manually adjust the focal length and focus. The next time when you move to the same focal length, the camera will use the parameters as the ones for Auto Focus. Auto Focus Click to automatically adjust the focus of the camera. The, go to “ADVANCED CONFIG” “DCCS”, and choose “ANGLE OF VIEW” for final calibration. For details, please refer to the next section “CAMERA PARAMETERS”. CAMERA PARAMETERS On the DVR, right-click to show the main menu, and go to “ADVANCED CONFIG” “DCCS”. In “DCCS”, select the channel which connects this camera, and click “SETUP” to enter the menu of camera parameters. ADVANCED CONFIG CAMERA DETECTION ALERT NETWORK DISPLAY RECORD DCCS NOTIFY MULTICASTING CH1 MENU CH2 CH3 CH4 SETUP DEVICE AVT553 CONNECTION OK EXIT Item Description BRIGHTNESS Click the current value to manually adjust the brightness of the image. The higher the value, the brighter the image. CONTRAST Click the current value to manually adjust the contrast of the image. The higher the value, the higher the contrast ratio. HUE Click the current value to manually adjust the hue of the image. SATURATION Click the current value to manually adjust the saturation of the image. The higher the value, the more saturated the image. WHITE BALANCE Process the current image to retain color balance over a color temperature range. The options are: Auto, 2500K, 3200K, 4200K, 5800K & 9500K. SHARPNESS Sharpness enhances the clarity of image detail by adjusting the aperture and sharpening the edges in the pictures. Click the current value to manually adjust the sharpness of the image. The higher the value, the sharper the image. SLOW SHUTTER Slow shutter is used to increase the exposure time to get clearer image, for example, at night. The options are: AUTO, 1/15 and 1/6. MIRROR Select “ON” to rotate the images horizontally based on your installation situation when necessary. FLIP Select “ON” to rotate the image 180° when necessary. DENOISE Click and drag the slider to adjust the level from 0 ~ 10 to decrease the noise shown in the dark environment. EXPOSURE VALUE Drag the slider to adjust the exposure level from 0 ~ 4. WIDE DYNAMIC RANGE Wide Dynamic Range (WDR) is used when users need to increase image recognizability in overexposure and dark areas. The options are: LOW / MIDDLE / HIGH / OFF FIXED SHUTTER Shutter Speed is a function that can adjust the duration of the electronic shutter to produce optimum image quality. Select the shutter speed suitable for your environment. FOCUS MODE Select the default focus mode when you’re adjusting the focal length and focus as described in the previous section of “FOCAL LENGTH & FOCUS ADJUSTMENT”. Choose “AUTO” to always automatically adjust the focus first when the focal length is changed; choose “MANUAL” to allow manually focus adjustment first when the focal length is changed. DEFOG Select “ON” to enable the defog function in poor weather conditions such as fog, smog or smoke. The captured image can be improved. ANGLE OF VIEW This function is used to slightly calibrate the viewing angle when the focal length and focus adjustment is completed. Select “DOWN” if your camera lens is facing down; select “UP” if your camera lens is facing up. IR CONTROL Select “AUTO” to automatically enable IR LEDs at night or in the dark environment, or “OFF” to disable this function. IR INTENSITY This function is used to enhance IR LEDs performance for longer projection distance. IR TURN ON LEVEL Select the level for IR light to activate. 0 ~ 20 IR EXTEND TIME Configure from 0 ~ 60 seconds to delay the switch of the IR mode at night, or select “0” to disable this function. This is used for the environment where the light condition may change suddenly and usually last for a short time, for example, the entrance of a parking lot. It may cause the day & night mode switching constantly and damage the camera. With this function, the camera will delay the mode switch at night since the light change is temporary and unnecessary to pay attention. RESET DEFAULT Click to reset all camera settings to their default values. REBOOT THE SYSTEM Click to reboot the camera if necessary.