Transcript
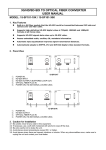
SATELLITE FINDER(SF101)
USER’S MANUAL
Safety requirements:
To benefit as much as possible from your satellite finder, please pay attention to the following:
1. Unit must be protected against humidity.
2. Unit should not be built-in between antenna and receiver permanently.
Advance Plus Co., Ltd.
3. Setting screw not to be over wound or broken.
4. Our general recommendation: always remember there is the risk of falling when mounting the device on your
roof, so please pay attention when installing components on your roof.
Operation:
1. Connetion: According to the connecting plan. The green LED (power) glows when the satellite finder is
supplied by the receiver. Turn the mounted setting screw to the left side stop on the top of the satellite finder (for
better insulation the setting screw is made of plastic and might thus break when treated too roughly). Your satellite
finder is now being ready for use.
2. Presetting the unit: The satellite antenna has to be oriented to the ground and the setting screw turned to the
right side until the first red LEDs start glowing. This way your satellite finder has got its optimum sensitivity.
3. Coarse adjustment of the antenna: Orientation depends on the geographic location of your place of residence.
In case you live in Central Europe, this means that-with excellent reception being desired-the antenna must be
mounted at a place where you can see the sun uncovered at midday. If the antenna has a vertical angular
adjustment,adjust it to about 27℃ to 36℃; with no angular adjustment, hold it almost vertical,but slightly upwards.
Now just turn the antenna to the south and from that position slightly to the east(i.e. to the left). For coarse
adjustment it could also be helpful to look at some already-mounted antennae in your neighbourhood. If you are
living in another European country, you will get informed about the parameters of coarse adjustment right at your
place.
4. Fine adjustment: Slowly move the antenna to the left and to the right till a glow of red LEDs is
recognizable(simultaneously the accoustic signal gets higher). If the antenna/LNB comination has a sufficient
sensitivity, this will happen twice; in rather western locations with EUTELSAT, and further eastward with ASTRA.
Now you can select the satellite; when the highest possible LED reaction has been reached, move the antenna up
Advance Plus Co., Ltd.
and down till a maximum number of LEDs are glowing(also till the highest accoustic signal is heard)-that maximum
is dependent on the antenna/LNB combination. When in a certain position all LEDs glow, the sensitivity can as
well be reduced by turning the setting screw to the left side. This ensures that the maximum is clearly recognized.
Finally, the antenna is to be fixed in the maximum position and checked once again.
5. advice to you: If TV reception should deteriorate in the course of time, it is recommendable to examine the
satellite system’s orientation, since the antenna adjustment might change due to certain weather conditions. If
image quality can by no means be improved, the reason will most probably lie somewhere else; you should then
ask your supplier.
Connecting plan:
S
N
SAT-Finder
Receiver