1
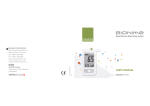
Table of Contents What is GlucoAlpha 3 in 1 system for?....................................................................................3 Important Information...........................................................................................................4 Items in the Package..................................................................................................................6 Items Need to be Purchased Separately.....................................................................................7 Getting to Know GlucoAlpha 3 in 1 Blood Glucose/Cholesterol/Uric Acid Multi-Function Monitoring System..............................................................................................8 Test Strips............................................................................................................................9 Setting Up Your GlucoAlpha 3 in 1 Multi-Function Monitoring System..................................10 Setting Date and Time........................................................................................................10 Checking the Unit of Measurement....................................................................................10 The Batteries Installation...................................................................................................11 Using Check Strip to Check the Meter................................................................................12 Control Check with Glucose/Cholesterol/Uric Acid Control Solutions..................................13 When to Run a Control Check with Glucose/Cholesterol/Uric Acid Control Solution?...........13 Items You Need..................................................................................................................13 Steps for Running a Glucose Control Check......................................................................14 Steps for Running a Cholesterol Control Check.................................................................16 Steps for Running a Uric Acid Control Check................................................................18 How to Read the Label on the Test Strip Vial?....................................................................19 Analyzing Your Control Results..........................................................................................20 TM TM TM 1 Blood Glucose/Cholesterol/Uric Acid Testing.......................................................................21 Items You Need..................................................................................................................21 Preparing the Puncturer (Lancing Device).........................................................................21 Structure of Puncturer and Lancet.....................................................................................22 Steps for Using the Puncturer............................................................................................23 Testing Your Blood Glucose Level......................................................................................24 Understanding Your Blood Glucose Test Results...............................................................26 Testing Your Blood Cholesterol Level.................................................................................27 Understanding Your Blood Cholesterol Test Results..........................................................29 Testing Your Blood Uric Acid Level................................................................................30 Understanding Your Blood Uric Acid Test Results.........................................................32 Using the Meter Memory...........................................................................................................33 Review the Stored Glucose Test Results...........................................................................33 Review the Stored Cholesterol Test Results......................................................................34 Review the Stored Uric Acid Test Results.....................................................................35 Deleting the Stored Memory of Blood Glucose/Cholesterol/Uric Acid Test Results..........35 Taking Care of Your Meter.........................................................................................................36 Maintaining the Meter.........................................................................................................36 The Battery Replacement..................................................................................................36 Cleaning the Meter.............................................................................................................37 Troubleshooting Guide.............................................................................................................37 Specifications...........................................................................................................................40 Customer Services...................................................................................................................42 Labeling and Information..........................................................................................................43 2 What is GlucoAlphaTM 3 in 1 system for? ●The self-testing GlucoAlphaTM 3 in 1 Blood Glucose/Cholesterol/Uric Acid MultiFunction Monitoring System is designed for in vitro diagnostic use only (external use only). The system is for healthcare professionals and persons with diabetes, hypercholesterolemia, or hyperuricemia to measure glucose, cholesterol, and uric acid values in fresh capillary whole blood from finger stick quantitatively. Frequent monitoring of whole blood glucose, cholesterol, and uric acid is an adjunct to the care of persons with diabetes, hypercholesterolemia, and hyperuricemia. Simply apply a drop of blood to the test strip, the test result will be displayed on the screen after 6 seconds for glucose, 150 seconds for cholesterol, and 6 seconds for uric acid. ●The GlucoAlphaTM 3 in 1 System is suitable for diabetes, hypercholesterolemia, and hyperuricemia management at home or professional use. ●The GlucoAlphaTM 3 in 1 Meter can only be used with GlucoAlphaTM Blood Glucose Test Strips, GlucoAlphaTM Cholesterol and GlucoAlphaTM Uric Acid Test Strips. The use of any other test strips may give incorrect results. ●Before using the products to test your blood glucose, cholesterol, and uric acid levels, read all the instructions carefully. It includes all the information you need to know in order to get the accurate blood glucose, cholesterol, and uric acid readings. 3 ●Do not change your medical plan without doctor’s approval. The GlucoAlphaTM 3 in 1 system should not be used for the diagnosis of diabetes, hypercholesterolemia, and hyperuricemia or for the test of newborns. Important Information ●Blood specimens containing Ascorbic Acid (Vitamin C) greater than 150 mg/dL, Amiloride greater than 20mg/dL, Acetaminophen greater than 8mg/dL, L-Dopa greater than 20 mg/dL, Dopamine greater than 20 mg/dL, Methyl-Dopa greater than 4 mg/ dL, Galactose greater than 400 mg/dL, Uric Acid greater than 10.5 mg/dL and Xylose greater than 50 mg/dL may give inaccurate glucose results. ●Blood specimens containing Ascorbic Acid (Vitamin C) greater than 5 mg/dL, Acetaminophen greater than 15 mg/dL, L-Dopa greater than 1.25 mg/dL, Dopamine greater than 3 mg/dL, Methyl-Dopa greater than 5 mg/dL, Glibenclamide greater than 10 mg/dL, Creatinine greater than 20 mg/dL and Billirubin greater than 20 mg/dL may give inaccurate cholesterol results. ●Blood specimens containing Ascorbic Acid greater than 10mg/dL, Acetaminophen greater than 2mg/dL, L-Dopa greater than 20 mg/dL, Dopamine greater than 5mg/dL, Methyl-Dopa greater than 1.0 mg/dL,Glibenclamide greater than 10mg/dL,Cholesterol greater than 400 mg/dL, Creatinine greater than 30 mg/dL, Diclofenac greater than 75 mg/dL, Amiloride greater than 20 mg/dL and Ketoprofen greater than 500 mg/dL may give inaccurate uric acid results. 4 ●Lipaemic samples - Cholesterol up to 500 mg/dL or triglycerides up to 3000 mg/dL, have not been test and are not recommended for testing with the GlucoAlphaTM 3 in 1 Monitoring System. ●Hematocrit (percentage of red blood cells in your blood) below 30% or higher than 55% was found to cause a higher or lower reading, respectively. No significant effect on the reading was found for hematocrits in the blood sample between 30% and 55%. ●The monitoring system will not work properly at altitudes greater than 8,000 feet. ●The system is designed to use at temperatures between 14°C and 40°C (57.2°F and 104°F) and below 85% of relative humidity. If you use the system outside the proposed conditions, it can give false results. ●Be sure to store the test strips between 4°C and 30°C (40°F and 86°F) and avoid direct sunlight. ●Be sure to follow your local regulations for proper disposal of used test strips and lancets. ●Do not use this meter in a dry environment, especially if synthetic materials are present. Synthetic clothes, carpets, etc., may cause damaging static discharges in a dry environment. ●Do not use this meter near cellular or cordless telephones, walkie talkies, garage door openers, radio transmitters, or other electrical or electronical equipment that are sources of electromagnetic radiation, as these may interfere with the proper operation of the meter. 5 Items in the Package GlucoAlpha 3 in 1 Meter Puncturer (lancing device) Lancets Pouch TM GlucoAlphaTM 3 in 1 User’s Manual Log Book Check Strip Two AAA Batteris 6 Items Need to be Purchased Separately Test Strip (comes with a code key) TM GlucoAlpha Blood Glucose Test Strips TM GlucoAlpha Cholesterol Test Strips Control Solutions GlucoAlpha Glucose Control Solution (3 ml) GlucoAlpha Cholesterol Control Solution (1 ml) GlucoAlpha Uric Acid Control Solution (3 ml) TM TM TM 7 TM GlucoAlpha Uric Acid Test Strips Getting to Know GlucoAlphaTM 3 in 1 Blood Glucose/Cholesterol/Uric Acid Multi-Function Monitoring System Code Key Slot Test Strip Slot Unit-Changing Switch (To Switch between mg/dL and mmol/L (μmol/L)) Battery Cover Screen (Display Messages and Test Result) Memory Button (Recall Stored Data) Setting Date and Time Button Battery Compartment 8 Test Strips GlucoAlphaTM Blood Glucose Test Strips GlucoAlphaTM Cholesterol Test Strips Sample target area 15µL Strip handle (Yon may touch here) 5mm Contact bars (lnsert this end to test strip slot on the meter) Contact bars (lnsert this end to test strip slot on the meter) 15µL CHOL 9 Strip handle (Yon may touch here) Sample target area (You may apply your blood on either side of the sample target area.) Target area (You must fill the whole area with blood) Sample target area Strip handle (Yon may touch here) Target area (You must fill the whole area with blood) Uric Acid Glucose Target area (You must fill the whole area with blood) Sample target area GlucoAlphaTM Uric Acid Test Strips Contact bars (lnsert this end to test strip slot on the meter) Setting Up Your GlucoAlphaTM 3 in 1 Multi-Function Monitoring System Setting Date and Time NOTE: When you install the batteries into the meter every time or replace the batteries, the meter will enter setting mode automatically. You can set correct time and date before you begin testing. 1. The meter will automatically enter the setting mode after you install the batteries. 2. Press “S” button to obtain correct month. 3. Press “M” button to confirm up setting and shifts to the date setting. 4. Repeat the same steps to set the date, hour and minute. 5. When you finish setting, the meter will turn off automatically. Checking the Unit of Measurement Before you get started… GlucoAlphaTM 3 in 1 meter can measure your blood glucose, cholesterol, and uric acid in units as described below: 10 Glucose Cholesterol Uric Acid Push Switch Up Unit Decimal point mmol/L Yes mmol/L Yes μmol/L No Push Switch Down Unit Decimal point mg/dL No mg/dL No mg/dL Yes * You should check this setting every time you put batteries into your meter. * Use a screwdriver to adjust the switch. The Batteries Installation NOTE: Your meter comes with two AAA size batteries (1.5V). 1. Slide battery cover off from the back of the meter. 2. Insert two AAA size batteries (1.5V) into battery slot. 3. Slide battery cover back. 11 CAUTIONS: ●Make sure the “+” and “-“ ends of the batteries match the marks in the battery compartment. ●Always replace both batteries at same time. Both batteries should be the same brand. Using Check Strip to Check the Meter You would need to use the check strip to check the meter when ●You use GlucoAlphaTM 3 in 1 monitoring system for the first time. ●You drop the meter. ●You think there is something wrong with the results you got and you want to check whether meter and test strips are working correctly or not. 1. Insert the check strip into the test strip slot on the meter. 2. The screen should display ”OK”. If “X” appears on the screen, remove the check strip and reinsert it. If “X” displays again, stop the test and call our customer support. 12 Control Check with Glucose/Cholesterol/Uric Acid Control Solutions When to Run a Control Check with Glucose/Cholesterol/Uric Acid Control Solutions? ●You think there is something wrong with the glucose, cholesterol, or uric acid measurement you got and you want to check whether meter and test strips are working correctly or not. Items You Need ●GlucoAlphaTM 3 in 1 Meter ●GlucoAlphaTM Blood Glucose Control Solution(option) ●GlucoAlphaTM Cholesterol Control Solution(option) ●GlucoAlphaTM Uric Acid Control Solution(option) ●GlucoAlphaTM Blood Glucose Test Strips ●GlucoAlphaTM Cholesterol Test Strips ●GlucoAlphaTM Uric Acid Test Strips ●Glucose/Cholesterol/Uric Acid code keys in the test strips box 13 Steps for Running a Glucose Control Check CAUTION: ●Always check the glucose code key number to make sure it matches the number labeled on the test strip vial when you run a glucose control test. Otherwise you may get incorrect results. ●Always write down the opening date of your glucose control solution vial and test strip vial. Both of them are good for only 3 months after first opening or until the expiration date, whichever comes first. ●The result will be stored in memory and appear just like the blood glucose result. 1. Insert the glucose code key into the code key slot on the back of the meter. 2. Take one strip from the vial. Close the vial quickly. 3. Insert the test strip into the test strip slot on the meter. The meter will first display code number, then the blood symbol “S”. 14 Cautions: Make sure that the code number shown on the screen is the same as the code number printed on the glucose test strip vial, otherwise you may get incorrect measurement. 4. Hold the glucose control solution bottle upside down, slowly squeeze the bottle to form a small drop, discard the first drop of the solution, let the second drop touch the edge of the sample targeting area on the test strip. The control solution will be drawn into the targeting zone automatically. 5. You will hear a “beep” sound. Close the cap of the control solution immediately. The meter starts to count down 6 seconds then shows your result on the screen. 6.Check if the displayed glucose value falls within the acceptable range shown on the test strip vial. 7. Remove the test strip from the meter and discard it. 15 Steps for Running a Cholesterol Control Check CAUTION: ●Always check the cholesterol code key number to make sure it matches the number labeled on the test strip vial when you run a cholesterol control test. Otherwise you may get incorrect results. ●Always write down the opening date of your cholesterol control solution vial and test strip vial. Both of them are good for only 2 months after first opening or until the expiration date, whichever comes first. ●The result will be stored in memory and appear just like the blood cholesterol result. 1. Insert the cholesterol code key into the code key slot on the back of the meter. 2. Take one strip from the vial. Close the vial quickly. 3.Insert the test strip into the test strip slot on the meter. The meter will first display code number, then the blood symbol “S”. 16 Cautions: Make sure that the code number shown on the screen is the same as the code number printed on the cholesterol test strip vial, otherwise you may get incorrect measurement. 4. Hold the cholesterol control solution bottle upside down, slowly squeeze the bottle to form a small drop, discard the first drop of the solution, let the second drop touch the edge of the sample targeting area on the test strip. The control solution will be drawn into the targeting zone automatically. 5. You will hear a “beep” sound. Close the cap of the control solution immediately. The meter starts to count down 150 seconds then shows your result on the screen. 6. Check if the displayed cholesterol value falls within the acceptable range shown on the test strip vial. 7. Remove the test strip from the meter and discard it. 17 CHOL CHOL Steps for Running a Uric Acid Control Check CAUTION: ●Always check the uric acid code key number to make sure it matches the number labeled on the test strip vial when you run a uric acid control test. Otherwise you may get incorrect results. ●Always write down the opening date of your uric acid control solution vial and test strip vial. Both of them are good for only 2 months after first opening or until the expiration date, whichever comes first. ●The result will be stored in memory and appear just like the blood Uric Acid result. 1. Insert the uric acid code key into the code key slot on the back of the meter. 2. Take one strip from the vial. Close the vial quickly. 3. Insert the test strip into the test strip slot on the meter. The meter will first display code number, then the blood symbol “S”. UA Cautions: Make sure that the code number shown on the screen is the same as the code number printed on the uric cid test strip vial, otherwise you may get incorrect measurement. 18 4. Hold the uric acid control solution bottle upside down, slowly squeeze the bottle to form a small drop, discard the first drop of the solution, let the second drop touch the edge of the sample target area on the test strip. The control solution will be drawn into the target zone automatically. 5.You will hear a “beep” sound. Close the cap of the control solution immediately. The meter starts to count down 6 seconds then shows your result on the screen. 6. Check if the displayed uric acid value falls within the acceptable range shown on the test strip vial. 7. Remove the test strip from the meter and discard it. UA UA How to Read the Label on the Test Strip Vial? Label on the Test Strip Vial Product name Code number of this lot of test strip Lot.NO: GDT09908A Exp.Date: 2009/03 Lot No of test strip Expiry date YYYY/MM Type of the Test Strip The results of the conrol solution test should fall within the specified ranges. Rev.A 08/10 P/N 204194 (Example) 19 You should fill in the opening date here Analyzing Your Control Results You will find the acceptable range of glucose, cholesterol, and uric acid levels for the normal and high controls on the test strip vial label. If your control results fall within the acceptable range, you can begin to test your blood glucose, cholesterol, or uric acid levels. If your control results are not within the acceptable range, check the following items: ●Are your Glucose/Cholesterol/Uric Acid Test Strips or control solutions expired? ●Have you ever forgotten to close your Glucose/Cholesterol/Uric Acid Test Strip vials or control solution bottles? ●Does the code in the meter match the code on the test strip vial? ●Do you follow all the operation instruction correctly? ●Repeat the control test with a new test strip, following the steps exactly. CAUTION: If you continue to receive control values that are outside of the accepted range, discontinue your blood testing and contact Customer Service or your healthcare provider immediately. 20 Blood Glucose/Cholesterol/Uric Acid Testing Items You Need ●GlucoAlphaTM 3 in 1 Meter ●GlucoAlphaTM Blood Glucose Test Strips ●GlucoAlphaTM Cholesterol Test Strips ●GlucoAlphaTM Uric Acid Test Strips ●Glucose code key (green color) in the glucose test strips box ●Cholesterol code key (blue color) in the cholesterol test strips box ●Uric Acid code key (orange color) in the Uric Acid test strips box ●Puncturer ●Lancets ●Alcohol swab (not included) ●Log book Preparing the Puncturer (Lancing Device) NOTE: To increase blood flow: warm fingers using warm water to wash hands, hang down arm. 21 CAUTIONS: ●For safety and to prevent cross-contamination, always place the protective cover back before discarding the used lancets. ●To avoid infection, you should- Never reuse the lancets. - Never share your puncturer with others. - Use an alcohol pad to wipe off blood from puncturer’s tip. ●To avoid accidental injury, do not leave a lancet in the puncturer. Always remove the used lancet immediately after a test. Structure of Puncturer and Lancet Lancet Remove Sliding Adjustable tip 1 2 3 4 Lancet LANZO Protective cover Trigger Carrier 22 Sliding barrel Steps for Using the Puncturer 1. Unscrew and remove the puncturer’s adjustable tip. 2. Insert a lancet into the carrier. 3. Twist off the protective cover. 4. Replace the adjustable tip tightly. Choose a desired skin penetration depth by rotating the top portion of the adjustable tip until the setting number lines up to the arrow. Settings are based on skintype: Depth 1~2: for soft or thin skin Depth 3: for average skin Depth 4~5: for thick or calloused skin 5. Hold the tip of the puncturer with one hand and pull the sliding barrel with the other hand. When a click is felt, the trigger rises up. Release the sliding barrel, it will move back to its original position. 23 Testing Your Blood Glucose Level CAUTIONS: You can only use GlucoAlphaTM Blood Glucose Test Strips and check strip on GlucoAlphaTM 3 in 1 meter. 1. When you first time use the GlucoAlphaTM 3 in 1 meter or open a new test strip vial, insert the code key from the test strip vial. Each test strip vial contains one code key. Make sure the number on the code key matches the code number on the vial of test strips you use. 2. Take one strip from the vial. Close the vial quickly. Caution: The test strips can be damaged when they are not capped and stored properly. 3. Insert the test strip into the test strip slot on the meter. The meter will first display code number, then the blood symbol “S”. 4. When the screen shows blood symbol “S”, clean your finger with alcohol swab. Let it dry completely. 5. Place the puncturer on your finger. NOTE: The best puncture site is on the side of fingertip, because it has the best blood supply. 24 6. Press the trigger on the puncturer. 7. Lift up the puncturer. 8. Get a drop of blood. 9. Put the drop of blood on the edge of the test strip target area. The blood will be absorbed and cause the target area to turn red. The testing reaction starts when the meter beeps. The meter starts to count down 6 seconds then shows your result on the screen. The meter stores your result in its memory automatically. NOTE: How much blood should be applied? Although only a small amount of blood is needed, it is very important that you put enough blood on your test strip so that the entire reaction zone is covered with blood. This ensures that your meter can give accurate and reliable results. Caution: If you don’t apply enough blood, you might need to use a new test strip to do the test again. 10. Record the glucose value in your log book. 11. Pull the test strip out of the meter. The meter will turn off by itself. Unscrew the adjustable tip of the puncturer. 25 12. Put the protective cover of the lancet back on the lancet. Grip the puncturer holder firmly and pull the lancet out. 13. Discard the used lancet in an appropriate container with a lid. 14. Screw the adjustable tip back on the puncturer. CAUTION: To avoid accidental injury, do not leave used lancet in the puncturer. Always remove the used lancet immediately after each test. Understanding Your Blood Glucose Test Results According to the suggestions of American Diabetes Association), Normal fasting blood glucose is 70~100 mg/dL (3.9~5.6 mmol/L). However, the above range is just a reference, and it may not apply for every person. Consult your doctor for the appropriate range for you. 26 Testing Your Blood Cholesterol Level CAUTIONS: You can only use GlucoAlpha TM Cholesterol Test Strips and check strip on GlucoAlphaTM 3 in 1 meter. 1. When you first time use the GlucoAlphaTM 3 in 1 meter or open a new test strip vial, insert the code key from the test strip vial. Each test strip vial contains one code key. Make sure the number on the code key matches the code number on the vial of test strips you use. 2. Take one strip from the vial. Close the vial quickly. Caution: The test strips can be damaged when they are not capped and stored properly. 3. Insert the test strip into the test strip slot on the meter. The meter will first display code number, then the blood symbol “S”. 4. When the screen shows blood symbol “S”, clean your finger with alcohol swab. Let it dry completely. 5. Place the puncturer on your finger. NOTE: The best puncture site is on the side of fingertip, because it has the best blood supply. 27 6. Press the trigger on the puncturer. 7. Lift up the puncturer. 8. Get a drop of blood. 9. Put the drop of blood on the edge of the test strip target area. The blood will be absorbed and cause the target area to turn red. The testing reaction starts when the meter beeps. The meter starts to count down 150 seconds then shows your result on the screen. The meter stores your result in its memory automatically. NOTE: How much blood should be applied? Although only a small amount of blood is needed, it is very important that you put enough blood on your test strip so that the entire reaction zone is covered with blood. This ensures that your meter can give accurate and reliable results. Example: The blood volume needed in cholesterol test is at least 15μl. As a reference, the round shaped blood formed on your finger should be at least 0.5 cm diameter. Caution: If you don’t apply enough blood, you might need to use a new test strip to do the test again. 28 10. Record the cholesterol value in your log book. 11. Pull the test strip out of the meter. The meter will turn off by itself. Unscrew the adjustable tip of the puncturer. 12. Put the protective cover of the lancet back on the lancet. Grip the puncturer holder firmly and pull the lancet out. 13. Discard the used lancet in an appropriate container with a lid. 14. Screw the adjustable tip back on the puncturer. CAUTION: To avoid accidental injury, do not leave used lancet in the puncturer. Always remove the used lancet immediately after each test. Understanding Your Blood Cholesterol Test Results Normal fasting blood cholesterol is below 200 mg/dL. However, the above range is just a reference, and it may not apply for every person. Consult your doctor for the appropriate range for you. 29 Testing Your Blood Uric Acid Level CAUTIONS: You can only use GlucoAlphaTM Uric Acid Test Strips and check strip on GlucoAlphaTM meter. 1. When you first time use the GlucoAlphaTM 3 in 1 meter or open a new test strip vial, insert the code key from the test strip vial. Each test strip vial contains one code key. Make sure the number on the code key matches the code number on the vial of test strips you use. 2. Take one strip from the vial. Close the vial quickly. Caution: The test strips can be damaged when they are not capped and stored properly. 3. Insert the test strip into the test strip slot on the meter. The meter will first display code number, then the blood symbol “S”. 4. When the screen shows blood symbol “S”, clean your finger with alcohol swab. Let it UA UA dry completely. 5. Place the puncturer on your finger. NOTE: The best puncture site is on the side of fingertip, because it has the best blood supply. 30 6. Press the trigger on the puncturer. 7. Lift up the puncturer. 8. Get a drop of blood. 9. Put the drop of blood on the edge of the test strip target area. The blood will be absorbed and cause the target area to turn red. The testing reaction starts when the meter beeps. The meter starts to count down 6 seconds then shows your result on the screen. The meter stores your result in its memory automatically. UA UA NOTE: How much blood should be applied? Although only a small amount of blood is needed, it is very important that you put enough blood on your test strip so that the entire reaction zone is covered with blood. This ensures that your meter can give accurate and reliable results. Caution: If you don’t apply enough blood, you might need to use a new test strip to do the test again. 10. Record the uric acid value in your log book. 11. Pull the test strip out of the meter. The meter will turn off by itself. Unscrew the adjustable tip of the puncturer. 31 12. Put the protective cover of the lancet back on the lancet. Grip the puncturer holder firmly and pull the lancet out. 13. Discard the used lancet in an appropriate container with a lid. 14. Screw the adjustable tip back on the puncturer. Understanding Your Blood Uric Acid Test Results The expected blood uric acid value is as following: Male: 3 ~ 7.2 mg/dL (179 ~ 428 μmol/L) Female: 2 ~ 6 mg/dL (119 ~ 357 μmol/L) However, the above range is just a reference, and it may not apply for every person. Consult your doctor for the appropriate range for you. 32 Using the Meter Memory GlucoAlpha 3 in 1 Meter can automatically store glucose, cholesterol, and uric acid most recent test results. You can review the test results in order from the newest to the oldest. If the memory is full, the oldest result is deleted as the newest result is added. The memory is not affected by replacing/removing the batteries. TM Review the Stored Glucose Test Results 1. Please enter the glucose test mode first. Insert the glucose code key (green color) and press “M” button. 2. Pressing and releasing the “M” button, the 7-day average, 14-day average and 28-day average will be displayed on the screen in order. 3. After the 28-day average, the newest blood glucose test result with date will be displayed via pressing and releasing the “M” button. 4. The stored results with date are displayed in order from the most recent to the oldest via pressing and releasing the “M” button. The meter will turn off automatically in 3 seconds when the symbol “----” is displayed on the screen. 33 5. If you decide to stop checking the results, stop pressing the “M” button. The meter will turn off automatically in 30 seconds or via pressing “S” button. 6. No test can be performed when you are checking the stored results. If you wish to perform a new test, please turn off the meter first and restart the steps described in the section 【Blood Glucose/Cholesterol/Uric Acid Testing】. Review the Stored Cholesterol Test Results 1. Please enter the cholesterol test mode first. Insert the cholesterol code key (blue color) and press “M” button. 2. The stored results with date are displayed in order from the most recent to the oldest via pressing and releasing the “M” button. The meter will turn off automatically in 3 seconds when the symbol “----” is displayed on the screen. 3. If you decide to stop checking the results, stop pressing the “M” button. The meter will turn off automatically in 30 seconds or via pressing “S” button. 4. No test can be performed when you are checking the stored results. If you wish to perform a new test, please turn off the meter first and restart the steps described in the section 【Blood Glucose/Cholesterol/Uric Acid Testing】. 34 Review the Stored Uric Acid Test Results 1. Please enter the uric acid test mode first. Insert the uric acid code key (orange color) and press “M” button. 2. The stored results with date are displayed in order from the most recent to the oldest via pressing and releasing the “M” button. The meter will turn off automatically in 3 seconds when the symbol “----” is displayed on the screen. 3. If you decide to stop checking the results, stop pressing the “M” button. The meter will turn off automatically in 30 seconds or via pressing “S” button. 4. No test can be performed when you are checking the stored results. If you wish to perform a new test, please turn off the meter first and restart the steps described in the section 【Blood Glucose/Cholesterol/Uric Acid Testing】. Deleting the Stored Memory of Blood Glucose/Cholesterol/Uric Acid Test Results 1. When the newest blood Glucose/Cholesterol/Uric Acid test result is displayed, press “S” button for 3 seconds. The newest blood Glucose/Cholesterol/Uric Acid test result is deleted as soon as you hear the “beep” sound from the meter. 2. The stored results can be deleted in order from the most recent to the oldest via press “S” button for 3 seconds. 3. If you decide to stop deleting the results, stop pressing the “S” button. The meter can automatically turn off in 30 seconds or via pressing “S” button. 35 Taking Care of Your Meter Maintaining the Meter ●Do not drop, hit or smash your meter. ●Keep your meter between -10°C and 60°C (14°F and 140°F) and below 95% of relative humidity. Do not store meter in area such as the kitchen, bathroom, laundry room or car. ●Keep the meter away from water. ●Do not use glass/household-cleaning solutions to clean the meter. Simply use an alcohol pad to wipe the surface of the meter, but do not wipe the test strip slot or code key slot. ●Do not disassemble the meter ●If you have any questions, please contact Customer Service or your healthcare provider. The Battery Replacement When the symbol” ” is displayed on the screen, please replace batteries immediately. 1. Slide battery cover off from the back of the meter. 2. Remove old batteries and insert 2 new AAA size batteries (1.5V) into the battery compartment. 3.Slide battery cover back and turn on your meter 36 Cleaning the Meter You can clean your meter with 70% isopropyl alcohol swab CAUTIONS: ●DO NOT spray any cleaning solution directly onto the meter. ●DO NOT dampen the code key slot or the test strip slot. ●DO NOT soak the meter in liquid. Troubleshooting Guide SYMBOL WHAT IT MEANS ACTION The battery power is low. Replace new batteries. “LO” flashes 5 times before the meter turning off automatically. The batteries are dead. Replace new batteries. 37 SYMBOL (Example) WHAT IT MEANS ACTION The environmental temperature is too low to perform a test. Repeat the test in a warm place about 14°C~40°C (57.2°F~104°F). You may need to wait as long as 20 minutes for the meter to warm up before testing again. The environmental temperature is too high to perform a test. Repeat the test in a cool place about 14°C~40°C (57.2°F~104°F). You may need to wait as long as 20 minutes for the meter to cool down before testing again. If the test result is over 240 Re-check your blood glucose level. mg/dL, the blood glucose Follow the instructions of your healthcare test result with a suggestion professional regarding ketone testing. to check your ketone levels. Your blood glucose level is higher than 600 mg/dL (33.3 Re-check your blood glucose level. If mmol/L). The blood glucose “HI” is displayed again, call your doctor test result with a suggestion immediately. to check your ketone levels. 38 SYMBOL CHOL CHOL UA UA WHAT IT MEANS ACTION Your blood glucose level is lower than 20 mg/dL (1.1mmol/L). Re-check your blood glucose level. If “LO” is displayed again, call your doctor immediately. Your blood cholesterol level is higher than 400 mg/dL (10.4 mmol/L). Re-check your blood cholesterol level. If “HI” is displayed again, call your doctor immediately. Your blood cholesterol Re-check your blood cholesterol level. If level is lower than 100 mg/ “LO” is displayed again, call your doctor immediately. dL (2.6 mmol/L). Your blood uric acid level is higher than 20 mg/dL (1190 μmol/L). Re-check your blood uric acid level. If “HI” is displayed again, call your doctor immediately. Your blood Uric Acid level is Re-check your blood uric acid level. If “LO” is displayed again, call your doctor lower than 3 mg/dL immediately. (179 μmol/L). 39 SYMBOL WHAT IT MEANS ACTION Operating procedure is incorrect. Repeat the test with a new test The test strip has been used, or the strip. If the symbol is displayed meter is not performing correctly. again, contact Customer Service. 1. Using a wrong code key or the code key is inserted improperly. 2. New meter hasn’t been code. 1. Check the code key. Be sure the code key is inserted into the code key slot completely. 2. Insert the code key. The code key is damaged. Contact Customer Service. Specifications GlucoAlpha 3 in 1 Multi-Function Monitoring System TM ET-311 Measuring Range Calibration Test Time Memory Capacity Glucose 20 ~ 600 mg/dL (1.1 ~ 33.3 mmo/L) Cholesterol 100 ~ 400 mg/dL (2.6 ~ 10.4 mmo/L) Plasma equivalent 150 seconds 50 test results 6 seconds 200 test results 40 Uric Acid 3 ~ 20 mg/dL (179 ~ 1190 μmo/L) 6 seconds 50 test results Specifications (cont.) ET-311 Operating Condition Temperature Humidity Meter Storage Condition (Transportation Condition) Temperature Humidity Sample Volume Sample Type Hematocrits Range Power Supply Meter Dimension HxWxD (mm) Display Weight Life of Battery Technology Used Glucose Cholesterol Uric Acid 14 ~ 40°C (57.2 ~ 104℉ ) ≦85% Relative Humidity ≧ 0.8 μl -10 ~ 60°C (14 ~ 140℉ ) ≦ 95% Relative Humidity ≧ 15 μl Finger capillary whole blood 30 ~ 55% 1.5V (AAA) x 2 ≧ 0.8 μl 90 x 66 x 22 LCD Display (35 x 45 mm) 60 grams, without Batteries More than 1000 Times Electrode-based Biosensor *The Meter has been safety and EMC tested and approved according to the requirement of EN 61010-1/EN 61010-2-101/EN 60601-1-2/EN 61326. 41 Customer Services Thank you for choosing the GlucoAlpha 3 in 1 Blood Glucose/Cholesterol/Uric Acid Multi-Function Monitoring System. IN4 Technology Corporation is honored to present this new product to you. Our customer services include: (1) Our customers are entitled to free repair and replacement of spare parts. If you have problems with the product, please contact local distributor/agent for further information. However the following damages resulted from improper use or accidents are excluded (such as smash, moisture, unauthorized repair, disassemble, and natural catastrophes). (2) IN4 Technology Corporation is not responsible for any accidents and worsening illness resulted from buyers’/users’ improper use of device without the instructions of professionals (e.g. medical personnel). Consumers may not request for compensation in this regard. (3) Please read this manual thoroughly before using this monitoring system. (4) If you have any questions, please contact local distributor or EU representative telephone: +49-6894-581020. TM 42 Labeling and Information Item Description Description Item Do not reuse Consult instruction for use Temperature limitation Keep away from sunlight Manufacturer Used by Caution, consult accompanying documents Authorized representative in the European Community Batch code Catalogue number Serial number Control In vitro diagnostic device Sterilized using irradiation Keep dry 43 Guidance and manufacturer’s declaration – electromagnetic emissions This device is intended for use in the electromagnetic environment specified below. The customer or the user of this device should assure that it is used in such an environment. Emissions test Compliance RF emissionsCISPR 11 RF emissionsCISPR 11 Electromagnetic environment – guidance Group 1 This device uses RF energy only for its internal function. Therefore, its RF emissions are very low and are not likely to cause any interference in nearby electronic equipment. Class B This device is suitable for use in all establishments, including domestic establishments and those directly connected to the public low-voltage power supply network that supplies buildings used for domestic purposes. Harmonic emissionsIEC 61000-3-2 Not applicable Voltage fluctuations/flicker emissionsIEC 61000-3-3 Not applicable Guidance and manufacturer’s declaration – electromagnetic immunity This device is intended for use in the electromagnetic environment specified below. The customer or the user of this device should assure that it is used in such an environment. Immunity test Electrostatic discharge (ESD) IEC 61000-4-2 IEC 60601test level ±6 kV contact ±8 kV air Power frequency (50/60 Hz) magnetic field IEC 61000-4-8 Compliance level ±6 kV contact ±8 kV air 3 A/m 3 A/m NOTE UT is the a.c. mains voltage prior to application of the test level. 44 Electromagnetic environment –guidance Floors should be wood, concrete or ceramic tile. If floors are covered with synthetic material, the relative humidity should be at least 30 %. Power frequency magnetic fields should be at levels characteristic of a typical location in a typical commercial or hospital environment. Guidance and manufacturer’s declaration – electromagnetic immunity This device is intended for use in the electromagnetic environment specified below. The customer or the user of this device should assure that it is used in such an environment. Immunity test IEC 60601 test level Compliance level Electromagnetic environment – guidance Portable and mobile RF communications equipment should be used no closer to any part of this device, including cables, than the recommended separation distance calculated from the equation applicable to the frequency of the transmitter. Radiated RF IEC 61000-4-3 3 V/m 80 MHz to 2,5 GHz 3 V/m Recommended separation distance d = 1,2 d = 1,2 80 MHz to 800 MHz d = 1,2 800 MHz to 2,5 GHz where P is the maximum output power rating of the transmitter in watts (W) according to the transmitter manufacturer and d is the recommended separation distance in metres (m). Field strengths from fixed RF transmitters, as determined by an electromagnetic site survey,a should be less than the compliance level in each frequency range.b Interference may occur in the vicinity of equipment marked with the following symbol: NOTE 1 At 80 MHz and 800 MHz, the higher frequency range applies. NOTE 2 These guidelines may not apply in all situations. Electromagnetic propagation is affected by absorption and reflection from structures, objects and people. a Field strengths from fixed transmitters, such as base stations for radio (cellular/cordless) telephones and land mobile radios, amateur radio, AM and FM radio broadcast and TV broadcast cannot be predicted theoretically with accuracy. To assess the electromagnetic environment due to fixed RF transmitters, an electromagnetic site survey should be considered. If the measured field strength in the location in which this device is used exceeds the applicable RF compliance level above, this device should be observed to verify normal operation. If abnormal performance is observed, additional measures may be necessary, such as reorienting or relocating this device. b Over the frequency range 150 kHz to 80 MHz, field strengths should be less than 3 V/m. 45 Recommended separation distances between portable and mobile RF communications equipment and this device This device is intended for use in an electromagnetic environment in which radiated RF disturbances are controlled. The customer or the user of this device can help prevent electromagnetic interference by maintaining a minimum distance between portable and mobile RF communications equipment (transmitters) and this device as recommended below, according to the maximum output power of the communications equipment. Rated maximum output Separation distance according to frequency of transmitterm power of transmitter 150 kHz to 80 MHz 80 MHz to 800 MHz 800 MHz to 2,5 GHz W d = 1,2 d = 1,2 d = 2,3 0,01 0,12 0,12 0,23 0,1 0,38 0,38 0,73 1 1,2 1,2 2,3 10 3,8 3,8 7,3 100 12 12 23 For transmitters rated at a maximum output power not listed above, the recommended separation distance d in metres (m) can be estimated using the equation applicable to the frequency of the transmitter, where P is the maximum output power rating of the transmitter in watts (W) according to the transmitter manufacturer. NOTE 1 At 80 MHz and 800 MHz, the separation distance for the higher frequency range applies. NOTE 2 These guidelines may not apply in all situations. Electromagnetic propagation is affected by absorption and reflection from structures, objects and people. 46 Lancet (lncluded in the package) Specification: Sterile, 30G Manufacturer: Sterilance Medical (Suzhou) Inc. Address: No. 68 Litanghe Road, Xiangcheng, Suzhou, Jiangsu 215133, P. R. China Lancing Device (lncluded in the package) Manufacturer: Global Medical Market Corp. Address: Room No. 1112, Ace Tower 9th Bldg., 345-30, Kasan-Dong, Kumchon-Ku, Seoul, Korea 47