Download Bionime GM300 Manual

Transcript
Blood Glucose Monitoring System
GM300
BIONIME GmbH
Tramstrasse 16, 9442 Berneck
Switzerland
0197
101-3GM300-702
EN
BIONIME CORPORATION
694, Renhua Road, Dali Dist.,
Taichung City 412, Taiwan
Tel: +886 4 24951268
Fax: +886 4 24952568
http: //www.bionime.com
E-mail: [email protected]
USER’S MANUAL
GM300
Preface
Thank you for selecting the
Blood Glucose Monitoring System. Please read this manual
thoroughly before you start testing. It provides all the information you need to use the product. You
will get a correct test result by the following instruction of this manual.
It is quite important for you to monitor blood glucose regularly. A derived complication can thus be
effectively reduced. Through the assistance of
Blood Glucose Monitoring system, which
provides considerate design and accurate results, your diabetes management can become more
reliable and ease-to-use.
Preface
your Bionime authorized representative or call us by phone number, 886 4 24951268 ( GMT+08:00,
08:30~17:30 ). We will make every effort to provide assistance and solutions for you.
Please forward your warranty card to Bionime authorized representative to activate your warranty
coverage.
The
Blood Glucose Monitoring System is intended for in vitro diagnostic use ( For selftesting & professional use ) only ( outside the body ). The testing result is calibrated to be plasma
equivalent for test with fresh capillary whole blood samples from the fingertip. You may consult your
healthcare professional for instructions on how to use the system correctly. Our Customer Support
staff is available to assist you as well.
The
Blood Glucose Monitoring System was manufactured and supported by Bionime
Corporation and its authorized representative. If you have any questions or concerns, please contact
2
3
Precaution
System to test your blood glucose, please read all the instructions and
- Before using the
practice the tests including quality control test. ( Refer to page 46.)
- Please do the quality control test regularly to make sure the test results are accurate .
Precaution
-
Blood Glucose Meter hasn't been used for arterial blood testing yet, so it is still not
suitable to be used for arterial blood testing so far.
- Do the test at least 30 minutes after while entering another site with different ambient temperature.
- Pay attention to the environment protection when disposal of batteries.
Blood Glucose Meter can only be used with the
Blood Glucose Test
- The
Strips. The use of any other brand Strips should not be used under any circumstances. The use of
other brands of strips may give inaccurate results.
- Using appliance in tropical and / or temperate climate.
- Not to be exposed dripping or splashing.
- The minimum blood sample size of
Blood Glucose Monitoring System is intended for in vitro diagnostic use only. The
- The
testing result is calibrated to be plasma equivalent for test with fresh capillary whole blood samples
by finger stick.
Blood Glucose Monitoring System is intended for self-testing. It should not be
- The
used to diagnose diabetes mellitus.
4
Blood Glucose Monitoring System has not been validated for use on neonates.
Therefore, it's not intended for use of neonates.
Sample Size Example
1.0µl
Glucose Monitoring System is 1.4µl :(
1.4µl
2.0µl
3.0µl
)
4.0µl
We suggest you to take 1.4~2.5µl to do the test on glucose monitoring system. Blood sample size
above 4.0µl might contaminate the Smart Code Key.
Blood sample size below 1.4µl might cause inaccurate test result or might not start on meter
measurement. In this case, repeat the test with a new test strip.
5
Table of Contents
Table of Contents
About
System
The
Blood Glucose Monitoring System
The
Meter
The
Test Strip
Dummy Code Key
The
Smart Code Key
8
10
14
16
17
Being Ready for Test
Smart Code Key Installation
Batteries Installation
Setting Up Your Meter
Turning On/Off the Meter
Function Screens and Button Operations
Easily Handling the
Test Strip
18
20
22
26
27
28
Testing Procedure
Getting Ready for Testing
Performing a Test in Order
Comprehending Test Results and Messages
30
31
41
6
Review Your Test Memory
Recalling Your Test Result
Recalling Your Average Test Result
43
45
Quality Control
About Quality Control Test
Performing a Quality Control Test
Understanding Control Test Results
46
49
54
Caring for Your Meter
Error Messages and Trouble Shooting
Limitations
Specification
Warranty
Customer Service
Parts of Critical Component
Log Book
Warranty Card
Emergency Card
55
56
59
60
62
63
64
65
76
79
7
The
Blood Glucose Monitoring System
Package of Meter Kit
Your
Blood Glucose Monitoring System consists of several items. Please identify each
item of your system and learn what they're called and how they're used.
These items are included in your
Blood Glucose Monitoring System :
1. Getting Started Guide
2. User's Manual ( includes Log Book, Warranty Card, Emergency Card )
3.
Blood Glucose Test Strip Package Insert
4. Control Solution Package Insert *
5.
Meter
Dummy Code Key ( for the package without strip ) or Smart Code Key pre-installed
6.
( for the package with strip )
7.
Test strips ( 0/10/25 pcs )*
8.
Control Solution *
9.
Check Key
10. Lancing Device *
11. Disposable Sterile Lancets ( 10 pcs ) *
12. Carrying Case ( not shown )*
8
The
Blood Glucose Monitoring System
13. Two AAA Batteries ( not shown )*
14. Instruction for the lancing device ( not shown )*
(* Different packages have different bundled items. Some of packages might not include * items.)
1
2
3
5
6
4*
8*
7*
9
11*
10 *
Test Strips
2007-06
9
The
Meter
The
Meter
Smart Code Key
For calibrating your meter. New one comes with every box
of test strips. ( Refer to page 17 )
Contain the test strip port for inserting strip.
Assemble Smart Code Key into code key base.
Up Button (
)
Down Button (
)
Press to review stored test value in memory and average.
Select the function mode.
Test Strip Port
Insert test strip here until you hear a click.
Display Window
Show your test result, messages and relative information.
Main Button (
)
Press to turn on/off meter.
Switch different function screen.
Press and hold down until enter to the setting mode.
( There will be a power-off period during this process.)
10
11
The
Meter
The
Meter
Please follow the step ① and step ②.
CODE:
Smart Code Key Base
Assemble Smart Code Key here
063
Smart Code Key Release Button
Press down to release and switch the
Smart Code Key.
Battery Cover
Slide cover to change batteries.
Model Number
Meter Serial Number
12
13
The
Test Strip
The
Test Strip
Sample Entry
Apply a drop of blood or control solution here.
The test request is only 1.4µl of blood.
Noble Metal Electrodes
Electrochemical sensor
Indication Symbol
Insert strip with indication symbol
up and toward meter.
Hand Bar
Where you can easily
hand the strip to do
the test.
View Window
This window is originally yellow
before applying blood sample.
It will gradually become red
after filled with blood drop.
Electrode Contacts
Sensing signal output terminals.
14
The blood sample will be drawn into
sample entry by capillarity automatically.
PRECAUTION
- Re-cap the vial cap immediately and close tightly after taking test strip out from the vial.
- Do not reuse test strips.
- Do not use expired test strips.
- Check the discard date you wrote on the vial label every time you use the strip.
- Store the test strip in a cool, dry place and avoid the exposure of direct sunlight and heat.
- For detailed information, please refer to the
Test Strip Package Insert.
15
The
Dummy Code Key
For package without test strip, not for package with test
strip
A Dummy Code Key will be installed on the new
meter in the
package without test strip. This Dummy Code Key is not intended to be used
for testing.
When you open a new box of test strips, you have to replace the Dummy
Code Key by new Smart Code Key in the box.
Do not throw away this Dummy Code Key. It can be used to keep the Smart
Code Key Base clean while the Smart Code Key is not installed.
16
Smart Code Key
What is Smart Code Key ?
Smart Code Key is designed to calibrate your meter to make each lot of
strips have the same performance. Each new box of strips contains its new
Smart Code Key. The Smart Code Key stores calibrated information that your
meter needs to give you accurate blood glucose results. You must change
your Smart Code Key with each new box of
Test Strips.
Smart Code Key also contains the test strip port. Although you can still review
the memory and other settings, it's necessary to assemble the Smart Code
Key into meter before actually starting your test. This procedure makes sure
you do calibrate the meter and assures you of getting accurate test results.
17
Smart Code Key Installation
How to switch Smart Code Key ?
Smart Code Key Installation
3. Push down the Smart Code Key until it snaps into the Smart Code Key base.
Every new box of test strips should come with a Smart Code Key inside. Before
you install the Smart Code Key, please check that the code number on the strip
vial and the code number on the bottom of Smart Code Key should be the
same.
If you find they are not the same, please return them to the store where you
bought from.
1. Turn the meter over. Remove old Smart Code Key by pressing down Smart
Code Key release button if one is installed.
2. With the Meter off, follow ① and ② direction to put the new Smart Code Key
into the track on code key base.
18
PRECAUTION
- Assemble the Smart Code Key into your meter is necessary before starting your test.
- Be sure to change the Smart Code Key with each new box of
Test Strips.
- Use only the Smart Code Key that is packaged with the box of strips you are using.
- Please don't remove this Smart Code Key before you run out of these new strips.
19
Batteries Installation
Your meter kit comes with two AAA, 1.5volt, batteries uninstalled. New set of batteries will provide
power to perform about 1000 tests under normal use. The low battery symbol "
" will keep
appearing on your display if your batteries run low. Please keep spares on hand and replace the
batteries soon when a battery symbol appears.
5. Press any button to close the running-test of the meter, and
enter setting mode.
6. Please set time and date when the batteries are replaced.
See Setting the Time, Date and Unit on page 23.
tt
er
0537
+
+
+
y -
Bat tery
-
The meter will automatically turn off after 3 minutes of nonuse to save battery power. Your test
memories are still saved.
4. Meter will do the self test and the whole screen will keep
blinking as soon as the batteries are installed.
Ba
Ba
0537
er
y
ry
-
tt e
+
tt
Ba
-
1. Turn the meter over.
Press and push battery
cover to open.
20
2. Install both batteries at once.
Be sure to put battery in
correct direction.
3. Slide the battery cover back
until it snaps into place.
PRECAUTION
- Danger of explosion might happen if battery is incorrectly replaced; replace only with the
same or equivalent type.
- Please follow the local regulation and discard used battery properly.
21
Setting Up Your Meter
Entering Setting Mode
Setting the Time, Date and Unit
You can enter Setting Mode by below two ways.
1. Reload batteries: After removing the battery, please press "
" button for several times until no
signal on screen, then follow the steps of page 20~21 to load batteries.
1. Year setting
With the year format blinking, press the "
" or "
" button on the side to
adjust it. Then press the "
" button to confirm the year adjustment and
move to month setting.
2. With batteries: Press "
will show setting data.
" button for 5 seconds till hearing a sound of " beep ". The display screen
PRECAUTION
When you keep pressing " " button for 2 seconds, the display on screen will turn off.
Please don't care it. Keep pressing the "
" button till entering Setting Mode.
22
2. Month setting
With the month blinking, press the " " or " " button until the current month
appears. Then press the "
" button to confirm it and move to day setting.
3. Day setting
With the day blinking, press the "
" or "
" button until the current day
appears. Then press the "
" button to confirm it and move to time format
setting.
23
Setting Up Your Meter
4. Time Format 12H/24H Selection
With the time format blinking, press the "
" or "
"
button on the side to adjust it. Then press the " " button
to confirm it and move to hour setting.
5. Hour Setting
With the hour blinking, press the "
" or "
" button until the current hour
appears. Then press the " " button to confirm it and move to minute setting.
Setting Up Your Meter
7. Setting the Unit of Measurement
With milligrams per deciliter ( mg/dL ) or millimol per liter
( mmol/L ) blinking, press the " " or " " button on the
side to switch.
8. Ending Setting
Then press the "
" button to complete the setting and go back to time
screen. The settings you have entered are saved.
9. When you do not do any settings of meter for over 3 minutes, the meter will
leave setting mode and power down automatically.
6. Minute setting
With the minute blinking, press the "
" or "
" button until the current
minute appears.
Then press the "
" button to confirm it and move to the setting mode of
measurement unit.
24
NOTE
Fast Settings :
When you do the settings, you can press the "
seconds to select or adjust faster.
" or "
" buttons and hold them for two
25
Turning On/Off the Meter
Function Screens and Button Operations
1. Auto Power Off
The Meter will power off automatically if you don't operate it for over 3 minutes.
2. Manual Power Off
If you want to turn off the Glucose Meter, please keep pressing the "
3. How to turn on the Power
1) Press the "
" button.
2) Insert one piece of strip.
Switching the Function Screens
1. Press the "
" button to switch function screens including Memory, Average and Time in
sequence.
" button for 2 seconds.
Memory
2. Under Memory function, press the "
Average
" or "
3. Under Average function, press the " " or "
7 days, 14 days or 30 days in sequence.
Time
" button to search your memorized testing data.
" button to search your average data of 1 day,
4. When the display on meter screen shows time, memory or average, keep pressing "
5 seconds to enter setting mode.
26
" button for
27
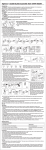
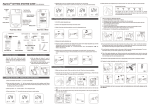
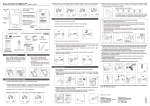
Easily Handling the
How to easily handle the
Test Strip
test strip ?
Easily Handling the
Test Strip
Removing the test strip:
1. Hold the test strip same as insert it.
Inserting the test strip:
1. Hold the test strip between thumb and middle finger with indication symbol
"
" facing up.
2. Put forefinger on the side of strip as shown.
NOTE
This is the easiest way to insert the strip.
3. Insert the test strip into test strip port until it snaps and firmly stops.
2. Rotate the test strip counterclockwise and pull up at the same time.
NOTE
Pull the strip in counterclockwise direction will be easier to remove it from
the meter.
3. Take the test strip out of test strip port totally.
Please follow the local regulation and discard used strip properly.
NOTE
Code key will not be contaminated by blood, if you follow the step correctly.
28
29
Getting Ready for Testing
Performing a Test in Order
Before performing a blood glucose test,
you have to prepare the items below :
Meter ( with
Smart Code
Key installed )
Blood Glucose Test Strips
( Please check the expired date on the vial. Don’t
use the expired test strip )
- Lancing device
- Sterile lancet
- Alcohol swab ( optional )
Each time of using a new box of test strip, you have to assemble the Smart Code
Key from the new strip package.
-
Test Strips
Cleaning your hands
Before starting your test, use warm soapy water to wash your hands and dry
thoroughly. Warm water helps to increase the blood flow to your fingertips. You can
also use alcohol swab to clean your finger to get accurate measurement.
Depth adjustable cap
Release button
Lancet carrier Safe switch
Hub
Plunger
1
1) Hold the adjustable cap in one hand and hold the hub in the other
hand. Bend the cap towards the down side. When a gap appears
between the cap and hub, pull them off in opposite directions.
2) Pull off the depth adjustable cap.
2
3
PRECAUTION
- Assembling the Smart Code Key into your meter is necessary before starting your test.
30
3) Insert a new disposable lancet firmly into lancet carrier.
31
Performing a Test in Order
4) Twist off and set aside the protective cover of the disposable lancet.
Performing a Test in Order
4
5
Preparing your meter and strip
5) Replace the depth adjustable cap.
6) Choose a depth of penetration by rotating the top portion of the depth adjustable
cap until the setting depth matches the window. Settings are based on skin type
”
“ for soft or thin skin;
”
“ for average skin;
”
“ for thick or calloused skin.
7) Hold the hub in one hand and pull on the plunger in the other hand. The device will
be cocked. Release the plunger, it will automatically move back to its original
position near the hub.
PRECAUTION
6
1. Remove new test strip from
vial and re-cap the vial cap
immediately.
7
2. Insert the test strip with
indication symbol, facing up,
into test strip port.
3. Push the test strip in until it
snaps and stops. The meter
turns on automatically.
When you put the strip into
the strip port, you will hear a
sound of " beep ".
4. Check that the code number blinking on your meter matches the
code highlighted on the vial of test strips currently in use.
- Load the lancing device ( Refer to Instruction manual of the lancing device )
- Be careful to load the lancing device to avoid being pierced by the needle.
32
33
Performing a Test in Order
5. While the "
" symbol flashing, you are ready to apply the blood sample. The
code number will appear on the right down corner of the screen.
Performing a Test in Order
Obtaining blood sample
1. Hold the lancing device to the soft side of your fingertip and press the
release button to get a tiny blood sample.
PRECAUTION
- Before "
" appearing, please don't touch your blood drop to the sample
entry on strip because meter is doing a internal test. If you do so, the
meter will show "
" and "
" and you will waste a strip.
PRECAUTION
- To ensure accurate test results, make sure the code number on your meter matches the
code highlighted on the vial of test strips you are using.
- If the code number does not match, change the Smart Code Key to the right one and redo
a test.
- If the meter turns off before you apply the blood sample, take out the unused test strip and
reinsert it. You have three minutes to apply the blood sample before the meter turns off
automatically.
- Please follow the local regulation and discard the used strips properly.
34
PRECAUTION
Before you take the blood sample, please make sure your fingertip for
sampling is dry thoroughly. Water or alcohol might affect the accuracy
of testing.
2. Obtain a small blood drop on your finger
In order to get a more accurate measurement, suggest to discard the first
drop of blood. ( The first drop of blood from your fingertip might include
some body liquid which might affect the testing accuracy. )
3. You can start measurement by the second drop of blood.
35
Performing a Test in Order
4. The minimum blood sample size of
Sample Size Example
1.0µl
Performing a Test in Order
Glucose Monitoring System is 1.4µl :(
1.4µl
2.0µl
3.0µl
)
Applying blood sample to test strip
4.0µl
We suggest you to take 1.4~2.5µl to do the test on glucose monitoring system. Blood sample size
above 4.0µl might contaminate the Smart Code Key.
PRECAUTION
- Don’t take too much blood sample, such as 4.0µl ( please see how much it is in the
example picture ) or more, to do the test. Too much blood might contaminate the Smart
Code Key.
- Please clean it up right away if your Smart Code Key gets blood stain or moisture.
( Refer to page 55 for cleaning Smart Code Key )
- Blood sample size below 1.4µl might cause inaccurate test result or might not start on
meter measurement. In this case, repeat the test with a new test strip.
36
1. Touch the blood drop
to the sample entry of
the strip. The blood
will be drawn into the
strip automatically.
2. Hold your finger on the sample entry until you hear a " beep " and
the view window is totally filled with blood. If the view window is not
totally filled with blood and/or the test does not start, discard the
test strip and repeat the test with a new test strip. When you repeat
the test, you may want to obtain the blood sample from a different
finger if the first attempt did not produce enough blood sample.
PRECAUTION
- When you do a test, please pay attention not to squeeze too much blood to pollute Smart
Code Key.
37
Performing a Test in Order
View Window Appearance
Make sure your blood sample covers
the whole area of the View Window
to get an accurate test result.
Insufficient blood sample might
cause inaccurate test result. Repeat
the test with a new test strip.
Insufficient blood sample
Enough blood sample
PRECAUTION
- Check the expiration date printed on the package every time you use the strip. Do not use
expired test strips.
- Use each test strip immediately after taking it out from the vial.
- Do not reuse test strips.
- Assemble the Smart Code Key into your meter is necessary before starting your test.
- Be sure to change the Smart Code Key with each new box of
Test Strips.
- Do the test at least 30 minutes after while entering another site with different ambient
temperature.
38
- To ensure accurate test results, make sure the code number on your meter matches the
code number highlighted on the vial of test strips you are using.
- Only place the blood drop to the sample entry of the strip.
- Keep your Smart Code Key dry and clean. Please clean it up right away if your Smart Code
Key gets blood stain or moisture. ( Refer to page 55 for cleaning )
- Pose the finger and the strip to the way you feel most comfortable.
- Please follow the local regulation and discard the used strip and lancet properly.
Appearance of result
1. When blood is applied to the strip, you see the countdown mode appearing on
your screen. This means the meter is measuring your glucose value.
2. Your blood glucose result appears after the measurement is completed. The
result is displayed in mmol/L or mg/dL. At the same time, the result will be
memorized with time and date.
39
Comprehending Test Results and Messages
Performing a Test in Order
Blood glucose test results are shown on the meter as mmol/L or mg/dL, depending on which unit of
measurement you have chosen. Consult your healthcare professional before making any changes to
your diabetes medication program.
3. The testing result with time and date is automatically stored in your
meter's memory. You may also record the glucose value in your Log
Book.
4. Rotate to remove the test strip. Please follow the local regulation and
discard the used strip properly.
5
6
7
8
5. Pull off the depth adjustable cap. Without touching the used
disposable lancet, stick the lancet tip into the protective cover.
1
2
6. Hold the release button in one hand and pull on the plunger in the
other hand will safely eject the used disposable lancet.
7. Discard the used disposable lancet into an appropriate punctureproof or biohazard container.
If your blood glucose result is unusually high or low, or if you question your testing results, repeat
the test with a new test strip. You can also run a QUALITY CONTROL TEST with your
Check Key and
Control Solutions to check your meter and strip. ( Refer to page 46. )
If the test result still remains unusually high or low, contact your healthcare professional
immediately.
If you are experiencing symptoms that are not consistent with your blood glucose test results and
you have made sure to follow all instructions of this manual, contact your healthcare professional
immediately.
8. Replace the depth adjustable cap after finishing the test.
PRECAUTION
- The meter will power off automatically after 3 minutes no use. You can also turn off the meter
by pressing the main button for 2 seconds.
40
41
Comprehending Test Results and Messages
The
Meter displays results between 0.6 and 33.3 mmol/L or 10
and 600 mg/dL. If your test result is below 0.6 mmol/L ( 10 mg/dL ), "
" will
appear on the screen. Please repeat your test again by a new strip.
If you still get "
" result, you should immediately contact your healthcare
professional.
Recalling Your Test Result
The
meter is able to store 300 test results with time and date automatically. If your test
results are up to 300 sets, which is the max memory of the meter, your newest test results will replace
the old ones starting from the oldest one.
To recall your test memory, start with the meter without test strip inserted.
1. Press the main button "
" to switch the screen to memory function, it will show the latest testing
result with time and date. The latest result is with sequence number, " 1 "
If your test result is above the high end of the system's detective range
( 33.3 mmol/L or 600 mg/dL ), " " will appear on the screen. Please repeat
your test again by a new strip. If you still get " " result, you should
immediately contact your healthcare professional.
42
2. Under the memory screen, use either the "
" or "
" button on the side
to review all previous results with date and time. You will see results from
the most recent ( Sequence no, " 1 " ) to the oldest ( Sequence no, " 300 " )
at the down right corner of the screen.
43
Recalling Your Test Result
3. If a test result is not yours or you think it is not suitable to be calculated by
average, you can mark it as non-average data by pressing and firmly holding
the "
" or "
" button for over 2 seconds until the "
" and "
"
appears on the screen, then press the "
" button to confirm it.
4. The quality control solution test result can be recalled from the memorized
data. When you see data with the "
", it is testing data with control
solution. The result will not be used for average calculation.
5. If the ambient temperature is 0℃~9℃ or 41℃~50℃ ( 32℉~48℉ or 106℉
~122℉ ), the test result will show with "
" symbol blinking. The test
result under these range of temperature will not be used for average
calculation because the test result may not be correct. It is for reference only.
44
Recalling Your Average Test Result
The
meter provides you several average test results. You can view the 1-day, 7-day, 14day and 30-day average of test results for better blood monitoring of your blood glucose .
1. Press the main button "
" to switch the screen to average function.
2. Under the average of screen, use either the " " or " " for the option of 1-day, 7-day, 14-day or
30-day average of test results.
3. The number showed on the down right corner means how many test results are calculated.
4. The "
" , " " results, the control solution results, the non-average test results and the test result
made out of normal temperature range ( 0~9℃ and 41~50℃ ) are not calculated in the average.
PRECAUTION
- You have to set the time and date to activate the average function.
45
About Quality Control Test
What is quality control test ?
To make sure the monitoring system will work properly. It is necessary to do two kinds of quality
controls.
1. Check Key Test
Please check your meter function by check key, the detail is shown in " Starting with Check Key "
section on page 49.
2. Control Solution Test
If you finish the check key test without error, that only makes sure the meter is working properly.
You still have to use control solution to check if the strip and meter work together properly.
PRECAUTION
- The complete quality check should include check key test and control solution test. Before
you do control solution test, you have to do check key test first.
46
About Quality Control Test
When should perform a quality control test ?
- Before doing a blood glucose test with your meter for the first time.
- When you open and start using a new vial of test strips.
- When you replace a new Smart Code Key, please check your meter by " CHECK KEY ".
- When your meter is dropped or splashed with liquids.
- Whenever you think your test result does not consistent with the way you feel.
- Whenever you want to check if your system is working properly or not.
- Whenever you want to practice testing and check correct procedure.
Required items for quality control tests
To perform a quality control test you have to prepare
the items below :
Meter ( with Smart Code Key installed )
Blood Glucose Test Strips
Control Solution
Check Key
47
Performing a Quality Control Test
About Quality Control Test
PRECAUTION
- When you open a new bottle of
Control Solution, please write the discard date
on the label.
Control Solution is good for 3 months after opening the bottle, or
until the expiration date printed on the label, whichever comes first.
Example
Exp. Date 2012-06
- Replace the vial cap of control solution and close tightly right away after using of control
solution sample.
- Check the expiration date before you use the control solution. ( Refer to Control Solution
Package Insert. )
48
Starting with Check Key
1. Insert the
Check Key with " Check Key " word, facing up, into test strip
port. The meter quickly goes through a series of internal checks.
2. The check key allows you to make sure your meter is functioning well. You can
see "
" symbol and "
" symbol blinking on the screen.
The check key also allows your meter proceeding quality control test with control
solution.
NOTE
The check key is only for functional testing of meter. If you want to make sure
strip and meter work properly, please use control solution for the test ( see
page 50 for detail. )
3. If both "
" symbol and "
" symbol blinking appear, remove check key
and insert it again. If error screen appears again, your meter is not working
correctly. Please contact Bionime authorized distributor or Customer Service
Center.
4. If you don't want to conduct the control solution test after the test of check key,
please press "
" to leave "
" mode first. Then start the blood test procedure.
Otherwise, your test resuit will be recorded as "
" data which will not be
counted in average data.
49
Performing a Quality Control Test
Performing test with control solution
1. Please run check key test first. After see "
" symbol and "
" appear on
the screen. Remove check key from meter. The screen shows the "
"
symbol blinking and "
" appears. Then you need to put a new strip into the
meter.
2. Remove test strip from vial and Re-cap the vial cap immediately.
3. Insert the test strip with view window, facing up, into test strip port. The code
number will appear.
4. The test strip symbol stops blinking. You will see blinking "
" symbol and
"
" symbol on the screen. Then you need to approach your control solution to
the meter.
50
Performing a Quality Control Test
PRECAUTION
- Before you do control solution test, you have to do check key test first.
- Before " " appears, please don't touch the control solution to the sample
entry on strip because meter is stilling in a internal test. If you do so, the
meter will show "
" and " ".
OPEN
5. Shake the bottle of control solution well before opening the cap. Then open the
cap and put it on the table.
6. Drip a drop of control solution on the top of the cap.
NOTE
- Don't drip the control solution to sample entry of strip directly.
- Don't touch the control solution. If you have touched it, please clean up
with water.
7. Gently touch sample entry of the strip with the control solution on
the top of the cap.
○
×
51
Performing a Quality Control Test
8. When you hear a sound of " beep " , leave the meter on the table while waiting
the test result. The screen will show the countdown mode.
PRECAUTION
- Your quality control test result by control solution test will not be calculated for average
reading but still can be recalled. The control solution test result will be shown with "
"
symbol on the screen.
9. Tightly recap the cap of control solution.
10. The control result appears after the measurement is completed. Compare your
control test result to the range printed on strip vial label.
CLOSE
Example
Your result should fall within the control solution
range printed on the label of strip vial. If result is
not within the control range, please refer to
Understanding Control Test Results on page 54.
Please follow the local regulation and discard the
used strip properly.
52
Control Solution Range
90-130 mg/dL
5.0-7.2mmol/L
- You have to do check key test before control solution test. If you only use the control
solution to do the quality control test, your test result will be memorized and calculated for
average same as real blood test.
- Please don't touch the control solution by approaching the vial to
the sample entry on strip ( see drawing ). The reagent might be
sucked into the vial of control solution which alteration or
degeneration might happen. If you approach the control solution
vial to the sample entry on strip for 3~5 times, you will find that the
measurements might lower down for 10-20%.
- Keep your Smart Code Key dry and clean. Please clean it up right
away if your Smart Code Key gets stain or moisture.
( Refer to page 55 for cleaning )
53
Understanding Control Test Results
Your control solution test results should fall within the control solution range. That means your
System is working correctly.
Control Soultion Range
90-130 mg/dL
5.0-7.2 mmol/L
Example of control solution range
printed on your test strip vial label.
If control solution test results are out of control solution range, your
System may not be
working properly. Repeat the quality control test. If your control solution results outside the range still
exist, do not use the
System to test your blood glucose. And contact Bionime authorized
distributor or Bionime Customer Service.
The reason your control solution results are out of the range :
- Your control solution has expired or after 3 months since opened.
- Your test strip has expired.
- You leave the cap off the vial of test strips or control solution for a long time.
- You didn't perform the test procedure correctly.
- Malfunction of the meter.
54
Caring for Your Meter
Maintenance
Keep your meter and test strip free of dust, water or any other liquid. Store the meter in the carrying
case when not in use. If meter is dropped or damaged, perform a quality control test with the check
key and control solution before doing a blood glucose test.
Cleaning Meter
Clean the outside of the meter with a damp cloth and mild soap/detergent. Keep the test strip port
and Smart Code Key base from getting wet.
Cleaning Smart Code Key
If your Smart Code Key is stained with blood, control solution or any liquid, please use a dry tissue or
alcohol swab to clean it up immediately. Do not use any thing wet to clean it. Perform a check key
and quality control test to ensure the system is working properly.
55
Error Messages and Trouble Shooting
About Temperature Error
1. In order to get accurate testing, please do testing between 10~40℃ ( 50~104℉
).
2. When the ambient temperature is 0~9℃ ( 32~48℉) or 41~50℃ (106~122℉) ,
the "
" warning symbol will blinking, you still can do the test but the result
obtained is only for reference because the test result under these range of
temperature might not be correct. Repeat the test at an area with temperature
between operating range. ( 10~40℃ or 50~104℉ )
3. When you move from the area with temperature outside the operating range of
test strip to another area with temperature under operating range of test strip,
please wait for 30 minutes before you do the test.
4. When the temperature is below 0℃ ( 32℉ ) or over 50℃ ( 122℉ ), Meter can not
do the test and the "
" symbol will blink in this condition.
Please move the meter to environment with temperature between 10~40℃
( 50~104℉ ) and redo the test after 30 minutes.
56
Error Messages and Trouble Shooting
About Battery Error
1. The "
" symbol is blinking when the battery power is low. Please change
batteries as soon as you can. You can still do the test.
2. The "
" and "
" symbol are blinking when the battery is too low. Meter
can not do the strip test. Please change the batteries immediately.
3. After changing the batteries you should do the quality control test.
About Check Key Error
When you see "
" and "
" symbols showing on screen, please do the
check key test again. If this error message appears again, it would be Meter or
Check Key defect.
Please return your Meter and Check Key to the store where you bought.
About Smart Code Key Error
The Smart Code Key is faulty or not assembled well to the meter. Reinsert the Smart
Code Key. If the error screen appears again, contact Bionime Customer Service.
57
Error Messages and Trouble Shooting
About early applying blood sample or control solution
The blood sample or control solution are applied before the meter is ready. Repeat
the test with a new test strip. Add sample after the "
" symbol appears.
About Strip Error - Er1
Test strip inserted has been used or damaged. Please use a new test strip from vial.
About Meter Error - Er2
Meter has malfunctioned. Do the quality control test or reinstall the batteries to see if
the meter works properly.
If error screen still appears, contact Bionime Customer Service.
About Signal Error - Er3
When you do the test, the meter find the signal is unreasonable. Please do a new
test again.
58
Limitations
- Store the strips in the original capped vial at temperatures between 4℃ to 30℃ ( 39℉ to 86℉ ) and
relative humidity below 90%. Do not freeze.
Blood Glucose Test strips are designed for using with capillary whole blood and venous
whole blood samples. Do not use serum or plasma samples.
- Inaccurate test results may be obtained at high altitude more than about 10000 feet ( 3048 meters )
above sea level.
- Hematocrit below 30% may cause higher results, and hematocrit above 55% may cause lower
results.
- Severe dehydration and excessive water loss may cause inaccurately low results.
Blood Glucose Monitoring System has not been validated for use on neonates.
- The glucose test may be interfered under abnormal concentration of
Uric acid > 0.54 mmol/L ( > 9.0 mg/dL )
L - Dopa > 0.076 mmol/L ( > 1.5 mg/dL )
Methyldopa > 0.071 mmol/L ( > 1.5 mg/dL )
Cholesterol > 6.5 mmol/L ( > 250 mg/dL )
59
Specification
Specification
Measurement Technology
Oxidase Electrochemical Sensor
Hematocrit
30 - 55%
Sample
Capillary whole blood
Power Supply
Two 1.5V ( AAA ) batteries
Minimum Sample Volume
1.4 microliters
Battery Life
About 1000 tests
Measuring Range
10-600 mg/dL ( 0.6-33.3 mmol/L )
Meter Dimension
85.0 mm x 58.0 mm x 22.0 mm
Test Time
8 seconds
Meter Weight
85.0 g with batteries
Memory Capacity
300 blood glucose test results with date and
time
Monitor
LCD display
Power Saving
Turn off automatically after 3 minutes no use
Press the "
" button for 2 seconds.
Display Area
39.0 mm x 38.0 mm
Operating Temperature
10 ~ 40℃ ( 50 ~ 104℉ )
Meter Storage Conditions
-10 ~ 60℃ ( 14 ~ 140℉ )
Operating Relative Humidity
10 - 90%
Test Strip Storage Conditions
4 ~ 30℃ ( 39 ~ 86℉ ),< 90% relative humidity
60
61
Customer Service
Warranty
Bionime Corporation warrants that your
Meter will be free from defects in materials and
workmanship for five years from the date of purchase.
This warranty does not apply to the performance of a
misused, tampered with or abused in any way.
Meter that has been altered,
We sincerely like to provide complete, considerate services to our customers. Please review all the
instructions to make sure you are performing the steps correctly. You are always welcome to contact
us by call: 886 4 24951268 ( GMT+08:00, 08:30~17:30 ), or by e-mail at [email protected]
If you have any question or advice.
This warranty applies only to the original purchaser of the meter.
Please complete and return the enclosed warranty card to Bionime authorized representative.
Different models have different specifications. Some of the models are not included with the warranty
card.
IVD
For in vitro diagnostic use
Manufacturer
LOT
Lot number
Use by
Temperature limitation
Do not reuse
Method of sterilization using irradiation
62
63
Parts of Critical Component
Log Book
Blood Glucose Meter, Test Strip, Control Solution
Manufacturer: Bionime Corporation
694,Renhua Road, Dali Dist., Taichung City 412, Taiwan
Product complied with In Vitro Diagnostic Medical Device Directive 98/79/EC. ( CE0197 )
EC-Rep: Bionime GmbH, Tramstrasse 16, 9442 Berneck / Switzerland
Lancing device
Manufacturer: Bionime Corporation
694, Renhua Road, Dali Dist., Taichung City 412, Taiwan
Product complied with Medical Device Directive 93/42/EEC
EC-Rep: Bionime GmbH, Tramstrasse 16, 9442 Berneck / Switzerland
Disposable Sterile Lancets
Manufacturer: SteriLance Medical (SuZhou) Inc.
No.68 LiTangHe RD, XiangCheng, SuZhou, JiangSu 215133, P.R. China
Product complied with Medical Device Directive 93/42/EEC. ( CE0197 )
EC- Rep: EMERGO EUROPE, Molenstraat 15, 2513 BH The Hague, The Netherlands
64
65
Log Book
Breakfast
Lunch
Dinner
Bedtime
Other
COMMENTS
66
DATE
Blood
Glucose
Insulin/
Medication
Blood
Glucose
Insulin/
Medication
Blood
Glucose
Insulin/
Medication
Blood
Glucose
Insulin/
Medication
Blood
Glucose
Insulin/
Medication
Log Book
M
T
W
T
F
S
S
Breakfast
Lunch
Dinner
Bedtime
Other
DATE
Blood
Glucose
Insulin/
Medication
Blood
Glucose
Insulin/
Medication
Blood
Glucose
Insulin/
Medication
Blood
Glucose
Insulin/
Medication
Blood
Glucose
Insulin/
Medication
M
T
W
T
F
S
S
COMMENTS
67
Log Book
Breakfast
Lunch
Dinner
Bedtime
Other
COMMENTS
68
DATE
Blood
Glucose
Insulin/
Medication
Blood
Glucose
Insulin/
Medication
Blood
Glucose
Insulin/
Medication
Blood
Glucose
Insulin/
Medication
Blood
Glucose
Insulin/
Medication
Log Book
M
T
W
T
F
S
S
Breakfast
Lunch
Dinner
Bedtime
Other
DATE
Blood
Glucose
Insulin/
Medication
Blood
Glucose
Insulin/
Medication
Blood
Glucose
Insulin/
Medication
Blood
Glucose
Insulin/
Medication
Blood
Glucose
Insulin/
Medication
M
T
W
T
F
S
S
COMMENTS
69
Log Book
Breakfast
Lunch
Dinner
Bedtime
Other
COMMENTS
70
DATE
Blood
Glucose
Insulin/
Medication
Blood
Glucose
Insulin/
Medication
Blood
Glucose
Insulin/
Medication
Blood
Glucose
Insulin/
Medication
Blood
Glucose
Insulin/
Medication
Log Book
M
T
W
T
F
S
S
Breakfast
Lunch
Dinner
Bedtime
Other
DATE
Blood
Glucose
Insulin/
Medication
Blood
Glucose
Insulin/
Medication
Blood
Glucose
Insulin/
Medication
Blood
Glucose
Insulin/
Medication
Blood
Glucose
Insulin/
Medication
M
T
W
T
F
S
S
COMMENTS
71
Log Book
Breakfast
Lunch
Dinner
Bedtime
Other
COMMENTS
72
DATE
Blood
Glucose
Insulin/
Medication
Blood
Glucose
Insulin/
Medication
Blood
Glucose
Insulin/
Medication
Blood
Glucose
Insulin/
Medication
Blood
Glucose
Insulin/
Medication
Log Book
M
T
W
T
F
S
S
Breakfast
Lunch
Dinner
Bedtime
Other
DATE
Blood
Glucose
Insulin/
Medication
Blood
Glucose
Insulin/
Medication
Blood
Glucose
Insulin/
Medication
Blood
Glucose
Insulin/
Medication
Blood
Glucose
Insulin/
Medication
M
T
W
T
F
S
S
COMMENTS
73
Log Book
Log Book
Breakfast
Lunch
Dinner
Bedtime
Other
COMMENTS
74
DATE
Blood
Glucose
Insulin/
Medication
Blood
Glucose
Insulin/
Medication
Blood
Glucose
Insulin/
Medication
Blood
Glucose
Insulin/
Medication
Blood
Glucose
Insulin/
Medication
M
T
W
T
F
S
S
Breakfast
Lunch
Dinner
Bedtime
Other
DATE
Blood
Glucose
Insulin/
Medication
Blood
Glucose
Insulin/
Medication
Blood
Glucose
Insulin/
Medication
Blood
Glucose
Insulin/
Medication
Blood
Glucose
Insulin/
Medication
M
T
W
T
F
S
S
COMMENTS
75
Warranty Card
Warranty Card
(Please present this card for replacement purpose)
Name
Tel
Distributor name and address
PLACE
Address
Serial No
STAMP
Model
Distributor name and address
HERE
Date of purchase
Limited warranty:
1. Bionime corp warrants the original purchaser only, that the
Monitor shall be free of any defects in materials or
workmanship and, provided it is not modified, altered or misused, will perform in accordance with specifications for a
period of five (5) years from the original date of purchase.
2. Bionime guarantees the performance of the
Monitor only if used as directed and provided that the failure to
perform or misperformance of the
Monitor has not been caused in whole or in part by the use of test strips that
are not
Test Strips manufactured by Bionime. Use only
Test Strips in your
Monitor.
3. The sole obligation of Bionime under this warranty shall be to replace any defective
Monitor. No other
warranties, express or implied, are made. Bionime shall not be responsible for any incidental or consequential damages.
4. Activation of this warranty shall be conditioned upon completion and return of the warranty registration card to your local
authorized Bionime distributor.
5. You must contact your local authorized Bionime distributor for assistance and/or instructions for obtaining a replacement
monitor.
76
77
Warranty Card
Emergency Card
Thank you for purchasing our product. Please complete and mail this warranty card within 30 days of purchase of your
Blood Glucose Monitoring System.
Name
Male/Female
Date of Birth
Address
City
Country
Postal Code
Phone Number
Healthcare Professional Who Recommended
City
Country
Store/Pharmacy Name Where Purchased
City
Country
Date of Purchase
Model No:
Do you have
Type I
Type II
Serial/Lot No.
Gestational Diabetes?
Have you owned a blood glucose monitor before?
Yes
No
Which brand/s were you most recently using?
Will the
meter be your primary monitor?
Yes
How often do you test your blood glucose? Times per day
Do you use insulin?
Yes
How did you hear about the
No
Oral medication?
Yes
No
Blood Glucose meter?
Thank you for answering these questions and for your purchase of the
Glucose Monitoring System.
78
No
per week
Blood
*Please fill this card and carry with you at anytime.
79