1
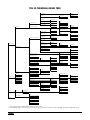
TSU IQ QUICK START GUIDE
Installation and Configuration
1.
2.
3.
4.
5.
6.
7.
Plug in AC power, press and hold the Quick key, and turn unit on. This sets the
unit to the factory default settings.
If a problem is detected during Self Test, contact ADTRAN Technical Support.
Activate menu item selections either by pressing the corresponding number (if
applicable) on the keypad or by scrolling to the selection using the arrow keys.
The cursor will flash on the first character of the activated selection. Press
Enter to select the activated menu item. See the Front Panel Keys section in
the right column of this page for more guidelines on using the front panel
interface.
Using a 4-wire telco cable, connect the TSU IQ’s telco connector to the telco
jack. The unit should establish synchronization with the T1 network. Verify
synchronization by viewing the TSU Loop State (STATS >NETWORK PORT
>TSU LOOP STATE). If this field displays a message other than D4 or ESF
NORMAL, refer to the Troubleshooting section below.
Connect unit to a router using a V.35 cable.
The TSU IQ should be exchanging frame relay PVC signaling messages with
the network. If the Signaling State (STATS >NETWORK PORT >SIGNAL
STATE) displays DOWN after one minute, see the Troubleshooting section
below.
Configure the PVC Options (CONFIG >NETWORK PORT >PVC CONFIG)
and the Management Options (CONFIG >SYSTEM) as desired for your
application.
Troubleshooting
Unit not in sync with T1:
1.
Ensure that the timing source is correct. By default, the TSU IQ derives timing
from the network (CONFIG >NETWORK PORT >PHYS LYR OPT >CLOCK
SOURCE).
2.
If the ERROR LED is on or blinking, change the LBO setting to 7.5 (CONFIG
>NETWORK PORT >PHYS LYR OPT >LBO). If the condition persists,
change the LBO to 15.
Network Signaling State is down:
1. The factory default setting for the signaling type is AUTO. Setting the unit to
the expected PVC signaling format may correct the problem (CONFIG
>NETWORK PORT >FR OPT >SIGNAL).
2. Ensure the correct start channel and number of channels is selected (CONFIG
>NETWORK PORT >PHYS LYR OPT).
Testing
Front Panel Keys
Enter: Selects the active menu
item.
Arrows: Scroll through and
activate the menu items of the
current menu. The flashing cursor
indicates the active parameter.
Cancel: Stops current activity and
returns to previous menu.
Numeric Keypad: Activates menu
items and enters numeric information.
Next, Prev, Add, and Delete: For
use when editing tables such as the
PVC Options table. You must press
and release the Shift key first to
activate these keys.
Quick: Resets the unit to factory
default settings. To reset, press and
hold this key when turning the TSU
IQ power on. When defaults are
successfully loaded, the unit name
displayed in the LCD is followed by
an exclamation point (!).
901 Explorer Boulevard
P.O. Box 140000
Huntsville, AL 35814-4000
Technical Support: (888) 4ADTRAN
© 1999 ADTRAN, Inc.
All rights reserved.
Printed in USA.
To verify data integrity across the frame relay network, perform a PVC loopback test
for each PVC (TEST >PVC LOOPBACK). This test is non-intrusive and can be
performed on all PVCs or on an individual PVC.
TSU IQ Quick Start Guide
61200215L1-13A
TSU IQ TERMINAL MENU TREE
1 F L OW CONT R OL
1 NONE
2 HAR DWAR E
2 CT S OP T ION
1 F OR CE D ON
3 F E CN/B E CN
2 F OL L OW R T S
3 DS R OP T ION
1 F OR CE D ON
4 CD OP T ION
2 NOR MAL
1 P HY S ICAL L AY E R
5 T C CL OCK OP T ION
1 DT E P OR T
1 T 392
2 N392
1 NOR MAL
3 N393
2 INVE R T E D
4 MANAGE ME NT DL CI
1 E NA B L ED
5 MANAGE ME NT P VC OP T ION
2 DIS AB L E D
2 F R AME R E L AY OP T IONS
1 D4
1 F R AMING F OR MAT
6 S IGNA LING R E S PON S E S
2 ESF
3 AUT O
2 L INE CODE
1 AL WAY S ON
2 F OL L OWS NE T WOR K
1 B 8Z S
2 AMI
1 AUT O
20
3 CL OCK S OU R CE
1 P HY S ICAL L AY E R OP T IONS
1 INT E R NAL
3 7.5
2 F R OM NE T WOR K
4 15.0
4 L INE B U IL DOUT
5 R X S E NS IT IVIT Y
1 CONF IGUR AT ION
5 22.5
1 NOR MAL
2 E X T E NDE D
6 CHANNE L B ANDWIDT H
2 NE T WOR K P OR T
1 X 56K
2 X 64K
7 CHANNE L AL IGNME NT
1 CONT IGUOUS
2 AL T E R NA TING
8 S T AR T CHANN E L
9 NUMB E R OF CHANN E L S
1 YE S
10 T R ANS MIT P R M
2 NO
2 F R AME R E L AY OP T IONS
1 S IGNA L T Y P E
3 MANAGE ME NT DL CI 1
4 MANAGE ME NT DL CI 2
1 DL CI
4 N392
4 IT U-T Q.933-A
2 DB U DL CI
5 N393
5 AUT O
6 MANAGE ME NT DL CI 2 MODE
2 DE DICAT E D
3 CIR (K bps )
7 MAX P VC COU NT
4 S E Q NU M CHE CK ING
1 DIS AB L E D
8 HIS T OR Y INT E R VAL COUNT
5 DE L AY ME AS UR E ME NT
2 E NA B L ED
9 P VC OP T IONS
6 S T AT S OP T ION
2 E NA B L E
7 NE X T
3 DIS AB L E
1 AUT O
8 P R E VIOUS
9 ADD
3 S UB NE T MAS K *
1 T E R MINAL
4 GAT E WAY IP ADDR E S S *
2 S L IP P R OT OCOL
5 CONT R OL P OR T OP T IONS
3 P P P P R OT OCOL
10 DE L E T E
1 DT E P OR T
6 R E AD COMMUNIT Y NAME
1 T R AP MANAG E R D LCI
2 NE T WOR K P OR T
7 WR IT E COMMUNIT Y NAM E
2 T R AP MNGR IP ADD R E S S
3 L AY E R 3 S T AT S
8 T R AP MANAG E R O P TION
3 T R AP MANAG E R PO R T
2 DT E P OR T
4 NE X T
3 NE T WOR K P OR T
4 T OP T AL K E R S
3 TEST
3 AN SI T1.617-D
1 S HAR E D
2 IP ADDR E S S
2 VIE W S T AT IS T ICS
2 L MI
3 N391
5 MANAGE ME NT DL CI 1 MODE
1 CHANGE P AS S WOR D
3 S YS T E M
1 NONE
2 T 391
1 NONE
5 DL CI L IS T
9 P R OT OCOL 1
1 NONE
5 P R E VIOUS
4 CONT R OL P OR T
6 S YS T E M
10 P R OT OCOL 2
2 IP
6 ADD
5 E T HE R NE T P OR T *
7 R E S E T S T AT IS T ICS
11 S Y S T E M T IME
3 IP X
7 DE L E T E
1 P ING *
12 S Y S T E M DAT E
1 5 MINU T E S
13 HIS T OR Y INT E R VAL S IZ E
2 10 MINU T E S
4 AR P
5 S NA
3 15 MINU T E S
6 UNK NOWN
P INGS S E NT
4 20 MINU T E S
R E S P ONS E S
5 30 MINU T E S
MIN T IME
1 P ING ADD R E S S
MAX T IME
2 S T AR T P ING
AVG T IME
1 DL CI
2 P VC L OOP B ACK
4 L OGOUT
2 T E S T L E N : MIN <0=UNT IME D>
3 S T AR T T E S T
4 S T OP T E S T
5 VIE W T E S T
6 R E S E T T E S T S T AT S
7 VIE W DL CI L IS T
* These options are only available when the Ethernet card is installed.
** If a Dial Backup (DBU) card is installed, refer to the TSU IQ User Manual for a menu tree of the related DBU and Dialing configuration options.
TSU IQ Quick Start Guide
61200215L1-13A