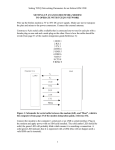
1
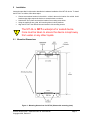
User Manual:
GSM2218PB001MAN
Enfora MT-GL (GSM/GPRS)
User Manual
Release 1.03
Confidential and Proprietary Information - © 2005 Enfora, L.P.
Do not duplicate without express permission from Enfora, L.P.
Enfora L.P. 661 E. 18th Street Plano Texas 75074
www.enfora.com
Version:
1.03
Date:
04/07/06
Status:
Released
Document Control ID:
GSM2218PB001MAN
General
All efforts have been made to ensure the accuracy of material provided in this document at the time of
release. However, the items described in this document are subject to continuous development and
improvement. All specifications are subject to change without notice and do not represent a
commitment on the part of Enfora, L.P. Enfora, L.P. will not be responsible for any loss or damages
incurred related to the use of information contained in this document.
This product is not intended for use in life support appliances, devices or systems where a
malfunction of the product can reasonably be expected to result in personal injury. Enfora, L.P.
customers using, integrating, and/or selling this product for use in such applications do so at their own
risk and agree to fully indemnify Enfora, L.P. for any damages resulting from illegal use or resale.
Copyright
Complying with all applicable copyright laws is the responsibility of the user. Without limiting the
rights under copyright, no part of this document may be reproduced, stored in or introduced into a
retrieval system, or transmitted in any form or by any means (electronic, mechanical, photocopying,
recording or otherwise), or for any purpose, without the express written permission of Enfora, L.P.
Enfora may have patents, patent applications, trademarks, copyrights or other intellectual property
rights covering subject matter in this document. Except as expressly provided in any written license
agreement from Enfora, the furnishing of this document does not give you any license to these
patents, trademarks, copyrights or other intellectual property.
©2005, Enfora, L.P. All rights reserved.
Enabler is a registered trademark or trademark of Enfora, L.P. in the United States.
Regulatory Compliance
FCC
The modem was tested and certified to meet FCC Parts 15 in a stand-alone configuration, which
demonstrated that the GSM2218 MT-GL complies with Part 15 emission limits. FCC Part 22 & Part
24 is covered by the Enfora Enabler-IIG "modular approval" process for a transmitter. This
approach, described by FCC Public Notice DA 00-131407 released June 26, 2000, is intended to
afford relief to equipment manufacturers by eliminating the requirement for obtaining a new
equipment authorization for the same transmitter when installed in a new device.
In order to use the GSM2218 MT-GL without additional FCC certification approvals, the installation
must meet the following conditions:
For the transmitter to meet the MPE categorical exclusion requirements of 2.1091, the
ERP must be less than 1.5 watts for personnel separation distance of at least 20 cm (7.9
in). Therefore, the maximum antenna gain cannot exceed +3.3dBi. If greater than 1.5
watts exists, then additional testing and FCC approval is required.
R&TTE The GSM2218 MT-GL modem has been fully tested and complies with all the requirements of EN301
489-1, EN301 489-7 and EN60950-1:2001. Compliance to EN301 511 has been demonstrated by
testing on both the GSM2218 and the integrated GSM0108 module.
Disclaimer
The information and instructions contained within this publication comply with all FCC, GCF, PTCRB,
R&TTE, IMEI and other applicable codes that are in effect at the time of publication. Enfora disclaims
all responsibility for any act or omissions, or for breach of law, code or regulation, including local or
state codes, performed by a third party.
Enfora strongly recommends that all installations, hookups, transmissions, etc., be performed by
persons who are experienced in the fields of radio frequency technologies. Enfora acknowledges that
the installation, setup and transmission guidelines contained within this publication are guidelines,
and that each installation may have variables outside of the guidelines contained herein. Said
variables must be taken into consideration when installing or using the product, and Enfora shall not
be responsible for installations or transmissions that fall outside of the parameters set forth in this
publication.
Enfora shall not be liable for consequential or incidental damages, injury to any person or property,
anticipated or lost profits, loss of time, or other losses incurred by Customer or any third party in
connection with the installation of the Products or Customer's failure to comply with the information
and instructions contained herein.
Warranty Information
LIMITED WARRANTY
Scope
Enfora warrants to the original purchaser of the product that, for a period of one (1) year from the date
of product purchase, the product hardware, when used in conjunction with any associated software
(including any firmware and applications) supplied by Enfora, will be free from defects in material or
workmanship under normal operation. Enfora further warrants to such original purchaser that, for a
period of ninety (90) days from the date of product purchase, any software associated with the
product will perform substantially in accordance with the user documentation provided by Enfora, and
any software media provided with the product will be free from defects in material or workmanship
under normal operation. Enfora does not warrant that (a) the product hardware or any associated
software will meet the purchaser’s requirements, (b) that the operation of the product hardware or
software will be uninterrupted or error-free, or (c) the product, when integrated in, or combined with,
other products or software not supplied by Enfora, will continue to perform substantially in accordance
with the user documentation. This limited warranty is only for the benefit of the original purchaser and
is not transferable. No other party may act on behalf of such purchaser for the purpose of claiming or
exercising any rights or benefits under or in connection with this limited warranty except as may be
provided in a written agreement between Enfora and such other party.
Hardware
During the warranty period applicable to the product hardware, Enfora, at its expense and in its sole
discretion, will repair or replace the product if it is determined to have a covered hardware defect,
provided that the purchaser first notifies Enfora of any such defect, furnishes Enfora with a proof of
purchase, requests and obtains a return merchandize authorization (RMA) number from Enfora, and
returns the product, shipping charges prepaid, to Enfora under that RMA. If, upon reasonable
examination of the returned product, Enfora does not substantiate the defect claimed by purchaser, or
determines that the defect is not covered under this limited warranty, Enfora will not be required to
repair or replace the product, but may instead reship the product to the purchaser, in which case
purchaser shall be responsible for paying Enfora’s usual charges for unpacking, testing, and
repacking the product for reshipment to purchaser. Purchaser shall bear the risk of loss or damage in
transit to any product returned by purchaser to Enfora, or any returned product not found to be
defective or covered under this warranty and reshipped by Enfora to purchaser. In the event Enfora
repairs or replaces a defective product, the repaired or replacement product will be covered under this
limited warranty for the remainder of the original warranty period on the defective product. If Enfora is
unable to repair or replace a defective product, the purchaser’s exclusive remedy shall be a refund of
the original purchase price. Any returned and replaced product, or any product for which Enfora has
refunded the original purchase price, becomes the property of Enfora.
Software
During the warranty period applicable to the software or its media, Enfora, at its expense, will replace
any defective software or media if purchaser gives written notification of the defect to the technical
support department at Enfora during the applicable warranty period. Enfora will ship or otherwise
transmit the replacement software or media to purchaser, and purchaser shall be responsible for
incorporating any replacement software in the product. Enfora shall not have any obligation to
provide any software bug fixes, upgrades or new releases except as may be necessary to correct any
covered defect of which purchaser notifies Enfora in writing during the applicable warranty period.
Enfora, from time to time and in its sole discretion, may make available for download on its website
(www.enfora.com) certain software bug fixes, upgrades or new releases for the product. The
purchaser should periodically visit such website to determine whether any such bug fixes, upgrades
or new releases have become available. Download and use of any such bug fixes, upgrades or new
releases is subject to all of the applicable terms and conditions of Enfora’s technical support policy as
posted and updated on its website.
Exceptions and Disclaimers
Enfora shall have no obligation under this limited warranty for (a) normal wear and tear, (b) the cost of
procurement of substitute products or (c) any defect that is (i) discovered by purchaser during the
warranty period but purchaser does not notify or request an RMA number from Enfora, as required
above, until after the end of the warranty period, (ii) caused by any accident, misuse, abuse, improper
installation, handling or testing, or unauthorized repair or modification of the product, (iii) caused by
use of any software other than any software supplied by Enfora, or by use of the product other than in
accordance with its documentation or (iv) the result of electrostatic discharge, electrical surge, fire,
flood or similar causes. Unless otherwise provided in a written agreement between the purchaser
and Enfora, the purchaser shall be solely responsible for the proper configuration, testing and
verification of the product prior to deployment in the field.
ENFORA’S SOLE RESPONSIBILITY AND PURCHASER’S SOLE REMEDY UNDER THIS LIMITED
WARRANTY SHALL BE TO REPAIR OR REPLACE THE PRODUCT HARDWARE, SOFTWARE OR
SOFTWARE MEDIA (OR IF REPAIR OR REPLACEMENT IS NOT POSSIBLE, OBTAIN A REFUND
OF THE PURCHASE PRICE) AS PROVIDED ABOVE. ENFORA EXPRESSLY DISCLAIMS ALL
OTHER WARRANTIES OF ANY KIND, EXPRESS OR IMPLIED, INCLUDING WITHOUT
LIMITATION ANY IMPLIED WARRANTIES OF NON-INFRINGEMENT, MERCHANTABILITY,
SATISFACTORY PERFORMANCE AND FITNESS FOR A PARTICULAR PURPOSE. IN NO EVENT
SHALL ENFORA BE LIABLE FOR ANY INDIRECT, SPECIAL, EXEMPLARY, INCIDENTAL OR
CONSEQUENTIAL DAMAGES (INCLUDING WITHOUT LIMITATION LOSS OR INTERRUPTION OF
USE, DATA, REVENUES OR PROFITS) RESULTING FROM A BREACH OF THIS WARRANTY OR
BASED ON ANY OTHER LEGAL THEORY, EVEN IF ENFORA HAS BEEN ADVISED OF THE
POSSIBILITY OR LIKELIHOOD OF SUCH DAMAGES.
Other Considerations
Some jurisdictions may require a longer warranty period than specified above and, accordingly, for
products sold in those jurisdictions the applicable warranty period shall be extended as required
under the laws of those jurisdictions. Furthermore, some jurisdictions may not allow the disclaimer of
implied warranties or the exclusion or limitation of incidental or consequential damages, so the above
disclaimer, limitation or exclusion may not apply to products sold in those jurisdictions. This limited
warranty gives the purchaser specific legal rights and the purchaser may have other legal rights that
vary from jurisdiction to jurisdiction.
In some instances, certain aspects of the product warranty may also be covered in a separate written
agreement between Enfora and the distributor or reseller, if any, from whom purchaser purchased the
product. That agreement may provide, for example, a different product return procedure that may
also be available to purchaser (e.g., the product may be returned to Enfora through that distributor or
reseller).
Governing Law
This limited warranty shall be governed by the laws of the State of Texas, United States of America,
without regard to conflict of laws principles. This limited warranty shall not be governed in any respect
by the United Nations Convention on Contracts for the International Sale of Goods.
Date
November 11, 2005
Rev
1.00
December 7, 2005
1.01
January 4, 2006
April 7, 2006
1.02
1.03
Author
Mike Cook
Description
Released
Diane O’Neil
Diane O’Neil
Added warning in section 2.7 regarding
voltage
Clarified Pin 1 description
Added CE information
Table Of Contents
1
Introduction ........................................................................................................................... 1
About the GSM/GPRS MT-GL.............................................................................................. 1
About This Manual................................................................................................................ 1
Contents of Basic Package .................................................................................................. 1
Available Accessories........................................................................................................... 1
System Requirements .......................................................................................................... 1
MT-GL Front and Back View ................................................................................................ 2
Product Specifications .......................................................................................................... 3
2
Installation............................................................................................................................. 4
2.1
Mounting Dimensions ........................................................................................................... 4
2.2
Installing Cables ................................................................................................................... 7
2.2.1 12 pin Connector............................................................................................................... 8
2.2.2 MT-GL Serial Adapter (Optional) ...................................................................................... 9
2.3
Installing Subscriber Identity Module (SIM) Card ............................................................... 12
2.4
Audio In/Audio Out.............................................................................................................. 13
2.5
Connecting GSM/GPRS modem Antenna.......................................................................... 14
2.6
Connecting GPS Antenna .................................................................................................. 15
2.7
Connecting the Power Source............................................................................................ 16
2.8
LED Operation .................................................................................................................... 17
3
Additional Software Features ............................................................................................. 18
4
Appendix 1 – Cable Wiring Diagrams................................................................................. 20
1.1
1.2
1.3
1.4
1.5
1.6
1.7
Table of Figures
Figure 1 - Enfora MT-GL Front View ...................................................................................................... 2
Figure 2 - Enfora MT-GL Back View....................................................................................................... 2
Figure 3 - Mounting dimensions of a MT-GL (Shown with mounting plate) ........................................... 4
Figure 4 - MT-GL Mounting Bracket (attached)...................................................................................... 5
Figure 5 - MT-GL Mounting Bracket (separated) ................................................................................... 6
Figure 6 - MT-GL Bracket Installation..................................................................................................... 6
Figure 7 - MT-GL Bracket Installation..................................................................................................... 7
Figure 8 - I/O Connector......................................................................................................................... 8
Figure 9 - 12-Pin Connection.................................................................................................................. 9
Figure 10 - Inserting a SIM ................................................................................................................... 12
Figure 11 - GSM/GPRS Antenna Connection ...................................................................................... 14
Figure 12 - GPS Antenna Connection.................................................................................................. 15
Figure 13 – Wiring for Power Only ....................................................................................................... 20
Figure 14 – Wire for Programming Cable............................................................................................. 20
Tables
Table 1 - 12 pin I/O Connector Interface ................................................................................................ 8
Table 2 - Audio Settings ....................................................................................................................... 13
Table 3 - GSM Operating Power .......................................................................................................... 16
Table 4 - GPRS Operating Power ........................................................................................................ 16
1
Introduction
1.1
About the GSM/GPRS MT-GL
The GSM/GPRS MT-GL (hereafter referred to as “MT-GL”) is an Automated Vehicle Locating (AVL)
device that utilizes a GSM/GPRS modem and a Global Positioning Satellite (GPS) module. Working
together, these technologies allow the MT-GL to simultaneously act as a stand alone GPS reporting
device and wireless data retrieval unit. The MT-GL provides a flexible AVL solution with Input/Output
(I/O), six selectable National Maritime Electronics Association (NMEA) GPS data format, Trimble
ASCII Interface Protocol (TAIP) GPS data format, and Enfora’s own proprietary Binary GPS data
format. The MT-GL is designed to work in a stand-alone device in an automobile. Enfora’s MT-GL
provides maximum AVL versatility in a single affordable device.
1.2
About This Manual
Contained in this manual are instructions on how to install and configure the MT-GL. Please follow
the instructions herein closely to avoid damaging the MT-GL.
1.3
Contents of Basic Package
•
•
•
1.4
Enfora MT-GL (P/N - GSM2218)
Mounting brackets
Documentation CD-ROM
Available Accessories
The following accessories for the MT-GL are available directly from Enfora:
•
•
•
1.5
Combination GPS and GSM/GPRS antenna. There are two models available; through-hole
(P/N ANT1303) and magnetic mount (P/N ANT1313).
12-pin serial I/O loading cable with DB-9 connector (P/N ADT2218).
12-pin connector with pins.
System Requirements
It’s necessary to have some type of terminal equipment, which includes a serial port, in order to
configure the MT-GL modem. This can be a computer running a Windows Operating System with the
HyperTerminal program.
GSM2218PB001MAN - GSM/GPRS MT-GL User Manual
Copyright 2005, Enfora L.P
Page 1
1.6
MT-GL Front and Back View
Figure 1 - Enfora MT-GL Front View
Figure 2 - Enfora MT-GL Back View
GSM2218PB001MAN - GSM/GPRS MT-GL User Manual
Copyright 2005, Enfora L.P
Page 2
1.7
Product Specifications
System Requirements
Interface:
Serial – Host DSUB 9 connector
L x W x H:
4.0 x 5.0 x 1.6 in
Housing:
One Piece, seamless Aluminum
Extrusion
TX Power:
Class 4 (2W @850/900 MHz)
Class 1 (1W @1800/1900 MHz)
Slot Class:
MS10(4RX/2TX, 5 MAX)
Band Operation
GSM2218 (850/900/1800/1900)
GPRS Packet Data
Mode:
Class B, Multislot 10 Certified
Protocol:
GPRS Release 97, SMG 31
Coding Schemes: CS1 – CS4
Packet Channel: PBCCH/PCCCH
Application Interface
• Host Protocols:
PPP, AT Commands, UDP,
TCP/IP
• Internal Protocols: UDP, TCP/IP (future release)
• API Control/Status: AT or UDP
• Friend’s IP Feature
• Auto-Registration software upon power-up
• Over the air commands for:
- I/O Control
- Status Change Reporting
- GPS TX Interval - GPS Content
- Binary Reporting - Event Reporting
- Timed Reporting - Distance Reporting
- Alarm Reporting - Geo-Fencing
SIM Card / Interface / I/O
• SMA Antenna Connector for 3.3 Vdc GPS 3.3
• External SIM accessible via end cap
• Audio connection
• TNC Antenna Connector for GSM
• 3 Pin I/O – 2 Input, 1 Output
3 LED Status indicators
1 Ignition Sense
• 1 Audio Input/Output
Environment
Operating:
-30°C to +70°C
Spec. Compliant: -20°C to +60°C
Storage:
-40°C to +85°C
Humidity:
Up to 95% non-condensing
GSM Functionality
Voice:
Full Rate, Enhanced full rate and
half rate, AMR (GSM2218)
CS Data:
Asynchronous, transparent and
non transparent up to 9.6 KB
GSM SMS:
Text, PDU, MO/MT Cell
broadcast
Certification (Pending)
GSM2218
FCC: Part 15,22,&24
Part 15
GCF: Version 3.11.0
Version 3.5.1
PTCRB: Version 2.9.1
Version 2.7.2
Industry Canada
Industry Canada
RTTE
RTTE
Status Indicator
• Power ON
• Registration Status
• GPS Status
• User Defined
GPS Functionality
• SMA Antenna Connector for GPS
• Supports 3.3V Active Antenna
• GPS Protocols: NMEA, TAIP, Enfora binary
• Stored GPS Messages Feature
Part Number
GSM2218
Power
DC Voltage:
9 - 30 V
MT-GL 2218 @ 12V Avg
Peak
BAND
MODE
(mA)
(A) @ (dBM)
GSM 850&
1TX/1RX 390
0.600 @ 32.5
900
1RX
180
Idle
65
GSM 1800& 1TX/1RX 400
0.570 @ 32.0
1900
1RX
190
Idle
55
GSM2218PB001MAN - GSM/GPRS MT-GL User Manual
Copyright 2005, Enfora L.P
850/900/1800/1900
Page 3
2
Installation
Instructions provided in this section describe the hardware installation of the MT-GL device. To install
the MT-GL in a vehicle, follow these steps:
•
Choose a convenient location in the vehicle – either in the trunk or interior of a vehicle. Avoid
locations that might expose the device to excessive heat or moisture.
Hold the MT-GL in place and mark the location for mounting screw holes
Using the markings as a guide, drill mounting holes in those positions
Align the MT-GL in the drilled holes and secure it with mounting screws
•
•
•
!
2.1
The MT-GL is NOT a waterproof or sealed device.
Care must be taken to ensure the device is kept away
from water or any other liquids.
Mounting Dimensions
Figure 3 - Mounting dimensions of a MT-GL (Shown with mounting plate)
GSM2218PB001MAN - GSM/GPRS MT-GL User Manual
Copyright 2005, Enfora L.P
Page 4
The bracket should be used as a template to mark screw holes for installation. See Figure 4 - MT-GL
Mounting Brackets. The mounting holes are designed for a number 10 screw. Once mounting holes
have been located for placement, the mounting plate can be easily broken into two parts as
demonstrated in Figure 5 - MT-GL Mounting Bracket (separated). The mounting bracket must be
separated in order to affix it to the MT-GL. The two pieces will easily slide into the grooves on the
modem.
Figure 4 - MT-GL Mounting Bracket (attached)
GSM2218PB001MAN - GSM/GPRS MT-GL User Manual
Copyright 2005, Enfora L.P
Page 5
Figure 5 - MT-GL Mounting Bracket (separated)
Figure 6 - MT-GL Bracket Installation
GSM2218PB001MAN - GSM/GPRS MT-GL User Manual
Copyright 2005, Enfora L.P
Page 6
Figure 7 - MT-GL Bracket Installation
2.2
Installing Cables
During installation, the following precautions will help ensure proper operation of the MT-GL
•
•
•
•
Remove power from the MT-GL.
Do not create loops, sharp bends or crimps in the cables
All cables should be attached to the vehicle and equipment in such a way to reduce stress or
wear caused by vibration generated by moving vehicles.
Use proper terminations on all power cables
GSM2218PB001MAN - GSM/GPRS MT-GL User Manual
Copyright 2005, Enfora L.P
Page 7
2.2.1 12 pin Connector
The user can purchase the optional 12-pin external I/O connector for the Enfora MT-GL that can be
used to interface with other devices. Enfora can provide an optional cable and connector (Part
#ADT2218). The user also has the option of building his/her own cable. Table 1 describes the pin
functionality for this 12 pin I/O connector. Pins that are not planned for usage can be left open without
anything connected to them.
Pin Number
Pin – 1
Pin – 2
Pin – 3
Pin – 4
Pin – 5
Pin – 6
Pin – 7
Pin – 8
Pin – 9
Pin – 10
Pin – 11
Pin – 12
Functionality
Serial Data Out
Serial Data In
Audio – Ear Speaker Out (-)
Audio – Ear Speaker Out (+)
Audio – Mic Input (+)
Audio – Mic Input (-)
User Controlled Output
User Controlled I/O
User Controlled I/O
Switched Power (Ignition)
Unswitched Power (Battery)
Ground
Table 1 - 12 pin I/O Connector Interface
Figure 8 - I/O Connector
GSM2218PB001MAN - GSM/GPRS MT-GL User Manual
Copyright 2005, Enfora L.P
Page 8
2.2.2 MT-GL Serial Adapter (Optional)
Enfora P/N ADT2218 can be used to provide a standard serial interface for the MT-GL. This adapter
provides a standard DB9 serial interface and power to the unit. The adapter would be used for
loading new software onto the MT-GL. The customer may choose to connect directly to the 12-pin
connector serial interface pins, or order this convenient adapter from Enfora.
Note: Only three of the pins are used; ground, serial in and serial out.
See Figure 9 - 12-Pin Connection.
Pin Number One
Figure 9 - 12-Pin Connection
GSM2218PB001MAN - GSM/GPRS MT-GL User Manual
Copyright 2005, Enfora L.P
Page 9
The customer can also build their own cable, if they choose. The following information contains
photographs and the manufacturer’s (AMP/Tyco) part numbers for the parts needed to build the
cable. Enfora recommends using 20-gauge wire when building the connector.
Pin Housing (2-87499-1)
Pins (8523-6)
NOTE: Instead of using the previous two parts, you can build the cable using the
Wago 733-112 connector (Enfora part number CON-3000-0112.) This connector is
keyed, so the user won’t be able to insert the connector into the MT-GL the wrong
way.
GSM2218PB001MAN - GSM/GPRS MT-GL User Manual
Copyright 2005, Enfora L.P
Page 10
DB-9 Pinout
There are three pins that are used to connect to the serial port of your computer. These are for
transmit (out), receive (in) and ground.
The following diagram displays the serial end of the interface cable.
Pin 1 on the
MT-GL
Pin 12 on the
MT-GL
Pin 2 on the
MT-GL
GSM2218PB001MAN - GSM/GPRS MT-GL User Manual
Copyright 2005, Enfora L.P
Page 11
2.3
Installing Subscriber Identity Module (SIM) Card
The SIM, an integral part of any GSM terminal device, is a “smart card” that is programmed with
subscriber information. The user information consists of an International Mobile Subscriber Identity
(IMSI) number which is registered with the GSM/GPRS service provider and an encryption Ki
(pronounced “key”). This information consists of a microprocessor and memory installed on a plastic
card. A SIM card can be installed by simply inserting the SIM card in the SIM slot provided in the front
of the device. See Figure 10 - Inserting a SIM below.
Note:
!
The SIM card is not provided with the MT-GL device. The SIM must be obtained from
the GSM/GPRS service provider and must be provisioned by the operator for data
and/or voice. Always take care to protect the SIM. MT-GL’s GSM/GPRS related
functionality will not operate without the SIM installed.
Ensure the power to the MT-GL is disconnected before
inserting the SIM card. Failure to do so might result in
unusable MT-GL or a damaged SIM card.
Figure 10 - Inserting a SIM
GSM2218PB001MAN - GSM/GPRS MT-GL User Manual
Copyright 2005, Enfora L.P
Insert the SIM into the SIM Slot
with the notch going into the
slot first, and facing toward the
left side of the modem.
Page 12
2.4
Audio In/Audio Out
The only way of connecting the microphone/speaker is via pins 3 - 6 of the 12-pin connector.
!
Please follow the specifications as listed in the table
below. Enfora is not liable for damage to the MT-GL
caused due to user error.
Ear – Speaker Output:
Parameter
Conditions
Maximum Input Range –
Mic(+) to Mic(-)
Inputs 3 dBm0 (Max. digital
sample amplitude when PGA
gain set to 0 dB)
Nominal Ref. Level –
Mic(+) to Mic(-)
Differential Input
Resistance –
Mic(+) to Mic(-)
Microphone Pre-Amplifier
Gain
Bias Voltage on Mic(+)
MIN
UNIT
TYP
MAX
32.5
mVrms
-10
dBm0
100
kΩ
25.6
2.0 or 2.5 V
Mic Bias Current Capability
dB
2.0
Vdc
0
mA
2.5
0.5
Handset Speaker Output
Parameter
Maximum Swing –
Ear(+) to Ear(-)
Maximum Capacitive Load –
Ear(+) to Ear(-)
Amplifier Gain
Amplifier State in Power Down
Conditions
RL = 32 Ω & 5% distortion
MIN
1.2
TYP
1.5
1
MAX
UNIT
Vpp
100
pF
dB
High Z
Table 2 - Audio Settings
GSM2218PB001MAN - GSM/GPRS MT-GL User Manual
Copyright 2005, Enfora L.P
Page 13
2.5
Connecting GSM/GPRS modem Antenna
The user must supply the GSM/GPRS antenna. The antenna must have a nominal impedance of 50
Ohms. The VSWR must be less than 2.0:1. System antenna gain should be 0 – 2 dB for optimum
performance.
The antenna connector on the GSM/GPRS MT-GL model is a TNC female connector.
The antenna has to be connected to the connector labeled “MODEM ANT”. See Figure 11 GSM/GPRS Antenna Connection.
GSM/GPRS
Antenna
Figure 11 - GSM/GPRS Antenna Connection
GSM2218PB001MAN - GSM/GPRS MT-GL User Manual
Copyright 2005, Enfora L.P
Page 14
2.6
Connecting GPS Antenna
The user must supply the GPS antenna. The GPS receiver inside the MT-GL powers the pre-amplifier
in the GPS antenna (Active-style) by applying a power of 3.3 Volts to the center conductor of the RF
input to the GPS receiver. If a passive-style GPS antenna must be used, please verify that it has a
DC block installed in order to prevent shorting to ground. GPS antenna connector on the MT-GL
model is a SMA female connector. The GPS antenna must be placed in an area where it can have
direct view of the sky.
The GPS antenna must be connected to the connector labeled “GPS ANT”. See Figure 12 - GPS
Antenna Connection.
!
User must disconnect power before connecting the
GPS antenna
GPS
Antenna
Figure 12 - GPS Antenna Connection
GSM2218PB001MAN - GSM/GPRS MT-GL User Manual
Copyright 2005, Enfora L.P
Page 15
2.7
Connecting the Power Source
The GSM/GPRS MT-GL has an input voltage range of 9 – 30 V DC. (See Table 3 and Table 4). The
power and ignition pins can support 9 – 30 V DC input voltage. The user has an option to connect
these wires depending on the desired functionality. Described below are the desired functionality and
their associated wire connecting procedure:
Use of the device outside of the specified voltage
range may result in damage to the device and/or
undesirable results.
Please follow the specifications as listed in the table
below. Enfora is not liable for damage to the MT-GL
caused due to user error.
!
!
PRELIMINARY TABLES
Enfora MT-G (@ 12 Volts)
Average Current (mAmps)
Peak Current (Amps)
GSM 850 &
900
GSM
1TX/1RX
1RX
Idle
390 mA
180 mA
65
[email protected]
DCS 1800 &
PCS 1900
GSM
1TX/1RX
1RX
Idle
400 mA
190 mA
55 mA
[email protected]
Table 3 - GSM Operating Power
Enfora MT-G (@ 12 Volts)
Average Current (mAmps)
Peak Current (Amps)
GSM 850 &
900
GPRS
TBD1TX/1RX
1RX
Idle
400 mA
190 mA
55 mA
[email protected]
DCS 1800 &
PCS 1900
GPRS
TBD
400 mA
200 mA
55 mA
[email protected]
Table 4 - GPRS Operating Power
•
MT-GL Always ON
o Connect the power and ground wires of the MT-GL to the battery leads. The MT-GL
will always remain ON as long as the battery lasts.
o The MT-GL will be non-operational when the input voltage and current requirements
are not met (battery drains).
o The Ignition wire has to be left open (not connected).
•
MT-GL Turns Off when Ignition Turned Off
o Connect the power line of the MT-GL to an auxiliary power source, i.e. ignition.
o Connect the ground wire to the chassis or negative terminal of the battery
o The Ignition wire has to be left open (not connected).
GSM2218PB001MAN - GSM/GPRS MT-GL User Manual
Copyright 2005, Enfora L.P
Page 16
•
2.8
Device in Low Power Mode when Ignition Turned Off
o Connect the power and ground wires of the MT-GL to the battery.
o Connect the ignition wire of the MT-GL to an auxiliary power source, i.e. ignition.
o Device enters low power mode when ignition line goes low. This feature has to be
enabled via the software configuration (see AT$PWRSAV command for more
details).
o Device enters normal power consumption mode when auxiliary power is supplied.
o Device goes through a reset upon ignition on.
LED Operation
The MT-GL has three LED’s on its front panel.
PWR:
User LED 1:
User LED 2:
Indicates power to the modem. LED is on when power is turned on and the
modem is operational. LED is off when power is removed or when the
modem enters low power mode.
This LED can be configured to display registration, GPS fix status, or other
user functions. By default, this LED indicates GSM/GPRS registration status.
LED state of OFF indicates that the device is not attempting to register to the
network. Blinking LED indicates that the device is trying to connect to the
network. LED always ON indicates that the device is attached to the network.
This LED can be configured to display registration, GPS fix status, or other
user functions. By default, this LED indicates GPS fix status. The LED
remains in OFF state when invalid GPS data is received. The LED remains
ON when valid GPS data is received.
GSM2218PB001MAN - GSM/GPRS MT-GL User Manual
Copyright 2005, Enfora L.P
Page 17
3
Additional Software Features
The following software features are included in version 0.6.0 and greater:
A user can send AT commands, via SMS, to the MTG in the following format:
>RSP=[T/F];ID=[modem id];[at command]<
[T/F] field has to be set to either T or F. Setting of T indicates that the response to
an AT command will be sent back to the originator. Setting of F indicates that the
response to an AT command will be discarded
[modem id] field has to be the same value as AT$MDMID command setting. This
field is case-sensitive
[at command] field has to be set to an AT command from the below list:
•
•
•
•
•
•
•
•
•
•
•
•
•
•
•
•
•
•
•
•
•
•
•
•
•
•
•
AT$ACKTM
AT$ACTIVE
AT$APIPWD
AT$AREG
AT$CONNTO
AT$EVDEL
AT$EVDELA
AT$EVENT
AT$EVTIM
AT $FRIEND
AT$GPSRD
AT$IDLETO
AT$MDMID
AT$MSGLOGEN
AT$MSGLOGRD
AT$MSGSND
AT$PADBLK
AT$PADBS
AT$PADDST
AT$PADSRC
AT$PADTO
AT$PKG
AT$SMSDA
AT$UDPAPI
AT$WAKEUP
AT+CGDCONT
AT&W
Note: Please refer to the MT-G AT Command Set Document (GSM2000PB001MAN) for
detailed information on AT Command execution.
Please note the following information regarding sending AT commands via SMS:
•
•
•
•
AT commands sent via SMS have to originate from an address listed in the AT$SMSDA
command;
An incorrectly formatted SMS message will be processed as a regular SMS message;
Not having the originating address of the SMS message listed in AT$SMSDA command will
result in the SMS message being treated as a regular SMS message;
Query of an AT command setting that returns more than 160 bytes will result in data being
truncated to a maximum of 160 bytes.
GSM2218PB001MAN - GSM/GPRS MT-GL User Manual
Copyright 2005, Enfora L.P
Page 18
The ability to store event data in memory, upon event trigger occurrence, and transmit data
when desired.
•
The user can configure the MT-GL to store event-generated data, to be sent over the air to a
remote server, in its internal memory. This feature can be enabled or disabled using the
AT$MSGLOGEN command.
•
“Total Number of Unread Messages” is decremented if an unread message is read via the
AT$MSGLOGRD command.
Example: Assume there are 50 unread messages in the GPRS queue and the total number of
messages in GPRS queue is 100. This means that the first 50 messages have been read
while the last 50 messages have not been read. If a user sends AT$GPSLOGRD=0,1,51 then
the total number of unread messages drops down to 49 after successful transmission of that
message. However, if a user sends AT$GPSLOGRD=0,1,99 then the total number of unread
messages still remains at 50 – that message is transmitted to the remote server.
•
A user can also read a message that has already been read from the memory by passing in
the appropriate starting index number.
Synchronize RTC time with GPS time
•
•
•
RTC time is synched with GPS time automatically
RTC time is synched with GPS time every time the device is powered up and the device
acquires valid GPS data
RTC time is synched with GPS time every time the GPS time rolls over from 23:59:59 to
00:00:01
Allow a user to append RTC date and time at the end of event data
•
•
•
•
Bit-21 for Parm2, for output message types 40 – 42 & 45 (in AT$EVENT command), has
been added to allow users to send RTC time along with event data
The RTC date and time contains Year, Month, Day, Hour, Minute, and Second fields
6 bytes of information is appended in Binary format when bit-21 is enabled. Each byte
represents an individual field
12 ASCII character (12-bytes) representing RTC date and time is appended in ASCII format
when bit-21 is enabled. Two bytes (or two ASCII characters) represents an individual field
GSM2218PB001MAN - GSM/GPRS MT-GL User Manual
Copyright 2005, Enfora L.P
Page 19
4
Appendix 1 – Cable Wiring Diagrams
Figure 13 – Wiring for Power Only
Figure 14 – Wire for Programming Cable
GSM2218PB001MAN - GSM/GPRS MT-GL User Manual
Copyright 2005, Enfora L.P
Page 20