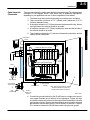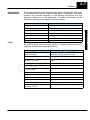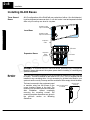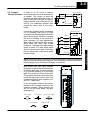
1
Siemens TI 305 | Siemens TI 405 | Siemens TI 505 And other related componentry Distributed Control Systems For Industrial Automation Siemens - Texas Instruments Product PDF Presented by DCScenter.com For Product Needs Email: [email protected] Call: 800-793-0630 DL405 Installation and I/O Manual Manual Number D4--INST--M C D C S r e t n e WARNING Thank you for purchasing automation equipment from Automationdirect.com. We want your new DirectLOGICä automation equipment to operate safely. Anyone who installs or uses this equipment should read this publication (and any other relevant publications) before installing or operating the equipment. To minimize the risk of potential safety problems, you should follow all applicable local and national codes that regulate the installation and operation of your equipment. These codes vary from area to area and usually change with time. It is your responsibility to determine which codes should be followed, and to verify that the equipment, installation, and operation is in compliance with the latest revision of these codes. At a minimum, you should follow all applicable sections of the National Fire Code, National Electrical Code, and the codes of the National Electrical Manufacturer’s Association (NEMA). There may be local regulatory or government offices that can also help determine which codes and standards are necessary for safe installation and operation. Equipment damage or serious injury to personnel can result from the failure to follow all applicable codes and standards. We do not guarantee the products described in this publication are suitable for your particular application, nor do we assume any responsibility for your product design, installation, or operation. r e t n e If you have any questions concerning the installation or operation of this equipment, or if you need additional information, please call us at 1--770--844--4200. C S This publication is based on information that was available at the time it was printed. At Automationdirect.com, we constantly strive to improve our products and services, so we reserve the right to make changes to the products and/or publications at any time without notice and without any obligation. This publication may also discuss features that may not be available in certain revisions of the product. C D Trademarks This publication may contain references to products produced and/or offered by other companies. The product and company names may be trademarked and are the sole property of their respective owners.Automationdirect.com disclaims any proprietary interest in the marks and names of others. Stage is a trademark of Koyo Electronics Industries Co., LTD. Think & Do Software is a trademark of Think & Do Software, Inc. Texas Instruments is a registered trademark of Texas Instruments, Inc. TI, TIWAY, Series 305, Series 405, TI305, and TI405 are trademarks of Texas Instruments, Inc. Siemens and SIMATIC are registered trademarks of Siemens, AG. GE is a registered trademark of General Electric Corporation. Series One is a registered trademark of GE Fanuc Automation North America, Inc. MODBUS is a registered trademark of Gould, Inc. IBM is a registered trademark of International Business Machines. MS-DOS and Microsoft are registered trademarks of Microsoft Corporation. Windows and Windows NT are trademarks of Microsoft Corporation. OPTOMUX and PAMUX are trademarks of OPTO 22. Copyright 1999, Automationdirect.com Incorporated All Rights Reserved No part of this manual shall be copied, reproduced, or transmitted in any way without the prior, written consent of Automationdirect.com Incorporated. Automationdirect.com retains the exclusive rights to all information included in this document. 1 Manual Revisions If you contact us in reference to this manual, be sure and include the revision number. Title: DL405 Installation and I/O Manual Manual Number: D4--INST--M Issue Original Date 12/99 Effective Pages Cover/Copyright Contents 1-1 -- 1-4 2-1 -- 2-9 3-1 -- 3-64 Description of Changes Original Issue C D C S r e t n e 1 Table of Contents i Getting Started About This Manual . . . . . . . . . . . . . . . . . . . . . . . . . . . . . . . . . . . . . . . . . . . . . . . . . . . . . . . . . . . . . . . . . . The Purpose of this Manual . . . . . . . . . . . . . . . . . . . . . . . . . . . . . . . . . . . . . . . . . . . . . . . . . . . . . . . . . Supplemental Manuals . . . . . . . . . . . . . . . . . . . . . . . . . . . . . . . . . . . . . . . . . . . . . . . . . . . . . . . . . . . . . Technical Support . . . . . . . . . . . . . . . . . . . . . . . . . . . . . . . . . . . . . . . . . . . . . . . . . . . . . . . . . . . . . . . . . Key Topics for Each Chapter . . . . . . . . . . . . . . . . . . . . . . . . . . . . . . . . . . . . . . . . . . . . . . . . . . . . . . . . Chapters . . . . . . . . . . . . . . . . . . . . . . . . . . . . . . . . . . . . . . . . . . . . . . . . . . . . . . . . . . . . . . . . . . . . . . . . . Conventions Used . . . . . . . . . . . . . . . . . . . . . . . . . . . . . . . . . . . . . . . . . . . . . . . . . . . . . . . . . . . . . . . . . . . DL405 System Components . . . . . . . . . . . . . . . . . . . . . . . . . . . . . . . . . . . . . . . . . . . . . . . . . . . . . . . . . . Bases . . . . . . . . . . . . . . . . . . . . . . . . . . . . . . . . . . . . . . . . . . . . . . . . . . . . . . . . . . . . . . . . . . . . . . . . . . . I/O Configuration . . . . . . . . . . . . . . . . . . . . . . . . . . . . . . . . . . . . . . . . . . . . . . . . . . . . . . . . . . . . . . . . . . I/O Modules . . . . . . . . . . . . . . . . . . . . . . . . . . . . . . . . . . . . . . . . . . . . . . . . . . . . . . . . . . . . . . . . . . . . . . r e t n e Installation Safety Guidelines . . . . . . . . . . . . . . . . . . . . . . . . . . . . . . . . . . . . . . . . . . . . . . . . . . . . . . . . . . . . . . . . . . . Plan for Safety . . . . . . . . . . . . . . . . . . . . . . . . . . . . . . . . . . . . . . . . . . . . . . . . . . . . . . . . . . . . . . . . . . . . Safety Techniques . . . . . . . . . . . . . . . . . . . . . . . . . . . . . . . . . . . . . . . . . . . . . . . . . . . . . . . . . . . . . . . . . Orderly System Shutdown . . . . . . . . . . . . . . . . . . . . . . . . . . . . . . . . . . . . . . . . . . . . . . . . . . . . . . . . . . System Power Disconnect . . . . . . . . . . . . . . . . . . . . . . . . . . . . . . . . . . . . . . . . . . . . . . . . . . . . . . . . . . Mounting Guidelines . . . . . . . . . . . . . . . . . . . . . . . . . . . . . . . . . . . . . . . . . . . . . . . . . . . . . . . . . . . . . . . . Base Dimensions . . . . . . . . . . . . . . . . . . . . . . . . . . . . . . . . . . . . . . . . . . . . . . . . . . . . . . . . . . . . . . . . . Panel Layout & Clearances . . . . . . . . . . . . . . . . . . . . . . . . . . . . . . . . . . . . . . . . . . . . . . . . . . . . . . . . . Enclosures . . . . . . . . . . . . . . . . . . . . . . . . . . . . . . . . . . . . . . . . . . . . . . . . . . . . . . . . . . . . . . . . . . . . . . . Agency Approvals . . . . . . . . . . . . . . . . . . . . . . . . . . . . . . . . . . . . . . . . . . . . . . . . . . . . . . . . . . . . . . . . . Environmental Specifications . . . . . . . . . . . . . . . . . . . . . . . . . . . . . . . . . . . . . . . . . . . . . . . . . . . . . . . Power . . . . . . . . . . . . . . . . . . . . . . . . . . . . . . . . . . . . . . . . . . . . . . . . . . . . . . . . . . . . . . . . . . . . . . . . . . . Installing DL405 Bases . . . . . . . . . . . . . . . . . . . . . . . . . . . . . . . . . . . . . . . . . . . . . . . . . . . . . . . . . . . . . . Three Sizes of Bases . . . . . . . . . . . . . . . . . . . . . . . . . . . . . . . . . . . . . . . . . . . . . . . . . . . . . . . . . . . . . . Mounting the Base . . . . . . . . . . . . . . . . . . . . . . . . . . . . . . . . . . . . . . . . . . . . . . . . . . . . . . . . . . . . . . . . Installing Components in the Base . . . . . . . . . . . . . . . . . . . . . . . . . . . . . . . . . . . . . . . . . . . . . . . . . . . Base Wiring . . . . . . . . . . . . . . . . . . . . . . . . . . . . . . . . . . . . . . . . . . . . . . . . . . . . . . . . . . . . . . . . . . . . . . C S C D 1--2 1--2 1--2 1--2 1--3 1--3 1--3 1--4 1--4 1--4 1--4 2--2 2--2 2--2 2--3 2--3 2--4 2--4 2--5 2--6 2--6 2--7 2--7 2--8 2--8 2--8 2--9 2--9 I/O Wiring and Specifications I/O Wiring Strategies . . . . . . . . . . . . . . . . . . . . . . . . . . . . . . . . . . . . . . . . . . . . . . . . . . . . . . . . . . . . . . . . . DL405 System Isolation Boundaries . . . . . . . . . . . . . . . . . . . . . . . . . . . . . . . . . . . . . . . . . . . . . . . . . Powering I/O Circuits Using Separate Supplies . . . . . . . . . . . . . . . . . . . . . . . . . . . . . . . . . . . . . . . . Sinking / Sourcing Concepts . . . . . . . . . . . . . . . . . . . . . . . . . . . . . . . . . . . . . . . . . . . . . . . . . . . . . . . . I/O “Common” Terminal Concepts . . . . . . . . . . . . . . . . . . . . . . . . . . . . . . . . . . . . . . . . . . . . . . . . . . . Connecting DC I/O to “Solid State” Field Devices . . . . . . . . . . . . . . . . . . . . . . . . . . . . . . . . . . . . . . Solid State Input Sensors . . . . . . . . . . . . . . . . . . . . . . . . . . . . . . . . . . . . . . . . . . . . . . . . . . . . . . . . . . Solid State Output Loads . . . . . . . . . . . . . . . . . . . . . . . . . . . . . . . . . . . . . . . . . . . . . . . . . . . . . . . . . . . Relay Output Guidelines . . . . . . . . . . . . . . . . . . . . . . . . . . . . . . . . . . . . . . . . . . . . . . . . . . . . . . . . . . . Prolonging Relay Contact Life . . . . . . . . . . . . . . . . . . . . . . . . . . . . . . . . . . . . . . . . . . . . . . . . . . . . . . . 3--2 3--2 3--3 3--4 3--5 3--6 3--6 3--6 3--8 3--8 ii Table of Contents I/O Module Wiring and Specifications . . . . . . . . . . . . . . . . . . . . . . . . . . . . . . . . . . . . . . . . . . . . . . . . . Module Placement . . . . . . . . . . . . . . . . . . . . . . . . . . . . . . . . . . . . . . . . . . . . . . . . . . . . . . . . . . . . . . . . I/O Module Status Indicators . . . . . . . . . . . . . . . . . . . . . . . . . . . . . . . . . . . . . . . . . . . . . . . . . . . . . . . . Color Coding of I/O Modules . . . . . . . . . . . . . . . . . . . . . . . . . . . . . . . . . . . . . . . . . . . . . . . . . . . . . . . . Wiring a Module with a Terminal Block . . . . . . . . . . . . . . . . . . . . . . . . . . . . . . . . . . . . . . . . . . . . . . . Wiring a Module using a Ribbon Cable/Solder Type Connector . . . . . . . . . . . . . . . . . . . . . . . . . . Part Numbers for Module Connectors . . . . . . . . . . . . . . . . . . . . . . . . . . . . . . . . . . . . . . . . . . . . . . . . Vendors For the Parts Used in the Terminal Block Configuration . . . . . . . . . . . . . . . . . . . . . . . . . Ribbon Cable . . . . . . . . . . . . . . . . . . . . . . . . . . . . . . . . . . . . . . . . . . . . . . . . . . . . . . . . . . . . . . . . . . . . . Ribbon Cable Connectors . . . . . . . . . . . . . . . . . . . . . . . . . . . . . . . . . . . . . . . . . . . . . . . . . . . . . . . . . . Interface Terminal Block . . . . . . . . . . . . . . . . . . . . . . . . . . . . . . . . . . . . . . . . . . . . . . . . . . . . . . . . . . . . I/O Wiring Checklist . . . . . . . . . . . . . . . . . . . . . . . . . . . . . . . . . . . . . . . . . . . . . . . . . . . . . . . . . . . . . . . DL405 Discrete Input Module Chart . . . . . . . . . . . . . . . . . . . . . . . . . . . . . . . . . . . . . . . . . . . . . . . . . . DL405 Discrete Output Module Chart . . . . . . . . . . . . . . . . . . . . . . . . . . . . . . . . . . . . . . . . . . . . . . . . Special Input Module Chart . . . . . . . . . . . . . . . . . . . . . . . . . . . . . . . . . . . . . . . . . . . . . . . . . . . . . . . . . Analog Input Module Chart . . . . . . . . . . . . . . . . . . . . . . . . . . . . . . . . . . . . . . . . . . . . . . . . . . . . . . . . . Analog Output Module Chart . . . . . . . . . . . . . . . . . . . . . . . . . . . . . . . . . . . . . . . . . . . . . . . . . . . . . . . . Glossary of Specification Terms . . . . . . . . . . . . . . . . . . . . . . . . . . . . . . . . . . . . . . . . . . . . . . . . . . . . . . D4--08ND3S DC Input . . . . . . . . . . . . . . . . . . . . . . . . . . . . . . . . . . . . . . . . . . . . . . . . . . . . . . . . . . . . . . . . D4--16ND2 DC Input . . . . . . . . . . . . . . . . . . . . . . . . . . . . . . . . . . . . . . . . . . . . . . . . . . . . . . . . . . . . . . . . . D4--16ND2F DC Input . . . . . . . . . . . . . . . . . . . . . . . . . . . . . . . . . . . . . . . . . . . . . . . . . . . . . . . . . . . . . . . . D4--16SIM Input Simulator . . . . . . . . . . . . . . . . . . . . . . . . . . . . . . . . . . . . . . . . . . . . . . . . . . . . . . . . . . . . D4--32ND3--1, 24VDC Input . . . . . . . . . . . . . . . . . . . . . . . . . . . . . . . . . . . . . . . . . . . . . . . . . . . . . . . . . . . D4--32ND3--2 5--12VDC Input . . . . . . . . . . . . . . . . . . . . . . . . . . . . . . . . . . . . . . . . . . . . . . . . . . . . . . . . . . D4--64ND2, 24 VDC Input Module . . . . . . . . . . . . . . . . . . . . . . . . . . . . . . . . . . . . . . . . . . . . . . . . . . . . . D4--08NA 110--220VAC Input . . . . . . . . . . . . . . . . . . . . . . . . . . . . . . . . . . . . . . . . . . . . . . . . . . . . . . . . . D4--16NA 110VAC Input . . . . . . . . . . . . . . . . . . . . . . . . . . . . . . . . . . . . . . . . . . . . . . . . . . . . . . . . . . . . . . D4--16NA--1 220VAC Input . . . . . . . . . . . . . . . . . . . . . . . . . . . . . . . . . . . . . . . . . . . . . . . . . . . . . . . . . . . . D4-16NE3 12--24VAC/DC Input . . . . . . . . . . . . . . . . . . . . . . . . . . . . . . . . . . . . . . . . . . . . . . . . . . . . . . . F4-08NE3S 90--150VAC/DC Input . . . . . . . . . . . . . . . . . . . . . . . . . . . . . . . . . . . . . . . . . . . . . . . . . . . . . . D4--08TD1 12--24 VDC Output . . . . . . . . . . . . . . . . . . . . . . . . . . . . . . . . . . . . . . . . . . . . . . . . . . . . . . . . F4-08TD1S 24--150 VDC Isolated Output . . . . . . . . . . . . . . . . . . . . . . . . . . . . . . . . . . . . . . . . . . . . . . . D4-16TD1 5-24 VDC Output . . . . . . . . . . . . . . . . . . . . . . . . . . . . . . . . . . . . . . . . . . . . . . . . . . . . . . . . . . D4-16TD2, 12--24 VDC Output . . . . . . . . . . . . . . . . . . . . . . . . . . . . . . . . . . . . . . . . . . . . . . . . . . . . . . . . D4--32TD1, 5--24VDC Output . . . . . . . . . . . . . . . . . . . . . . . . . . . . . . . . . . . . . . . . . . . . . . . . . . . . . . . . . D4--32TD1--1, 5--15VDC Output . . . . . . . . . . . . . . . . . . . . . . . . . . . . . . . . . . . . . . . . . . . . . . . . . . . . . . . D4--32TD2, 12--24 VDC Output Module . . . . . . . . . . . . . . . . . . . . . . . . . . . . . . . . . . . . . . . . . . . . . . . . D4--64TD1, TTL/CMOS/5--24 VDC Output Module . . . . . . . . . . . . . . . . . . . . . . . . . . . . . . . . . . . . . . . D4--08TA, 18--220VAC Output . . . . . . . . . . . . . . . . . . . . . . . . . . . . . . . . . . . . . . . . . . . . . . . . . . . . . . . . D4--16TA, 18--220VAC Output . . . . . . . . . . . . . . . . . . . . . . . . . . . . . . . . . . . . . . . . . . . . . . . . . . . . . . . . . D4--08TR, Relay Output . . . . . . . . . . . . . . . . . . . . . . . . . . . . . . . . . . . . . . . . . . . . . . . . . . . . . . . . . . . . . . F4--08TRS--1, Relay Output . . . . . . . . . . . . . . . . . . . . . . . . . . . . . . . . . . . . . . . . . . . . . . . . . . . . . . . . . . . F4--08TRS--2, Relay Output . . . . . . . . . . . . . . . . . . . . . . . . . . . . . . . . . . . . . . . . . . . . . . . . . . . . . . . . . . D4--16TR, Relay Output . . . . . . . . . . . . . . . . . . . . . . . . . . . . . . . . . . . . . . . . . . . . . . . . . . . . . . . . . . . . . . F4--04AD 4--Channel Analog Input Specifications . . . . . . . . . . . . . . . . . . . . . . . . . . . . . . . . . . . . . . F4--04AD 4--Channel Analog Input Module . . . . . . . . . . . . . . . . . . . . . . . . . . . . . . . . . . . . . . . . . . . . . F4--04ADS 4--Channel Isolated Analog Input Specifications . . . . . . . . . . . . . . . . . . . . . . . . . . . . F4--04ADS 4--Channel Isolated Analog Input Module . . . . . . . . . . . . . . . . . . . . . . . . . . . . . . . . . . . C D C S r e t n e 3--10 3--10 3--10 3--10 3--11 3--12 3--13 3--13 3--14 3--14 3--14 3--15 3--16 3--16 3--17 3--17 3--18 3--19 3--20 3--20 3--21 3--21 3--22 3--22 3--23 3--24 3--24 3--24 3--25 3--25 3--26 3--26 3--27 3--27 3--28 3--28 3--29 3--30 3--31 3--31 3--32 3--32 3--33 3--33 3--34 3--35 3--36 3--37 iii Table of Contents F4--08AD 8--Channel Analog Input Specifications . . . . . . . . . . . . . . . . . . . . . . . . . . . . . . . . . . . . . . F4--08AD 8--Channel Analog Input Module . . . . . . . . . . . . . . . . . . . . . . . . . . . . . . . . . . . . . . . . . . . . . D4--02DA 2--Channel Analog Output Specifications . . . . . . . . . . . . . . . . . . . . . . . . . . . . . . . . . . . . D4--02DA 2--Channel Analog Output Module . . . . . . . . . . . . . . . . . . . . . . . . . . . . . . . . . . . . . . . . . . . F4--04DA 4--Channel Analog Output Specifications . . . . . . . . . . . . . . . . . . . . . . . . . . . . . . . . . . . . F4--04DA 4--Channel Analog Output Module . . . . . . . . . . . . . . . . . . . . . . . . . . . . . . . . . . . . . . . . . . . F4--04DA--1 4--Channel Analog Current Output Specifications . . . . . . . . . . . . . . . . . . . . . . . . . . F4--04DA--1 4--Channel Analog Current Output Module . . . . . . . . . . . . . . . . . . . . . . . . . . . . . . . . . F4--04DA--2 4--Channel Analog Voltage Output Specifications . . . . . . . . . . . . . . . . . . . . . . . . . . . F4--04DA--2 4--Channel Analog Voltage Output Module . . . . . . . . . . . . . . . . . . . . . . . . . . . . . . . . . F4--04DAS--1 4--Channel 4--20mA Isolated Analog Output Specifications . . . . . . . . . . . . . . . . . F4--04DAS--1 4--Channel 4--20mA Isolated Analog Output Module . . . . . . . . . . . . . . . . . . . . . . . F4--08DA--1 8--Channel Analog Current Output Specifications . . . . . . . . . . . . . . . . . . . . . . . . . . F4--08DA--1 8--Channel Analog Current Output Module . . . . . . . . . . . . . . . . . . . . . . . . . . . . . . . . . F4--08DA--2 8--Channel Analog Current Output Specifications . . . . . . . . . . . . . . . . . . . . . . . . . . F4--08DA--2 8--Channel Analog Current Output Module . . . . . . . . . . . . . . . . . . . . . . . . . . . . . . . . . F4--16DA--1 16--Channel Analog Current Output Specifications . . . . . . . . . . . . . . . . . . . . . . . . . F4--16DA--1 16--Channel Analog Current Output Module . . . . . . . . . . . . . . . . . . . . . . . . . . . . . . . . F4--16DA--2 16--Channel Analog Current Output Specifications . . . . . . . . . . . . . . . . . . . . . . . . . F4--16DA--2 16--Channel Analog Current Output Module . . . . . . . . . . . . . . . . . . . . . . . . . . . . . . . . F4--08THM 8--Channel Thermocouple Input Specifications . . . . . . . . . . . . . . . . . . . . . . . . . . . . . . F4--08THM 8--Channel Thermocouple Input Module . . . . . . . . . . . . . . . . . . . . . . . . . . . . . . . . . . . . F4--08THM--n 8--Channel Thermocouple Input Specifications . . . . . . . . . . . . . . . . . . . . . . . . . . . F4--08THM--n 8--Channel Thermocouple Input Module . . . . . . . . . . . . . . . . . . . . . . . . . . . . . . . . . . F4--08RTD 8--Channel RTD Input Specifications . . . . . . . . . . . . . . . . . . . . . . . . . . . . . . . . . . . . . . . . F4--08RTD 8--Channel RTD Input Module . . . . . . . . . . . . . . . . . . . . . . . . . . . . . . . . . . . . . . . . . . . . . . C D C S r e t n e 3--38 3--39 3--40 3--41 3--42 3--43 3--44 3--45 3--46 3--47 3--48 3--49 3--50 3--51 3--52 3--53 3--54 3--55 3--56 3--57 3--58 3--59 3--60 3--61 3--62 3--63 Getting Started 11 In This Chapter. . . . — About This Manual — Conventions Used — DL405 System Components C D C S r e t n e 1--2 Getting Started Getting Started About This Manual The Purpose of this Manual This manual is written for the user of non-traditional CPU-slot controllers or I/O controllers who are also using our DL405 I/O products. This manual shows you how to install and wire the equipment. It provides specifications for input and output modules. It also helps you understand how to interface these products to other devices in a control system. r e t n e Supplemental Manuals In addition to this manual, you will want to have the appropriate manual for your CPU-slot controller and for the PC-based control software you will be using. Technical Support We strive to make our manuals the best in the industry. We rely on your feedback to let us know if we are reaching our goal. If you cannot find the solution to your particular application, or, if for any reason you need additional technical assistance, please call us at 770--844--4200. C S C D The technical support group is glad to work with you in answering your questions. They are available weekdays from 9:00 a.m. to 6:00 p.m. Eastern Time. Please visit our site on the worldwide web where you can find technical and nontechnical information about our products and our company. http://www.automationdirect.com. If you have a comment or question about any of our products, services, or manuals, please fill out and return the ‘Suggestions’ card that was shipped with this manual. Getting Started 1--3 The beginning of each chapter will list the key topics that can be found in that chapter. Chapters The main contents of this manual are organized into the following three chapters: introduces the various components of a DL405 system. Also includes tips on getting started and how to design a successful system. 1 Getting Started 2 Installation and Wiring 3 I/O Wiring and Specifications shows how to prepare for system installation, and gives safety guidelines to help protect your personnel and machinery r e t n e Includes system and I/O wiring diagrams, and discrete I/O module specifications. C S C D Conventions Used 1 When you see the “light bulb” icon in the left-hand margin, the paragraph to its immediate right will give you a special tip. The word TIP: in boldface will mark the beginning of the text. When you see the “notepad” icon in the left-hand margin, the paragraph to its immediate right will be a special note. The word NOTE: in boldface will mark the beginning of the text. When you see the “exclamation mark” icon in the left-hand margin, the paragraph to its immediate right will be a warning. This information could prevent injury, loss of property, or even death (in extreme cases). The word WARNING: in boldface will mark the beginning of the text. Getting Started Key Topics for Each Chapter 1--4 Getting Started Getting Started DL405 System Components Bases Three base sizes are available in the system: 4 slot, 6 slot and 8 slot. I/O Configuration The CPU slot controllers can support up to 512 I/O points in an eight slot base with up to three expansion bases. I/O Modules The DL405 family provides some of the most powerful modules in the industry. There is a complete range of discrete modules which support 24 VDC, 125 VDC, 110/220 VAC and up to 10A relay outputs. Analog modules provide 12 and 16 -bit resolution and several selections of input and output signal ranges (including bipolar). At this time, only the D4--HSC High Speed Counter Specialty Module is supported; no other intelligent modules are supported. The controllers available at the time this manual was printed are: S Ethernet Base Controller - H4--EBC - H2--EBC--F r e t n e C S C D H4--EBC H4--EBC--F Installation 12 In This Chapter. . . . — Safety Guidelines — Mounting Guidelines — Installing DL405 Bases C D C S r e t n e 2--2 Installation Safety Guidelines Installation WARNING: Providing a safe operating environment for personnel and equipment is your responsibility and should be a primary goal during system planning and installation. Automation systems can fail and may result in situations that can cause serious injury to personnel or damage to equipment. Do not rely on the automation system alone to provide a safe operating environment. Use external electromechanical devices, such as relays or limit switches, that are independent of the DL405 system to provide protection for any part of the system that may cause personal injury or damage. Every automation application is different, therefore, there may be special requirements for your particular application. Be sure to follow all National, State, and local government requirements for the proper installation and use of your equipment. Plan for Safety r e t n e The best way to provide a safe operating environment is to make personnel and equipment safety part of the planning process. Examine every aspect of the system to determine which areas are critical to operator or machine safety. If you are not familiar with system installation practices, or your company does not have established installation guidelines, you should obtain additional information from the following sources. · NEMA — The National Electrical Manufacturers Association, located in Washington, D.C., publishes many different documents that discuss standards for industrial control systems. You can order these publications directly from NEMA. Some of these include: ICS 1, General Standards for Industrial Control and Systems ICS 3, Industrial Systems ICS 6, Enclosures for Industrial Control Systems · NEC — The National Electrical Code provides regulations concerning the installation and use of various types of electrical equipment. Copies of the NEC Handbook can often be obtained from your local electrical equipment distributor or your local library. S Local and State Agencies — many local governments and state governments have additional requirements above and beyond those described in the NEC Handbook. Check with your local Electrical Inspector or Fire Marshall office for information. Installation and Safety Guidelines C S C D Safety Techniques The publications mentioned provide many ideas and requirements for system safety. It is recommended to follow these regulations as a minimum. Using the techniques listed below will further help reduce the risk of safety problems. · Orderly system shutdown sequence in the control program. · System power disconnects (guard limits, emergency stop switches, etc.) Installation Orderly System Shutdown 2--3 The control program can provide the first level of protection when used to identify machine problems. After analyzing your application, identify any shutdown sequences that must be performed. Typical problems include part jams, empty bins, etc. that do not pose a risk of personal injury or equipment damage. Turn off Saw Jam Detect WARNING: The control program must not be the only form of protection for any problems that may result in a risk of personal injury or equipment damage. RST Retract Arm System Power Disconnect Guard Limit Switch By using electro-mechanical devices such as master control relays and/or limit switches, you can prevent accidental equipment startup. When installed properly, these devices will prevent any machine operations from occurring. For example, if the machine has a jammed part the control program can turn off the saw blade and retract the arbor. However, since the operator must open the guard to remove the part, you must include a disconnect switch that removes all system power any time the guard is opened. The machine operator must also have a quick and easy method of manually disconnecting all system power. This is accomplished with a mechanical device that is clearly labeled as an Emergency Stop switch. r e t n e C S Use E-Stop and Master Relay E STOP Power On Emergency Stop Guard Limit Master Relay Installation and Safety Guidelines C D Installation RST Master Relay Contacts Master Relay Contacts To disconnect PLC Power Master Relay Contacts Output Module Saw Arbor To disconnect output module power After an Emergency shutdown or any other type of power interruption, there may be requirements that must be met before the control program can be restarted. For example, there may be specific register values that must be established (or maintained from the state prior to the shutdown) before operations can resume. In this case, you may want to use retentive memory locations, or include constants in the control program to ensure a known starting point. 2--4 Installation Mounting Guidelines Installation Base Dimensions In addition to the panel layout guidelines, other specifications can affect the installation of a DL405 system. Always consider the following: · Environmental specifications · Power supply specifications · Regulatory Agency Approvals · Enclosure Selection and Component Dimensions The following diagram shows the outside dimensions and mounting hole locations for the 4-slot, 6-slot, and 8-slot bases. Make sure you follow the installation guidelines to allow proper spacing from other components. 4.312” 110mm 1.37” 34.8mm r e t n e Module Controller 4 holes, clearance for M4 screw Installation and Safety Guidelines 0.47” 12 mm C S C D 4 Slot Base 11.54” 293mm 10.83” 275mm 6 Slot Base 14.45” 367mm 13.74” 349mm 5.91” 4.69” 150mm 119mm 0.75” 19 mm 0.28” 7 mm Base mounting dimensions given to upper (fully seated) location 8 Slot Base Mounting hole close-up 0.47” 12 mm 5.91” 4.69” 150mm 119mm 0.75” 19 mm 17.36” 441mm 16.65” 423mm Installation Panel Layout & Clearances 2--5 Temperature Probe r e t n e 2” Ç DL405 CPU Base slot controller à Power Source 3” 75mm min. C S 7.2” -- 13.75” DL405 Local Expansion Base Á 183 -- 350mm À 2” Å Â 50mm Æ min. BUS Bar Star Washers Ground Braid Copper Lugs Earth Ground ´ Star Washers 2” 50mm min. Panel or Single Point Ground Installation and Safety Guidelines ´ C D  50mm min.  À É Panel Installation There are many things to consider when designing the panel layout. The following items correspond to the diagram shown. Note: there may be additional requirements, depending on your application and use of other components in the cabinet. 1. The bases must be mounted horizontally to provide proper ventilation. 2. There should be a minimum of 7.2” (183mm) and a maximum of 13.75” (350mm) between bases. 3. A minimum clearance of 2” (50mm) between the base and the top, bottom and right side of the cabinet should be provided. 4. A minimum clearance of 3” (75mm) between the base and the left side of the cabinet should be provided. 5. There must be a minimum of 2” clearance between the panel door and the nearest DL405 component. Ä Panel Ground Terminal Note: there is a minimum of 2” (50mm) clearance between the panel door and the nearest DL405 component. Not to scale 6. Connect the ground terminal on the DL405 base to a single point ground. Use copper stranded wire to achieve a low impedance. Copper eye lugs should be crimped and soldered to the ends of the stranded wire to ensure good surface contact. Remove anodized finishes and use copper lugs and star washers at termination points. A rule of thumb is to achieve 0.1 ohm of DC resistance between the DL405 base and the single point ground. 2--6 Installation 7. There must be a single point ground (i.e. copper bus bar) for all devices in the panel requiring an earth ground return. The single point of ground must be connected to the panel ground termination. The panel ground termination must be connected to earth ground. For this connection you should use #12 AWG stranded copper wire as a minimum. Minimum wire sizes, color coding, and general safety practices should comply with appropriate electrical codes and standards for your area. A good common ground reference (Earth ground) is essential for proper operation of the DL405, which include: a) Installing a ground rod as close to the panel as possible. b) Connection to incoming power system ground. Installation 8. Installations where the ambient temperature may approach the lower or upper limits of the specifications should be evaluated properly. To do this place a temperature probe in the panel, close the door and operate the system until the ambient temperature has stabilized. If the ambient temperature is not within the operating specification for the DL405 system, measures such as installing a cooling/heating source must be taken to get the ambient temperature within the DL405 operating specifications. 9. Device mounting bolts and ground braid termination bolts should be #10 copper bolts or equivalent. Tapped holes instead of nut--bolt arrangements should be used whenever possible. To assure good contact on termination areas impediments such as paint, coating or corrosion should be removed in the area of contact. 10. The DL405 system is designed to be powered by 110/220 VAC normally available throughout an industrial environment. Isolation transformers and noise suppression devices are not normally necessary, but may be helpful in eliminating/reducing suspect power problems. Installation and Safety Guidelines Enclosures C S C D Agency Approvals r e t n e Your selection of a proper enclosure is important to ensure safe and proper operation of your DL405 system. Applications of DL405 systems vary and may require additional features. The minimum considerations for enclosures include: · Conformance to electrical standards · Protection from the elements in an industrial environment · Common ground reference · Maintenance of specified ambient temperature · Access to equipment · Security or restricted access S Sufficient space for proper installation, cooling, and maintenance Some applications require agency approvals. The DL405 agency approvals for which DL405 products are submitted are; · UL (Underwriters’ Laboratories, Inc.) · CE EMC (Electromagnetic Compatibility) · CUL (Canadian Underwriters’ Laboratories) A complete listing of agency approvals for each product in the DL405 family is available in the sales catalog, or you may call 1--770--844--4200. Installation Environmental Specifications The following table lists the environmental specifications that generally apply to the DL405 system (Slot Controller, Expansion Unit, Bases, I/O Modules). I/O module operation may fluctuate depending on the ambient temperature and your application. Please refer to the appropriate I/O module specifications for the temperature derating curves applying to specific modules. Specification Rating Storage temperature --4° F to 158° F (--20° C to 70° C) Ambient operating temperature 32° F to 140° F (0° C to 60° C) Ambient humidity 5% -- 95% relative humidity (non--condensing) Vibration resistance MIL STD 810C, Method 514.2 Shock resistance MIL STD 810C, Method 516.2 Noise immunity NEMA (ICS3--304) Atmosphere No corrosive gases r e t n e The external power source must be capable of suppling voltage and current complying with the power supply specifications. Specifications Voltage withstand (dielectric strength) C S Insulation resistance Input voltage range H4--EBC (--F)/ D4--EX Input voltage range D4--EXDC--2 1 min. @ 1500 VAC between primary, secondary, field ground and run relay > 10MO at 500 VDC 85--132 VAC (110 range) / 170--264 VAC (220 range) 20--29 VDC (24VDC) less than 10% ripple 90--146 VDC (125 VDC) less than 10% ripple Maximum inrush current H4--EBC (F) / D4--440 / D4--EX 20A Maximum inrush current D4--EXDC 10A Maximum inrush current D4--EXDC--2 20A Maximum power H4--EBC (F)/D4--EX 50VA Maximum power D4--EXDC 38W Maximum power D4--EXDC--2 30W 24VDC Auxiliary Power Supply H4--EBC (F)/D4--EX 20--28 VDC @ 0.4A maximum, ripple > 1V p-p Installation and Safety Guidelines C D Input voltage range D4--EXDC Installation Power 2--7 2--8 Installation Installing DL405 Bases Three Sizes of Bases All I/O configurations of the DL405 will use a selection of either 4, 6 or 8 slot base(s). Local and expansion bases can be 4, 6, or 8-slot in size. Local and expansion bases differ only in how they are wired in a system. Expansion cable input connection Local Base Installation Expansion cable output connection Expansion cable r e t n e 8 slot base Expansion Bases Expansion Power Supplies Installation and Safety Guidelines C S C D 6 slot base 4 slot base WARNING: To minimize the risk of electrical shock, personal injury, or equipment damage, always disconnect the system power before installing or removing any system component. Mounting the Base The CPU slot controller/Expansion Unit must always be installed in the left-most slot in a base. This slot is marked on the base as P/S, CPU. The I/O modules can be installed in any remaining slots. It is not necessary for all slots to be filled for your system to work correctly. You may use filler modules to fill the empty slots in the base. The base is secured to the equipment panel or machine using four M4 screws in the corner locations shown to the right. The mounting cut-outs allow removal of the base after installation, without completely removing the mounting screws. Full mounting template dimensions are given in the previous section on Mounting Guidelines. Base mounting holes, 4 locations Mounting hole close-up Installation Installing 1. Note the components have plastic tabs at the bottom and a screw at the top. Components in the Base 2. With the device tilted slightly forward, hook the plastic tabs into the notch on the base. 3. Then gently push the top of the component back toward the base until it is firmly installed into the base. 4. Now tighten the screw at the top of the device to secure it to the base. 2--9 Spring loaded securing screw Base Wiring r e t n e Installation WARNING: To minimize the risk of electrical shock, personal injury, or equipment damage, always disconnect the system power before installing or removing any system component. The main power terminal connections are under the front covers of the controllers. Please refer to the applicable User manual for the base wiring guidelines. Installation and Safety Guidelines C D C S 13 I/O Wiring and Specifications In This Chapter. . . . — I/O Wiring Strategies — I/O Module Wiring and Specifications — Glossary of Specification Terms — I/O Module Wiring diagrams C D C S r e t n e 3--2 I/O Wiring and Specifications Getting Started I/O Wiring Strategies DL405 System Isolation Boundaries The DL405 system is very flexible and will work in many different wiring configurations. By studying this section before actual installation, you should find the best wiring strategy for your application . This will help to lower system cost, wiring errors, and avoid safety problems. DL405 system circuitry is divided into three main regions separated by isolation boundaries, shown in the drawing below. Electrical isolation provides safety, so that a fault in one area does not damage another. A transformer in the power supply provides magnetic isolation between the primary and secondary sides. Opto-couplers provide optical isolation in Input and Output circuits. This isolates logic circuitry from the field side, where factory machinery connects. Note that the discrete inputs are isolated from the discrete outputs, because each is isolated from the logic side. Isolation boundaries protect the operator interface (and the operator) from power input faults or field wiring faults. When wiring a DL405 system, it is extremely important to avoid making external connections that connect logic side circuits to any other. Primary Side I/O Wiring and Specifications DL405 System Main Power Supply Power Input r e nt Secondary, or Logic side S C D Isolation Boundary e C CPU Field Side (backplane) Input Module Inputs (backplane) Output Module Outputs Programming Device, Operator Interface, or Network Isolation Boundary The next figure shows the physical layout of a DL405 system, as viewed from the front. In addition to the basic circuits covered above, AC-powered units include an auxiliary +24VDC power supply with its own isolation boundary. Since the supply output is isolated from the other three circuits, it can power input and/or output circuits! Primary Side Power Input +24VDC Out Main Power Supply Auxiliary +24VDC Supply DL405 System Secondary, or Logic side Internal CPU Backplane Comm. Input Module To Programming Device, Operator Interface, Network Inputs Commons Field Side Output Module Outputs Commons Supply for Output Circuit I/O Wiring and Specifications In some cases, using the built-in auxiliary +24VDC supply can result in a cost savings for your control system. It can power combined loads up to 400 mA. Be careful not to exceed the current rating of the supply. If you are the system designer for your application, you may be able to select and design in field devices which can use the +24VDC auxiliary supply. In most applications it will be necessary to power the input devices from one power source, and to power output loads from another source. Loads often require high-energy AC power, while input sensors use low-energy DC. If a machine operator is likely to come in close contact with input wiring, then safety reasons also require isolation from high-energy output circuits. It is most convenient if the loads can use the same power source as the DL405 system, and the input sensors can use the auxiliary supply, as shown to the left in the figure below. If the loads cannot be powered from the system supply, then a separate supply must be used as shown to the right in the figure below. AC Power Power Input + AC Power r e t n e Power Input DL405 System Input Module Output Module Inputs Outputs Com. Com. Auxiliary +24VDC Supply C S -- + C D Loads DL405 System Input Module Output Module Inputs Outputs Com. Com. -- Loads Load Supply A worst-case scenario, from a cost and complexity view-point, is an application which requires separate power sources for the DL405 system, input devices, and output loads. The example wiring diagram below on the right shows how this can work, but also that the auxiliary supply output is an unused resource. AC Power Power Input Auxiliary +24VDC Supply + DL405 System Input Module Output Module Inputs Com. Outputs Com. Input Supply Loads -Load Supply I/O Wiring and Specifications Auxiliary +24VDC Supply Getting Started Powering I/O Circuits Using Separate Supplies 3--3 Getting Started 3--4 I/O Wiring and Specifications Sinking / Sourcing This next section helps to provide a solid understanding of “sinking” and “sourcing” concepts. Use of these terms occurs frequently in input or output circuit discussions. Concepts It is the goal of this section to make these concepts easy to understand, further ensuring success in installation. Sinking = provides a path to supply ground (--) Sourcing = provides a path to supply source (+) I/O Wiring and Specifications Sinking and sourcing terminology only applies to DC input and output circuits because of the reference to (+) and (--) polarities. Input and output points that are sinking or sourcing only can conduct current in only one direction. This means it is possible to connect the external supply and field device to the I/O point with current trying to flow in the wrong direction, and the circuit will not operate. However, you can successfully connect the supply and field device every time by understanding “sourcing” and “sinking”. For example, the figure to the right illustrates a “sinking” input. To properly connect the external supply, we just have to connect it so the input provides a path to ground (--). Start at the DL405 system input terminal, follow through the input sensing circuit, exit at the common terminal, and connect the supply (--) to the common terminal. By adding the switch, between the supply (+) and the input, we have completed the circuit. Current flows in the direction of the arrow when the switch is closed. + -- Input Sensing Common C S C D DL405 System r e t n e Input (sinking) By applying the circuit principle above to the four possible combinations of input/output sinking/sourcing types, you have the four circuits as shown below. The I/O module specifications at the end of this chapter list the input or output type. Sinking Input Sinking Output Input + -- Common DL405 System Input Sensing Sourcing Input Common + -- Input DL405 System Output Switch Output Load + -- Common Sourcing Output DL405 System Input Sensing DL405 System Output Switch Common + Output Load -- 3--5 I/O Wiring and Specifications DL405 System I/O Circuit + -Return Path DL405 System Input Sensing Input 1 Input 2 Input 3 r e t n e C S Input 4 + -- Common NOTE: In the circuit above, the current in the common path is 4 times any channel’s input current when all inputs are energized. This is important in output circuits where heavier gauge wire is sometimes necessary on commons. C D Most DL405 input and output modules group their I/O points into banks that share a common return path. The best indication of I/O common grouping is on the wiring label, such as the one shown to the right. The miniature schematic shows two circuit banks with eight input points in each. The common terminal for each is labeled “CA” and “CB”, respectively. In the wiring label example, the positive terminal of a DC supply connects to the common terminals. Some symbols you will see on the wiring labels, and their meanings are: AC supply DC supply -- Input Switch AC or DC supply + Output Load L 12--24VDC INPUT TB A 0 1 2 3 B 4 5 6 7 0 1 2 3 D4--16ND2 10.2--26.4VDC 4--12mA CA 0 4 1 5 2 6 3 7 CB 4 0 5 1 6 2 7 3 4 5 6 7 I/O Wiring and Specifications If there was unlimited space and budget for I/O terminals, then every I/O point could have two dedicated terminals as the figure above shows. However, providing this level of flexibility is not practical or even necessary for most applications. Most Input or Output points are in groups which share the return path (called commons). The figure to the right shows a group (or bank) of 4 input points which share a common return path. In this way, the four inputs require only five terminals instead of eight. Main Path (I/O Point) Field Device Getting Started I/O “Common” In order for an I/O circuit to operate, Terminal Concepts current must enter at one terminal and exit at another. This means at least two terminals are associated with every I/O point. In the figure to the right, the Input or Output terminal is the main path for the current. One additional terminal must provide the return path to the power supply. Getting Started 3--6 I/O Wiring and Specifications Connecting DC I/O In the previous section on Sourcing and Sinking concepts, we explained that DC I/O circuits sometimes will only allow current to flow one way. This is also true for many of to “Solid State” the field devices which have solid-state (transistor) interfaces. In other words, field Field Devices devices can also be sourcing or sinking. When connecting two devices in a series DC circuit, one must be wired as sourcing and the other as sinking. Solid State Several DL405 DC input modules are flexible in that they detect current flow in either direction, so they can be wired as either sourcing or sinking. In the following circuit, a Input Sensors field device has an open-collector NPN transistor output. It sinks current from the input point, which sources current. The power supply can be the +24 auxiliary supply or another supply (+12 VDC or +24VDC), as long as the input specifications are met. Field Device DL405 System DC Input Input (sourcing) Output (sinking) Supply Ground -- + Common r e t n e In the next circuit, a field device has an open-emitter PNP transistor output. It sources current to the input point, which sinks the current back to ground. Since the field device is sourcing current, no additional power supply is required. I/O Wiring and Specifications Field Device +V Solid State Output Loads C S C D Output (sourcing) Ground DL405 System DC Input Input (sinking) Common Sometimes an application requires connecting an output point to a solid state input on a device. This type of connection is usually made to carry a low-level control signal, not to send DC power to an actuator. Several of the DL405 DC output modules are the sinking type. This means that each DC output provides a path to ground when it is energized. In the following circuit, the output point sinks current to the output common when energized. It is connected to a sourcing input of a field device input. DL405 System DC Sinking Output Power +DC pwr Field Device +V Output (sinking) + Common -- Input (sourcing) 10--30 VDC Ground 3--7 I/O Wiring and Specifications DL405 System DC Output Power +DC pwr Field Device R pull-up (sourcing) (sinking) Output Supply Common + Input (sinking) -- Ground R input C S It is important to choose the correct value of R pull-up. In order to do so, the nominal input current to the field device (I input) when the input is energized needs to be identified. If this value is not known, it can be calculated as shown (a typical value is 15 mA). Then use I input and the voltage of the external supply to compute R pull-up. Next calculate the power Ppull-up (in watts), in order to size R pull-up properly. C D = R pull-up = V input (turn--on) R input V supply -- 0.7 I input -- R input P pull-up = V supply 2 R pullup The easiest way to drive a sinking input field device as shown below is to use a DC sourcing output module. The Darlington NPN stage will have about 1.5 V ON-state saturation, but this is not a problem with low-current solid-state loads. DL405 System DC Sourcing Output +DC pwr Common Field Device Output (sourcing) Supply + Input (sinking) -- Ground R input I/O Wiring and Specifications r e t n e NOTE 1: DO NOT attempt to drive a heavy load (>25 mA) with this pull-up method NOTE 2: Using the pull-up resistor to implement a sourcing output has the effect of inverting the output point logic. In other words, the field device input is energized when the DL405 system output is OFF, from a ladder logic point-of-view. Your ladder program must comprehend this and generate an inverted output. Or, you may choose to cancel the effect of the inversion elsewhere, such as in the field device. I input Getting Started In the next example a sinking DC output point is connected to the sinking input of a field device. This is different, because both the DL405 system output and field device input are sinking type. Since the circuit must have one sourcing and one sinking device, a sourcing capability is added to the system output by using a pull-up resistor. In the circuit below, connect Rpull-up from the output to the DC output circuit power input. I/O Wiring and Specifications Getting Started 3--8 I/O Wiring and Specifications Four output modules in the DL405 I/O family feature relay outputs: D4--08TR, F4--08TRS--1, F4--08TRS--2, D4--16TR. Relays are best for the following applications: S Loads that require higher currents than the solid-state outputs can deliver S Cost-sensitive applications S Some output channels need isolation from other outputs (such as when some loads require different voltages than other loads) Some applications in which NOT to use relays: S Loads that require currents under 10 mA S Loads which must be switched at high speed or heavy duty cycle Relay Output Guidelines Relay outputs in the DL405 output modules are available in two contact arrangements, shown to the right. The Form A type, or SPST (single pole, single throw) type is normally open and is the simplest to use. The Form C type, or SPDT (single pole, double throw) type has a center contact which moves and a stationary contact on either side. This provides a normally closed contact and a normally open contact. Some relay output module’s relays share common terminals, which connect to the wiper contact in each relay of the bank. Other relay modules have relays which are completely isolated from each other. In all cases, the module drives the relay coil when the corresponding output point is on. Relay with Form A contacts r e t n e C S C D Prolonging Relay Contact Life Relay with Form C contacts Relay contacts wear according to the amount of relay switching, amount of spark created at the time of open or closure, and presence of airborne contaminants. However, there are some steps you can take to help prolong the life of relay contacts: S Switch the relay on or off only when the application requires it. S If you have the option, switch the load on or off at a time when it will draw the least current. S Take measures to suppress inductive voltage spikes from inductive DC loads such as contactors and solenoids (circuit given below). DL405 Relay Output Inductive Field Device Input Output R C Common Supply + -- Common I/O Wiring and Specifications 3--9 2 I C (µF) = R (O ) = 10 V 10 x I x , where x= 1 + Getting Started Adding external contact protection may extend relay life beyond the number of contact cycles listed in the specification tables for relay modules. High current inductive loads such as clutches, brakes, motors, direct-acting solenoid valves, and motor starters will benefit the most from external contact protection. The RC network must be located close to the relay module output connector. To find the values for the RC snubber network, first determine the voltage across the contacts when open, and the current through them when closed. If the load supply is AC, then convert the current and voltage values to peak values: 50 V C minimum = 0.001 µF, the voltage rating of C must be = V, non-polarized R minimum = 0.5 O , 1/2 W, tolerance is ? 5% For example; a relay contact drives a load at 120VAC, 1/2 A. Since this example has an AC power source, first, calculate the peak values: Ipeak = Irms x 1.414, = 0.5 x 1.414 = 0.707 Amperes r e t n e Vpeak = Vrms x 1.414 = 120 x 1.414 = 169.7 Volts Now, finding the values of R and C: C S I 10 C D R (O ) = x= 1 + = V 10 x I 50 169.7 x 0.707 10 2 = 0.05 µF, voltage rating = 170 Volts , where x= 1 + = 1.29 R (O ) = 50 V 169.7 10 x 0.707 1.29 = 16 O , 1/2 W, ? 5% If the contact is switching a DC inductive load, add a diode across the load as near to load coil as possible. When the load is energized the diode is reverse-biased (high impedance). When the load is turned off, energy stored in its coil is released in the form of a negative-going voltage spike. At this moment the diode is forward-biased (low impedance) and shunts the energy to ground. This protects the relay contacts from the high voltage arc that would occur just as the contacts are opening. For best results, follow these guidelines in using a noise suppression diode: S DO NOT use this circuit with an AC power supply. S Place the diode as close to the inductive field device as possible. S Use a diode with a peak inverse voltage rating (PIV) at least 100 PIV, 3A forward current or larger. Use a fast-recovery type (such as Schottky type). DO NOT use a small-signal diode such as 1N914, 1N941, etc. S Be sure the diode is in the circuit correctly before operation. If installed backwards, it short-circuits the supply when the relay energizes. I/O Wiring and Specifications C (µF) = 2 3--10 I/O Wiring and Specifications Getting Started I/O Module Wiring and Specifications Module Placement ? Before wiring the I/O modules in your system to field devices, it’s very important to make sure each I/O module is in the right slot and base in the system. Costly wiring errors may be avoided by doing the following: S S Perform the power budget calculations for each base to verify the base power supply can power all the modules in the base. Whenever possible, keep modules with high voltage and current wiring away from sensitive analog modules. NOTE: Please refer to the applicable Base Controller User manual for the power budget requirements and worksheets. I/O Wiring and Specifications I/O Module Status Indicators r e t n e The diagram below shows the status indicator location for common I/O modules. C S Status indicators C D Display status (selects a group of signals to be displayed) Loose terminal block indicator Blown fuse (non-replaceable) indicator (Output modules only) Wire tray Color Coding of I/O Modules The DL405 family of I/O modules have a color-coded stripe on the front bezel to help identify whether the module type is input, output, or special module. The color code description is listed below: Module Type Discrete/Analog Output Discrete/Analog Input Other Color Code Red Blue White INPUT 110VAV TB A Color Bar å B 0 4 0 4 1 5 1 5 2 6 2 6 3 7 3 7 D4--16NA 80--132VAC 80--20mA 50/60Hz CA 0 I/O Wiring and Specifications You must first remove the front cover of the module prior to wiring. To remove the cover depress the bottom tab of the cover and tilt the cover up to loosen from the module. All DL405 I/O module terminal blocks are removable for your convenience. To remove the terminal block loosen the retaining screws and and lift the terminal block away from the module. When you return the terminal block to the module make sure the terminal block is tightly seated. Be sure to tighten the retaining screws. You should also verify the loose terminal block LED is off when system power is applied. Getting Started Wiring a Module with a Terminal Block 3--11 WARNING: For some modules, field device power may still be present on the terminal block even though the system is turned off. To minimize the risk of electrical shock, disconnect all field device power before you remove the connector. Loose terminal block LED indicator Retaining screw C S C D Terminal screws Push tab and lift to remove I/O module wiring tray Retaining screw I/O Wiring and Specifications r e t n e