1
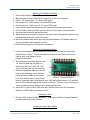
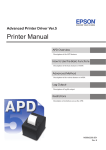
Advisor Advanced Pedestrian System (AAPS) Installation Guide 906-0004 Revision E ● July 9, 2015 Campbell Company AAPS Installation Guide Campbell Company 450 W. McGregor Drive Boise, Idaho 83705 USA Tel: 1-208-345-7459 Fax: 1-208-345-7481 Last edited: 09 July 2015 This document is copyright © 09 July 2015 by Dick Campbell Company. All rights reserved. No part of this publication may be reproduced, transmitted, transcribed, stored in a retrieval system, or translated into any language, in any form or by any means, electronic, mechanical, photocopying, recording, or otherwise, without prior written permission from Campbell Company. All copyright, confidential information, patents, design rights and all other intellectual property rights of whatsoever nature contained herein are and shall remain the sole and exclusive property of Campbell Company. The information furnished herein is believed to be accurate and reliable. However, no responsibility is assumed by Campbell Company for its use, or for any infringements of patents or other rights of third parties resulting from its use. The Campbell Company name and Campbell Company logo are trademarks or registered trademarks of Dick Campbell Company. All other trademarks are the property of their respective owners Page 2 of 10 906-0004 AAPS Installation Guide Rev E.docx © Dick Campbell Company 2015. All rights reserved Campbell Company AAPS Installation Guide AAPS Installation Guide 906-0004 Revision History Revised By Revision D Zane Sapp E Tony Brennan APC 906-0004 AAPS Installation Guide Rev E.docx © Dick Campbell Company 2015. All rights reserved Date 10-13-2014 7-09-15 APB Page 3 of 10 Campbell Company AAPS Installation Guide Table of Contents 1 1 Table of Contents ................................................................................................... 4 2 Introduction ............................................................................................................ 5 2.1 PURPOSE OF THIS DOCUMENT............................................................................................................ 5 2.2 ADDITIONAL INFORMATION ................................................................................................................. 5 2.3 CONTACT INFORMATION .................................................................................................................... 5 3 Installation .............................................................................................................. 6 3.1 STANDARD COMPONENTS ................................................................................................................. 6 3.2 INSTALLATION ................................................................................................................................... 6 4 Post Installation ...................................................................................................... 9 4.1 5 OPERATIONAL CHECK ....................................................................................................................... 9 Appendix A: Acronyms, Abbreviations & Definitions ............................................ 10 Page 4 of 10 906-0004 AAPS Installation Guide Rev E.docx © Dick Campbell Company 2015. All rights reserved Campbell Company AAPS Installation Guide 2 Introduction 2.1 Purpose of this document This guide covers the installation of the Advisor Advanced Pedestrian System (AAPS) and its related components, Base Station, APC and Termination Board. It does not cover the configuration of the AAPS. For details on configuring the AAPS, please see the User’s Manual. 2.2 2.3 Additional Information See the AAPS User’s Manual for operational information Reference the Campbell Company Message Worksheet for location specific information See the Installation Quick Guide for a brief graphical installation guide. See the Base Station Mounting Template for an easy to use hole pattern for mounting the APBs. Contact Information The first line of contact should be the distributor that the system was purchased from. If you are unable to contact the distributor, contact Campbell Company directly. 906-0004 AAPS Installation Guide Rev E.docx © Dick Campbell Company 2015. All rights reserved Page 5 of 10 Campbell Company AAPS Installation Guide 3 Installation 3.1 Standard Components 1(+) ea. APB Base Station 1(+) ea. Terminal Cover Plate + Nipple 1(+) ea. Adapter Plate, Sign, & Hardware 1 ea. APC with Power Cable 1 ea. APC Input Cable (25 conductor) 1 ea. APC Output cable (9 conductor) 1 ea. 7ft EoP Cable (2 conductor) 1 ea. EoP Termination Board 3.2 Installation 3.2.1 Warranty Void Do not connect the 120 VAC to the 2 position field wire terminals on the back of the APB station as this will cause damage to the unit. This will void terms and conditions of the warranty agreement. 3.2.2 Tactile Arrow Orientation Mount the Base Station with the tactile arrow pointing directly to the crossing destination THE PEDESTRIAN RELIES ON THIS INFORMATION TO CROSS SAFELY. Some intersections do not call out arrow directions and require installation in the field. The tactile arrow is field selectable (left or right) requiring two security screws and a special bit. Campbell Company provides this hardware when specified at the time of purchase. Bumpers on the back of the Base Station are adjustable allowing for a number of configurations to ensure a precise fit, especially on decorative or small diameter poles where the station needs to be angled to provide accurate directionality of the arrow. 3.2.3 Base Station Installation Each station is pre-configured for a specific location as determined by the Intersection Worksheet. If the stations are not installed in the correct locations, the audio messages may not be correct. Incorrect messages are a safety hazard. The AAPS should not be left running as long as they are incorrect. If the stations are not installed in the correct position, see the AAPS User’s Manual on how to re-configure them. It is recommended to use an anti-seize compound on all screws going into the pedestrian station. Failure to do so may damage the station if removal is necessary. Page 6 of 10 906-0004 AAPS Installation Guide Rev E.docx © Dick Campbell Company 2015. All rights reserved Campbell Company AAPS Installation Guide Mounting the Pedestrian Stations See the Base Station Mounting Template for a visual aid. Mark the point where the PPB will be centered 36” to 42” from the ground. Drill a 1 1/8” through hole 1 1/4” above PPB center. Drill and tap for a 1/4-20 screw 2 1/4” above PPB center. Drill and tap for a 1/4-20 screw 10 1/2” above PPB center. Insert control cabinet field wiring through the terminal cover plate chase nipple. Connect cabinet field input wires to screw terminals on the back of the base station. Secure protective terminal plate with screws. Adjust bumpers as necessary to ensure a secure fit. Place the pedestrian station on the pole and fasten using two 1/4-20 FHP screws. 10. Attach the adapter plate and/or sign using provided hardware. The adapter plate and mounting hardware differ depending on size. 11. Repeat these steps for all stations at the intersection. 1. 2. 3. 4. 5. 6. 7. 8. 9. Mounting the Termination Board 1. Locate a rail that spans the entire side of the cabinet wall to mount the Termination Board shown in Figure 1. It is recommended to choose an area at the bottom of the cabinet close to the entrance of the pedestrian field wires. 2. The termination board back plate has two 1/4” holes for fastening the plate on a cabinet rail. With two 1/4-20 x1/2” PHP, secure the back plate onto the cable rail. 3. Identify the pedestrian field wires that will land on the termination board. With any pair of field wires (APBs do not need to Figure 1. Termination Board be in any particular order), connect both wires in sequential order to the terminal block. Strip the field wire ends to 1/4” and slide them into the corresponding female terminal connection. Tighten the set screw above to ensure a good connection. Repeat for the remaining field wires. 4. Attach the 7 ft. two wire EoP Cable from the 2 position terminal on the Termination Board to the APB Output connection on APC. Installing the APC 1. Place the APC on shelf inside the cabinet. If shelf space is limited, Campbell Company provides optional mounting solutions. Installing the Input Cable (DB25) 906-0004 AAPS Installation Guide Rev E.docx © Dick Campbell Company 2015. All rights reserved Page 7 of 10 Campbell Company AAPS Installation Guide 1. Identify the outputs to the pedestrian display from the traffic controller cabinet for the pedestrian phases. Reference the accompanying Campbell Company intersection worksheet and identified the pedestrian phases on the planning sheet (P2, P4, P6, P8, etc) 2. Route the DB25 APC input cable in Figure 2 from the front of the APC to the traffic controller cabinet load switch outputs. Secure the excess cable in a loop and tie neatly to avoid confusion. 3. Attach the APC input connections to Pedestrian Display Outputs (W and DW), and ground to traffic controller cabinet Pedestrian Display Outputs. See the Installation Quick Guide for wiring colors and labels. Figure 2. DB25 APC Input Cable Installing the APC Output Cable (DB9) 1. Identify the pedestrian pushbutton inputs in the traffic controller cabinet (PB2, PB4, PB6, PB8, etc) 2. Route the DB9 APC output cable in Figure 3 from front of APC to the pedestrian pushbutton inputs. 3. Attach the APC output connections PB1 – PB8 to the Figure 3. DB9 APC Output Cable cabinet’s pushbutton inputs, and GND to the cabinet’s pushbutton input common. See the Installation Quick Guide for wiring colors and labels. Connect 120 VAC 1. The 120 VAC power cable shown in Figure 4 is supplied with the AAPS system. 2. Attach the green wire to the cabinet ground: the blue wire will attach to 120 VAC Neutral: the Brown wire will attach to the 120 VAC terminal (hot) in the cabinet. Note that some cables can have an alternate coloring. Green should be connected to Figure 4. 120VAC Power Cord earth ground, black to 120VAC (hot), and white to AC neutral. 1. 2. 3. 4. 1. Power Up Sequence Verify that all cables are connected to the front of the APC. Make sure the power switch is in the OFF position before attaching the 120 VAC cord. Turn the power switch to the RESET position allowing the APC to power up. The red status light should be blinking when the APC begins communicating with the APBs. (May take up to a minute to establish communications) The APC display will show a green up arrow or down arrow for each APB. Ethernet Connectivity See the AAPS User’s Manual for instructions on how to connect the APC to a network. SEE AAPS USERS MANUAL FOR DETAILED OPERATIONAL INSTRUCTIONS Page 8 of 10 906-0004 AAPS Installation Guide Rev E.docx © Dick Campbell Company 2015. All rights reserved Campbell Company AAPS Installation Guide 4 Post Installation 4.1 Operational Check 1. The AAPS comes fully configured from the factory. When first powered up, an audible locator tone will be present at the pedestrian station. 2. Depress the push button and verify the red LED turns on with an audible acknowledgement message “Wait”. (No acknowledgment message in EPAPS mode). Verify that pedestrian call is transmitted to the traffic controller. 3. Following a momentary press, verify the Walk message is present and the vibro-tactile button vibrates concurrently with the walk sign. 4. Repeat again with an extended press and verify the red LED turns on and an audible location message plays. 5. After the Walk message, verify an audible locator tone is present during the clearance interval (Flashing Don’t Walk). 6. Recheck all units for a full cycle to ensure all options and features operate as desired. 7. Depending on intersection location, factory default settings for volume, AGC, and vibotactile settings may require modifications. 906-0004 AAPS Installation Guide Rev E.docx © Dick Campbell Company 2015. All rights reserved Page 9 of 10 Campbell Company AAPS Installation Guide 5 Appendix A: Acronyms, Abbreviations & Definitions Term Meaning Adapter Plate An aluminum plate that mounts to the base station to display crosswalk signs. APB Advanced Pedestrian Button APC Advanced Pedestrian Coordinator Base Station Fully integrated APS station that contains the microcontroller, push button, speaker, adapter plate EoP Ethernet over Power line Intersection Worksheet On APS, holding the pedestrian push button down from 1-3 seconds may activate special features, including audible beaconing and extended pedestrian clearance interval. Document containing the intersection specific information including where to install pedestrian stations. Station ID Intersection unique identification number for each APB Termination Board Circuit board that consolidates the pedestrian field wiring to 2 wires. Extended Press Page 10 of 10 906-0004 AAPS Installation Guide Rev E.docx © Dick Campbell Company 2015. All rights reserved