1
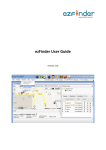
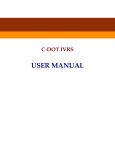
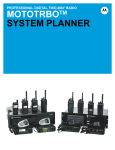
StreetTrek™ GPS Tracking Software for MOTOTRBO™
StreetTrek™ User Manual
Comtran Associates Inc
1961 Utica Avenue
Brooklyn, NY 11234
www.streettrek.com 866.531.7676 [email protected]
Motorola and the Stylized M Logo are registered in the US Patent & Trademark Office. MOTOTRBO is a trademark of Motorola, Inc. All other products or services names are the property of their respective owners. © Motorola, Inc. 2010
Welcome to StreetTrek
Welcome to StreetTrek
Page 1 of 5
Top Next
Welcome to StreetTrek™ Vehicle Tracking. This help covers the use of StreetTrek™ Client Vehicle Tracking
software. For the latest news about StreetTrek™ visit www.streettrek.com.
Previous Top Next
Getting started
When you launch StreetTrek™ for the first time you will be presented with the map of North America. You can
zoom into any area using common navigation methods like holding the left mouse button down and drawing a
rectangle on the map around the area you wish to zoom in. Once you release the left mouse button, move the
mouse cursor within the rectangle and click anywhere inside. The map view port will change to the area you
selected.
Depending on the region you are in you may want to select distance and speed unit measure. Default settings
are miles for distance and mph (Miles per Hour) for speed. To switch to metric distance and speed select menu
Setup|Options. On the pop up dialog select the desired distance units.
If you will be using StreetTrek™ for Vehicle Tracking, change the Speed Limit to match your local traffic law.
Speed Limit entered here can be overridden on per vehicle basis, refer to the Changing Vehicle Name and Icon
topic for details.
If you data comes from hardware attached to the PC through a Serial or USB port, check the 'Local Data'
check box. If StreetTrek™ receives data over the Network or Internet 'Local Data' should be unchecked.
If you expect the map to be populated with vehicles/assets positions saved during the previous program run,
then check the 'Load at start' box (default). The Days Back edit field allows you to specify the threshold for
loading saved data. Positions older then the 'Days Back' value will not be loaded.
The next step is to get your vehicles plotted onto the map.
If the source of GPS data is a MOTOTRBO™ radio, you need to plug MOTOTRBO™ USB cable into the PC
USB port. If MOTOTRBO™ radio drivers are properly installed, StreetTrek™ will automatically configure itself for
MOTOTRBO™ hardware. Refer to the MOTOTRBO Settings and Troubleshooting sections for details.
If GPS data is sent to your PC from the StreetTrek™ Server over the Internet make sure the PC running
StreetTrek™ has Internet connection. Select the Setup|Network menu option or click the
toolbar button.
You will be presented with a form like the one below, except that most fields will be blank. On this form enter the
Server IP Address or, if the server runs on the same LAN, Server Machine Name, TCP Port number and Login
credentials - user name and password.
file://C:\Users\LennyHome\AppData\Local\Temp\~hh19F7.htm
4/23/2010
Welcome to StreetTrek
Page 2 of 5
For more detailed description of Network Setup refer to Login topic.
During the first program run or after running an Upgrade you may encounter Windows Firewall Warning about
the program trying to access the Internet or change Network Settings. Select the option that allows Internet or
Network access. StreetTrek does not send any data to web sites or open any ports accepting outside
connections.
Note:
MOTOTRBO™ is a registered trademark of Motorola, Inc
System Requirements
Previous Top Next
StreetTrek requires a PC with Windows 2000 or later operating system.
Vehicle positions information is sent to your PC over the Internet. Broadband Internet connection - Cable or DSL
is preferable, however, dial-up modem connection is acceptable for most operations.
StreetTrek is a graphic-intensive application. For best results use a PC with adequate amount of RAM (1G RAM
recommended) and high resolution video card and display. Since StreetTrek is capable of showing multiple maps,
dual monitor system is highly recommended.
StreetTrek requires Windows administrative login due to MOTOTRBO™ features that require administrative
privileges.
Previous Top Next
Getting Help
To get assistance using StreetTrek send email to [email protected] or call toll free 866-531-7676 and speak
with the StreetTrek representative.
Previous Top Next
Software Registration
StreetTrek contains copyrighted third-party materials - digital maps. To satisfy the terms and conditions of
distributing these copyrighted materials each installation of StreetTrek requires registration. To register your copy
toolbar split button
of StreetTrek select File|Register menu option, or a similar option under the Information
- you have to click the arrow portion of the button to pull down a sub-menu. You will be presented with a form like
the one shown below
file://C:\Users\LennyHome\AppData\Local\Temp\~hh19F7.htm
4/23/2010
Welcome to StreetTrek
Page 3 of 5
The form shows a Product Code that uniquely identifies your copy of StreetTrek installed on a particular machine.
To register StreetTrek you will need to obtain registration code that you will enter into the 'Registration Code' field.
To obtain your Registration Code either call toll free the phone number shown, or send an email request by
clicking the Email button, which would open a Registration Request Form, like the one shown below.
file://C:\Users\LennyHome\AppData\Local\Temp\~hh19F7.htm
4/23/2010
Welcome to StreetTrek
Page 4 of 5
Once you fill in the mandatory fields the Submit button will become enabled. Clicking the Submit button would
generate and send an email to [email protected]. In order to better serve you in case you need to re-install
StreetTrek™ we recommend filling in the optional fields. A confirmation email listing the information you entered
will be sent to the email address you specified. This is the preferred method of requesting Registration for
computers with Internet access.
Alternatively, you can send an email to [email protected] or [email protected] from any PC with an
Email account. The text of the email registration request is automatically generated and pasted to the Windows
Clipboard when you open the Registration Form. All you need to do is to paste the text into the email body and
send it to [email protected] or [email protected].
Note: an unregistered copy of StreetTrek will run for 15 days in evaluation mode. During these 15 days StreetTrek
will remain fully functional. If you fail to register within the 15 days evaluation period, StreetTrek will stop showing
street level maps. Registration will permanently remove this restriction.
Once StreetTrek is registered respective menu options will not be not visible to the user.
Copyright
Previous Top Next
Your purchase of StreetTrek entitles you installing the number of program copies specified in your purchase
contract. You are not authorized distributing StreetTrek. StreetTrek is copyrighted software and uses following
copyrighted third party software components:
MapPro71 ActiveX Control Copyright © 1988 - 2008 Trius Inc.
Dynamap®/Transportation Data © 2008 Tele Atlas North America, Inc.
file://C:\Users\LennyHome\AppData\Local\Temp\~hh19F7.htm
4/23/2010
Welcome to StreetTrek
Page 5 of 5
For more information about third-party products use the Help/About MapPro
menu option.
Terms and conditions of distributing third-party copyrighted materials require each installed copy of StreetTrek to
be registered within 15 days. For information about StreetTrek Registration refer to the Software Registration
section.
file://C:\Users\LennyHome\AppData\Local\Temp\~hh19F7.htm
4/23/2010
Main Window
Page 1 of 12
Main Window
Previous Top Next
StreetTrek Main Window is it's 'Command and Control' center. It is designed to provide maximum space for the map and easy access to program controls.
StreetTrek Program Controls - menu bar and toolbar, are on the top of the Main Window.
StreetTrek Menu Bar provides access to all options available.
StreetTrek toolbar is below the menu bar.
It provides quick access to the most commonly used options. All toolbar controls have tool tips. To find out what a particular toolbar control does, move the
mouse cursor over the control and read the text in the balloon.
In addition some actions can be performed directly on the map surface. Refer to Map Navigation topic for further details.
The most frequently used toolbar controls are:
zooms map in/out
enable/disable grab and drag map navigation.
find address.
open a Raster Map. The arrow on the right edge of the button indicates there might be submenu options. Clicking on the arrow part of the button will
produce a submenu listing previously opened Raster Maps (if any), that can be selected directly.
import ESRI Shape Files.
place a user-defined landmark.
clears vehicle icons from the map.
open Vehicle Log Form.
open Vehicle Report Form.
save current map view to an image file (screenshot).
print the map.
save the current Map View upon application exit.
saves the current map view port.
restores the map view port.
opens Vehicles/Assets list - a table of current vehicles or assets. The arrow on right edge of the button indicates there are submenu options that pop up
when the user clicks on the arrow part of the button.
view/edit user-defined Landmarks.
view change MOTOTRBO™ settings. This option is visible only after StreetTrek detected MOTOTRBO™ radio presence.
view change connections. This option is not visible when StreetTrek switched to Local Mode upon MOTOTRBO™ detection.
view help and copyright information.
locates a vehicle.
locates a user-defined landmark.
will close StreetTrek.
Since menu bar and tool bar provide similar functionality you can hide one of them. This is done via context menu activated by holding the right mouse
button down when the mouse cursor is on the menu bar or the toolbar. Uncheck the toolbar you want to hide, or check the toolbar you want to bring back.
Previous Top Next
Adjusting window position and size
StreetTrek map windows, when shown for the very first time, will be drawn in default size at the default screen position. You can adjust the size of the map
window by moving the mouse cursor toward the window edge and dragging the border with the mouse while holding the left mouse button down. You can
also drag any StreetTrek window (not maximized) over the display surface the same way you would with any Windows Application - place the mouse cursor
onto the window caption and drag the window while holding the left mouse button down. StreetTrek will 'remember' the size and position and use the same
settings next time. This applies equally to the Main Window and the Detailed Map windows. If you use a dual monitor system, it makes sense placing detail
windows onto the secondary display.
Previous Top Next
Map Navigation
StreetTrek offers most the commonly used map navigation methods - pan, drag, center, zoom in, zoom out.
Pan is performed when you need moving the map to uncover adjacent area. You can pan the map North, South, East, West pan by moving the mouse
cursor near the map border and clicking the left mouse button when the mouse cursor changes shape to a big arrow. If you place the mouse cursor near
one of the map corners
and click the left mouse button, then the map will be panned in two directions at once.
Another way of changing the map view port is to 'grab and drag' the whole map. To do so click the
toolbar button. Once you move the mouse cursor
over the map the cursor shape will change to
. At this point you can press and hold down the left mouse button, and drag the whole map in any direction.
To cancel 'grab and drag' click the right mouse button or click again the
toolbar button. In any case, the shape of the mouse cursor will suggest whether
the grab and drag is enabled.
To center the map around a point on the map move the mouse cursor to that point and double-click the left mouse button. The map will redraw centered
around the point selected.
file://C:\Users\LennyHome\AppData\Local\Temp\~hhC31.htm
4/23/2010
Main Window
Page 2 of 12
To zoom in or zoom out the map view port, use the 'Map/Zoom In' and 'Map/Zoom Out' options, or the respective toolbar buttons
. 'Zoom In' can be
also performed directly on the map surface by drawing a rectangle around the area. This is done by placing the mouse cursor above the area of interest and
drawing a rectangle by holding the left mouse button down while moving the mouse cursor across the area. After releasing the left mouse button move it
into the rectangle. Once the cursor shape changes to the 'magnifying glass' with a plus sign inside, click the left mouse button. You can cancel the 'Zoom In'
action by moving the mouse cursor outside the rectangle and clicking the left mouse when the cursor takes the 'x' shape.
When you start StreetTrek you are likely to expect the main map showing a certain area. To save the current map view port to be used for future program
runs click the
toolbar button or select the File/Save menu option. You can restore the map view port to the saved state by clicking the
or selecting the Map/Home menu option.
toolbar button
When you move the mouse cursor across the map and notice the cursor shape changing to
, it means that an action can be performed for the object
cursor is hovering on. If the cursor is over a vehicle icon, then clicking the left mouse button will open a Detail Map Window for that vehicle. Clicking the right
mouse button will produce a Vehicle Edit Form where you can choose the icon image and label. Moving the mouse over a landmark graphic will also
change the mouse cursor to
. Left mouse click will produce a Landmark Graphic Form where you can change the Landmark graphic image and label.
In addition, whenever the mouse cursor changes to
, a balloon with information will appear on the screen for a few seconds. For example, if you move
the mouse cursor over a landmark icon, an address balloon will pop up. You can produce a balloon with address information for any point on the map. To do
so hold the right mouse button down. A balloon with the closest address will be shown for as long as you keep the right mouse button down.
Previous Top Next
Locating a vehicle/asset
To locate a mobile asset select the asset name from a drop-down list box on the toolbar
. If the vehicle/asset icon is within the current
map view port a balloon with the current asset information will be shown next to the icon. If the vehicle/asset icon is not within the map bounds, the map will
be redrawn with the vehicle/asset icon in the map center. When you run StreetTrek™ you may notice that some assets icons are plotted semi-transparent
and do not have labels. This indicates that the given asset stopped reporting. The degree of transparency depends on the number of missed updates,
however the icon will never disappear completely.
Previous Top Next
Changing Vehicle Name and Icon
Each vehicle or asset icon is shown on the map with a label on top. You can change the vehicle/asset icon image and the text label. To do so, move the
mouse cursor over the vehicle icon and click the right mouse button. On the pop-up window type the desired name into the Name field and select the icon
from the drop down Image List.
You can add extra graphics by clicking the 'Import' button and locating suitable image files on your hard drive. The 'Open File' dialog you will start with
defaults to the 'Graphics' folder in the StreetTrek Application folder. You may find a suitable image in one of the folders there, or you could use your own
graphics located anywhere on the hard drive.
For icons representing vehicles you can enter the user-defined Speed Limit. Whenever the vehicle is moving over the user-defined speed limit, the Vehicle
Name will be drawn on a pink background. Keep in mind that the Speed Limit you enter may not correspond to the legal speed limit of the area.
For vehicles you also may choose the icon to be rotated to indicate direction. To make it so, check the 'can rotate' box. Keep in mind that not any image is
fit for rotating. 'View from above' images are bet suited for rotation. The criteria for rotating is as follows: the original graphic image should be facing East.
StreetTrek graphics collection has 4 built-in car images suited for rotation.
Note:
The exact look of the above form may vary depending on the hardware used for GPS tracking. The above picture corresponds to data collected from a
MOTOTRBO™ base radio. For MOTOTRBO™ hardware GPS Update Interval can be set individually for each radio.
If you need to edit multiple assets - use the Assets/Edit menu option
assets with their respective icons, icon labels and speed limits.
. You will be presented with a form listing all your mobile or portable
file://C:\Users\LennyHome\AppData\Local\Temp\~hhC31.htm
4/23/2010
Main Window
Page 3 of 12
Assets Icons are selected from a drop-down list of available vehicle graphics that will appear when you click on the image. Name and Speed are typed in
when the respective cell gets edit focus. Geofence column is visible only if Geofence options are enabled in Telemetry and Special Conditions. Clicking on
a button in the Geofence column will produce an Asset Geofences form for setting up individual Asset Geofence configuration. Refer to Geofencing for
more details.
To save your changes click the Save toolbar button. You can export your current Assets set to an external XML file. This way you can set up your assets on
one machine and import the same settings on other machines.
Telemetry and Special Conditions
Previous Top Next
StreetTrek™ offers Visual and Sound Effects to indicate the status of the assets being tracked. For example, assets exceeding a user-selected speed
limit can be marked with labels on a pink background. Labels on a gray background could mark assets that were turned off. Similarly, telemetry information
received from the tracked assets could be indicated by user-selectable asset label color. The form shown below opened via menu Setup|Options
or a
similar option under the arrow portion of the Red Car toolbar button, allows the user selecting various settings to customize the way assets are displayed
The colored rectangles on the right represent the color of the asset label corresponding to either a telemetry value entered into a numerical up/down
controls next to them, or a fixed asset condition. Each color can be adjusted by clicking the respective field with the left mouse button. This would produce a
Standard Color Dialog where the user can select a desired color. Telemetry values in the numeric up/down controls should be chosen to match received
telemetry data, which can be hardware-specific. Received telemetry values can be viewed in Vehicles/Assets List 'Telemetry' column. The telemetry column
of the Vehicles/Assets List is hidden by default, you may need to make it visible. Refer to the Vehicles/Assets List topic for details.
Each telemetry value and matching color code can be associated with a friendly name entered by the user into a text box to the left of the numeric telemetry
fields. These aliases will be used in reports. The default telemetry codes are I/O 1, I/O 2, I/O 3, I/O 4. It makes sense to replace these default codes with
text matching real conditions. The 'Normal' condition indicates that GPS data is not associated with any telemetry or special conditions. "Talking' applies to
communications hardware 'Push To Talk' (PTT) condition. Not every type of hardware supports PTT.
Emergency Transmissions are indicated by flashing asset labels and optionally by a sound played through the PC speakers. If the tracked asset is a twoway radio and the radio operator activated the Alarm switch, the label of the respective asset icon will start blinking. It will do so until the StreetTrek™ user
file://C:\Users\LennyHome\AppData\Local\Temp\~hhC31.htm
4/23/2010
Main Window
Page 4 of 12
clicks the icon. You can make StreetTrek™ indicate an alarm condition by playing either a built-in media file or a sound clip your choice. To switch from the
default sound clip to a sound clip of your choice click the 'Select' button and locate a sound file in WAV, MIDI or MP3 format.
Radio buttons inside the Distance Units group box determine speed and distance unit measure in Miles or kilometers.
Controls within the View Options group box determine how assets are shown on the map. The Active Time numeric control sets the maximum time in
minutes since the last update the Asset is still considered to be active. Setting Active Time to a non-negative value will produce a dimming effect for nonactive assets. Assets that did not report within the Active Time threshold will be gradually phased out. Setting Active Time to -1 will turn this feature off.
The default setting for Active Time is off.
Geofencing check box enables/disables Geofencing menu options and features. The default Geofencing setting is off. If you intend using Geofencing
features make sure to check this box. Note the Geofence Violation color selector visible when Geofencing is checked. If the asset is in violation with a
Geofence, its label will alternate between the Geofence Violation color and the color representing other conditions. Refer to the Geofencing topic for more
details.
Previous Top Next
Geofencing
StreetTrek™ implements most common Geofencing - visual notification of an asset within a certain predefined area, or outside a certain predefined area.
Geofencing is not enabled by default. To make Geofencing controls visible make sure to check the Geofencing check box in StreetTrek™ Options.
StreetTrek™ allows setting up to 32 Geofences.
To set up a new Geofence zoom the map to the area and locate the Geofence drop down options under Map menu
, or click on the toolbar
button. On the drop-down submenu select any Add Geofence option with an
icon.
Move the mouse cursor
to the area you will be defining and click the left mouse button. This would paint a small quadrangle representing the first vertex
of the geofence polygon. Repeat the procedure to define polygon vertices.
file://C:\Users\LennyHome\AppData\Local\Temp\~hhC31.htm
4/23/2010
Main Window
Page 5 of 12
Click on the first vertex to finish. This should produce a Geofence pop-up form like the one below.
Geofence Setup
On the Geofence form type the name of the new Geofence. If you want the area to be shaded, select the color and the opacity level and check the Visible
box. If this Geofence should be in effect for all assets within your fleet, check the Apply to All box. Select if the Alert condition either Inside to be notified of
assets entering the area, or Outside for alerts when assets leave the area. Finish by clicking the Save button. Once the Geofence has been defined the
menu option text you started with will change to the Geofence Name you selected, and the option will get a submenu with options to hide, modify, re-define
or delete the Geofence as needed.
file://C:\Users\LennyHome\AppData\Local\Temp\~hhC31.htm
4/23/2010
Main Window
Page 6 of 12
Note the icons of the Geofence menu options indicating whether a Geofence is an Inside Alert
or an Outside Alert . Each defined Geofence can be
hidden/shown, edited, re-defined or deleted via respective sub-menu options.
Next step is to assign Geofences to mobile and portable assets. You may skip this step if you selected Apply to All option when saving the Geofence. In
that case all assets in your fleet will have identical geofences. Otherwise, each asset can be assigned an individual combination of Geofences. The most
simple way to assign geofences for an asset is to locate an asset on the map and click on it with the right mouse button. If Geofencing is enabled, then one
of the options on the context menu will be Geofence.
Selecting Geofence would produce a form listing all existing geofences.
Asset Geofences form
The check marks indicate geofences in effect for the asset, and the Alert cell text and icon indicate whether the Alert Condition is for entering the
geofence (Inside) or leaving the geofence (Outside). The row color indicates the shading color used to paint the geofence on the map if the Visible option
file://C:\Users\LennyHome\AppData\Local\Temp\~hhC31.htm
4/23/2010
Main Window
Page 7 of 12
was selected in the Geofence Setup form. You can make changes to the asset geofences by checking or unchecking check boxes in the Alert column. The
changes you make will be in effect only if you close the form via the Save button.
Note that only defined Geofences will be listed when you open the Asset Geofences form. StreetTrek™ allows to define up to 32 geofences.
StreetTrek™ geofences can be saved to a file in XML format via Export geofence submenu option. If you have multiple StreetTrek™ installations, you can
define geofences on one machine, export geofences to a file, copy the file to a folder of your choice on other machines, and import geofences via Import
geofence submenu option.
Detail Windows
Previous Top Next
At program start StreetTrek shows the Main Window . You can open additional maps 'dedicated' to individual vehicles. To do so, move the mouse cursor
over the vehicle icon and click it.
A smaller window centered around the vehicle will pop up. Unlike the main map, the Detail Window will 'follow' it's vehicle and show vehicle status on the
caption bar. If the vehicle moves beyond the Detail Window boundaries, the window will automatically change it's map view port centered around the vehicle
icon. Detail Windows can be individually re sized by dragging window borders. You can also pan, zoom in/zoom out the Detail Map using the toolbar buttons
or navigate directly on the map as you would on the Main Window. Detail Window size, position, and zoom level will be saved and used the next time you
open the Detail Window for the same vehicle. You can have multiple Detail Windows simultaneously open. If you use a dual monitor system, you could
place several Detail Windows onto a secondary display while keeping the Main Window on the main display.
If you 'loose' the vehicle icon vehicle navigating the Detailed Map, you can center the map around it's vehicle by clicking the
have to do this if the vehicle moved outside the map boundaries. In that case, the map will center itself automatically.
Raster Maps
toolbar button. You don't
Previous Top Next
StreetTrek can import Raster Maps. You can use this option to supplement installed vector maps. A Raster Map is basically an image with known corner
coordinates. StreetTrek requires raster image file to be accompanied by a file in Google KML format. The KML file should contain the full path to the image
file and geographic coordinates in decimal degrees in accordance with Google™ KML File Format Specification. To open a Raster Map Select File|Open
or Map|Open menu option or click the
toolbar button. This will produce a Windows File Open Dialog from where you navigate to a file to open. It is
recommended that you place your Raster Maps into the StreetTrek Application Data Folder, which is the default start directory for the File Open Dialog,
however, you can place your raster maps into any folder of your choice. Upon selecting a map file StreetTrek will open a form showing your raster map with
your mobile or portable assets plotted onto it.
file://C:\Users\LennyHome\AppData\Local\Temp\~hhC31.htm
4/23/2010
Main Window
Page 8 of 12
Navigating raster maps is quite similar to navigating database-generated vector maps. The only difference is that a raster map can't be zoomed out beyond
the boundaries of the loaded image. You can open several raster maps. For example, the screenshot below shows a Raster Map centered around the same
coordinates as the map shown above, but at a lesser zoom level.
After a Raster Map was opened for the first time, it will be added as a submenu option File|Open and Map|Open menu options
that will be also available
at subsequent program runs as long as files they point to still exist. Next time you want to open the same map you can do so directly instead of using the
File Open Dialog.
Previous Top Next
Vehicles/Assets List
Mobile Assets List provides a table form view of your fleet. To open the Mobile Assets List select the Assets/View menu option or click the
button.
file://C:\Users\LennyHome\AppData\Local\Temp\~hhC31.htm
toolbar
4/23/2010
Main Window
Page 9 of 12
By default the Vehicles/Assets List sorts by Date/Time Descending. You can change the sorting order to Ascending by clicking on the Date or Time
column header, or sort by Asset Name or by Speed by clicking on the respective column header. The sorting type (Ascending/Descending) is indicated by
an arrow icon in the column header to the right of the column caption.
Vehicles/Assets names in the 'Assets' column are listed with an Icon indicating the Vehicle/Asset status. The icon legend is as follows:
Ignition is on.
Ignition is off.
The vehicle exceeds the user-defined speed limit.
The vehicle operates under special conditions (emergency lights, door open, lift switch etc...).
No GPS data available.
No GPS data available condition most often occurs when the vehicle is in a covered area, like underpass or underground garage. You may want to check
the On/Off column. On/Off data is not directly related to GPS. It is normally generated by hardware inputs like Ignition in a vehicle or On/Off switch on a
radio.
You can select which columns should be shown. To do activate the context menu by holding the right mouse button down, and select the top option
On the pop-up form
.
check the column names you want to keep and uncheck those you don't want, then click the Save button.
Note the Geofence check box on the above form and Geofence menu option on the context menu above it. Both these options are visible only if
Geofencing is enabled. Refer to Telemetry and Special Conditions topic for information how to enable Geofencing. If Geofencing is enabled and
Geofences are defined, rows in the Mobile and Portable Assets form that belong to assets in Geofence violation will be highlighted by yellow (gold)
background color.
Adding Custom Pushpin
Previous Top Next
You can place onto the map graphics representing static (not moving objects). It could be a location of your center office, or your customers locations, or
landmarks to ease map navigation. To add a pushpin, make sure the place for the pushpin or Landmark is within the current map view port. Select the
Map/Mark menu option or click on the
toolbar button. The mouse cursor will change shape to 'Pushpin'. Move the mouse cursor to the place of your
interest and click the left mouse button. A pushpin will appear on the map surface. You can drag this pushpin on the map surface by placing a mouse cursor
on it and holding the left mouse button down. Next step is to provide the pushpin with a name and change the graphic from the default. To do so click on the
pushpin with the left mouse button. A pop-up dialog, like the one below
file://C:\Users\LennyHome\AppData\Local\Temp\~hhC31.htm
4/23/2010
Main Window
Page 10 of 12
will be shown. Enter the name (label) and select the desired graphic from the drop-down box. The address fields will be automatically filled in with the
closest address match for pushpin coordinates; make changes if you know the exact address.
You can add extra graphics by clicking the 'Import' button and locating suitable image files on your hard drive. The 'Open File' dialog you will start with
defaults to the 'Graphics' folder in the StreetTrek Application folder. You may find a suitable image in the 'Landmarks' folder there, or you could use your
own graphics located anywhere on the hard drive.
You may check the Locked box or leave it for later. Locked Landmark can't be dragged. You can change this setting whenever you need to adjust the
Landmark position or lock the position as final. Finish by pressing the 'Save' button. The pushpin now will show the image you selected and if you entered
the Label field, the Label will be drawn above the Landmark image and the Label text will be also shown in the Drop Down Landmarks Box
on the Toolbar. You can use the toolbar Landmarks Drop Down box to quickly navigate to the Landmark. Labeled Landmarks will
be saved when StretTrek closes and loaded at future program runs. Landmarks with empty labels are not saved.
To remove a custom pushpin (Landmark) click it using the left mouse button and on the Landmark pop-up dialog click the 'Remove' button'.
Another way of managing user-defined landmarks is to open a separate form with a table listing all landmarks. To do so, click the Main Window toolbar
button. You will be presented with a window showing a table listing all user-defined landmarks. You can edit Landmark label and address fields. This makes
sense when there are more then just a few user-defined-defined landmarks and looking them up on the map becomes cumbersome.
Previous Top Next
Clearing Vehicle Icons
If for whatever reason you need to remove all vehicle icons from the map use the Map/Clear menu option or click the
toolbar icon. Vehicle icons will be
removed from the map, but not permanently deleted. When new AVL data is received vehicle icons will be plotted onto the map with previously selected
image and label. You can 'reload' removed vehicle icons by clicking the
toolbar button.
Previous Top Next
Locating Address
StreetTrek allows to find and optionally mark (via pushpin) a Street Address, State, Postal Code (ZIP), phone area code and phone exchange number,
geographical coordinates.
To start location search select the Map/Find menu option or click the
toolbar button. To find an address fill in fields on the Address tab and click the Find
button.
Address search will be permitted only if either State and City or the Zip code are filled in. Search for Canadian Postal Codes is limited to the first 3
characters. USA Postal Codes require 5 digits. The search results will be listed in a table. There can be more then one result if the address information is
incomplete. For example, on the above form, if you remove the street number and leave only street name then the search will return 60 results listing each
block along Utica Avenue in Brooklyn NY. If you leave the City and State fields blank and fill in the ZIP code 11234 the search will return 17 results listing
each block along Utica Avenue within the 11234 ZIP code area. To plot an address search result onto the map highlight the Search Result row and click the
file://C:\Users\LennyHome\AppData\Local\Temp\~hhC31.htm
4/23/2010
Main Window
Page 11 of 12
'Go' button. A default Landmark pushpin will be placed onto the map at the address coordinates and a balloon with the address information will be shown
next to the pushpin for several seconds. If the address location is outside the current map view port, the map will be automatically centered to coordinates of
the address. By default, all search address push pins are temporary - they have no label attached. To make a permanent pushpin or Landmark, click with
the left mouse button and fill in the label field on the pop up dialog. For more details refer to the Adding Custom Pushpin topic.
To find the State (Province) and City for a phone number, select the Phone tab and enter the area code plus the first 3 digits of the phone number (phone
exchange number). StreetTrek will perform search within the Phone Exchange Database for the physical location matching these numbers.
To pinpoint specific geographical coordinates, select the Latitude/Longitude tab and enter the Latitude and Longitude, then click the 'Find' button. The
search result will be shown as a closest address match. If you click the 'Go' button, the main map will be zoomed to coordinates you entered, and place a
pushpin at there.
Previous Top Next
Points of Interest
StreetTrek allows importing Points of Interest markers from external files. Point of Interest is similar to a Land Mark, except that when shown on the map it
has no label above it. StreetTrek Points of Interest menu and toolbar upper level options are marked by
icon. The most common Point of Interest, as
applies to Vehicle Tracking, can be a Red Light Camera. Points of Interest databases are most often distributed in comma-delimited format (CSV) with
records having Longitude in the first field and Latitude in the second field. To import a Points of Interests File Select menu option 'File|Points of
Interest|Import'. StreetTrek Toolbar has similar options under the Landmarks split button. After Points of Interest are loaded they can be hidden or shown via
'Points of Interest' sub-menu. You can also change Point of Interest Icon and 'tip' label, or add you own Points of Interest and save them to an external file.
Previous Top Next
Updating StreetTrek
StreetTrek posts regular updates available for download from StreetTrek web site www.streettrek.com . Updates availability and installation are done while
StreetTrek is running. To check for available updates select the Help/Check for Upgrades menu option
A pop up dialog will show your current StreetTrek Version and, after a brief delay, the last available upgrade.
If the new version is the same or later, then the 'Download' button will be enabled. The read-only text box should list recent updates. To download the
upgrade click the 'Download' button. The progress of the download will be indicated by the progress bar and can be interrupted by clicking the 'Cancel'
button. Upon the completion of the download the caption of the 'Download' button will change to 'Install'. Clicking 'Install' will cause StreetTrek to close and a
following window will pop up window:
file://C:\Users\LennyHome\AppData\Local\Temp\~hhC31.htm
4/23/2010
Main Window
Page 12 of 12
At this point you can either finish the upgrade procedure by clicking the 'Install' button, or click 'Cancel' to keep your current StreetTrek version. Selecting
'Install' will result in overwriting existing StreetTrek program files with newer versions, and/or adding new files, if any. In either case, the Upgrade pop-up will
close. If you clicked 'Install' the new StreetTrek version should be launched automatically. If StreetTrek™ fails to start automatically, start it manually from
the desktop shortcut or from the Programs menu and verify the build number (click on the main portion of the
file://C:\Users\LennyHome\AppData\Local\Temp\~hhC31.htm
button).
4/23/2010
Internet Connection
Internet Connection
Page 1 of 3
Previous Top Next
StreetTrek (Client) receives data from StreetTrek Server over the Internet. The connection to StreetTrek Server is
initiated automatically using credentials (User Name and Password) used during the previous session. Internet
connection status is indicated by the Traffic Light Icon in the upper left corner of the main program window. The
yellow light
indicates connection was not yet established. All Lights traffic icon
indicates StreetTrek is
receiving and processing data from the server. Red Light traffic icon
indicates a dropped connection. Changes
in the connection status normally do not require any user intervention. At the program start the main window icon
should be Yellow Light
and change within few seconds to All Lights (or busy)
and stay 'busy' for several
seconds (longer for larger fleets), while StreetTrek receives and processes most recent vehicles positions. After
that the icon should become Green Light
and occasionally flash 'busy'
when a vehicle update is received.
Connection to the StreetTrek Server may sometimes drop, especially if your PC is on a wireless network.
StreetTrek will attempt to re-connect in 25 seconds intervals. You don't have to do anything.
Previous Top Next
Login
StreetTrek™ (Client) can receive data from StreetTrek™ Server over Local or Wide Area Networks (Internet).
Before you can connect to the StreetTrek™ Server you have to enter the Server IP Address or Machine Name
toolbar button
(LAN), TCP Port number and Login Credentials - user name and password. To do so click the
or select menu Setup|Network option. If you never done this procedure during this or previous sessions, you will
presented with a form like the one below, except that most fields will be blank. Enter your Server IP Address or, if
StreetTrek Server is on the same network, Server Machine Name, Server TCP Port number (default is 9001)
user name and password. User name and password for a given server are assigned by a StreetTrek Manager
utility. If you run your own servers you should know them, otherwise contact your service provider. Connection
Name field should describe your connection. The default name is 'Default Connection'. To finish Network
Connection Setup click the 'Save' button. StreetTrek™ will test the connection and if successful, the Network
Connection Setup form will close.
The Connection Name you entered will now appear as a submenu option for menu Setup|Network and also as
Network submenu option. The highlighted submenu graphic indicates the currently Active
Toolbar
Connection. If you move the mouse cursor over this new submenu option it should read 'Disconnect from + your
connection name' indicating that clicking this option at this time would disconnect StreetTrek from the server. To
connect again select the same submenu option. When you close StreetTrek™, the Active Connection will be
automatically terminated and the same connection will be automatically initiated at the next program run. If you
closed the connection manually or it was terminated during the program run and there was no Active Connection
upon StreetTrek exit, then no connection will be established when you start StreetTrek™ next time. However, the
Setup|Network menu option will contain a submenu listing the previously existing connection(s). To connect to the
server simply select the submenu option with the connection name of your choice.
StreetTrek™ can connect to multiple servers (one at a time). To add another connection click
toolbar button
or select menu Setup|Network option. This time you will be presented with a form listing all existing connections.
file://C:\Users\LennyHome\AppData\Local\Temp\~hh8749.htm
4/23/2010
Internet Connection
Page 2 of 3
To add a new connection click the 'New' toolbar button and perform the Network Connection Setup described
above. You can make changes to an existing Server Connection by clicking the 'Edit' toolbar button. You can
delete an existing Server Connection by clicking the 'Delete' toolbar button. Note, that you can't edit or delete the
currently Active Connection - the respective toolbar buttons are disabled if you select an Active Connection
from the Servers list. All changes you made while this form was open will be reflected in respective StreetTrek
menu options once the Servers form is closed.
Note: the Network menu and tool strip options may function differently when MOTOTRBO™ hardware is
plugged in or when you turn on MOTOTRBO™ radio while it's USB cable is already plugged in, and there is no
Active Server Connection. In that case StreetTrek will automatically configure it's menu options to match the
hardware configuration.
Note: MOTOTRBO™ is a registered trademark of Motorola, Inc
Firewall
Previous Top Next
StreetTrek Client can and should run behind a firewall. Hardware firewalls, like those integrated within routers,
should not require any special adjustments. Software firewalls, like Windows Firewall, have to be setup to accept
exceptions, which is a default. If you get a Windows Security Alert from Windows Firewall,
make sure the name of the program is StreetTrek Client and Publisher is StreetTrek.com, and click the 'Unblock'
button. If you have firewall related problems consult your network administrator or contact your StreetTrek
representative at [email protected] or call toll free (866) 531-7676.
Previous Top Next
Local Serial Ports
file://C:\Users\LennyHome\AppData\Local\Temp\~hh8749.htm
4/23/2010
Internet Connection
Page 3 of 3
StreetTrek can obtain vehicles/assets positions over or from a directly connected hardware. For example, if you
are traveling in a vehicle equipped with a GPS modem, you could hook the modem's serial output (provided it has
one) to a laptop running StreetTrek, and locate your own position. To do so, select the Setup|Local Ports|Serial
option.
It will produce a pop-up form like the one shown below. StreetTrek will examine all Serial Ports available on the
PC for GPS data. You may need to select the baud rate.
If one of the check boxes is already checked click the OK button. The form will close and your current position will
be plotted onto the map, and labeled 'Me' by default. Your position will be updated in 10 seconds intervals.
If none of the check boxes was automatically checked verify that your GPS device is powered up and
connected to the computer. Next, click the 'Test' button. The text appearing in the Response column should
provide a clue. The text shown in the third row of the table in the picture is the typical response of an Enfora™ MTGL series GSM/GPRS modem. You can 'force' StreetTrek to 'poll' the Serial Port of your choice by checking the
respective check box.
Warning: under no circumstances the above described actions should be performed by the driver of a
moving vehicle. They should be done either before starting the trip, or during a stop.
To stop polling the Serial Port, select the Setup|Local Ports|Serial menu option and close the 'Select Serial Port'
form clicking the 'Cancel' button. The current status of the Local Port (open/closed) is indicated by the checked
status of the Setup|Local Ports menu option. When it is checked (the serial icon is shown within a black rectangle)
then the PC did open a serial port and issues a polling command in 10 seconds intervals. It makes sense turning
off the Local Serial Port option when you do not need it anymore.
file://C:\Users\LennyHome\AppData\Local\Temp\~hh8749.htm
4/23/2010
MOTOTRBO Settings
Page 1 of 3
MOTOTRBO Settings™
Previous Top Next
StreetTrek supports Motorola MOTOTRBO™ series radio models with GPS option. StreetTrek will automatically detect
MOTOTRBO™ hardware provided MOTOTRBO™ radio USB drivers are installed and the base radio is on, it's USB cable is
changing to Local .
plugged in, and StreetTrek is not connected to a server. The visual clue is the tool strip Network button
You may need to select or change MOTOTRBO™ options to match radio programming and your requirements. To do so select
Setup|Local Ports|MOTOTRBO menu option
pop-up form like the one shown below.
or click on the tool strip
button. You will be presented with a
Note: MOTOTRBO™ menu options are visible only when MOTOTRBO™ hardware is on and plugged into at least one PC USB
port.
The drop-down combo box under 'Radio Parameters' lists the IP addresses provided by the attached MOTOTRBO™ radios acting
as DHCP Servers. StreetTrek allows multiple MOTOTRBO™ base radios simultaneously connected to several USB ports. You have
to make sure that each MOTOTRBO™ base radio is programmed with a unique IP Address. For multiple base configurations we
recommend changing the third octet of the IP Address for each additional base. For example, if the first base IP Address was
programmed 192.168.10.1, the next base could get 192.168.11.1, next 192.168.12.1 and so on. Refer to the MOTOTRBO™ CPS
manuals for detailed information on radio programming. Information shown in the Radio Parameters group matches the selection in
the IP Address Drop/Down box. If you have multiple bases attached, then selecting a different IP address will show respective radio
parameters.
Note: the above considerations apply only to MOTOTRBO™ radios to be used as bases for a PC running StreetTrek™. Radios
sending GPS do not require unique IP Addresses.
CAI Network ID is MOTOTRBO™ parameter programmed into MOTOTRBO™ radios. CAI abbreviation stands for Common Air
Interface. The default value for CAI Network ID is 12. You can change it to match your radio programming.
ARS Port is the UDP Port number for MOTOTRBO™ Automatic Registration Service (ARS).
Telemetry Port is the UDP Port number for MOTOTRBO™ Telemetry Services.
CAI Network ID and ARS and Telemetry UDP port numbers are programmed into MOTOTRBO™ radios. It is generally not
recommended using values other then the default. To prevent accidental changing, these fields are grayed out until you check the
'Network Settings' check box.
GPS Update Interval in seconds is the desired time interval between GPS updates. MOTOTRBO™ Radio Manual recommends 4
minutes (240 seconds) between updates and cautions against lowering them below 60 seconds. StreetTrek MOTOTRBO™ Settings
Form allows entering shorter (down to 20 seconds) update intervals for testing purpose. Keep in mind that shorter update intervals
translate into more radio traffic and less radio battery life.
The GPS Update Interval entered here will be applied to MOTOTRBO™ radios registering with StreetTrek™ for the first time.
StreetTrek™ stores the GPS Update Interval for each radio, and a GPS Update Interval of a particular radio can be changed
independently of the global GPS Update Interval entered here. If you need changing GPS Update Interval for each previously
registered radio, check the Apply to All box.
Any changes you made on the above form are applied only when you close the form using the 'Save' button. If you changed the CAI
Network ID, or ARS Port, the changes will be in effect only after you restart StreetTrek.
Note: MOTOTRBO™ is a registered trademark of Motorola, Inc.
file://C:\Users\LennyHome\AppData\Local\Temp\~hhF029.htm
4/23/2010
MOTOTRBO Settings
Troubleshooting
Page 2 of 3
Previous Top Next
Getting GPS data from MOTOTRBO™ hardware may require some troubleshooting. Due to the constraints of MOTOTRBO™
Location Services Architecture a GPS-capable radio will send GPS only after getting an Over the Air instruction issued by a
GPS-tracking application like StreetTrek™. There is a fair chance that when you run StreetTrek™ with MOTOTRBO™ for the first
time you will be looking at a map with no Asset icons. An Asset icon is plotted onto the map only if StreetTrek™ received GPS data
with valid coordinates. There could be various causes for an Asset icon not shown on the map. For example, a radio might be
programmed incorrectly, or not acquired GPS lock. To assist the system operator with troubleshooting StreetTrek™ offers a
Diagnostics View Data option under the toolbar button. Moving the mouse cursor over the toolbar button should pull down a
submenu:
Selecting View Data would produce a Radio Data form showing data received from the base radio(s).
Each row in the above table represents a decoded data message. The message type is indicated by an icon in the left most cell.
icon will translate into an Asset icon plotted onto the map. Messages
Note that only data messages represented by a Green Star
represented by a Yellow Star
icon have no GPS coordinates and will not be reflected on the map. Rows starting with a Blue
icon represent ARS messages. ARS messages carry no GPS information and are not reflected on the map, however ARS
Star
icon
(Automatic Registration Service) is an essential component of MOTOTRBO™ Data Services. Rows starting with an
represent a response to a Periodic Location Update Request. In essence, this message indicates that a radio received an
application (StreetTrek™) request for a Periodic Location Update and will start sending GPS at the rate specified. To find out the
meaning of each icon move the mouse cursor over the icon and read the tooltip that should appear shortly. You can also open a
form showing all possible data icons by selecting the Legend toolbar option.
file://C:\Users\LennyHome\AppData\Local\Temp\~hhF029.htm
4/23/2010
MOTOTRBO Settings
Page 3 of 3
Information shown on the Radio Data form can be helpful to a person with some knowledge or understanding of MOTOTRBO™
Data Services. Regular program users may never use this option.
Note:
MOTOTRBO™ is a registered trademark of Motorola, Inc.
file://C:\Users\LennyHome\AppData\Local\Temp\~hhF029.htm
4/23/2010
Location Log Feature
Page 1 of 2
Location Log Feature
Previous Top Next
StreetTrek location data is stored at the source. Data obtained from the locally attached hardware, like as Motorola MOTOTRBO radio, is stored in the
local database. All location data obtained over the Internet is stored on the StreetTrek Server. The procedure for retrieving stored data is identical for
both Internet and locally stored data. Location Log is available in two forms - as a map and in a tabular form. To retrieve Location Data use one of the
two options - Log/Open or Log/Report.
Log/Open
activates the Visual Log presenting a map with plotted positions, while Log/Report
will generate a
report in tabular form. Visual Log is available only for a single Vehicle or Asset, while tabular report can be loaded for either single Vehicle/Asset, or All
Vehicles/Assets. Log options are also available from the toolbar
. In either case you will be presented with a pop-up dialog.
On this dialog select the vehicle or asset from the drop down list, or check the 'All' box to request data for all vehicles/assets. StreetTrek will either query
a local database, or send a request to the server for available log range. If log data is available, the two date picker controls - 'Start Date' and 'End
Date', and the 'Load' button will be enabled. The date controls allow to specify the desired report range and default to the last 24 hours of available data.
You can specify the desired date range by making selections in both date controls. The 'Speeding' check box allows loading only records with speed
exceeding the Speed Limit. Once you done with your selections, click the 'Load' button. The Location Log pop-up will be closed and StreetTrek will
either load data from the local database, or start receiving data from the Server. Selecting a wide date range may result in loading large amount of data
and may take some time for data received over the Internet. In that case StreetTrek will show a progress bar indicating the progress of the download.
Previous Top Next
Location Log Form
Location Log Form is a separate window showing a map with route plotted as way points with time stamps. It has it's own toolbar and can be
navigated and zoomed in/out similar to the Main Map or Detailed Maps.
Unlike the detail maps, the Log Form is modal - you can't work with other forms until you close this one.
You can 'play' the vehicles route by moving the vehicle icons from one way point to another using the toolbar arrow buttons, or you can play animation
file://C:\Users\LennyHome\AppData\Local\Temp\~hh5448.htm
4/23/2010
Location Log Feature
Page 2 of 2
by clicking the Animate toolbar button. You can also advance the vehicle icon directly to any way point by clicking on it. When you do so, the date, time,
speed and direction (if any) will be shown on the title bar. Moving the mouse cursor onto a way point will produce a balloon with similar information. Like
all StreetTrek maps, log map is printable.
Individual way points are colored to indicate vehicle's status. Green indicates that ignition is on, gray - ignition is off. The color of way point becomes
pink if the vehicle exceeds the use-defined speed limit. If the vehicle operates under special conditions - lights/siren, open door, raised plow, etc, way
points will be drawn on yellow background.
You can open the same vehicle log in a tabular form directly from the map form by clicking the
button.
Location Report Form
Previous Top Next
Location Report Form processes and displays location log for any 24 hours (or less) period in tabular form.
The address information (Street Address (Block), Street, City) is calculated after the form is shown. Depending on the number of records it may take
more or less time to process. The progress of address calculations is indicated by a progress bar shown on the Report Form toolbar during processing.
You can stop the address calculation process by clicking the
toolbar button. If you need to close the Report Form during the address calculation
click the
button.
The Status column legend is identical to that on the Vehicles List .
Ignition is on.
Ignition is off.
The vehicle exceeds the user-defined speed limit.
The vehicle operates under special conditions (emergency lights, door open, lift switch etc...).
No GPS data available.
To print the table click the
toolbar button. You can print a partial table by selecting multiple rows prior to clicking the printer button.
The data shown in the Report table can be exported into common formats - CSV or comma-separated format often associates with MS Excel, and in
XML format. To export the Log click the
toolbar button.
file://C:\Users\LennyHome\AppData\Local\Temp\~hh5448.htm
4/23/2010
Vehicle and Landmark Graphics
Page 1 of 1
Vehicle and Landmark Graphics
Previous Top Next
StreetTrek comes with a set of built-in vehicle and landmark graphics. You can add your own graphics in most common
graphic formats -GIF, JPEG, BMP, PNG. To add your custom graphic to StreetTrek vehicles icons collection use the menu
Setup/Graphics/Vehicle Graphics menu option, or click the right section of the respective Toolbar Split Button select the
and
pull-down menu option. For Vehicle Graphics a window, like the one shown here
will pop up. Click the 'Add' toolbar button to show a standard Windows 'File Open' dialog. Using this dialog locate the
graphic image file on your hard drive and add it to the collection by clicking OK. To remove an item from the collection
highlight it and click the Remove toolbar button. To finalize your choices click the toolbar 'Save' button. You can arrange
the order the icons are listed by dragging the icon to the desired position on the list.
To add/edit Landmark Graphics, select Setup/Graphics/Landmarks Graphics menu option or click on the right section of
the main toolbar
Split Button and select the
pull-down menu option.
When choosing or creating custom vehicle and landmark graphics consider the following:
The built-in graphic are 32x32 pixels. You can use and mix images of a different size. If you want your custom graphics to
be drawn transparently you have two choices. You can use or create transparent graphics in a graphic format that
supports transparency. Alternatively you can use graphic images on a solid background. In that case the color of the upper
left pixel will be used as 'transparent color.
You can always restore the original built-in graphic collections by clicking the 'Reset' toolbar button followed by 'Save'.
When editing graphic collections keep in mind that StreetTrek assigns each vehicle or landmark a certain image. If you
delete that image from the collection, StreetTrek will substitute the 'missing' image with the first image in the collection. For
example, if you current fleet have vehicles shown on the map as 'School Bus', and you delete 'School Bus' from the
collection, then the affected vehicles will be shown in the 'Blue Car' image.
A special consideration for vehicle graphics. The first 4 images shown in the above table are fit for rotation. If you check
the 'enable rotation' box on the Vehicle Name and Icon form, then respective vehicles will be drawn corresponding to the
direction they move in. Note that for rotated graphics the original graphic should be facing 'East', like the first 4 images on
the above form. The 'Truck' image is less suited for rotation. The rest of the built-in vehicle graphics are not suited for
rotation.
file://C:\Users\LennyHome\AppData\Local\Temp\~hhB990.htm
4/23/2010
Map Folders
Map Folders
Page 1 of 3
Previous Top Next
StreetTrek uses Dynamap®/Transportation Data © 2008 by Tele Atlas North America, Inc. StreetTrek installation
places map folders within the StreetTrek program folder. If for whatever reason you need to move map folders to
a different location or you already have compatible digital maps installed in a different location, you may need to
adjust StreetTrek map path. This is done by selecting File/Map Folders. You will be presented with a form looking
like the one on the picture below
with the entries pointing to the existing map folder locations. To point StreetTrek to the new map folder location,
enter the new path or find the respective folder by clicking the button to the right of the entry field.
Note: States0 and States1 may point to the same folder.
Digital Maps and MapPro Mapping ActiveX control copyright information are shown in the About MapPro Form
called from the Help/About MapPro menu option. Tele Atlas North America copyright notice is shown in the lower
left corner of every map shown by StreetTrek.
Previous Top
Importing Maps
StreetTrek allows importing digital maps in ESRI Shape File Format. These maps will be drawn as layers on top
of installed maps, if any. StreetTrek mapping component currently supports only SHP/DBF and MID/MIF file pairs.
To import a shape file select the Map|Import menu option or click the toolbar
'Import Layer Manager Form'.
file://C:\Users\LennyHome\AppData\Local\Temp\~hhFBA.htm
button. StreetTrek will open the
4/23/2010
Map Folders
Page 2 of 3
On this form click the
button to open a Standard File Open Dialog where you can navigate to the file you
intend to import.
You can add as many layers as you need. You can change the order in which imported layers will be drawn by
moving respective lines to a another position on the list using the arrow buttons. Once the file name appears on
the list you can select the desired layer properties using 'Properties' button that will produce a pop-up form like the
one shown below:
Layer properties you may need to adjust include Name, Upper and Lower visibility thresholds, layer opacity, Pen
for drawing lines, brush for filling polygons. Visibility thresholds define the maximum and minimum dimensions in
current map units for the layer to be drawn. The Name field in the upper left part of the form allows to give the
layer a descriptive name. The default layer name is the file name without extension. If you import multiple layers it
makes sense providing them with names you can associates with.
file://C:\Users\LennyHome\AppData\Local\Temp\~hhFBA.htm
4/23/2010
Map Folders
Page 3 of 3
To finish the import click the 'OK' button. Once the Import Manager form closes the main map will be redrawn and
should show imported layers as long as they are within the current map view port and at the sufficient zoom level.
Keep in mind that imported maps should be in X,Y projection - no other projections are supported at this time.
file://C:\Users\LennyHome\AppData\Local\Temp\~hhFBA.htm
4/23/2010