1
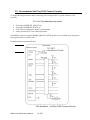
2 Setup for Use With a PC
2.1 WATCHPOINT Software Installation
a) Do not connect the EJ-SCT to the PC USB port until after the WATCHPOINT software has
been installed so that the PC will have access to the USB driver.
b) WATCHPOINT versions are determined by the processor that they support. Check to be sure
that the version of WATCHPOINT being installed matches the processor on the unit under
test.
c) Install Sophia Systems WATCHPOINT debug software using the supplied CD ROM.
d) Do not attempt to start a WATCHPOINT session until the JTAG hardware is installed. For a
WATCHPOINT session to start normally the PC must recognize the EJ-SCT on a USB port,
and the EJ-SCT must find a compatible processor on an active JTAG port.
e) The EJ-SCT receives power via the USB cable when connected to a personal computer.
f) Make sure that the supplied WATCHPOINTt CD is in the PC ROM drive and connect the
USB cable to the PC and EJ-SCT. The PC will detect the new USB hardware and find the
needed USB driver on the WATCHPOINT CD.
g) Be sure that the unit under test power is off. When WATCHPOINT is installed and the
EJ-SCT has been recognized by the PC you can plug the EJ-SCT into the unit under test.
Make sure that Pin 1 on the JTAG cable is connected to Pin 1 on the unit under test.
Failure to do so may damage the EJ-SCT and your test unit.
h) Turn on the unit under test. The EJ-SCT target power on LED, (labeled P-ON) should light.
Now you are ready to start the first WATCHPOINT session. Refer to the WATCHPOINT
manual and WATCHPOINT Help button for additional necessary start-up steps and
instructions.
ARM Cortex Series User's Manual
8 of 81