1
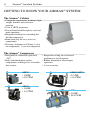
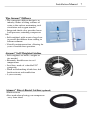
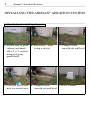
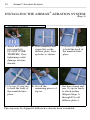
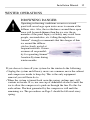
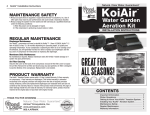
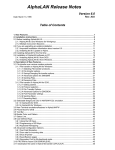
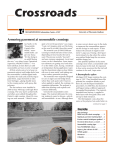
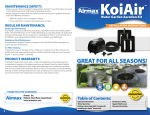
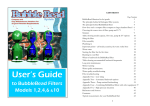
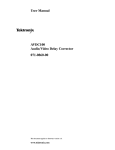
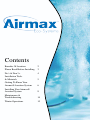
Contents
Benefits Of Aeration
2
Please Read Before Installing 3
Do’s & Don’t’s
4
Installation Tools
& Materials
5
Getting To Know Your
Airmax® Aeration System
6
Installing Your Airmax®
Aeration System
8
Maintenance &
Troubleshooting
14
Winter Operations
15
2
Airmax® Aeration Systems
THANK YOU FOR CHOOSING AIRMAX®!
You have purchased the most efficient and cost-effective aeration system available on the market today.
BENEFITS OF AERATION
The Airmax® Aeration System will provide many vital benefits to the
overall health of a water body:
• Improve Water Clarity
• Prevent Fish Kills
• Reduce Weed & Algae Nutrient Availability
• Keeps Ice Open To Reduce Harmful Gas Buildup
• Eliminates Odors
• Maintain Larger and Healthier Fish Populations
• Greatly Reduces Pathogenic Bacteria
• Reduces Mosquito Population
• Increase Beneficial Aerobic Bacteria, Which Are Needed To
Breakdown Organics
• Reduce Organic Sediment & Muck
• Thermal Stratification of Water Column Eliminated
Installation Manual 3
PLEASE READ BEFORE INSTALLING
Please read the following instructions carefully before operating your
aeration system. Failure to follow the recommendations in this section
may result in personal injury or rescinding of the machine warranty
agreement.
The purpose of the aeration system is to circulate the pond’s entire
water column. This circulation will increase and maintain oxygen levels
and eliminate thermal stratification.
The efficiency of the system can initially create problems if start-up
procedures are not followed properly
WARNING:
The circulation of poor quality, low oxygen deep
water to the pond’s surface can introduce harmful
gases and by-products into the previously healthy
upper regions of the water column. These by-products can make the upper regions unfit for aquatic
life and could result in a fish-kill.
To Prevent An Initial Fish-Kill
• Turn system on and operate for 30 minutes
• Turn system off for the rest of the day
• Restart the system the next day and operate for 1 hour
• Turn system off for the rest of the day
• Each day, double the operating time from the previous day until
system is running non-stop. This should take 7 days.
If you have any questions regarding these general guidelines, contact
your local Airmax® dealer for technical assistance.
4
Airmax® Aeration Systems
WARNING:
Please read the following instructions carefully before
operating your aeration system. Failure to follow the
recommendations in this section may result in personal
injury or rescinding of the machine warranty agreement.
DO’s
• Follow all warnings and instructions that are marked on or supplied
with the aeration system
• Always locate the cabinet on a solid support with adequate strength for
the weight of the unit
• Locate the cabinet away from irrigation sprinklers
• Always connect the cabinet to a properly grounded outlet. If in doubt,
have the outlet checked by a qualified electrician. This system is
supplied with a ground fault outlet. If a GFCI breaker is used with this
making two (2) ground fault outlets, nuisance tripping may occur. To
eliminate nuisance tripping, one of the ground fault circuits MUST be
removed.
• Always wear a Coast Guard approved life jacket and follow all water
safety guidelines.
DON’T’s
• Never use an extension cord between the cabinet power cord and an
electrical outlet
• Do not allow anything to rest on the power cord
• Do not place the cabinet where people may step on the power cord
• Never override or “cheat” electrical or mechanical interlock devices
• Never push objects of any kind into the slots in the covers, as they may
touch dangerous voltage points or short out parts that could result in a
risk of fire or electrical shock.
• Never attempt any maintenance function that is not specified in the
user manual
• Never operate the system if unusual noises or odors are detected.
Disconnect the power cord from the outlet and call Airmax to correct
any problems
Installation Manual 5
MAINTENANCE SAFETY
• Always use parts that are supplied or approved by Airmax®
Eco-Systems, Inc.. Use of other parts may result in poor performance
and could create a hazardous situation.
• Always unplug the system from the outlet and refer servicing to
a qualified electrician under the following conditions:
◦ When the power cord is damaged or frayed
◦ Compressor fan, outlet or other electrical components need
service
◦ If the cabinet is producing unusual noises or odors
INSTALLATION TOOLS & MATERIALS
For quick, easy and professional installations, it is suggested that the
following materials be on site.
• Placement rope
• Utility razor knife
• Level
• Boat/Raft/Swim Suit
• Pea gravel or small stone
• Shovel (if trench is needed)
• Rake (if trench is needed)
• Flathead Screw Driver
6
Airmax® Aeration Systems
GETTING TO KNOW YOUR AIRMAX® SYSTEM
The Airmax® Cabinet
• Composite construction, making it light
weight, durable and corrosion
resistant.
• Class A GFCI protection
• Forced Ventilation Design for cool and
quiet operation
• Integrated cooling fan, extending the
life the compressor
• Removable top for easy access to
components
• Warranty: Lifetime on Cabinet, 5-year
on components, 1-year on compressor
The Airmax® Compressor
• Integrated cooling fan to increase
• Designed for continuous operation
performance and longevity
“24/7”
• Rubber mounted to ensure quiet
• Built with the highest quality
operation
components assuring years of trouble• 1-year warranty
free service
AM20
• 1/8 HP
• 0.8 CFM
AM30
• 1/4 HP
• 1.5 CFM
AM60/AM70
• 1/3 HP
• 4.0 CFM
AM80
• 3/4 HP
• 10.0 CFM
Installation Manual 7
The Airmax® Diffuser
• The synergistic diffuser design is an
industry leader at lifting volumes of
water to the surface maximizing total
circulation and oxygen transfer
• Integrated check valve provides lower
back pressure, extending compressor
life
• Self-weighted, with an extra large base
to prevent the diffuser from settling in
bottom sediment
• Virtually maintenance free, allowing for
years of trouble-free operation.
Airmax® Self-Weighted Airline
• Self-weighted: no bricks, weights or
ties needed
• Extremely flexible even in cool
temperatures
• Lead free, made of a durable PVC
composite
• Thick walled making it kink free, fish
hook resistant and trouble-free
• 5-year warranty
Airmax® Direct-Burial Airline (optional)
• Kink resistant
• Best used when placing your compressor
away from shore
8
Airmax® Aeration Systems
INSTALLING THE AIRMAX® AERATION SYSTEM
1. Decide Location & Prep Ground
A. Locate area to place B. Excavate 6” deep
cabinet and mark
using a shovel
off a 2’ x 3’ section
using red spray
paint/chalk.
C. Compact base,
smooth out and level
D. Pour pea gravel into E. Compact base,
F. Place Cabinet
now excavated area.
smooth out and level
Installation Manual 9
INSTALLING THE AIRMAX® AERATION SYSTEM
(Steps 2 - 3)
Trenching (Steps 2 & 3) are only if the cabinet is placed away from the
shoreline. You may skip Steps 2 & 3 if the cabinet is next to shore.
2. Excavate Trench
Mark the location for the trench
between cabinet and shoreline. Then
excavate trench 6-8” deep.
3. Place & Backfill
Place direct burial airline(s) into the
trench and backfill with the dirt you
just excavated.
10
Airmax® Aeration Systems
INSTALLING THE AIRMAX® AERATION SYSTEM
(Step 4)
4. Assemble Diffuser
A. Screw all airstones
into manifold.
DO NOT OVER
TIGHTEN! Over
tightening could
damage airstone
threads.
B. Place manifold and
stones flat on the
diffuser plate. Line
up holes as shown.
C. Use two (2) zip ties
to hold the back of
the manifold into
place
D. Use two (2) zip ties
to hold the front of
the manifold into
place.
E. Cut off the
remaining pieces of
zip tie.
F. Get hose clamp and
one (1) zip tie ready
to attach airline.
(Repeat Steps A
through F for all
diffuser plates.)
This step may be skipped if diffuser has already been assembled.
Installation Manual 11
INSTALLING THE AIRMAX® AERATION SYSTEM
(Steps 5-6)
5. Connect Airline
Uncoil self-weighted airline along
shoreline. It is important to make
sure the airline does not get twisted
or tangled for proper installation.
Connect direct burial airline to selfweighted airline using the connector
kit (included).
6. Extend Airline
Place diffuser plate(s) in boat, grab
the opposite end of the airline and
heads towards your drop point in reverse (to prevent damage to your boat
propeller). Extend the self-weighted
airline out to where the diffuser
should be placed.
Note: Because there is tension on the extended airline the diffuser will
want to move back towards the shore. It is best to over compensate for
this by releasing the diffuser several feet farther than the desired placement area.
12
Airmax® Aeration Systems
INSTALLING THE AIRMAX® AERATION SYSTEM
(Steps 7-9)
7. Connect Diffuser & Airline
Connect self-weighted airline to diffuser plate using hose clamp. Fasten
last zip tie to hold tubing in place.
This will prevent airline from slipping off of the insert fitting. (Refer to
Step 4F for recap on diffuser assembly.)
8. Place Airmax® Diffuser
Slide nylon rope between the manifold and diffuser plate. While traveling in reverse, slowly lower the
diffuser plate using the nylon rope.
(Repeat Steps 5 through 8 until all
diffusers are in place.)
9. Connect Airline To Flex Lines
Connect airline(s) to flex line(s) from
the cabinet.
Installation Manual 13
INSTALLING THE AIRMAX® AERATION SYSTEM
(Steps 10-11)
10. Testing
Plug in compressor and confirm
“boiling action” from diffuser placements. It may take several minutes
for all diffusers to produce boiling
action.
11. Final Adjustments
Mark valves for easy valve to diffuser
reference. If bubble action is not
consistent adjust valve in 1/4” increments waiting 3-5 minutes between
adjustments to allow for an accurate
judgement of airflow.
Pressure Gauge: Mark initial installation pressure. This should stay fairly
consistent. If your ratio influxes in pressure this may be the result of
damaged airline, plugged diffusers or other damage and/or wear to the
system. The pressure gauge is a great tool to troubleshooting problems.
(see pg 14)
14
Airmax® Aeration Systems
MAINTENANCE & TROUBLESHOOTING
Airmax® aeration systems are designed for low-maintenance and
require minimal scheduled maintenance.
Cabinet air inlets and outlets should be kept free of debris and weed
growth allowing normal ventilation.
*Unplug system before performing any maintenance and/or when
troubleshooting.
If size and appearance of diffuser bubbles decreases from initial installation, perform one or more of the following:
AIR FILTER REPLACEMENT
• Air filter cleaning or replacement: Remove air intake filter and
replace. Under normal conditions, this should be done every
6 to 12 months.
AIR STONE CLEANING / REPLACEMENT
• Air stones must be cleaned every 1 to 2 years using muriatic acid.
Place stones in muriatic acid for 5 minutes. Please Note: Do not
expose plastic threaded fittings to muriatic acid. If you do, you must
replace the air stone completely. Air stones must be replaced every
three years.
CHECK PRESSURE GAUGE
• If the pressure gauge shows a reading significantly above the initial
installation pressure, then it may be advised to clean the air stones.
• If the pressure gauge shows a reading below the initial installation
pressure, then this may be caused by damage in the airline.
PRESSURE RELIEF VALVE
• If enough back pressure is created, this valve will open to suppress
the pressure to protect the compressor.
Installation Manual 15
WINTER OPERATIONS
DROWNING DANGER
Operating in freezing conditions on an ice-covered
pond will cause large open water areas to remain at the
diffuser sites. Also, the ice thickness around these open
areas will be much thinner than the ice over the remainder of the pond. Injury or fatality may result from
people, snowmobilers, etc. falling through the ice.
Airmax® strongly recommends that this danger of thin
ice around the diffuser
site be clearly posted at
frequent intervals. Owner
assumes all responsibility for operating Airmax®
Aeration Systems during
winter months
If you choose to turn off your system for the winter do the following:
• Unplug the system and if heavy snows are common, move the cabinet
and compressor inside to keep dry. This is the only equipment
removal you will have do to.
• When the system is turned back on in the spring, airlines may still
contain ice inside. If so, use one cup of denatured alcohol to melt the
ice to allow the compressor to push air through the line. Do this for
each airline. The heat generated by the compressor will melt the
remaining ice. The procedures on Page 3 should be followed every
spring.
Website: www.airmaxeco.com
E-mail: [email protected]