1
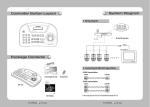
Contents
•
•
•
Table of Contents ……………………………………………………………… 2
Safety caution…………………………………………………………………… 3
Main Features and Characteristics… …………………………………… 5
•
•
•
•
•
•
•
•
•
Controller Button Layout …………………………………………………… 6
Package Contents……………………………………………………………… 6
System Diagram ………………………………………………………………… 6
1. Introduction… ………………………………………………………………………………
2. Characteristics………………………………………………………………………………
5…
5
1. Wiring Diagram… …………………………………………………………………………… 7…
2. Connecting RS-485/422 Signal Wires…………………………………………………… 7
Names and Functions… ……………………………………………………… 8
Controlling PTZ Camera……………………………………………………… 9
1. Power………………………………………………………………………………………… 9…
2. Initial Screen Display……………………………………………………………………… 9…
3. Camera ID Setup…………………………………………………………………………… 9…
4. Pan / Tilt / Zoom Using Joystick………………………………………………………… 10…
5. Iris / Focus / Zoom Buttons……………………………………………………………… 11…
6. Preset………………………………………………………………………………………… 11…
7. Swing………………………………………………………………………………………… 12…
8. Group… ……………………………………………………………………………………… 12…
9. A/F……………………………………………………………………………………………… 12…
10. OSD… ……………………………………………………………………………………… 13…
11. Lock… ……………………………………………………………………………………… 13…
12. AUX…………………………………………………………………………………………… 13
Setting Up Controller Environment ……………………………………… 14
1. PTZ Setup…………………………………………………………………………………… 14…
2. Controller Main Setup… ………………………………………………………………… 15…
3. Joystick Calibration… …………………………………………………………………… 18
Troubleshooting………………………………………………………………… 19
Design……………………………………………………………………………… 19
Product Specifications……………………………………………………… 20
PTZ CONTROLLER
2
User Guide
Samsung Techwin cares for the environment at all product manufacturing
stages to preserve the environment, and is taking a number of steps to provide
customers with more environment-friendly products.The Eco mark represents
Samsung Techwin’s will to create environment-friendly products, and indicates
that the product satisfies the EU RoHS Directive.
Safety caution
Warning
• All work related to the installation of this appliance must be performed by qualified
service personnel or system installers.
- If the product is connected or installed improperly, electric shock, fire, severe injury, and/or
damage can result.
• Please install the product on a completely flat floor.
- Always check the strength and stability of the installation location.
- Do not drop the appliance on the floor. This may result in damage or injury.
Do not attempt to disassemble the appliance. To prevent electric shock, do not remove screws or
covers.
- There are no user-serviceable parts inside. Contact qualified service personnel for maintenance.
• Never use the appliance in places where there are flammable materials.
- Never use the appliance in places where flammable materials such as gas are used.
• This may result in fire, explosion, and other serious accidents.
• Never touch un-insulated parts with wet hands.
- Touching un-insulated parts with wet hands may result in serious electric shock.
• Never expose the appliance to water or moisture.
- If the appliance gets wet, immediately turn the power off.
- Stop using the appliance if it gets wet. Contact the manufacturer immediately.
• Stop using the appliance if there appears to be any operational problem.
- Immediately turn the power off to the appliance if there is any abnormal condition such as
smoke or unusual smells.
- Continuing to use the appliance under abnormal conditions may result in serious damage.
• Always use the recommended power.
- Using incorrect power source ratings may result in fire, electric shock, or damage.
• Always handle the connection cable with care.
- Never damage or modify the connection cable.
- Do not pull, expose to heat, or place heavy objects on the connection cable.
- Non-observance of these warnings may result in fire, electric shock or damage.
PTZ CONTROLLER
3
User Guide
Safety caution
Caution
• Use the appliance indoors only.
- Do not place the appliance outdoors or expose it to rain or moisture.
- If dropped in water, the appliance may be corroded and damaged.
• Do not use the appliance where there is excessive dust, smoke, or moisture.
- Using the appliance under such conditions may result in fire, electric shock or serious
damage.
• Do not operate the appliance in temperatures beyond those specified.
- Excessive heat or cold may damage the appliance.
- Always operate the appliance within the recommended temperature range of 0ºC ~ 40ºC.
• Do not place the appliance in direct sunlight.
- This may discolor the appliance.
• Do not apply excessive shock to the appliance.
- Excessive shock may damage the appliance.
Main Features and Characteristics
1. Introduction
The SPC-1010 PTZ Controller controls the operation of the PTZ Dome and Zoom Camera
series and the SRX-100B Receiver.
• S upported Protocols: SAMSUNG-T, SAMSUNG-E, PELCO-D, PELCO-P, Panasonic, Vicon, AD, and
Honeywell.
Maintenance and Repair
If the controller body gets dirty, turn the power off and wipe the surface with a soft cloth.
- Do not use chemical agents such as alcohol or benzene. For detailed information on
upgrading the firmware, please direct your inquiries to the installation vendor.
Refer all work related to the installation of this appliance to qualified service
personnel or system installers.
FCC Compliance Statement
This equipment has been tested and found to comply with the limits for a Class A digital device,
pursuant to Part 15 of the FCC Rules. These limits are designed to provide reasonable protection
against harmful interference when the equipment is operated in a commercialenvironment. This
equipment generates, uses, and can radiate radio frequency energy and, if not installed and used in
accordance with the instruction manual, may cause harmful interference to radio communications.
Operation of this equipment in a residential area is likely to cause harmful interference, in which
case the user will be required to correct the interference at his own expense.
PTZ CONTROLLER
4
User Guide
2. Characteristics
- Controls up to 255 cameras.
- Supports different protocols per channel.
- Supports serial communications for RS-485/422.
- Supports Pan / Tilt / Zoom operations using a 3-axis joystick.
- Supports Zoom / Focus / Iris operations using the controller buttons.
- Supports various camera options: Preset, Swing, Group, etc.
- Supports 9V Battery.
PTZ CONTROLLER
5
User Guide
System Diagram
Controller Button Layout
Tx1+
Tx1Tx2+
Tx2Tx3+
Tx3TRx+
TRx-
1. Wiring Diagram
RS-485/422 Signal Wire
Package Contents
2. Connecting RS-485/422 Signal Wires
· RS485 Communications
Power Adapter (DC 12V)
Terminal Block
Camera
Controller
RXD+
RXD-
Tx1+
Tx1-
· RS485 Communications
SPC-1010
User’s Manual
PTZ CONTROLLER
6
User Guide
Camera
Controller
RXD+
RXDTXD+
TXD-
Tx1+
Tx1TRx+
TRx-
• You may use the Tx2 or Tx3 terminal instead of Tx1.
PTZ CONTROLLER
7
User Guide
Controlling PTZ Camera
Names and Functions
①
②
⑤
1. Power
① To turn on the power, press the PWR button.
② To turn off the power, hold down the PWR button.
2. Initial Screen Display
SAMSUNG-T
③
④
⑥
①
ESC / POWER
Cancels a command or turns power on/off.
②
LCD DISPLAY
16 X 2 LCD
③
Number Pad
Enables changing channels or opening and closing the camera OSD.
④
1. LOCK
2. FN
3. AUX
4. SET
5. OPEN
6. CLOSE
Locks out the system.
Function keys: Perform special functions in combination with other buttons.
Controls the camera’s AUX output.
Enters the controller settings menu.
IRIS OPEN
IRIS CLOSE
1. P-SET
2. SWING
4. A/F
5. OSD
Sets up and moves to preset locations.
Commands the camera to move between 2 selected locations while
panning or tilting.
Commands the camera to monitor preset locations at a selected speed
and standby time in an orderly manner.
Performs the One-Shot AF function.
Indicates the camera’s OSD menu.
1. FOCUS -/+
2. ZOOM W/T
Manually focuses the camera.
Zooms the camera in or out.
⑤
⑥
3. GROUP
PTZ CONTROLLER
8
User Guide
① ID : Indicates the current channel number.
② SAMSUNG-T : Indicates the current channel camera protocol.
③ 9.6k : Indicates the current channel camera baud-rate.
3. Camera ID Setup
① Using the number pad, enter a number.
② Press the ENT button to confirm the Camera ID.
• Camera IDs are between 1 to 255.
PTZ CONTROLLER
9
User Guide
Controlling PTZ Camera
Controlling PTZ Camera
4. Pan / Tilt / Zoom Using Joystick
5. Iris / Focus / Zoom Buttons
■ You can use the joystick to control the camera's Pan and Tilt operations.
■ The farther you move the joystick from the center, the faster the camera moves.
① Screen Brightness
■ To adjust the camera's screen brightness, use the OPEN and CLOSE buttons.
- OPEN : Brighter (Iris Open)
- CLOSE : Darker (Iris Close)
② Camera Focus
■ To adjust the focus of the camera, use the FOCUS - / + button.
- FOCUS - : Closer
- FOCUS + : Farther
③ Camera Zoom
■ To control the camera’s Zoom operation, use the ZOOM W / T button.
- ZOOM W : Zoom Wide
- ZOOM T : Zoom Tele
6. Preset
6-1. Setting Up Preset Location
① Using the joystick and controller buttons, move the camera to a desired location.
② Enter a preset number.
③ Hold down the P-SET button for 2 seconds to save the preset location.
6-2. Moving to Preset Location
■ You can also use the joystick to control the camera’s Zoom operation.
① Enter the number of a preset location.
② Press the P-SET button to move the camera to the preset location.
Notes
[ Zoom Wide Action ]
PTZ CONTROLLER
[ Zoom Tele Action ]
10 User Guide
• You can select preset numbers from 1 to 255 using the controller. The maximum preset location
number varies depending on the camera model. (For more information, please refer to your
camera’s user manual.)
• You can set up preset locations in the OSD menu of the camera.
PTZ CONTROLLER
11 User Guide
Controlling PTZ Camera
Controlling PTZ Camera
7. SWING
10. OSD
■ The Swing function commands the camera to move between 2 selected locations,
monitoring the route.
① Press the SWING button.
② Press Number 1 or 2 to activate the Swing mode.
- Number 1 : Commands the camera to pan while moving between 2 locations.
- Number 2 : Commands the camera to tilt while moving between 2 locations.
• To pause Swing, move the joystick.
8. Group
■ The Group command recalls a ground of multiple preset locations in sequence.
① Enter the group number.
② Press the GROUP button to activate the Group mode.
• To pause the Group mode, move the joystick.
■ Shows the camera’s OSD menu on the monitor screen.
① To enter the OSD menu, press the OSD button. To exit the
menu, hold down the OSD button. (SAMSUNG-T Protocol)
② ENT Button : P
erforms the Enter function in the OSD menu.
③ CLR Button : Performs the Esc function in the OSD menu.
④ To move the menu cursor upward, downward, leftward, or
rightward, use the joystick. Certain protocols (SAMSUNG-E,
Panasonic, etc.) do not support using the joystick to move the
menu cursor. Instead, they require pressing a number button
while holding down the FN button. (Number 2, 4, 6, 8
Buttons)
11. Lock
■ Locks out the controller.
① To lock out, hold down the LOCK button.
② To unlock, enter the 4-digit password. (Default Password: 0000)
Notes
• In order to use Swing and Group modes, you must set up the modes in the camera’s OSD menu
prior to actual operation.
• The Swing and Group modes only support the Samsung Techwin SAMSUNG-T protocol.
12. AUX
■ Controls the camera’s Aux output operation.
① AUX ON : Press the AUX button to turn AUX on.
② AUX OFF : Hold down the AUX button for 2 seconds to turn AUX off.
9. A/F
■ Pressing the A/F button uses One-Shot AF.
PTZ CONTROLLER
12 User Guide
PTZ CONTROLLER
13 User Guide
Setting Up Controller Environment
Setting Up Controller Environment
2. Controller Main Setup
1. PTZ Setup
① Press 2 on the number pad.
② Hold down the SET button to enter the controller’s
① Press 1 on the number pad.
② Hold down the SET button to enter the PTZ SETUP
MAIN SETUP mode.
mode.
③ Enter the 4-digit password. (Default Password: 0000)
④ A fter changing the settings, select <YES> in the
③ Enter the 4-digit password. (Default Password: 0000)
④ To change a channel address, select a channel by
moving the joystick to the right or left. Or you can
enter the channel number and then press the ENT
button.
⑤ Change the Protocol, Baud Rate, and Parity Bit settings
of the select channel.
⑥ Select the SAVE menu to save the changes. You can
continue changing the settings by selecting different
channels. To exit to the initial screen, select the EXIT
menu or press the ESC button.
SAVE/EXIT menu to save the changes and move back
to the initial screen. To cancel changes and move
back to the initial screen, select <NO> in the Save
menu or press the ESC button.
SAMSUNG-T
• To move between the options, move the joystick up or
down.
• To change the value of the settings, move the joystick
to the right or left.
• For the default settings values, please refer to the
picture on the right.
Protocol : Samsung Techwin SAMSUNG-T
Baud Rate : 9.6Kbps, Parity Bit : None
• To move between the options, move the joystick up or down.
• To change the value of the settings, move the joystick to the right or left.
• For the default settings values, please refer to the picture on the right.
2-1. Firmware Version
■ Displays the current version of the controller firmware.
2-2. Serial Data Transfer Standard
■ Select RS-485 or RS-422.
2-3. LCD Backlight
Notes
• After changing the settings of a channel, you must select the Save menu. If you move to a different
channel without using the SAVE menu, the changes will not be saved.
•U
nder Controller Serial Setup, Data Bit is fixed to 8 and Stop Bit to 1. Serial values of the controller
and camera must match each other.
PTZ CONTROLLER
14 User Guide
■ AUTO : Turns the backlight off automatically if no
command has been entered in the last 30
seconds.
■ ON : Keeps the backlight on at all times.
■ OFF : Keeps the backlight off at all times.
PTZ CONTROLLER
15 User Guide
Setting Up Controller Environment
2-4. Sleep
Setting Up Controller Environment
2-8. Password
■ If no joystick or button input is detected for a set
duration, the LCD screen turns itself off and enters
Sleep mode.
■ Enables changing the controller password.
2-9. Factory Set
2-5. Buzzer
■ Turns the sound of controller buttons on or off.
■ Resets the controller’s current settings to the factory
release default values and optimizes the joystick
calibration.
2-6. Terminate
■ To prevent the attenuation of communication signals
between the camera and controller, the controller’s
termination option must be ON if it is located farthest from
the camera and controller communication loop. If the
controller is in the middle of the camera and controller
communication loop, turn the termination option off.
2-7. Joystick’s Serial Command Transfer Cycle
■ Select a PTZ serial command transfer cycle for using
the joystick. Shortening the transfer cycle increases
the response speed of the camera.
Notes
• Shortening the joystick's serial command transfer cycle may cause certain camera models to not
process commands properly. To prevent and resolve such malfunctions, extend the transfer cycle.
PTZ CONTROLLER
16 User Guide
PTZ CONTROLLER
17 User Guide
Troubleshooting
Setting Up Controller Environment
● If the power is not turned on
▶ Please check if the controller is connected to the power adapter.
3. Joystick Calibration
① Press 3 on the number pad.
② Hold down the SET button to enter the Joystick Calibration mode.
③ At each option, move the joystick as far as you can, and then press the ENT button to
calibrate.
● If the joystick does not move, or the controller buttons are not pressed
▶ There may be a problem with the controller board. Please contact your nearest dealer for further
assistance.
● If the controller cannot control the camera
▶ Please check the network cable between the controller and camera.
Joystick in the Center
▶ Please check if you have selected the correct ID for the camera on the controller.
▶ P lease check the protocol and serial settings of the controller and camera.
Move to the far left side
Design
Move to the far right side
55
100
Move to the far upper side
Move to the far lower side
180
280
Rotate to the Wide direction as far as possible
Rotate to the Tele direction as far as possible
Select <YES> to save the changes and move
back to the initial screen. Select <NO> or press
the ESC button to cancel changes and move back
to the initial screen.
PTZ CONTROLLER
18 User Guide
PTZ CONTROLLER
19 User Guide
Product Specifications
Product
MEMO
SPC-1010
LCD Display
16 x 2 Character LCD
Speed Control
Joystick (3-axis Twist Zoom)
Samsung Techwin PTZ Dome
PTZ Dome
Compatible
Hardware
Zoom
Camera
SCZ-3430/2430/3370/2370/3250
SDZ-375/370
Receiver
SRX-100B
Control Capacity
Communications
SAMSUNG-T, SAMSUNG-E, PELCO-D/P, Panasonic, Vicon, AD,
Honeywell
Up to 255 Cameras (Suitable for Mid-, Large-size System)
Standards
RS-485 / RS-422 (Remote Control: 1km Distance)
Transfer
Speed
2,400 ~ 57,600bps
Voltage
12V DC, 140mA
Operating Temperature
0℃~ 45℃
Operating Humidity
10 ~ 70%
Dimensions
280(W) x 180(H) x 100(D)mm
Weight
Approx. 0.7Kg (Without Adapter)
PTZ CONTROLLER
20 User Guide
PTZ CONTROLLER
21 User Guide
MEMO
PTZ CONTROLLER
22 User Guide
MEMO
PTZ CONTROLLER
23 User Guide
SALES NETWORK
•
AMSUNG TECHWIN CO., LTD.
S
Samsungtechwin R&D Center, 701, Sampyeong-dong, Bundang-gu, Seongnam-si, Gyeonggi-do, Korea, 463-400
TEL: +82-70-7147-8740~60, FAX: +82-31-8018-3745
•
AMSUNG TECHWIN AMERICA Inc.
S
1480 Charles Willard St, Carson, CA 90746, UNITED STATES
Tol Free : +1-877-213-1222 FAX : +1-310-632-2195
www.samsungcctvusa.com
•
AMSUNG TECHWIN EUROPE LTD.
S
Samsung House, 1000 Hillswood Drive, Hillswood Business
Park Chertsey, Surrey, UNITED KINGDOM KT16 OPS
TEL : +44-1932-45-5300 FAX : +44-1932-45-5325
www.samsungtechwin.com
www.samsungsecurity.com
VAN 10. 07