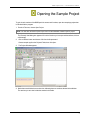
1
BSD SpecLink – Evaluation Notes
Welcome
Welcome to a new and better way of managing specifications production for all phases of a building construction
project. BSD SpecLink® is an innovative system for preparing and managing all types of specification documents
for buildings. Originally developed for the preparation of construction documents, it now incorporates modules
from the PerSpective® product, which allow preparation of specification documentation at the earliest phases of a
project. It is the only specification product incorporating features designed especially for design-build projects, but
it can also be used effectively for all phases of conventional design-bid-build projects. Because of its unique
linking feature, decisions made early in a project “pre-select” text that will be used during later phases, eliminating
the need to re-enter data.
The data in BSD SpecLink is organized on three tabs that will normally be used in sequence. The first tab
includes the PerSpective performance data, typically used at the programming phase of a project, before any
significant design work has occurred. The second tab incorporates the PerSpective short form specs, primarily
intended for schematic design and design development phases. The third tab is the most comprehensive and
includes detailed specifications for construction documentation.
BSD SpecLink’s comprehensive database includes thousands of helpful notes to the specifier that help the
architect or engineer make intelligent decisions about what to include for a particular project. Its unprecedented
“edit by selection” structure also means that as you choose sections to include in your project and make product
selections, over 150,000 “intelligent” links in the SpecLink database automatically select related text and exclude
incompatible options, multiplying your productivity. When you are ready to print your specifications, you can
choose a standard page format for your project or create a customized one. Either way, the format is
automatically applied to each section in the project.
Although it incorporates many word processing features and feels much like word processing, SpecLink is
actually a sophisticated relational database application. All information about each project is contained in a single
project file that overlays the master text. Because all project information is contained in a single file, you make
decisions that apply to the whole project—page setup, formatting, numbering, headers and footers,
MasterFormat Version, and units of measure, for example—in one place. In addition, because all your specific
project data is included in the overlay project file, you won’t lose any of your customization when you install
BSD’s quarterly updates, which affect only the master text.
In SpecLink you select the text you want from the master database, instead of deleting text you don’t want. Only
selected, active text is assembled into the final document and printed; the other text is ignored by the Print and
Preview functions. You can also edit master paragraphs and add your own paragraphs. The major advantage of
the SpecLink approach, however, is that all the master text is always available for use on future projects. Nothing
is ever deleted. In SpecLink, when you copy a project file for use on another project, you see the entire master as
overlaid by the project information. Options not needed on the original project that might apply to the new one are
still visible and available for selection, in contrast with the word processing alternative where deleted text is gone
forever.
1
BSD SpecLink – Evaluation Notes
Major Benefits
Valuable Knowledge Base
SpecLink offers a database of almost 900 specification sections that are augmented by over 150,000 built-in links
that automatically add related text, highlight relevant options, and exclude incompatible text. It also includes over
22,000 notes to the specifier and information about hundreds of reference standards cited throughout the
database. Even without the automation features of the software, this knowledge base is a very valuable
resource to draw upon when defining requirements for building construction.
Standardization
The organization of SpecLink’s data follows CSI standard formats. Sections on the PerSpective tab are
organized according to CSI’s UniFormat™, which structures data based on the building element (substructure,
shell, interiors, etc.), rather than on building materials. The Short Form tab follows the 1995 edition of
MasterFormat, which structures data according to basic materials. Sections on the SpecLink tab, for construction
specifications, are organized according to both the 1995 and the 2004 editions of CSI’s MasterFormat™,
depending upon which global option has been chosen. Instead of providing huge broad-scope sections that are
difficult to edit for specific projects, SpecLink’s content is primarily organized into smaller medium-scope and
narrow-scope sections. On the SpecLink tab for construction specifications, the organization of the individual
sections closely follows CSI’s SectionFormat™. Each section is organized into 3 parts: Part 1 – General, Part 2 –
Products, and Part 3 – Execution. The titles and the order of the articles within each part also follow CSI’s
recommendations. This standardized organization helps users maintain their orientation during the editing
process and helps constructors by assuring that similar provisions are always found in the same place within
different sections. Finally, the default page format provided with SpecLink is based on CSI’s recommended
PageFormat™, but you can easily customize this layout or replace it with one of the other formats provided.
Comprehensiveness
The BSD SpecLink database offers master text for a comprehensive array of sections—currently almost 900—
that encompass all divisions of CSI’s UniFormat™ and MasterFormat™, plus representative introductory
documents that precede the specification sections. On the SpecLink tab for construction documents, the
specification sections are divided into “non-proprietary” and “proprietary” documents. Those labeled as nonproprietary are based on industry standards and do not rely on information from particular building product
manufacturers. In the Tree Panel of the Main Window, the titles for non-proprietary sections appear in blue. The
proprietary sections are based on products by sponsoring building product manufacturers, and their titles appear
in black in the Tree Panel. Sections that you import or copy appear in a green font.
Automation
While relational databases are commonly used for construction scheduling and cost-estimating tasks, the
application of this powerful tool to specifications documents is unique to SpecLink. Some of SpecLink’s additional
benefits include the following:
Compare Projects Feature: Users can automatically compare projects in SpecLink to clearly show the
differences between them. The Compare Projects feature allows you to compare individual sections,
divisions, or whole projects. This feature is especially helpful for addenda, because it allows the design
professional to issue a document that clearly shows the differences from the original document. Additions to
the original document or documents are underlined, and deletions still appear, but are stricken through.
2
BSD SpecLink – Evaluation Notes
Global Options: You can replace the specific terms "Owner," "Architect," “Contractor,” "Design-Builder,“ and
“the State in which the Project is located” throughout your project with terms of your choice—automatically.
With one mouse click, you can also establish the units of measure (inch-pound, SI metric, or a combination)
used throughout the project. With a single mouse click, you can also switch your projects between the 1995
edition of MasterFormat™ (with 5-digit section numbers and 16 divisions) and the MasterFormat™ 2004
(with 6-digit section numbers and 49 divisions). This global switch also automatically changes all cross
references to the appropriate section number and title, in addition to changing the title and number in the
sections themselves and in the navigation tree.
Table of Contents: At project completion, the last document you print is typically the Table of Contents
(TOC). In BSD SpecLink, there are several TOC options, all of which are generated automatically. On the
PerSpective tab, there is a separate Section 00010 – Table of Contents that is linked from all other sections
on the tab so that all sections included on a particular project automatically select their titles in the TOC. On
the SpecLink tab there are two options—an automatic Table of Contents report, and two separate sections
called “Table of Contents”—one for each of the two MasterFormat editions. The TOC report includes page
counts for all sections, and both TOC sections—like the one on the PerSpective tab—are linked from all
others so the titles of selected sections are automatically included.
Requirements Reports: On the SpecLink tab for construction documents, twenty-five special requirements
reports are available for project management during the construction administration phase. Paragraphs
within sections that require Product Data Submittals or Shop Drawings, for example, are tagged with a
special code. When you have completed your specification, you can print a list of all sections in the project
that include paragraphs with the special code. You can also add tags to paragraphs you have added to the
project, assuring that those sections will end up in the reports you generate.
Word Processing Features: You can choose one of several automatic paragraph numbering schemes or
design your own. You can add customized headers and footers, using optional keywords for variables such
as section number and section title. You can change fonts and use bold or underlined characters, varying
them by text level. You can select portrait or landscape page orientation. A find/replace feature allows you to
search for any word or phrase and replace it, if necessary. A spell checker allows you to find errors in any
text you add.
Notes that Don’t Get in the Way: Context-sensitive notes to the user are designed to give you additional
information about choices in the text, helping you make decisions appropriate for your project. They appear
in a separate Notes panel that can be left open or closed entirely. You can also attach notes of your own to
any paragraph, including paragraphs you have added. Notes can consist of text, graphic images, or a
combination of text and graphic data. Since notes will print only when you specifically request them, there is
no danger that they will be added unexpectedly to a printed document. Many notes attached to manufacturer
listings in Part 2 of most sections include a hyperlink to the manufacturer’s website. Clicking on the hyperlink
automatically opens the relevant website in a separate window. Also, virtually all reference standards in the
master data include hyperlinks that provide immediate access to information about the standard and an
opportunity to buy the document or, in some cases, view or download it at no cost.
3
BSD SpecLink – Evaluation Notes
Learning about SpecLink
SpecLink is designed to be as intuitive as possible. If you are familiar with other Windows programs, it should be
easy to learn SpecLink’s basic operations. At a minimum, you should understand how to open several windows
concurrently and display and re-size them for greater productivity.
On-Line Help
On-line Help will get you answers fast, without having to read through a lot of instructions. A table of contents, an
index of all topics, and the ability to search through all topics for any keyword offer powerful assistance in using
the software.
User Manual
The user manual is available on CD and the chapter names below can help you find information quickly. Check
out the table of contents and the index for more detailed topics. The user manual is also available on our
website. Go to http://www.bsdsoftlink.com/support/sl_manual.htm .
Chapter 1 - Introduction
Chapter 2 - Using SpecLink Effectively
Chapter 3 - Software Orientation
Chapter 4 - Starting a New Project
Chapter 5 - Editing a Project
Chapter 6 - Understanding Links
Chapter 7 - Comparing Projects
Chapter 8 - Printing
Chapter 9 - Managing Projects
Chapter 10 - Creating a Master Project File
Chapter 11 - Updating
Appendix A - A listing of PerSpective (first tab) Documents.
Appendix B - Comprises content summaries for PerSpective sections.
Appendix C - A listing and content summaries for Short Form specs (second tab).
Appendix D - A description of the CSI 3-part section format for SpecLink (third tab).
Appendix E - Documents the terms and conditions of the BSD SpecLink license agreement.
Technical Support
Your paid SpecLink license includes unlimited technical support. In order for you to fully evaluate the software,
we encourage you to also evaluate our excellent product support team. They can be reached by phone, fax, or
email and are available Monday – Friday, 8:30 to 5:30, Eastern time zone. In the event that all support staff are
engaged, please leave a voice mail and your call will be returned.
Phone: 800-266-SPEC (800-266-7732)
Fax: 404-365-8912
Email: [email protected]
4
BSD SpecLink – Evaluation Notes
Installation
To install and run BSD SpecLink effectively, we recommend the following equipment:
Intel-compatible processor, 1 GHz or better
Windows™ Vista, XP, or Windows 2000
512 megabytes of RAM (128 minimum)
500 MB of available disk space
17-inch or 19-inch XGA monitor
(1024 x 768 resolution and matching video card)
32x CD-ROM reader
600 dpi laser printer
Internet Explorer 5.5 or higher (5.0 minimum)
Meter account requires internet connection
Prior to installing SpecLink, it is best to upgrade your operating system to the latest service pack, if
necessary.
Before installing any Windows programs, it is important to close all applications. This includes disabling all antivirus applications running in the background and the Microsoft Office Shortcut bar.
See our installation instructions for complete directions. You can either download them from our website at
http://www.bsdsoftlink.com/downloadcenter/downloadpagefornonsubscribers.htm or you can print them from the
CD.
After Installation
Once the installation is complete, you can start the BSD SpecLink software by clicking on
Start/Programs/BSD SoftLink Products/SpecLink. You will see the following message:
SpecLink uses a special Access Key system to control access to the master database. Since you are
evaluating the system, you do not need a key and will be given default access. Click OK.
5
BSD SpecLink – Evaluation Notes
The Registration and Settings dialog box appears.
When you decide to purchase SpecLink, you will be given an Access Key that corresponds to the
catalog you buy and your machine. Users may select from the following catalogs of sections:
Architectural, Structural, Civil, Landscaping, Mechanical/Electrical, Comprehensive, The Basics,
PerSpective Performance, and PerSpective Short Form. A complete list of the sections included in each
catalog is available in the Catalog Listing. You may also purchase a meter account which gives you
access to any section but you are charged for each section you print.
Why Our User Count Gives You the Most Value for Your Money:
An unlimited number of users may run the software at a single office location. Subscriptions are based
on a specific number of concurrent users, i.e. users at one time, not total number of users. For instance,
if you have paid for a 3-user subscription, everyone in the office may gain access to the software but
only three people may gain access simultaneously. A fourth person attempting to open the software
receives a message that the User Count has been exceeded, and access is denied. Our unique key
system allows you to increase the number of users with a call to our office (during business hours) and a
credit card.
Quarterly Updates
Access to SpecLink is sold on an annual subscription basis. The annual subscription price includes
software and a master database, the User Manual in electronic form, free telephone support, on-line
support, and quarterly updates. Users may choose to download the software from our website or
receive CD-ROMs.
Leave the Access Key blank, and click OK.
6
BSD SpecLink – Evaluation Notes
Opening the Sample Project
To gain a basic overview of the BSD SpecLink screens and functions, open the sample.spp project that
is included with the program.
1. From the File menu, choose Open Project.
NOTE: You can also choose the Open Project icon from the Standard Toolbar to open a project.
The Recently Used dialog box appears. If this is the first time you have opened the software, this box
will be empty.
2. Click on Browse button and choose a file from the list presented.
Choose sample.spp from the Projects Folder; then click Open.
3.
The Project Window appears.
4. Notice that most divisions have a sheet icon indicating there are sections selected in that division.
The sections you can view include the sections in this table:
7
BSD SpecLink – Evaluation Notes
00010 (00 0111) Table of Contents
09300 (09 3000) Tile
02310 (31 2200) Grading
09380 (09 3033) Cut Natural Stone Tile
02785 (32 1440) Stone Pavers
09910 (09 9100) Painting
07131 (07 1355) Dimpled Plastic Membranes
09930 (09 9300) Staining & Trans Finishing
07261 (07 2501) Weather Barrier in Exterior Wall
15735 (23 7413) Packaged Roof Top AC
07620 (07 6200) Sheet Metal Flashing and Trim
16272 (26 2200) Dry Type Transformers
You can click on the plus signs adjacent to each division folder to expand each branch manually, or use
the Expand Branch and Expand Tree controls on the Project Window Toolbar. Expand the tree to see
broadscope section folders available in each division and the individual sections available under each
broadscope folder. Use the scroll bar to see the complete list.
The other grayed out sections become available when you license the corresponding catalog.
For PerSpective Performance Specs you have free access to 111 Facility Performance and for
Short Form Specs you have free access to X02 Site Construction.
5. Click on a section title to the right of the checkbox in the Tree Panel. The corresponding section
appears in the Document Panel.
8
BSD SpecLink – Evaluation Notes
6. Collapsing and expanding the section content in the Document Panel is a convenient way to
navigate the document. Many people start editing a specification in Part 2: Products. This way, as
products are selected for inclusion, the links built into the master data will select the appropriate
installation paragraphs in Part 3 and reference standards in Part 1 automatically, saving you time.
7. Click on the “next paragraph at this level” button to move to Part 1, then click again to move to Part 2
(or scroll down to find Part 2 – Products).
9
BSD SpecLink – Evaluation Notes
Overview
To prepare a project specification using SpecLink you always work in one of two areas of the Project
Window—the Tree Panel or the Document Panel. SpecLink windows contain many areas that are
typical to Windows applications, including a Title Bar, Menu Bar, and Toolbars.
Menu Bar
Toolbars
Tree Panel
Document
Panel
Project notes
Panel
Master Notes
Panel
In the Project Window, both the tree panel and the document panel are open in default view. When a
project is first opened, the document panel is blank. You can change this view at any time by closing
either panel, and the system will save the current project view when you close the project. You can also
adjust the view by resizing the panels. To do so, move the cursor to the vertical bar separating the two
panels. When the cursor changes to a vertical bar with left and right arrows, press and hold the left
mouse button to “grab” the vertical bar, then drag it left or right to suit your needs.
10
BSD SpecLink – Evaluation Notes
The Tree Panel
The tree panel allows you to navigate through the database and select a section you would like to
review or edit. The tree operates exactly like Microsoft’s Windows Explorer. To open a branch, click on
the plus sign adjacent to the folder. To close a branch, click on the minus sign. To open a section in the
document panel, click on the title of the section in the tree.
Content of
selected
section
displays in
Document
Panel when
the title is
clicked in the
Tree Panel
Status Columns
The Document Panel
The Document Panel is where you edit the section content. The panel makes it easy to see section
organization and components. In the Document Panel you can scroll and view master text to determine
the paragraphs you want to include in your document. In addition to the section content, the Document
Panel includes status columns associated with the content, a horizontal ruler to assist with document
formatting, and a document formatting toolbar.
The Standard Toolbar
Compare
Projects
Close Project
Print
Paste
Cut
Copy
New
Project
Open Project
Open New Window
Tile Windows
Horizontally
Find
Spell
Help
Summary Info
Undo Last Edit
Customize Styles
Print Preview
Page Setup
Cascade
Windows
Tile Windows Vertically
11
BSD SpecLink – Evaluation Notes
Adding Sections and Content to Your Spec
To prepare a project specification using SpecLink, you first select a project or start a new project. Unlike
documents in a word-processing environment, where unwanted text is deleted to remove it, in BSD
SpecLink you select a section by clicking on its status box in the Tree Panel to include it (or by clicking
the status box of the title in the Document Panel). Unselected sections are not included in your project
and do not print. In addition, as you make text selections in the Document Panel, software links
automatically make other changes to the section and to other sections in the project.
Status Boxes
The status of each section in the Tree Panel and each paragraph in the Document Panel is visually
displayed in the box in the Status column to the left of the paragraph text (or the section title) using
symbols and colors. There are two types of status, as follows:
User status
reflects actions taken by the user, and
Software status
reflects links made by the software.
The color and shape of the status box determines the status type of the software links. A green square
indicates selected, a yellow triangle indicates highlighted for consideration, and a red stop sign indicates
excluded.
The status box of an active paragraph will look like one of the following:
Selected by user (checkmark), neutral by system
Neutral by user, selected by system (green)
Selected by user (checkmark), and selected by system (green)
NOTE: The checkmark on the green box is redundant. It is not necessary to check a green status box
in order for the paragraph to be active.
Selected by user (checkmark), highlighted by system (yellow triangle)
NOTE: When a paragraph is highlighted by the system, in order to make it active the user must put a
checkmark in the triangle.
Selected by user (checkmark), excluded by system (red stop sign)
NOTE: The system excludes conflicting options, but if for some reason both are needed, the user can
override the exclusion by putting a checkmark in the stop sign.
The status box of an inactive paragraph will look like one of the following:
Neutral by user, neutral by system
NOTE: To make the paragraph active click in the box.
12
BSD SpecLink – Evaluation Notes
Selected by user (checkmark), neutral by system
NOTE: The gray background of the status box indicates that the paragraph is not active. Check the
parentage of the paragraph.
Excluded by user (X), neutral by system
NOTE: The X on the gray box is unnecessary.
Neutral by user, highlighted by system (yellow triangle)
NOTE: To make the paragraph active click in the triangle.
Excluded by user (X), highlighted by system (yellow triangle)
NOTE: The X on the yellow triangle is unnecessary.
Neutral by user, excluded by system (red stop sign)
NOTE: Override the system exclusion by clicking in the stop sign.
Excluded by user (X), selected by system (green box)
NOTE: If a system selection is inappropriate, override it by clicking once in the box to get a
checkmark, and clicking a second time to get an X.
Excluded by user (X), excluded by system (red stop sign)
NOTE: The X on the red stop sign is redundant.
13
BSD SpecLink – Evaluation Notes
Using the Notes Panel
Use the Master Notes toolbar button (or go to the View menu and select Master Notes) to open the
Notes Panel that will open on the tree panel. The title of each section always has a note attached that
includes a brief description of the section contents. You can therefore move quickly from section to
section in the Tree Panel and see a quick overview of the section in the Notes panel. For faster
operation, make sure you have the sections fully “collapsed” by clicking on the Show Level 1 button on
the Project Window Toolbar.
Choices
Many paragraphs in the master database include embedded choices. Each of these embedded choices
has a default value, which may or may not be appropriate for your project. Therefore, it is important to
look at the other options available in any selected paragraph that includes an embedded choice. To
view the choice options for an embedded multiple choice (marked by blue text), click once anywhere
within the embedded choice to "pop up" the choice options.
Exclusive Multiple Choice
Exclusive multiple choices include two or more options, one of which must be
selected, but only one. They sometimes include a "None - N/A" option, which
effectively allows all choices to be omitted.
Inclusive Multiple Choice
14
BSD SpecLink – Evaluation Notes
Inclusive multiple choices include two or more options, one or more of which must be selected. These
options are automatically punctuated and joined with the word "and" or "or" as appropriate. They
sometimes include a "None - N/A" option, which effectively allows all choices to be omitted.
Fill in the Blank
For blanks, the user must enter a word, phrase, or number to make the text complete. These are shown
in the text as [______]. Fill-ins can stand alone−as the only option−or they can occur as one of the
options in multiple choice groups. Stand-alone fill-ins appear with red brackets. Those that are an option
in a multiple-choice group appear with blue brackets. The brackets appear on screen, but do not print.
Changing Views and Previewing
As you select and exclude text, it is sometimes helpful to change your view of the project. The View
options provide three different ways to "look at" your project in the Document Panel.
Master View
In Master View, all text appears, regardless of status. This is the default view, which is generally the
most useful.
Expert View
Expert View hides all paragraphs that have been excluded by the user or by links and shows all other
text. Expert View is useful when you want to concentrate on possibilities and eliminate distractions.
Because all excluded information is hidden, you see only the information that has potential for your
project.
Compact View
Compact View hides all paragraphs that are not active. It shows only the text that prints in the final
document. Compact View is useful to get a "snapshot" of exactly what is included in your final
documents before printing sections or transmitting a project file.
Using the View Options
Choose the desired view option from the View menu or click the appropriate button on the toolbar.
Printing a Master Draft
Some people feel more comfortable editing from a printed document or red-lining a document for
someone else to enter into the software. There are two options available for this as described below:
Draft Copy - prints all the master text and all the user-added text, with all available choices, regardless
of what has been selected.
15
BSD SpecLink – Evaluation Notes
Master Text Copy – prints all master text (but no user-added text), with all available choices, regardless
of what has been selected.
These two options are available from the Report to Print area of the Reports screen.
Printing
When all necessary text has been selected or added and all modifications have been made, a section is
ready to print.
From the File menu you can choose Print to open the Reports dialog box, where you can select the
document you want to print (the current section is the default document). In addition to specification
sections, you can print 25 different requirements reports and an automatically generated Table of
Contents. Page Setup on the File menu allows you to select paper size and orientation, as well as
establish margins. Select Print to print the document currently selected in the Reports dialog box. In
addition to printing a single section, you can choose to print a branch or the whole project. You can also
select Print Preview from the File menu or click on the Print Preview button on the Standard toolbar to
preview the section currently selected in the Reports dialog box.
Customizing the Page Layout for Specification Documents
Four types of settings affect the printed output:
• Styles: numbering scheme, font, line spacing, etc., set for each hierarchy level.
• Page Setup: margins, orientation, paper size, etc.
• Headers and Footers: project-wide settings.
• Printer Setup: printer selection, tray and paper selection, available from the Reports dialog box at the
Print command.
The best way to achieve the desired page layout is to change one factor at a time and Preview the
result. That way you waste less time and paper while fine-tuning your setup.
The Specification Format
SpecLink provides the four most commonly used specification formats for you to use:
CSI-Style
This format is called CSI style because it is the format recommended by the
Construction Specifications Institute.
Military Style
This format is called military style because it resembles the format used for US
Army Corps of Engineers and NAVFAC specifications in the SPECSINTACT
program.
Block Style
A basic block format that uses increasing indentation to indicate hierarchy level.
Sequential
Numbering Style
This style adds left-justified sequential paragraph numbers to the
block style format, permitting unique identification of specific paragraphs in
addenda and other documentation.
All four styles have a default font of Arial, 10 points.
NOTE: You can customize all aspects of the specification format at each paragraph level for the CSI
and Military styles; you can modify text properties only for the other two styles.
16
BSD SpecLink – Evaluation Notes
If you customize one of the predefined styles, your settings will be saved as a User-Defined Style. This
allows you to switch back and forth in the project between a predefined style and a customized style. For
example, you could use the CSI style for most of the project content and switch to a user-modified block
format for the preliminary documents.
Page Setup
Use the Page Setup function to modify margins, orientation, paper size, and similar variables.
From the File menu, choose Page Setup, or click the Page Setup Button on the toolbar. The Page
Setup dialog box appears.
Margins Tab
Paper Information Tab
17
BSD SpecLink – Evaluation Notes
Headers and Footers
You can define a header and footer for all sections in a project, using keywords that automatically
substitute information specific to a section, such as the section title.
Use the Headers and Footers function to create customized headers and footers for your project.
1. From the View menu, choose Show Header/Footer, or click the Show Header/Footer button on the
View toolbar.
2. Use the Customize Header tab to establish a header for your project. Click on the Customize Footer
tab to switch to a similar form for establishing a footer.
3. At the top of the Header/Footer dialog box are a variety of customizing tools, as follows: font selection
pull-down list; font size pull-down list; bold, italic, and underline icons; keyword pull-down list, and
borders pull-down list.
4. Click in any of the three fields at the top of the dialog box to enter text for a left, centered, or right
justified entry. You can type text, paste text from the clipboard, or insert keywords from the pull-down list,
in any combination.
5. Text in the left field will begin at the left margin, text in the middle field will be centered, and text in the
right field will be right justified from the right margin. In addition to keywords, you may use any text
characters in these fields, and you can use up to six lines, using the Enter key to mark the end of a line.
6. The field at the bottom of the dialog box is a preview of the way your header or footer will be
organized in the document.
18
BSD SpecLink – Evaluation Notes
The keywords in the example above will be replaced by information appropriate to each document.
For example, SXX is the keyword for Section ID, and # is the keyword for page number.
7. When your header and footer are both complete, click on OK, or click on Cancel to discard your
changes.
8. To preview your header and footer layout as it will appear on your documents, click the Print Preview
button on the Standard toolbar, or choose Print Preview from the File menu.
19
BSD SpecLink – Evaluation Notes
Printing
From the File menu, choose Print. The Reports dialog box appears.
The options on the Reports dialog box are as follows:
20
Default Printer
Use this pull-down list to select the printer you wish to use.
Report to Print
This pull-down list gives you five options: Document, Draft Copy, Master Text
Copy, Requirements Report, and Table of Contents. Document is the default
choice and comprises the actual edited specification document. Draft Copy
prints all the master text and all user-added text, regardless of what has been
selected. Master Text Copy prints all master text (but no user-added text),
regardless of what has been selected. Select the document type you want from
this list.
Scope of Report
What you see in this pull-down list depends on the option selected in the Report
to Print list above. When Document, Draft Copy, or Master Text Copy is
selected from the list above, this pull-down list defaults to the document that is
currently active, but all sections in the project appear on the list, and you can
click on any section in the project. Then choose one of the scope options, as
follows
Print Project
This option assembles all the active sections in the project
for printing or exporting.
Print Branch
This option assembles all the active sections in the selected
branch (CSI division) for printing or exporting.
Print Section
This is the default option, which assembles only the selected
section for printing, previewing, or exporting.
BSD SpecLink – Evaluation Notes
If Requirements Report is selected in the Report to Print pull-down list, the
Scope of Report pull-down list includes twenty-five different reports that are
available. These reports would normally be created only upon completion of the
specifications and used for project administration driving the construction phase.
If you have any questions during your evaluation of SpecLink, please call Sales at 1-888-2737638 or Technical Support at 1-800-266-7732.
21