1
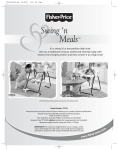
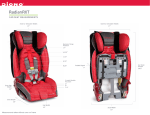
SproutTM Chair
Sprout High Chair & Youth Chair grows with your child
from 6 months to 5 years of age
Instruction Manual
IMPORTANT! KEEP FOR FUTURE REFERENCE
Congratulations on your purchase of the OXO Tot Sprout Chair, a chair that grows with your child
from six months to five years!
Sprout Chair is an extended use Chair that grows with your child through their developmental stages.
The seat adjusts in height, width and depth and the footrest is height-adjustable for a perfect fit
during all stages.
A depth-adjustable tray accommodates your growing baby and can be removed so the Chair can
be pulled up to the table. The seat, back and cushions are contoured for comfort and promote
“sitting up straight.”
We know how eating time can be messy, so the Chair and cushions are easily wipeable for quick
cleanup of crumbs and other sticky messes.
For children age three and older, the crotch post, tray and harness are removable to convert the
Sprout High Chair to a Youth Chair so children can sit comfortably at the table. For grown-ups’
added convenience, Sprout requires no tools to adjust the seat, tray or footrest. Sleek wood
construction and space-saving design complement any home décor.
Please read instructions carefully before assembling your Sprout Chair.
Complies with ASTM F404-08
TABLE OF CONTENTS
Parts Included......................................................2
Assembling High Chair..........................................3
Base Assembly.........................................4
Seat Back Assembly.................................5
Seat Bottom Assembly.............................6 – 7
Seat Removal..........................................7
Installing Footrest....................................8
Adjusting Footrest...................................8
Tray Attachment......................................9
Tray Adjustment......................................9
Securing Child.........................................10
Youth Chair Assembly...........................................11
Tray Removal..........................................12
Seat Adjustment......................................12 – 13
Seat Cushion Replacement.......................13
Footrest Adjustment................................14
Harness Removal....................................14
Care, Cleaning & Storage.....................................15
Replacement Parts...............................................15
Warranty.............................................................16
Registration.........................................................16
Contact Us...........................................................16
INCLUDED
NOT INCLUDED
2
ASSEMBLING THE HIGH CHAIR
WARNING
!
Failure to follow these warnings and the assembly instructions could result in serious injury or death.
• Prevent serious injury or death from falls or sliding out.
- Always secure child in the restraint. Snugly adjust the restraint belts to fit your child.
- Warning: Do not leave the child unattended.
- Use High Chair only with children capable of sitting upright unassisted.
- Never adjust seat height when child is sitting in seat.
- Do not allow children to climb into the High Chair unassisted.
- The tray is not designed to hold the child in the Chair.
• Maximum weight 60lbs (27kg)
• Avoid injuries to adults and older children from falls.
- Do not use High Chair as a step stool or ladder to climb up or reach elevated surfaces.
- Do not allow adults or older children to sit in High Chair.
• Never use High Chair without seat back attached.
• Keep High Chair away from open fire and other sources of strong heat (electric and gas fires).
• Do not over tighten screws.
• Tighten screws frequently.
• Check this product for damaged hardware, loose joints, missing parts or sharp edges before and after assembly and frequently during
use. Do not use High Chair unless all components are correctly fitted and adjusted. DO NOT use High Chair if any parts are missing,
damaged or broken. Contact OXO for replacement parts and instructional literature if needed at 1-800-545-4411(U.S.).
Outside U.S. contact your local distributor or [email protected]. DO NOT substitute parts.
• Adult assembly is required. Take care when unpacking and assembling; contains small parts and sharp edges.
3
HIGH CHAIR – Base Assembly
Insert barrel nuts (L) all the way into each hole on the bottom of the rear
brace (E). Using a flat head screwdriver (not included), orient the barrel
nuts so that the grooves are horizontal and pointing towards end of rear
brace.
Lower rear brace (E) into place between the left leg (G) and right leg (F).
Note: Warning label should be facing upwards. Insert two leg screws (K)
with four washers (O) and (N) and repeat on opposite side to attach rear
brace to legs. Tighten all four screws with hex wrench. Note: Split washer
must go on leg screw first.
Insert barrel nuts (L) all the way into each hole on the bottom of the front
brace (J). Using flat head screwdriver, orient the barrel nuts so that the lines
are horizontal and pointing towards end of front brace.
Raise front brace (J) into place between the left leg (G) and right leg (F).
Insert two leg screws (K) with four washers (O) and (N) and repeat on
opposite side to attach front brace to legs. Note: Split washer must go on
leg screw first. Tighten all four screws with hex wrench.
4
HIGH CHAIR – Seat Back Assembly
Flip leg assembly over. Lower seat back (A) into position so that arms
are outside of the legs. Insert two seat back screws (M) on each side and
tighten. Ensure all screws are tightened securely.
STOP
The OXO Sprout Chair has three seat height adjustment positions. Positions 1 and 2 are for use in the High Chair mode only and for ages 6
months to 3 years old. Position 3 is for the Youth Chair and for children 3 years to 5 years old. If you are assembling for Youth Chair skip
to page 11.
5
HIGH CHAIR – Seat Bottom Assembly
Check tightness: Using a Phillips Head screwdriver (not included), check the
four screws under the crotch post to make sure they are attached securely.
DO NOT remove screws.
View chart below to select the recommended seat position based on child’s
age. Children do vary in height and weight. Strap holes on seat back should
be slightly above or level with child’s shoulders. If shoulder holes are below
child’s shoulders, move seat from position 1 to position 2.
6 – 18 months
Position – 1
18 – 36 months
Position – 2
Note: Position 3 is for Youth Chair mode only, children 3 years of age or older.
6
To insert seat, align seat glide with seat position slots and push seat (H)
into selected seat position until it clicks into place. Press in release levers
on both sides.
Important: Seat is NOT locked if any red is visible on the release lever or if
there is a gap between release lever and leg. Seat is also NOT locked if any
red is visible on seat glide.
HIGH CHAIR – Remove Seat
Install High Chair seat cushion (C).
To adjust or remove seat, pull slide release levers on both left and right
sides. Simultaneously press down on both seat release levers to unlock
seat. Pull seat forward.
7
HIGH CHAIR – Installing Footrest
Place child in the seat and select a footrest position where your child’s feet
will rest comfortably. See chart below for recommended footrest positions.
6 – 18 months
Position – 1
18 – 36 months
Position – 2
Position the adjustable footrest (I) with curved surface toward the front of
leg. Slide footrest into desired position until you hear a “click.” Note: Check
if footrest is locked into place by pushing on the front surface.
HIGH CHAIR – Adjusting Footrest
Note: Position 3 is for Youth Chair mode only, children 3 years of age or older.
To adjust the footrest, simultaneously slide the two footrest latches on the
bottom of the footrest inward. Then slide the footrest backward and out of
the front legs.
8
HIGH CHAIR – Tray Attachment
HIGH CHAIR – Tray Adjustment
Fully compress tray button located underneath tray (B). With button still
compressed, slide tray onto armrests. Release tray button to lock tray onto
crotch post.
To adjust tray depth, compress button half way. Slide tray into desired position and release button.
!
WARNING
• Avoid injury from pinching. Keep child’s hands and feet clear of armrests and crotch post when securing tray.
• Tray is not designed to hold child in the High Chair. Always use with safety harness.
• Never use or modify High Chair to use food tray without the crotch post in place.
• Food tray is not dishwasher safe or microwave safe. Excessive heat can damage the food tray.
Do not place food tray in dishwasher or microwave.
9
HIGH CHAIR – Securing Child
Position the crotch strap between child’s legs. Fasten waist/shoulder
harness to the crotch strap. You will hear a “click” when buckles lock. Note:
Pull on harness to check that both belts are locked into the buckle.
!
Tighten the waist and shoulder belts to make sure the restraint system
is snug. To loosen, slide the buckles towards the center. To tighten, slide
the buckles away from the center. Note: When re-installing harness straps,
make sure straps go through cushion and chair slots.
WARNING
• Prevent falls from child standing or falling over side of High Chair. Always use the shoulder belts with waist belt.
CONGRATULATIONS! You are finished with the High Chair assembly.
10
ASSEMBLING THE YOUTH CHAIR
!
WARNING
The Youth Chair is intended for use by children 3 years of age up to 5 years of age. Maximum weight is 60lbs (27kg)
• Prevent serious injury or death from falls or sliding out.
- Never leave child unattended.
- Remove food tray, crotch post, waist and shoulder belts when using chair as a Youth Chair.
- Never adjust seat height when child is sitting in seat.
- Never use or modify Youth Chair to use food tray without the crotch post in place.
• Discontinue use when child is 6 years of age or child’s weight exceeds 60lbs (27kg).
• Never use Youth Chair without seat back.
• Avoid injuries to adults and older children from falls.
- Do not use Youth Chair as a step stool or ladder to climb up or reach elevated surfaces.
- Do not allow adults or older children to sit in Youth Chair.
11
YOUTH CHAIR – Tray Removal
Compress tray release button completely and slide tray forward. Discontinue tray use in Youth Chair mode.
YOUTH CHAIR – Seat Adjustment
Pull slide release levers on both left and right side. Simultaneously press
down on both seat release levers to unlock seat. Pull seat forward.
12
Using a Phillips Head screwdriver (not included), remove the four screws
under the crotch post. Remove crotch post. Discontinue use of crotch post
in Youth Chair mode.
Remove High Chair seat cushion (C). Discontinue use of High Chair seat
cushion in Youth Chair mode.
Push seat (H) into seat position 3 until it clicks into place. Press in release
levers on both sides.
YOUTH CHAIR – Seat Cushion Replacement
! Important: Seat is NOT locked if any red is visible on the release lever or if
there is a gap between release lever and leg. Seat is also NOT locked if any
red is visible on seat glide.
Place Youth Chair seat cushion (D) on seat.
13
YOUTH CHAIR – Footrest Adjustment
Simultaneously slide the two footrest latches on the bottom of the footrest
inward. Then slide the footrest backward and out of the front legs.
Place child in the seat and select a footrest position where your child’s feet
will rest comfortably.
YOUTH CHAIR – Harness Removal
Position footrest (I) with curved surface toward the front of leg. Slide footRemove shoulder and waist belts from seat back by fitting the “T” end of
rest into desired position until you hear a “click.” Note: Check if footrest is
each belt through the slots in the back.
locked into place by pushing against front surface.
REVERSE DIRECTIONS TO CONVERT FROM YOUTH CHAIR TO HIGH CHAIR.
14
CARE, CLEANING & STORAGE
CARE
- Excessive heat can damage the food tray.
- Do not place food tray in dishwasher or microwave.
- Chair is not for outdoor use.
- Protect from exposure to water and moisture.
CLEANING
- Food tray, plastic on Chair, seat cushions, and harness are surface wash only.
- Wash with mild soap and water. Rinse with clean water and wipe dry.
- Do not use abrasive cleaners or scrubbing pads. Wipe surface with mild soap and water.
- Rinse with clean water and wipe dry.
STORAGE
- Store all parts in a cool, dry location.
- Do not store outside or where wood can be exposed to moisture or water.
REPLACEMENT PARTS
If parts are missing, damaged or broken, contact OXO Customer Service. See page 16 for contact information.
!
WARNING
• Check this product for damaged hardware, loose joints, missing parts or sharp edges before and after assembly and frequently during use.
DO NOT use chair if any parts are missing, damaged or broken. Contact OXO for replacement parts and instructional literature if needed.
• Tighten screws regularly.
• DO NOT substitute parts.
15
LIMITED WARRANTY
OXO warrants that this product is free from defects in workmanship for seven years from the date of purchase on all wooden,
plastic and metal parts. There is a two year warranty on all cushions and harness straps. A receipt indicating the purchase date
is required for warranty claims.
This warranty does NOT cover damages resulting from normal wear and tear, accident, misuse, abuse, alterations, attempts at
repair or use with unauthorized attachments or the failure to follow the instructions provided with the product.
For warranty and service questions please contact OXO Customer Service.
REGISTRATION
We need to reach you in the event of a recall or safety alert! If you are a U.S. resident, please complete the enclosed self-addressed,
postage-paid card. All international and U.S. residents can also register online at www.oxotot.com.
CONTACT US
For replacement parts or to report a problem, contact:
OXO U.S. Customer Service
Hours: Monday – Friday, 8:00am – 5:00pm (ET)
Phone: (800) 545-4411
Fax: (717) 709-5350
Letter: OXO International, Inc. at 1331 S Seventh St. Ste 4, Chambersburg, PA 17201-9912
Email: [email protected]
Website: www.oxo.com
Outside the U.S.
Please contact your local distributor or email [email protected]
16
www.oxo.com
OXO®, OXO TotTM, SproutTM and related logos are trademarks of Helen of Troy Limited.
In the United Kingdom and Ireland, OXO is a registered trade mark of Premier Foods plc and used under licence.
©2010 OXO. Illustration by Petit Collage.