1
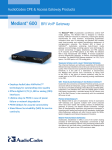
Microsoft® Lync™ Server 2013 Enhanced Gateway Mediant Gateway family Configuration Note AudioCodes Enhanced Gateway for Microsoft Lync Server 2013 September 2013 Document #: LTRT-40133 Configuration Note Contents Table of Contents 1 Introduction ......................................................................................................... 7 2 Component Information...................................................................................... 9 2.1 2.2 3 AudioCodes Gateway Version ................................................................................. 9 Microsoft Lync Server 2013 Version ........................................................................ 9 Assigning IP Address to PSTN Gateway......................................................... 11 3.1 Initial Access to the PSTN Gateway ...................................................................... 11 3.1.1 4 Assigning IP Address to the Device ........................................................................13 Configuring the Enhanced Gateway ................................................................ 15 4.1 4.2 4.3 Step 1: Configuring the Mediation Server as a Proxy ............................................ 17 Step 2: Restricting Communication to Mediation Server Only ............................... 20 Step 3: Configuring TLS ......................................................................................... 21 4.3.1 4.3.2 4.3.3 4.3.4 4.4 4.5 4.6 4.7 4.8 4.9 Enabling TLS and Defining TLS Port.......................................................................21 Configuring the NTP Server ....................................................................................22 Configuring the DNS Server ....................................................................................23 Configuring a Certificate ..........................................................................................23 Step 4: Configuring TCP Transport Type ............................................................... 30 Step 5: Configuring Secure Real-Time Transport Protocol .................................... 31 Step 6: Configuring Voice Coders (with Silence Suppression) .............................. 33 Step 7: Configuring Comfort Noise and Gain Control ............................................ 34 Step 8: Configuring Early Media ............................................................................ 36 Step 9: Configuring PSTN Trunks .......................................................................... 39 4.9.1 4.9.2 4.9.3 4.9.4 4.9.5 Enabling Trunks .......................................................................................................39 Configuring the Channel Select Method ..................................................................40 Configuring IP-to-Trunk Group Routing ...................................................................41 Configuring the Trunk ..............................................................................................42 Configuring the TDM Bus ........................................................................................44 4.10 Step 10: Configuring Normalization Rules for E.164 Format for PBX/PSTN Connectivity ..................................................................................................................... 45 4.10.1 Number Normalization Examples ............................................................................49 4.11 Miscellaneous Configuration .................................................................................. 52 4.11.1 Configuring SRTP Behavior upon Rekey Mode ......................................................52 A Configuring Lync Server 2013 ......................................................................... 53 Version 6.6 3 Enhanced Gateway Enhanced Gateway List of Figures Figure 1-1: High-Level Architecture of Enhanced Media Gateway ..........................................................7 Figure 3-1: Login Screen ........................................................................................................................12 Figure 3-2: IP Settings Screen (Single Network Interface) ....................................................................12 Figure 3-3: IP Settings Screen (Multiple Network Interface) ..................................................................13 Figure 3-4: Maintenance Actions: Reset Gateway .................................................................................13 Figure 4-1: Summary of Steps for Configuring Enhanced Gateway for PSTN-Only..............................16 Figure 4-2: Proxy & Registration Page ...................................................................................................17 Figure 4-3: Proxy Sets Table Page ........................................................................................................18 Figure 4-4: Reasons for Alternative Routing Page .................................................................................19 Figure 4-5: SIP General Parameters Page ............................................................................................19 Figure 4-6: Advanced Parameters Page ................................................................................................20 Figure 4-7: SIP General Parameters Page ............................................................................................21 Figure 4-8: Application Settings Page ....................................................................................................22 Figure 4-9: DNS Server Settings ............................................................................................................23 Figure 4-10: Certificates Page ................................................................................................................24 Figure 4-11: Microsoft Certificate Services Web Page ..........................................................................25 Figure 4-12: Request a Certificate Page ................................................................................................26 Figure 4-13: Advanced Certificate Request Page ..................................................................................26 Figure 4-14: Submit a Certificate Request or Renewal Request Page ..................................................27 Figure 4-15: Certificate Issued Page ......................................................................................................27 Figure 4-16: Download a CA Certificate, Certificate Chain, or CRL Page .............................................28 Figure 4-17: Certificates Page (Uploading Certificate) ...........................................................................29 Figure 4-18: SIP General Parameters Page ..........................................................................................30 Figure 4-19: Media Security Page ..........................................................................................................32 Figure 4-20: Coders Table Page ............................................................................................................33 Figure 4-21: RTP/RTCP Settings Page..................................................................................................34 Figure 4-22: IPMedia Settings Page ......................................................................................................35 Figure 4-23: SIP General Parameters Page (1) .....................................................................................36 Figure 4-24: SIP General Parameters Page (2) .....................................................................................37 Figure 4-25: Advanced Parameters Page ..............................................................................................38 Figure 4-26: Trunk Group Table Page ...................................................................................................39 Figure 4-27: Trunk Group Settings Page ...............................................................................................40 Figure 4-28: Inbound IP Routing Table Page .........................................................................................41 Figure 4-29: Trunk Settings Page ..........................................................................................................42 Figure 4-30: TDM Bus Settings Page.....................................................................................................44 Figure 4-31: Number Manipulation Table - Add Dialog Box...................................................................45 Figure 4-32: Destination Phone Number Manipulation Table for IPTel Calls .....................................50 Figure 4-33: Destination Phone Number Manipulation Table for TelIP Calls .....................................51 Figure 4-34: AdminPage.........................................................................................................................52 Figure A-1: Starting the Lync Server Topology Builder ..........................................................................53 Figure A-2: Topology Builder Options ....................................................................................................54 Figure A-3: Save Topology .....................................................................................................................54 Figure A-4: Downloaded Topology .........................................................................................................55 Figure A-5: Choosing New IP/PSTN Gateway .......................................................................................55 Figure A-6: Define New IP/PSTN Gateway ............................................................................................56 Figure A-7: Define the IP Address ..........................................................................................................56 Figure A-8: Define the Root Trunk .........................................................................................................57 Figure A-9: Gateway Added as an IP/PSTN Gateway and Trunk created ............................................58 Figure A-10: Choosing Publish Topology ...............................................................................................58 Figure A-11: Publish Topology Screen...................................................................................................59 Figure A-12: Publish Topology Progress Screen ...................................................................................59 Figure A-13: Publish Topology Successfully Completed .......................................................................60 Microsoft Lync Server 2013 4 Document #: LTRT-40133 Configuration Note Notices Notice This document describes the installation and configuration of AudioCodes Mediant Gateway family as Enhanced Gateway deployed in the Microsoft Lync Server 2013 environment. Information contained in this document is believed to be accurate and reliable at the time of printing. However, due to ongoing product improvements and revisions, AudioCodes cannot guarantee the accuracy of printed material after the Date Published nor can it accept responsibility for errors or omissions. Updates to this document and other documents as well as software files can be viewed by registered customers at http://www.audiocodes.com/downloads. © Copyright 2013 AudioCodes Ltd. All rights reserved. This document is subject to change without notice. Date Published: September-08-2013 Trademarks AudioCodes, AC, AudioCoded, Ardito, CTI2, CTI², CTI Squared, HD VoIP, HD VoIP Sounds Better, InTouch, IPmedia, Mediant, MediaPack, NetCoder, Netrake, Nuera, Open Solutions Network, OSN, Stretto, TrunkPack, VMAS, VoicePacketizer, VoIPerfect, VoIPerfectHD, What's Inside Matters, Your Gateway To VoIP and 3GX are trademarks or registered trademarks of AudioCodes Limited. All other products or trademarks are property of their respective owners. Product specifications are subject to change without notice. WEEE EU Directive Pursuant to the WEEE EU Directive, electronic and electrical waste must not be disposed of with unsorted waste. Please contact your local recycling authority for disposal of this product. Customer Support Customer technical support and service are generally provided by AudioCodes’ Distributors, Partners, and Resellers from whom the product was purchased. For technical support for products purchased directly from AudioCodes, or for customers subscribed to AudioCodes Customer Technical Support (ACTS), contact [email protected]. Abbreviations and Terminology Each abbreviation, unless widely used, is spelled out in full when first used. Documentation Feedback AudioCodes continually strives to produce high quality documentation. If you have any comments (suggestions or errors) regarding this document, please fill out the Documentation Feedback form on our Web site at http://www.audiocodes.com/downloads. Your valuable feedback is highly appreciated. Version 6.6 5 Enhanced Gateway Enhanced Gateway Related Documentation Manual Name Mediant 500 MSBR Hardware Installation Manual Mediant 500 MSBR SIP User's Manual Mediant 800 Gateway and E-SBC User's Manual Mediant 1000B Gateway & E-SBC User's Manual Mediant 2000 User's Manual Mediant 3000 User's Manual Mediant 800 Gateway and E-SBC Hardware Installation Manual Mediant 1000B Gateway and E-SBC Hardware Installation Manual Mediant 2000 SIP Hardware Installation Manual Mediant 3000 SIP Installation Manual Microsoft Lync Server 2013 6 Document #: LTRT-40133 Configuration Note 1 1. Introduction Introduction This document describes the installation and configuration of Enhanced Gateway (hereafter referred to as gateway), deployed in the Microsoft Lync Server 2013 environment. The Enhanced Gateway is typically co-located with Microsoft Mediation server at the enterprise’s headquarters. The Mediation server is the Lync Server entity that is responsible for interfacing the Lync Server network with the gateway, which provides legacy connections to the public switched telephone network (PSTN) or private branch exchange (PBX). Note: AudioCodes’ SBA located at the remote branch office, can also provide Enhanced gateway functionality. For information on how to configure the SBA, refer to the relevant SBA Installation Manual. AudioCodes gateways can also provide the Lync Server environment with a connection to analog devices (such as fax machines and telephones) with AudioCodes MediaPack™ 1xx series as an Analog Telephone Adapter (ATA). Note: This document doesn’t describe how to configure the gateway for communication with Analog Devices. For information on how to configure the Gateway with Analog Devices, refer to the Enhanced Gateway and Analog Devices Configuration Note. Figure 1-1: High-Level Architecture of Enhanced Media Gateway Version 6.6 7 Enhanced Gateway Enhanced Gateway Reader's Notes Microsoft Lync Server 2013 8 Document #: LTRT-40133 Configuration Note 2. Component Information 2 Component Information 2.1 AudioCodes Gateway Version AudioCodes Gateway Version 2.2 GW Vendor AudioCodes Models Software Version SIP_6.60A or later Protocol Additional Notes None Mediant 500 MSBR Mediant 800 Gateway & E-SBC Mediant 1000B Gateway & E-SBC Mediant 2000 Gateway Mediant 3000 Gateway & E-SBC PRI /BRI (to PSTN) SIP/TCP or TLS (to Lync Server) Microsoft Lync Server 2013 Version Microsoft Lync Server 2013 Version Version 6.6 Vendor Microsoft Model Microsoft Lync Software Version Release 2013 5.0.8308.0 Protocol SIP Additional Notes None 9 Enhanced Gateway Enhanced Gateway Reader's Notes Microsoft Lync Server 2013 10 Document #: LTRT-40133 Configuration Note 3 3. Assigning IP Address to PSTN Gateway Assigning IP Address to PSTN Gateway The gateway includes an embedded Web server (Web interface), providing a user-friendly graphical user interface (GUI) for configuration. The IP address used for accessing this Web interface must be changed to suit the networking scheme in which your Enhanced Gateway is deployed. Before you can configure the PSTN gateway, you need to first access it with the default VoIP / Management LAN IP address, as described below. 3.1 Initial Access to the PSTN Gateway Before you can configure the PSTN gateway, you need to access its Web interface using the default VoIP / Management LAN IP address as shown in the table below. PSTN Gateway Default IP Addresses Device Name IP Address Subnet Mask Mediant 3000 TP-6310 or TP-8410 blade in Slot 1: 10.1.10.10 TP-6310 or TP-8410 blade in Slot 3: 10.1.10.11 (HA mode) 255.255.0.0 Mediant 2000 • Device with single module (trunks 1-8): 10.1.10.10 Device's second module (trunks 9-16): 10.1.10.11 255.255.0.0 • Mediant 1000B 192.168.0.2 255.255.255.0 Mediant 800 192.168.0.2 255.255.255.0 Mediant 500 192.168.0.2 255.255.255.0 Version 6.6 11 Enhanced Gateway Enhanced Gateway To initially access the PSTN gateway: 1. Connect to the first LAN port on the device directly to a PC, using a straight-through Ethernet cable. 2. Ensure that your PC is configured with an IP address in the same subnet as the gateway. 3. Open a standard Web browser, and then in the URL address field, enter the default VoIP / Management LAN IP address (e.g., ''10.1.10.10''). The following login screen appears, prompting you to log in with your login credentials: Figure 3-1: Login Screen 4. Log in with the default, case-sensitive user name (''Admin'') and password (''Admin''), and then click OK; the Web interface appears, displaying the Home page. 5. Do one of the following: a. b. For the Mediant 500, Mediant 800, and Mediant 1000B devices: ♦ Open the Multiple Interface Table page (Configuration tab > VoIP menu > Network > IP Settings) and proceed to Section 3.1.1. For the Mediant 2000 and Mediant 3000 devices: ♦ Open the IP Settings page (Configuration tab > VoIP menu > Network > IP Interfaces Table ), as shown below: Figure 3-2: IP Settings Screen (Single Network Interface) ♦ ♦ Click the Multiple Interface Table button, located under the Multiple Interface Settings group; a confirmation message box appears. Click OK; the Multiple Interface Table page appears; proceed to Section 3.1.1. Microsoft Lync Server 2013 12 Document #: LTRT-40133 Configuration Note 3.1.1 3. Assigning IP Address to PSTN Gateway Assigning IP Address to the Device This section describes how to assign an IP address to the device. To assign an IP address to the device: 1. Select the Index radio button corresponding to the Application Type OAMP + Media + Control (i.e., the VoIP and Management LAN interface), and then click Edit. Figure 3-3: IP Settings Screen (Multiple Network Interface) 2. Configure a LAN network address so that it corresponds to your network IP addressing scheme. 3. Click Apply, and then click Done to apply and validate your settings. 4. On the toolbar, from the Device Actions drop-down list, choose Reset, and then in the Maintenance Actions page, click the Reset button; the gateway resets and your settings are saved to the flash memory. Figure 3-4: Maintenance Actions: Reset Gateway 5. Version 6.6 Maintain the cabled connection between the gateway’s LAN port and the computer. 13 Enhanced Gateway Enhanced Gateway Reader's Notes Microsoft Lync Server 2013 14 Document #: LTRT-40133 Configuration Note 4 4. Configuring the Enhanced Gateway Configuring the Enhanced Gateway This section provides step-by-step procedures for configuring the Enhanced Gateway for scenarios where it is used only for connecting the Microsoft Lync environment to the PSTN network. The configuration steps described in this section are performed through the embedded Web server (Web interface) of the Enhanced Gateway. Notes: Version 6.6 • The gateway must be installed with a Software License that includes the following items: ♦ Microsoft ♦ Security ♦ RTP ♦ SIP For more information about the Software License, contact your AudioCodes representative. • The Gateway must be installed with SIP firmware version 6.6 or later. • This configuration of the Enhanced Gateway is relevant for both Microsoft Lync 2013 and Microsoft Lync 2010. 15 Enhanced Gateway Enhanced Gateway The steps for configuring the Enhanced Gateway are summarized in the flowchart below: Figure 4-1: Summary of Steps for Configuring Enhanced Gateway for PSTN-Only Microsoft Lync Server 2013 16 Document #: LTRT-40133 Configuration Note 4.1 4. Configuring the Enhanced Gateway Step 1: Configuring the Mediation Server as a Proxy The procedure below describes how to configure the address (IP address or FQDN) of the Mediation server through which the Enhanced Gateway communicates with Microsoft Lync. The Enhanced Gateway forwards all telephone calls (PBX/PSTN) to the Mediation server using this configured address. This address is configured in the Enhanced Gateway as a proxy server. In other words, the Mediation server acts as a proxy server (without registration) for the Enhanced Gateway. To configure the Mediation server as a proxy server: 1. Open the Proxy & Registration page (Configuration tab > VoIP menu > SIP Definitions > Proxy & Registration). Figure 4-2: Proxy & Registration Page 1-a 1-b a. b. c. d. Version 6.6 From the 'Use Default Proxy' drop-down list, select Yes to enable the Mediation server to serve as a proxy server. From the 'Redundant Routing Mode' drop-down list, select Proxy. This setting ensures that if a SIP 5xx message is received in response to an INVITE message sent to the primary proxy (i.e., Mediation server), the Enhanced Gateway re-sends it to the redundant proxy (i.e., next Mediation server). To configure alternative routing upon receipt of a SIP 503 response (as required by Microsoft Lync), see Step 3. Click Submit. On the toolbar, click Burn to save the changes to the Enhanced Gateway flash memory. 17 Enhanced Gateway Enhanced Gateway 2. Click the Proxy Set Table button to open the Proxy Sets Table page: Figure 4-3: Proxy Sets Table Page 2-b 2-a 2-c 2-d 2-e a. In the 'Proxy Address' fields, configure all Mediation server IP addresses or FQDN’s with which the Enhanced Gateway is required to work. Note: If you configured the Mediation server address as an FQDN, ensure that you configure the DNS server (see Section 4.3.2 on page 23). b. c. d. e. f. In the 'Transport Type' drop-down list, select the transport type (TLS or TCP) for these proxies. For more information on the TLS and TCP transport type configuration, see Section 4.3 on page 21. From the 'Enable Proxy Keep Alive' drop-down list, select Using Options to discover whether a particular Mediation server in the cluster is available. From the 'Proxy Load Balancing Method' drop-down list, select Round Robin to enable the round robin proxy load-balancing mechanism. From the 'Is Proxy Hot Swap' drop-down list, select Yes. If there is no response from the first Mediation server after a user-defined number of retransmissions, the INVITE message is sent to the redundant Mediation server. Click Submit to apply your settings. Microsoft Lync Server 2013 18 Document #: LTRT-40133 Configuration Note 3. 4. Configuring the Enhanced Gateway When the Enhanced Gateway receives a SIP 503 response from the Mediation server in response to an INVITE, it re-sends the INVITE to the redundant Mediation server (located at the datacenter). To achieve this, you need to configure the receipt of a SIP 503 response as a reason for IP alternative routing: a. Open the Reasons for Alternative Routing page (Configuration tab > VoIP menu > GW and IP to IP > Routing > Alternative Routing Reasons). Figure 4-4: Reasons for Alternative Routing Page b. c. d. Under the Tel to IP Reasons group, from the 'Reason 1' drop-down list, select 503. Click Submit. Open the SIP General Parameters page (Configuration tab > VoIP menu > SIP Definitions > General Parameters). Figure 4-5: SIP General Parameters Page e. f. g. Version 6.6 In 'Fake Retry After' field, enter the time 60 (in seconds). When the Enhanced Gateway receives a SIP 503 response (from the Mediation server) without a Retry-After header, the Enhanced Gateway behaves as if the 503 response includes a Retry-After header with this user-defined period. Click Submit. On the toolbar, click Burn to save the changes to the Enhanced Gateway flash memory. 19 Enhanced Gateway Enhanced Gateway 4.2 Step 2: Restricting Communication to Mediation Server Only The procedure below describes how to restrict IP communication, by allowing communication only between the Enhanced Gateway and the Mediation server. This ensures that the Enhanced Gateway accepts and sends SIP calls only to and from the Mediation server (as required by Microsoft). This is done by enabling the IP Security feature and then defining the allowed (“administrative” list) IP addresses (or FQDNs) in the Proxy Set table. To allow IP communication only between the Enhanced Gateway and Mediation server: 1. Open the Advanced Parameters page (Configuration tab > VoIP menu > SIP Definitions > Advanced Parameters). Figure 4-6: Advanced Parameters Page 2. From the 'IP Security' drop-down list, select Secure Incoming calls to enable the security feature to accept and send SIP calls only from and to user-defined IP addresses or FQDN (i.e., Mediation server) configured in the Proxy Set table (see Step 4.1 on page 17). 3. Click Submit to apply your settings. 4. On the toolbar, click Burn to save the changes to the Enhanced Gateway flash memory. Microsoft Lync Server 2013 20 Document #: LTRT-40133 Configuration Note 4.3 4. Configuring the Enhanced Gateway Step 3: Configuring TLS Transport Layer Security (TLS) is the recommended transport type (enabled by default on Lync environment) for communication between the Enhanced Gateway and the Mediation server. However, if you require TCP instead, then skip this section and proceed to Step 4 (Section 4.4 on page 30). TLS provides encrypted SIP signaling between the Enhanced Gateway and the Mediation server. When using TLS, you also need to configure the Enhanced Gateway with a certificate for authentication during the TLS handshake with the Mediation server. 4.3.1 Enabling TLS and Defining TLS Port The procedure below describes how to enable TLS and configure the Enhanced Gateway ports used for TLS. To enable TLS and configure TLS ports: 1. Open the SIP General Parameters page (Configuration tab > VoIP menu > SIP Definitions > General Parameters). Figure 4-7: SIP General Parameters Page 2 3 4 2. From the 'SIP Transport Type' drop-down list, select TLS. 3. In the 'SIP TLS Local Port', enter 5067.This port corresponds to the Mediation server TLS transmitting port configuration. 4. In the 'SIP Destination Port', enter 5067.This port corresponds to the Mediation server TLS listening port configuration. 5. Click Submit to apply your settings. 6. On the toolbar, click Burn to save the changes to the Enhanced Gateway flash memory. Version 6.6 21 Enhanced Gateway Enhanced Gateway 4.3.2 Configuring the NTP Server The procedure below describes how to configure the Network Time Protocol (NTP) server. This is important for maintaining the correct time and date on the Enhanced Gateway, by synchronizing it with a third-party NTP server. This ensures that the Enhanced Gateway has the same date and time as the Certification Authority (CA), discussed later in Section 4.3.4 on page 21. To configure the NTP server: 1. Open the Application Settings page (Configuration tab > System menu > Application Settings). Figure 4-8: Application Settings Page 2. In the 'NTP Server IP Address' field, enter the IP address of the NTP server. 3. Click Submit to apply your changes. 4. On the toolbar, click Burn to save the changes to the Enhanced Gateway flash memory. Microsoft Lync Server 2013 22 Document #: LTRT-40133 Configuration Note 4.3.3 4. Configuring the Enhanced Gateway Configuring the DNS Server The procedure below describes how to configure the IP address of the Domain Name System (DNS) servers. This is required if the Mediation server is configured with an FQDN, in which case, the DNS is used to resolve it into an IP address. To configure the DNS servers: 1. Open the IP Settings page (Configuration tab > VoIP menu > Network > IP Settings). Figure 4-9: DNS Server Settings 4.3.4 2. In the 'DNS Primary Server IP' and 'DNS Secondary Server IP' fields, enter the IP address of the primary and secondary DNS server, respectively. 3. Click Submit to apply your changes and then click Done. 4. On the toolbar, click Burn to save the changes to the Enhanced Gateway flash memory. 5. On the toolbar, from the Device Actions drop-down list, choose Reset, and then in the‘ Maintenance Actions’ page, click the Reset button; the Enhanced Gateway resets and your settings are saved to the flash memory. Configuring a Certificate This step describes how to exchange a certificate with Microsoft Certificate Authority (CA). It is composed of the following steps: 1. Generating a certificate signing request (CSR) 2. Obtaining CA and Trusted Root certificates from Microsoft 3. Installing Microsoft CA and Trusted Root certificates on the Enhanced Gateway Version 6.6 23 Enhanced Gateway Enhanced Gateway 4.3.4.1 Generating a Certificate Signing Request The procedure below describes how to generate a CSR by the Enhanced Gateway. This CSR is later sent to the Microsoft CA. To generate a CSR: 1. Open the Certificates Signing Request page (Configuration tab > System menu > Certificates). Figure 4-10: Certificates Page 2 3 4 2. In the Subject Name field, enter the media gateway name (e.g., "ACGW1.ilync15.local"). This name must be equivalent to the gateway name configured in the Topology Builder for Lync Server 2013. 3. Click Create CSR; a Certificate request is generated and displayed on the page. 4. Copy the certificate from the line “----BEGIN CERTIFICATE” to “END CERTIFICATE REQUEST----” to a text file (such as Notepad), and then save it to a folder on your PC with the file name certreq.txt. Microsoft Lync Server 2013 24 Document #: LTRT-40133 Configuration Note 4.3.4.2 4. Configuring the Enhanced Gateway Obtaining the Microsoft CA and Trusted Root Certificates Once you have generated a CSR (described in the previous section), you need to upload it to Microsoft Certificate server and request a CA and trusted root certificates. To obtain Microsoft CA and trusted root certificates: 1. Open a Web browser and then navigate to Microsoft Certificate Services at the following link: http://< certificate server address >/certsrv Figure 4-11: Microsoft Certificate Services Web Page 2. Version 6.6 Click the Request a certificate link; the Request a Certificate page appears: 25 Enhanced Gateway Enhanced Gateway Figure 4-12: Request a Certificate Page 3. Click the advanced certificate request link; the Advanced Certificate Request page appears: Figure 4-13: Advanced Certificate Request Page Microsoft Lync Server 2013 26 Document #: LTRT-40133 Configuration Note 4. 4. Configuring the Enhanced Gateway Click the Submit a Certificate request by using base-64-encoded... link; the Submit a Certificate Request or Renewal Request page appears: Figure 4-14: Submit a Certificate Request or Renewal Request Page 5. Open the CSR file (certreq.txt) that you created and saved in Section 4.3.4.1 on page 24, and then copy its contents to the Saved Request text box. 6. From the Certificate Template drop-down list, select Web Server. 7. Click Submit; the Certificate Issued Page is displayed: Figure 4-15: Certificate Issued Page 8. Select the Base 64 encoded option. 9. Click the Download CA certificate link, and then save the file with the name, gateway.cer in a folder on your PC. 10. Navigate once again to the certificate server at http://< certificate server address >/certsrv. Version 6.6 27 Enhanced Gateway Enhanced Gateway 11. Click the Download a CA certificate, certificate chain or CRL link; the Download a CA Certificate, Certificate Chain, or CRL page appears: Figure 4-16: Download a CA Certificate, Certificate Chain, or CRL Page 12. Under the Encoding method group, select the Base 64 option. 13. Click the Download CA certificate link, and then save the file with the name certroot.cer in a folder on your PC. Microsoft Lync Server 2013 28 Document #: LTRT-40133 Configuration Note 4.3.4.3 4. Configuring the Enhanced Gateway Loading Microsoft CA and Trusted Root Certificates to Enhanced Gateway Once you have obtained the CA and trusted root certificates from Microsoft, you need to load these two certificates to the Enhanced Gateway. To load certificates to the Enhanced Gateway: 1. Open the Certificates Signing Request page (Configuration tab > System menu > Certificates). Figure 4-17: Certificates Page (Uploading Certificate) 2 3 2. In the 'Device Certificate' field, click Browse, select the gateway.cer certificate file that you saved on your local disk (see Step 9 in the previous section), and then click Send File to upload the certificate to the Enhanced Gateway. 3. In the 'Trusted Root Certificate Store' field, click Browse to select the certroot.cer certificate file that you saved on your local disk (see Step 13 in the previous section), and then click Send File to upload the certificate. 4. On the toolbar, click Burn to save the certificates to the Enhanced Gateway flash memory. 5. On the toolbar, from the Device Actions drop-down list, choose Reset, and then in the Maintenance Actions page, click the Reset button; the Enhanced Gateway resets and your settings are saved to the flash memory. Version 6.6 29 Enhanced Gateway Enhanced Gateway 4.4 Step 4: Configuring TCP Transport Type TCP provides unencrypted SIP signaling between the Enhanced Gateway and Mediation server. The procedure below describes how to configure the SIP TCP transport type. Note: Microsoft does not recommend implementing TCP for the SIP transport type between the Enhanced Gateway and the Mediation server. To set SIP transport type to TCP: 1. Open the SIP General Parameters page (Configuration tab > VoIP menu > SIP Definitions > General Parameters). Figure 4-18: SIP General Parameters Page 2 3 2. From the ‘SIP Transport Type' drop-down list, select TCP. 3. In the 'SIP TCP Local Port' field, enter the same Gateway TCP listening port number that was configured on the Topology Builder for the gateway. 4. Click Submit to apply your changes. 5. On the toolbar, click Burn to save the changes to the Enhanced Gateway flash memory. Microsoft Lync Server 2013 30 Document #: LTRT-40133 Configuration Note 4.5 4. Configuring the Enhanced Gateway Step 5: Configuring Secure Real-Time Transport Protocol If you configure TLS as the SIP transport type between the Enhanced Gateway and Mediation server, it is recommended to enable Secure RTP (SRTP) encryption and set its mode of operation to one of the following (and that which matches the SRTP supported at the Mediation server): Preferable (default): The Enhanced Gateway initiates encrypted calls. However, if negotiation of the cipher suite fails, an unencrypted call is established. Incoming calls that don't include encryption information are accepted – This option is not supported by the Mediation server. Mandatory: The Enhanced Gateway initiates encrypted calls, however if negotiation of the cipher suite fails, the call is terminated. Incoming calls that don't include encryption information are rejected. Preferable - Single Media: The PSTN Gateway sends SDP with a single media ('m=') line only (e.g., m=audio 6000 RTP/AVP 8 0 101) with RTP/AVP and crypto keys. The remote SIP user agent (UA) can respond with SRTP or RTP parameters: Version 6.6 • If the Mediation Server does not support SRTP, it uses RTP and ignores the crypto lines. • If the PSTN Gateway receives an SDP offer with a single media, it responds with SRTP (RTP/SAVP) if the 'Media Security' parameter is set to Enable. If SRTP is not supported (i.e., 'Media Security' is set to Disabled), it responds with RTP. 31 Enhanced Gateway Enhanced Gateway To configure SRTP: 1. Open the Media Security page (Configuration tab > VoIP menu > Media > Media Security). Figure 4-19: Media Security Page 2 3 4 5 2. From the 'Media Security' drop-down list, select Enable to enable SRTP. 3. From the 'Media Security Behavior' drop-down list, select one of the following: • Mandatory if the Mediation server is configured to 'SRTP Required' • Preferable-Single media if the Mediation server is configured to 'SRTP Optional' or 'Disable'. 4. In the 'Master Key Identifier (MKI) Size' field, enter 1. This configures the size (in bytes) of the MKI in SRTP Tx packets. 5. From the 'Enable Symmetric MKI Negotiation' drop-down list, select Enable. 6. Click Submit to apply your changes. 7. On the toolbar, click Burn to save the changes to the Enhanced Gateway flash memory. 8. On the toolbar, from the 'Device Actions' drop-down list, choose Reset, and then in the Maintenance Actions page, click the Reset button; the Enhanced Gateway resets and your settings are saved to the flash memory. Microsoft Lync Server 2013 32 Document #: LTRT-40133 Configuration Note 4.6 4. Configuring the Enhanced Gateway Step 6: Configuring Voice Coders (with Silence Suppression) The Enhanced Gateway communicates with the Mediation server using either the G.711 A-law or G.711 µ-law (Mu-Law) voice coder. In addition, silence suppression can be enabled per coder, which is recommended for improving the performance of the Mediation server. The procedure below shows how you can change the default coder. To configure the voice coder and silence suppression: 1. Open the Coders page (Configuration tab > VoIP menu > Coders And Profiles > Coders). Figure 4-20: Coders Table Page 2. From the 'Coder Name' drop-down list, select the required coder. 3. From the 'Silence Suppression' drop-down list, select Enable. 4. Click Submit. 5. On the toolbar, click Burn to save the certificates to the Enhanced Gateway flash memory. Version 6.6 33 Enhanced Gateway Enhanced Gateway 4.7 Step 7: Configuring Comfort Noise and Gain Control The Microsoft Lync network provides high voice quality by implementing suppression of typing noise during calls and improved generation of “comfort noise,” which reduces hissing and smoothes over the discontinuous flow of audio packets. You may need to configure the Enhanced Gateway to match these voice quality features, by enabling silence suppression, comfort noise generation, automatic gain control (AGC), and echo canceller (enabled by default). Note: Silence suppression is configured Step 6 (See Section 4.6 on page 33). per coder type, as described in To configure voice quality: 1. Open the RTP/RTCP Settings page (Configuration tab > VoIP menu > Media > RTP/RTCP Settings). Figure 4-21: RTP/RTCP Settings Page 2 3 2. Verify that the 'Enable RFC 3389 CN payload Type' parameter is set to Enable. 3. From the 'Comfort Noise Generation Negotiation' drop-down list, select Enable to enable comfort noise generation. 4. Click Submit. 5. Open the IPMedia Settings page (Configuration tab > VoIP menu > Media > IPMedia Settings). Microsoft Lync Server 2013 34 Document #: LTRT-40133 Configuration Note 4. Configuring the Enhanced Gateway Figure 4-22: IPMedia Settings Page 6 7 6. From the 'IPMedia Detectors' drop-down list, select Enable. This parameter requires an Enhanced Gateway reset (see below). 7. From the 'Enable AGC' drop-down list, select Enable. 8. Click Submit to apply your changes. 9. On the toolbar, click Burn to save the changes to the Enhanced Gateway flash memory. 10. On the toolbar, from the 'Device Actions' drop-down list, choose Reset, and then in the Maintenance Actions page, click the Reset button; the Enhanced Gateway resets and your settings are saved to the flash memory. Version 6.6 35 Enhanced Gateway Enhanced Gateway 4.8 Step 8: Configuring Early Media Early media refers to audio and video that is exchanged before a call is accepted by the recipient. Early media generated by the caller includes voice commands or dual-tone multi frequency (DTMF) tones to activate interactive voice response (IVR) systems. Early media generated by the call recipient include ringback tones, announcements, and requests for input. Enhanced early media support in Microsoft Lync 2013 enables a caller to hear a ringback tone generated by the call recipient’s mobile phone. This is also the case in team-call scenarios, where a call is routed to two team members, one of whom has configured simultaneous ringing for their mobile device. According to Microsoft Lync 2013 requirements, the Enhanced Gateway must send a SIP 183 with SDP response immediately after it receives an INVITE. The RTP packets however, will not be sent until the Enhanced Gateway receives an ISDN Progress, Alerting and Progress Indicator or Connect message. For example, if the Enhanced Gateway receives ISDN Progress, it starts sending RTP packets according to initial negotiation; however there is no need to re-send the 183 response. You may optionally configure the Enhanced Gateway's early media feature to support the Microsoft Lync 2013 enhanced early media feature. To configure the Early Media feature: 1. Open the General Parameters page (Configuration tab > VoIP menu > SIP Definitions > General Parameters). Figure 4-23: SIP General Parameters Page (1) 2. From the 'Enable Early Media' drop-down list, select Enable. Microsoft Lync Server 2013 36 Document #: LTRT-40133 Configuration Note 4. Configuring the Enhanced Gateway Figure 4-24: SIP General Parameters Page (2) 3 4 3. 4. 5. 6. Version 6.6 From the ‘Play Ringback Tone to Tel’ drop-down list, select Play Local Until Remote Media Arrive. If a SIP 180 response is received and the voice channel is already open (due to a previous 183 early media response or due to an SDP in the current 180 response), the Enhanced Gateway plays a local ringback tone if there are no prior received RTP packets. The Enhanced Gateway stops playing the local ringback tone as soon as it starts receiving RTP packets. At this stage, if the Enhanced Gateway receives additional 18x responses, it does not resume playing the local ringback tone. From the 'Forking Handling Mode' drop-down list, select Sequential handling. The PSTN Gateway re-opens the stream according to subsequently received 18x responses with SDP, or plays a ringback tone if 180 response without SDP is received. Click Submit to apply your changes. Open the Advanced Parameters page (Configuration tab > VoIP menu > SIP Definitions > Advanced Parameters). 37 Enhanced Gateway Enhanced Gateway Figure 4-25: Advanced Parameters Page 7. From the 'Enable Early 183' drop-down list, select Enable. 8. Click Submit to apply your changes. 9. On the toolbar, click Burn to save the changes to the Enhanced Gateway flash memory. Microsoft Lync Server 2013 38 Document #: LTRT-40133 Configuration Note 4.9 4. Configuring the Enhanced Gateway Step 9: Configuring PSTN Trunks This section describes how to configure PRI (i.e., E1/T1) or BRI trunks connected to the Enhanced Gateway. 4.9.1 Enabling Trunks To enable trunks, you need to assign them to Trunk Groups, as described below. To enable trunks: 1. Open the Trunk Group Table page (Configuration tab > VoIP menu > GW and IP to IP > Trunk Group > Trunk Group). Figure 4-26: Trunk Group Table Page 2. In the 'Module' column, select the module number and type (e.g., PRI) on which the trunks are located. 3. In the ‘From Trunk' and 'To Trunk' columns, select the physical trunk range. 4. In the 'Channel(s)' column, enter the B-channels (e.g., 1-31) that you want to enable. 5. In the 'Phone Number' column, enter the phone number (e.g., 1000) for the first channel; phone numbers 1001, 1002, 1003, and so on are sequentially assigned to subsequent channels. Note that these numbers are used internally. 6. In the 'Trunk Group ID' column, enter the ID for the Trunk Group. 7. Click Submit to apply your changes. 8. On the toolbar, click Burn to save the changes to the Enhanced Gateway flash memory. Version 6.6 39 Enhanced Gateway Enhanced Gateway 4.9.2 Configuring the Channel Select Method Once you have enabled the trunks and assigned them to Trunk Groups, you need to configure the method for which IP-to-Tel calls are assigned to channels within the Trunk Group. To configure the channel select mode: 1. Open the Trunk Group Settings page (Configuration tab > VoIP menu > GW and IP to IP > Trunk Group > Trunk Group Settings). Figure 4-27: Trunk Group Settings Page 2. 3. 4. 5. 6. In the 'Trunk Group ID' column, enter the Trunk Group ID that you want to configure. From the 'Channel Select Mode' drop-down list, select the method for which IP-to-Tel calls are assigned to channels pertaining to the Trunk Group (i.e. Cyclic Ascending). From the ‘Registration Mode’ drop-down list, select Don’t Register. Click Submit to apply your changes. On the toolbar, click Burn to save the changes to the Enhanced Gateway flash memory. Microsoft Lync Server 2013 40 Document #: LTRT-40133 Configuration Note 4.9.3 4. Configuring the Enhanced Gateway Configuring IP-to-Trunk Group Routing The procedure below describes how to configure an IP-to-Trunk Group routing rule, whereby all calls from the Mediation server to any destination phone number is routed to Trunk Group 1 (that you configured in Section 4.9.1 on page 39). To configure an IP-to-Trunk Group routing rule: 1. Open the Inbound IP Routing Table page (Configuration tab > VoIP menu > GW and IP to IP > Routing > IP to Trunk Group Routing). Figure 4-28: Inbound IP Routing Table Page 2. In the first table entry row, enter the asterisk (*) sign in the 'Dest. Phone Prefix' and 'Source Phone Prefix' fields. 3. In the 'Source IP Address' field, enter the IP address of the Mediation server. 4. In the 'Trunk Group ID' field, enter the Trunk Group to where the calls must be routed. 5. Click Submit to apply your changes. 6. On the toolbar, click Burn to save the changes to the Enhanced Gateway flash memory. Version 6.6 41 Enhanced Gateway Enhanced Gateway 4.9.4 Configuring the Trunk The procedure below describes basic configuration of the physical trunk. To configure the physical trunk: 1. Open the Trunk Settings page (Configuration tab > VoIP menu > PSTN > Trunk Settings). Figure 4-29: Trunk Settings Page 4-a 4-b 4-c 4-d 4-e 2. On the top of the page, a bar with trunk number icons displays the status of each trunk: • Grey - disabled • Green - active • Yellow - RAI alarm • Red - LOS / LOF alarm • Blue - AIS alarm • Orange - D-channel alarm (ISDN only) Select the Trunk that you want to configure, by clicking the desired trunk number icon. 3. If the trunk is new, configure the trunk as required. If the trunk was previously configured, click the Stop Trunk button to de-activate the trunk. Microsoft Lync Server 2013 42 Document #: LTRT-40133 Configuration Note 4. 4. Configuring the Enhanced Gateway Basic trunk configuration: a. From the 'Protocol Type' drop-down list, select the required trunk protocol. Notes: b. c. d. e. • If the 'Protocol Type' field displays 'NONE' (i.e., no protocol type selected) and no other trunks have been configured, after selecting a PRI protocol type, you must reset the Enhanced Gateway. • All PRI trunks of the Enhanced Gateway must be of the same line type - E1 or T1. However, different variants of the same line type can be configured on different trunks, for example, E1 Euro ISDN and E1 CAS (subject to the constraints in the Release Notes). • BRI trunks can operate with E1 or T1 trunks. • If the trunk can’t be stopped because it provides the clock (assuming the Enhanced Gateway is synchronized with the E1/T1 clock), assign a different E1/T1 trunk to provide the clock or enable ‘TDM Bus PSTN Auto Clock’ in the 'TDM Bus Settings' page (see Section 4.9.5 on page 44). • To delete a previously configured trunk, set the parameter 'Protocol Type' to None. From the 'Clock Master' drop-down list, select the trunk's clock source: ♦ Recovered: clock source is recovered from the trunk. ♦ Generated: clock source is provided by the internal TDM bus clock source (according to the parameter 'TDM Bus Clock Source' – see Section 4.9.5 on page 44). From the 'Line Code' drop-down list, select the line code: ♦ B8ZS (bipolar 8-zero substitution) for T1 trunks only ♦ HDB3 (high-density bipolar 3) for E1 trunks only ♦ AMI (for E1 and T1) From the 'Framing Method' drop-down list, select the required framing method. For E1 trunks always set this parameter to Extended Super Frame. To configure whether the trunk is connected to the PBX is User or Network side, from the 'ISDN Termination' drop-down list, select User side or Network side. 5. Continue configuring the trunk according to your requirements. 6. When you have completed configuration, click the Apply Trunk Settings to apply the changes to the selected trunk. 7. On the toolbar, click Burn to save the changes to the Enhanced Gateway flash memory. 8. On the toolbar, from the 'Device Actions' drop-down list, choose Reset, and then in the Maintenance Actions page, click the Reset button; the Enhanced Gateway resets and your settings are saved to the flash memory. Version 6.6 43 button Enhanced Gateway Enhanced Gateway 4.9.5 Configuring the TDM Bus The procedure below describes how to configure the TDM bus of the Enhanced Gateway. To configure the TDM bus: 1. Open the TDM Bus Settings page (Configuration tab > VoIP menu > TDM > TDM Bus Settings). Figure 4-30: TDM Bus Settings Page 2-a 2-b 2-c 2. Configure the TDM bus parameters according to your deployment requirements. Below is a description of some of the main TDM parameters: a. b. c. PCM Law Select: defines the type of PCM companding law in the input/output TDM bus. Typically, A-Law is used for E1 and Mu-Law for T1/J1. TDM Bus Clock Source: defines the clock source to which the Enhanced Gateway synchronizes - generate clock from local source (Internal) or recover clock from PSTN line (Network). TDM Bus Local Reference: defines the physical trunk ID from which the Enhanced Gateway recovers (receives) its clock synchronization when the TDM Bus Clock Source is configured to recover the clock from the PSTN line. 3. Click Submit to apply your changes. 4. On the toolbar, click Burn to save the settings to the Enhanced Gateway flash memory. 5. On the toolbar, from the 'Device Actions' drop-down list, choose Reset, and then in the Maintenance Actions page, click the Reset button; the Enhanced Gateway resets and your settings are saved to the flash memory. Microsoft Lync Server 2013 44 Document #: LTRT-40133 Configuration Note 4.10 4. Configuring the Enhanced Gateway Step 10: Configuring Normalization Rules for E.164 Format for PBX/PSTN Connectivity Microsoft Lync 2013 implements the standard E.164 format, while the PBX or PSTN implements other number formats for dialing. If the Enhanced Gateway is connected to a PBX or directly to the PSTN, the Enhanced Gateway may need to perform number manipulations for the called and/or calling number to match the PBX or PSTN dialing rules or to match Microsoft Lync 2013 E.164 format. Therefore, the Enhanced Gateway must be configured with manipulation rules to translate (i.e., normalize) numbers dialed in standard E.164 format to various formats, and vice versa. Manipulation needs to be done for outbound calls (i.e., calls received from Microsoft Lync clients through Microsoft Lync 2013) and inbound calls (i.e., calls destined to Lync clients). Number manipulation (and mapping of NPI/TON to SIP messages) rules are configured in the following Manipulation tables: For Tel-to-IP calls: • Destination Phone Number Manipulation Table for Tel-to-IP Calls • Source Phone Number Manipulation Table for Tel-to-IP Calls For IP-to-Tel calls: • Destination Phone Number Manipulation Table for IP-to-Tel Calls • Source Phone Number Manipulation Table for IP-to-Tel Calls Number manipulation configuration examples are provided for inbound and outbound calls in Section 4.10.1. To configure number manipulation rules: 1. Open the required Number Manipulation page (Configuration tab > VoIP menu > GW and IP to IP > Manipulations > Dest Number IP -> Tel or Dest Number Tel -> IP, Source Number IP -> Tel, or Source Number Tel -> IP); the relevant Manipulation table page is displayed. 2. Click the Add button; the following dialog box is displayed: Figure 4-31: Number Manipulation Table - Add Dialog Box 3. Click the Rule tab, and then configure the matching characteristics. For a description of the parameters, see the table below. 4. Click the Action tab, and then configure the manipulation operation. For a description of the parameters, see the table below. Version 6.6 45 Enhanced Gateway Enhanced Gateway 5. Click Submit to apply your changes. 6. On the toolbar, click Burn to save the changes to the Enhanced Gateway flash memory. Table 4-1: Number Manipulation Parameters Description Parameter Description Matching Characteristics (Rule) Destination Prefix Defines the destination (called) telephone number prefix and/or suffix. You can use special notations for denoting the prefix. For example, [100199](100,101,105) denotes a number that starts with 100 to 199 and ends with 100, 101 or 105. You can also use the $ sign to denote calls without a called number. Source Prefix Defines the source (calling) telephone number prefix and/or suffix. You can use special notations for denoting the prefix. For example, [100199](100,101,105) denotes a number that starts with 100 to 199 and ends with 100, 101 or 105. You can also use the $ sign to denote calls without a calling number. Source IP Address Defines the source IP address of the caller. This is obtained from the Contact header in the INVITE message. Notes: This parameter is applicable only to the number manipulation tables for IPto-Tel calls. The source IP address can include the 'x' wildcard to represent single digits. For example: 10.8.8.xx represents all IP addresses between 10.8.8.10 to 10.8.8.99. The source IP address can include the asterisk (*) wildcard to represent any number between 0 and 255. For example, 10.8.8.* represents all IP addresses between 10.8.8.0 and 10.8.8.255. Source Host Prefix Defines the URI host name prefix of the incoming SIP INVITE message in the From header. Notes: This parameter is applicable only to the number manipulation tables for IPto-Tel calls. The asterisk (*) wildcard can be used to denote any prefix. If the P-Asserted-Identity header is present in the incoming INVITE message, then the value of this parameter is compared to the P-AssertedIdentity URI host name (instead of the From header). Destination Host Prefix Defines the Request-URI host name prefix of the incoming SIP INVITE message. Notes: This parameter is applicable only to the number manipulation tables for IP-to-Tel calls. The asterisk (*) wildcard can be used to denote any prefix. Microsoft Lync Server 2013 46 Document #: LTRT-40133 Configuration Note 4. Configuring the Enhanced Gateway Parameter Description Source Trunk Group Defines the source Trunk Group ID for Tel-to-IP calls. To denote all Trunk Groups, leave this field empty. Notes: The value -1 indicates that this field is ignored in the rule. This parameter is applicable only to the number manipulation tables for Telto-IP calls. For IP-to-IP call routing, this parameter is not required (i.e., leave the field empty). Source IP Group Defines the IP Group from where the IP call originated. Typically, the IP Group of an incoming INVITE is determined or classified using the Inbound IP Routing Table. If not used (i.e., any IP Group), leave the field empty. Notes: The value -1 indicates that this field is ignored. This parameter is applicable only to the number manipulation tables for Telto-IP calls. If this Source IP Group has a Serving IP Group, then all calls from this Source IP Group are sent to the Serving IP Group. In this scenario, this table is used only if the 'PreferRouteTable' parameter is set to 1. Destination IP Group Defines the IP Group to where the call is sent. Notes: The value -1 indicates that this field is ignored. This parameter is applicable only to the Destination Phone Number Manipulation Table for Tel -> IP Calls. Operation (Action) Stripped Digits From Left Defines the number of digits to remove from the left of the telephone number prefix. For example, if you enter 3 and the phone number is 5551234, the new phone number is 1234. Stripped Digits From Right Defines the number of digits to remove from the right of the telephone number prefix. For example, if you enter 3 and the phone number is 5551234, the new phone number is 5551. Prefix to Add Defines the number or string that you want added to the front of the telephone number. For example, if you enter 9 and the phone number is 1234, the new number is 91234. Suffix to Add Defines the number or string that you want added to the end of the telephone number. For example, if you enter 00 and the phone number is 1234, the new number is 123400. Number of Digits to Leave Defines the number of digits that you want to keep from the right of the phone number. For example, if you enter 4 and the phone number is 00165751234, then the new number is 1234. Version 6.6 47 Enhanced Gateway Enhanced Gateway Parameter NPI Description Defines the Numbering Plan Indicator (NPI). [0] Unknown (default) [9] Private [1] E.164 Public [-1] Not Configured = value received from PSTN/IP is used Notes: This parameter is applicable only to number manipulation tables for IP-toTel calls. NPI can be used in the SIP Remote-Party-ID header by using the 'EnableRPIHeader' and 'AddTON2RPI' parameters. For more information on available NPI/TON values, see Numbering Plans and Type of Number on page 49. TON Defines the Type of Number (TON). If you selected 'Unknown' for the NPI, you can select Unknown [0]. If you selected 'Private' for the NPI, you can select Unknown [0], Level 2 Regional [1], Level 1 Regional [2], PISN Specific [3] or Level 0 Regional (Local) [4]. If you selected 'E.164 Public' for the NPI, you can select Unknown [0], International [1], National [2], Network Specific [3], Subscriber [4] or Abbreviated [6]. The default is 'Unknown'. Notes: This parameter is applicable only to number manipulation tables for IP-toTel calls. TON can be used in the SIP Remote-Party-ID header by using the 'EnableRPIHeader' and 'AddTON2RPI' parameters. For more information on available NPI/TON values, see Numbering Plans and Type of Number on page 49. Presentation Enables caller ID. Not Configured = Privacy is determined according to the Caller ID table. [0] Allowed = Sends Caller ID information when a call is made using these destination/source prefixes. [1] Restricted = Restricts Caller ID information for these prefixes. Notes: This field is applicable only to number manipulation tables for source phone number manipulation. If this field is set to Restricted and the 'Asserted Identity Mode' (AssertedIdMode) parameter is set to P-Asserted, the From header in the INVITE message includes the following: From: 'anonymous' <sip: [email protected]> and 'privacy: id' header. Microsoft Lync Server 2013 48 Document #: LTRT-40133 Configuration Note 4. Configuring the Enhanced Gateway 4.10.1 Number Normalization Examples Two examples are provided below for number normalization. The examples are based on the following assumptions: PBX with prefix (local) number 333 4-digit extension numbers that begin with the digit 1 (i.e., 1xxx) National area code is 206 Country code is 1 4.10.1.1 Modifying E.164 Numbers to PBX / PSTN Format for Outbound Calls Outbound calls refer to calls made by Lync clients to a PBX / PSTN number: 1. Local Calls within PBX: The caller dials only the last four digits (e.g., 1212). Lync translates (normalizes) the phone number into an E.164 number format: +12063331212 (where +1 is the country code, 206 the local area code, and 333 the PBX prefix number). The Manipulation table is configured to send only the last four digits to the PBX (i.e., 1212). 2. National Calls to the Same Area Code: The caller dials 9 for an external line, and then dials a 7-digit telephone number (e.g., 9-555-4321). Lync translates (normalizes) the phone number into an E.164 number format: +12065554321 (where +1 is the country code, 206 the local area code, 5554321 the phone number). The Manipulation table is configured to remove (strip) the first five digits and add 9 as a prefix to the remaining number. Therefore, the Enhanced Gateway sends the number 95554321 to the PBX, and then the PBX sends the number 5554321 to the PSTN. 3. National Calls to a Different Area Code: The caller dials 9 for an external line, the out-of-area code, and then a 7-digit telephone number (e.g., 9-503-331-1425). Lync translates (normalizes) the phone number into an E.164 number format: +15033311425 (where +1 is the international code, 503 the out-of area code, 3311425 the phone number). The Manipulation table is configured to remove (strip) the first two digits (i.e., +1), then add 9 as a prefix to the remaining number. Therefore, the Enhanced Gateway sends the number 95033311425 to the PBX, and then the PBX sends the number 5033311425 to the PSTN. 4. Dialing International Calls: The caller dials 9 for an external line, the access code for international calls (e.g., 011 for the US), the country code (e.g., +44 for the UK), the area code (e.g., 1483), and then a 6-digit telephone number (e.g., 829827). Lync translates (normalizes) the phone number into an E.164 number format: +441483829827 (where +44 is the country code, 1483 the area code, 829827 the phone number). The Manipulation table is configured to remove the first digit (e.g., +), and add the external line digit (e.g., 9) and the access code for international calls (e.g., 011 for the US) as the prefix. Therefore, the Enhanced Gateway sends the number 9011441483829827 to the PBX and the PBX, in turn, sends the number 011441483829827 to the PSTN. Version 6.6 49 Enhanced Gateway Enhanced Gateway The configuration of the above scenarios is shown in the Figure 4-32. Figure 4-32: Destination Phone Number Manipulation Table for IPTel Calls 4.10.1.2 Modifying PBX, Local, and National Calls to E.164 Format for Inbound Calls Inbound calls refer to calls received by Lync clients from the PBX / PSTN: 1. Local Calls from the PBX / PSTN: The PBX user only dials a 4-digit extension number of the Lync client (e.g., 1220). The Manipulation table is configured to normalize the number into E.164 format and adds the prefix +1206333 to the extension number. Therefore, the Enhanced Gateway sends the number +12063331220 to Lync, which relays the call to the Lync client. 2. National Calls with the Same Area Code: The PSTN user dials a 7-digit phone number (e.g., 333-1220), which is received by the Enhanced Gateway. The Manipulation table is configured to normalize the number into E.164 format and adds the prefix +1206 to the number. Therefore, the Enhanced Gateway sends the number +12063331220 to Lync, which relays the call to the Lync client. 3. National Calls from a Different Area Code: The PSTN user dials the national area code and then a 7-digit phone number (e.g., 206-333-1220), which is received by the Enhanced Gateway. The Manipulation table is configured to normalize the number into E.164 format and adds the prefix +1 to the number. Therefore, the Enhanced Gateway sends the number +12063331220 to Lync, which relays the call to the Lync client. 4. International Calls: The PSTN international (overseas) caller dials the international access and country code (e.g., 001 for the US), the national area code, and then a 7-digit phone number (e.g., 206-333-1220), which is received by the Enhanced Gateway. The Manipulation table is configured to normalize the number into E.164 format, by removing the first two digits (e.g., 00) and adding the prefix plus sign (+). Therefore, the Enhanced Gateway sends the number +12063331220 to Lync, which relays the call to the Lync client. Note: The international and country codes that are received by the Enhanced Gateway depend on the respective country's PSTN numbering rules. Microsoft Lync Server 2013 50 Document #: LTRT-40133 Configuration Note 4. Configuring the Enhanced Gateway The configuration of the above scenarios is shown in the figure below: Figure 4-33: Destination Phone Number Manipulation Table for TelIP Calls Version 6.6 51 Enhanced Gateway Enhanced Gateway 4.11 Miscellaneous Configuration This step describes the miscellaneous Gateway configuration. 4.11.1 Configuring SRTP Behavior upon Rekey Mode This section describes how to configure SRTP Behavior upon Rekey Mode. To configure SRTP Behavior upon Rekey Mode: 1. Open the Admin page by appending the case-sensitive suffix 'AdminPage' to the Gateway’s IP address in your Web browser's URL field (e.g., http://10.15.4.22/AdminPage). 2. On the left pane, click ini Parameters. Figure 4-34: AdminPage 4 3 3. In the ‘Parameter Name’ field, enter RESETSRTPSTATEUPONREKEY. 4. In the 'Enter Value' field, enter 1. 5. Click the Apply New Value button. Microsoft Lync Server 2013 52 Document #: LTRT-40133 Configuration Note A A Configuring Lync Server 2013 Configuring Lync Server 2013 This appendix describes how to configure Microsoft Lync Server 2013 topology builder to operate with the AudioCodes Enhanced Gateway. Note: Routes, Dial plans, voice policies, and PSTN usages are also necessary for Enterprise voice deployment; however, they are beyond the scope of this document. The procedure below describes how to configure the Gateway as an IP / PSTN Gateway. To configure the Gateway as an IP/PSTN Gateway and associate it with the Mediation Server: 1. On the Microsoft Lync server where the Topology Builder is installed, start the Lync Server 2013 Topology Builder (Point to Start menu > All Programs > Lync Server Topology Builder). Figure A-1: Starting the Lync Server Topology Builder Version 6.6 53 Enhanced Gateway Enhanced Gateway The Topology Builder screen is displayed: Figure A-2: Topology Builder Options 2. Select the Download Topology from existing deployment option, and then click OK; you are prompted to save the downloaded Topology: Figure A-3: Save Topology 3. Enter a name for the Topology file, and then click Save. This action enables you to roll back from any changes you make during the installation. Microsoft Lync Server 2013 54 Document #: LTRT-40133 Configuration Note A Configuring Lync Server 2013 The Topology Builder screen with the downloaded Topology is displayed: Figure A-4: Downloaded Topology 4. In the Navigation tree, select Lync Server 2013 > Site name i.e. AudioCodes > Shared Components > PSTN Gateways. 5. Right-click the PSTN gateways folder, and then in the pop-up dialog, choose New IP/PSTN Gateway as shown below: Figure A-5: Choosing New IP/PSTN Gateway Version 6.6 55 Enhanced Gateway Enhanced Gateway The following dialog box appears: Figure A-6: Define New IP/PSTN Gateway 6. In the 'FQDN' field, enter the Fully Qualified Domain Name (FQDN) of the Gateway (e.g., "ACGW1.ilync15.local"); this FQDN should be updated in the relevant DNS record ,and then click Next; the Define the IP address screen is displayed: Figure A-7: Define the IP Address Microsoft Lync Server 2013 56 Document #: LTRT-40133 Configuration Note 7. A Configuring Lync Server 2013 Define the listening mode (IPv4 or IPv6) of the IP address of your new PSTN gateway, and click Next; the Define the root trunk screen is displayed: Figure A-8: Define the Root Trunk 8. 9. In the Trunk name field, define a root trunk for the PSTN gateway. A trunk is a logical connection between a Mediation Server and a gateway uniquely identified by the combination (Mediation Server FQDN, Mediation Server listening port (TLS or TCP) : gateway IP and FQDN, gateway listening port): • When defining a PSTN gateway in the Topology Builder, you must define a root trunk to successfully add the PSTN gateway to your topology. • The root trunk cannot be removed until the associated PSTN gateway is removed. In the 'Listening Port for IP/PSTN' gateway field, type the listening port that the Gateway uses for SIP messages from the Mediation Server that will be associated with the root trunk of the PSTN gateway (i.e. 5067). 10. In the 'SIP Transport Protocol' field, select the transport type (i.e. TLS) that the trunk uses. 11. In the 'Associated Mediation Server' field, select the Mediation Server pool to associate with the root trunk of this PSTN Gateway. 12. In the 'Associated Mediation Server port', type the listening port that the Mediation Server will use for SIP messages from the Gateway (i.e. 5067). 13. Click Finish. Version 6.6 57 Enhanced Gateway Enhanced Gateway The Gateway is added as a PSTN Gateway and a trunk is created as shown below: Figure A-9: Gateway Added as an IP/PSTN Gateway and Trunk created 14. Publish the Topology; In the Navigation tree, select the root item Lync Server, and then in the Main Menu, choose Action > Publish Topology. Figure A-10: Choosing Publish Topology Microsoft Lync Server 2013 58 Document #: LTRT-40133 Configuration Note A Configuring Lync Server 2013 The Publish Topology screen is displayed: Figure A-11: Publish Topology Screen 15. Click Next; the Topology Builder starts to publish your topology, as shown below: Figure A-12: Publish Topology Progress Screen Version 6.6 59 Enhanced Gateway Enhanced Gateway 16. Wait until the publishing topology process completes successfully: Figure A-13: Publish Topology Successfully Completed 17. Click Finish. Microsoft Lync Server 2013 60 Document #: LTRT-40133 Configuration Note A Configuring Lync Server 2013 Reader's Notes Version 6.6 61 Enhanced Gateway Configuration Note www.audiocodes.com


![LTRT-71403 MediaPack MGCP User Manual ver 4[1].](http://vs1.manualzilla.com/store/data/005760883_1-b98cf40cc1cd8cff0fa8bbf345d132db-150x150.png)