1
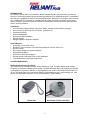
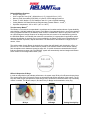
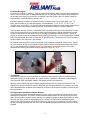
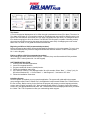
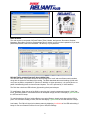
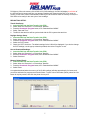
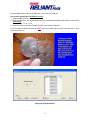
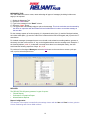
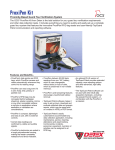
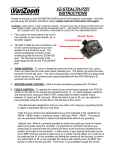
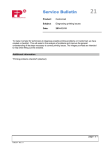
USER MANUAL
TABLE OF CONTENTS
INTRODUCTION ……2
Capabilities ……2
System Reports ……2
SYSTEM COMPONENTS ……2
Reliant Data Acquisition Unit (DAU) ……2
Reliant DAU Specifications ……3
Touch-memory iButton® ……3
Officer & Supervisor ID Keys ……3
Incidents (Messages) ……4
Checkpoints ……4
Checkpoint Assembly Mounts (iButton Mounts) ……4
Tour Areas ……5
Beginning an Officer’s Shift (recommended procedure) ……5
Ending an Officer’s Shift (recommended procedure) ……5
SOFTWARE INSTALLATION ……5
Initializing System ……5
MAIN SCREEN ……6
RELIANT DATA ACQUISITION UNIT (DAU) Operation: ……6
RELIANT DAU SETUP ……7
Time & Date Setup ……7
Daylight Savings Setup ……7
How to Download Readings ……7
Memory Delete (Reset) ……7
HEADER (TAB) ……8
ASSIGNMENTS (TAB) ……8
Preparation ……8
Pre-assigned System Messages ……8
Assigning a new data item (one at a time) ……9
Assigning a group of new data items ……9
Follow-up ……10
BOOKLETS (KEYPADS) ……10
How to add a new Keypad, one iButton at a time ……10
How to add a new Keypad, all iButtons at once ……11
MESSAGES (TAB) ……12
REPORTS ……12
Report Configuration ……12
Filtered Reports ……13
Performance / Exceptions Report ……14
Missed Stations Report ……16
Export ……16
PASSWORD (TAB) ……16
ARCHIVE MANAGER (“ARCHIVING” TAB) ……16
ABOUT (TAB) ……17
MOBILE DATA TRANSFER UNIT (MDTU) ……17
How to assign the Download key ……17
How to Download Reliant Data Acquisition Units to the MDTU ……18
FCC COMPLIANCE ……18
EC COMPLIANCE ……18
1
INTRODUCTION
The RELIANT PLUS Guard Tour Verification System was developed to assist the users of guard tour
services in efficiently programming and supervising guard patrols. An additional benefit is a considerable
reduction in the probability of theft, fire and industrial accidents. RELIANT PLUS employs proven technology: our RELIANT PLUS software, the portable RELIANT Data Acquisition Unit (DAU) and the touchmemory iButtons®, which are utilized as checkpoints, identification devices for officers and supervisors
and for recording incidents.
Capabilities:
• Accommodates multiple officers, supervisors, DAUs, checkpoints and incident messages
• Access control (Log IN/Log OUT) of vehicles, equipment, etc.
• Password Protected.
• Archive Management.
• Repairs Damaged Databases.
• Exports Reports
• Bilingual operation (English or Spanish)
System Reports:
• All security tours by date & time.
• By name or type of element to be controlled (checkpoint, vehicle, officer, etc.)
• By DAU utilized.
• By incident messages or regular messages.
• Missed Stations Report
• Performance & Exceptions Report.
• Exports reports to Windows Excel or other databases
• Lists all parameters (employed components).
SYSTEM COMPONENTS:
Reliant Data Acquisition Unit (DAU)
The Reliant DAU is a portable electronic device designed to “read” and store iButton serial numbers,
along with the exact time and date of the reading. The DAU downloads the stored readings into any IBM
or compatible PC (Pentium II 300 MHz or higher processor) by means of the Reliant Data Transfer Unit
(DTU). The Reliant DAU is a sturdy device capable of withstanding impacts, rough handling, rain, mud,
grease, dust and radio interference. The unit is powered by 3 “AAA” batteries.
Reliant DAU
Reliant Data Transfer Unit (DTU)
2
Reliant DAU Specifications:
• Weight: 150 grams
• Size: Length 98.5 mm (3.88”), Width 48 mm (1.9”), Height 34.5 mm (1.36”)
• Memory: 64K, Nonvolatile (NVO RAM); 10-year life; 5,460 readings maximum
• Power: 3 “AAA” alkaline 1.5-VDC batteries; lasts for 1 year or 500,000 readings.
• Casing Material: 40 Glass-Reinforced Polycarbonate (General Electric - Lexan®).
• Operation temperature: -40° to +85°C (-40° to +185°F)
Touch-memory iButton®
The iButton is a microcircuit, encapsulated in a stainless steel, weather-resistant button of great durability
and reliability (1,000,000 readings per button). Each iButton is a guaranteed unique, never-to-be-repeated
factory-programmed ROM. Its 16-character serial number is maintained in laser-cut poly-silicon links, not
as a stored magnetic charge. Because of its design and the strict control of the manufacturing process,
the DS1990A iButton is an identifier that cannot be counterfeited. It is appropriate for applications where
absolute identification is required. Due to its great reliability, the iButton is well known internationally as a
universal identifier of persons, objects and events. The dimensions of the iButton are: Height, 5mm; Diameter, 16mm.
The serial number of each iButton is physically the number that will identify each checkpoint, officer, supervisor, etc. The 16-character serial number is printed on the metallic surface of each button, starting
with two alphanumeric characters located at center left; 12 smaller characters centered below with the
final two characters at center right. The RELIANT system will automatically read and assign each iButton
serial number on the Assignments Folder (Tab).
Officer & Supervisor ID Keys:
In order to assign duties and evaluate performance, the system uses ID Keys for officers and supervisors.
The correct usage of the ID Keys will ensure an appropriate and efficient operation of the system. The ID
keys are made of nylon and provide a simple way to carry an iButton for situations where only momentary
contact is needed. The iButton snaps in, and the ID Key or Badge can be attached to a key ring.
ID Badge
ID Keys
3
Casing Security Key
Incidents (Messages):
An incident is an event or condition – generally pertaining to security, safety, maintenance or operational
issues – that an officer observes while performing a tour. The RELIANT PLUS system allows incidents to
be reported by the officer to a supervisor; for example, Gas Leak, Water Leak, Fire Hazard, Lights On,
Unlocked Door, Unlocked Window, Intruder, etc.
If incident reporting is desired, the officer must carry an Incident Book. The Incident Book is a 3” x 4”
folder, which contains on one side the keypad (12 riveted iButtons: 1, 2, 3, 4, 5, 6, 7, 8, 9, 0, C for
“CLEAR” and E for “ENTER”). On the other side it has 5 plastic pockets that contain paper sheets with the
printed incident codes (incident codes are defined, assigned and printed by the user in advance).
Some incidents are fairly common, while others arise only within certain types of environments. The RELIANT PLUS system allows you to define as many incident messages or regular messages as needed.
For the incident system to operate correctly, the following procedure should be followed: 1.) When an
incident is observed, read the Checkpoint location with the Reliant DAU; 2.) Enter the appropriate incident
code using the keypad, and finally 3.) Read the “E” (ENTER) button. The system will not correctly associate the incident if this sequence is not followed.
For isolated incidents (those that are not or should not be related to checkpoints, persons, etc.), the officer must read the “0” key on the keypad, and then read the keys for the relevant message code. Example: If a gas leak (which we will define as code 15) is detected in an area where there is no nearby
checkpoint, the officer must read the following sequence of keys: 0, 1, 5, E.
Checkpoints:
A Checkpoint is a device securely mounted at a location within a particular Tour Area (office building,
warehouse, parking lot, shipping dock, etc.) where an officer’s presence is desired at certain predetermined intervals. Each Checkpoint consists of an iButton and its mounting device.
When an officer reads a Checkpoint with his assigned Reliant DAU, the unique serial number of the
Checkpoint is stored in the DAU’s memory, along with the exact time and date of the reading. This data,
when downloaded into the Reliant PLUS software, will produce all the reports needed to evaluate an officer’s performance.
Checkpoint Assembly Mounts (iButton Mounts):
The iButtons come with a multipurpose assembly mount, made of polycarbonate, which can be used to
assemble all Checkpoints. The mount consists of two transparent plates, one front plate and one back
plate. The front plate includes a circular retaining rim to press fit the iButton. Both plates include an internal cavity into which a label or photograph may be inserted. The plates can be assembled together
(and/or to any desired surface) with rivets or screws such that all mount contents are securely retained.
For wall mounting of Checkpoints, the use of 1/8” self-threading screws (provided with mounts) is recommended.
4
Tour Areas:
A Tour is the physical displacement of an officer through a predetermined area (Tour Area). The size of a
Tour Area, the duration of a Tour and the number of Checkpoints per area varies for different users; but a
typical Tour Area features: One officer per Tour Area; one Reliant DAU per officer; 10 Checkpoints and a
tour duration ranging from 45 to 60 minutes. The RELIANT PLUS system is capable of handling overlapping tours (several officers touring the same area during the same shift). Overlapping tours can coexist
within one Tour Area, or one guard can handle several areas.
Beginning an Officer’s Shift (recommended procedure)
Before commencing their shifts, officers should identify themselves (Log In) to the system. To Log In, they
must first read their ID Key with their assigned Reliant DAU and then read the “START” Button (button
No. 1 on the Keypad).
Ending an Officer’s Shift (recommended procedure)
When ending their shifts, officers should Log Out. To do this, they must first read their ID Key and then
read the “STOP” button (button No. 3 on the Keypad).
SOFTWARE INSTALLATION:
1. Close all other Windows applications.
2. Insert CD in appropriate drive.
3. Program contains an Autorun (install) function.
4. Follow the installation instructions.
5. If the Autorun function is not displayed within 30 to 60 seconds; Select “Start” → “Setup” (only for
OS before Windows XP) → “Control Panel” → “Add Programs” → and select “CD” drive.
6. Follow the installation instructions.
Initializing System
Once the system is installed, you may start the application. The system will reside within the program
group manager called “Detex / Reliant Plus”; the application is also named “Reliant Plus.” Double-click on
the icon to Enter. Before running for the first time the program will prompt you with a language selection
screen; select “English” and press “OK.” Next, the program will display a “Vendor’s Contact Information”
screen; fill in the appropriate data and press “OK.” The data filled in will be displayed whenever you select
the “About” Tab. This is important in case you need training and/or support.
5
MAIN SCREEN:
The main screen is composed of 9 Data Folders (Tabs): Header, Assignments, Recorders, Booklets,
Messages, Recordings, Archiving, Password and About. Initially you will not need a password; if you want
password protection, select the “Password” Tab and key-in your password.
RELIANT DATA ACQUISITION UNIT (DAU) OPERATION:
The RELIANT DAU is a portable electronic device designed to “read” and store iButton serial numbers,
along with the exact time and date of the reading. The DAU downloads the stored readings (5,460 maximum) into any IBM or compatible PC (Pentium II 300 MHz or higher processor). It is a sturdy device capable of withstanding harsh environments and impacts. The unit is powered by 3 “AAA” batteries.
The DAU has a luminous LED indicator (light emitting diode) and a beeper.
To install battery: Open the top of the DAU by removing the 2 security screws and connect 3 “AAA” batteries, preferably alkaline. If the batteries have an adequate charge, the DAU will display 5 green blinks of
the LED and emit 5 beeps.
To read checkpoints, ID Keys, Incident Books or any other iButtons, simply touch them with the DAU’s
probe. If a successful reading is made, the DAU will display 2 green blinks of the LED and emit 2 beeps.
Low battery: The DAU will signal a low-battery status by displaying 2 red blinks of the LED and emitting 2
beeps. A new set of batteries will last for one year or 500,000 readings.
6
Full Memory: When the memory of the DAU is full (5,460 readings), the DAU will display 4 red blinks of
the LED and emit 4 beeps each time you attempt a reading; this means that the DAU is no longer recording. In this event, make a full download of data to your PC and then erase the memory to reset; the
DAU will then be ready for the next cycle of new readings.
RELIANT DAU SETUP:
Time & Date Setup
1. Insert the DAU into the Data Transfer Unit (DTU).
2. Select either the “Recorders” or “Recordings” data tab.
3. Press the Download / Program button, then “Download from M6000.”
4. Select “Date and Time.”
5. The DAU’s date and time will be synchronized with the PC’s system date and time.
Daylight Savings Setup:
1. Insert the DAU into the Data Transfer Unit (DTU).
2. Select either the “Recorders” or “Recordings” data tab.
3. Press the Download / Program button, then “Download from M6000.”
4. Select the “DST” button.
5. Check the “DST" check box. The default settings for the USA will be displayed. If you wish to change
the DST settings, use the pop-up calendar provided, then select “Program” to exit.
How to Download Readings:
1. Insert the DAU into the Data Transfer Unit (DTU).
2. Select either the “Recorders” or “Recordings” data tab.
2. Press the Download / Program button, then “Download from M6000.”
3. Select Download.
Memory Delete (Reset)
1. Insert the DAU into the Data Transfer Unit (DTU).
2. Select either the “Recorders” or “Recordings” data tab.
3. Press the Download / Program button, then “Download from M6000.”
4. Select Erase.
A complete download when the memory is full (5,460 readings) will take approximately 3 minutes, and
you will be advised of its progress and function status. To print a list of Recorders (DAUs), select the “List
button for a print preview; then click the printer icon to print.
7
HEADER (TAB)
The name entered in this field will serve as the header for all reports and listings. It is important not to skip
this step, as the text inserted here will also be the name (header) of the archived (backed up) databases.
ASSIGNMENTS (TAB)
Preparation:
Before you begin the assignments (defining the iButtons), the following preparation and verification sequence might be helpful:
1. Make a sketch of the premises and a list of all the sites (Checkpoints), elements and persons to be
controlled.
2. With sketch in hand; take a thorough physical tour of the premises.
3. Note on the list the 16-character serial number of each iButton to be installed (Checkpoint) along with
its description.
4. The sketch will be useful when you are assigning and installing the iButtons.
5. All Checkpoints are best installed at a height of 45 inches above the floor. Using water sealant around
the plate edges will help protect the ink of the paper labels from being washed out during wet
weather. Always use both mount plates. iButton mounts can be installed on walls, doors, furniture,
fences, metal surfaces, trees, etc.
The Assignments data tab is used to define and assign iButtons for all Checkpoints, Watchmen, Supervisors and other elements that are to be controlled.
Pre-assigned System Messages:
There are 3 pre-assigned system messages:
1. Battery Disconnected: If at any time the battery of a DAU is disconnected, the DAU will record the
time and date of the event. This message will appear on the Recordings Screen along with the DAU’s
serial number and the time and date of the event.
2. Isolated Message: Whenever an incident is reported that is not related to a particular checkpoint,
this message will appear on the Recordings Screen along with the date, time and message name.
3. Low Battery: Whenever a DAU enters a “low battery” status, the DAU will record the time and date of
the event; this message will appear on the Recordings Screen along with the DAU’s serial number
and the date and time of the event.
8
Assigning a new data item (one at a time):
1. Select the Assignments tab.
2. Press the “NEW” button located at the Menu bar.
3. Read the iButton to be assigned with the Data Transfer Unit (DTU) (see illustration above). At this
point do not read any of the iButtons in the Incident Book.
4. In the “Name” window, enter the name of the Checkpoint, Watchman, Supervisor, Vehicle number or
the name/number of other persons or elements to be controlled.
5. In the “Type” window, select with the drop list the type (category) to which the iButton belongs, i.e.
Recording Station, Supervisor, Watchman, Vehicle, etc. Press the Edit / Add Type button or rightclick the mouse on top of the “Type” window to edit or add additional Types.
6. (Recording Stations Only): In the “Area” window, select with the drop list the Tour Area to which the
checkpoint is to be assigned. Press the Edit / Add Area button or right-click the mouse on top of the
“Area” window to edit or add additional Areas.
7. (Recording Stations Only): Press the Station Schedule button. The station’s number of readings per
each day of the week and per each hour of the day (number of times per hour the station is to be visited) can be scheduled here. Select the number of readings per hour with the drop list (arrow) and
click on each cell. To assign the same number of readings per hour to all hours of the day, press the
Set All button. Click “Save” to exit.
8. Once this procedure is completed, the checkpoints can be installed.
Assigning a group of new data items:
1. Select the Assignments tab.
2. Read all the iButtons to be assigned with the Reliant DAU. At this point do not read any of the iButtons in the Incident Book.
3. Place the DAU in the Data Transfer Unit (DTU).
4. Press “Download.”
5. All iButtons will be automatically transferred to this data folder (Tab).
6. With a click of the mouse, choose one of the iButtons listed on the screen.
7. Select the “Edit” button located at the Menu bar.
8. In the “Name” window, enter the name of the Checkpoint, Watchman, Supervisor, Vehicle number or
the name/number of other persons or elements to be controlled.
9. In the “Type” window, select with the drop list the type (category) to which the iButton belongs, i.e.
Recording Station, Supervisor, Watchman, Vehicle, etc. Press the Edit / Add Type button or rightclick the mouse on top of the “Type” window to edit or add additional Types.
10. (Recording Stations Only): In the “Area” window, select with the drop list the Tour Area to which the
checkpoint is to be assigned. Press the Edit / Add Area button or right-click the mouse on top of the
9
“Area” window to edit or add additional Areas.
11. (Recording Stations Only): Press the Station Schedule button. The station’s number of readings per
each day of the week and per each hour of the day (number of times per hour the station is to be visited) can be scheduled here. Select the number of readings per hour with the drop list (arrow) and
click on each cell. To assign the same number of readings per hour to all hours of the day, press the
Set All button. Click “Save” to exit.
12. Once this procedure is completed, the checkpoints can be installed.
Follow-up:
The first column on the left displays the serial numbers of the iButtons. The second column displays the
names of the Recording Stations, Watchmen, Supervisors, Vehicles, etc. The third column displays the
Type of individual or element to be controlled. The fourth column displays the Tour Area (name or number) to which the Recording Stations have been assigned.
If you desire a printed list of all “Assignments”, select the “List” button on the menu bar to access a
print preview; to print select the printer icon. Either a simple listing or an expanded listing showing schedules may be selected. Contents of the list can be sorted by iButton, Name, Type or Area; select the Sort
button on the menu bar to configure your listing.
Booklets (Keypads)
How to add a new Keypad, one iButton at a time:
1. Select the “Booklets” Tab
2. Press the “NEW” button located in the Menu bar.
3. Read the iButtons of a Keypad Booklet with the Reliant Data Transfer Unit (DTU) (the software will
prompt you to read the iButtons in the following strict order):
Touch key button 0 and press Save
Touch key button 1 and press Save
Touch key button 2 and press Save
Touch key button 3 and press Save
Touch key button 4 and press Save
Touch key button 5 and press Save
Touch key button 6 and press Save
Touch key button 7 and press Save
Touch key button 8 and press Save
Touch key button 9 and press Save
Touch key button C and press Save
Touch key button E and press Save
10
Press the Edit button located in the Menu bar if you require any changes.
How to add a new Keypad, all iButtons at once:
1.) Select the Booklets Tab
2.) Read the iButtons of the Keypad Booklet with the Reliant Data Acquisition Unit (DAU) in the following
strict order:
1, 2, 3, 4, 5, 6, 7, 8, 9, C, 0, E
3.) Place the DAU into the Data Transfer Unit (DTU) and select “Download.”
To list the assigned Booklets, select the List button on the Menu bar to access a print preview; to print,
select the printer icon.
Assigning Keypad Booklets
11
MESSAGES (TAB)
This Tab enables the user to create, name and assign all types of messages (including incident messages) to be reported.
1.)
2.)
3.)
4.)
5.)
Select the Messages Tab
Press the “Add” button
Type in the message in the “Detail” column.
Press the “Save” button.
The system will automatically assign a code to the message. This is the code that must be entered by
the officer or supervisor with the Reliant DAU and Incident Book in order to record that message in
the tour data.
For the message system to function properly, it is important that the User (1) read the Checkpoint where
an incident takes place, (2) enter the code for the incident with the DAU and keypad, and (3) touch the “E”
enter button.
For isolated messages (messages that are not or should not be related to recording stations, persons or
elements), the User must touch the “0” key on the keypad and then enter the message code. Example: if
an electrical problem (code 12) is detected in an area where there is no checkpoint nearby, the User
would read the following sequence of keys: 0, 1, 1, E.
To produce a list of assigned Messages, select the List button on the menu bar to access a print preview; to print, select the printer icon.
REPORTS:
The RELIANT PLUS System generates 3 types of reports:
• Filtered Reports
• Performance / Exceptions Report
• Missed Stations Reports.
Report Configuration:
The structure of the reports is controlled by the settings chosen with the Sort and View functions, plus the
Column Positioning and Column Width controls.
12
Sort:
To select a specific pattern to display readings, select the Sort button. A pop-up window will present the
following options:
Recorder No. (R.N.): Sorts all readings by Recorder Number.
Date / Time: Sorts readings by Date and Time.
Name: Sorts all readings by Name.
Message Code: Sorts readings by Message Code.
Type: Sorts all readings by Type.
Area: Sorts readings by Tour Area
Watchman: Sorts all readings by Watchman.
Page Breaks on printed reports are also controlled by the Sort function.
View:
Columns may be displayed, hidden or revealed with this function.
1.
2.
3.
4.
Press the View button or right-click on any part of the active screen.
A list of column headers will be displayed.
Columns that are to be shown have a checkmark.
Click on the header names to select (display) or deselect (hide) columns.
Column Positioning:
The user can reposition a column by clicking on the column header and dragging the column left or right
until it is in the desired position. The width of a column can also be adjusted as necessary.
Filtered Reports:
All reports are generated based on selections made through the SORT and VIEW functions and Column
Positioning settings.
1.
2.
3.
4.
5.
•
•
•
•
•
•
•
•
To generate reports, press the “Reports” button, then the “Filtered Reports” button.
The “Selection Filter” window will appear.
To clear previous filtering, select the “Reset / View All” button.
To view report only on the screen, select “View Screen”
To print the report, select “View / Print;” a Print Preview will be displayed. To print, select the printer
Icon.
Filters:
Date Span: Displays readings made within the selected date range.
Daily Span: Displays readings made within the selected time frame.
Name: Displays readings by iButton Name (one, several or all).
Recorder: Displays readings by Recorder (one, several or all).
Message: Displays readings associated with a Message (one, several or all).
Type: Displays readings by Type (one, several or all).
Area: Displays all readings made within a Tour Area (one, several or all).
Watchman: Displays all readings made by a Watchman (one, several or all).
The Name, Recorder, Message, Type, Area and Watchman drop lists allow you to make multiple selections within each list. After clicking on any of the drop-down lists (arrows), you can click (select) one or
more items. To deselect a previously-selected item, click on the item. To select all items leave the dropdown list blank, or press the “Reset /View All” button.
Item Divider & Marker
When multiple selections have been made, an inverted “T” (_|_) character will divide each selection. Ex:
001 / Lobby_|_002 / Customer Service_|_003 / Helicopter hangar # 3, etc.
13
Filtered Report
Performance / Exceptions Report:
This report allows the user to make a quick and easy evaluation of an officer’s tours. It is focused on the
performance of each officer (accountability) and is composed of a rectangular chart containing rows
and columns. Figures in red indicate the presence of detect incomplete tours and omissions.
Rules and Conventions:
• The Hour header (columns) displays hours of the day from 00 to 23; the 24 columns represent a
complete day.
• The Max. UT row (Maximum Unattended Time) displays the maximum time per hour (in minutes)
during which a checkpoint has been left unattended.
• The RPH row (Recordings per Hour) displays the number of times per hour that a checkpoint has
14
•
•
•
been visited by a specific officer. The name of the officer appears to the left of the RPH row. The
checkpoint’s name appears above the officer’s name.
The Total row summarizes the total number of times a checkpoint has been read by all officers who
have visited the checkpoint. If only one officer is patrolling a particular Area, the RPH and Total values will be the same.
The P-RPH (Programmed Recordings Per Hour) row indicates the day’s schedule for that checkpoint.
Checkpoints that belong to a Tour Area will be displayed under its respective Area header.
15
Missed Stations Report:
This report allows the user to quickly see which checkpoints have been missed during patrols and with
what frequency. The report is focused on individual checkpoints.
Export:
You can export reports to any database or to Microsoft Excel for further processing. Data will be exported
in a “.txt” file format.
How to export:
1. Click on the Export button.
2. Select the path for the file to be exported.
3. Enter a file name.
4. Press “Open.”
PASSWORD (TAB)
Access to the software may be restricted by requiring a password at start-up. To establish a password,
select the Password Tab, enter your password under “New Password;” verify it under “Verify Password”
and press “OK.” The password will be required the next time Reliant PLUS is started.
To remove the password restriction, clear both the “New Password” and “Verify Password” fields and click
“OK.”
ARCHIVE MANAGER (“ARCHIVING” TAB)
Functions:
The Archiving Tab provides for the creation, retrieval and management of backup files. The Archive
Manager consists of 4 basic functions: Backup, Restore, Purge and Exit.
Backup: Creates a copy of all information contained in the databases. The Backup function automatically
compresses all active databases, copies them to a designated location and assigns a name to the created file. This name is the time span of the archived data, expressed as dates (FROM yy_mm_dd_TO_yy_mm_dd).
Restore: Permits the retrieval of archived data. This stored data can only be managed by the system
itself; it is protected by an internal password and cannot be decompressed by external utilities. The Restore function opens a window displaying all archived files in the Backup folder (Program
Files\Detex\Reliant Plus\Datos2XX\Backup); the user selects a file to be restored and clicks “Open.”
Backup files may be restored temporarily to review old data, or permanently to become your current operating database. NOTE: It is strongly recommended to always make a backup of your current data
16
before restoring an archived file.
Purge: This is essentially a “system reset” operation. The Purge command automatically creates a
backup of all data and resets the Recordings folder (Tab) to 0 readings. It clears the system of excessive
amounts of unnecessary old data and allows the PC to operate much faster.
Users may also choose to purge data only within a certain range of dates (“Purge by Date” button). Data
contained in all other data Tabs remains in place.
The path for retrieving purged data files: Program Files\Detex\Reliant Plus\Program
Files\Datos2XX\Close.
ABOUT (TAB):
Contains vendor contact information, software version and manufacturers web page. Vendor’s contact
information must be entered when software is installed.
MOBILE DATA TRANSFER UNIT (MDTU):
The Mobile Data Transfer Unit (MDTU) can collect the data from several Reliant DAU readers, which is
often desirable in the field. The DAUs can then be immediately returned to service. This makes it unnecessary to carry a portable PC to several sites or to bring the DAUs to a central location for downloading.
The memory capacity of the MDTU is 21,842 readings.
How to assign the Download key:
1. Press one of the “AAA” batteries backwards (as shown below) so as to interrupt battery contact.
2. Touch and hold the iButton to be used as the Download key to the read head as shown.
3. Release the battery to renew contact while maintaining contact between Download key and read
head.
4. The MDTU will acknowledge key activation by emitting 8 beeps.
17
How to Download Reliant Data Acquisition Units to the MDTU:
1. Place the Reliant DAU on the MDTU as shown below.
2. Touch the read head of the MDTU with the Download key as shown.
3. Both devices will beep 5 times (with 5 blinks of the green LED) when the download is initiated, and
beep 3 times when the transfer (download) is completed.
FCC COMPLIANCE:
The Reliant Data Acquisition Unit (M6000-R iButton Recorder), MDTU Mobile Data Transfer Unit (T6000
Portable Transfer Station) and Data Transfer Unit (P6000 Download Station) comply with Part 15, Class B
of the FCC Rules (Non Intentional Radiators, Class B Digital Devices).
Operation is subject to the following two conditions: (1) these devices may not cause harmful interference,
and (2) these devices must accept any interference received, including interference that may cause undesired operation.
Harmful interference (definition): Any emission, radiation or induction that endangers the functioning of a
radio navigation service or of other safety services, or seriously degrades, obstructs or repeatedly interrupts a radio communications service operating in accordance with FCC rules.
Changes or modifications to these devices not expressly approved by Detex Corporation & Centor &
Cía. S. EN C. will void the user's authority to operate the equipment.
EC COMPLIANCE:
The Reliant Data Acquisition Unit (M6000-R iButton Recorder), MDTU Mobile Data Transfer Unit (T6000
Portable Transfer Station) and Data Transfer Unit (P6000 Download Station) comply with regulation
EN55022 Class B and regulation EN50082-1.
18