1
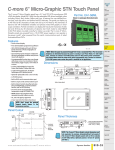
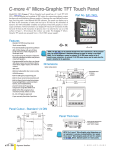
ACCESSORIES
CHAPTER
3
2
In This Chapter...
Accessories . . . . . . . . . . . . . . . . . . . . . . . . . . . . . . . . . . . . . . . . . . . . . . . . . . . . . . . .3–2
C-more Micro-Graphic Programming Software . . . . . . . . . . . . . . . . . . . . . . . . . . . .3–3
USB to RS-232 Programming Cable Assembly . . . . . . . . . . . . . . . . . . . . . . . . . . . . .3–7
8-Button Keypad Bezel . . . . . . . . . . . . . . . . . . . . . . . . . . . . . . . . . . . . . . . . . . . . . . .3–9
20-button Keypad Bezel . . . . . . . . . . . . . . . . . . . . . . . . . . . . . . . . . . . . . . . . . . . . .3–12
DC Power Adapter . . . . . . . . . . . . . . . . . . . . . . . . . . . . . . . . . . . . . . . . . . . . . . . . .3–15
Serial Port with DC Power Adapter . . . . . . . . . . . . . . . . . . . . . . . . . . . . . . . . . . . .3–19
Clear Screen Overlay . . . . . . . . . . . . . . . . . . . . . . . . . . . . . . . . . . . . . . . . . . . . . . . .3–22
Chapter 3: Accessories
1
2
3
4
5
6
7
8
9
10
11
12
13
14
A
B
C
D
Accessories
C-more Micro-Graphic Programming Software & Programming Cable
Part Number
Description
C-more Micro-Graphic panel Windows-based configuration software.
Requires Windows 2000 with Service Pack 4 or XP Home or
Professional with Service Pack 2. Requires USB port connection from
PC to touch panel. Includes CD-ROM. Programming cable
(EA-MG-PGM-CBL) sold separately. Downloadable version available
from the Web site at no charge. Software Help Files included in
download.
6-ft. cable assembly to connect personal computer to any C-more
Micro-Graphic panel for setup and programming. (Note: This cable
assembly uses the PC's USB port and converts the signals to serial
transmissions. The USB port supplies 5 VDC to the Micro-Graphic
panel for configuration operations). Assembly includes standard USB
A-type connector to B-type connector cable, custom converter, and an
RS232C cable with RJ12 modular connector on each end.
EA-MG-PGMSW
EA-MG-PGM-CBL
C-more Micro-Graphic Panel Accessories
Part Number
Description
EA-MG-BZ1
8-button keypad bezel for C-more Micro-Graphic panels, with 4 arrow
adjust keys, and ESCAPE, MENU, CLEAR and ENTER buttons. Helps to
reduce screen wear in heavy-duty applications where operators can
use the keypad. Designed for easy drop-in of the Micro-Graphic
panels. No panel configuration is required.
EA-MG-BZ2
20-button keypad bezel with numeric keypad for C-more MicroGraphic panels, with 4 arrow adjust keys, and ESCAPE, MENU, CLEAR
and ENTER buttons. Helps to reduce screen wear in heavy-duty
applications where operators can use the keypad to enter numeric
data. Designed for easy drop-in of the Micro-Graphic panels. No panel
configuration is required.
EA-MG-P1
Optional DC Power Adapter for C-more Micro-Graphic panels.
Required when using third party PLCs, or when using 24 VDC power
instead of the 5 VDC supplied from the RJ12 connector of a
CLICK or Direct LOGIC PLC.
EA-MG-SP1
Optional Serial Port with DC Power Adapter for C-more Micro-Graphic
panels. Serial port is a D-Sub 15-pin RS-232/RS-422/485 connector.
Required when using RS422, RS485 or third party PLCs.
EA-MG-COV-CL
Optional clear screen overlay used to protect C-more Micro-Graphic
displays from minor scratches and wear. Package contains 5 clear
screen overlays.
3–2
®
EA1-MG-USER-M Hardware User Manual, 2nd Ed. Rev. C, 06/13
Chapter 3: Accessories
C-more Micro-Graphic Programming Software
C-more® Micro-Graphic Programming Software is a
spin-off of its powerful sibling C-more Touch Panel
Programming software. It offers very high end features
designed to reduce your configuration time. Simply drag
and drop the objects from the object list (right side of
screen) onto the screen construction area. Then configure
your PLC tags and click on the objects you wish to use. Use the built-in simulator to review
your work on your PC before ever downloading your project!
NOTE: Software and Firmware Version 1.5 or later is required with models EA1-S3MLW and
EA1-S3MLW-N. Available for free download at www.automationdirect.com.
Hardware Version
Product Package Label
Product Label
C-more 3” Micro Graphic panels with hardware version R04 and higher must use firmware version 3.20
or higher.
®
EA1-MG-USER-M Hardware User Manual, 2nd Ed. Rev. C, 06/13
1
2
3
4
5
6
7
8
9
10
11
12
13
14
A
B
C
D
3–3
Chapter 3: Accessories
1
2
3
4
5
6
7
8
9
10
11
12
13
14
A
B
C
D
Micro-Graphic Programming Software (cont’d)
3–4
Thumbnail project preview pane
Helps keep track of multi-screen projects.
Built-in user object/screen libraries
Save time by re-using your custom objects
and screens.
Scrolling object selection window
Lets you find the object you want fast. Just
drag and drop it on the screen.
Scrolling help window
Gives you helpful information on each object
Built-in project simulator
• Runs your project on your PC
• Test all of your screens before downloading
• Time savings pays for the panel
PC Requirements:
Following are the minimum system requirements for running C-more Micro-Graphic
Programming Software, EA-MG-PGMSW, on a PC:
• Operating System - Windows® XP Home / Professional Edition Service Pack 2, Windows® 2000
with Service Pack 4, Windows® Vista (32 and 64 bit), Windows® 7 (32 and 64 bit), Windows 8
(32 and 64 bit)
• Keyboard and Mouse or compatible pointing device
• Super VGA color video adapter and monitor with at least 800 x 600 pixels resolution
(1024 x 768 pixels recommended) 64K color minimum
• 150 MB free hard-disk space
• 128 MB free RAM (512 MB recommended); 512 MB free RAM (1GB recommended) for Vista
• CD-ROM or DVD drive for installing software from the CD, or internet access to download free
programming software
• USB pot to use with an EA-MG-PGM-CBL, USB to RS232 Programming Cable Assembly for
project transfer from the programming software to the panel
®
EA1-MG-USER-M Hardware User Manual, 2nd Ed. Rev. C, 06/13
Chapter 3: Accessories
Micro-Graphic Programming Software (cont’d)
C-more Micro-Graphic Panel Objects
Object
Graphic
Object
The Line object, just like with drawing tools, allows the user to insert a
straight line drawing into a project. When a Line is inserted into a
project, a window opens to allow the user to setup all available
parameters for the Line object. Some of the uses for Line Objects
include but are not limited to adding callouts, pointers, or indicators.
The Numeric Display consists of a frame that displays a real-time
numeric value according to the value of data received from an assigned
Tag Name. The Numeric Display supports numeric Signed Decimal,
Unsigned Decimal, BCD, and Floating Point data types with up to 11
digits, including decimal point. User Defined Alpha Numeric Prefix and
Suffix values are also supported.
The Rectangle object, just like with drawing tools, allows the user to
insert a drawing of a Rectangle as well as other geometric shapes into
a project. When this object is inserted into a project, a window opens to
allow the user to setup all available parameters for the Rectangle object.
The Numeric Entry object is used to enter a value from your Panel to
a PLC Register. This object, when selected, opens a Numeric Keypad
that allows the user to enter a new value that will be written to the
assigned Tag Name. The Numeric Entry supports numeric Signed
Decimal, Unsigned Decimal, BCD, and Floating Point data types with up
to 11 digits, including decimal points. User Defined Alpha Numeric Prefix
and Suffix values are also supported.
The Circle object, just like with drawing tools, allows the user to insert
a drawing of a Circle or ellipse shape into a project. When this object is
inserted into a project, a window opens to allow the user to setup all
available parameters for the Circle object.
The Increment/Decrement Value object is used to add or subtract a
value by pressing a button on the Panel. Basically the object uses two
Tags, one to read a value from and another to write a modified value to.
The Increment/Decrement Value supports numeric Signed Decimal,
Unsigned Decimal, BCD, and Floating Point data types with up to 11
digits, including decimal points. The Increment and decrement values
are also user selectable.
The Frame object allows the user to insert a Frame to the project that
can be used to Frame other objects. Some of the uses for Frame object
include but are not limited to graphically separating objects for different
operations that may appear on one screen and emphasizing
pushbuttons or other objects that may require more attention by the
operator.
The Real Time Graph object displays the value stored in up to two PLC
tags, over a history of up to 24 points each. One point is added at each
refresh.
The Pushbutton object is available from the Button Category of the
Object List window. The Pushbutton object is an electronic version of a
typical Pushbutton normally found on control panels. The Pushbutton
object can be used to activate or deactivate components assigned to a
Discrete Tag Name.
The Line Graph object displays the values of up to 24 PLC address
points. Up to two address arrays can be displayed. The line is drawn in
its entirety at each refresh.
The Switch object is an electronic version of a typical Switch that
normally can be found on control panels. The Switch object can be used
to activate or deactivate components assigned to a Discrete Tag Name.
The Analog Meter object is used to display the current value of a Tag
Name.
The Indicator Button object is available from the Button Category of
the Object List window. The Indicator Button object is an electronic
version of a typical Indicator Button normally found on control panels.
The Indicator Button is a combination of a Pushbutton and an Indicator
Light. The Indicator Button can be used to activate or deactivate
components assigned to a Discrete Tag Name.
The Bar Meter object is used to monitor up to two assigned Tag Names
continuously. This object has various appearances depending upon the
relative value of the tags. The Bar Meter can be used to create digital
versions of level, current, and flow meters to name a few samples, or
gauges that measure speed and other measurable data.
The Indicator Light object is an electronic version of a typical Indicator
Light normally found on industrial control panels. The Indicator Light can
be configured to display the status of the assigned Discrete Tag Name.
The Bitmap Button object offers the ability to use a Bitmap graphic to
perform the functions of a Button. This allows users to create their own
graphics and implement them within the software project. The Bitmap
Button object can be used to activate or deactivate components
assigned to a Discrete Tag Name. The C-more Micro-Graphic display
only supports two colors, black and white.
The Graphic Indicator Light object is a more enhanced version of the
“Indicator Light Object” that allows the user to choose more detailed
graphics to display the status of a tag. This object is an electronic
version of a typical Indicator Light normally found on industrial control
panels. The Indicator Light can be configured to display the status of the
assigned Discrete Tag Name.
The Static Bitmap offers the ability to display a Bitmap graphic on any
screen. The Static Bitmap does not change state. Refer to the Dynamic
Bitmap Object if you require the graphic object to change state based
on a Tag Value in your PLC. The dialog box for a "Static Bitmap" object
allows you to "read from disk" and select a graphic file for import.
Graphics must be in one of the following formats: .BMP .WMF .JPG
.JPEG
C-more Micro-Graphic Panel Objects continued at top of next page.
®
EA1-MG-USER-M Hardware User Manual, 2nd Ed. Rev. C, 06/13
Graphic
1
2
3
4
5
6
7
8
9
10
11
12
13
14
A
B
C
D
3–5
Chapter 3: Accessories
1
2
3
4
5
6
7
8
9
10
11
12
13
14
A
B
C
D
Micro-Graphic Programming Software (cont’d)
C-more Micro-Graphic Panel Objects
Object
Graphic
Object
Recipe objects make it easy to make a large number of tag changes
with the push of a single button. Create Recipes with up to 99 entries,
and multiple sets of values. Then just push a button to load an entire set
of values into the group of recipe tags.
The Scroll Text object is available from the Text Category of the Object
List window. The Scroll Text object is an electronic version of a marquee.
It is similar to the Static Text Object. If the text in the object does not fit
in the window, it will scroll from right to left across the window. The Scroll
Text object does not require a Tag Name assignment. The Scroll Text
Object has a maximum character limit of 128 characters.
The Dynamic Bitmap object offers the ability to make an object using
two different Bitmap graphics that will display one graphic when the Tag
is On and a different graphic when the Tag is Off. Use your own bitmap
designs or use some of the bitmaps provided with the software that are
located in the User Graphic Library.
The Screen Change Pushbutton object is available from the Control
Category of the Object List window. The Screen Change Pushbutton
object is a pushbutton that can be configured to activate another screen
in the project. This object may be edited to various colors and sizes.
Users can configure the button to activate the Power-Up screen,
Forward Screen, Previous Screen, or any one of the project screens.
The Static Text object is used to display a Frame with a personalized
Message. This Frame and Message can be placed on any screen and
any location within the screen.
The Screen Selector object is available from the Control Category of
the Object List window. This object is an enhanced version of the
Screen Change pushbutton in that it offers many more features and
defaults with data from screens in the project. This helps to save time by
not having to create Screen change buttons for each screen. This object
may be edited to various colors and sizes.
The Lookup Text object is used to display a Frame with a personalized
Message. This Frame and Message can be placed on any screen and
any location within the screen. The object is always displayed like a sign
but is configured to display only the message prompted by an assigned
Tag Name. Messages are retrieved from a Message Database which is
configured by the user with text defined by the user. The Lookup Text
Object will scroll text up to 128 characters.
The Adjust Display Contrast object is used to allow the operator to
adjust the Panel Display Contrast. The default Display setting often
works in most applications, however lighting may vary based on the
location of each application. In these cases the operator can use this
object to make adjustments. The current display setting value will
appear on the top of the button and will change as the arrow keys are
pressed. This button can be modified to various sizes.
The Dynamic Text object is used to display text that is retrieved from
data stored in a Tag. The Tag Name is assigned to registers in the PLC
that contain set character data. The data can be stored in the PLC in
ASCII format and may include information such as machine numbers,
locations, part numbers, and such. The Message can be configured to
be visible (Trigger) when an associated Tag Name is On or Off. This
object can be placed on any screen and any location within the screen.
The Dynamic Text Object will scroll text up to 40 characters.
The Function object is used to assign the panels function key buttons
to a particular action as well as assigning the control of the LED On/Off
status. When a button has been assigned as a shift button, the then F1
through F5 will become F6 through F10. The Function Object buttons
will activate when the hardware button is pressed or when the object is
pressed on the screen. The object size is restricted so that the keys will
line up with the hardware function keys on the panel.
3–6
®
Graphic
EA1-MG-USER-M Hardware User Manual, 2nd Ed. Rev. C, 06/13
Chapter 3: Accessories
USB to RS-232 Programming Cable Assembly
Using the C-more Micro-Graphic Programming Software for project development, the C-more
Micro-Graphic panel can be connected to a PC (personal computer) by using EA-MG-PGMCBL, the USB-to-RS-232 cable assembly.
• Connect the USB programming cable ( included) from a USB port type A on the PC to the USB type
B port on the converter (included). Next connect the serial programming cable from the converter’s
RJ12 port to the panel’s RJ12 serial port. The panel receives power from the USB port of the PC that
it is connected to through the USB to RS-232 converter assembly.
Converter Dimensions
EA-MG-PGM-CBL
Converter Status LEDs
USB to RS-232 Converter Pin Assignments
Pin No. Signal
LED Status Indicators
Pin Assignment
No. 1
No. 6
TxD
RxD
1
2
3
4
5
6
0V
5Vout
RXD
TXD
5Vin
0V
Description
Power (-) Connection (GND)
Output +5V
Receive data (232C)
Transmit data (232C)
Input +5V Detect
Power (-) Connection (GND)
PWR
USB Connectivity
PC to Panel Programming
Cable Assembly
(Includes serial & USB cables)
p/n EA-MG-PGM-CBL
User PC
Serial
Cable
USB
Cable
USB to RS232
Converter
C-more
Micro-Graphic
Panel
1
2
3
4
5
6
7
8
9
10
11
12
13
14
A
B
C
D
USB to RS-232 Programming Cable Assembly continued at top of next page.
®
EA1-MG-USER-M Hardware User Manual, 2nd Ed. Rev. C, 06/13
3–7
Chapter 3: Accessories
1
2
3
4
5
6
7
8
9
10
11
12
13
14
A
B
C
D
USB to RS232 Programming Cable Assembly (cont’d)
USB to RS232 Converter Specifications
Part Number:
EA-MG-PGM-CBL
Description:
6-ft. cable assembly to connect personal computer to any C-more Micro-Graphic panel for
setup and programming. (Note: This cable assembly uses the PC's USB port and converts the
signals to serial transmissions. The USB port supplies 5 VDC to the Micro-Graphic panel for
configuration operations.) Assembly includes standard USB A-type connector to B-type
connector cable, custom converter, and an RS232C cable with RJ12 modular connector on
each end.
Hardware:
• USB Interface
• Serial Interface
• Baud Rate
• Input Voltage
• Power Consumption
Accessory Cables:
• USB Cable
• Serial Cable
Environmental:
• Operating Temperature
• Storage Temperature
• Humidity
• Environmental air
• Vibration
• Shock
USB Specification Rev. 1.1
Connector: USB Type B jack to accept USB Type B cable plug
RS232 (EIA-232-E)
Connector: RJ12 phone jack 6p to accept RJ12 cable plug
115.2 kbps Maximum
5 VDC (Supplied thru serial interface cable.)
50 mA (Does not include power to panel and/or bezel.)
USB Type A plug to PC on one end, USB Type B plug to converter on other end,
0.30 m [1 foot] length (* Note)
RJ12 phone plug connectors on both ends, 2.0 m [6.56 feet] length (* Note)
0 to 50 °C (32 to 122 °F)
-20 to 60 °C (-4 to 140 °F)
5 to 95 % RH (non-condensing)
No corrosive gases permitted
IEC60068-2-6 (Test Fc), 5-9 Hz: 3.5 mm amplitude, 9-150 Hz: 1.0G, sweeping, at a rate of
1 octave/min. (±10%), 10 sweep cycles per axis on each of 3 mutually perpendicular axes
IEC60068-2-27 (Test Ea), 15 G peak, 11 ms duration, three shocks in each direction
per axis, on 3 mutually perpendicular axes (total of 18 shocks)
Physical:
3–8
2.559” (W) x 1.417” (H) x 0.886” (D)
[65.0 mm x 36.0 mm x 22.5 mm]
1.06 oz. [30 g]
• Dimensions
• Weight
* Note: Maximum cable length for either the USB or serial cable should not exceed 2.0 m [6.56 feet] in length.
®
EA1-MG-USER-M Hardware User Manual, 2nd Ed. Rev. C, 06/13
Chapter 3: Accessories
8-Button Keypad Bezel
The 8-button keypad bezel can be used with both the touch and non-touch 3” Micro-Graphic
panels. The keypad includes four directional arrow cursor buttons, and one each of an ESCAPE,
MENU, CLEAR and ENTER button. The keypad is intended to be used with the numeric
entry object (Style 3) to allow changing of a value, and can also be used to navigate & select
screen objects when using the non-touch panel version. The cursor left and right buttons are
used to select a digit and the cursor up and down buttons to change the value, along with the
ENTER and CLEAR buttons. It can also be used to access and navigate the screen selector
feature. The keypad bezel is designed for easy drop-in of a C-more 3” Micro-Graphic panel. No
panel configuration is required.
Dimensions
EA-MG-BZ1
Panel Cutout
6.417 –+0.04
0.00
+1
163.0 –0
0.354
[9.0]
0.361
[9.2]
0.354
[9.0]
Four directional
cursor buttons, and
ESC, MENU, CLEAR
and ENTER buttons.
R0
.0
98
[R
CUTOUT
2]
CUTOUT
OUTLINE
3.504 –+0.04
0.00
+1
89.0 –0
BEZEL
OUTLINE
0.361
[9.2]
Units: inches [mm]
PANEL CUTOUT
Panel Thickness
NOTE: A minimum clearance of 1.2 inches
(30mm) must be maintained around and
behind the panel to allow for proper
cooling.
1
2
3
4
5
6
7
8
9
10
11
12
13
14
A
B
C
D
8-Button Keypad Bezel continued at top of next page.
®
EA1-MG-USER-M Hardware User Manual, 2nd Ed. Rev. C, 06/13
3–9
Chapter 3: Accessories
1
2
3
4
5
6
7
8
9
10
11
12
13
14
A
B
C
D
8-Button Keypad Bezel (cont’d)
8-Button Keypad Bezel Specifications
Part Number:
General:
• C-more Micro-Graphic
Panels Supported
EA-MG-BZ1
EA1-S3ML, EA1-S3MLW, EA1-S3ML-N, EA1-S3MLW-N
Connects with expansion connector on the rear of the C-more 3” Micro-Graphic panel.
An expansion connector is also on the rear of the keypad bezel to allow the EA-MG-P1 DC
Power Adapter, or the EA-MG-SP1 Serial Port with DC Power Adapter to be attached.
• Connection
• Power Consumption
• Keypad Button Life
None
Minimum of 500,000 cycles
(2) mounting clips, EA-MG-BZ1-BRK, included.
• Enclosure Mounting
Environmental:
• Operating Temperature
• Storage Temperature
• Humidity
• Environmental air
• Vibration
• Shock
• Noise Immunity
• Enclosure
Note: The C-more 3” Micro-Graphic panel is installed into the keypad bezel using the
mounting clips, EA-MG-S3ML-BRK, that are supplied with the panel.
0 to 50 °C (32 to 122 °F)
-20 to 60 °C (-4 to 140 °F)
5 to 95 % RH (non-condensing)
No corrosive gases permitted
IEC60068-2-6 (Test Fc), 5-9 Hz: 3.5 mm amplitude, 9-150 Hz: 1.0G, sweeping, at a rate of
1 octave/min. (±10%), 10 sweep cycles per axis on each of 3 mutually perpendicular axes
IEC60068-2-27 (Test Ea), 15 G peak, 11 ms duration, three shocks in each direction
per axis, on 3 mutually perpendicular axes (total of 18 shocks)
NEMA ICS3-304
RFI, (145 MHz, 440 Mhz 10 W @ 10 cm)
Impulse 1000 V @ 1 µs pulse
NEMA 4/4X, IP-65 (When mounted correctly, for indoor use only.)
• Agency Approvals
CE (EN61131-2), UL508, CUL Canadian C22.2 No. 142-M95, UL File E157382,
CSA File 234884
Physical:
7.126” (W) x 4.225” (H) x 2.180” (D)
[181.0 mm x 107.3 mm x 55.4 mm]
• Dimensions
• Weight
7.05 oz. [200 g]
8-button Keypad Bezel
EA-MG-BZ1
8-Button Keypad Bezel continued at top of next page.
3–10
®
EA1-MG-USER-M Hardware User Manual, 2nd Ed. Rev. C, 06/13
Chapter 3: Accessories
8-Button Keypad Bezel (cont’d)
Panel and 8-Button Keypad Bezel Assembly
3. Use (2) Bezel Mounting Clips,
EA-BZ1-BRK, to secure keypad
bezel through enclosure cutout.
Tighten screws to a torque of
21-28 oz-in [0.15-0.2 Nm].
2. Use the (2) Panel Mounting
Clips, EA-S3ML-BRK, that
are supplied with the panel,
to secure panel to keypad
bezel. Tighten screws to
a torque of 21-28 oz-in
[0.15-0.2 Nm].
1. Remove
Expansion
Connector
Protective
Cover from
rear of
panel.
8 Button Keypad Bezel
EA-MG-BZ1
C-more Micro-Graphic Panel
4. Peel Protective Film
from front of panel.
NOTE: Mounting clips for the panel and keypad bezels are included with the respective product.
®
EA1-MG-USER-M Hardware User Manual, 2nd Ed. Rev. C, 06/13
1
2
3
4
5
6
7
8
9
10
11
12
13
14
A
B
C
D
3–11
Chapter 3: Accessories
1
2
3
4
5
6
7
8
9
10
11
12
13
14
A
B
C
D
20-button Keypad Bezel
The 20-button keypad bezel can be used with both the touch and non-touch C-more 3” MicroGraphic panels. The keypad includes four directional arrow cursor buttons, a full numeric
keypad, and one each of an ESCAPE, MENU, CLEAR and ENTER button. The keypad is
intended to be used with the numeric entry object (Style 3) to allow changing of a value, and
can also be used to navigate & select screen objects when using the non-touch panel version.
The numeric buttons can be used to enter a new value, or use the cursor left and right buttons
to select a digit and the cursor up and down buttons to change the value, along with the
ENTER and CLEAR buttons. It can also be used to access and navigate the screen selector
feature. The keypad bezel is designed for easy drop-in of a C-more 3” Micro-Graphic panel. No
panel configuration is required.
Dimensions
EA-MG-BZ2
6
Panel Cutout
7.441 +0.04
– 0.00
189.0 +1
–0
0.361
[9.2]
0.354
[9.0]
0.354
[9.0]
R0
.0
98
[R
2]
CUTOUT
3.504 +0.04
– 0.00
CUTOUT
OUTLINE
89.0 +1
–0
BEZEL
OUTLINE
0.361
[9.2]
PANEL CUTOUT
F
7
8
9
E
4
5
6
G
1
2
3
H
+/ –
0
.
Esc
Menu
CLR
Units: inches [mm]
Four directional
cursor buttons,
numeric buttons,
and ESC, MENU,
CLEAR and ENTER
buttons.
Enter
Panel Thickness
NOTE: A minimum clearance of 1.2 inches
(30mm) must be maintained around and
behind the panel to allow for proper
cooling.
20-Button Keypad Bezel continued at top of next page.
3–12
®
EA1-MG-USER-M Hardware User Manual, 2nd Ed. Rev. C, 06/13
Chapter 3: Accessories
20-button Keypad Bezel (cont’d)
20-Button Keypad Bezel Specifications
Part Number:
General:
• C-more Micro-Graphic
Panels Supported
EA-MG-BZ2
EA1-S3ML, EA1-S3MLW, EA1-S3ML-N, EA1-S3MLW-N
Connects with expansion connector on the rear of the C-more 3” Micro-Graphic panel.
An expansion connector is also on the rear of the keypad bezel to allow the EA-MG-P1 DC
Power Adapter, or the EA-MG-SP1 Serial Port with DC Power Adapter to be attached.
• Connection
• Power Consumption
• Keypad Button Life
None
Minimum of 500,000 cycles
(6) mounting clips, EA-MG-BZ2-BRK, included.
• Enclosure Mounting
Environmental:
• Operating Temperature
• Storage Temperature
• Humidity
• Environmental air
• Vibration
• Shock
• Noise Immunity
• Enclosure
• Agency Approvals
Note: The C-more Micro-Graphic panel is installed into the keypad bezel using the mounting
clips, EA-MG-S3ML-BRK, that are supplied with the panel.
0 to 50 °C (32 to 122 °F)
-20 to 60 °C (-4 to 140 °F)
5 to 95 % RH (non-condensing)
No corrosive gases permitted
IEC60068-2-6 (Test Fc), 5-9 Hz: 3.5 mm amplitude, 9-150 Hz: 1.0G, sweeping, at a rate of
1 octave/min. (±10%), 10 sweep cycles per axis on each of 3 mutually perpendicular axes
IEC60068-2-27 (Test Ea), 15 G peak, 11 ms duration, three shocks in each direction
per axis, on 3 mutually perpendicular axes (total of 18 shocks)
NEMA ICS3-304
RFI, (145 MHz, 440 Mhz 10 W @ 10 cm)
Impulse 1000 V @ 1 µs pulse
NEMA 4/4X, IP-65 (When mounted correctly, for indoor use only.)
CE (EN61131-2), UL508, CUL Canadian C22.2 No. 142-M95, UL File E157382,
CSA File 234884
Physical:
8.150” (W) x 4.225” (H) x 2.180” (D)
[207.0 mm x 107.3 mm x 55.4 mm]
• Dimensions
• Weight
7.40 oz. [210 g]
C-more Micro-Graphic Panel being Installed
in a 20-button Keypad Bezel EA-MG-BZ2
1
2
3
4
5
6
7
8
9
10
11
12
13
14
A
B
C
D
20-Button Keypad Bezel continued at top of next page.
®
EA1-MG-USER-M Hardware User Manual, 2nd Ed. Rev. C, 06/13
3–13
Chapter 3: Accessories
1
2
3
4
5
6
7
8
9
10
11
12
13
14
A
B
C
D
20-button Keypad Bezel (cont’d)
3–14
Panel and 20-Button Keypad Bezel Assembly
2. Use the (2) Panel Mounting
Clips, EA-S3ML-BRK, that
are supplied with the panel,
to secure panel to keypad
bezel. Tighten screws to
a torque of 21-28 oz-in
[0.15-0.2 Nm].
3. Use (6) Bezel Mounting Clips,
EA-BZ2-BRK, to secure keypad
bezel through enclosure cutout.
Tighten screws to a torque of
21-28 oz-in [0.15-0.2 Nm].
1. Remove
Expansion
Connector
Protective
Cover from
rear of
panel.
20 Button Keypad Bezel
EA-MG-BZ2
C-more 3” Micro-Graphic Panel
4. Peel Protective Film
from front of panel.
NOTE: Mounting clips for the panel and keypad bezels are included with the respective product.
®
EA1-MG-USER-M Hardware User Manual, 2nd Ed. Rev. C, 06/13
Chapter 3: Accessories
DC Power Adapter
The C-more Micro-Graphic panel is designed to use the 5 VDC power that is available from an
RJ12 serial communications port found on most AutomationDirect CLICK and DirectLOGIC
PLC’s. However, for other PLC brands that do not supply power through their serial
communications port, the EA-MG-P1 DC power adapter or EA-MG-SP1 serial port with DC
power adapter should be used. Both adapters require power from a 12-24 VDC source. The EAMG-P1 DC Power Adapter for C-more 3” Micro-Graphic panels is designed to easily snap on
to the rear of a C-more 3” Micro-Graphic panel or the rear of an optional Keypad Bezel being
used with a 3” Micro-Graphic panel.
EA-MG-P1
Dimensions
Wiring Diagram
DC Power Adapter
EA-MG-P1
+
Recommended
DC Supply Fuse
750 mA fast acting,
ADC p/n AGC-75
Panel Overall Depth
with Adapter Installed
Supply to adapter:
1 A @ 12 - 24 VDC
(10.8 - 26.4 VDC)
–
GND
Equipment
Ground
2.298
[58.4]
Units: inches [mm]
NOTE: A minimum clearance of 1.2 inches (30mm) must be
maintained around and behind the panel to allow for proper
cooling.
1
2
3
4
5
6
7
8
9
10
11
12
13
14
A
B
C
D
DC Power Adapter continued at top of next page.
®
EA1-MG-USER-M Hardware User Manual, 2nd Ed. Rev. C, 06/13
3–15
Chapter 3: Accessories
1
2
3
4
5
6
7
8
9
10
11
12
13
14
A
B
C
D
DC Power Adapter (cont’d)
DC Power Adapter Specifications
Part Number:
Electrical:
• Input Voltage
• Input Voltage Range
• Power Consumption
• Maximum Power
• Maximum Inrush
Current
• Recommended Fuse
• Connector Type
Environmental:
• Operating Temperature
• Storage Temperature
• Humidity
• Environmental air
• Vibration
• Shock
• Noise Immunity
• Enclosure
• Agency Approvals
EA-MG-P1
12-24 VDC
10.8-26.4 VDC
100 mA at 24 VDC
2.90 Watts
5 A @ 500 µs with 12 VDC applied, 10 A @ 500 µs with 24 VDC applied
Type AGC fast acting glass fuse, 750 mA, 250 VAC, ADC p/n AGC-75
3-pin screw type terminal block
0 to 50 °C (32 to 122 °F)
-20 to 60 °C (-4 to 140 °F)
5 to 95 % RH (non-condensing)
No corrosive gases permitted
IEC60068-2-6 (Test Fc), 5-9 Hz: 3.5 mm amplitude, 9-150 Hz: 1.0G, sweeping, at a rate of
1 octave/min. (±10%), 10 sweep cycles per axis on each of 3 mutually perpendicular axes
IEC60068-2-27 (Test Ea), 15 G peak, 11 ms duration, three shocks in each direction
per axis, on 3 mutually perpendicular axes (total of 18 shocks)
NEMA ICS3-304
RFI, (145 MHz, 440 Mhz 10 W @ 10 cm)
Impulse 1000 V @ 1 µs pulse
NEMA 4/4X, IP-65 (When mounted correctly, for indoor use only.)
CE (EN61131-2), UL508, CUL Canadian C22.2 No. 142-M95, UL File E157382
Physical:
3–16
3.823” (W) x 3.284” (H) x 1.331” (D)
[97.1 mm x 83.4 mm x 33.8 mm]
2.8 oz. [80 g]
• Dimensions
• Weight
NOTE: Recommended DC power supply to power either DC Power Adapter, AutomationDirect Part No.
PSC-24-015 or PSC-24-030.
NOTE: If the adapter is installed on the panel, the adapter must be powered.
DC Power Adapter continued at top of next page.
®
EA1-MG-USER-M Hardware User Manual, 2nd Ed. Rev. C, 06/13
Chapter 3: Accessories
DC Power Adapter (cont’d)
DC Power
Adapter
Installed
Panel to
EA-MG-SP1
Assembly
onto a Panel
3. Use (2) Panel Mounting
Clips, EA-S3ML-BRK,
to secure panel through
enclosure cutout. Tighten
screws to a torque of
21-28 oz-in [0.15-0.2 Nm].
2. Plug Serial Port with DC Power
Adapter, EA-MG-SP1, or DC
Power Adapter, EA-MG-P1, into
the expansion connector on the
rear of the panel and secure
with the (3) yellow locking tabs.
1. Remove
Expansion
Connector
Protective
Cover from
rear of
panel.
Expansion
Connector
C-more 3” Micro-Graphic Panel
4. Peel Protective Film
from front of panel.
NOTE: Mounting clips for the panel are included with the panel.
1
2
3
4
5
6
7
8
9
10
11
12
13
14
A
B
C
D
DC Power Adapter continued at top of next page.
®
EA1-MG-USER-M Hardware User Manual, 2nd Ed. Rev. C, 06/13
3–17
Chapter 3: Accessories
1
2
3
4
5
6
7
8
9
10
11
12
13
14
A
B
C
D
DC Power Adapter (cont’d)
3–18
DC Power Adapter Installed onto a
Panel with a 8-Button Keypad Bezel
or a 20-Button Keypad Bezel
2. Plug Serial Port with DC Power Adapter,
EA-MG-SP1, or DC Power Adapter, EAMG-P1, into the expansion connector on
the rear of the keyboard bezel and secure
with the (3) yellow locking tabs.
Expansion
Connector
1. Remove
Expansion
Connector
Protective
Cover from
rear of
Bezel.
C-more 3” Micro-Graphic Panel
and 8 Button Keypad Bezel
EA-MG-BZ1.
NOTE: Mounting clips for the panel and keypad bezels are included with the respective product.
®
EA1-MG-USER-M Hardware User Manual, 2nd Ed. Rev. C, 06/13
Chapter 3: Accessories
Serial Port with DC Power Adapter
The C-more Micro-Graphic panel is designed to use the 5 VDC power that is available from an
RJ12 serial communications port of most AutomationDirect CLICK and DirectLOGIC PLC’s.
However, for other PLC brands that do not supply power through their serial communications
port, the EA-MG-P1 DC power adapter or EA-MG-SP1 serial port with DC power adapter
should be used. The EA-MG-SP1, with D-Sub 15-pin RS-232/RS-422/485 serial port, can be
used to connect to a PLC using RS-232 or RS-422/485. The adapter requires power from a 1224 VDC source. This optional Serial Port with DC Power Adapter for C-more 3” MicroGraphic panels is designed to easily snap on to the rear of a C-more 3” Micro-Graphic panel or
the rear of an optional Keypad Bezel being used with a 3” Micro-Graphic panel.
Dimensions
EA-MG-SP1
3.661
[93.0]
0.162
[4.1]
2.740
[69.6]
Port 2
1.689
[42.9]
0.902
[22.9]
Units: inches [mm]
Wiring Diagram
TOP VIEW
Port 2
Serial Port with
DC Power Adapter
EA-MG-SP1
Port 2
2.716
[69.0]
2.031
[51.6]
0.406
[10.3]
+
Recommended
DC Supply Fuse
750 mA fast acting,
ADC p/n AGC-75
Supply to adapter:
1 A @ 12 - 24 VDC
(10.8 - 26.4 VDC)
LEFT VIEW
–
GND
Equipment
Ground
Panel Overall Depth
with Adapter Installed
REAR VIEW
Port 2
Port 2
FRONT VIEW
2.833
[72.0]
NOTE: A minimum clearance of
1.2 inches (30mm) must
be maintained around
and behind the panel to
allow for proper cooling.
Units: inches [mm]
1
2
3
4
5
6
7
8
9
10
11
12
13
14
A
B
C
D
Serial Port with DC Power Adapter continued at top of next page.
®
EA1-MG-USER-M Hardware User Manual, 2nd Ed. Rev. C, 06/13
3–19
Chapter 3: Accessories
1
2
3
4
5
6
7
8
9
10
11
12
13
14
A
B
C
D
Serial Port with DC Power Adapter (cont’d)
Serial Port w/ DC Power Adapter Specifications
Part Number:
Serial PLC Interface Port:
• Interface Standard
• Adjustable Settings
from Software
(Dependent on PLC Protocol)
• Connector Type
EA-MG-SP1
RS232 & RS485/422
Baud rate: 9600, 19200 or 38400 bits/sec
Data bits: 7/8 bits
Parity: None, Odd/Even
Stop bits: 2/1 bits
15-pin D-sub connector (female)
Electrical:
• Input Voltage
• Input Voltage Range
• Power Consumption
• Maximum Power
• Maximum Inrush
Current
• Recommended Fuse
• Connector Type
Environmental:
• Operating Temperature
• Storage Temperature
• Humidity
• Environmental air
• Vibration
• Shock
• Noise Immunity
• Enclosure
• Agency Approvals
12-24 VDC
10.8-26.4 VDC
100 mA at 24 VDC
2.90 Watts
5 A @ 500 µs with 12 VDC applied, 10 A @ 500 µs with 24 VDC applied
Type AGC fast acting glass fuse, 750 mA, 250 VAC, ADC p/n AGC-75
3-pin screw type terminal block
0 to 50 °C (32 to 122 °F)
-20 to 60 °C (-4 to 140 °F)
5 to 95 % RH (non-condensing)
No corrosive gases permitted
IEC60068-2-6 (Test Fc), 5-9 Hz: 3.5 mm amplitude, 9-150 Hz: 1.0G, sweeping, at a rate of
1 octave/min. (±10%), 10 sweep cycles per axis on each of 3 mutually perpendicular axes
IEC60068-2-27 (Test Ea), 15 G peak, 11 ms duration, three shocks in each direction
per axis, on 3 mutually perpendicular axes (total of 18 shocks)
NEMA ICS3-304
RFI, (145 MHz, 440 Mhz 10 W @ 10 cm)
Impulse 1000 V @ 1 µs pulse
NEMA 4/4X, IP-65 (When mounted correctly, for indoor use only.)
CE (EN61131-2), UL508, CUL Canadian C22.2 No. 142-M95, UL File E157382
Physical:
3.823” (W) x 3.284” (H) x 1.866” (D)
[97.1 mm x 83.4 mm x 47.4 mm]
4.375 oz. [125 g]
• Dimensions
• Weight
NOTE: Recommended DC power supply to power either DC Power Adapter, AutomationDirect Part No.
PSC-24-015 or PSC-24-030.
NOTE: If the DC power adapter is installed on the panel, the adapter must be powered.
Serial Port with DC Power Adapter continued at top of next page.
3–20
®
EA1-MG-USER-M Hardware User Manual, 2nd Ed. Rev. C, 06/13
Chapter 3: Accessories
Serial Port with DC Power Adapter (cont’d)
DC Power Adapter Installed onto a
Panel with a 20-Button Keypad Bezel
or a 8-Button Keypad Bezel
2. Plug Serial Port with DC Power Adapter,
EA-MG-SP1, or DC Power Adapter, EAMG-P1, into the expansion connector on
the rear of the keyboard bezel and secure
with the (3) yellow locking tabs.
Expansion
Connector
1. Remove
Expansion
Connector
Protective
Cover from
rear of
bezel.
C-more 3” Micro-Graphic Panel
and 20 Button Keypad Bezel
EA-MG-BZ2.
NOTE: Mounting clips for the panel and keypad bezels are included with the respective product.
NOTE: When an EA-MG-SP1 Serial Port with DC Power Adapter is installed, only one of the ports can be used
with a connected PLC. The programming software allows the user to select either Comm. Port1 or Comm.
Port2 under the Panel Manager dialog box. When using Port 2 to communicate with the connected PLC, Port
1 can still be used with the EA-MG-PGM-CBL Software Programming Cable Assembly to transfer projects
between the PC and panel.
Available PLC
Protocols
PLC Serial
Communications Port 2
Serial Port w/
DC Power Adapter
EA-MG-SP1
PLC 15-pin serial
communications port 2
8
1
15
9
PLC Drivers
Serial - port1 or port2
Serial - port2 only*
AutomationDirect CLICK
AutomationDirect K-sequence
AutomationDirect DirectNET
AutomationDirect Modbus
Modicon Modbus RTU
Entivity Modbus RTU
Allen-Bradley DF1 Half Duplex
Allen-Bradley DF1 Full Duplex
Allen-Bradley PLC5 DF1
Allen-Bradley DH485
GE SNPX (90/30, 90/70, Micro 90, VersaMax Micro)
Mitsubishi FX
Mitsubishi Q & QnA
Omron Host Link (C200 Adapter, C500)
Omron FINS Serial (CJ1, CS1)
Siemens PPI (S7-200 CPU)
*Note: Serial port2 requires the use of EA-MG-SP1 adapter
See the PLC Compatibility & Connection Charts in Chapter 6 for details
®
Expansion
Connector
Pin
Signal
Pin
1
Frame GND
6
LE
11
2
TXD (232C)
7
CTS (232C)
Signal
Pin
12 TXD– (422/485)
Signal
3
RXD (232C)
8
RTS (232C)
13 Term. Resistor
4
do not use
9
RXD+ (422/485)
14 do not use
5
Logic GND
10 RXD– (422/485)
15 do not use
TXD+ (422/485)
1
2
3
4
5
6
7
8
9
10
11
12
13
14
A
B
C
D
NOTE: Adapter requires 10.8-26.4 VDC supply.
EA1-MG-USER-M Hardware User Manual, 2nd Ed. Rev. C, 06/13
3–21
Chapter 3: Accessories
Clear Screen Overlay
Optional clear screen overlay used to protect C-more Micro-Graphic displays from minor
scratches and wear. Package contains 5 clear screen overlays.
EA-MG-COV-CL
Clear Screen Overlay Installation
Step 1
Remove the overlay from the
package
Dimensions
Step 2
Remove the paper backing
from the overlay
Step 4
Step 3
Align the overlay with the screen
and press the adhesive firmly
into place
Remove the protective film*
*NOTE: The overlay cover ships with a thin protective film on the face that should be carefully removed
after installation.
3–22
®
EA1-MG-USER-M Hardware User Manual, 2nd Ed. Rev. C, 06/13